GOAT G1 - Vacuum Cleaner ECOVACS - Free user manual and instructions
Find the device manual for free GOAT G1 ECOVACS in PDF.
User questions about GOAT G1 ECOVACS
0 question about this device. Answer the ones you know or ask your own.
Ask a new question about this device
Download the instructions for your Vacuum Cleaner in PDF format for free! Find your manual GOAT G1 - ECOVACS and take your electronic device back in hand. On this page are published all the documents necessary for the use of your device. GOAT G1 by ECOVACS.
USER MANUAL GOAT G1 ECOVACS
Installation....FR | P68
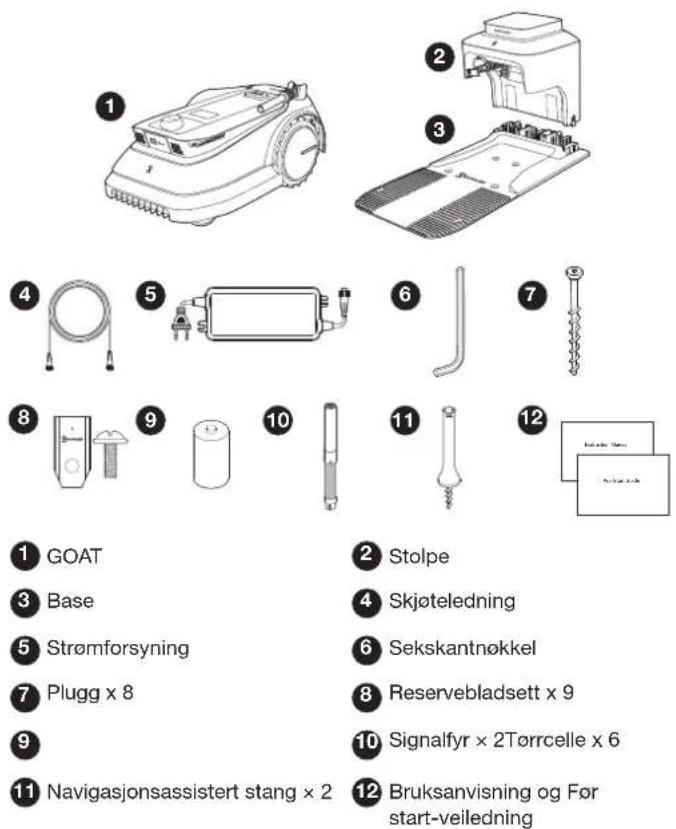
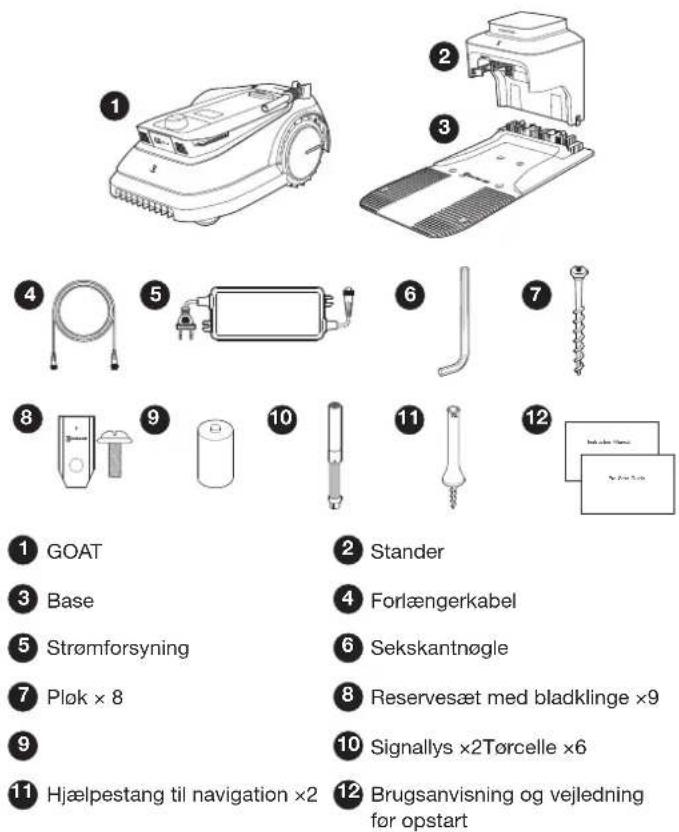
1 GOAT
3 Base
5 Power Supply
7 Peg ×8
9 Dry Cell ×6
11 Navigation-assisted Pole ×2
2 Pile
4 Extension Cable
6 Hex Key
8 Spare Blade Kit ×9
10 Beacon ×2
12 Instruction Manual and Pre-Start Guide
GETTING FAMILIAR WITH YOUR GOAT PRODUCT DIAGRAM
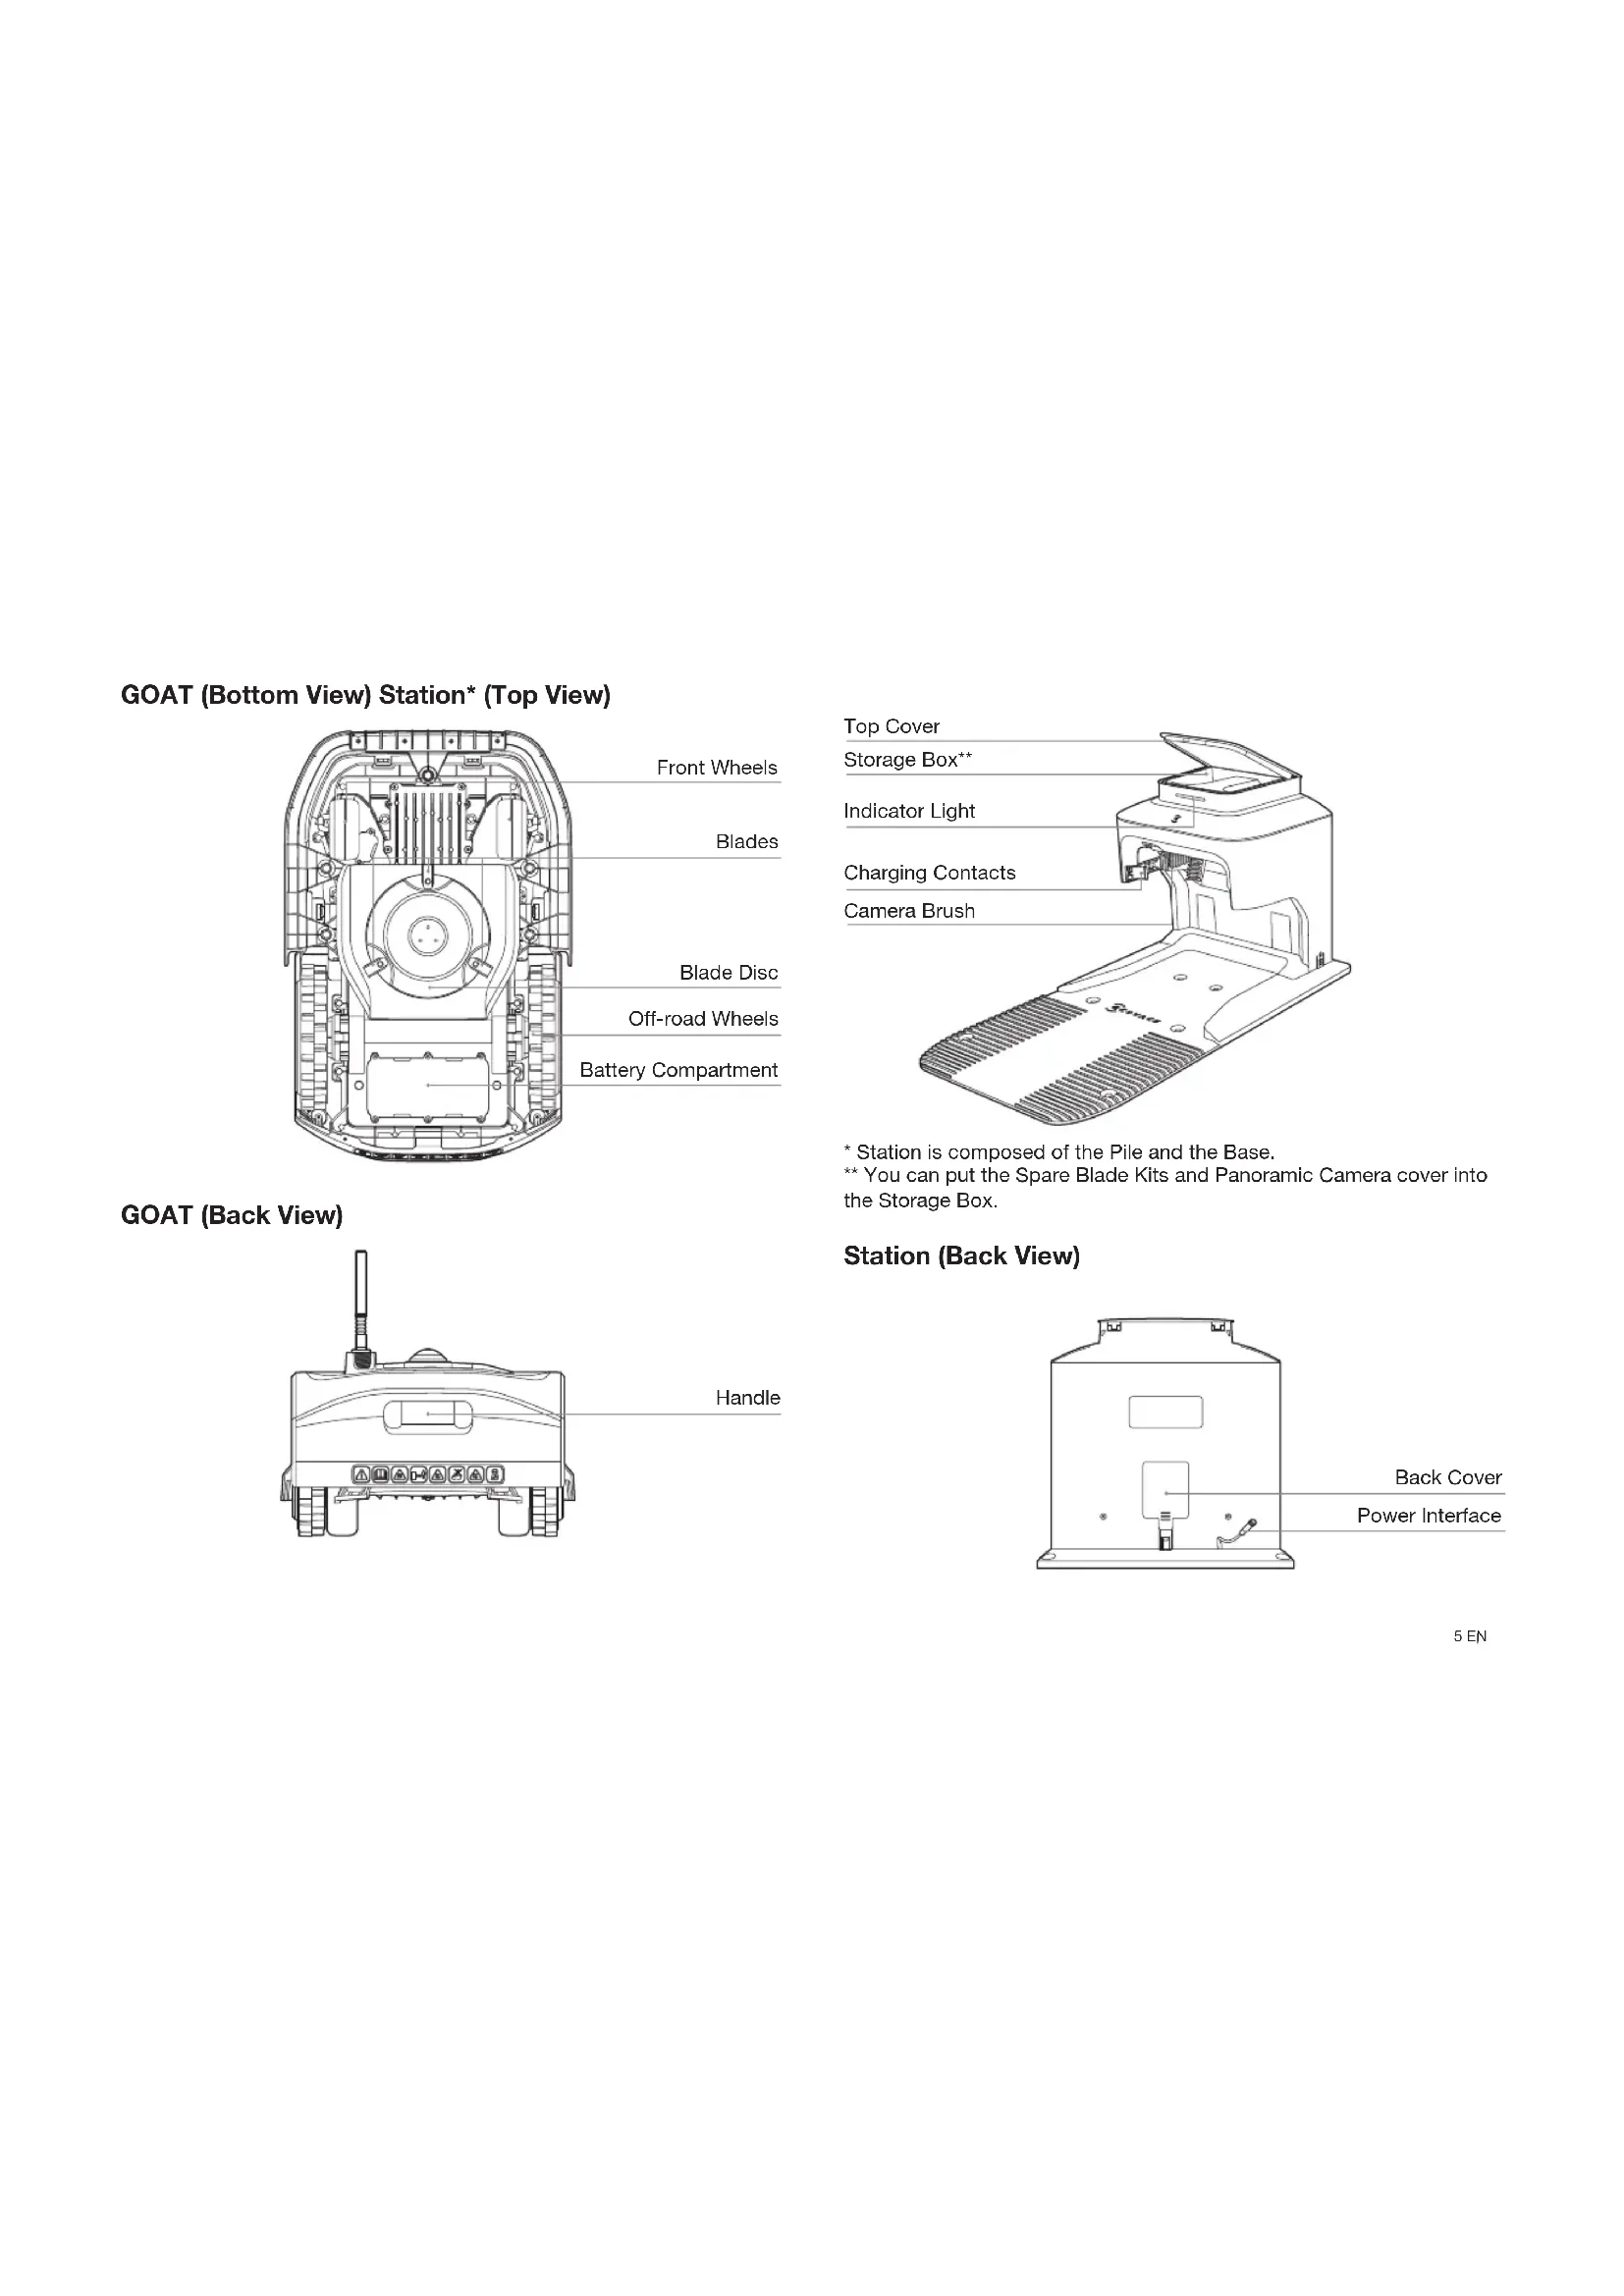
GOAT (Top View)

text_image
Hatch Front AI Camera Rain Sensor STOP Button Signal Receiver* Cutting Height Adjustment Knob Control Panel Charging Contacts Panoramic Camera ToF SensorGOAT (Bottom View) Station* (Top View)

text_image
Front Wheels Blades Blade Disc Off-road Wheels Battery CompartmentGOAT (Back View)
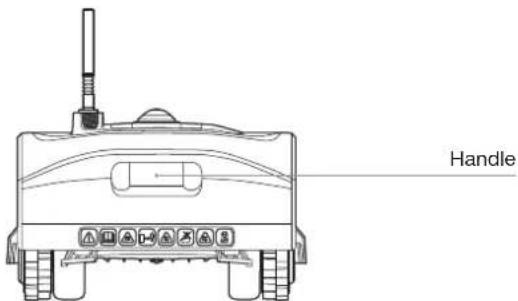
text_image
Handle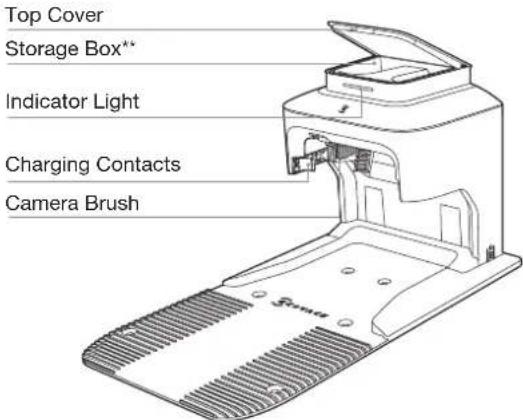
text_image
Top Cover Storage Box** Indicator Light Charging Contacts Camera Brush* Station is composed of the Pile and the Base.
** You can put the Spare Blade Kits and Panoramic Camera cover into the Storage Box.
Station (Back View)
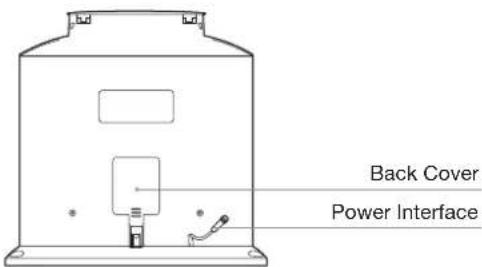
text_image
Back Cover Power InterfaceINSTALLATION
Before use, here are some steps you need to complete. Please follow the instructions below to install the Station.
1 Assemble the Station
- Place the Station on an open and flat lawn with no slope or rock. Ensure that there are no objects (e.g. trees, balls or houses) within 2 m on left and right, and 2 m in front of the Station.
- GOAT can still guard your property with the Panoramic Camera when charging in the Station. For a better guarding result, please try to guarantee that there is a broad view in front so that your GOAT can better guard your lawn.

text_image
2m 2m 2m- If you want to remotely control your GOAT, put the Station as close as possible to a place with strong Wi-Fi signal.

natural_image
Illustration of a mobile phone with wireless signal icons above it, showing a device and its screen (no text or symbols present)- Make sure that the grass around the Station is no longer than 6 cm. Overgrown grass may affect the recharging.

text_image
6cm- Remove the sticker. Put the Base connector outward in case it is squeezed during the operation.
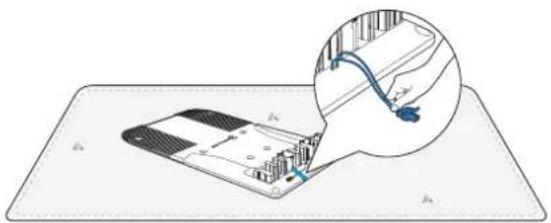
natural_image
Diagram showing a device with a cable inserted into a grid, with an inset close-up of its cable (no text or symbols present)- Pull out the Power Interface and stick it into slot.

natural_image
Illustration of a hand operating a machine with a magnified inset showing a blue arrow (no text or symbols)- Insert the Pile into the Base until you hear a "click".
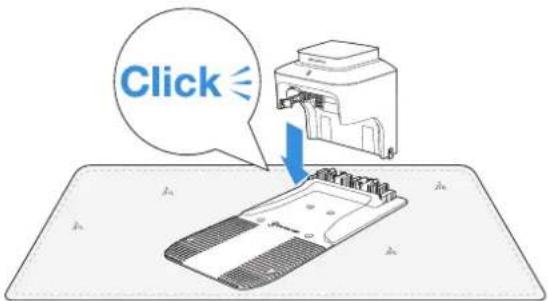
text_image
Click- Remove the Back Cover. Insert the Base connector into the Pile connector until you hear a "click". Then, gently put the cable into slot as shown in the picture and close the cover.

text_image
Diagram showing a printer setup with labeled parts and a magnified view of the printer's internal structure.- Fix the Station to the ground in the selected area with Pegs, using the supplied Hex Key.

natural_image
Technical line drawing of a mechanical device with mounting holes and a base plate (no text or symbols)2 Connect the Power Interface with the Power Supply
- Align the notch (a) with the groove (b).

a

b
- Screw the nut until they are locked into each other.
Note: You can choose to use the Extension Cable by connecting it to Power Interface if needed.

text_image
Technical diagram showing a mechanical or electrical device connected to a coiled cable, with an inset illustrating the internal mechanism.③ Plug into the Power Outlet and Charge up GOAT
- The Indicator Light on the Station will be solid blue if all connections are correct. If there is something wrong with the connection, it will be red.
Note: Keep the Power Supply at least 30 cm/12" above the ground.
Note: When Indicator Light is red, it may look pinkish if you observe the Station from a front view under the strong sunlight.

text_image
30 cm (12'')-
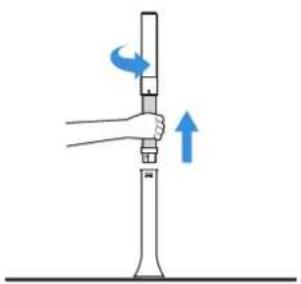
Remove the foam from the Signal Receiver. Pull the nut towards the head of GOAT, lift the Signal Receiver up and turn the nut clockwise to tighten. Take off the Panoramic Camera cover and put it into Storage Box.
-
Put GOAT on charge. Make sure that the charging contacts of GOAT have completely connected to those of the Station. The Indicator Light on the Station will blink blue and GOAT will be powered on automatically.
2
1
LET'S START EXPERIENCING! CONNECT YOUR GOAT WITH APP
Preparation:
① Make sure that your GOAT has been powered on. If not, please take the following actions:
- Open the Hatch.

natural_image
Line drawing of a robotic vacuum cleaner with control panel and sensor (no text or symbols)- Press and hold for 2s on GOAT until the display lights up. Note: Your GOAT will be automatically powered on when it docks with the Station.

text_image
2s ECOVACS② Set the Language
Press nor to select the language you prefer and then press toOK confirm.

text_image
LANGUAGE Dansk Deutsch English
text_image
LANGUAGE Dansk Deutsch English
text_image
LANGUAGE Dansk Deutsch English OK③ Set the PIN code
There is no default PIN code. Please follow the instructions and set your PIN code.
- Press ∧ or √to choose the number you prefer (0-9). Press OK or > to set the next number. Use the same method to complete the rest numbers. During the process, you can press
to modify the number you have already set.
Note: If your PIN code is set to be "0000", the display will show "Too simple, please reset!". Please press OK reset the PIN code.

text_image
NEW PIN CODE ↑ +
text_image
NEW PIN CODE NEW A -
text_image
N CODE OK OR >
text_image
NEW PIN CODE
text_image
NEW PIN CODE >
text_image
NEW PIN CODE OK- Re-enter the PIN code you just set on by following step 1. Then, the display will show "PIN code OK!".
Note: If the PIN code you enter on CONFIRM page is inconsistent with the one you set before, the display will show "PIN codes do not match!". Please press OK to re-enter your PIN code.

text_image
1 CONFIRM OK
text_image
② PIN code OK!4 Download ECOVACS HOME App
Before you start, make sure that:
- Your mobile phone is connected to a Wi-Fi network.
• The 2.4GHz band wireless signal is enabled on your router.
Note: After installing ECOVACS HOME App, please complete the registration and login.


⑤ Connect GOAT to the Internet
1. Bluetooth Connection
- Scan the QR Code on the GOAT or select GOAT manually via the App.
- Turn on Bluetooth on your phone to connect your GOAT.
- × on the display will light up after successful connection.
Note: Ensure your phone has Bluetooth function and your GOAT is within the connectable distance (10 m).

text_image
Diagram showing a mobile phone interface connected to a QR code and a robot, with Chinese text labels.2. Wi-Fi Connection (Optional)
- Make sure your GOAT and your phone are in the same router environment.
- Follow the instructions in the App to complete the connection.
- 📞 on the display will light up after successful connection.
Note: Please use a 2.4GHz network.
- You can tap "SKIP" in the App to skip Wi-Fi connection so that there will be only Bluetooth connection between your GOAT and the App. In this situation, however, you should stay with your GOAT within 10 m and some functions will be limited.
- You also can purchase the additional Connection Module so that GOAT can be connected even without Wi-Fi.

text_image
Wi-Fi Last stepHow to unbind your GOAT?
Allowing binding to one App account currently, your GOAT is unable to be bound to another App account before unbinding. You can unbind your GOAT in the App. Feel assured to take this operation which would not erase the working data such as schedules of your GOAT. You also can cancel the account in Mine->Settings->Account and security->Cancel Account->Confirmation cancellation via the App.
INSTALL THE NAVIGATION BEACON
Note: Navigation Beacon is composed of the Beacon and the Navigation-assisted Pole.
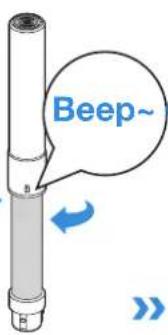
1 Assemble the Navigation Beacon
- Disassemble the Beacon by turning the upper Beacon counterclockwise.
- Please remove the protection materials inside the Beacons and then install the Dry Cells.
- Pay attention to the correct match of positive and negative polarity.
- Assemble the Beacon by turning the upper Beacon clockwise. You will hear the sound of "beep" if the Beacon is correctly connected. Continue screwing for a firm connection.
- Insert the Beacon into the Navigation-assisted Pole by aligning projections on the Beacon with grooves of the Navigation-assisted Pole.
- Turn Beacon clockwise until you hear a "click".

text_image
TION Ask of explosion if the battery is replaced by an incorrect type. wered by 3pcs of type D alkaline batteries.CAUTION
- Risk of explosion if the battery is replaced by an incorrect type.
- Powered by 3pcs of type D alkaline batteries.
② Bind the Navigation Beacon to GOAT
Scan the QR code or input the passkey on the Navigation Beacon to add your beacon via the App. Then you will hear a sound of "beep" if the Navigation Beacon is successfully bound.
Please make sure when you try to bind the Navigation Beacon:
- Keep the Navigation Beacon near GOAT (within 1 m) when operating.
• DO NOT lay it on the ground.
• DO NOT hold the upper Beacon. - Make sure that the Signal Receiver on GOAT is lifted up.
- Up to 10 Navigation Beacons can be bound to one GOAT.
- Put the Navigation Beacon to be unbound near your GOAT and unbind it in the App. If not, you cannot unbind the Navigation Beacon thoroughly. The binding relationship still exists even if you remove the Navigation Beacon from App by force. By the way, the Navigation Beacon removed by force can be rebound to the current GOAT and unable to be bound to other GOAT.

text_image
Mobile app interface screenshot showing a smartwatch icon with Chinese text '眼' and status bar
text_image
Diagram showing a screwdriver and a digital display with a QR code, likely representing a security or data entry interface.③ Install the Navigation Beacon
General principles:
- Signal coverage radius of each Navigation Beacon is 45 m.

text_image
45m- Make sure that signal coverages overlap each other to cover the lawn as much as possible.
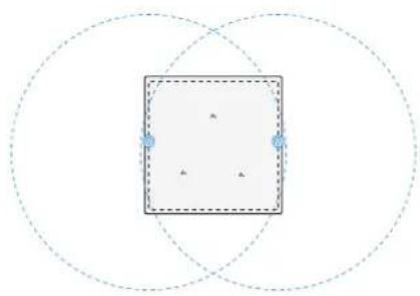
text_image
Diagram showing a central square with three smaller circles and directional arrows, likely representing a set or region in a mathematical or physical context.- Keep the Navigation Beacon perpendicular to the ground and should not tilt over 10^ . You can make use of the Spirit Level (not supplied) to check its tilt.
Note: To have a larger signal coverage, please keep the distance between two Navigation Beacons as far as possible and within the communication range (45m).
- To ensure the best mowing performance, it is recommended to install the Navigation Beacons at the edge of the lawn. Keep the Navigation Beacon over 20 cm away from the obstacles (taller than 60 cm, such as metal objects, trees, shrubs, and flowers) close to the lawn edge.

text_image
≥10° ≤45m
text_image
20cm 20cm × ✓- To improve the signal coverage, keep the Navigation Beacon over 5 m away from the obstacles close to the center of lawn taller than 60 cm, such as metal objects, trees, shrubs, flowers, bricks, walls and so on. Make sure that there are no obstacles between two Navigation Beacons for better signal communication.

text_image
5m 5m × ✓ ≤45m- If the lawn where your GOAT works has a slope, make sure that the Navigation Beacon is perpendicular to the ground during operation.
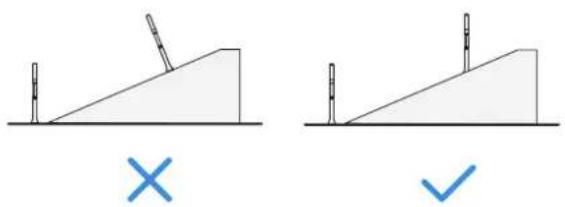
natural_image
Two diagrams showing a ramp and a block on an inclined plane, with no text or symbols present.- To prevent the Navigation Beacons from being stolen, taken away by kids and damaged over the winter, it is recommended to remove the Beacons from the Navigation-assisted Poles when your GOAT is not working and put the Beacons back to the original position when your GOAT works next time.
- Location failure may occur when the Navigation Beacons are moved during use.
natural_image
Illustration of a hand holding a vertical tool with blue arrows indicating rotational direction (no text or symbols)RECOMMENDED INSTALLATION
Before you start, please read the following instructions carefully:
-
How to Define Your Lawn Shape
-
When your lawn is all connected without paths in it, please follow the installation recommendation.
- When your lawn is divided by paths with a height lower than 3 cm, you could take your lawn as a whole and follow the installation recommendation.
- When your lawn is divided by paths with a height higher than 3cm, please place an object with a slope equal in height to the path (e.g.uphill mat) and take your lawn as a whole, and follow the installation recommendation.
Note: If there is a terrace, a pet house or other obstacles within or alongside your lawn, please check the height of the obstacles, if the height is lower than 60 cm, you could take the area of a terrace, a pet house or other obstacles and the lawn as a whole, check the shape of this whole area and then follow the installation recommendation. If the height is higher than 60 cm, please contact our Customer Service team for help.

text_image
Diagram illustrating a rural road scenario with a small boat, a ramp, and distance annotations of 1m and >3cm.-
Lawn with Trees and Hedges
-
When there are few trees and hedges on your lawn or they are mainly scattered at the edge of the lawn with a height lower than 60~cm , see point 5 in "3. Install the Navigation Beacon" for more information.
- When there are plenty of trees and hedges scattered over the lawn with height higher than 60 cm, please contact Customer Service for help.
Note: Your GOAT is equipped with 2 Navigation Beacons. You can confirm the number of Navigation Beacons you need and the layout by comparing our recommendations with your own lawn. It is recommended to purchase more Navigation Beacons to achieve a better signal coverage.
See the table below for detailed information.
Note: Keep the Navigation Beacon away from trees, pools and pet houses.
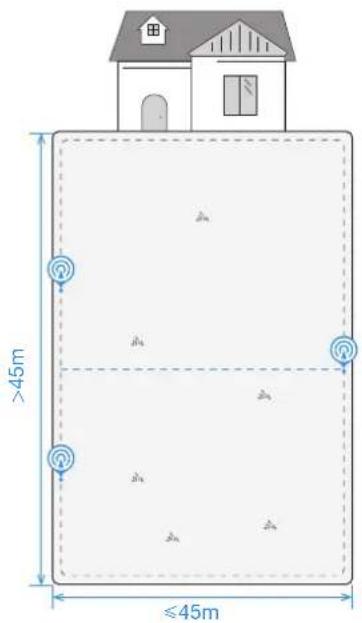
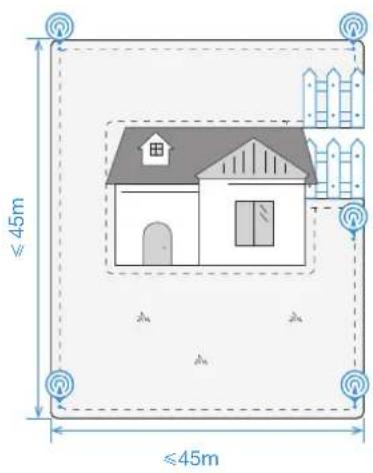
1 The lawn is on one side
- Side length: ≤slant 45m (all sides)
• The number of Navigation Beacon needed: 2

text_image
≤45m ≤45m- Side length: 45-90 m (the distance marked out on left long side)
• The number of Navigation Beacon needed: 3
text_image
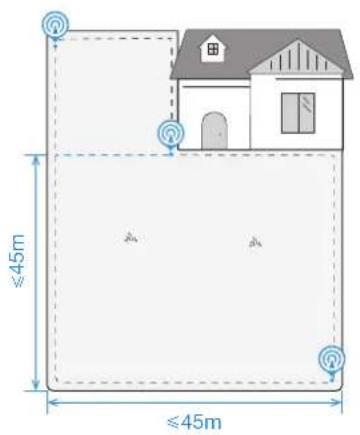
>45m ≤45m② L-shaped lawn
-
Side length: ≤slant 45m (all sides)
• The number of Navigation Beacon needed: 3 -
Side length: 45-90 m (the distance marked out on left long side)
• The number of Navigation Beacon needed: 4
text_image
≤45m ≤45m
text_image
>45m ≤45m③ U-shaped lawn
-
Side length: ≤slant 45m (all sides)
• The number of Navigation Beacon needed: 4 -
Side length: 45-90 m (the distance marked out on right long side)
• The number of Navigation Beacon needed: 5

text_image
≤45m ≤45m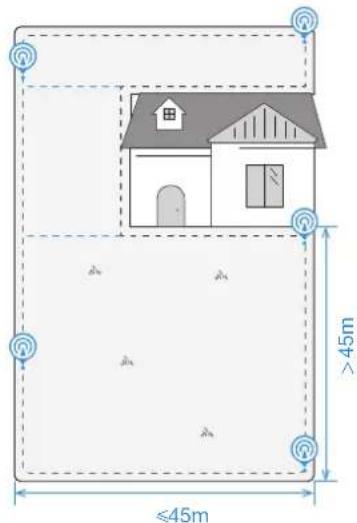
text_image
≤45m >45m4 O-shaped lawn
-
Side length: ≤slant 45m (all sides)
• The number of Navigation Beacon needed: 4 -
Side length: 45-90 m (the distance marked out on right long side)
• The number of Navigation Beacon needed: 5

text_image
≤45m ≤45m
text_image
≤45m >45m- Side length: ≤slant 45m (all sides)
• The number of Navigation Beacon needed: 5
• Side length: 45-90 m (right long side)
• The number of Navigation Beacon needed: 6
text_image
≤45m ≤45m
text_image
≤45m >45m
* With the obstacle higher than 60 cm * With the obstacle higher than 60 cm
⑤ Irregular-shaped lawn
- Side length: ≤slant 45m (bottom short side)
• The number of Navigation Beacon needed: 6

text_image
≤45mNote: If your lawn type is very complex, it is recommended to contact Customer Service for a more reasonable plan.
CREATE THE MAP
Before mapping, the following tips need to be noted:
- If your lawn is divided by paths with a height lower than 3 cm, please create a channel wider than 1 m when you create the map.
- If your lawn is divided by paths with a height higher than 3 cm, please place an object with a slope equal in height to the path first (e.g. uphill mat) and create a channel wider than 1 m when you create the map.

text_image
1m 3cm-
DO NOT map in the corridor narrower than 1 m.
-
Make sure that Signal Receiver is lifted up and Panoramic Camera cover on your GOAT is removed.
* It is recommended to put the Panoramic Camera cover in Storage Box.
1m
≤1m
2
1
-
Do not create the virtual boundary on a slope that exceeds 20%.
-
Your GOAT correctly docks with the Station.
≤slant 20% 20%
H≤20cm
H>20cm
L=100cm L=100cm
- The battery level of your GOAT is more than 50%.

text_image
>50%- The map must be built between 8 am to 6 pm in order to get full sunlight.

natural_image
Line drawing of a tractor with wheels and a sun symbol above it (no text or labels)② Map out the Virtual Boundary
Let GOAT start from the Station and follow GOAT within 6 m. If the height difference is more than 3 cm, please keep your GOAT at least 10 cm from the edge of the lawn.

text_image
Diagram illustrating robot arm positioning with magnified views showing distance measurement of 6 meters between a robot and a person.
text_image
>10cm >3cm >10cm >3cm- Make sure that the turning angle is greater than 90^ .

text_image
>90° <90°③ Return to the Station
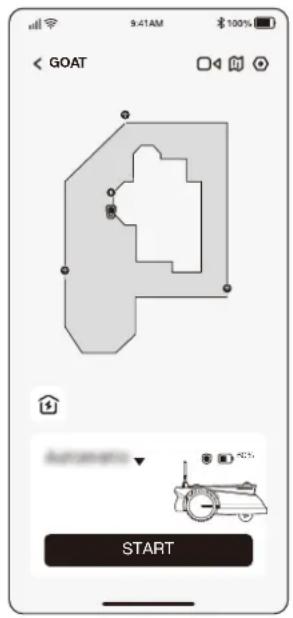
When controlling the GOAT to the place near the Station, you will receive a message from the App about whether to complete the boundary setup. Continue controlling your GOAT to the place 0.5 m in front of the Station and make sure that GOAT faces the Station. Then tap " 🔒" in the App. Your GOAT will automatically go back to Station to make a closed virtual boundary.

text_image
0.5m
text_image
Mobile app screenshot showing a 3D geometric logo with Chinese text and a button labeled 'OK' (OK)4 Set up No-Entry Zone
Though GOAT can automatically adjust its direction when hitting solid obstacles such as stones or trees, it is still necessary to set up No-Entry Zones for objects you want to protect, such as a flowerbed, a trampoline and a vegetable plot. To protect your GOAT, areas where GOAT is prohibited from passing also should be set as No-Entry Zones, such as raised tree roots, exposed wire, pool and slope that exceeds 45%.
- Follow the instructions in the App.
- Control your GOAT to Return to the Station after the setup completes.

natural_image
Illustration showing a person using a small robotic vehicle near a circular tank (no text or symbols)
Map Learning
After completing the boundaries, your GOAT needs to autonomously walk within the map to get familiar with the layout of your lawn. Then, a complete map will be generated automatically.
Depending on the size and complexity of your lawn, the learning time will vary from 20 minutes to 1 hour.
After completing the Map Learning, you can get the schedule automatically generated according to the actual lawn area and unlock more functions, such as different mowing modes, map editing and so on.

natural_image
Mobile phone screenshot showing a simple geometric shape with control buttons at the bottom (no readable text or symbols)START USING YOUR GOAT
Tips before first mowing:
- Cut the grass to a height of no more than 10 cm with your manual lawnmower and clear away obstacles including debris, piles of leaves, toys, wires and stones. Do not let your children play on the lawn when your GOAT is mowing.

text_image
Illustration showing various illustrations of a child and four other animals with a magnified detail indicating a minimum height of 10cm.- Set the mowing direction you need.
Note: Your GOAT will adjust its direction after departing from the Station and go straight forward to mow by default.

natural_image
Diagram showing a blue arrow pointing left with a connector icon, no text or symbols presentNOW COMES THE MOST EXCITING PART!
START YOUR GOAT FOR THE FIRST TIME
GET PREPARED: LET'S GET FAMILIAR WITH THE CONTROL PANEL ON YOUR GOAT.
1 Control Panel

text_image
Thu 12:30 DISPLAY to mow POWER ON/OFF START HOMEBACK STOP STOP② Icons on display
| Battery level (Timely reflects the battery level of your GOAT.) | |
| Charging (Indicates GOAT's successful docking with the Station.) | |
| Bluetooth (Lights up when your GOAT is successfully connected with the App through Bluetooth.) | |
| Wi-Fi (Lights up when your GOAT is successfully connected with the App through Wi-Fi.) | |
| Connection (Lights up when additional Connection Module is installed.) | |
| Guarding (Lights up when you are using Video Manager in the App or related guarding functions.) | |
| Schedule (Lights up when Schedule is on.) |
③ General Setting
- Press to back to Main Screen.
- Press > or < to select "MOWING MODE ■ "SCHEDULE " "SETTINGS ". Then press to enter.
- Select the item you need by pressing √ or ∧Then press toKstart detailed operations.
- Press 5 to go back.
Frame of Functions on Display

flowchart
graph TD
    A["Main Screen*"] --> B["MOWING MODE"]
    A --> C["SCHEDULE"]
    A --> D["SETTINGS"]
    B --> E["Auto mow"]
    B --> F["Edge mow"]
    C --> G["Animal protection"]
    C --> H["Rain sensor"]
    C --> I["Mowing efficiency"]
    C --> J["Change PIN code"]
    C --> K["Anti-theft"]
    C --> L["Language"]
    C --> M["Volume"]
    C --> N["Reset GOAT"]
    C --> O["About"]
* It might be renewed according to the software version.
YOUR GOAT IS READY FOR MOWING NOW! PRINCIPLE FUNCTIONS AND OPERATIONS OF YOUR GOAT
1 Start
Press ▷, then OGOAT will start mowing. Or you can start mowing via the App.
Note: Make sure the grass has been cut to a height of no more than 10 cm with your manual lawnmower.
2 Pause
Press STOP on GOAT or stop it via the App.
- For security, your GOAT will be locked and cannot be started directly via the App after impressed. Please enter your PIN code on the Control Panel first.

③ Resume Mowing
Press ▷ and then OK GOAT or tap the button in the App to resume mowing.
Note: It is necessary to enter your PIN code before resuming when encountering the following situations:
- Your GOAT is lifted up or tilted.
• pressed. - Your GOAT is restarted.

text_image
OR OR FINISH CONTINUE4 Return to the Station
Send GOAT to the Station by pressing 🏠 or via the App.

text_image
< GOAT STARTECOVACS HOME APP
WHERE YOU CAN EXPLORE MORE
The App, is very powerful with multiple functions. Do not consider it simply as a remote control.
You can do many things via the App, such as completing various settings remotely, experiencing different mowing modes, editing the map freely and adjusting the mowing schedules.
Moreover, you can view the scenery of your lawn directly through the App.
Supporting the OTA (Over-the-Air) update, the new software update will automatically happen Over-the-Air with your confirmation so that you can experience more functions.
text_image
< GOAT 9:41AM 100% STARTHOW YOUR GOAT WORKS
The following part will help you know how your GOAT works. GOAT is a smart robot equipped with AI and several sensors. It can deal with various complicated scenes autonomously.
1 Mowing mode
You can switch modes on your GOAT or via the App.


2 Schedule
GOAT automatically generates the mowing schedule according to the lawn area. Modify the pre-set in the App at any time. Supporting two schedules, GOAT enables you to set and switch based on different seasons.


③ Cutting height
GOAT is a smart robot for maintaining your lawn well. Before starting, make sure that the grass is no longer than 10 cm. If longer, cut the grass roughly with a manual lawnmower. Then your GOAT will keep the grass nicely clipped within a height of 6 cm.


4 Programmed cutting
With programmed cutting, your GOAT mows along an S-shaped path to achieve maximum efficiency.


5 Autonomous recharging
When the battery is low, your GOAT will pause the task autonomously and go back to the Station to charge itself. When fully charged, your GOAT will resume the unfinished mowing task of the day.

natural_image
Blue icon depicting a vehicle and a charging station with lightning bolt symbol (no text or labels)6 Rain sensor
With waterproof level of IPX6, your GOAT will be very pleased to stay outside. However, mowing under heavy rain will not bring out the best result. Your GOAT, equipped with the Rain Sensor, will pause mowing and return to the Station automatically when a certain amount of rainwater is detected. When the rain stops, GOAT will automatically resume the mowing task. It is recommended to mow in dry weather for the best mowing result.
You also can inactivate it on your GOAT or via the App to mow on rainy days.


7 Rain delay time
The lawn may still be wet after the rain stops. For a better mowing result, your GOAT will resume mowing 3 hours after the Rain Sensor detects that the rain has stopped by default. You can change the rain delay time via the App.

natural_image
Blue icon depicting a car with exhaust smoke and clock, symbolizing transportation or industrial activity (no text or symbols)8 Animal protection
With the aim to protect nocturnal animals, GOAT will stop mowing from 7 pm to 7 am the next day.
You also can inactivate it on your GOAT or via the App to mow at night


9 Smart obstacle avoidance
Equipped with ToF Sensor, your GOAT can detect objects taller than 15 cm and avoid them in advance. Moreover, some obstacles can precisely be avoided by AI recognition.

natural_image
Blue icon showing a vehicle emitting sound waves and a traffic cone (no text or symbols)
10 No need for disposal of grass clippings
Daily mowing with your GOAT leaves short clippings, which will be scattered evenly on the lawn as the best fertilizer.


11 Safety and PIN code protection
The PIN code you set for your GOAT at the first startup is used to prevent being stolen and operated by children. When GOAT is off map or lifted, it will automatically lock itself and raise an alarm. You can unlock it by entering the PIN code.
Note: You can change the PIN code on your GOAT in "SETTINGS ➕Change PIN code" or in the App in Settings->Account and security->Set the PIN code


12 Video guarding
Not merely a robot, GOAT enables you to see your lawn remotely and in real time through the top Panoramic Camera and Front AI Camera. With the ability to detect humans by AI, your GOAT can release the voice alarm and simultaneously send you the alarm message when it detects humans entering your lawn.

natural_image
Blue icon showing a vehicle with warning sign and speaker, no text or symbols present
AUSPACKEN
LIEFERUMFANG

text_image
Exploded view diagram of household appliances and fixtures with numbered labelsnatural_image
Illustration of a smartphone with wireless signal icons above it, showing a device and its screen (no text or symbols present)natural_image
Diagram showing a device with a cable inserted into a circuit board, with an inset magnified view of the cable being inserted (no text or symbols present)natural_image
Illustration of a small electronic device with a magnified inset showing a blue upward arrow (no text or symbols)text_image
Diagram illustrating a robotic arm operation with labeled steps and directional arrows indicating movementnatural_image
Technical line drawing of a mechanical device with rotating arms and base plates (no text or symbols)text_image
Technical diagram showing a mechanical or electrical device connected to a coiled spring, with an inset illustrating the internal mechanism and directional arrows.text_image
Diagram illustrating robotic arm operation with labeled steps and directional arrows indicating motionnatural_image
Line drawing of a robotic vacuum cleaner with a blue component and control panel (no text or symbols)text_image
LANGUAGE Dansk Deutsch English OKtext_image
③ N CODE OK OR >
text_image
1 CONFIRM OK
text_image
2 PIN code OK!
text_image
NEW PIN CODE OK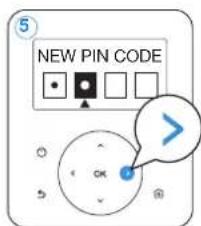
text_image
NEW PIN CODE OK
text_image
NEW PIN CODE OKtext_image
Diagram showing a mobile phone interface with IOMC label and a QR code payment terminal connected to a robot.2. WLAN Verbindung (optional)
text_image
Wi-Fi Next steptext_image
Diagram illustrating smartwatch interface scanning process with QR code payment and pixelated sensor③ Installation des Navigationssenders
text_image
Diagram showing a central square with three smaller circles and arrows pointing to its intersection, likely representing a set theory or geometric relationship.text_image
5m 5m × ✓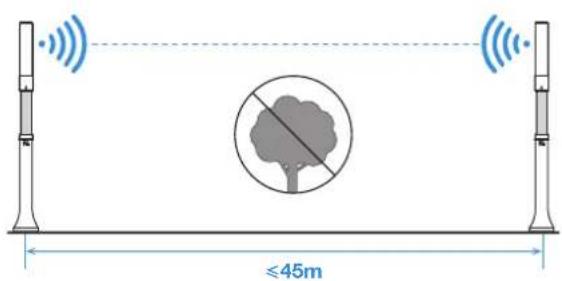
text_image
≤45mnatural_image
Two diagrams showing a ramp and an inclined plane with a pencil, marked with blue X and ✓ symbols (no text or labels)natural_image
Illustration of a hand holding a cylindrical tool with blue arrows indicating motion or force direction (no text or symbols)EMPFOHLENE INSTALLATION
text_image
Diagram illustrating a rural road scenario with a house, a vehicle, and distances labeled >1m and >3cm.text_image
≤45m ≤45mtext_image
>45m ≤45m② L-förmiger Rasen
text_image
≤45m ≤45m
text_image
>45m ≤45m③ U-förmiger Rasen
text_image
≤45m ≤45m
text_image
≤45m >45m4 O-förmiger Rasen
text_image
≤45m ≤45m
text_image
≥45m ≤45mtext_image
≤45m ≤45m
text_image
≤45m >45m
text_image
Diagram illustrating a rural road scenario with a small boat, distances labeled >1m and >3cm, and a house above it.text_image
Diagram illustrating robotic arm operation with labeled steps and directional arrows indicating motionnatural_image
Line drawing of a mechanical device with wheels and a mounted component (no text or symbols)natural_image
Line drawing of a tractor with a sun icon above it, no text or symbols presenttext_image
Diagram illustrating robot navigation and distance measurement, showing hands operating a robot and a robot with a 6-meter clearance indicator.
text_image
>10cm >3cm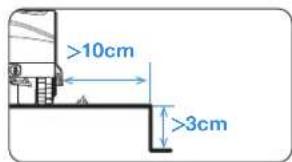
text_image
>10cm >3cmtext_image
Mobile app screenshot showing a user interface with a gray 3D character and Chinese text instructions.4 Verbotszone festlegen
natural_image
Illustration showing a person using a small robotic device near a circular water tank (no text or symbols)5 Kartenlernen
text_image
Mobile app screenshot showing a location pin icon with control buttons and status bartext_image
Illustration showing various activities with icons and a magnified detail indicating ≤10cm size.natural_image
Diagram showing a blue arrow pointing left from a car icon, with no text or symbols present.NUN KOMMT DER AUFREGENDSTE TEIL!
DER ERSTE START IHRES GOAT
text_image
Thu 12:30 to mow ODER START
text_image
STOP ODER GOAT FINISH PAUSE③ Mähen fortsetzen
text_image
< GOAT 9:41AM 100% STARTSO FUNKTIONIERT IHR GOAT
natural_image
Blue icon depicting a vehicle and a charging station (no text or symbols)6 Regensensor
natural_image
Blue icon depicting a car with exhaust smoke and clock, symbolizing transportation or industrial activity (no text or symbols)8 Tierschutz
natural_image
Blue icon depicting a vehicle emitting sound waves and a traffic cone (no text or symbols)
natural_image
Blue icon showing a vehicle with warning sign and speaker symbol (no text or labels)
DÉBALLAGE
CONTENU

natural_image
Illustration of a mobile device with Wi-Fi signal icons and an inset showing a smartphone (no text or symbols present)natural_image
Diagram showing a device on a mat with a magnified inset highlighting internal components (no text or symbols)natural_image
Illustration of a hand holding a small device with a magnified inset showing a blue arrow pointing upward (no text or symbols)text_image
Diagram showing a sewing machine with labeled parts and a magnified view of the component being handled.natural_image
Technical line drawing of a mechanical device with mounting holes and a base plate (no text or symbols)natural_image
Technical diagram of a mechanical or electrical device with labeled components and a magnified inset showing internal connections (no text or symbols present)text_image
Diagram illustrating robotic arm movement with labeled steps ① and ②, showing hand pressing a component on a tracked vehicle.natural_image
Line drawing of a robotic vacuum cleaner with a blue clip and control panel (no text or symbols)text_image
LANGUAGE Dansk Deutsch English OKtext_image
NEW PIN CODE NEW PIN
text_image
3 N CODE OK OR >
text_image
1 CONFIRM OK
text_image
② PIN code OK!
text_image
NEW PIN CODE OK S
text_image
NEW PIN CODE >
text_image
NEW PIN CODE OK4 Téléchargez l'application ECOVACS HOME
text_image
Mobile phone screenshot connected to a QR code payment terminal with a mobile robot displaying the payment.2. Connexion Wi-Fi (facultatif)
text_image
Diagram illustrating a smartwatch interface and its corresponding QR code payment mechanism, showing UI elements and payment process.③ Installez la balise de navigation
text_image
Diagram showing overlapping regions with a central square containing scattered triangles and directional arrows, likely representing a set theory or mathematical concept.text_image
5m 5m × ✓ ≤45mnatural_image
Two diagrams showing a ramp and an inclined plane with a pencil, marked with blue X and ✓ symbols (no text or labels)natural_image
Illustration of a hand holding a cylindrical object with blue arrows indicating motion or force direction (no text or symbols)INSTALLATION RECOMMANDÉE
text_image
≤45m ≤45mtext_image
>45m ≤45m② Pelouse en L
text_image
≤45m ≤45mtext_image
>45m ≤45m③ Pelouse en U
text_image
≤45m ≤45mtext_image
≤45m >45m4 Pelouse en O
text_image
≤45m ≤45mtext_image
≤45m >45mtext_image
≤45m ≤45m
text_image
≤45m >45m
text_image
Diagram illustrating robotic arm movement with labeled parts and directional arrows, showing hand pressing a component on a cart.natural_image
Line drawing of a mechanical device with wheels and a handle (no text or symbols)natural_image
Line drawing of a tractor with wheels and a sun symbol above it (no text or labels)text_image
Diagram illustrating robot arm positioning with distance annotation and hands operating a device, showing a person interacting with robots.
text_image
>10cm >3cm >10cm >3cmtext_image
Mobile app screenshot showing a user interface with a gray icon and Chinese text, likely for a user application or registration.4 Configuration de zones interdites
natural_image
Illustration showing a person using a small robot near a circular platform with a scale and pointer (no text or symbols)text_image
Mobile app interface screenshot showing a 3D shape selection dialog with Chinese labels and control buttonstext_image
Diagram illustrating a child running with multiple circular icons representing different activities or conditions, including a magnified view showing a scale of ≤10cm.flowchart
graph TD
    A["Car Icon"] --> B["Arrow Left"]
    B --> C["Arrow Right"]
ET MAINTENANT LE PLUS INTÉRESSANT !
DÉMARREZ VOTRE GOAT POUR LA PREMIÈRE FOIS
PRÉPAREZ-VOUS : DÉCOUVREZ LE PANNEAU DE COMMANDE SUR VOTRE GOAT.
text_image
Thu 12:30 to mow OU START2 Pause
text_image
OU OU OCAT FINISH CONTINUEtext_image
Diagram showing a hand pressing a button on a remote control and interacting with a DOAT app interface, with a 'START' button visible.APPLICATION ECOVACS HOME POUR ALLER ENCORE PLUS LOIN
text_image
< GOAT 9:41AM 100% STARTFONCTIONNEMENT DE VOTRE GOAT
natural_image
Blue icon depicting a robotic car and a charging station with a lightning bolt symbol (no text or labels)6 Capteur de pluie

The image contains only a stylistic horizontal line, which must be ignored according to Rule 2. No text or placeholder characters should be output.
natural_image
Blue icon of a car with motion lines and clock symbol (no text or labels)The image contains no text or characters. It is a stylistic or background line with no actual text content.

The image contains only a stylistic horizontal line, which must be ignored according to Rule 2. No text or placeholder characters should be output.
natural_image
Blue icon showing a vehicle emitting sound waves and a traffic cone (no text or symbols)The image contains no legible text or symbols. According to Rule 4 (Edge Noise Strategy), since the ground truth is not clearly visible, the OCR should output nothing.
Therefore, the corrected OCR text is:
```text [No text detected]

The image contains only a stylistic horizontal line, which must be ignored according to the rules. According to Rule 2, such lines must be ignored and not represented by underscores or any other character in the OCR output.
Therefore, the corrected OCR text is:
[empty string]

The image contains only stylistic horizontal lines, which must be ignored according to the rules. There is no actual text content to extract.
Therefore, the corrected OCR output is:
[Empty String]
natural_image
Blue icon showing a vehicle, a warning sign, and a person with sound waves (no text or symbols)The image contains only a stylistic horizontal line, which must be ignored according to Rule 2. No text or placeholder characters should be output.
text_image
Exploded view diagram of a robotic vacuum cleaner with numbered parts including battery, screwdriver, and control unit1 GOAT
3 Base
5 Alimentatore
7 Piolo × 8
9
natural_image
Diagram showing a device with Wi-Fi signal and a hand holding a smartphone (no text or symbols present)
natural_image
Diagram showing a device on a mat with a magnified inset highlighting internal components (no text or symbols)natural_image
Diagram of a sewing machine with a magnified inset showing a blue arrow indicating upward motion (no text or symbols present)text_image
Diagram showing a sewing machine with labeled parts and a magnified view of the component being adjusted.natural_image
Diagram of a medical or laboratory device with electrodes and tubing, no visible text or symbolsnatural_image
Technical diagram of a mechanical or electrical device with labeled components and a magnified inset showing internal connections (no text or symbols present)text_image
(a) 30cm (12")text_image
Diagram illustrating robotic arm movement with labeled parts and directional arrows, including a magnified inset showing rotational motion.
text_image
ECOVACSCOMINCIAMO A FARE SPERIMENTARE. COLLEGAMENTO DI GOAT CON L'APP
Preparazione:
natural_image
Line drawing of a robotic vacuum cleaner with a blue clip and control panel (no text or symbols)text_image
LANGUAGE ● Dansk ○ Deutsch ○ English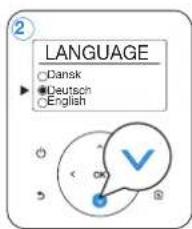
text_image
LANGUAGE Dansk Deutsch English
text_image
LANGUAGE Dansk Deutsch English OKtext_image
NEW PIN CODE A + OK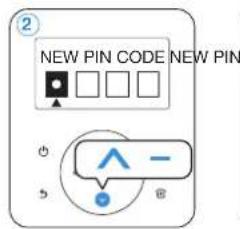
text_image
NEW PIN CODE NEW PIN
text_image
③ CODE OK OR >
text_image
CONFIRM OK
text_image
② PIN code OK!
text_image
NEW PIN CODE OK >
text_image
NEW PIN CODE OK
text_image
NEW PIN CODE OK4 Scaricare l'app ECOVACS HOME
text_image
Diagram showing a mobile device connected to a QR code payment interface, with Chinese UI elements and a separate UI panel.text_image
Diagram illustrating a QR code scanning process: before scanning, adding code to a smartphone screen, and after scanning to add a QR code on a smartwatch.natural_image
Venn diagram with two intersecting circles and a central square containing scattered triangles (no text or labels)text_image
5m 5m × ✓ ≤ 45mnatural_image
Two diagrams showing a ramp and a block on an inclined plane, with no text or symbols present.natural_image
Illustration of a hand holding a vertical cylindrical object with blue arrows indicating motion or force direction (no text or symbols)text_image
≤45m ≤45mtext_image
≥45m ≤45m② Prato a "L"
text_image
≤45m ≤45mtext_image
>45m ≤45m3 Prato a "U"
text_image
≤45m ≤45mtext_image
≥45m ≤45m4 Prato a "O"
text_image
≤45m ≤45mtext_image
≤45m >45mtext_image
≤45m ≤45m
text_image
≤45m >45m
text_image
1 m >3 cmtext_image
≤20% 20% A≤20cm L = 100cm L = 100cm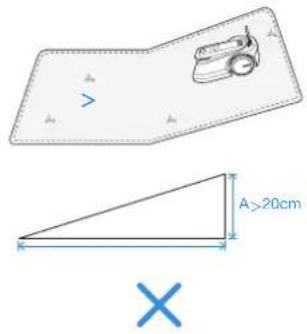
text_image
A>20cm Xtext_image
Diagram illustrating robotic arm operation with labeled steps and directional arrows indicating motionnatural_image
Line drawing of a mechanical device with wheels and a tool, no text or symbols presentnatural_image
Line drawing of a tractor with wheels and a sun symbol above it (no text or labels)text_image
Diagram illustrating robot tracking and distance measurement, showing a person using a robot and a device with a magnified view of the robot's leg measurement.
text_image
>10cm >3cm >10cm >3cmtext_image
Mobile app screenshot showing a user interface with a 3D geometric logo and Chinese text instructions.natural_image
Illustration showing a person standing near a small robot and a circular tank with internal components (no text or symbols)text_image
Mobile app interface screenshot showing a 3D geometric shape with control buttons and status barCOMINCIARE A USARE GOAT
text_image
Illustration showing various activities with icons and a magnified detail indicating a minimum distance of 10 cm.natural_image
Diagram showing a blue arrow pointing left with a car icon, no text or symbols presentORA ARRIVA LA PARTE PIÙ INTERESSANTE!
IL PRIMO AVVIO DI GOAT
PREPARATEVI: ACQUISIAMO FAMILIARITÀ CON IL PANNELLO DI CONTROLLO DI GOAT.
text_image
Thu 12:30 DISPLAY ACCENSIONE/ SPEGNIMENTO AVVIO HOMEINDIET STOP STOP② Icone sul display
text_image
Thu 12:30 to mow OPPURE START
text_image
STOP OPPURE < GOAT FINISH PAUSEtext_image
Diagram showing a hand pressing a button on a remote control and interacting with a GOAT interface, with a 'START' button visible.APP ECOVACS HOME
text_image
< GOAT 9:41AM 100% STARTCOME FUNZIONA GOAT
natural_image
Blue icon depicting a robotic car and a charging station with a lightning bolt symbol (no text or labels)6 Sensore pioggia
natural_image
Blue icon depicting a car with a radio emitting sound waves, next to a clock and droplets (no text or symbols)
The image contains no legible text or symbols. According to the guidelines, non-text figures/diagrams are stylistic lines and must be ignored. Therefore, the correct OCR output is empty.
(No text to output)

The image contains only a stylistic horizontal line, which must be ignored according to Rule 2. No text or placeholder characters should be output.
12 Vigilanza video
natural_image
Blue icon showing a vehicle with warning sign and a person speaking into a microphone (no text or symbols)The image contains no legible text or symbols. According to Rule 4 (Edge Noise Strategy), since the ground truth is a non-textual graphic and does not contain any characters, the OCR output must be empty.
Therefore, the corrected OCR text is:
```text [No text detected]
DESEMBALAJE
CONTENIDO DE LA CAJA

natural_image
Illustration of a smartphone with Wi-Fi signal icons above it, showing no text or symbols on the device itself.natural_image
Diagram showing a device on a mat with an inset close-up of its internal structure (no text or symbols)natural_image
Illustration of a device with a magnified inset showing a blue arrow pointing to a device (no text or symbols present)text_image
Diagram showing a sewing machine with labeled parts and directional arrows indicating movement or operation.natural_image
Diagram of a medical or laboratory device with electrodes and tubing, no visible text or symbolsnatural_image
Technical diagram of a mechanical or electrical device with labeled components and a magnified inset showing internal components (no text or symbols present)text_image
Diagram illustrating robotic arm movement with labeled steps ① and ②, showing hand positioning and motion arrows.
text_image
ECOVACSnatural_image
Line drawing of a robotic vacuum cleaner with a blue component inserted, showing no text or symbolstext_image
LANGUAGE Dansk Deutsch English OKtext_image
NEW PIN CODE NEW PIN
text_image
3 N CODE OK OR >
text_image
1 CONFIRM OK
text_image
② PIN code OK!
text_image
NEW PIN CODE OK
text_image
NEW PIN CODE >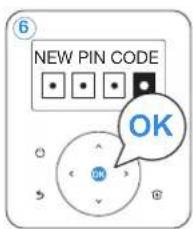
text_image
NEW PIN CODE OKtext_image
Mobile app interface screenshot showing QR code scanning and a device with Chinese text labelstext_image
Wi-Fi New stepstext_image
Diagram illustrating a QR code scanning process: before scanning, adding a cable to a device, and after scanning it.natural_image
Venn diagram with two intersecting circles and a central square containing scattered triangles (no text or labels)text_image
≥10° × ≤45m
text_image
20cm 20cm × ✓text_image
5m 5m × ✓ ≤45mnatural_image
Two diagrams showing a ramp and a block on an inclined plane, with no text or symbols present.natural_image
Illustration of a hand holding a cylindrical object with blue arrows indicating motion or force direction (no text or symbols)text_image
Diagram illustrating a rural water feature with a small boat, distances labeled >1m and >3cm, and a house above it.text_image
≤45m ≤45mtext_image
≥45m ≤45mtext_image
≤45m ≤45mtext_image
>45m ≤45mtext_image
≤45m ≤45mtext_image
≤45m >45mtext_image
≤45m ≤45mtext_image
≤45m >45mtext_image
≤45m ≤45m
text_image
Diagram showing a house with dimensions and signal icons, including a 45m width and 200mm height measurement.
natural_image
Pure diagram of a 3D object with no text, numbers, or symbols

text_image
Altura >20cm Xtext_image
Diagram illustrating robot motion with labeled parts and directional arrows, showing hand pressing motion on a cart.natural_image
Technical line drawing of a mechanical device with no visible text or symbolsnatural_image
Line drawing of a tractor with a sun icon above it, no text or symbols presenttext_image
Diagram illustrating robot navigation and distance measurement, showing hands interacting with a device and robotic arm with a 6m measurement annotation.
text_image
>10cm >3cm
text_image
>10cm >3cmtext_image
Mobile app screenshot showing a 3D geometric logo with Chinese text and a 'OK' buttonnatural_image
Illustration showing a person using a small boat near a circular platform with a gear-like structure (no text or symbols)natural_image
Mobile phone screenshot showing a 3D geometric shape with control buttons at the bottom (no readable text or symbols)EMPIECE A UTILIZAR GOAT
text_image
Illustration showing a person with various animal poses and a magnified view indicating ≤10cm size.natural_image
Diagram showing a blue arrow pointing left with a car icon, no text or symbols presenttext_image
Thu 12:30 to mow START
text_image
STOP GOAT FINISH FAUSEtext_image
Diagram showing hand interacting with a remote control interface and screen displaying icons for cleaning and continuation.text_image
< GOAT STARTtext_image
< GOAT 9:41AM 100% AUTO STARTCÓMO FUNCIONA GOAT
natural_image
Blue icon depicting a vehicle and a charging station with lightning bolt symbol (no text or labels)6 Sensor de lluvia
natural_image
Blue icon depicting a car with a flag, speedometer, and clock symbol (no text or numbers)natural_image
Blue icon showing a vehicle emitting sound waves next to a traffic cone (no text or symbols)The image contains no legible text or symbols. According to Rule 4 (Edge Noise Strategy), since the ground truth is a non-textual graphic, no character should be output.
Therefore, the corrected OCR text is:
```text [No text detected]

The image contains only a stylistic horizontal line, which must be ignored according to the rules. According to Rule 2, such lines must be ignored and not represented by underscores or any other character in the OCR output.
Therefore, the corrected OCR text is:
[empty string]

The image contains no legible text or symbols. According to the guidelines, non-text figures and diagrams must be ignored. Therefore, the correct OCR output is an empty string.
natural_image
Blue icon showing a vehicle with warning sign and speaker symbol (no text or labels)The image contains only a stylistic horizontal line, which must be ignored according to Rule 2. No text or placeholder characters should be output.
UIT DE VERPAKKING HALEN
INHOUD VAN DE DOOS

1 GOAT
3 Onderkant
5 Voedingskabel/-adapter
7 8 pinnen
9
11 2 navigatiestaven
UW GOAT LEREN KENNEN
PRODUCTAFBEELDING
GOAT (bovenaanzicht)

natural_image
Illustration of a smartphone with wireless signal icons above it, showing a device with grid and buttons (no text or symbols on the device itself)
natural_image
Diagram showing a device with a cable inserted into a housing, with an inset close-up of the cable being inserted (no text or symbols present)natural_image
Illustration of a sewing machine with a magnified inset showing a sewing needle (no text or symbols)text_image
Diagram showing a printer setup with labeled parts and directional arrows, including numbered annotations.natural_image
Technical line drawing of a mechanical device with bolts and a base plate (no text or symbols)natural_image
Technical diagram of a mechanical or electrical device with labeled components and a magnified inset showing internal connections (no text or symbols present)1168NL
text_image
30cm (12 inch)text_image
Diagram illustrating robotic arm motion with labeled steps ① and ②, showing hand placement and tool pathnatural_image
Line drawing of a robotic vacuum cleaner with a blue component and control panel (no text or symbols)text_image
LANGUAGE Dansk Deutsch English OK③ De pincode instellen
text_image
② NEW PIN CODE NEW PIN
text_image
③ N CODE OK OR >
text_image
CONFIRM OK
text_image
② PIN code OK!
text_image
NEW PIN CODE OK
text_image
NEW PIN CODE OK
text_image
NEW PIN CODE OK4 De app ECOVACS HOME downloaden
natural_image
Diagram of a cylindrical device with two blue arrows indicating rotation or movement (no text or symbols)


text_image
Beep~Click~
natural_image
Diagram of a mechanical device with a spiral base and cylindrical shaft, showing rotational motion arrows (no text or symbols)LET OP
text_image
Diagram illustrating a smartwatch interface and its corresponding QR code payment process, with Chinese labels.text_image
Diagram showing a central square with four smaller circles and arrows pointing to its intersection, likely representing a set theory or geometric relationship.text_image
5m 5m × ✓ ≤45mnatural_image
Two diagrams showing a ramp and an inclined plane with a pencil, marked with blue X and ✓ symbols (no text or labels)natural_image
Illustration of a hand holding a cylindrical object with blue arrows indicating motion or force direction (no text or symbols)AANBEVOLEN INSTALLATIE
text_image
≤45m ≤45mtext_image
>45m ≤45m② L-vormig gazon
text_image
≤45m ≤45m
text_image
>45m ≤45m③ U-vormig gazon
text_image
≤45m ≤45m
text_image
≤45m >45m4 Rond gazon
text_image
≤45m ≤45mtext_image
≤45m >45mtext_image
≤45m ≤45m
text_image
Diagram showing a house with dimensions and sensor placements, including a 45m width measurement and labeled points.
text_image
Diagram illustrating robotic arm movement with labeled parts and directional arrows, including a hand pressing a component.natural_image
Line drawing of a mechanical device with wheels and a tool, no text or symbols present1184NL
natural_image
Line drawing of a tractor with wheels and a sun symbol above it (no text or labels)② De virtuele randen in kaart brengen
text_image
Diagram illustrating robot arm positioning with labeled distances and sensor readings, showing a person interacting with robots and a robot on a floor.
text_image
>10cm >3cm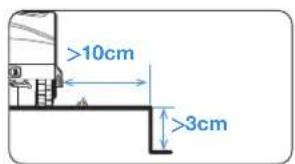
text_image
>10cm >3cmtext_image
Mobile app screenshot showing a login page with a 3D character and Chinese text instructionsnatural_image
Illustration showing a person using a small robot near a circular water tank (no text or symbols)5 Kaart leren
text_image
Mobile app interface screenshot showing a 3D object outline with control buttons and status bartext_image
Diagram illustrating a child running with multiple animals and a magnified view showing a 10cm size measurement.flowchart
graph TD
    A["Car Icon"] --> B["Arrow Left"]
    B --> C["Arrow Right"]
EN DAN HET LEUKSTE ONDERDEEL: DE GOAT VOOR HET EERST AANZETTEN
TER VOORBEREIDING: RAAK VERTROUWD MET HET BEDIENINGSPANEL OP DE GOAT.
1 Bedieningspaneel

text_image
Thu 12:30 DISPLAY to mow IN-/UITSCHAKELEN STARTEN HOMETERUG STOP STOPPEN② Weergegeven pictogrammen
text_image
Thu 12:30 to mow OF GOAT START
text_image
STOP OF GOAT FINISH PAUSEtext_image
< GOAT STARTIN DE ECOVACS HOME-APP
VINDT U NOG MEER INFORMATIE
text_image
< GOAT 9:41AM 100% AUTO STARTHOE WERKT DE GOAT?
natural_image
Blue icon depicting a vehicle and a charging station with lightning bolt symbol (no text or labels)6 Regensensor
natural_image
Blue icon depicting a car with a radio emitting sound waves, next to a clock and droplets (no text or symbols)8 Dierbeveiliging
natural_image
Blue icon depicting a vehicle with signal waves and a traffic cone (no text or symbols)
natural_image
Blue icon showing a vehicle with a warning sign and a person speaking into a microphone (no text or symbols)
UPPACKNING
FÖRPACKNINGENS INNEHÅLL

EN NÄRMARE TITT PÅ GOAT
PRODUKTDIAGRAM
GOAT (ovansida)

natural_image
Illustration of a mobile phone with Wi-Fi signal icons above it, showing no text or symbols on the device itself.natural_image
Diagram showing a device with a cable inserted into a housing, with an inset close-up of the cable (no text or symbols present)natural_image
Illustration of a hand pressing a button on a flat surface with a magnified inset showing a blue arrow (no text or symbols)text_image
Diagram showing a sewing machine with labeled parts and a magnified view of the process, likely illustrating a sewing or sewing machine operation.natural_image
Technical line drawing of a mechanical device with bolts and a base plate (no text or symbols)natural_image
Technical diagram of a mechanical or electrical device with labeled components and a magnified inset showing internal connections (no text or symbols present)text_image
(a) 30cm (12'')text_image
Diagram illustrating robotic arm movement with labeled steps and directional arrows indicating motion directionnatural_image
Line drawing of a robotic vacuum cleaner with a blue clip and control panel (no text or symbols)text_image
LANGUAGE Dansk Deutsch English OK③ Ställ in PIN-kod
text_image
NEW PIN CODE OK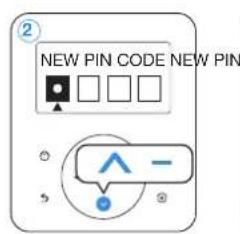
text_image
NEW PIN CODE NEW PIN
text_image
③ N CODE OK OR >
text_image
1 CONFIRM OK
text_image
② PIN code OK!
text_image
NEW PIN CODE OK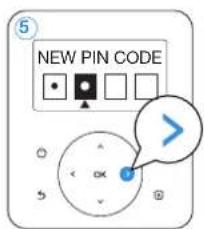
text_image
NEW PIN CODE >
text_image
NEW PIN CODE OK4 Hämta ECOVACS HOME-appen
text_image
Wi-Fi Next stepINSTALLERA NAVIGATIONSFYREN
text_image
Diagram illustrating a QR code scanning process: before scanning, adding code to a smartphone screen, and after scanning to add a QR code on a smartwatch.③ Installera navigationsfyren
Allmänna principer:
natural_image
Venn diagram with two intersecting circles and a central square containing scattered triangles (no text or labels)text_image
5m 5m × ✓ ≤45mnatural_image
Two diagrams showing a block on an inclined plane with a pencil, marked with X and ✓ symbols (no text or labels)natural_image
Illustration of a hand using a tool to lift a cylindrical object with blue directional arrows indicating motion (no text or symbols)REKOMMENDERAD INSTALLATION
text_image
≤45m ≤45mtext_image
>45m ≤45m② L-formad gräsmatta
text_image
≤45m ≤45m
text_image
>45m ≤45m③ U-formad gräsmatta
text_image
≤45m ≤45m
text_image
≤45m >45mtext_image
≤45m ≤45m
text_image
Diagram showing a house within a rectangular boundary with dimensions and signal icons, including annotations for width ≤45m and height >45m.text_image
≤45m ≤45mtext_image
≤45m >45m
text_image
Diagram illustrating robotic arm movement with labeled parts and directional arrows, including a hand pressing a component.natural_image
Line drawing of a mechanical device with wheels and a mounted component (no text or symbols)natural_image
Line drawing of a tractor with wheels and a sun symbol above it (no text or labels)text_image
Diagram illustrating robot arm positioning with distance annotation ≤6m between robotic arm and human operator
text_image
>10cm >3cm >10cm >3cmtext_image
Mobile app screenshot showing a user interface with a gray 3D letter 'P' and a small icon, likely for editing or scanning purposes.4 Skapa en spärrzon
natural_image
Illustration of a person using a small robot near a circular tank (no text or symbols)⑤ Kartinlärning
text_image
Mobile app interface screenshot showing a 3D geometric shape with control buttons and status bartext_image
Illustration showing a child running with icons of animals and a magnified view indicating a minimum height of 10cm.natural_image
Diagram showing a blue arrow pointing left from a car icon, with no text or symbols present.NU KOMMER DEN MEST SPÄNNANDE DELEN!
STARTA GOAT FÖR FÖRSTA GÅNGEN
FÖRBERED DIG: TA EN NÄRMARE TITT PÅ KONTROLLPANELEN PÅ GOAT.
1 Kontrollpanel

text_image
Thu 12:30 DISPLAY to mow STRÖM PÅ/AV START HEMTILLBA2 Ikoner på displayen
text_image
STOP STOPPtext_image
Thu 12:30 to mow ELLER GOAT START
text_image
STOP ELLER GOAT FINISH PAUSEtext_image
< GOAT 9:41AM 100% AUTO STARTSÅ HÄR FUNGERAR GOAT
natural_image
Blue icon depicting a vehicle and a charging station with lightning bolts (no text or symbols)6 Regnsensor
natural_image
Blue icon depicting a car with exhaust smoke and clock, symbolizing transportation or industrial activity (no text or symbols)8 Djurskydd
natural_image
Blue icon depicting a vehicle with signal waves and a traffic cone (no text or symbols)The image contains no text. The horizontal line is a stylistic or background element and must be ignored according to the rules.

The image contains only a stylistic horizontal line, which must be ignored according to the rules. According to Rule 2, such lines must be ignored and not represented by underscores or any other character in the OCR output.
Therefore, the corrected OCR text is:
[empty string]

The image contains no legible text or symbols. According to Rule 4 (Edge Noise Strategy), since the ground truth is a non-textual graphic and does not contain any characters, punctuation, or symbols that can be reliably extracted from it. Therefore, the correct OCR output must reflect the absence of any content.
[No text detected]
12 Videoövervakning
natural_image
Blue icon showing a car with a warning sign and a person speaking into a microphone (no text or symbols)The image contains no legible text or symbols. According to Rule 4 (Edge Noise Strategy), since the ground truth is a non-textual graphic, no character should be output.
Therefore, the corrected OCR text is:
```text [No text detected]
UTPAKKING
DETTE ER I ESKEN
BLI KJENT MED GOAT
PRODUKTDIAGRAM
GOAT (vist ovenfra)

text_image
Regnsensor STOPP-knapp Signalmottaker* Luke Fremre Al-kamera Justeringsbryter for klippehøyde Kontrollpanel Ladekontakter Panoramakamera ToF-sensornatural_image
Illustration of a mobile device with wireless signal icons and a hand holding a smartphone (no text or symbols present)natural_image
Diagram showing a device with a cable inserted into a circuit board, with an inset magnified view of the cable being inserted (no text or symbols present)natural_image
Illustration of a hand operating a device with a magnified inset showing a blue upward arrow (no text or symbols)text_image
Diagram illustrating a sewing machine operation with labeled steps and directional arrows indicating movementnatural_image
Diagram of a machine with sensors and control panel, no text or symbols present② Koble strømgrensesnittet til strømforsyningen
- Sett innsnittet (a) inn i sporet (b).

a

b
natural_image
Technical diagram of a mechanical or electrical device with labeled components and a magnified inset showing internal connections (no text or symbols present)text_image
(a) 30cm (12'')text_image
Diagram illustrating robotic arm movement with labeled steps ① and ②, showing hand positioning and motion arrows.natural_image
Diagram of a robotic vacuum cleaner with a blue component inserted, showing no text or symbolstext_image
LANGUAGE Dansk Deutsch English OK③ Konfigurer PIN-koden
text_image
NEW PIN CODE A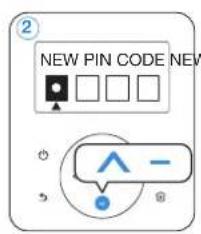
text_image
NEW PIN CODE NEW ↑ - 5
text_image
3 N CODE OK OR >
text_image
1 CONFIRM OK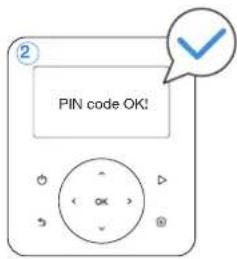
text_image
② PIN code OK!
text_image
NEW PIN CODE OK >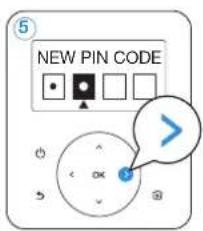
text_image
NEW PIN CODE
text_image
NEW PIN CODE OK4 Last ned ECOVACS HOME-appen
text_image
Diagram showing a mobile phone interface connected to a QR code and a robot-mounted device, with Chinese UI elements.2. Wi-Fi-tilkobling (valgfritt)
text_image
Wi-Fi Next stepnatural_image
Diagram of a cylindrical mechanical component with two blue arrows indicating rotational direction (no text or symbols)


text_image
Beep~
text_image
Click~ 01/02
natural_image
Diagram of a mechanical device with a spiral base and cylindrical shaft, showing rotational motion arrows (no text or symbols)ADVARSEL
text_image
Diagram illustrating a smartwatch interface and its corresponding QR code payment process, with Chinese labels.natural_image
Venn diagram with two intersecting circles and a central square containing scattered triangles (no text or labels)text_image
5m 5m × ✓ ≤45mnatural_image
Two diagrams showing a ramp and a block on an inclined plane, with no text or symbols present.natural_image
Illustration of a hand holding a vertical cylindrical object with blue arrows indicating rotational motion (no text or symbols)ANBEFALT INSTALLASJON
text_image
≤45m ≤45mtext_image
>45m ≤45m
L-formet plen
text_image
≤45m ≤45m
text_image
>45m ≤45m③ U-formet plen
text_image
≤45m ≤45m
text_image
≥45m ≤45m4 O-formet plen
text_image
≤45m ≤45m
text_image
Diagram showing a house with dimensions and wireless signal icons, including measurements ≤45m and >45mtext_image
≤45m ≤45mtext_image
Diagram showing a house with dimensions and sensor placements, including a 45m height and 200mm width measurement.
text_image
≤20% 20% H≤20cm L = 100cm L = 100cm
text_image
H>20cm ×text_image
Diagram illustrating robotic arm movement with labeled parts and directional arrows, showing hand pressing motion on a cart.natural_image
Line drawing of a mechanical device with wheels and a tool, no text or symbols presentnatural_image
Line drawing of a tractor with wheels and a sun symbol above it (no text or labels)② Kartlegg den virtuelle grensen
text_image
Diagram illustrating robot arm positioning with distance annotation ≤6m and hands operating a device
text_image
>10cm >3cm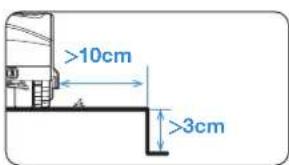
text_image
>10cm >3cmtext_image
Mobile app screenshot showing a user interface with a gray tool icon and Chinese text instructions.natural_image
Illustration of a person standing near a small robot and a circular tank with a mesh pattern (no text or symbols)5 Kartlæring
natural_image
Mobile app interface showing a 3D geometric shape with control buttons (no readable text or symbols)TA GOAT I BRUK
text_image
Illustration showing a child running with icons and a magnified view indicating a minimum height of 10 cm.natural_image
Diagram showing a blue arrow pointing left with a car icon, no text or symbols presentNÅ KOMMER DEN MEST SPENNENDE DELEN!
START GOAT FOR F∅RSTE GANG
FORBERED DEG: LA OSS BLI KJENT MED KONTROLLPANELET PÅ GOAT.
1 Kontrollpanel

text_image
Thu 12:30 SKJERM to mow STROM PÅ/AV START HJEMTILBAKE STOP STOPPtext_image
Thu 12:30 to mow ELLER GOAT START
text_image
STOP ELLER GOAT FINISH PAUSE③ Starte klipping på nytt
text_image
Diagram showing a hand pressing a button on a remote control and interacting with a DOAT app interface, with a 'START' button visible.ECOVACS HOME-APPEN
DER DU KAN UTFORSKE MER
Appen er svært komplett med flere funksjoner. Ikke se på den kun som en fjernkontroll.
text_image
< GOAT 9:41AM 100% AUTO STARTSLIK FUNGERER GOAT
natural_image
Blue icon depicting a vehicle and a charging station with lightning bolts (no text or symbols)6 Regnsensor
natural_image
Blue icon of a car with motion lines and clock, no text or symbols present8 Dyrebeskyttelse

The image contains no text or characters. It is a stylistic or background line with no actual text content.

The image contains only a stylistic horizontal line, which must be ignored according to the rules. According to Rule 2, such lines must be ignored and not represented by underscores or any other character in the OCR output.
Therefore, the corrected OCR text is:
[empty string]
11 Sikkerhet og PIN-kodebeskyttelse

The image contains no text. The horizontal line is a stylistic or background element and must be ignored according to the rules.
12 Videoovervåking
natural_image
Blue icon showing a vehicle with warning sign and speaker symbol (no text or labels)The image contains only a stylistic horizontal line, which must be ignored according to the rules. According to Rule 2, such lines must be ignored and not represented by underscores or any other character in the OCR output.
Therefore, the corrected OCR text is:
[empty string]
UDPAKNING
HVAD DER ER I KASSEN
GOAT
Base
Strømforsyning
Pløk × 8
Signallys ×2Tørcelle ×6
natural_image
Illustration of a smartphone with wireless signal icons above it, showing a device and a hand holding the phone (no text or symbols present)natural_image
Diagram showing a device on a mat with a magnified inset highlighting internal components (no text or symbols)natural_image
Illustration of a hand holding a small object on a mat, with an inset showing a blue arrow pointing upward (no text or symbols)text_image
Diagram showing a sewing machine with labeled parts and a magnified inset showing hand positioning and adjustment mechanism.natural_image
Technical illustration of a machine tool with sensors and a base, no text or symbols presenttext_image
Technical diagram showing a mechanical device connected to a coiled cable and a pressure sensor, with an inset illustrating the connection mechanism.1264DK
text_image
Diagram illustrating robotic arm movement with labeled steps ① and ②, showing hand positioning and motion arrows.natural_image
Line drawing of a robotic vacuum cleaner with a blue clip and control panel (no text or symbols)text_image
LANGUAGE Dansk Deutsch English OK③ Indstil PIN-koden
text_image
NEW PIN CODE ↑ +
text_image
② NEW PIN CODE NEW PIN ^ -
text_image
③ CODE OK OR >
text_image
1 CONFIRM OK
text_image
② PIN code OK!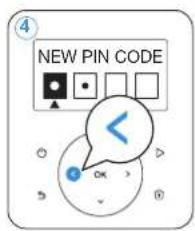
text_image
NEW PIN CODE OK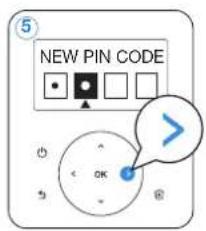
text_image
NEW PIN CODE OK
text_image
NEW PIN CODE OK4 Download ECOVACS HOME App
text_image
Diagram showing a device connected to a QR code and a mobile phone interface, with Chinese labels for UI elements.2. Wi-Fi-forbindelse (valgfrit)
text_image
Wi-Fi Next Steptext_image
Diagram illustrating a QR code scanning process: before scanning, adding a cable to a device, and after scanning it.③ INSTALLERE NAVIGATIONSSIGNALLYSET
Generelle principper:
- Signaldækningsradius for hvert navigationssignallys er 45 m.

text_image
45mnatural_image
Venn diagram with two intersecting circles and a central square containing scattered triangles (no text or labels)text_image
5m 5m × ✓ ≤45mnatural_image
Two diagrams showing a ramp and an inclined plane with a pencil, marked with blue X and ✓ symbols (no text or labels)natural_image
Illustration of a hand holding a cylindrical object with blue arrows indicating motion or force direction (no text or symbols)ANBEFALET INSTALLATION
text_image
Diagram illustrating a rural water feature with a boat, dam, and elevation markers (>1m and >3cm)text_image
≤45m ≤45mtext_image
>45m ≤45mtext_image
≤45m ≤45m
text_image
>45m ≤45mtext_image
≤45m ≤45m
text_image
≤45m >45mtext_image
≤45m ≤45m
text_image
≤45m >45mtext_image
≤45m ≤45m
text_image
≤45m >45m
text_image
≤20% 20% H≤20cm L = 100cm L = 100cm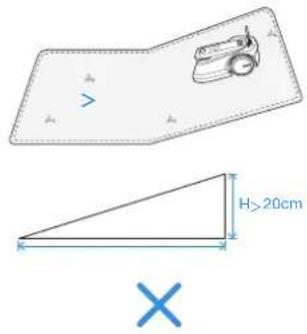
text_image
H>20cm ×text_image
Diagram illustrating robotic arm movement with labeled steps ① and ②, showing hand positioning and motion arrows.natural_image
Technical line drawing of a mechanical device with no visible text or symbolsnatural_image
Line drawing of a small agricultural robot with a sun icon above it, no text or symbols presenttext_image
Diagram illustrating robot arm positioning with magnified views showing distance ≤6m between robotic arm and human operator
text_image
>10cm >3cm
text_image
>10cm >3cmtext_image
Mobile app screenshot showing a 3D object icon with Chinese text and a button labeled 'OK' (OK)natural_image
Illustration of a person standing next to a small robot and a circular tank with a grid, both without any text or symbols.⑤ MAP LEARNING (kortlæring)
natural_image
Mobile app interface showing a 3D geometric shape with control buttons (no readable text or symbols)text_image
Diagram illustrating a child's physical activity with icons and a magnified view showing a 10cm scale.flowchart
graph TD
    A["Car Icon"] --> B["Arrow Left"]
    B --> C["Arrow Right"]
NU KOMMER DEN MEST SPÄNDENDE DEL!
The Ground Truth image displays a single, solid horizontal line. According to Rule 2 (UNDERSCORE & LINE RULES), this is a stylistic or background line, not a placeholder underscore. Therefore, the OCR result must ignore it and output nothing or only meaningful text. The provided OCR content is "____", which consists of four underscores. This is an incorrect interpretation of the line as a placeholder, violating the rule that stylistic lines must be ignored. The OCR has hallucinated placeholder underscores where none should exist in the GT. Hence, the OCR result is inconsistent with the Ground Truth.

text_image
Thu 12:30 to mow ELLER START
text_image
STOP ELLER GOAT FINISH PAUSE③ Genoptag slåning
text_image
< GOAT 9:41AM 100% STARTnatural_image
Blue icon depicting a vehicle and a charging station with lightning bolt symbol (no text or labels)6 Regnsensor
natural_image
Blue icon depicting a car with a flag, speedometer, and clock symbol (no text or numbers)8 Dyrebeskyttelse
natural_image
Blue icon showing a vehicle emitting sound waves next to a traffic cone (no text or symbols)The image contains no text. The horizontal line is a stylistic or background element and must be ignored according to the rules.

The image contains only a stylistic horizontal line, which must be ignored according to Rule 2. No text or placeholder characters should be output.

The image contains no text. The horizontal line is a stylistic or background element and must be ignored according to the rules.
12 Videoovervågning
natural_image
Blue icon showing a vehicle with warning sign and a person speaking into a microphone (no text or symbols)The image contains only a stylistic horizontal line, which must be ignored according to the rules. According to Rule 2, such lines must be ignored and not represented by underscores or any other character in the OCR output.
Therefore, the corrected OCR text is:
[empty string]
PAKKAUKSEN PURKAMINEN
MITÄ LAATIKOSSA ON

natural_image
Illustration of a mobile phone with wireless signal icons above it, showing a device and its screen (no text or symbols present)natural_image
Diagram showing a device on a mat with an inset close-up of its cable and connectors (no text or symbols)natural_image
Illustration of a hand operating a small building with an arrow pointing to it, no text or symbols present.text_image
Diagram showing a device with labeled parts and a magnified view of the component being inserted into a cable or cable.natural_image
Diagram of a medical or laboratory device with electrodes and tubing, placed on a flat surface (no text or symbols visible)natural_image
Technical line drawing of a mechanical or electrical device with a coiled cable, connected via tubing and a sensor device (no text or symbols present)text_image
Diagram illustrating robotic arm motion with labeled steps and directional arrows indicating movement directionnatural_image
Line drawing of a robotic vacuum cleaner with a blue clip and control panel (no text or symbols)text_image
LANGUAGE Dansk Deutsch English OK③ Säädä PIN-koodi
text_image
NEW PIN CODE A
text_image
NEW PIN CODE NEW ^ -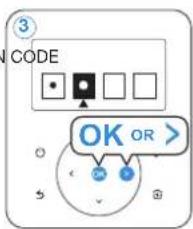
text_image
3 N CODE OK OR >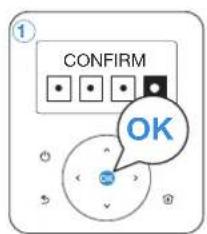
text_image
CONFIRM OK
text_image
② PIN code OK!
text_image
NEW PIN CODE OK
text_image
NEW PIN CODE
text_image
NEW PIN CODE OK4 Lataa ECOVACS HOME -sovellus
text_image
Mobile phone interface screenshot showing a QR code payment and a robot-mounted device with Chinese text labels.text_image
Diagram illustrating a QR code scanning process: before scanning, adding a screwdriver to a device screen.natural_image
Venn diagram with two intersecting circles and a central square containing scattered symbols (no text or labels)text_image
5m 5m × ✓ ≤45mnatural_image
Two diagrams showing a ramp and an inclined plane with a pencil, marked with blue X and ✓ symbols (no text or labels)natural_image
Illustration of a hand holding a vertical tool with blue arrows indicating rotational motion (no text or symbols)SUOSITELTAVA ASENNUS
text_image
≤45m ≤45mtext_image
>45m ≤45mtext_image
≤45m ≤45m
text_image
>45m ≤45mtext_image
≤45m ≤45m
text_image
≤45m >45mtext_image
≤45m ≤45m
text_image
≤45m >45mtext_image
≤45m ≤45m
text_image
≤45m >45m
text_image
Diagram illustrating robotic arm movement with labeled parts and directional arrows, including a magnified view of the hand interacting with a device.natural_image
Line drawing of a mechanical device with wheels and a handle (no text or symbols)- GOAT-akun lataustaso on yli 50%.

text_image
>50%natural_image
Line drawing of a small agricultural robot with a sun icon above it, no text or symbols presenttext_image
Diagram illustrating robot arm positioning with labeled distances: ≤6m and a person using a robot.
text_image
>10cm >3cm >10cm >3cmtext_image
Mobile app screenshot showing a user interface with a gray 3D shape and Chinese text instructions below it.natural_image
Illustration of a person using a small robotic vehicle near a circular water tank (no text or symbols)Kartan oppiminen
GOAT ON NYT VALMIS LEIKKAAMAAN NURMIKON! GOATIN TÄRKEIMMÄT TOIMINNOT
1 Käynnistys
text_image
TAI TAI OK CONTINUE4 Paluu asemaan
text_image
Diagram showing a hand interacting with a remote control and a smartphone displaying a 3D robot interface with 'START' button.ECOVACS HOME -sovellus
JOSSA VOIT LÖYTÄÄ LISÄÄ MAHDOLLISUUKSIA
text_image
< GOAT 9:41AM 100% AUTO STARTMITEN GOAT TOIMII
natural_image
Blue icon depicting a vehicle and a charging station with lightning bolt symbol (no text or labels)6 Sadeanturi

The image contains only a stylistic horizontal line, which must be ignored according to Rule 2. No text or placeholder characters should be output.
7 Sadeviive
natural_image
Blue icon depicting a car with exhaust smoke and clock, symbolizing transportation or industrial pollution (no text or symbols)The image contains no text. The horizontal line is a stylistic or background element and must be ignored according to the rules.
8 Eläintensuojelu

The image contains only a stylistic horizontal line, which must be ignored according to Rule 2. No text or placeholder characters should be output.
natural_image
Blue icon showing a vehicle emitting sound waves next to a traffic cone (no text or symbols)The image contains no legible text or symbols. According to Rule 4 (Edge Noise Strategy), since the ground truth is not clearly visible, the OCR should output nothing.
Therefore, the corrected OCR text is:
```text [No text detected]

The image contains only a stylistic horizontal line, which must be ignored according to Rule 2. No text or placeholder characters should be output.

The image contains only a stylistic horizontal line, which must be ignored according to the rules. According to Rule 2, such lines must be ignored and not represented by underscores or any other character in the OCR output.
Therefore, the corrected OCR text is:
[empty string]
12 Videosuojaus
natural_image
Blue icon showing a vehicle with warning sign and speaker symbol (no text or labels)The image contains only a stylistic horizontal line, which must be ignored according to the rules. According to Rule 2, such lines must be ignored and not represented by underscores or any other character in the OCR output.
Therefore, the corrected OCR text is:
[empty string]
Ecovacs Home Service Robotics Co., Ltd.
No.518 Songwei Road, Wusongjiang Industry Park, Guoxiang Street, Wuzhong District, Suzhou, Jiangsu, China.
451-2201-0000