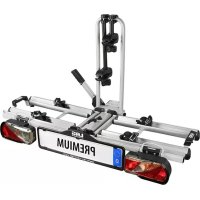
Premium 12011 - Bike rack EAL - Free user manual and instructions
Find the device manual for free Premium 12011 EAL in PDF.



| Product type | Towbar bike rack |
| Brand | EAL |
| Model | Premium 12011 |
| Capacity | 2 bikes |
| Maximum payload | 60 kg |
| Weight | 18 kg |
| Material | Steel (St52, minimum quality) |
| Mounting | On tow ball (steel or cast iron, standard Ø) |
| Maximum speed | 130 km/h |
| Main functions | Strap fixing, tilt for boot access, integrated lighting, anti-theft lock |
| Included accessories | Safety straps, keys, carrying bag, lighting harness, plate holder |
| Maintenance | Clean with warm water, store dry, regular check of straps |
| Safety | European approval (EGBE), handbrake applied, respect load and speed |
| Spare parts | Available: straps, wheel blockers, screws, lights, etc. (see parts list) |
Frequently Asked Questions - Premium 12011 EAL
User questions about Premium 12011 EAL
0 question about this device. Answer the ones you know or ask your own.
Ask a new question about this device
Download the instructions for your Bike rack in PDF format for free! Find your manual Premium 12011 - EAL and take your electronic device back in hand. On this page are published all the documents necessary for the use of your device. Premium 12011 by EAL.
USER MANUAL Premium 12011 EAL
Bicycle carrier Premium
Porte-vélo Premium
Portabiciclette Premium
Fietsdrager Premium
A = Fahrradträger
B = 2 Schlüssel
WARNUNG!

ACHTUNG!

ACHTUNG!

Bicycle carrier Premium
Operating instructions
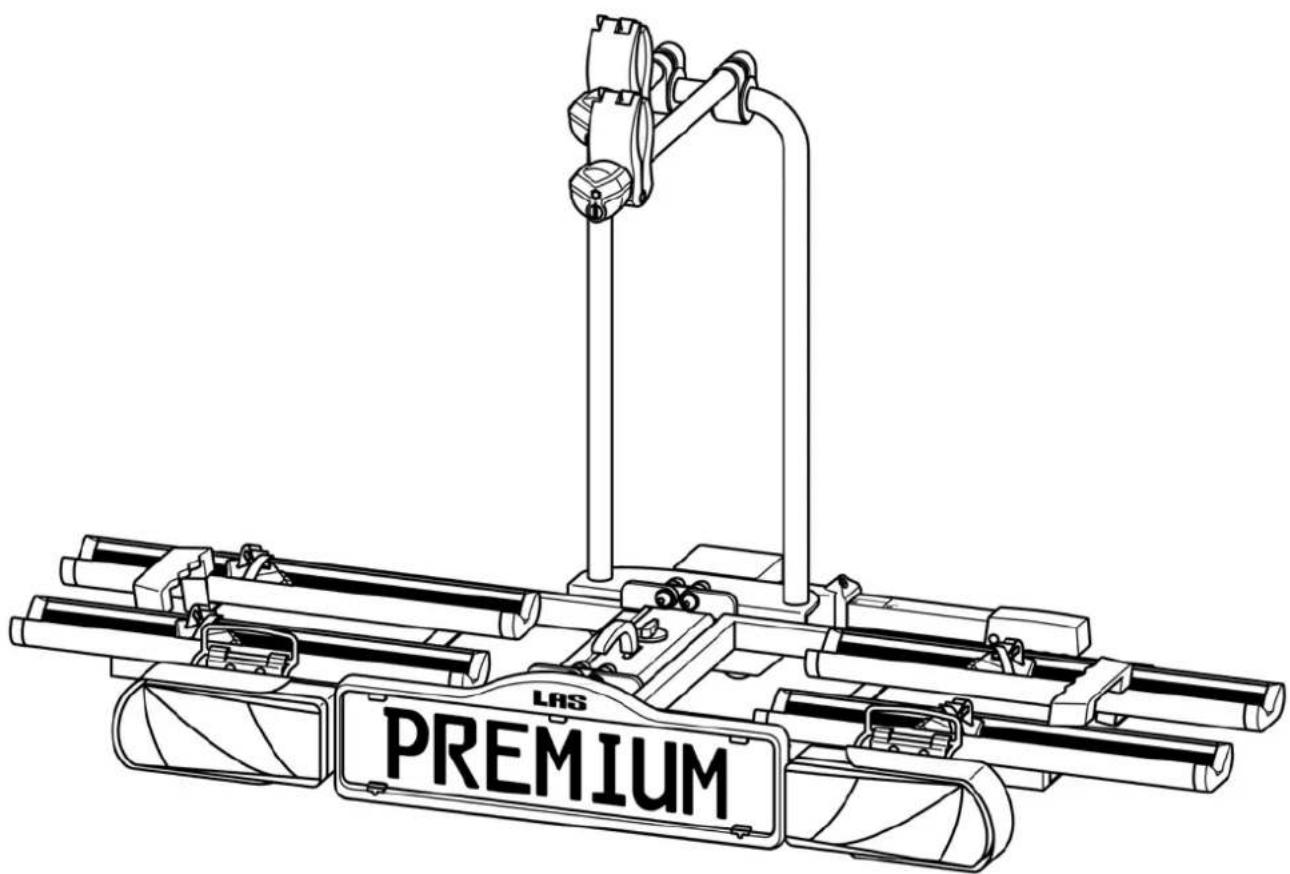
Premium
Article no.: 12011LAS
Table of contents
Information on these operating instructions....19
Foreword....19
Obligations regarding these fitting instructions....19
Proper use....19
Safety instructions – Explanation of the categories....19
Scope of delivery....20
Technical data....20
Coupling requirements.... 20
Safety instructions....20
Before first use....21
Fitting the registration plate to the bicycle carrier....21
Fitting and use....22
Fitting the bicycle carrier to the trailer coupling....22
Mounting bicycles....25
Tilting the bicycle carrier, access to the luggage space....28
Dismantling the bicycle carrier....29
Carrying the bicycle carrier without the transport bag....29
Stowing the bicycle carrier in the transport bag....29
Cleaning and care....29
Maintenance....30
Adjustment of the quick-fastener 30
Disposal....30
Contact....30
Spare parts overview - Exploded drawing.... 31
Spare parts overview - Table.... 32
10/2018
Information on these operating instructions
Foreword
These fitting instructions will assist you with the
• proper and
- safe
fitting of the Premium bicycle carrier.
Obligations regarding these fitting instructions
Every person who
- fits,
- cleans or
- disposes of
this bicycle carrier must have taken note of and understood the complete contents of these fitting instructions.
Keep these fitting instructions ready-to-hand and safe at all times. Hand on these fitting instructions when removing or passing on the bicycle carrier.
Proper use
The Premium bicycle carrier is used for the transport of max. two bicycles. It must be mounted only on trailer couplings which meet the requirements specified in the chapter "Coupling requirements". The permissible carrying capacity of the bicycle carrier must not be exceeded under any circumstances.
Proper use also includes the observation of all information provided in these fitting instructions, and in particular the safety instructions. Any other form of use constitutes improper use, and can result in personal injury or material damage.
EAL GmbH accepts no liability for damage resulting from improper use.
Safety instructions – Explanation of the categories
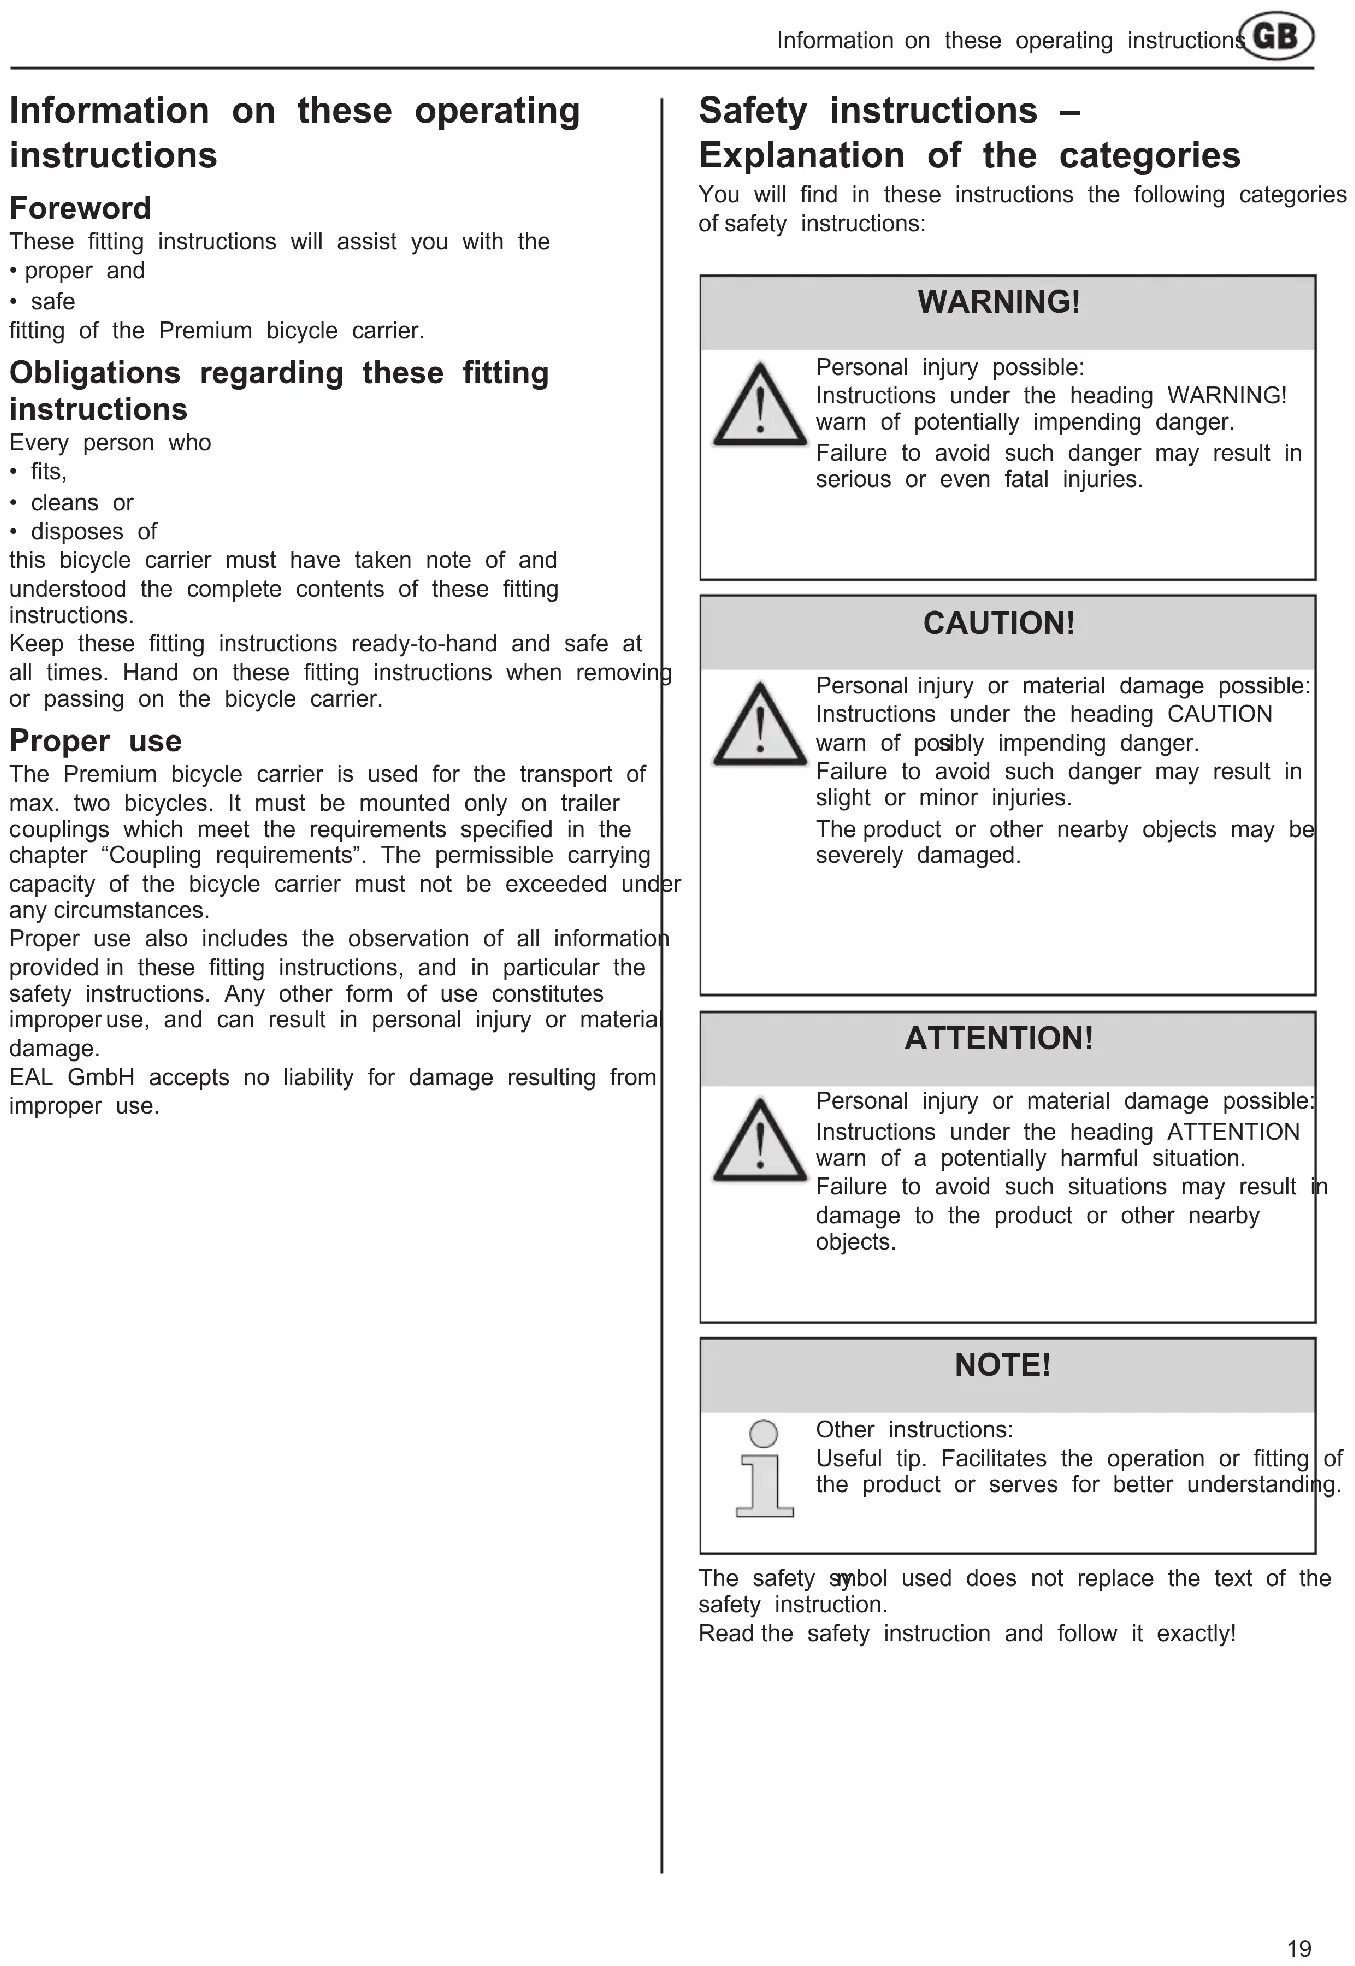
You will find in these instructions the following categories of safety instructions:
WARNING!

Personal injury possible: Instructions under the heading WARNING! warn of potentially impending danger.
Failure to avoid such danger may result in serious or even fatal injuries.
CAUTION!

Personal injury or material damage possible: Instructions under the heading CAUTION warn of possibly impending danger.
Failure to avoid such danger may result in slight or minor injuries.
The product or other nearby objects may be severely damaged.
ATTENTION!

Personal injury or material damage possible: Instructions under the heading ATTENTION warn of a potentially harmful situation.
Failure to avoid such situations may result in damage to the product or other nearby objects.
NOTE!

Other instructions: Useful tip. Facilitates the operation or fitting of the product or serves for better understanding.
The safety symbol used does not replace the text of the safety instruction.
Read the safety instruction and follow it exactly!
Scope of delivery
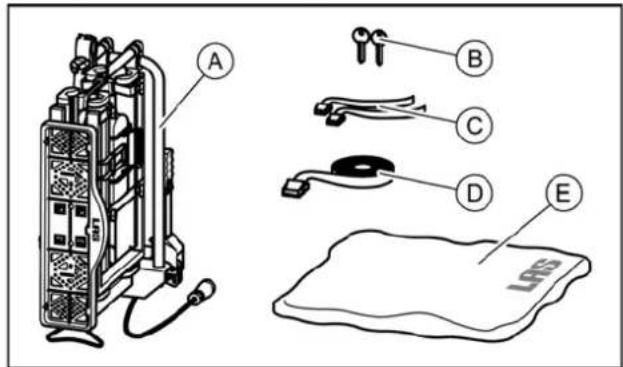
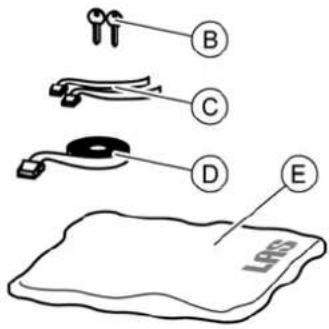
A = Bicycle carrier
B = 2 keys
C = 2 safety straps for front wheels
D = Safety strap for bicycle frame
E = Transport bag
Technical data
Carrier: Premium
Article no: 12011LAS
Material: Stahl
Weight: 18 kg
Carrying capacity, max.: 60 kg
The max. carrying capacity of the bicycle carrier and the permissible bearing load of the trailer coupling must not be exceeded.
The bicycle carrier and load must not exceed the permissible overall weight, or the permissible axle load of the vehicle.
Coupling requirements
WARNING!

Personal injury possible due to breakage of the trailer coupling.
The coupling could break if the bicycle carrier is fitted to a coupling made of too soft a material.
- Fit the bicycle carrier only to a coupling made of steel St52, grey cast iron GG52 or higher quality.
- Never fit the bicycle carrier to a coupling made of aluminium, other light metals or plastic.
Fit the bicycle carrier only to trailer couplings with the following properties
Material:......min. steel St52 or grey cast iron GG52
D-value: ≥ 7,6 kN
Note the instructions of the coupling manufacturer.
Safety instructions
Follow the fitting instructions carefully. Failure to follow the instructions can lead to personal injuries and material damage.
If you are not sure about correct fitting, ask your dealer or the manufacturer for further information.
Neither the manufacturer nor dealer are liable for damages which are due to improper use or fitting.
Check the bicycle carrier and the load regularly: you are required to do so and may be held liable in case of damage.
NOTE!

European operating approval has been obtained for this bicycle carrier. This is supplied with the carrier, and must be carried when using the carrier.
WARNING!

Personal injury or material damage due to changed vehicle driving characteristics. Driving with the bicycle carrier fitted will affect the driving characteristics of your vehicle.
- Adjust your speed to the new driving characteristics.
• Never exceed a speed of 130 km/h.
- Avoid sudden and jerky steering movements.
- Remember that your vehicle is longer than usual.
WARNING!

Personal injury or material damage due to loss of the bicycles.
Carrying bicycles without using the safety straps can lead to accidents.
- Before the start of every journey, check the correct and firm attachment of the strap around the bikes and the U-shaped bracket of the carrier (see Step 9).
- Before the start of every journey, check the correct and firm attachment of both straps around the front wheel, and the strap around the rear wheel of the bicycle.
- Tighten the straps if necessary.
- Before the start of every journey, check that the straps are not worn or damaged.
- Worn or damaged straps must be replaced with undamaged traps before the start of the journey. The straps used must be approved by EAL GmbH.
WARNING!

Personal injury or material damage due to incompletely fitted bicycle carrier.
Driving with a folded bicycle carrier can lead to accidents.
The moving parts of bicycle carrier constitute a source of danger if not properly fitted.
- Remove the bicycle carrier if it is not needed.
- Never drive with a folded bicycle carrier.
WARNING!

Personal injury or material damage due to projecting parts.
Parts projecting beyond the edge of the vehicle or bicycle carrier can cause personal injury or material damage when driving.
- Fit only such parts which do not project beyond the edge of the vehicle or bicycle carrier.
WARNING!

Personal injury or material damage due to overloading.
Exceeding the max. carrying capacity of the bicycle carrier or the permissible bearing load of the trailer coupling or the permissible overall weight can lead serious accidents.
- Observe the information on the max. carrying capacity, permissible bearing load and permissible overall weight of your vehicle. Never exceed these specifications.
ATTENTION!

Material damage due to opening tailgate.
The tailgate could impact against the bicycle carrier and be damaged.
- Switch off electric tailgates and operate them manually.
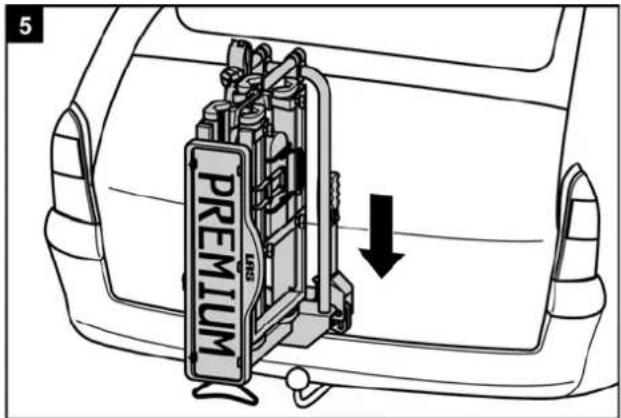
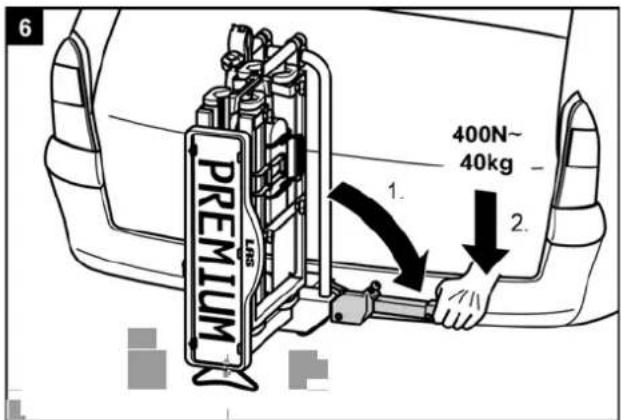
- Fold down the bicycle carrier before opening the tailgate.
ATTENTION!

Material damage due to hot exhaust gases.
Damage can be caused to the bicycle carrier or the bicycles if the exhaust pipe is lose.c
• Fit an exhaust deflector if necessary.
Before first use
Fitting the registration plate to the bicycle carrier
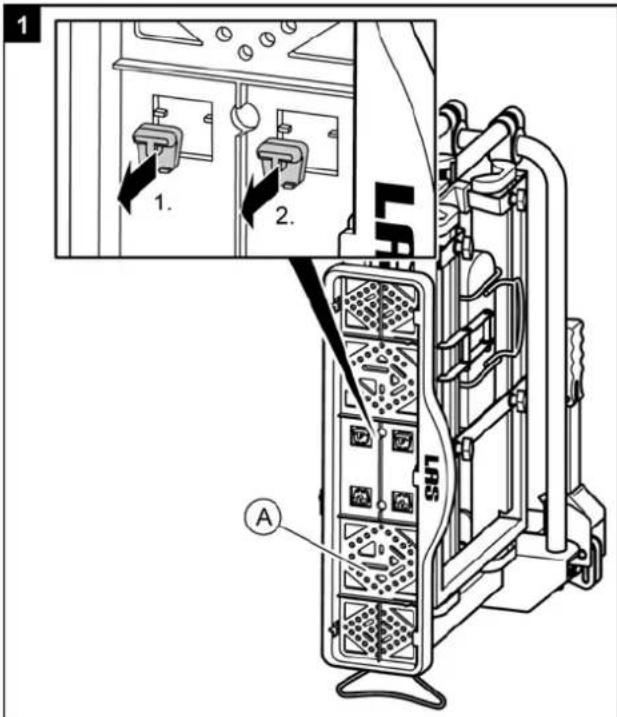
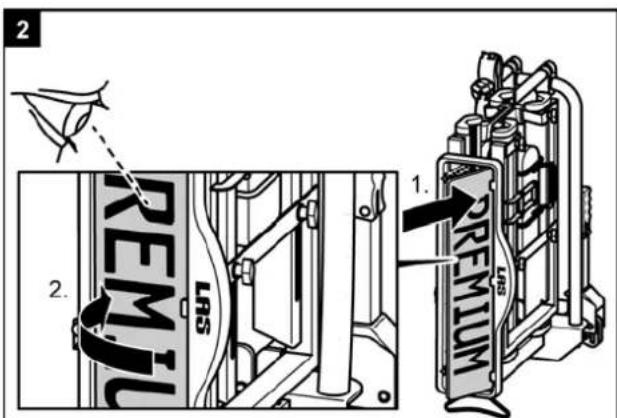
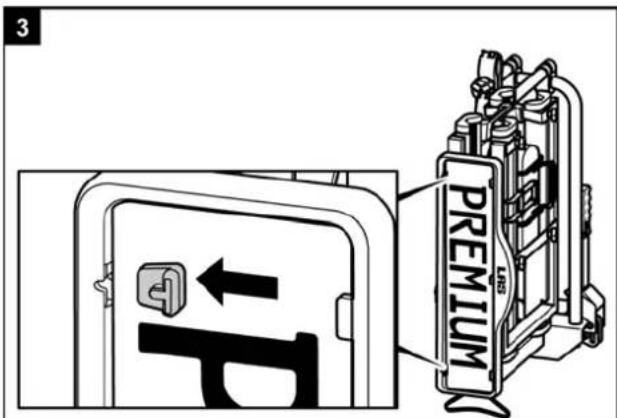
Fitting and use
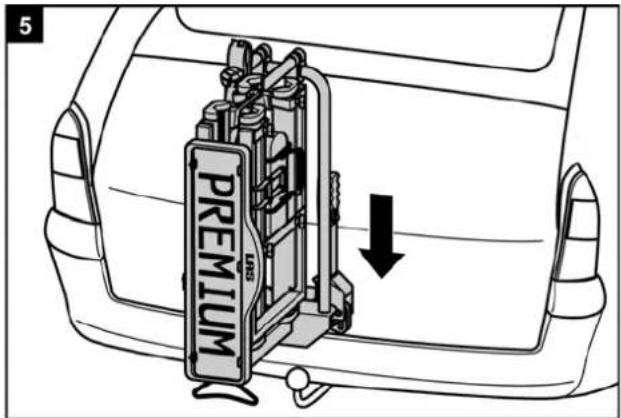
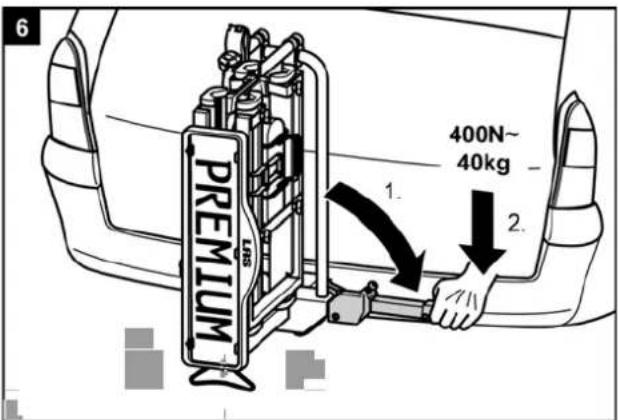
Fitting the bicycle carrier to the trailer coupling
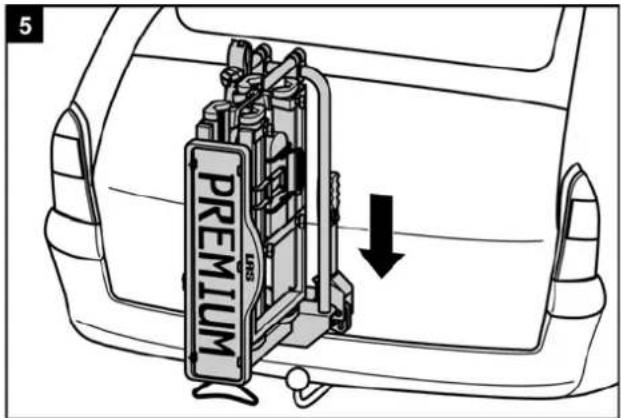
- Park your vehicle on a level surface.
- Apply the handbrake.
WARNING!

Personal injury or material damage due to damaged bicycle carrier.
Damage of the carrier, e.g. by bent parts, cracks or scratches, prevent the safe operation of the carrier.
- Do not fit the bicycle carrier if it is damaged in any way.
- Proceed as described in the chapter "Maintenance".
WARNING!

Personal injury or material damage due to loss of the bicycle carrier during the journey.
A faulty or defective connection between the bicycle carrier and trailer coupling can lead to the detachment of the bicycle carrier.
- Replace the trailer coupling if it is damaged
- Clean the trailer coupling of dirt, dust and grease.
NOTE!

There is often a layer of paint on the coupling ball.
For the best possible attachment of the bicycle carrier, this paint coating should be carefully removed. Note the instructions of the coupling manufacturer.
4

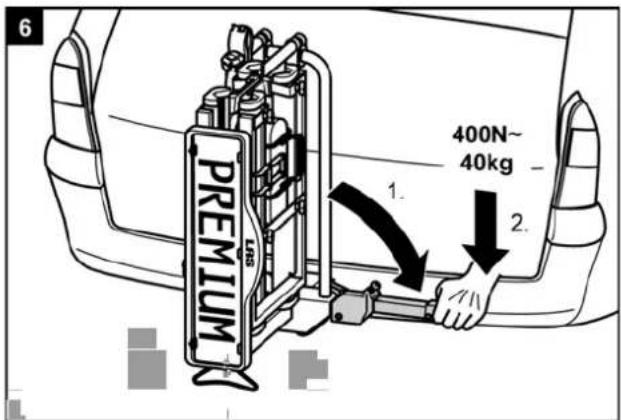
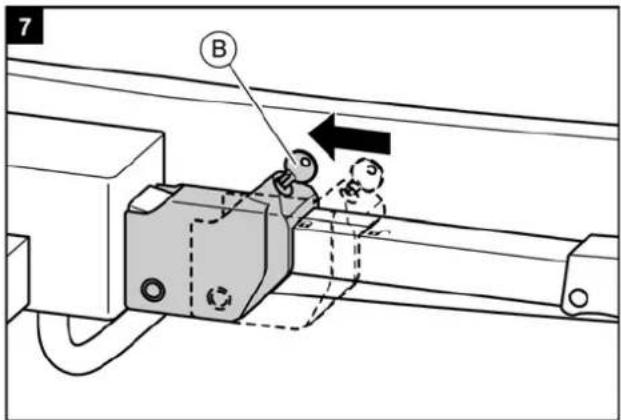
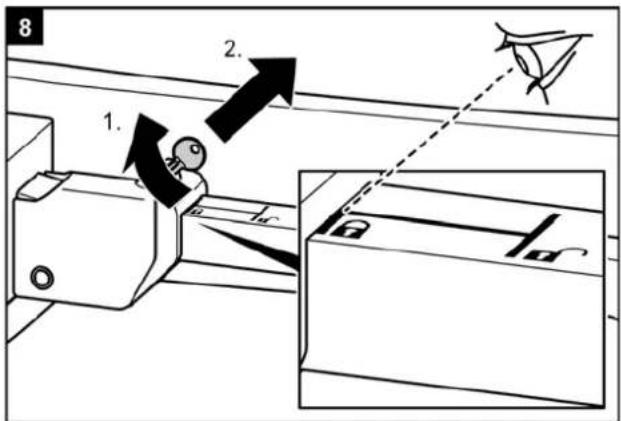
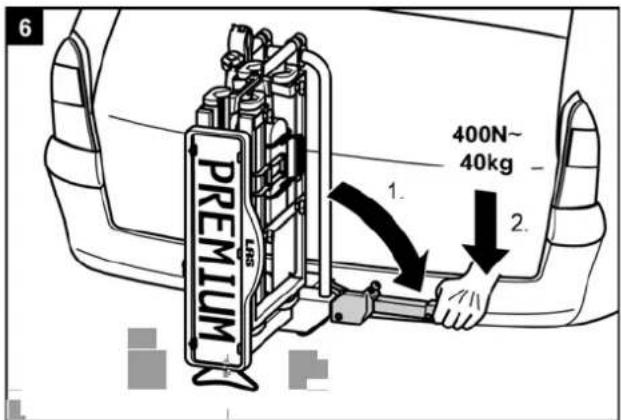
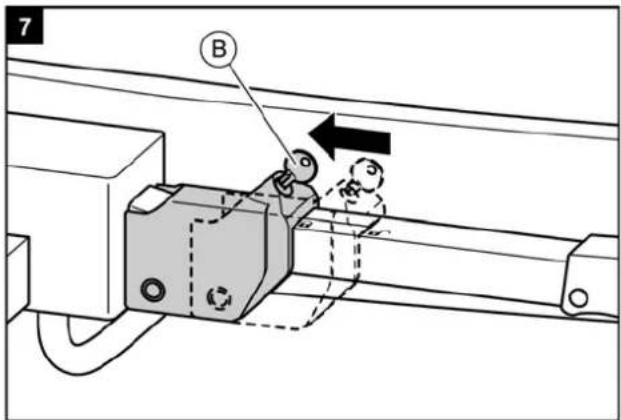
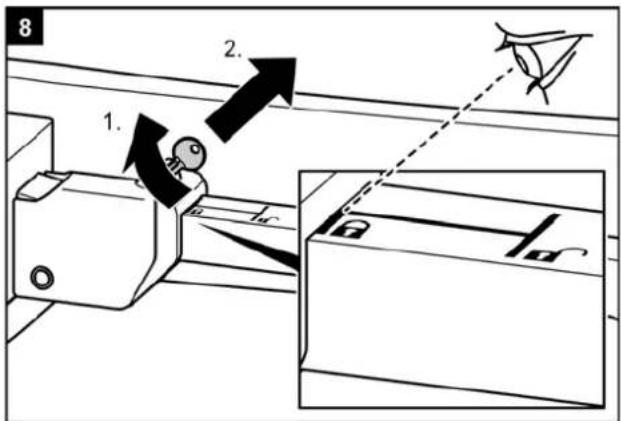
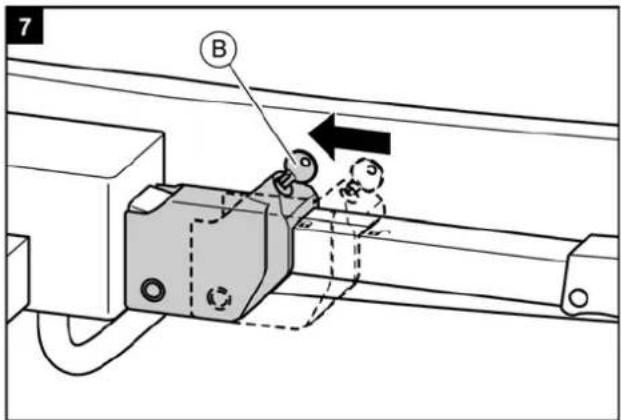
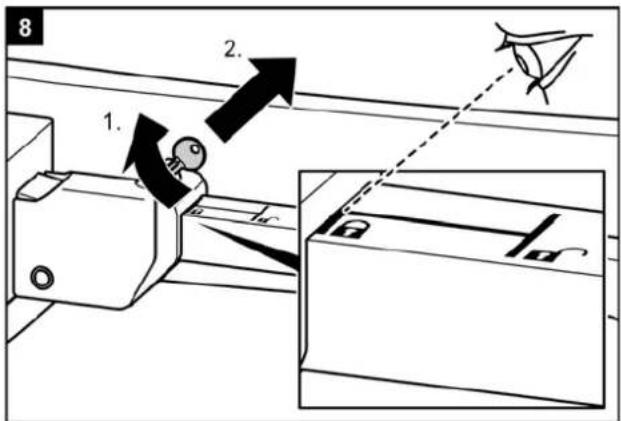
WARNING!

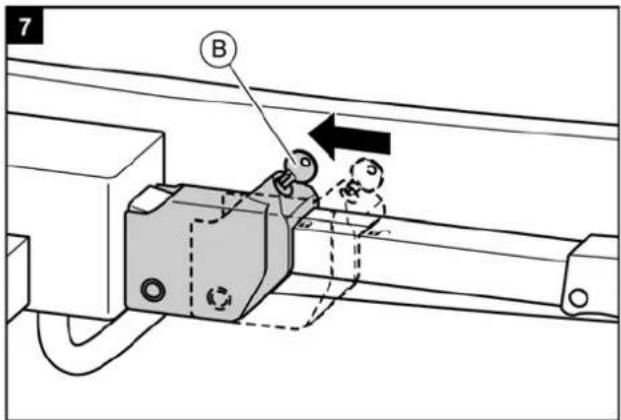
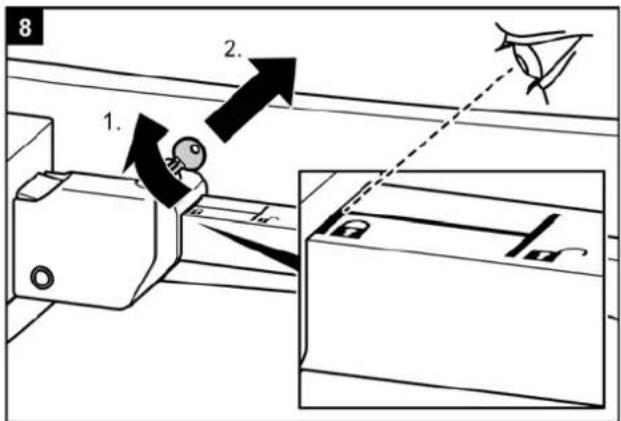
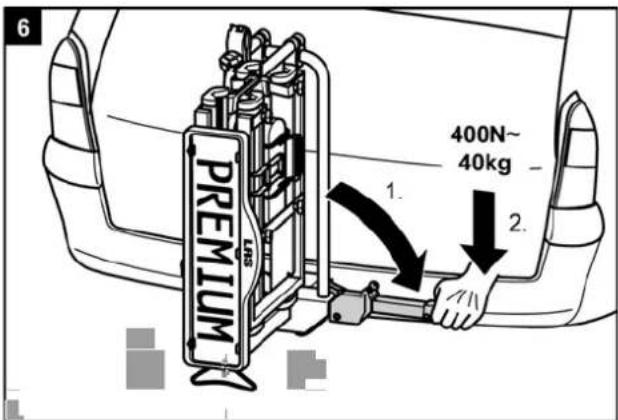
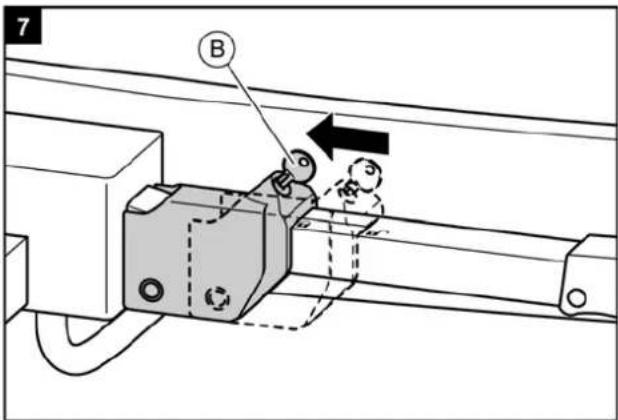
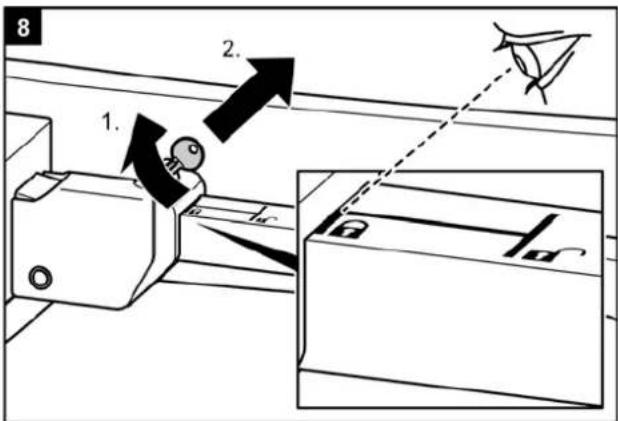
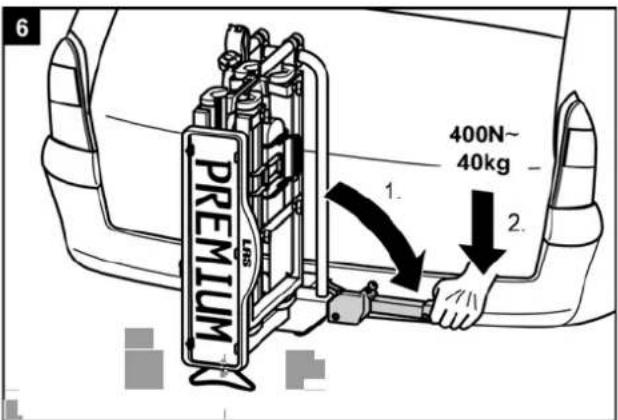
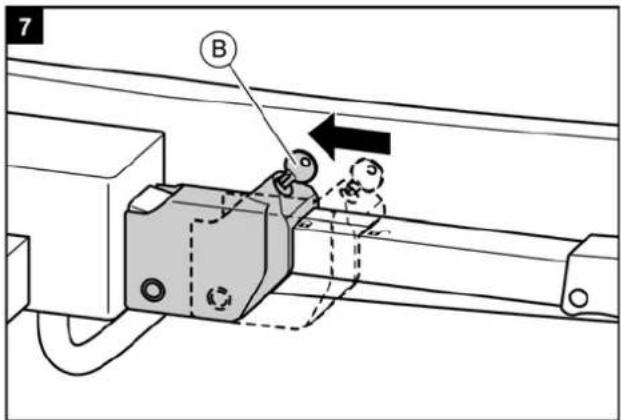
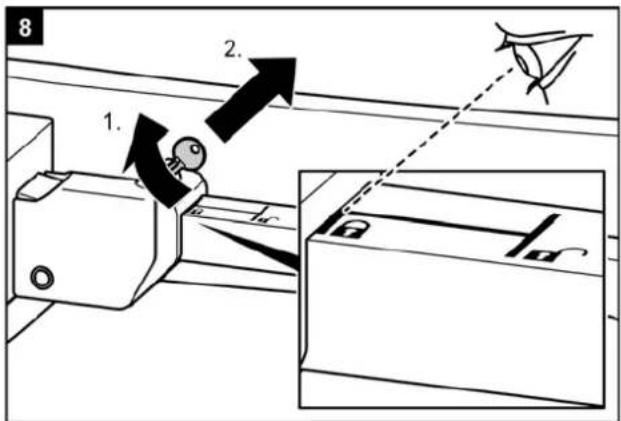
Personal injury or material damage due to unsecure bicycle carrier.
If the lever is not secured by in rock the bicycle carrier could become detached from the vehicle during the journey.
- Check that you have locked the lever and removed the key.
- Lock the bicycle carrier. Locking the bicycle carrier also prevents its possible loss by theft.
WARNING!

Personal injury or material damage due to loss of the bicycle carrier during the journey.
A loose connection between the bicycle carrier and trailer coupling can lead to detachment of the bicycle carrier.
- Check the bicycle carrier for secure attachment.
- Repeat steps 4 to 8 in the event of a loose connection. If this brings about no improvement, the quick-fastener may need to be adjusted, see chapter "Maintenance".
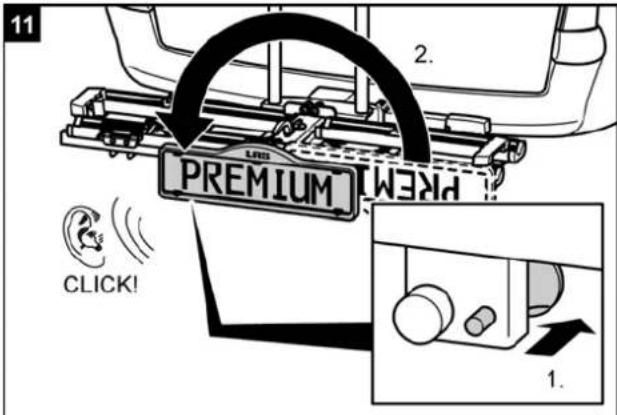
WARNING!

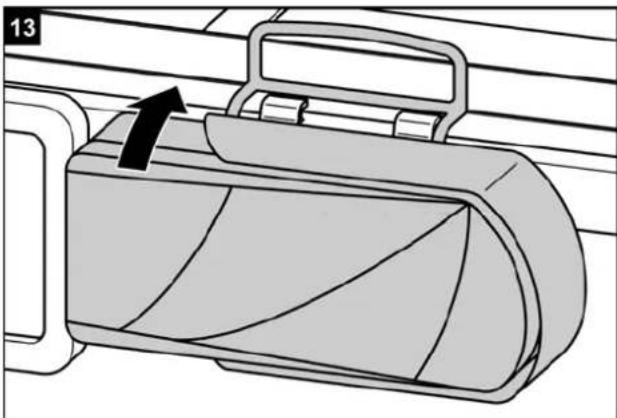
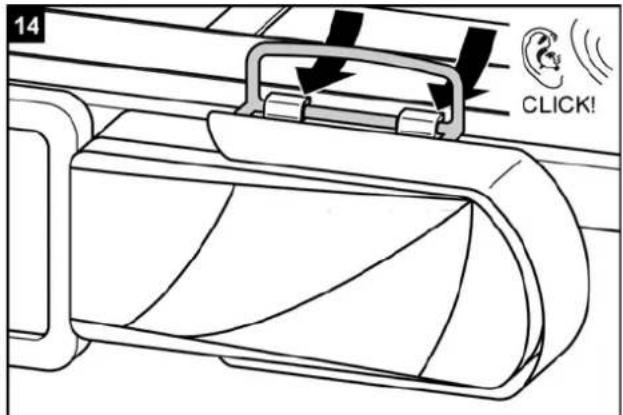
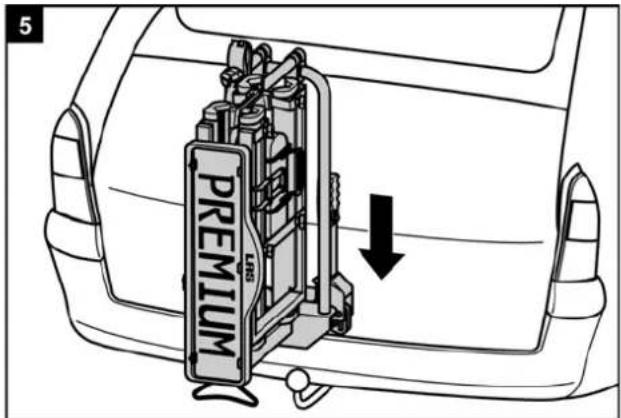
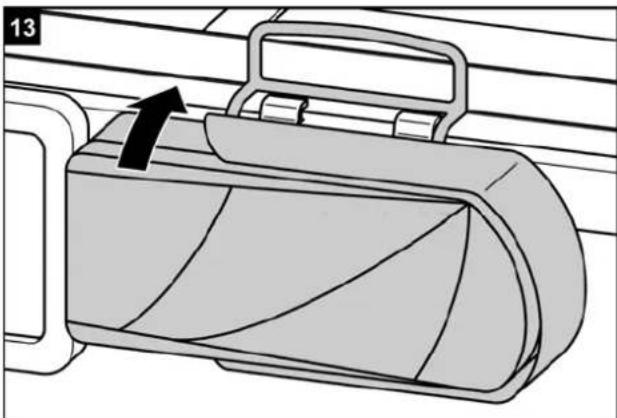
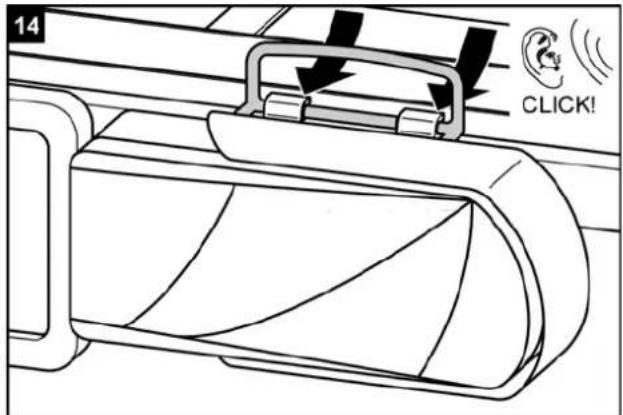
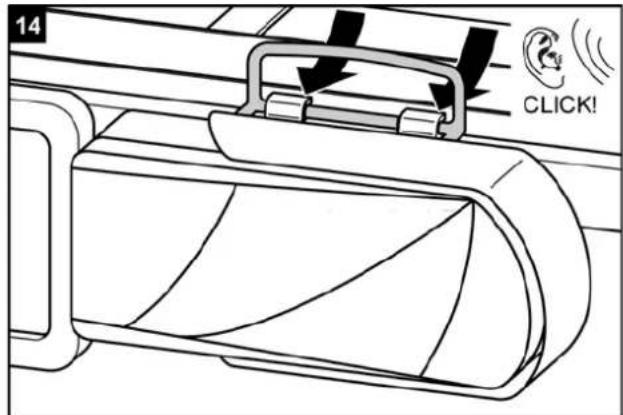
Personal injury or material damage due to unsecure registration plate holder.
If the registration plate holder is not secured by the locking bolt, it could become detached during the journey.
- Withdraw the Iding bolt.
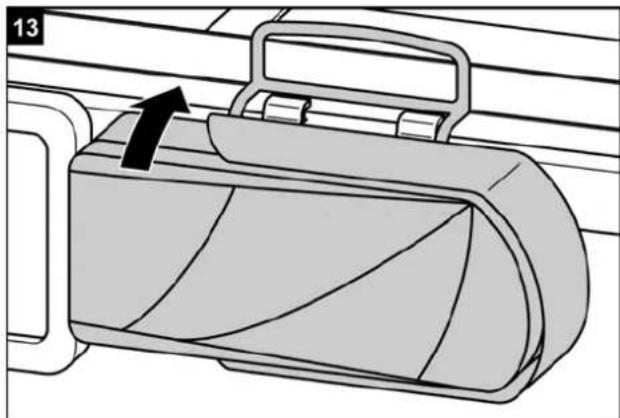
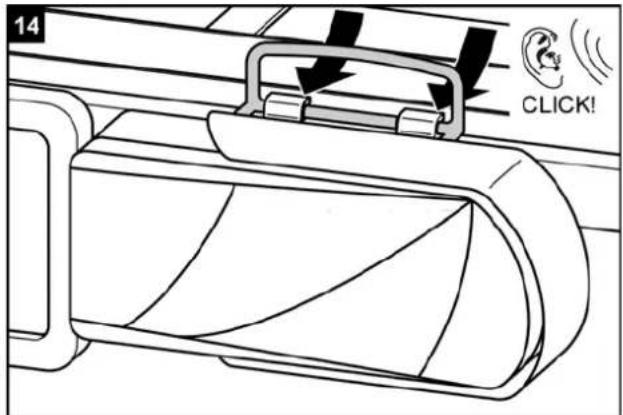
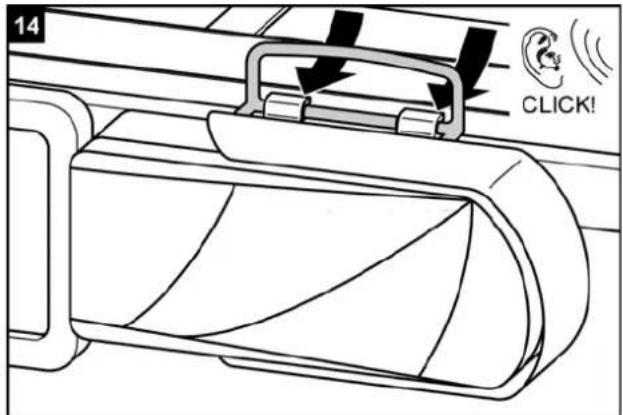
- Fold down the registration plate holder until it is heard to engage.
9
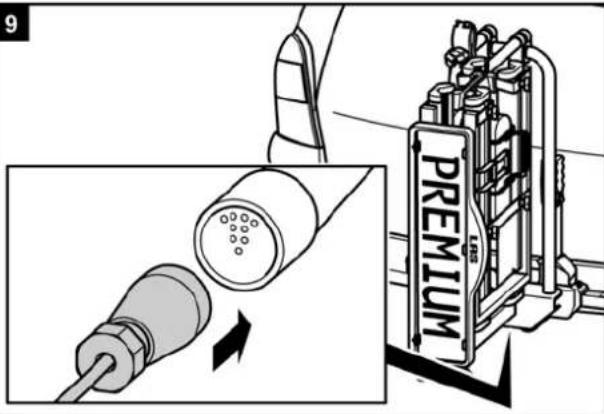
10

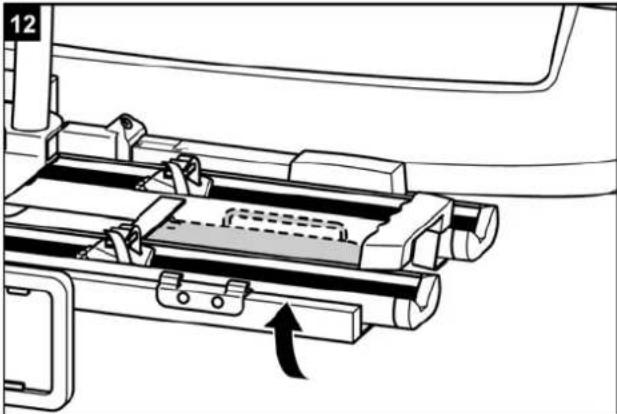
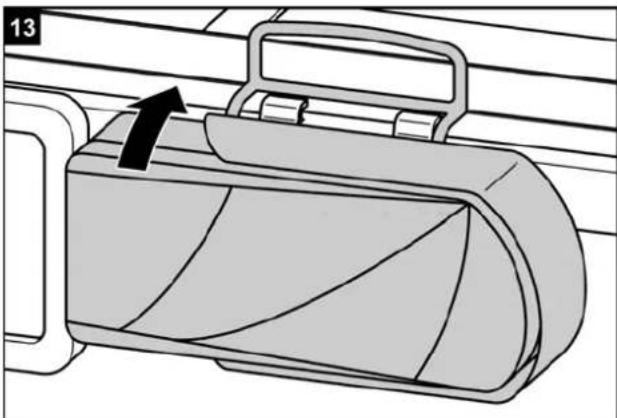
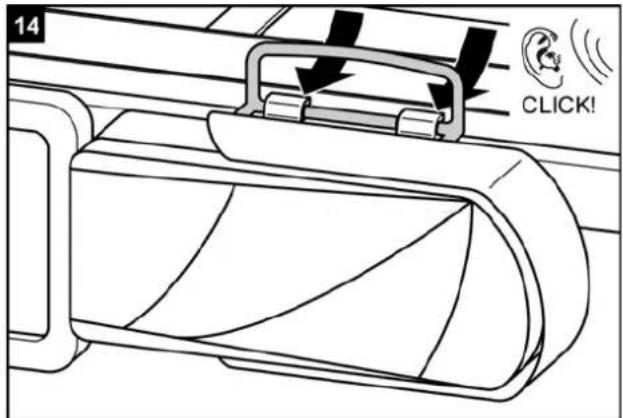
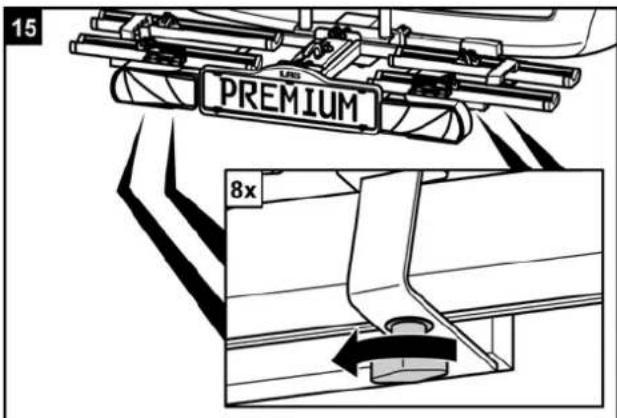
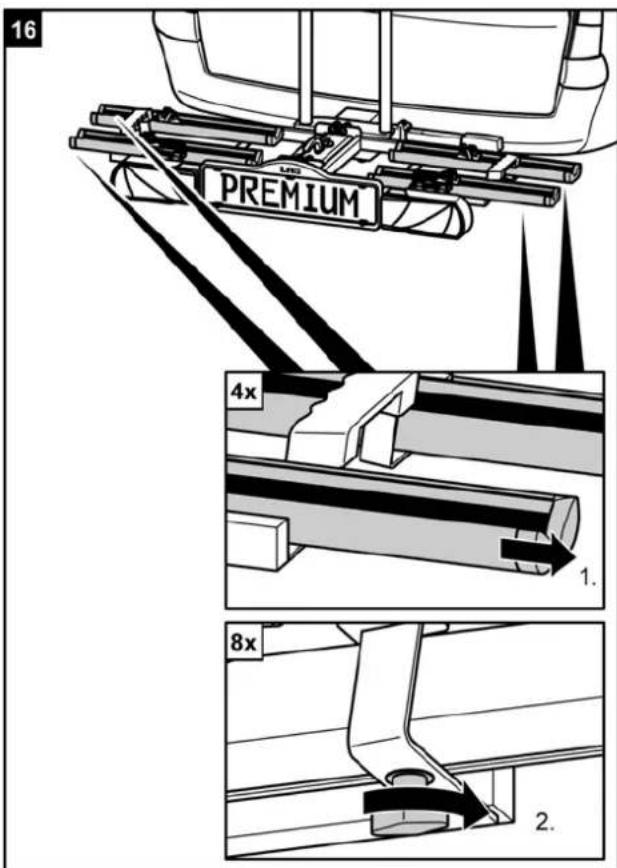
ATTENTION!

Personal injury or material damage possible due to loose parts.
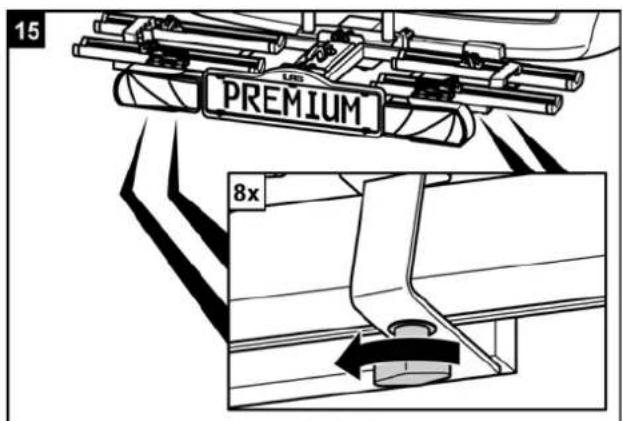
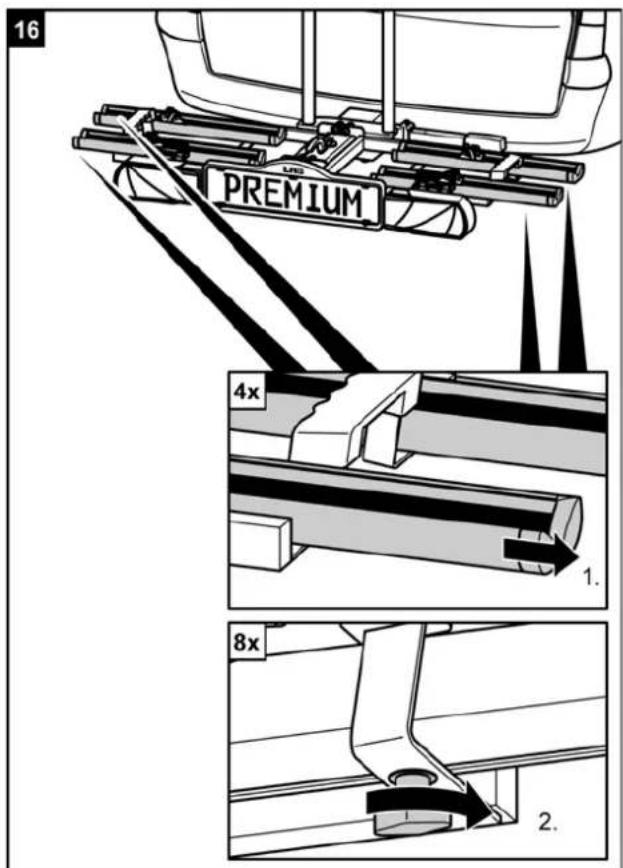
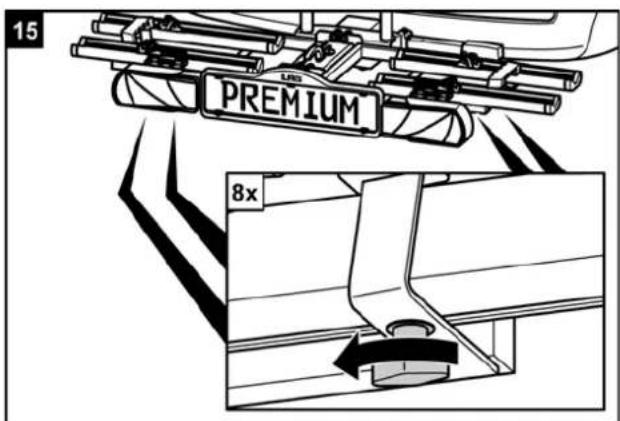
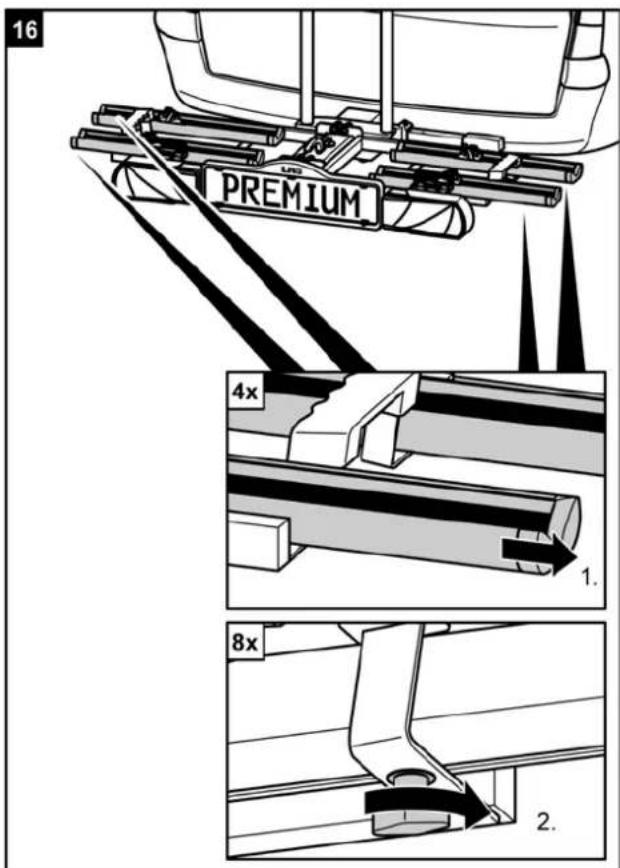
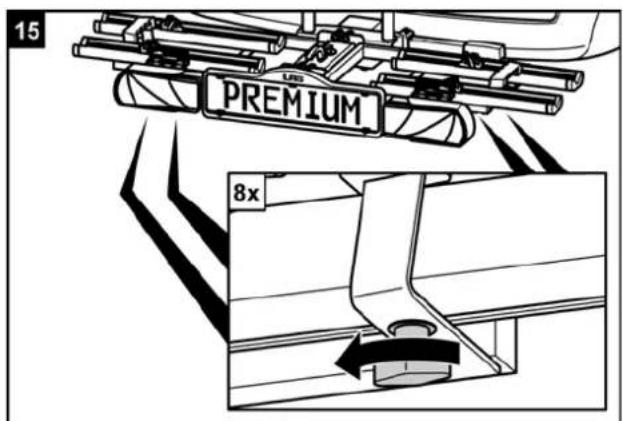
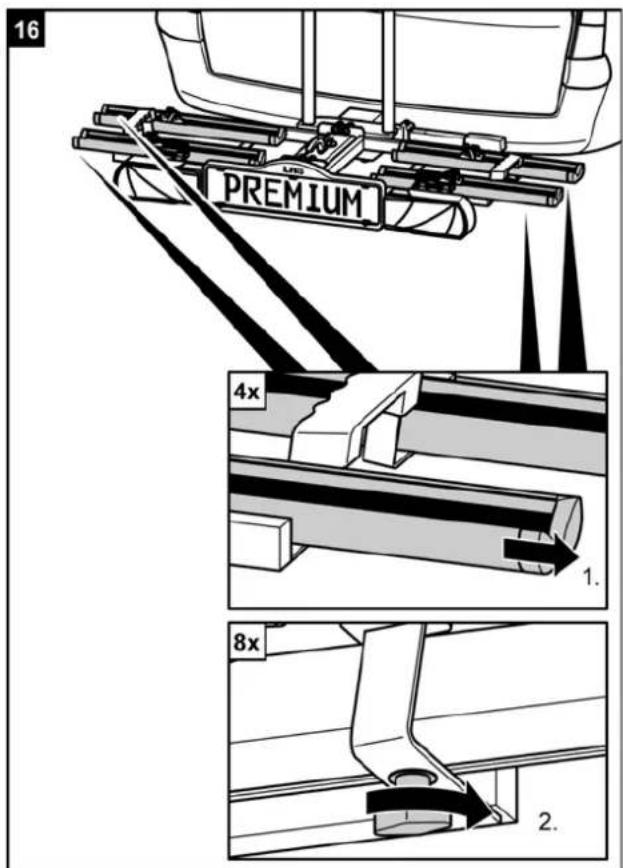
Improperly tightened wing screws on the rails of the bicycle carrier can become loose during the journey, resulting in the loss of the screws and rails.
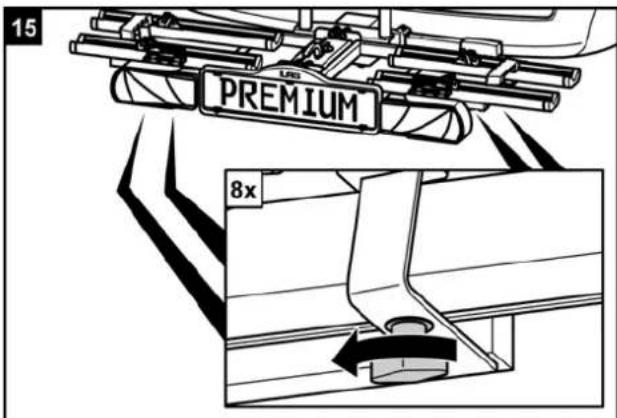
- Tighten all wing screws on the rails hand tight before starting the journey.
WARNING!

Personal injury due to not being seen by other road-users.
Driving with a defective lighting system can lead to accidents.
- Check the correct operation of the lighting system before the start of every journey.
- Replace any defective bulbs.
- Check the connection between the plug and coupling.
Mounting bicycles
ATTENTION!

Personal injury or material damage possible due to loose parts.
Improperly tightened parts on the bicycles can become loose during the journey.
- Remove all parts not firmly attached to the bicycle, such as bicycle pumps, panniers, navigation devices or batteries.
NOTE!

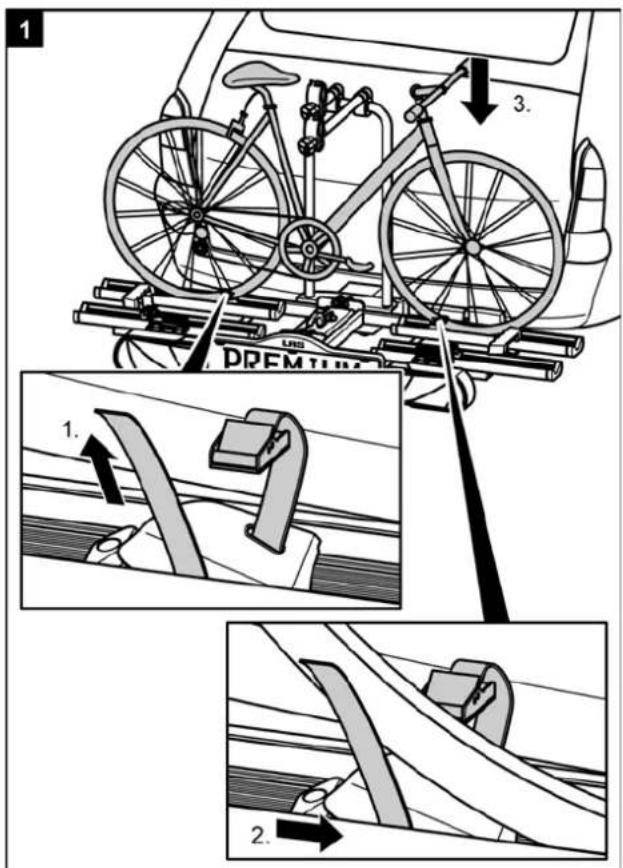
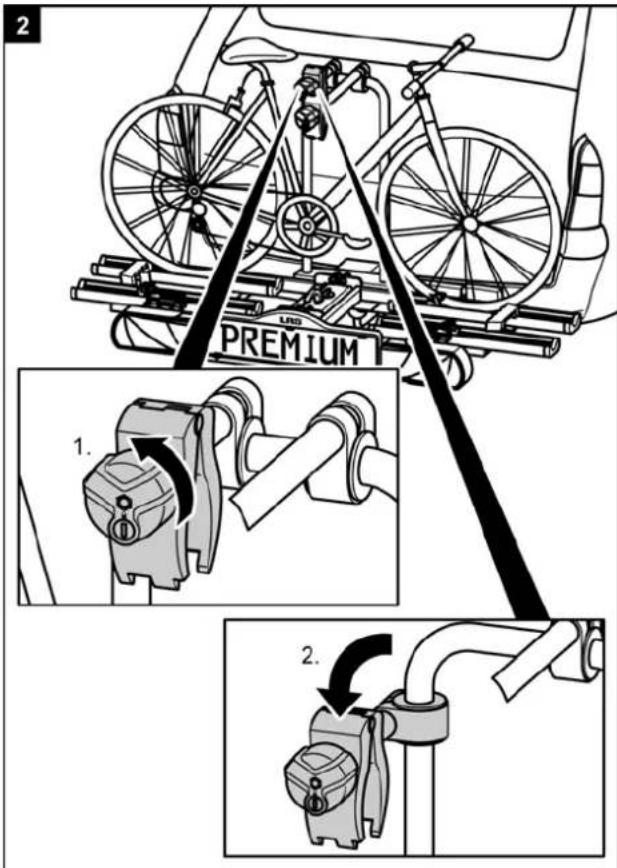
In order to improve the driving characteristics of your vehicle, mount the heavier bicycle first. If carrying only one bicycle, this should be mounted in the rail closest to the rear of the vehicle.
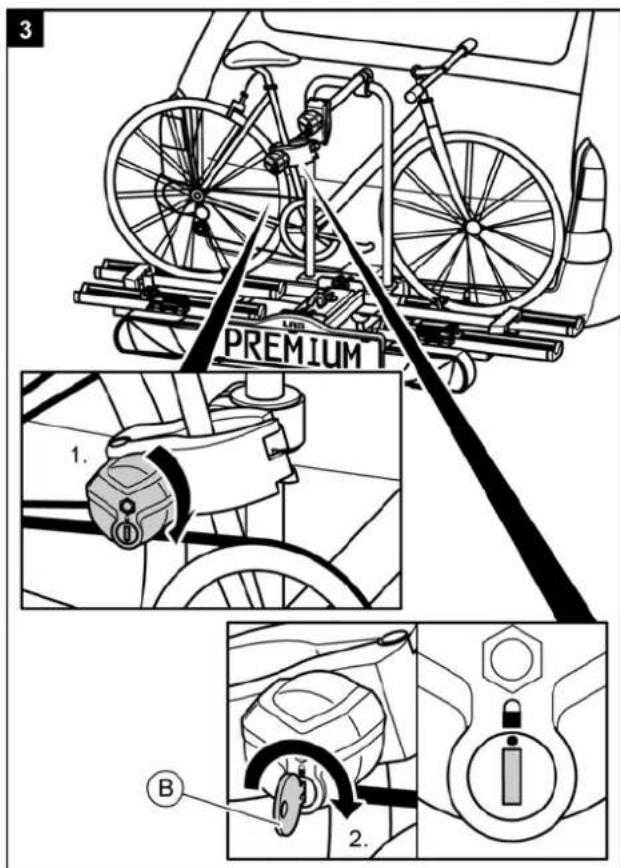
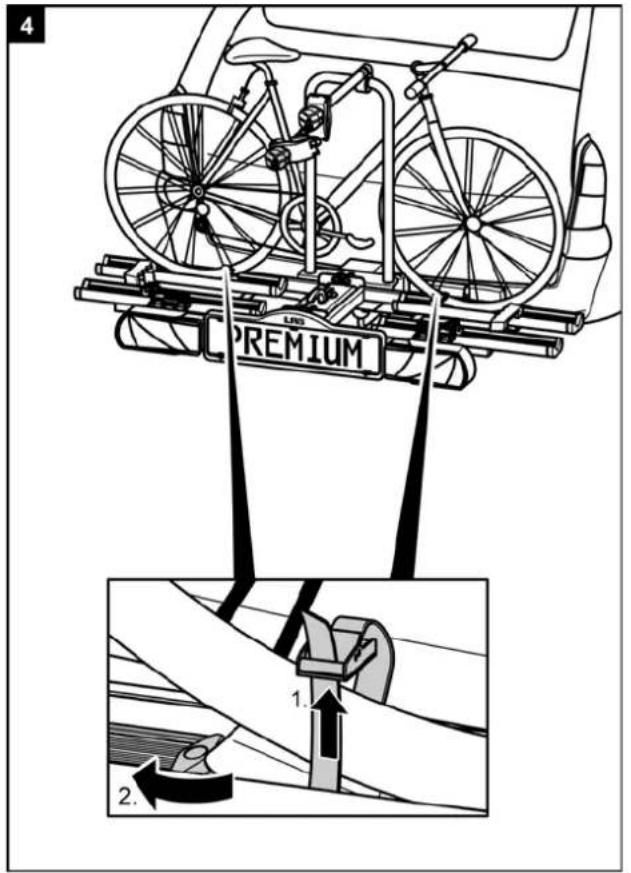
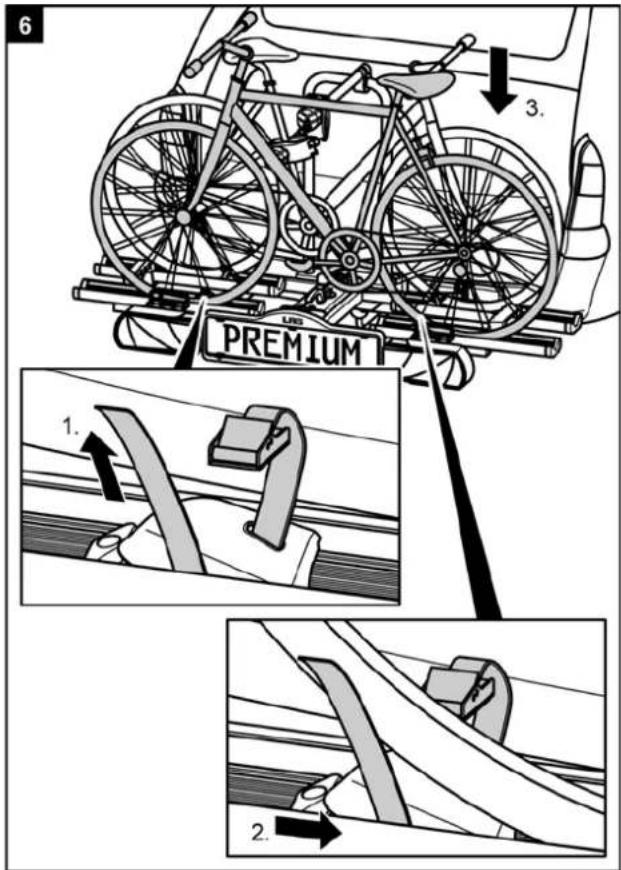
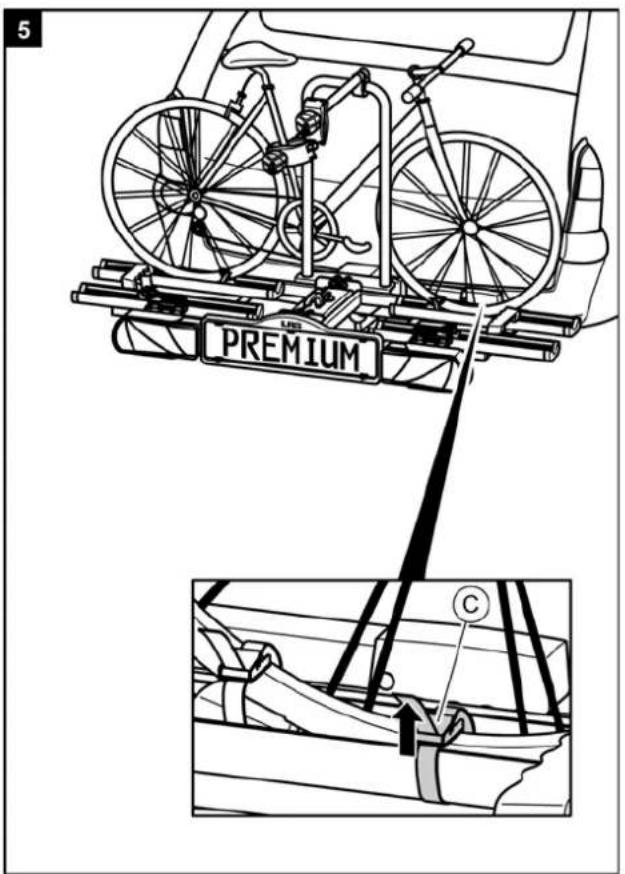

8
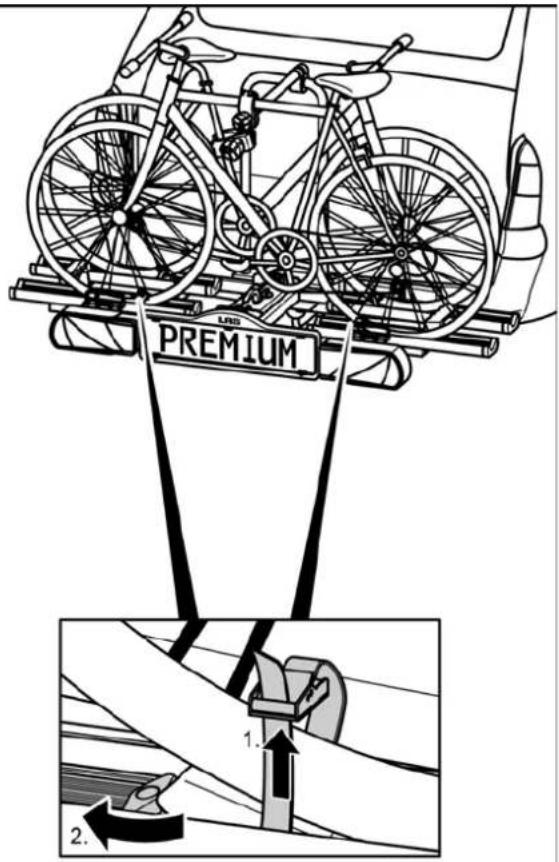
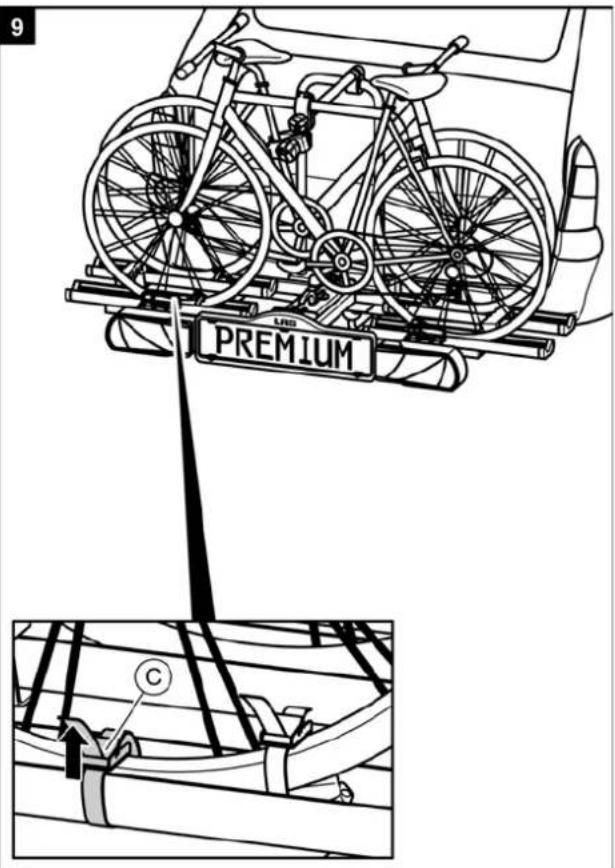
WARNING!

Personal injury or material damage due to loss of the bicycles.
Carrying bicycles without using the safety straps can lead to accidents.
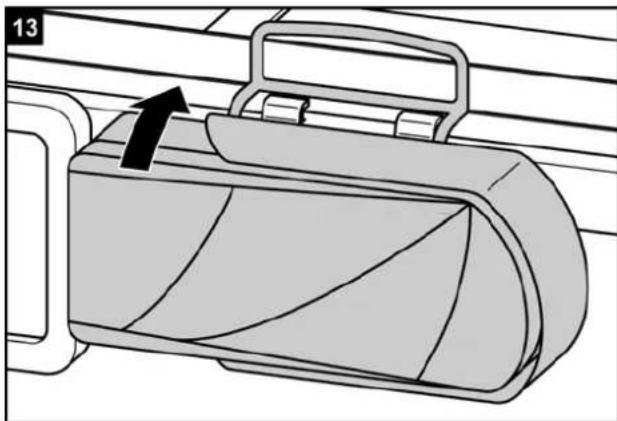
- Before the start of every journey, check the correct and firm attachment of the strap around the bikes and the U-shaped bracket of the carrier (see Step 9).
- Before the start of every journey, check the correct and firm attachment of both straps around the front wheel, and the strap around the rear wheel of the bicycle.
- Tighten the straps if necessary.
- Before the start of every journey, check that the straps are not worn or damaged.
- Worn or damaged straps must be replaced with undamaged traps before the start of the journey. The straps used must be approved by EAL GmbH.
WARNING!

Personal injury or material damage due to loss of a bicycle during the journey.
A loose connection between the bicycle carrier and bicycle can lead to detachment of the connection and loss of the bicycle.
- Check the bicycles for secure and complete attachment.
- Repeat steps 1 to 6 of this chapter in the event of a loose connection.
Tilting the bicycle carrier, access to the luggage space
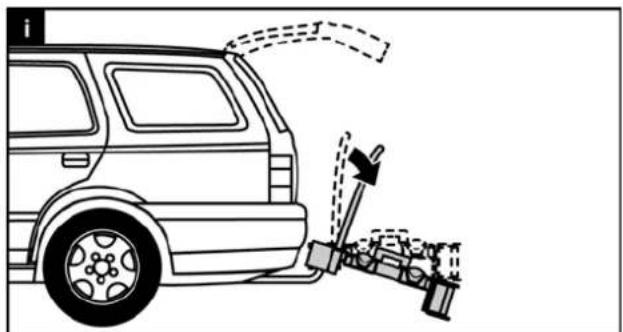
ATTENTION!

Material damage due to opening tailgate. The tailgate could impact against the bicycle carrier and be damaged.
- Switch off electric tailgates and operate them manually.
- Fold down the bicycle carrier before opening the tailgate.
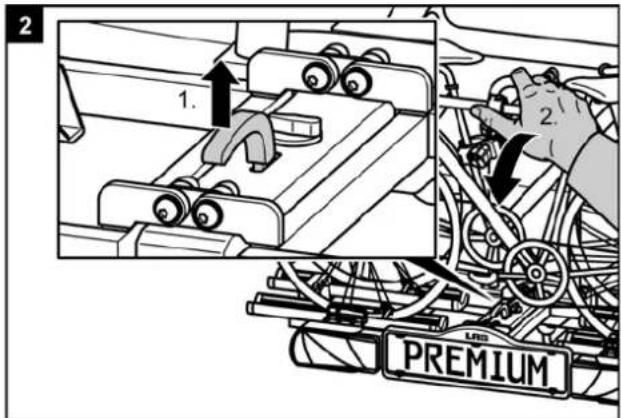
CAUTION!

Personal injury or material damage possible when folding up the carrier. Body parts or objects between the carrier and the vehicle when it is folded up may be trapped.
• Make sure that there is nothing between the carrier and the vehicle.
- Remove any objects between the carrier and the vehicle.
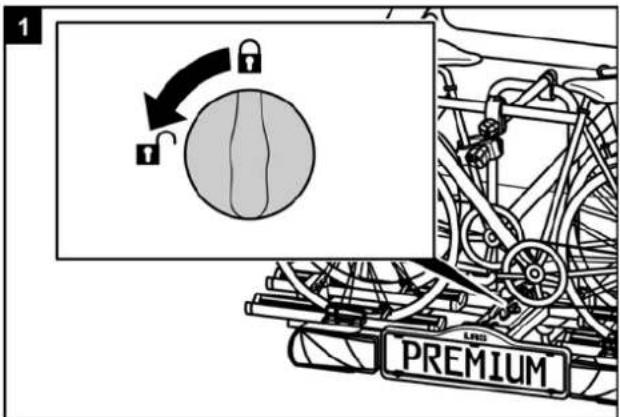
CAUTION!

Personal injury or material damage due to sudden folding down of the carrier. Body parts or objects under or in front of the carrier when it is folded down may be trapped
• Make sure that there is nothing under the carrier.
- Keep all body parts, and particularly your head, clear, and maintain a suitable safety distance.
- Hold the carrier by the U-bracket when folding it down.
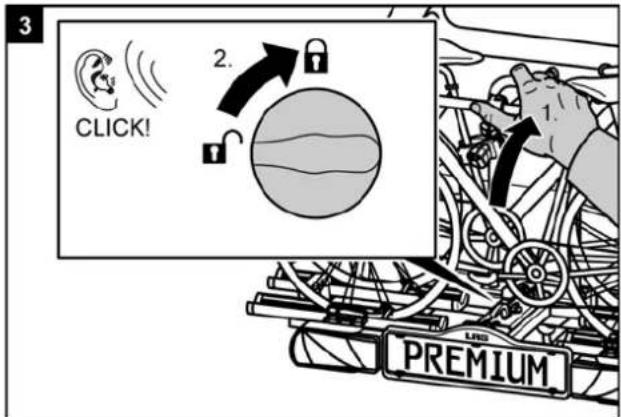
WARNING!

Personal injury or material damage possible due to loss of the bicycle carrier during the journey.
A bicycle carrier which is not folded up can result in detachment of the carrier or the coupling.
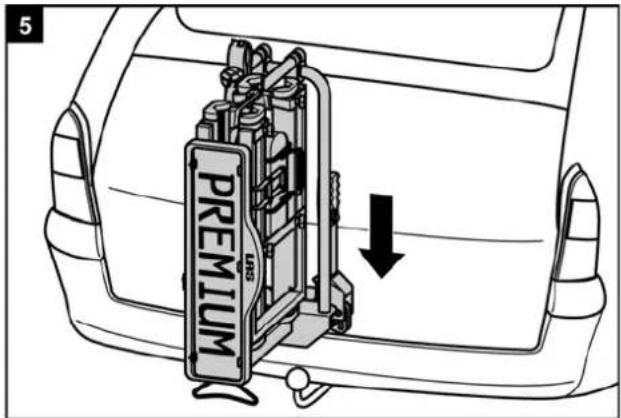
- Fold the carrier up before the start of the journey.
- Check that the bicycle carrier is correctly engaged and the rotary knob is set to "locked". Lock the carrier if necessary as described above and set the rotary knob to "locked".
Dismantling the bicycle carrier
First release the locking bolt behind the registration plate holder.
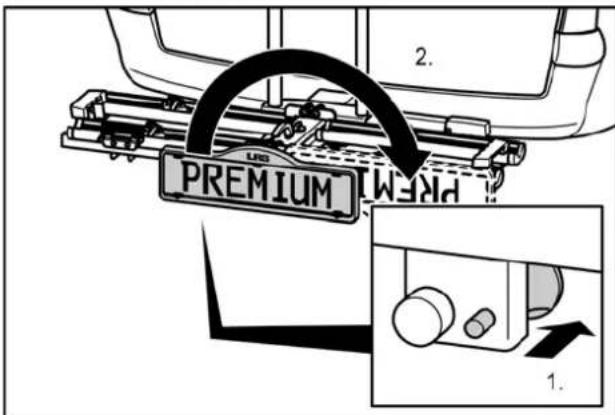
To dismantle the bicycle carrier, proceed in the reverse order to fitting.
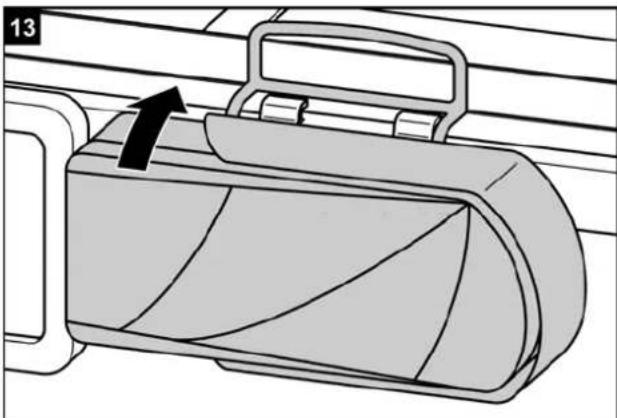
Carrying the bicycle carrier without the transport bag
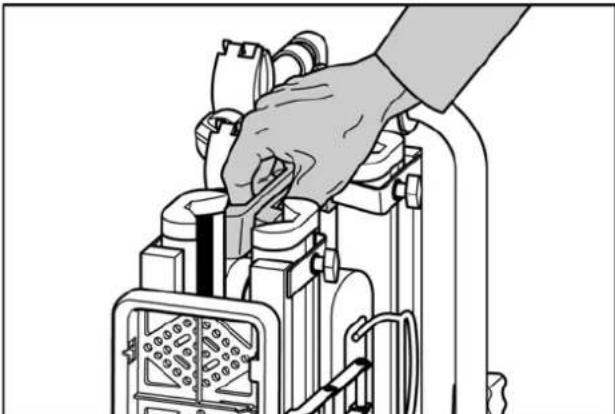
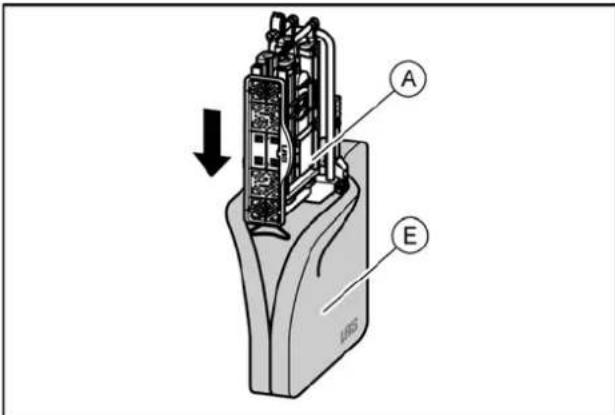
Stowing the bicycle carrier in the transport bag
Cleaning and care
The bicycle carriera be cleaned with a mild cleaning agent, with warm water and/or a soft cloth.
First remove any coarse dirt and dust. Do not use any solvents or similar cleaning agents, since these can damage the bicycle carrier.
Leave the bicycle carrier to dry on its own. Do not use any electrical driers or other heating equipment to speed up the drying process.
Clean the bicycle carrier regularly when used in coastal areas or in winter conditions in order to wash off any salt and prolong the service life of the bicycle carrier.
Store the bicycle carrier in a dry and protected area when not used for extended periods (e.g. over winter) in order to prolong the service life of the bicycle carrier.
Maintenance
Check the bicycle carrier for wear before the start of every journey. Defective metal parts and straps in particular must be replaced.
Please refer to our customer service for the replacement of parts.
Any modification of original parts and materials or the construction of bicycle carrier can adversely affect its safety and serviceability.
The steelparts of the bicycle carrier are protected in the works against corrosion by a powder-paint coating. If this paint coating is damaged, please have the damage rectified professionally as soon as possible.
Under normal conditions and use, the bicycle carrier only requires cleaning, and is otherwise maintenance-free.
Adjustment of the quick-fastener
Carry out this maintenance operation only if the bicycle carrier cannot be fitted firmly to the trailer coupling, as described in the chapter "Fitting".
- Remove the bicycle carrier from the trailer coupling, as described under "Dismantling".
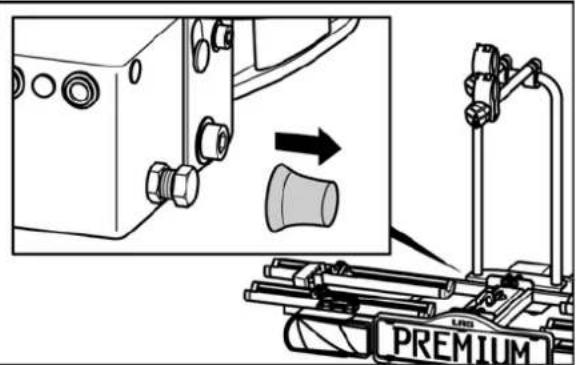
- Remove the dust protection cap.
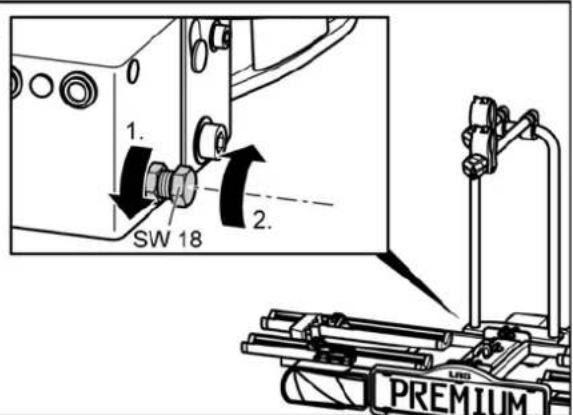
- Loos en the locking nut slightly, as shown in the illustration.
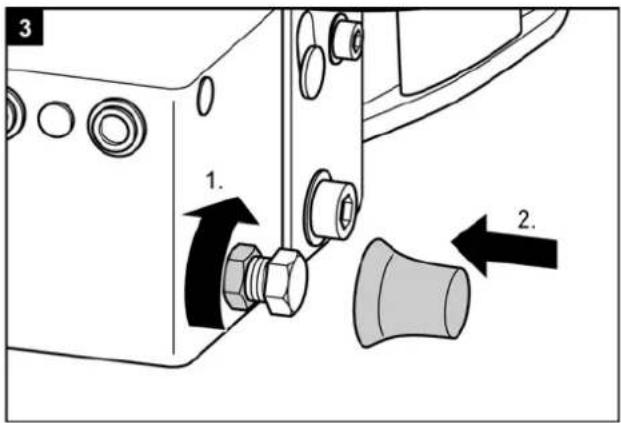
- Screw in the setting screw one quarter of a turn.
- Tighten the locking nut.
- Check whether the carrier is now firmly seated on the trailer coupling, as described under "Fitting". If not, repeat the above steps.
1
2
Disposal
Local regulations must be observed for the disposal of the product.
The packagingshould also be sorted by type and disposed of in the relevant collection containers.
Further information is available from your communal disposal point.
Contact
EAL GmbH
| Pos. | Spare part number | Quantity | Part designation |
| 1 | Pre-assembled | 1 | U-bracket and basic carrier |
| 2 | 90251 | 1 | U-washer M6 |
| 3 | 90800 | 1 | Quick-fastener |
| 4 | 90321 | 1 | U-washer M10 |
| 5 | Pre-assembled | 1 | Bolt ∅ 10mm |
| 6 | Pre-assembled | 1 | Socket-head bolt M10 x 80mm |
| 7 | 90320 | 1 | Self-locking nut M10 |
| 8 | 90321 | 1 | U-washer M10 |
| 9 | Pre-assembled | 1 | Guide eye |
| 10 | Pre-assembled | 1 | Quick-fastener tension spring |
| 11 | Pre-assembled | 1 | Socket-head bolt M6 x 80mm |
| 12 | 90660 | 4 | Steel wheel rail |
| 13 | Pre-assembled | 4 | Support table end-cap |
| 14 | Pre-assembled | 2 | Plastic carrying handle |
| 15 | 90417 | 4 | Wheel blocker pre-assembled |
| 16 | 90516 | 8 | Wheel rail end-cap |
| 17 | 90802 | 1 | Support table right with registration plate holder |
| 18 | 90254 | 2 | U-washer M5 |
| 19 | Pre-assembled | 4 | Bolt M5 x 50mm |
| 20 | Pre-assembled | 4 | Cap nut M5 |
| 21 | Pre-assembled | 4 | Cap nut M5 |
| 22 | Pre-assembled | 1 | Lamp protection, holding plate right |
| 23 | 90392 | 1 | Lamp protection, plastic right |
| 24 | 11500 | 1 | Tinted glass right |
| 25 | 90414 | 1 | Registration plate holder |
| 26 | 90254 | 2 | U-washer M5 |
| 27 | 90320 | 4 | Self-locking nut M5 |
| 28 | 90250 | 1 | Self-locking nut M10 |
| 29 | 11501 | 1 | Tinted glass left |
| 30 | 90250 | 2 | Self-locking nut M5 |
| 31 | 90405 | 1 | Bolt M5 x 25mm |
| 32 | Pre-assembled | 1 | Unlocking lever |
| 33 | Pre-assembled | 1 | Locking catch |
| Pos. | Spare part number | Quantity | Part designation |
| 34 | 90251 | 1 | U-washer M6 |
| 35 | 90253 | 1 | Self-locking nut M6 |
| 36 | Pre-assembled | 1 | Clamping lever |
| 37 | Pre-assembled | 1 | Locking catch knob |
| 38 | 906775 | 4 | Nut cover cap M10 |
| 39 | Pre-assembled | 4 | Hinge protector |
| 40 | Pre-assembled | 4 | Socket-head bolt M10 x 30mm |
| 41 | Pre-assembled | 4 | Socket-head bolt M8 x 25mm |
| 42 | Pre-assembled | 4 | Nut M8 |
| 43 | Pre-assembled | 1 | Registration plate holder Vernietet mit Teil 17 |
| 44 | 90422 | 2 | Bolt M5 x 10mm |
| 45 | Pre-assembled | 4 | Bolt M5 x 55mm |
| 46 | 90391 | 1 | Lamp protection,plastic left |
| 47 | Pre-assembled | 4 | Sleeve M5 x 35mm |
| 48 | Pre-assembled | 4 | Rear light holder retaining arm |
| 49 | Pre-assembled | 1 | Lamp protection, holding plate left |
| 50 | 90803 | 1 | Support table left |
| 51 | 90194 | 8 | Scenery bolt M6 x 25mm |
| 52 | 90489 | 2 | Belt guide |
| 53 | 90251 | 8 | U-washer M6 |
| 54 | 90515 | 8 | Wing nut M6 |
| 55 | 11233 | 1 | Frame holder long |
| 56 | 11232 | 1 | Frame holder short |
| 57 | 90618 | 4 | Fixing strap small |
| 58 | 90667 | 1 | EGBE in accessory bag |
| 59 | 90741 | 2 | Key, please enter Y number |
| 60 | 80224 | 1 | Safety strap in accessory bag |
| 61 | 90500 | 1 | Allen key M5 in accessory bag |
| 62 | 90618 | 2 | Fixing strap small in accessory bag |
| 63 | 90755 | 1 | Bag |
| 64 | 11504 | 1 | Lamps, complete with cable |
| 65 | 11505 | 1 | Cable harness for rear lights |
Porte-vélo Premium
A = Porte-vélo
B = 2 clés
E = sac de transport
Données techniques
Support :....Premium
AVERTISSEMENT !

ATTENTION !

ATTENTION!

PERICOLO!


ATTENZIONE!

ATTENZIONE!

Pulizia e cura
Smaltimento

WAARSCHUWING!

LET OP!

LET OP!

VAROVÁNÍ!

POZOR!

POZOR!


- WARNUNG
- ACHTUNG
- BICYCLE CARRIER PREMIUM
- OPERATING INSTRUCTIONS
- TABLE OF CONTENTS
- INFORMATION ON THESE OPERATING INSTRUCTIONS
- FOREWORD
- OBLIGATIONS REGARDING THESE FITTING INSTRUCTIONS
- PROPER USE
- SAFETY INSTRUCTIONS – EXPLANATION OF THE CATEGORIES
- WARNING
- CAUTION
- ATTENTION
- NOTE
- SCOPE OF DELIVERY
- TECHNICAL DATA
- COUPLING REQUIREMENTS
- SAFETY INSTRUCTIONS
- BEFORE FIRST USE
- FITTING AND USE
- FITTING THE BICYCLE CARRIER TO THE TRAILER COUPLING
- MOUNTING BICYCLES
- TILTING THE BICYCLE CARRIER, ACCESS TO THE LUGGAGE SPACE
- DISMANTLING THE BICYCLE CARRIER
- CARRYING THE BICYCLE CARRIER WITHOUT THE TRANSPORT BAG
- STOWING THE BICYCLE CARRIER IN THE TRANSPORT BAG
- CLEANING AND CARE
- MAINTENANCE
- ADJUSTMENT OF THE QUICK-FASTENER
- DISPOSAL
- CONTACT
- PORTE-VÉLO PREMIUM
- DONNÉES TECHNIQUES
- AVERTISSEMENT
- PERICOLO
- ATTENZIONE
- PULIZIA E CURA
- SMALTIMENTO
- WAARSCHUWING
- LET OP
- VAROVÁNÍ
- POZOR
Brand : EAL
Model : Premium 12011
Category : Bike rack