SC MCM 5000 - Coffee machine Efbe-Schott - Free user manual and instructions
Find the device manual for free SC MCM 5000 Efbe-Schott in PDF.

| Product type | Coffee machine |
| Brand | Efbe-Schott |
| Model | SC MCM 5000 |
| Power supply | 230 V ~ 50 Hz (check on the device) |
| Power | Approximately 1200 W (estimate) |
| Water tank capacity | 0.6 L (MAX mark) |
| Usable coffee type | Nespresso capsules, Dolce Gusto capsules, ground coffee, ESE pods |
| Included adapters | Nespresso, Dolce Gusto, ground coffee (with spoon), ESE pods |
| Preparation functions | Short espresso, Lungo, customizable volume |
| Volume programming | Yes, by holding buttons (10 to 90 seconds) |
| Energy saving mode | Automatic after 15 minutes of inactivity (can be disabled) |
| Heating time | Approximately 45 seconds |
| Safety | Automatic shut-off, locked lever, children supervision recommended |
| Exterior material | Plastic |
| Dimensions (estimated) | Approximately 25 x 20 x 30 cm |
| Weight (estimated) | Approximately 2.5 kg |
| Cleaning | Rinse adapters with clean water, wipe exterior with a damp cloth, removable drip tray |
| Descaling | Every 1 to 2 months with descaling solution (not vinegar) |
| Repairability | Authorized technical service required |
| Warranty | See provided warranty card |
Frequently Asked Questions - SC MCM 5000 Efbe-Schott
User questions about SC MCM 5000 Efbe-Schott
0 question about this device. Answer the ones you know or ask your own.
Ask a new question about this device
Download the instructions for your Coffee machine in PDF format for free! Find your manual SC MCM 5000 - Efbe-Schott and take your electronic device back in hand. On this page are published all the documents necessary for the use of your device. SC MCM 5000 by Efbe-Schott.
USER MANUAL SC MCM 5000 Efbe-Schott
text_image
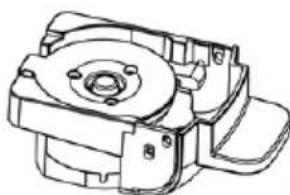
A B C D E F GEN
A. Lever
B. Buttons
C. Water tank cover
D. Water tank
E. Brewing basket
F. Drip tray cover
G. Removable drip tray
DE
natural_image
Technical line drawing of a mechanical component with no visible text or symbolsNespresso adaptor / Nespresso-Adapter / Adaptateur Nespresso / Adaptador Nespresso / Adapter do kapsutek Nespresso / Nespresso-adapter / Adaptér Nespresso / Adaptér Nespresso
natural_image
Technical line drawing of a mechanical housing or bracket component (no text or symbols)Dolce Gusto adaptor / Dolce-Gusto-Adapter / Adaptateur Dolce Gusto / Adaptador Dolce Gusto / Adapter do kapsut Dolce Gusto / Dolce Gusto adapter / Adaptér Dolce Gusto / Adaptér Dolce Gusto
natural_image
Technical line drawing of a mechanical component with no visible text or symbolsnatural_image
Simple line drawing of a circular tank or basin with three legs (no text or symbols)ESE coffee pods adaptor / ESE-Kaffeepad-Adapter / Adaptateur pour les dosettes ESE / Adaptador de cápsulas de café ESE / Adapter do saszetek kawy ESE / ESE koffiepads adapter / Adaptér na kávové struky ESE / Adaptér na kávové lusky ESE
IMPORTANT SAFEGUARDS
Please read this manual carefully before using the appliance, and always follow the safety and operating instructions.
Important : This appliance can be used by children over 8 years old and people with reduced physical, sensory or mental capacities or with a lack of experience or knowledge if they have been given supervision or instructions concerning the safe use of the appliance and the risks involved. Children shall not play with the appliance. Cleaning and user maintenance shall not be made by children unless they are older than 8 years and supervised. Never leave the appliance and its cord unsupervised and within reach of children less than 8 years old or irresponsible persons when it is plugged into the wall or when it is cooling down.
☐ Check that your mains voltage corresponds to that stated on the appliance.
□ Never leave the appliance unsupervised when in use.
☐ From time to time check the appliance for damages. Never use the appliance if cord or appliance shows any signs of damage. In that case, repairs should be made by a competent qualified electrician(*). Should the cord be damaged, it must be replaced by a competent qualified electrician(*) in order to avoid all danger.
☐ Only use the appliance for domestic purposes and in the way indicated in these instructions.
□ Always place your appliance on a flat stable surface and away from wet surfaces.
□ Never immerse the appliance in water or any other liquid for any reason whatsoever. Never place it into the dishwasher.
□ Never touch the cable or the machine with damp or wet hands.
□ Never use the appliance near hot surfaces.
□ Never cover the machine during operation.
□ Never lift the lever during operation.
Before cleaning or storing the appliance, always unplug the appliance from the power supply and let it cool down.
□ Never use the appliance outside and always place it in a dry environment.
☐ Never use accessories that are not recommended by the producer. They could constitute a danger to the user and risk to damage the appliance.
☐ Never move the appliance by pulling the cord. Stand the appliance on a table or flat surface. Make sure the cord cannot get caught in any way. Do not wind the cord around the appliance and do not bend it.
□ Never move the appliance during operation.
☐ When removing lime scale, only use special products for the removal of lime scale. Never use ammonia or any other substance that might damage your health.
☐ Never operate the coffee maker without water in it. Always make sure there is no less water in the tank than the minimum level.
The manufacturer will not assume any responsibility in case of non-respect of these instructions.
Keep this user manual carefully.
(*) Competent qualified electrician: after-sales department of the producer or importer or any person who is qualified, approved and competent to perform this kind of repairs in order to avoid all danger. In case of need you should return the appliance to this electrician.
BEFORE FIRST USE
Before using for the first time or after long periods of non-use, the machine must be flushed out in order to clean the internal piping thoroughly.
- Fill the water tank with fresh water. You can fill the tank without removing it by lifting the cover and pouring water using a jug, or you can remove the tank. To do so, tilt the tank towards you and lift it up.
- Fill the tank to the MAX level, place the cover back and slide the tank back in the receptacle.
Note: Make sure the tank is full and correctly placed, that the lever is down and there is no capsule inside.
- Plug in the coffee machine and press the power button. The lights will blink while the machine is heating up. This process takes about 45 seconds.
- Place a large recipient (minimum 250 ml capacity) under the coffee outlet.
- Press the large coffee cup button; the flush out process will stop automatically when complete.
Water pump
If the machine has trouble pumping water after a long non-use period or before the first use, you can pump the water manually:
- Insert the pipe into the water inlet at the back of the machine.
- Pour water into the pipe and inject the water from the pipe into the machine so that the internal circuit is filled with water.
- If necessary, repeat the operation two or three times.
natural_image
Technical line drawing of a mechanical component with a cylindrical pin and base (no text or symbols)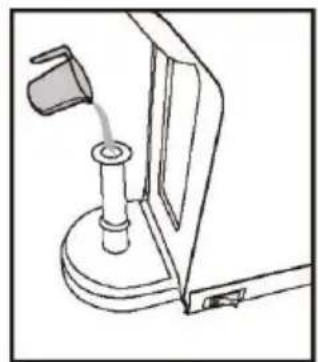
natural_image
Line drawing of a mechanical device with a lever and base mount (no text or symbols)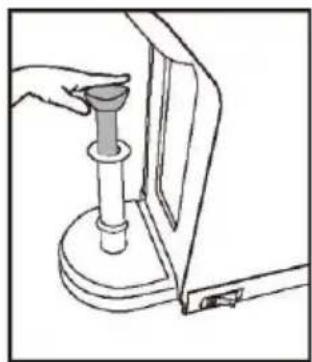
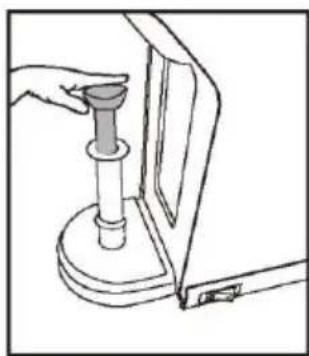
natural_image
Line drawing of a hand holding a cylindrical object with a base, next to a mechanical component (no text or symbols)COFFEE PREPARATION
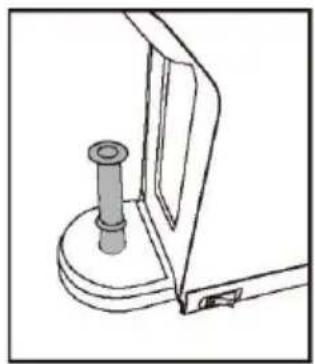
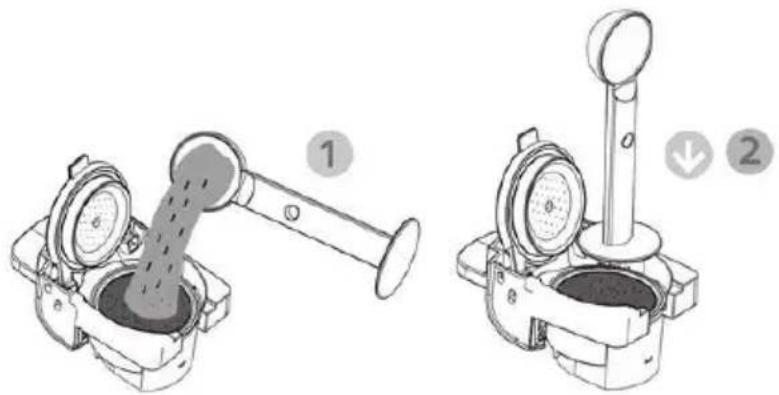
Filling the tank with fresh water :
There are two ways to fill the water tank :
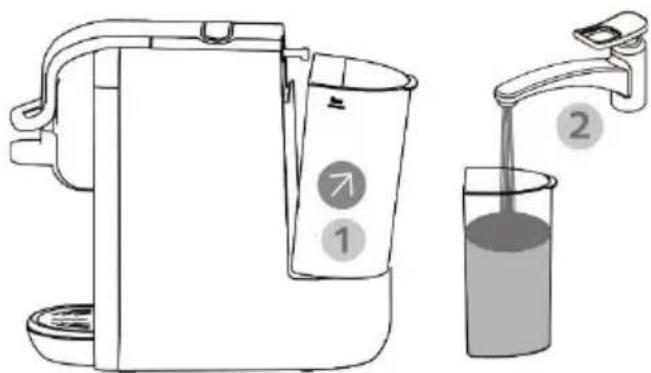
- Unlock the cover and then the water tank itself by tilting it backwards in a small angle as shown on the picture below (1) and fill it directly under the tap (2). Then slide the water tank carefully in its base and lock the cover into position.
text_image
Diagram showing a water dispenser pouring liquid into a glass of liquid, with numbered labels indicating components.- Unlock the water tank cover (1) and fill in the tank directly with water (2). Then lock back the cover into position.
text_image
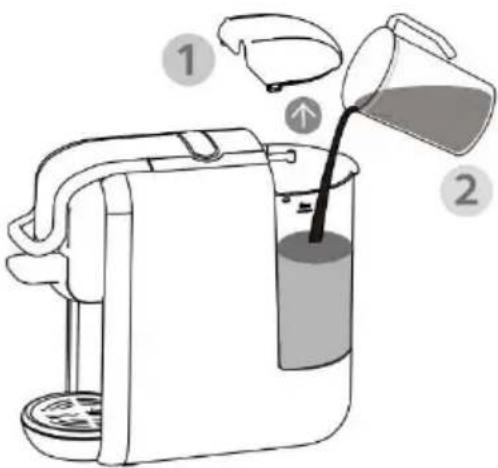
Diagram showing a hand pouring liquid into a water heater with labeled steps 1 and 2Caution :
- Fill the tank up to the "MAX" mark (0.6 litre or 1.05 gallon) with fresh water.
• The water temperature can be max 35^ C
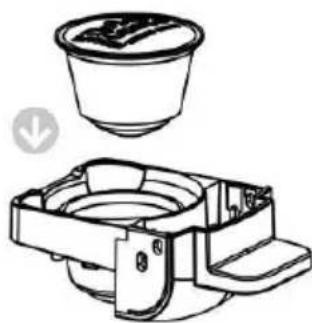
Filling the adaptor with coffee:
There are three adaptors related to four types of coffee conditioning :
- Nespresso capsules are to be inserted in the Nespresso adaptor only, with the small side up and the large side down.
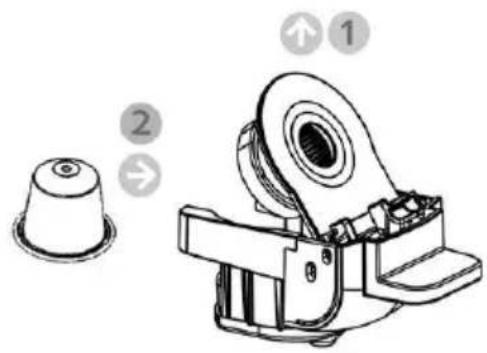
The Nespresso adaptor has to be unlocked by gently pressing its lid (1) before inserting the capsule (2) and locked back.
text_image
Technical diagram of a mechanical device with numbered components and directional arrows indicating assembly or movement.- Dolce-Gusto Capsules are to be inserted in the Dolce-Gusto adaptor only, with the small side down and the large side up.
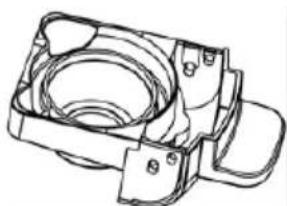
natural_image
Technical line drawing of a mechanical assembly with a top component and a side view (no text or symbols)- Ground coffee is to be poured in the ground coffee adaptor only. Unlock the lid of the ground coffee adaptor and pour some coffee powder in it (1) then press down the coffee powder with the flat backside of the ground coffee spoon provided (2) and lock back the lid.
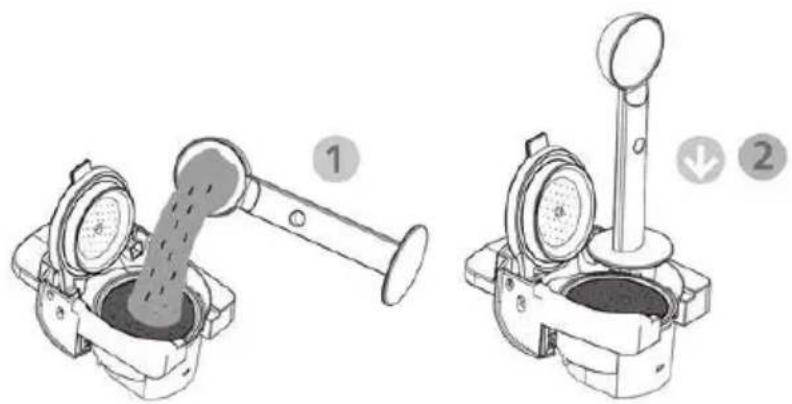
text_image
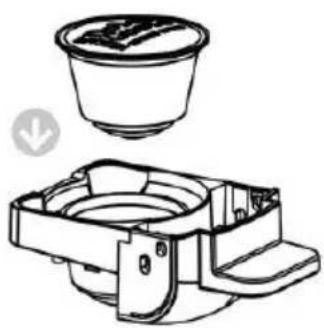
Technical diagram showing two mechanical device configurations with labeled parts 1 and 2, likely illustrating a valve or pump mechanism.The ground coffee adaptor can also be used with ESE coffee pods. Insert the stainless steel cup inside the adaptor of coffee powder (1), place an appropriate coffee pod inside (2) and close the lid.
text_image
Diagram showing two steps of a cooking or cleaning device with labeled parts and directional arrows indicating process flow.Brewing coffee :
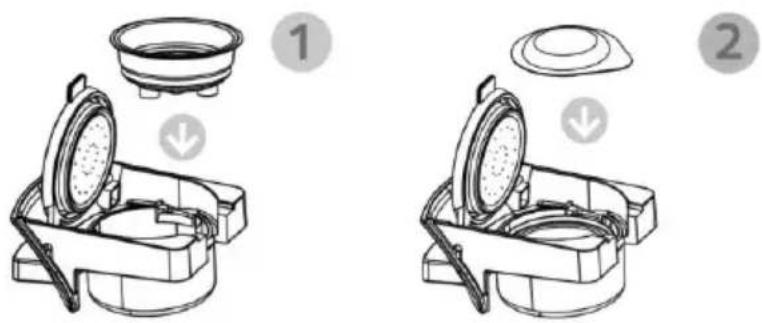
- Unlock the coffee adaptor receptacle by lifting up the lever (1)
- Push the chosen and properly filled coffee adaptor into the receptacle (2).
- Lock back the adaptor in by pulling the lever down (3).
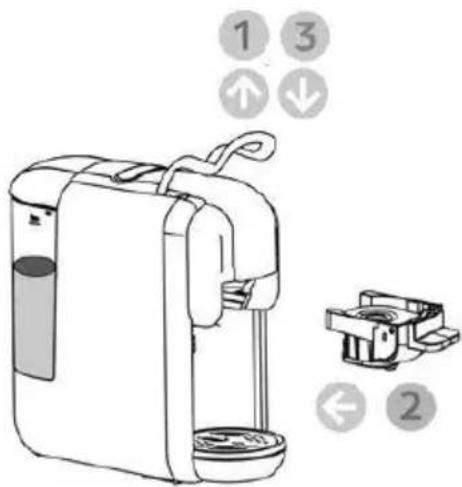
text_image
1 3 ↑ ↓ ← 2- Place a cup under the dispenser.
- Press the desired coffee button once: the small coffee cup button will brew a short Espresso while the large coffee cup button will brew a Lungo coffee.
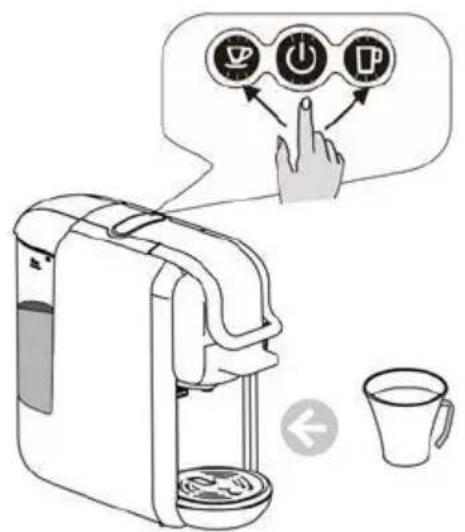
text_image
Diagram illustrating a coffee maker's usage process with icons and a hand interacting with the device, next to a cup.Caution :
- There is a sharp needle in the coffee adaptor receptacle to pierce the capsule. Never touch it with your fingers.
- When the brewing stops, lift up the lever and pull out the coffee adaptor to eject the used capsule or discard the coffee grounds.
PROGRAMMING THE WATER VOLUME
Default settings :
- Small coffee cup button : the coffee machine will brew a short Espresso for 16 seconds if you use a coffee capsule and 25 seconds if you use ground coffee.
• Large coffee cup button : the coffee machine will brew a Lungo coffee for 35 seconds if you use a coffee capsule and 47 seconds if you use ground coffee.
Personalized brewing :
To customize the brewing time, place some water in the tank and a cup under the coffee outlet.
Then press and hold the small coffee button as long as it takes to get the desired volume for a short Espresso served in the cup.
Also press and hold the large coffee cup button as long as it takes to get the desired volume for a Lungo coffee served in the cup.
These settings will be saved and repeated every next time you will press the small or large coffee cup buttons.
Note: the minimum and maximum brewing times are 10 seconds and 90 seconds respectively.
To revert to the factory settings, unplug the machine, press and hold the large coffee cup button then insert the plug into the socket.
The indicator lights will flash twice to confirm the reboot of the settings.
ENERGY SAVING MODE
The machine enters energy saving mode automatically once it has been idle for 15 minutes. To quit energy saving mode, press the power button, the lights will start blinking indicating that the appliance is warming up.
When the lights stop blinking, the machine is ready for use.
To disable the standby mode, press and hold the small and large coffee cup buttons at the same time then insert the plug to the socket.
The power button will light up. Press then the small coffee cup button.
The small coffee cup button light will turn off, indicating that the standby mode is disabled.
CLEANING
- Rinse the brewing baskets under clean water.
- Wipe the exterior of the machine with a soft damp cloth regularly.
- Clean the removable drip tray and cover with a soft wet sponge and mild detergent.
• Make sure all the removable parts are completely dry before reassembling.
DESCALING
To keep the coffee quality to the highest, the machine should be descaled every 1 to 2 months or if the output is significantly reduced.
It is recommended to use a commercially available descaling solution made for coffee machines.
- Fill the tank completely with the descaling solution diluted with water according to the manufacturer's instructions.
- Make sure there is no capsule in the machine.
- Place a large bowl under the coffee outlet.
- Press the Lungo button as you would do normally to brew coffee and repeat until the tank is empty. Repeat the process once again with the new descaling solution.
- After all the descaling solution has been flushed out, repeat the process with a tank of fresh water to rinse the internal circuit completely.
Notes: Never use vinegar, this may damage the machine and give a bad taste to your coffee.
TROUBLESHOOTING
| Problem | Cause | Solution |
| No coffee is brewed. | The water tank is empty. | Fill the water tank. |
| The coffee is not hot enough. | The cup/mug is cold.There is a scale build-up in the machine.The machine is cold. | Preheat the cup/mug.Descale the machine.Brew a cup of water to warm up the circuit. |
| Water leakage | The water tank is leaking.The drip tray is full of water. | Check if the valve on the water tank is stuck.Empty the drip tray. |
| The lever does not close. | The brewing basket is not placed correctly. | Push the brewing basket into the correct position. |
PROTECTION OF THE ENVIRONMENT – DIRECTIVE 2012/19/EU
In order to preserve our environment and protect human health, the waste electrical and electronic equipment should be disposed of in accordance with specific rules with the
implication of both suppliers and users. For this reason, as indicated by the symbol on the rating label or on the packaging, your appliance should not be disposed of as unsorted municipal waste. The user has the right to bring it to a municipal collection point performing waste recovery by means of reuse, recycling or use for other applications in accordance with the directive.
ERP DECLARATION - REGULATION 1275/2008/EC
We, TKG SRL/Bvba, hereby confirm that our product meets the requirements of regulation 1275/2008/EC. Admittedly, our product does not dispose of a function to minimize the power consumption, which should according to regulation 1275/2008/EC put the product in off or standby mode after finishing the main function, but this is practically impossible, as it would compromise the main function of the product so strongly, that using the product would no longer be possible!
For this reason we always tell the customer in our instruction manual to unplug the appliance immediately after use.
The user manual is by simple request also available in electronic format from the after-sales service.

DEUTSCH
natural_image
Technical line drawing of a mechanical component with a cylindrical pin and base (no text or symbols)
natural_image
Line drawing of a mechanical device with a lever and base mount (no text or symbols)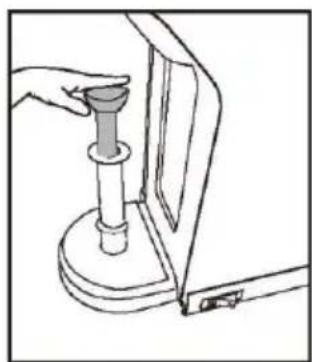
natural_image
Line drawing of a hand holding a cylindrical object inserted into a mechanical component (no text or symbols)KAFFEE ZUBEREITEN
text_image
Diagram showing a water dispenser pouring liquid into a glass of liquid, with numbered labels indicating components.text_image
Diagram showing a hand pouring liquid into a water heater with labeled steps 1 and 2Achtung:
text_image
Technical diagram of a mechanical device with numbered parts and directional arrows indicating assembly or process flow.natural_image
Technical line drawing of a mechanical assembly with a top component and a side view (no text or symbols)text_image
Technical diagram showing two mechanical device configurations with labeled parts and directional arrowstext_image
Diagram showing two steps of a cooking or cleaning device with labeled parts and directional arrows indicating process flow.Kaffee kochen:
text_image
1 3 ↑ ↓ ← 2text_image
Illustration of a coffee maker with three circular icons labeled P, P, and P' interacting with a hand pointing to it, accompanied by a cup and directional arrow.Achtung:
natural_image
Technical line drawing of a mechanical component with a cylindrical pin and base mount (no text or symbols)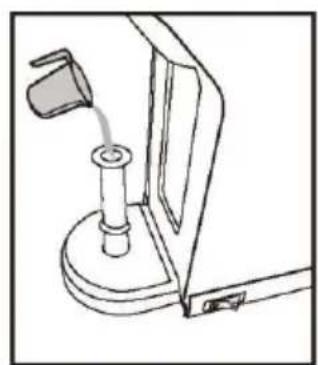
natural_image
Line drawing of a mechanical device with a lever and base mount (no text or symbols)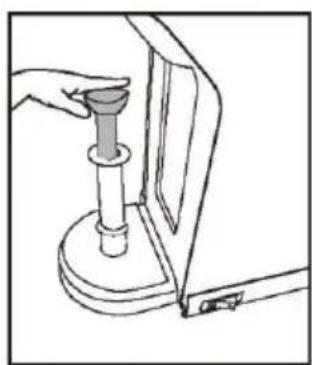
natural_image
Line drawing of a hand using a tool to press or install a mechanical component (no text or symbols visible)PRÉPARATION DU CAFÉ
text_image
Diagram showing a water dispenser pouring liquid into a glass, with numbered labels indicating components.text_image
Diagram showing a hand pouring liquid into a container with labeled parts 1 and 2Attention:
text_image
Technical diagram of a mechanical device with numbered components and directional arrows indicating assembly or movement.natural_image
Technical line drawing of a mechanical assembly with a top view and side view (no text or symbols)text_image
Technical diagram showing two mechanical device configurations with labeled parts 1 and 2, likely illustrating a valve or pump mechanism.text_image
Diagram showing two steps of cooking a grater with labeled parts and directional arrows indicating movement.text_image
1 3 ↑ ↓ ← 2text_image
Diagram showing a coffee maker with three icons (press, power, and coffee cup) interacting with a hand pointing to it, next to a mug.Attention :
natural_image
Technical line drawing of a mechanical component with a cylindrical pin and base mount (no text or symbols)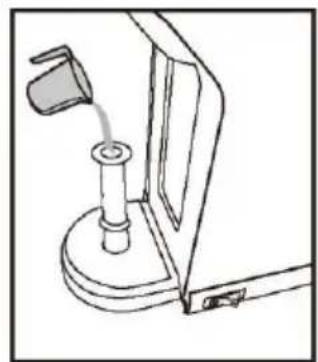
natural_image
Line drawing of a mechanical device with a lever and base mount (no text or symbols)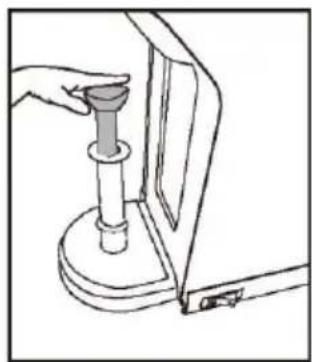
natural_image
Line drawing of a hand using a tool to press or install a mechanical component (no text or symbols visible)PREPARACIÓN DE CAFÉ
text_image
Diagram showing a water dispenser pouring liquid into a glass, with numbered labels indicating components.text_image
Diagram showing a hand pouring liquid into a water heater with labeled steps 1 and 2Precaución:
text_image
Technical diagram of a mechanical device with numbered components and directional arrows indicating assembly or movement.natural_image
Technical line drawing of a mechanical assembly with a top component and internal components (no text or symbols)text_image
Technical diagram showing two mechanical device configurations with labeled parts 1 and 2, likely illustrating a valve or pump mechanism.text_image
Diagram showing two steps of a cooking or processing device with labeled parts and directional arrows indicating movement.text_image
Diagram of a portable coffee maker with numbered instructions and labeled partstext_image
Diagram illustrating a coffee maker's usage with icons for menu, power button, and coffee cup, showing a hand interacting with the device.Precaución:
natural_image
Line drawing of a mechanical component with a cylindrical pin inserted into a base (no text or symbols)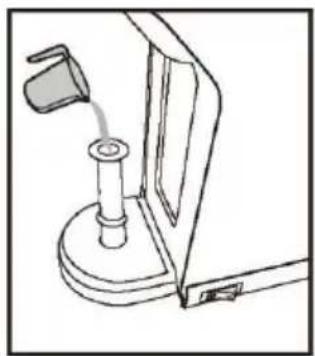
natural_image
Line drawing of a mechanical device with a lever and base mount (no text or symbols)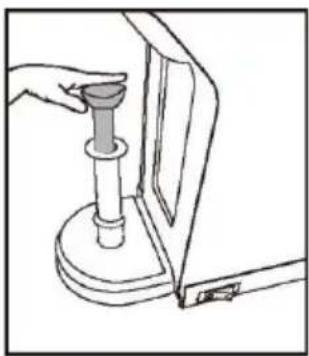
natural_image
Line drawing of a hand using a tool to press or install a mechanical component (no text or symbols visible)PRZYGOTOWANIE KAWY
text_image
Diagram showing a water dispenser with labeled components and a glass of liquid being poured into it, with numbered callouts.text_image
Diagram showing a hand pouring liquid into a water heater with labeled parts 1 and 2Uwaga :
text_image
Technical diagram of a mechanical device with numbered parts and directional arrows indicating assembly or process flow.natural_image
Technical line drawing of a mechanical component with a top view and a side view (no text or symbols)text_image
Technical diagram showing two mechanical components with labeled parts, including a lever and a valve mechanism.text_image
Diagram showing two steps of a cooking or storage device with labeled parts and directional arrows indicating process flow.Parzenie kawy:
text_image
1 3 ↑ ↓ ← 2text_image
Illustration of a hand pressing three circular icons labeled with 'P', indicating a menu or app interface.Uwaga:
natural_image
Technical line drawing of a mechanical component with a cylindrical pin and base (no text or symbols)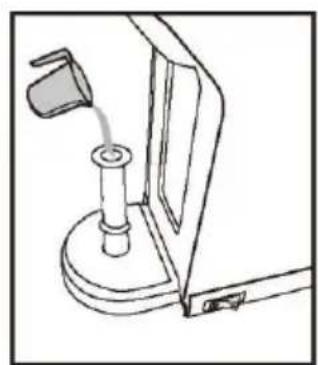
natural_image
Line drawing of a mechanical device with a lever and base mount (no text or symbols)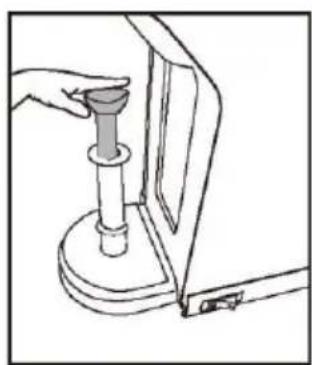
natural_image
Line drawing of a hand holding a cylindrical object inserted into a mechanical component (no text or symbols)KOFFIE BEREIDING
text_image
Diagram showing a handwashing device and pouring liquid into a glass, with numbered labels indicating step 1 and step 2.text_image
Diagram of a handwashing machine with labeled parts including a container and pouring liquidLet op:
text_image
Technical diagram of a mechanical device with numbered parts and directional arrows indicating assembly or process flow.natural_image
Technical line drawing of a mechanical component with a top view and a side view (no text or symbols)text_image
Technical diagram showing two mechanical device configurations with labeled parts and directional arrowstext_image
Diagram showing two steps of a cooking or cleaning device with labeled parts and directional arrows indicating process flow.Koffie zetten:
text_image
Diagram of a coffee maker with numbered instructions and labeled parts including tray, printer, and buttonstext_image
Illustration of a coffee maker with three coffee cups and a finger pointing to the menu, accompanied by a speech bubble showing coffee icons.Let op :
HET WATERVOLUME PROGRAMMEREN
Standaard instellingen :
natural_image
Technical line drawing of a mechanical component with a cylindrical pin and base mount (no text or symbols)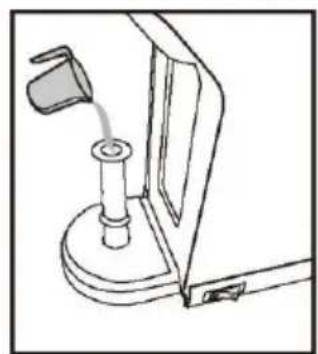
natural_image
Line drawing of a mechanical device with a lever and base mount (no text or symbols)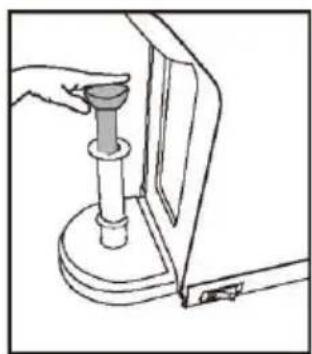
natural_image
Line drawing of a hand holding a cylindrical object next to a mechanical component (no text or symbols)PRÍPRAVA KÁVY
text_image
Diagram showing a water dispenser pouring liquid into a glass, with numbered labels indicating components.text_image
Diagram of a handwashing machine with labeled steps 1 and 2 showing liquid being poured into a container.Poznámka :
- Naplňte nádrž čerstvou vodou do značky „MAX“ (0,6 litra alebo 1,05 galona)
text_image
Technical diagram of a mechanical device with numbered parts and directional arrows indicating assembly or process flow.- Kapsuly Dolce-Gusto je treba vkladať len do adaptéra Dolce-Gusto, užšou stranou dolu a širšou hore.
natural_image
Technical line drawing of a mechanical assembly with a top component and a side view showing internal components (no text or symbols)- Mletú kávu je treba sýpaf výhradne do adaptéra mletej kávy. Odblokujte vieko adaptéra pre mletú kávu a nasypte doňho porciu mletej kávy (1) a potom pritlačte mletú kávu plochou zadnou stranou priloženej lyžičky do mletej kávy (2) a uzavrite vieko.
text_image
Technical diagram showing two mechanical device configurations with labeled parts and directional arrowstext_image
Diagram showing two steps of cooking a microwave oven, labeled with numbered instructions and directional arrows.Príprava kávy:
text_image
1 3 ↑ ↓ ← 2text_image
Diagram illustrating a coffee maker's usage interface with icons for coffee, power, and cup, showing finger pressing the button.Poznámka:
natural_image
Technical line drawing of a mechanical assembly with a cylindrical component inserted into a base (no text or symbols)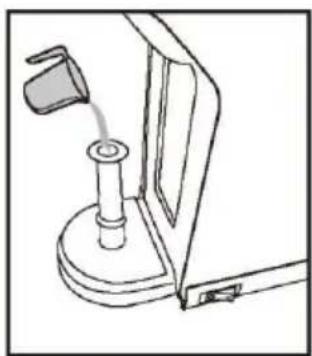
natural_image
Line drawing of a mechanical device with a lever and base mount (no text or symbols)