
Inshore 335 VII - Kayak CRIVIT - Free user manual and instructions
Find the device manual for free Inshore 335 VII CRIVIT in PDF.
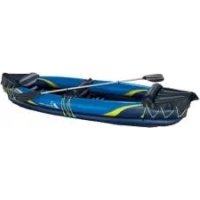
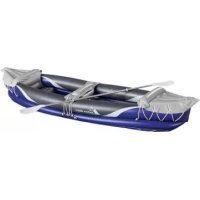
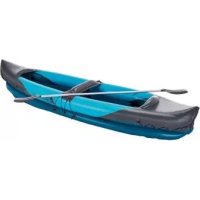
| Product type | 2-person inflatable kayak |
| Brand | Crivit |
| Model | Inshore 335 VII |
| Dimensions (inflated) | 310 x 91 x 47 cm (L x W x H) |
| Weight (without accessories) | 7 kg |
| Maximum load capacity | 160 kg (352.73 lb) |
| Number of seats | 2 adults (0 children) |
| Operating pressure | 0.05 bar (0.73 psi) |
| Number of air chambers | 5 (floor chambers, lower and upper side chambers) |
| Material | PVC |
| Standard | ISO 6185-1, category III, type B |
| Intended use area | Protected coastal waters up to 300 m, lakes, rivers, canals |
| Paddles | 2 double paddles, length 220 cm, angle adjustable |
| Included accessories | Front seat, bow cover, stern cover with seat, triangular cushion, paddles, repair kit, storage bag, dry bag, deflation hoses, control ruler |
| Valve types | Two-way screw valves (dia. 17.5 mm) and stop valves (dia. 8.5 mm) |
| Maintenance | Clean with fresh water and mild soap, store dry and deflated, frost-free |
| Repairs | Repair kit included for minor damage; major repairs entrusted to a professional |
| Warranty | 3 years from date of purchase |
| After-sales service France | 0800 919270 / deltasport@lidl.fr |
| After-sales service Belgium | 070 270 171 (0.15 EUR/min) / deltasport@lidl.be |
| IAN | 311071 |
Frequently Asked Questions - Inshore 335 VII CRIVIT
User questions about Inshore 335 VII CRIVIT
0 question about this device. Answer the ones you know or ask your own.
Ask a new question about this device
Download the instructions for your Kayak in PDF format for free! Find your manual Inshore 335 VII - CRIVIT and take your electronic device back in hand. On this page are published all the documents necessary for the use of your device. Inshore 335 VII by CRIVIT.
USER MANUAL Inshore 335 VII CRIVIT
DELTA-SPORT HANDELSKONTOR GMBH
Wegenvp 6 • DC 22397 Homburg
GERMANY

一
Nord Short No. 13591
[Unreadable]
crivit
natural_image
Illustration of a small boat with visible hull and side rod, no text or symbols present2-PERSONEN-KAJAK
2-PERSON KAYAK
KAYAK 2 PLACES
DE AT CH
2-PERSONEN-KAJAK
Gebrauchsanweisung
PR 38
KAYAK 2 PLACES
Instructions for use
NL B9
2-PERSOONS KAJAK
Gebruiksonwijzing
CZ
NAFUKOVACİ KAJAK
Náved k obsluze

M 47 04
Before reading, told out the illustration page and get to know all of the functions of your unit.
图 10
GS/IF: Industriors and Safety Networks; Page 17
flowchart
graph LR
    A["Step 1"] --> B["Step 2"]
    B --> C["Step 3"]
    C --> D["Step 4"]
    D --> E["Step 5"]
    E --> F["Step 6"]
    F --> G["Step 7"]
    G --> H["Step 8"]
    H --> I["Step 9"]
    I --> J["Step 10"]
    J --> K["Step 11"]
    K --> L["Step 12"]
    L --> M["Step 13"]
    M --> N["Step 14"]
    N --> O["Step 15"]
    O --> P["Step 16"]
    P --> Q["Step 17"]
    Q --> R["Step 18"]
    R --> S["Step 19"]
    S --> T["Step 20"]
    T --> U["Step 21"]
    U --> V["Step 22"]
    V --> W["Step 23"]
    W --> X["Step 24"]
    X --> Y["Step 25"]
    Y --> Z["Step 26"]
    Z --> AA["Step 27"]
    AA --> AB["Step 28"]
    AB --> AC["Step 29"]
    AC --> AD["Step 30"]
    AD --> AE["Step 31"]
    AE --> AF["Step 32"]
    AF --> AG["Step 33"]
    AG --> AH["Step 34"]
    AH --> AI["Step 35"]
    AI --> AJ["Step 36"]
    AJ --> AK["Step 37"]
    AK --> AL["Step 38"]
    AL --> AM["Step 39"]
    AM --> AN["Step 40"]
    AN --> AO["Step 41"]
    AO --> AP["Step 42"]
    AP --> AQ["Step 43"]
    AQ --> AR["Step 44"]
    AR --> AS["Step 45"]
    AS --> AT["Step 46"]
    AT --> AU["Step 47"]
    AU --> AV["Step 48"]
    AV --> AW["Step 49"]
    AW --> AX["Step 50"]

natural_image
Diagram showing a mechanical component interacting with a circular component, with arrows indicating motion or force direction (no text or symbols present)DE AT CH
Lieferumfang 10
Technische Daten 10
Verwendete Symbole 10
Scope of delivery 17
Technical data 17
Symbols used 17
Intended use 17
Safety instructions 17 - 18
Danger to life 17
Risk of injury 17 - 18
Avoiding material damage 18
Assembly 19 - 20
Assembling the 2-way screw-on valve ..... 19
Inflation 19
Filling the air chambers 19-20
Checking the operating pressure.... 20
Attachment of accessories 20 - 21
Securing the front seat 20
Attaching the bowsprit guard
Attaching the stern splash guard with seat ...20
Triangular cushion 20
Assembling the double-bladed paddle ..... 21
Duffel bag 21
Storage bag 21
Disassembling the kayak 21
Deflating
Disassembling the double-bladed paddles ...21
Transport 21
Storage, cleaning 21
Repairs 21-22
Information on disposal 22
Notes on the guarantee and
service handling 22
With your purchase you have decided to buy a high-quality product. Familiarise yourself with the product before first use.

Read the following instructions for use carefully to do so.
Use the product only as described and for the purposes indicated.
Keep this instructions for use handy. When passing the product on to third persons hand over all documents also.
They contain important details regarding the product, its assembly, operation and care, as well as safety rules. Since water sport always involves risks, having precise information regarding the product prevents possible personal injury or even fatalities.
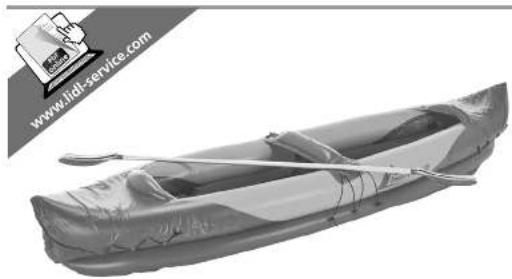
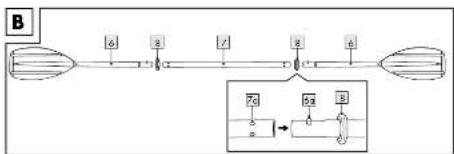
Scope of delivery (fig. A)
1 x kayak (1)
1 x bowsprit guard (2)
1 x front seat (3)
1 x stern splash guard with seat (4)
1 x triangular cushion/footrest (5)
2 x double-bladed paddle (6)
1 x centre section (7)
2 x drip ring (8)
1 x set of cords (9)
1 x 200cm (9a)
1 x 80cm (9b)
3 x 2-way screw-on valve (10)
1 x control ruler (11)
2 x deflation tube (12)
1 x repair kit (13)
1 x storage bag (14)
1 x duffel bag (15)
1 x instructions for use
Technical data
Dimensions (inflated):
Kayak: approx. 310 x 91 x 47cm (l x w x h)
Double-bladed paddle: Length: approx. 220cm
Weight without accessories: approx. 7kg
Permissible operating pressure:
approx. 0.05bar (0.73psi)

Date of manufacture (month/year)
03/2019

Maximum load
Symbols used

WARNING!
Pay attention to the symbols marked on the product before using it.
□ = labelling on the kayak
♀ = 2 ♂ = 0 number of people allowed: 2 adults/0 children
permissible load capacity: 160kg (352.73lbs)
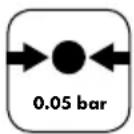
Permissible operating pressure
Intended use
This product has been developed for private use. Range of application: Protected shore zones up to 300m - for travel in protected coastal waters, small bays, on small lakes, narrow rivers and canals. Do not use in wind forces greater than 4 and/or waves higher than 0.5m.
Safety instructions

Danger to life!
- Never leave children unsupervised with the packaging material. Risk of suffocation!
- Never let children play with the product without supervision.

Risk of injury!
Beware of offshore winds!
Beware of offshore currents!
- Make sure that people and cargo are always distributed uniformly in the kayak to avoid the risk of capsizing.
- Pay attention to the information on the nameplate, permissible load capacity, and number of people, as well as the warning instructions.
- Always comply with local navigation regulations.
-
Do not bring any sharp or pointed objects on board.
-
The kayak should be protected against contact with any questionable liquids or acids. This can cause irreparable damage.
- Protect the kayak from heat and fire! Be careful with lit cigarettes!
- To avoid damage to the hull, make sure that the kayak does not run onto rocky ground.
- Should damage occur to one of the five internal chambers while you are on the water, under no circumstances must you abandon the kayak. The buoyancy of the four intact internal chambers is sufficient to keep the kayak safely above water.
- Under no circumstances should the inflated kayak be transported by vehicle.
- Never leave your kayak in the water unoccupied. It will drift away faster than it can be reached by swimming.
- Before using always make sure that you have the paddles with you since you may otherwise not be able to manoeuvre the kayak properly.
- Do not make any technical modifications to your kayak. Modifications of any kind put operation of the kayak at risk.
- Never use your kayak when under the influence of alcohol, drugs or medications.
- Never overestimate your strength and when paddling conserve the strength in your muscles in such a way that you can easily paddle back again over the distance you have covered. Stay in sheltered shore areas within 300m and beware of changing winds and currents that may make it significantly harder for you to navigate.

WARNING!
Your caution and self-awareness when on the water are extremely important. Never overestimate your strength and navigational skills! Always stay close to shore! Be aware of what the weather conditions are and pay attention to storm warnings or any flares!

WARNING!
Please always comply with the safety regulations and the current local provisions for lakes and open bodies of water, and always wear a certified life jacket for your own safety.

WARNING!
Avoid using sunscreen and skin care products containing alcohol. Sunscreen and skin care products containing alcohol can cause the colour coating of this PVC inflatable product to peel. This can lead to stains on your body, your clothing, and other objects that are in contact.

WARNING!
If someone falls overboard they should always climb back on board via the bow or the stern because there is a high risk of capsizing when trying to board from the sides.
Avoiding material damage!
- All inflatables are susceptible to cold. For this reason never unfold and inflate the product at a temperature lower than 15 °C!
- In the event that the air pressure increases in the hot sun, it must be balanced accordingly by letting out air.
- Make sure that the product, especially when inflated, does not come into contact with stones, gravel, or sharp objects and does not rub or scrape against anything; this can cause damage to the plastic foil.
- Use only the correct pump adapters to insert into the safety valves. The valves might otherwise be damaged.
- Do not over-inflate because you then risk tearing open the welded seams. Close the valves properly after inflating.
- Avoid contact with sharp, hot, pointed, or dangerous objects.
Assembly
Follow the individual assembly steps in the order indicated. If the correct sequence for inflating the five air chambers is not followed the pressure may be distributed unevenly. This can lead to instability of the kayak and adversely affect its handling characteristics.
Note: The side of the kayak with the 3 screw-on valves is the stern side (1f). The opposite side (without screw-on valves) is the bow side (1g).
- Assembly should always be performed by two adults because of the product's size.
- Select a smooth and clean surface with enough space to unfold the kayak. Check that all the individual parts are present and in good order and condition.
- When assembling the kayak for the second and subsequent times, you should inspect for any possible damage, holes, and tears and these should be sealed as described in the section "Repairs". Once you are on the water it is no longer possible to remedy any damage.
- Do not over-inflate the air chambers so as not to overstretch the plastic foil.
- Make sure that the inflated kayak does not come into contact with stones or other sharp objects and become damaged.
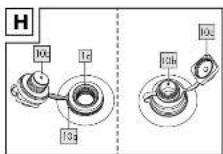
Assembling the 2-way screw-on valve (fig. H)
The floor chambers and the upper side chambers 3 of the kayak are all provided with a threaded opening for the screw-on valves (10).
- Pull the loop (10a) of the valve over the threaded opening (1c) so that it loops tightly around the edge of the threaded opening.
- Turn the base (10b) clockwise into the threaded opening.
Inflation

WARNING!
- Follow the correct sequence when inflating the air chambers. The correct sequence is indicated on the kayak and in the instructions for use (No 1).5
- The recommended operating pressure is 0.05bar (= 50mbar = 0.73psi).
- Avoid inflating the air chambers too much because there is the risk of over-stretching the welded seams or even tearing them open.
- To inflate the product use standard commercial foot pumps or double-stroke piston pumps with matching adapter attachments, and where applicable a pressure gauge.
- Do not use a compressor or compressed air bottle to inflate the product. This can lead to damage to the product.
• Always inflate all air chambers fully.
Inflation sequence
Inflate the air chambers in the following sequence:
-
- Floor chamber with screw-on valve 1
-
- Lower side chamber with stopper valve 2
-
- Upper side chamber with screw-on valve 3
-
- Lower side chamber with stopper valve 4
-
- Upper side chamber with screw-on valve 5
Note: The air chambers are marked on the kayak with the corresponding numbers. (1) 5
Filling the air chambers
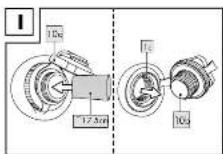
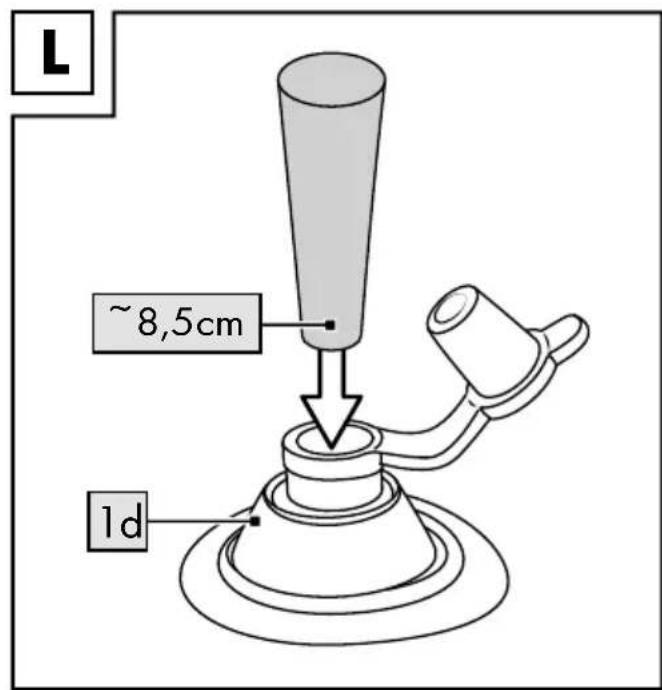
Note: For the screw-on valve you need a pump with a conical nozzle with a diameter of approx. 17.5mm (fig. 1).
For the stopper valve you need a pump with a conical nozzle with a diameter of approx.
8.5mm (fig. L).
1. Floor chamber with screw-on valve
- Open by turning the seal cap (10c) of the screw-on valve (10) anticlockwise (fig. H).
- Inflate the floor chamber 1 using the appropriate pump.
- Check the operating pressure as described in the section "Checking the operating pressure".
- Turn the seal cap (10c) of the screw-on valve (10) clockwise to close it again.
2. Lower side chambers with stopper valve
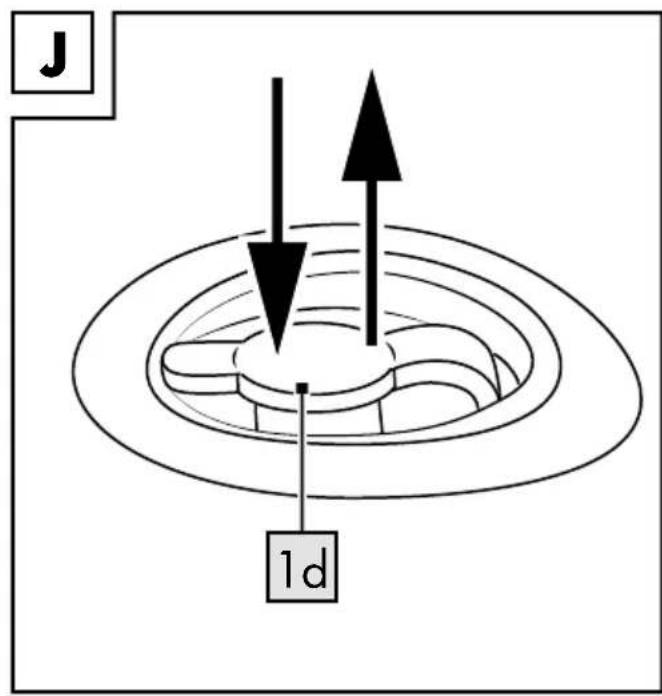
- Open the valve seal (fig. K).
- Inflate the lower side chambers 2, 4 using the appropriate pump.
-
Check the operating pressure as described in the section "Checking the operating pressure".
-
Close the valve seal and push in the valve by pressing lightly (fig. J/K).
3. Upper side chambers with screw-on valve
- Open by turning the seal cap (10c) of the screw-on valve (10) anticlockwise (fig. H).
- Inflate the upper side chambers 3, 5 using the appropriate pump.
- Check the operating pressure as described in the section "Checking the operating pressure".
- Turn the seal cap (10c) of the screw-on valve (10) clockwise to close it again.
Checking the operating pressure
IMPORTANT!
The PVC material expands somewhat after the product is inflated for the first time and does not return to its original condition. Remember that the specifications may vary slightly depending on the load and outside temperature.
- Inflate the floor chamber 1 and the two lower side chambers 2 until they feel firm and no more folds can be seen in the material.
Note: When you press with your thumb against each air chamber it should still give a little.
- To check the operating pressure of the two upper side chambers, 3 place the control ruler (11) over the measuring strip (1h) on the inside of each upper air chamber (fig. N). The lower arrow and the 0 on the control ruler (11) must overlap the lower arrow and the 0 on the measuring strip (1h).
- When inflating for the first time the number 10 on the measuring strip (1h) may NOT exceed position A on the control ruler (11).
Note: The number 10 on the measuring strip (1h) indicates the maximum expansion of the air chambers. - With repeated inflations the number 10 of the measuring strip (1h) must be between position A and position 10 on the control ruler (11).
Attachment of accessories
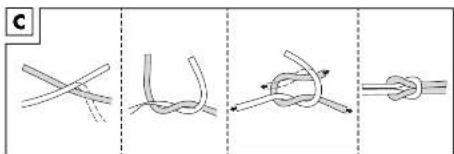
Note: Secure the cords of the duffel bag and seat with a reef knot (fig. C).
Securing the front seat (fig. D)
- Inflate all air chambers of the front seat (3) until they feel firm and push down the valves.
- Place the seat between the two upper side chambers 3 to ensure that the it stays firmly in place.
Note: The hook-and-loop straps on the backrest of the front seat (3) must point towards the stern (1f).
Note: The hook-and-loop straps on the backrest of the front seat (3) must point towards the stern (1f).
-
Secure the seat with the 80cm cord (9b) at the grommets (1a) on the floor chamber 1 (fig. D) using a reef knot (fig. C).
-
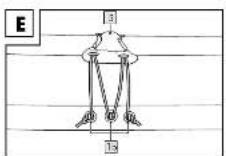
Attach the backrest of the seat (3) at the buttons (1b) on the two lower side chambers 2, using the elastic bands attached to the kayak so that it forms a zigzag pattern (fig. E).
-
Secure the seat with the 80cm cord (9b) at the grommets (1a) on the floor chamber 1 (fig. D) using a reef knot (fig. C).
- Attach the backrest of the seat (3) at the buttons (1b) on the two lower side chambers 2, 4 using the elastic bands attached to the kayak so that it forms a zigzag pattern (fig. E).
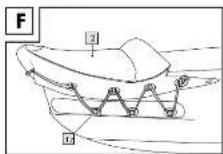
Attaching the bowsprit guard
-
Inflate the air chamber of the bowsprit guard (2).
-
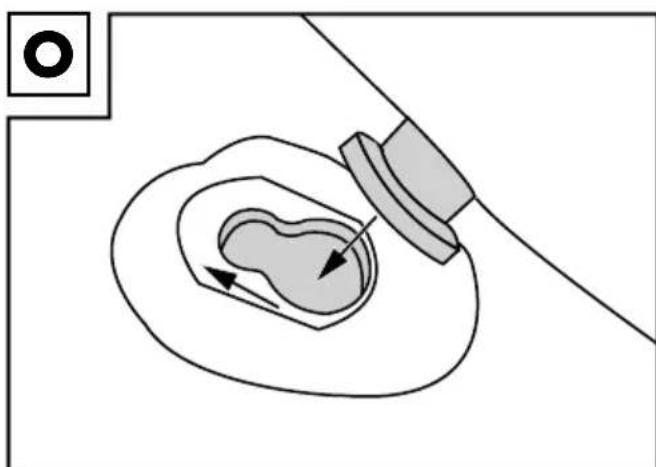
Push the safety buttons of the bowsprit guard into the openings on the kayak (fig. O). Make sure that they seat firmly.
-
Attach the bowsprit guard (2) at the buttons (1b) on the two upper side chambers 3 5 using the pre-installed elastic band so that it forms a zigzag pattern (fig. F).
-
Inflate the air chamber of the bowsprit guard (2).
- Push the safety buttons of the bowsprit guard into the openings on the kayak (fig. O). Make sure that they seat firmly.
- Attach the bowsprit guard (2) at the buttons (1b) on the two upper side chambers 3 5 using the pre-installed elastic band so that it forms a zigzag pattern (fig. F).
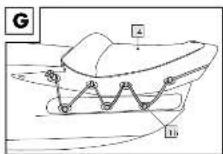
Attaching the stern splash guard with seat
- Inflate all air chambers of the stern splash guard (4).
- Inflate all air chambers of the stern splash guard (4).
- Press the seat down under the two upper side chambers 3 to ensure that it stays firmly in place.
- Push the safety buttons of the stern splash guard into the openings on the kayak (fig. O). Make sure that they seat firmly.
- Attach the stern splash guard (4) at the buttons (1b) on the two upper side chambers 3 using the pre-installed elastic band so that it forms a zigzag patter. (fig. G).
Triangular cushion
-
Inflate the triangular cushion (5) and press down the valve.
-
Position the inflated triangular cushion (5) firmly in the bow of the kayak.
-
Inflate the triangular cushion (5) and press down the valve.
- Position the inflated triangular cushion (5) firmly in the bow of the kayak.
Note: The triangular cushion (5) serves as a footrest for the person sitting at the front.
Assembling the double-bladed paddle (fig. B)
- Push a drip ring (8) over both ends of each paddle tube so that the rings sit below the locking button (6a) and the taper of the tube.
- Insert the two paddle tubes (6) into the centre section (7). In doing so, both locking buttons (6a) must snap audibly and visibly with a slight offset into the openings (7a) on the centre section (7).
Note: You have the option of setting the paddle at two different angles according to your preference. When there are two people the paddles can also be used without the centre section individually as single-blade paddles.
Duffel bag
The product comes with a duffel bag (15) in which the kayak can be stowed for transport and for storage.
To close it use the 200cm cord (9a). The duffel bag can also be used on board to keep provisions, clothing, etc. protected against splash.
Note: Remember that the duffel bag is not waterproof. Do not stow any sensitive items such as cameras in the duffel bag.
For use on board remove the cord and roll the top end up flat. Then close the duffel bag using the hook-and-loop fasteners.
Storage bag
In addition, the product also comes with a splash-proof storage bag (14) which is attached to the back of the front seat (3) by the hook-and-loop fasteners. Smaller items can be stowed in the storage bag.
Note: Remember that the storage bag is not waterproof. Do not stow any sensitive items in the bag.
Disassembling the kayak
Remove the front seat, stern splash guard with seat, bowsprit guard, and triangular cushion.
Deflating
Deflate the kayak as follows:
-
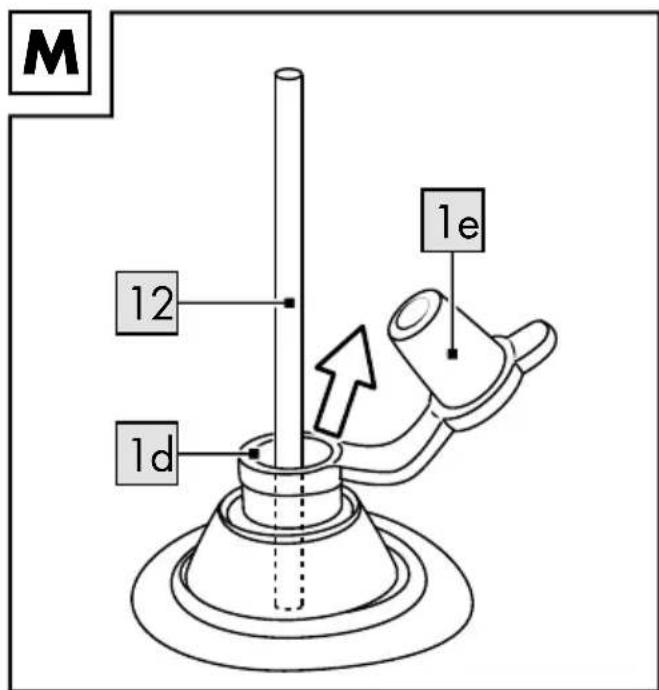
To deflate air chambers with stopper valves pull the stopper valves (1d) out of the recesses (fig. J) and press the stems together lightly or use the deflation tube (12) (fig. M).
-
To deflate air chambers with screw-on valves, unscrew the screw-on valves (10b) from the base (1c) and let the air out completely (fig. 1).
Disassembling double-bladed paddles
- Push down the respective locking button.
- Pull the two paddle tubes from the centre section.
Note: The drip rings remain on the paddle tubes.
Transport
The kayak should always be transported by two people.
Storage, cleaning
WARNING!
Use only care products containing no acid or petroleum components and never use silicon-based products.
Always store the product deflated, clean, and dry at room temperature and out of the reach of rodents. The valves should always be closed during storage. Make sure that the product is stored flat, not twisted.
- Clean your kayak thoroughly each time after use by rinsing it with clean water and mild soap to get rid of salt crystals, grains of sand, and other tiny contaminants. Then allow it to dry completely.
- Let the air out of all air chambers completely.
- Lay the two upper side chambers inside the kayak and then fold it up carefully.
Repairs
WARNING!
When there is more serious damage you should not under any circumstance perform repairs yourself.
You can repair minor damage with the repair kit (13) supplied.
-
Let the air out of the kayak completely and clean the location in question using an alcohol-based solution. Use fine sandpaper to roughen the area around the tear or hole.
-
Trim a patch that covers the damaged area and overlaps by 1.25cm on all sides.
- Apply the adhesive both to the location on the kayak and also to the patch. Let the adhesive dry for approx. 3 minutes.
- Press the patch down firmly with something soft.
Note: Be sure to work on an even surface without wrinkles or folds. Gently remove any air bubbles with a rounded object, working from the inside towards the outside.
- After repairs wait at least 12 hours before inflating the kayak again.
Information on disposal
Dispose of the item and its packaging materials in accordance with current local regulations.
Packaging materials like e.g. foil bags must be kept away from children. Keep the packaging materials out of reach of children.

Dispose of the equipment and packaging in an environmentally-friendly manner.

The recycling code is used to identify various materials for recycling. The code consists of the recycling symbol – which
is meant to represent the recycling cycle - and a number which identifies the material.
Notes on the guarantee and service handling
The product was produced with great care and under constant supervision. You receive a three-year warranty for this product from the date of purchase. Please retain your receipt.
The warranty applies only to material and workmanship and does not apply to misuse or improper handling. Your statutory rights, especially the warranty rights, are not affected by this warranty.
With regard to complaints, please contact the following service hotline or contact us by e-mail.
Our service employees will advise as to the subsequent procedure as quickly as possible.
We will be personally available to discuss the situation with you.
Any repairs under the warranty, statutory guarantees or through goodwill do not extend the warranty period. This also applies to replaced and repaired parts. Repairs after the warranty are subject to a charge.
IAN: 311071
GB Service Great Britain
Tel.: 0800 404 7657
E-Mail: deltasport@lidl.co.uk
IE Service Ireland
Tel.: 1890 930 034
(0,08 EUR/Min., (peak))
(0,06 EUR/Min., (off peak))
E-Mail: deltasport@lidl.ie
Félicitations!

- 2-PERSONEN-KAJAK
- 2-PERSON KAYAK
- KAYAK 2 PLACES
- DE AT CH
- Read the following instructions for use carefully to do so.
- Scope of delivery (fig. A)
- Technical data
- Symbols used
- WARNING!
- Intended use
- Safety instructions
- Danger to life!
- Risk of injury!
- Beware of offshore winds!
- Beware of offshore currents!
- Avoiding material damage!
- Assembly
- Assembling the 2-way screw-on valve (fig. H)
- Inflation
- Inflation sequence
- Filling the air chambers
- Floor chamber with screw-on valve
- Lower side chambers with stopper valve
- Upper side chambers with screw-on valve
- Checking the operating pressure
- IMPORTANT!
- The PVC material expands somewhat after the product is inflated for the first time and does not return to its original condition. Remember that the specifications may vary slightly depending on the load and outside temperature.
- Attachment of accessories
- Securing the front seat (fig. D)
- Attaching the bowsprit guard
- Attaching the stern splash guard with seat
- Triangular cushion
- Assembling the double-bladed paddle (fig. B)
- Duffel bag
- Storage bag
- Disassembling the kayak
- Deflating
- Disassembling double-bladed paddles
- Transport
- Storage, cleaning
- Use only care products containing no acid or petroleum components and never use silicon-based products.
- Repairs
- When there is more serious damage you should not under any circumstance perform repairs yourself.
- Information on disposal
- Notes on the guarantee and service handling
Brand : CRIVIT
Model : Inshore 335 VII
Category : Kayak