
IAN 86427 - Kayak CRIVIT - Free user manual and instructions
Find the device manual for free IAN 86427 CRIVIT in PDF.


| Product Type | 2-Person Inflatable Kayak |
| Model | IAN 86427 |
| Brand | Crivit |
| Length | Approx. 325 cm |
| Width | Approx. 91 cm |
| Height | Approx. 46 cm |
| Weight | Approx. 7 kg |
| Maximum Load Capacity | 160 kg (352.75 lbs) |
| Maximum Air Pressure | 0.05 bar (0.73 psi) |
| Number of Air Chambers | 5 |
| Number of Persons | 2 adults |
| Intended Use | Protected coastal waters up to 300 m from shore; small lakes, narrow rivers, canals; wind up to Beaufort 4, wave height up to 0.5 m |
| Included Accessories | Double-bladed paddle (1), drip rings (2), front seat (1), rear splash guard with seat (1), prow splash guard (1), triangular cushion/footrest (1), carrying straps (2), ropes (6), repair kit (1), control ruler (1), kit bag (1), storage bag (1), screw valves (2) |
| Material | PVC (presumed) |
| Care Instructions | Clean with fresh water and mild soap after each use; dry completely; store in a clean, dry place away from direct sunlight; do not use acidic, petroleum-based, or silicone products |
| Safety Features | 5 separate air chambers (4 intact chambers keep kayak afloat if one fails); warning labels; must wear life vest; not for use under influence |
| Warranty | 3 years from date of purchase |
| Repairability | Small damages repairable with included repair kit; large damages should be handled by professional |
| Assembly | Requires 2 adults; inflate in specified order; use standard foot pump or double-stroke piston pump (no compressor) |
| Storage Temperature | Do not unfold or inflate below 15°C; avoid temperature extremes |
Frequently Asked Questions - IAN 86427 CRIVIT
User questions about IAN 86427 CRIVIT
0 question about this device. Answer the ones you know or ask your own.
Ask a new question about this device
Download the instructions for your Kayak in PDF format for free! Find your manual IAN 86427 - CRIVIT and take your electronic device back in hand. On this page are published all the documents necessary for the use of your device. IAN 86427 by CRIVIT.
USER MANUAL IAN 86427 CRIVIT
natural_image
Exterior view of a gray inflatable boat with visible branding and website URL (no signage on the boat itself)2-PERSON KAYAK
DELTA SPORT HANDELSKONTOR OMBH
Wichard
3220714568
Verd sec Co/2013
2016 Sp. 34 N: 107,000 325
[QR] [REDACTED]
2-PERSON KAYAK
Instructions for use
⑧
2-MANSKAJAK
Bruksonvisning
DE AT CH
2-PERSONEN-KAJAK
Bedienungsanleitung
H
2 HENKILON KAJAKKI
Käyttöphje
PK
KAJAK TIL 2 PERSONER
Brugervejledning
IAN 86427IAN 86427
08 11 12 13
DK DF AF CH

(1)
Before reading, fold out the illustration page and get to know all of the functions of your unit.
⑪
G8/IE Instructions and Safety Notice Page G5
Fl Kayto naturalissuosoet Sivuta 12

flowchart
graph LR
    A["Oxygenation"] --> B["Hotening"]
    B --> C["Washing"]
    C --> D["Clearing"]
    D --> E["Clearing"]
    style A fill:#f9f,stroke:#333
    style B fill:#ccf,stroke:#333
    style C fill:#cfc,stroke:#333
    style D fill:#fcc,stroke:#333
    style E fill:#cff,stroke:#333


Technical Data / Symbols Used 6
Parts Overview / Contents 6
Intended Use 6
Code of Conduct / Safety Notice 6-7
Danger of Injury 7
Minimising Damage 7
Assembly 7-8
Assembling the double paddle 8
Assembling the Screw Valve 8
Inflating 8-9
Inflation Sequence 8
Monitoring the Operating Pressure 9
Measuring Strips and Monitoring Ruler 9
Inflating the Air Chambers 9
Front seat, Rear splash guard with seat, Prow splash guard, Triangular cushion 9
Dismantling the Kayak 9 - 10
Kit bag 10
Storage bag 10
Transport 10
Care / Maintenance / Storage 10
Repairs 10
Disposal 10
3-year warranty 11

Congratulations!
With your purchase you have decided on a high-quality product. Get to know the product before you start to use it. Carefully read the following operating instructions. Use the product only as described and only for the given areas of application. Keep these instructions safe. When passing the product on to a third party, always make sure that the documentation is included.
It contains important information regarding the product, its construction, the company and care of, as well as safety instructions. Because water sports always have a certain risk involved, exact knowledge about the product could prevent possible personal injury or even death.
Technical Data / Symbols Used
= 2 = 0 Number of persons
permitted: 2 adults / 0 children
Permitted safe load capacity:
160 kg (352,75 lbs.)
→ ● ⇔ max. air pressure: 0,05 bar (0,73 psi)
Length: approx. 325 cm
Width: approx. 91 cm
Height: approx. 46 cm
Weight: approx. 7 kg
Parts Overview / Contents (Fig. A-D)
① Floor chamber with stopper valve
2/4 lower side chamber with peg valve
3/4pper side chamber with screw valve
6 Front seat (1 x)
⑦ Rear splash guard with seat (1 x)
8 Prow splash guard (1 x)
9 Carrying strap (2 x)
10 Ropes (6 x) (2 x 280 cm / 2 x 150 cm / 1 x 80 cm / 1 x 200 cm )
11 Double-bladed paddle (1 x)
11a Drip ring (2 x)
12 Triangular cushion / Footrest (1 x)
13 Screw valve (2 x)
14 Kit bag (1 x)
15 Storage bag (1 x)
16 Repair kit (1 x)
17 Control ruler (1 x)
18 Vent (2 x)
19 Instructions (1 x)
Intended Use
This article has been designed for private use. Area of use: Protected shoreline up to 300m - for journeys in protected coastal waters, small bays, on small lakes, narrow rivers and canals. Do not use in windy conditions above Beaufort Scale 4 or with a wave height of over 0.5m.

Code of Conduct / afety Notice
This kayak is a tested and safe piece of water sports equipment. We urgently ask you to comply with the following rules and regulations:

WARNING!
Your care and self-assessment on the water is extremely important. Never over-estimate your power and steering skills! Remain close to the shore! Keep a constant eye on the weather, storm warnings and possible flare signals!

WARNING!
Please always follow the safety regulations and laws applicable to lakes and open water, and for your own safety, always wear a tested life-vest.

WARNING!
Danger of suffocation for children! Never allow children to play unsupervised with the packaging materials, or the article itself.

WARNING!
If a person happens to have fallen over-board, their rescue must take place via the front or rear of the craft. Re-entry at the side can cause the craft to capsize.

Danger of Injury!
Caution by offshore winds! Caution by offshore currents!
- Please note that the weight of the occupants of the craft as well as the luggage must be uniformly distributed otherwise the kayak can capsize.
- Follow the information on the type plate regarding the permitted weight allowance and number of occupants as well as the warning information.
• Always keep to the local navigation regulations.
- Do not carry any sharp or pointed objects.
- The kayak should be protected against contact with dubious liquids or acids to avoid irreparable damage.
- Protect the kayak against heat and fire! Take care with lit cigarettes!
- Make sure you do not run aground on stony subsoil to avoid damage to the underside of the kayak.
- Should damage to one of the five inner chambers occur whilst afloat, do not abandon the kayak. The floatation force of the four intact inner chambers is sufficient to maintain the kayak safely on the water.
- Never transport the kayak in vehicles when inflated.
- Never leave your unoccupied kayak on the water. It can be swept away faster than you can swim after it.
• Always carry the paddle with you when using the kayak otherwise you will not be able to maneuver it.
- Do not attempt to make any technical changes to your kayak. Changes of any kind endanger the operation of the sports device.
- Never use your kayak under the influence of alcohol, drugs or medicinal products.
- Never overestimate your own strength and divide your muscular strength with the paddle in such a way that the distance you have paddled away from the shore can be easily paddled back again. Stay in protected coastal areas, no more than 300m away, and pay attention to varying winds and currents which can complicate your movement.
Minimising Damage!
- All inflatable articles are sensitive to cold. This article should never be unfolded and inflated at a temperature under 15^ !
- If the atmospheric pressure increases under the blazing sun, this must be compensated by releasing some air from the craft.
- Pay attention to the fact that the article - particularly in its inflated state - does not come into contact with stones, gravel or sharp objects, and that it is not dragged or pulled along the ground because this can damage the kayak's skin.
- Only insert suitable pump adaptors into the valve. The wrong type of pump adaptor can damage the valve.
- Do not over-inflate - this can result in the danger of the seams bursting. Seal all valves securely after inflating.
- Avoid contact with sharp, hot, pointed or dangerous objects.
Assembly
Assembly should be carried out by two adults, on account of the kayak's size. Please follow the individual steps of the assembly instructions in the correct order.
This is particularly important when inflating the five air chambers because incorrect pressure distribution can lead to kayak instability and to the interference of its handling characteristics.
- Select a smooth, clean surface with sufficient space to unpack and unfold the kayak.
Make sure that all of the individual parts are present and in a flawless state. - From the second assembly onwards, the kayak should be checked for possible damage.
Inspect for holes and tears, and seal any that you find, as described later. You cannot repair any damage once you are afloat.
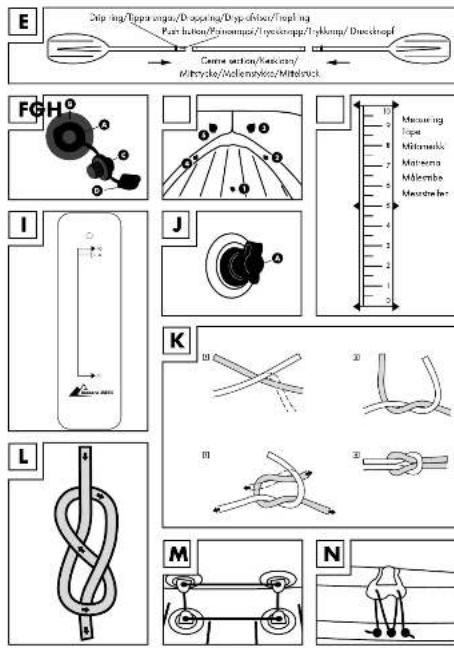
Assembling the double paddle (Fig. E)
Note:
The paddle can be converted into a single blade paddle by removing the paddle centre section for when 2 occupants are present.
- First push both drip-rings over both ends of the paddle tubes so that they sit below the push button on the taper of the pipe. Then connect both paddle tubes with the centre section so that both push buttons engage audibly and visibly.
Assembling the Screw Valve (Fig. F)
The upper side chambers of the kayak ④ ⑤ are each equipped with a threaded opening for the attached screw valve.
Pull the loop A of the valve over the threaded opening B so that it is firmly placed in the groove intended for it. This process requires sensitivity and patience, however, this must be carried out carefully so that there is no chance of the valve coming free of the opening later on.
Now turn the base ⓒ firmly in a clockwise direction into the threaded opening.
Inflating
WARNING!
- Follow these directions in the correct, consecutive order when inflating the air chambers.
- The recommended operating pressure is 0.05 bar (= 50 mbar = 0.73 psi).
- Avoid excessive inflating of the air chambers to prevent the danger of the material stretching or the seams tearing.
- Use a standard foot pump for inflating the article or a double stroke piston pump with the corresponding connection and a manometer if necessary.
- Do not use a compressor or a compressed air bottle to inflate the article because this can cause article damage.
• Always completely inflate all of the air chambers.
Inflation Sequence (Fig. G)
Inflate the air chambers in the following sequence:
- ① Floor chamber with stopper valve
- ①ower side chamber with stopper valve
- Upper side chamber with screw valve
- ④ower side chamber with stopper valve
- Upper side chamber with screw valve
□ = as marked on the boat
Monitoring the Operating Pressure IMPORTANT!
The PVC material will stretch a little following initial inflation and will never return to its original size.
Please remember that this data can vary slightly, depending on the cargo it is carrying and the outside temperature.
Pump up the air chambers ①/② that they feel firm to the touch and no wrinkles can be seen in the material. Press on each air chamber with your thumb; you should just about be able to press the material in slightly.
Measuring Strips and Monitoring Ruler (Fig. H, I)
To monitor the air chamber ⑦ operating pressure, place the → 0 of the monitoring ruler (fig. I) over the ←→ 0 of the measuring strip (fig. H) on the article.
During initial inflation, the maximum stretch point MUST NOT exceed Position A on the monitoring ruler.
From the second use onwards, pump up the craft so that the 10 on the measuring strip is between Position A and Position 10 of the monitoring ruler.
Inflating the Air Chambers (Fig. J)
① Floor chamber with stopper valve ②/④ Lower side chamber with stopper valve
- Open the valve closure A.
- Pump up each air chamber.
- Close the valve closure and press the sealed valve down using a little pressure.
3/5 Upper side chamber with screw valve
- Inflate the upper side chambers ⑦ and seal the closure cap D (Fig. F) by screwing in a clockwise direction.
Front seat, Rear splash guard with seat, Prow splash guard, Triangular cushion (Fig. K - N)
Note:
The ropes must be tied using a reef knot and a figure-of-eight hitch knot (Fig. K, L)
1. Front seat (Fig. M, N)
Pump up all of the air chambers. Place the seat underneath both of the upper side air chambers ③/⑤so that the seat is securely fitted. Tie the seat using the 80cm rope through the eyelet on the floor chamber (fig. M) as well as with a 150cm rope in a zig-zag shape through the eyelets on the side chambers and (fig. N).
2. Rear splash guard with seat
Pump up all of the air chambers. Press the seat underneath both of the upper side air chambers ③/④so that the seat is securely fitted. Fasten the rear splash guard with seat with a 280cm rope in a zig-zag shape through the eyelets on the side chambers ⑤and .⑥
3. Prow splash guard
Pump up all of the air chambers and fasten the prow splash guard with a 280cm rope in a zig-zag shape to the eyelets on the side chambers ③ and ⑤
4. Triangular cushion
Position the triangular cushion securely in the prow of the kayak. It is there to serve as a foot-rest for then person sitting at the front.
Dismantling the Kayak
Remove the front seat, the rear splash guard with seat, the prow splash guard and the triangular cushion.
Deflating
Deflate the kayak as follows:
-
To deflate the floor chamber ①, the lower side chambers ②, the front seat, the rear splash guard with seat, and the prow splash guard, pull the stopper valve out of its concealed location and press the shaft lightly or use the deflation tube.
-
To deflate the side chambers ①/⑤crew the valves completely from their base mountings.
Kit bag
A kit bag 📋s included with this article in which the kayak is stowed away for transport and storage. In order to close this, please use the 200cm rope. The kit bag is also useful when afloat for the splash-proof safekeeping of provisions, clothes etc. Please remember that this bag is not watertight. For this reason, do not store sensitive objects in it, for example, cameras. For use aboard it is advisable to remove the rope and to flatten and roll up the upper end, closing it when necessary with the hook and loop fastener.
Storage bag
A splash-proof storage bag is also included ^15 which can be attached to the back of the front seat using the hook and loop fastener. Small objects can be stowed away here to keep them dry but please remember that this bag too is not completely watertight. Please do not store sensitive objects here.
Transport
Always transport the kayak with two adults and use the carrying straps at the front and back of the craft.
Care / Maintenance / Storage

WARNING!
Only use care products that do not contain traces of acids or petroleum and never use silicone-based products.
- Clean your kayak thoroughly after every use with fresh water and mild soap to remove salt crystals, sandy granules and other small dirt particles. Leave it to dry completely.
-
Lay both of the upper side pipes into the inside of the kayak and fold them together carefully.
-
Store your kayak in a clean and dry place away from direct sunlight and somewhere where there are no great temperature fluctuations. Pay attention to the fact, that the kayak is not wrinkled but lays flat, and keep well out of the reach of rodents.
Repairs

WARNING!
You should not attempt to repair large damaged sections by yourself.
You can repair small areas with the enclosed repair kit.
- Deflate the kayak completely and clean the area to be repaired with an alcohol-based solution. Roughen up the damaged area surrounding the hole or tear with a fine sand paper.
- Cut a patch to cover the damaged area. The patch should overlap the damaged area by at least 1.25cm on all sides.
- Apply the glue to the kayak as well as to the patch. Allow to dry for approx. 3 minutes.
- Press the patch down firmly using a soft object. Make sure that you are working on a flat, even surface. Remove any air bubbles with a rounded object, gently pushing the bubbles in an outward direction.
- Always wait at least 12 hours after a repair before pumping up the kayak once again.
Disposal
Please dispose of the product and packaging in an environmentally friendly manner, separating different materials for recycling as required! Dispose of this item through an authorised disposal company or through your local waste disposal facilities - ask your local authority for information if further guidance is required. Ensure that you comply with all regulations currently in force.
3-year warranty
The product was produced with great care and under constant supervision. You receive a three-year warranty for this product from the date of purchase. Please retain your receipt.
The warranty applies only to material and workmanship and does not apply to misuse or improper handling. Your statutory rights, especially the warranty rights, are not affected by this warranty.
With regard to complaints, please contact the following service hotline or contact us by e-mail.
Our service employees will advise as to the subsequent procedure as quickly as possible.
We will be personally available to discuss the situation with you.
Any repairs under the warranty, statutory guarantees or through goodwill do not extend the warranty period. This also applies to replaced and repaired parts. Repairs after the warranty are subject to a charge.
IAN: 86427
GB Service Great Britain
Tel.: 0871 5000 720
(£ 0.10/Min.)
E-Mail: deltasport@lidl.co.uk
IE Service Ireland
Tel.: 1890 930 034
(0,08 EUR/Min., (peak))
(0,06 EUR/Min., (off peak))
E-Mail: deltasport@lidl.ie
You can also find spare parts for your product at: www.delta-sport.com, category Service - Lidl Spare Parts Service
www.delta-sport.com, rubrik service - reservedelservice Lidl
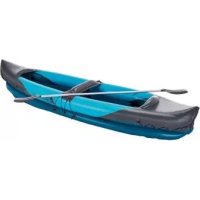
- 2-PERSON KAYAK
- Congratulations!
- Technical Data / Symbols Used
- Parts Overview / Contents (Fig. A-D)
- Intended Use
- Code of Conduct / afety Notice
- WARNING!
- Danger of Injury!
- Minimising Damage!
- Assembly
- This is particularly important when inflating the five air chambers because incorrect pressure distribution can lead to kayak instability and to the interference of its handling characteristics.
- Assembling the double paddle (Fig. E)
- Note:
- Assembling the Screw Valve (Fig. F)
- Inflating
- Inflation Sequence (Fig. G)
- Monitoring the Operating Pressure IMPORTANT!
- Measuring Strips and Monitoring Ruler (Fig. H, I)
- Inflating the Air Chambers (Fig. J)
- ① Floor chamber with stopper valve ②/④ Lower side chamber with stopper valve
- 3/5 Upper side chamber with screw valve
- Front seat, Rear splash guard with seat, Prow splash guard, Triangular cushion (Fig. K - N)
- Front seat (Fig. M, N)
- Rear splash guard with seat
- Prow splash guard
- Triangular cushion
- Dismantling the Kayak
- Deflating
- Kit bag
- Storage bag
- Transport
- Care / Maintenance / Storage
- Only use care products that do not contain traces of acids or petroleum and never use silicone-based products.
- Repairs
- You should not attempt to repair large damaged sections by yourself.
- Disposal
- 3-year warranty
Brand : CRIVIT
Model : IAN 86427
Category : Kayak