
549095 - Battery charger SILVERLINE - Free user manual and instructions
Find the device manual for free 549095 SILVERLINE in PDF.
| Product type | Automatic battery charger |
| Brand | Silverline |
| Model | 549095 |
| Input voltage | 230 V~, 50 Hz |
| Maximum input power | 400 W |
| Output current 12 V (fast charge) | 12 A max. |
| Output current 12 V (start) | 75 A max. |
| Output current 6 V | 2 A (normal charge) |
| Battery capacity range | 8–180 Ah (6 V and 12 V) |
| Compatible battery types | Standard (FLA/VRLA), deep cycle, AGM/GEL |
| DC circuit protection | 80 A fuse |
| Thermal protection | Integrated |
| Protection rating | IP20 |
| Dimensions (L × W × H) | 195 × 255 × 200 mm |
| Weight | 6.75 kg |
| Features | Digital display, battery type and mode selectors (fast charge/normal/start) |
| Use | 3-stage automatic charger for 6 V/12 V lead-acid batteries |
| Maintenance | Clean with dry cloth; replace external 80 A fuse |
| Safety | Reverse polarity protection, thermal protection, fuse |
| Spare parts available | 80 A DC fuse |
| Warranty | 3 years (subject to online registration within 30 days) |
Frequently Asked Questions - 549095 SILVERLINE
User questions about 549095 SILVERLINE
0 question about this device. Answer the ones you know or ask your own.
Ask a new question about this device
Download the instructions for your Battery charger in PDF format for free! Find your manual 549095 - SILVERLINE and take your electronic device back in hand. On this page are published all the documents necessary for the use of your device. 549095 by SILVERLINE.
USER MANUAL 549095 SILVERLINE
Automatic Battery Starter Charger 12A 6/12V 8-180Ah Capacity
natural_image
Exterior view of a silver line test instrument with dual clamp and power cord (no visible text or symbols)

silverlinetools.com
| Powerbox Int. Ltd. Somerset, BA22 8HZ, UK | |||
 | Automatic battery charger 12A, 549095 | ||
| Input: | 230V~50Hz, 250W, 400Wmax | ||
| Output: | Setting Choose | ||
 | 12V REGULAR 12V DEEP CYCLE 12V AGMIGEL | Fast charge: 12VDC, 12A max, 6A min Normal charge: 12VDC, 2A | |
| 6V REGULAR | Normal charge: 6VDC, 2A | ||
| Engine Start | 12VDC, 75A max 3s ON, 180s ORF, Max. Scycle | ||
 |  | Apply to Lead-acid battery: 8Ah-180Ah | |
| Warnings: • Before charging, read the instructions • For indoor use, or do not expose to rain • disconnect the supply before making or breaking the connections to the battery • WARNING. Explosive gases. Prevent flames and sparks. Provide adequate ventilation during charging | |||
| IP20 | |||
English ......4
Français ......10
Deutsch......16
Español......22
Italiano ......28
Nederlands ......34
Polski ......40
Introduction
Thank you for purchasing this Silverline tool. This manual contains information necessary for safe and effective operation of this product. This product has unique features and, even if you are familiar with similar products, it is necessary to read this manual carefully to ensure you fully understand the instructions. Ensure all users of the tool read and fully understand this manual.
Description of Symbols
The rating plate on your tool may show symbols. These represent important information about the product or instructions on its use.

Wear hearing protection.
Wear eye protection.
Wear breathing protection.
Wear head protection.

Wear hand protection.

Read instruction manual.

Wear protective clothing

Wear protective shoes

Class I construction (protective earth)

Indoors use only!

NO open flames!

Always disconnect from the power supply when adjusting, changing accessories, cleaning, carrying out maintenance and when not in use!

Risk of fire!

Risk of explosion!

Toxic fumes or gases!

DO NOT use in rain or damp environments!

Caution!

Lead acid battery!

NO smoking!

Environmental Protection
Waste electrical products should not be disposed of with household waste. Please recycle where facilities exist. Check with your local authority or retailer for recycling advice.

Conforms to relevant legislation and safety standards.
Technical Abbreviations Key
| V Volts | |
| ~, AC Alternating current | |
| A, mA Ampere, milli-Amp | |
| Ah Amp hours (battery capacity) | |
| Hz Hertz | |
| -, DC Direct current | |
| W, kW Watt, kilowatt | |
| Ω Ohms (resistance) |
Specification
Input: 230V\~50Hz, 250W, 400W max
Output power 12V: 12V DC, 12A max, 6A min (Fast charge)
.12V DC, 2A (Normal charge)
12V DC, 75A max (Engine start)
Output power 6V: 6V DC, 2A (Normal charge)
Battery capacity range: 8-180Ah (6 & 12V)
Battery cell type: Regular (FLA/VRLA), Deep cycle, AGM/GEL
DC circuit protection: DC 80A fuse
Thermal protection: Built in
Protection class:
Ingress protection: IP20
Dimensions (L x W x H): 195 x 255 x 200mm
Product weight: 6.75kg
As part of our ongoing product development, specifications of
Silverline products may alter without notice.
General Safety
WARNING Read all safety warnings and all instructions. Failure to follow the warnings and instructions may result in electric shock, fire and/or serious injury.
WARNING: This appliance is not intended for use by persons (including children) with reduced, physical or mental capabilities or lack of experience or knowledge unless they have been given supervision or instruction concerning use of the appliance by a person responsible for their safety. Children must be supervised to ensure that they do not play with the appliance.
Save all warnings and instructions for future reference.
The term "power tool" in the warnings refers to your mains-operated (corded) power tool or battery-operated (cordless) power tool.
Work area safety
a) Keep work area clean and well lit. Cluttered or dark areas invite accidents.
b) Do not operate power tools in explosive atmospheres, such as in the presence of flammable liquids, gases or dust. Power tools create sparks which may ignite the dust or fumes.
c) Keep children and bystanders away while operating a power tool. Distractions can cause you to lose control.
Electrical safety
a) Power tool plugs must match the outlet. Never modify the plug in any way. Do not use any adapter plugs with earthed (grounded) power tools. Unmodified plugs and matching outlets will reduce risk of electric shock.
b) Avoid body contact with earthed or grounded surfaces, such as pipes, radiators, ranges and refrigerators. There is an increased risk of electric shock if your body is earthed or grounded.
c) Do not expose power tools to rain or wet conditions. Water entering a power tool will increase the risk of electric shock.
d) Do not abuse the cord. Never use the cord for carrying, pulling or unplugging the power tool. Keep cord away from heat, oil, sharp edges or moving parts. Damaged or entangled cords increase the risk of electric shock.
e) When operating a power tool outdoors, use an extension cord suitable for outdoor use. Use of a cord suitable for outdoor use reduces the risk of electric shock.
f) If operating a power tool in a damp location is unavoidable, use a residual current device (RCD) protected supply. Use of an RCD reduces the risk of electric shock.
Personal safety
a) Stay alert, watch what you are doing and use common sense when operating a power tool. Do not use a power tool while you are tired or under the influence of drugs, alcohol or medication. A moment of inattention while operating power tools may result in serious personal injury.
b) Use personal protective equipment. Always wear eye protection. Protective equipment such as dust mask, non-skid safety shoes, hard hat, or hearing protection used for appropriate conditions will reduce personal injuries.
c) Prevent unintentional starting. Ensure the switch is in the off-position before connecting to power source and/or battery pack, picking up or carrying the tool. Carrying power tools with your finger on the switch or energising power tools that have the switch on invites accidents.
d) Remove any adjusting key or wrench before turning the power tool on. A wrench or a key left attached to a rotating part of the power tool may result in personal injury.
e) Do not overreach. Keep proper footing and balance at all times. This enables better control of the power tool in unexpected situations.
I) Dress properly. Do not wear loose clothing or jewellery. Keep your hair, clothing and gloves away from moving parts. Loose clothes, jewellery or long hair can be caught in moving parts.
g) If devices are provided for the connection of dust extraction and collection facilities, ensure these are connected and properly used. Use of dust collection can reduce dust-related hazards.
Power tool use and care
a) Do not force the power tool. Use the correct power tool for your application. The correct power tool will do the job better and safer at the rate for which it was designed.
b) Do not use the power tool if the switch does not turn it on and off. Any power tool that cannot be controlled with the switch is dangerous and must be repaired.
c) Disconnect the plug from the power source and/or the battery pack from the power tool before making any adjustments, changing accessories, or storing power tools. Such preventive safety measures reduce the risk of starting the power tool accidentally.
d) Store idle power tools out of the reach of children and do not allow persons unfamiliar with the power tool or these instructions to operate the power tool. Power tools are dangerous in the hands of untrained users.
e) Maintain power tools. Check for misalignment or binding of moving parts, breakage of parts and any other condition that may affect the power tool's operation. If damaged, have the power tool repaired before use. Many accidents are caused by poorly maintained power tools.
f) Keep cutting tools sharp and clean. Properly maintained cutting tools with sharp cutting edges are less likely to bind and are easier to control.
g) Use the power tool, accessories and tool bits etc. in accordance with these instructions, taking into account the working conditions and the work to be performed. Use of the power tool for operations different from those intended could result in a hazardous situation.
WARNING: When used in Australia or New Zealand, it is recommended that this tool is ALWAYS
supplied via Residual Current Device (RCD) with a rated residual current of 30mA or less.
Service
a) Have your power tool serviced by a qualified repair person using only identical replacement parts. This will ensure that the safety of the power tool is maintained.
Battery Charger Safety
WARNING: Be aware that lead-acid batteries emit flammable, explosive gases during charging and engine cranking. Do not charge batteries close to any kind of ignition, sparks, open flames or heat source. Do not smoke near batteries that are being charged. If you smell gas at any time during battery charging, DO NOT disconnect clamps. Ensure windows and doors are open to allow maximum ventilation. When gas has cleared, disconnect charger from the mains power supply.
WARNING: When working with or near a lead-acid battery, always ensure there is someone nearby, within vocal range, who can come to your aid if required.
- Always refer to the battery manufacturer's guidance before charging a battery
- Do not allow solvents such as paint thinner, petrol or detergents to contact the battery case
- Unless the battery is of the 'maintenance free' type, always check that the electrolyte level is correct before attempting to charge
-
Always check the battery type (AGM, gel, etc.) and capacity (Ah) is compatible with the battery charger
-
Remove all metal jewellery before handling lead-acid batteries
• Always wear protective gloves and goggles when handling lead-acid batteries
• To prevent sparking, do not wear clothes made of synthetic fibre that may hold a static charge - Never use this charger to charge non-rechargeable batteries or other batteries this charger is not designed to charge
- Use this battery charger in completely dry conditions
- Never attempt to charge a frozen battery
- Do not attempt to charge any battery that is leaking, cracked, or otherwise damaged
- If the battery charger supply cord is damaged, it must be replaced by the manufacturer, its service agent or similarly qualified persons in order to avoid a hazard
- Ensure that there is at least 600mm of clear space around the charger to allow adequate ventilation
• This battery charger is designed to charge one battery at a time
- Batteries should always be in a stable, upright position during charging
- Position the charger as far from the battery as charging leads will allow
- Always handle battery terminal connectors at arm's length
• Always disconnect power supply before making, or breaking, battery terminal connections
- Do not allow any metal items to come into contact with the battery terminals
- Do not allow positive and negative lead clamps to touch
- If the battery does not appear to be charging, or displays any unusual operating characteristics, dispose of the battery and replace
- Allow batteries to cool for 15 minutes after charging or heavy use
- Wash thoroughly with soap and water if battery acid contact skin or clothing
- If battery acid contacts eyes, wash thoroughly with clean water and seek medical help
- Batteries should always be disposed of at suitable recycling facilities. Do not dispose of batteries with regular household waste
- Keep battery charger and batteries clean; foreign objects or dirt may cause a short circuit. Failure to follow these instructions may cause overheating or fire
- When not in use, batteries should be stored in a dry place at room temperature (20°C). Ensure that batteries are stored in such a way that they cannot accidentally short-circuit in storage
- Always recycle lead acid batteries. Contact your local or national authority for the correct recycling procedure. When returning batteries, cover the terminals with insulated adhesive tape to prevent shorting and possible fire or explosion
• Always keep lead acid batteries out of reach of children
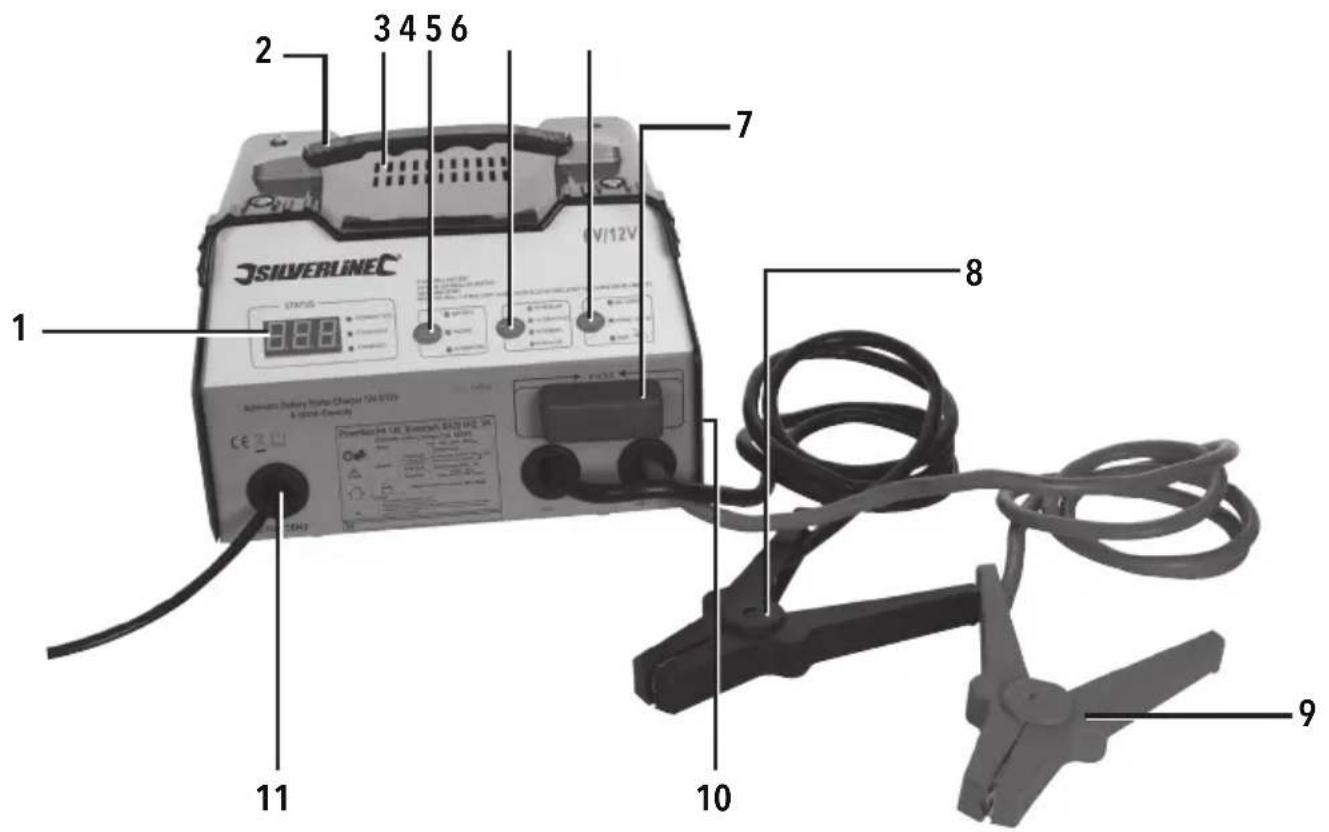
Product Familiarisation
| 1 Digital Display |
| 2 Carry Handle |
| 3 Air Vent |
| 4 Digital Display Selector |
| 5 Battery Type Selector |
| 6 Charge Start Selector |
| 7 Fuse |
| 8 Black Negative Clamp |
| 9 Red Positive Clamp |
| 10 Rear Fan (not shown) |
| 11 Mains Power Cord |
Intended Use
Battery charger for charging conventional wet-cell lead acid batteries that are either fitted in a vehicle or freestanding. 12V (normally 6 cell) and 6V (normally 3 cell) batteries are supported. Automatic battery charger is also capable of AC power-assisted starting of vehicles in the same range.
Note: This battery charger is not suitable for charging electric vehicles with built-in rechargeable batteries.
Unpacking Your Tool
- Carefully unpack and inspect your tool. Fully familiarise yourself with all its features and functions
- Ensure that all parts of the tool are present and in good condition. If any parts are missing or damaged, have such parts replaced before attempting to use this tool
Before Use
WARNING: Do not connect the charger to the mains power supply until instructed in the steps below.
⚠ WARNING: Always visually check the charger and all cables prior to each use for signs of wear/defects/damage.
WARNING: Only use this product in a dry, well-ventilated area.
WARNING: Ensure the charger is on a stable, flat surface where the unit and/or connecting cables will not pose a tripping hazard when in use.
IMPORTANT: It is always recommended to disconnect the battery from the vehicle before charging, which helps avoid damage to the alternator and other electrical accessories on the vehicle. Before disconnecting the battery, ensure that the voltage of the battery is compatible with the charger.
A guide to typical vehicle battery Ah ratings (to be used as a rough guide; always check the battery in the vehicle)
| Engine Capacity | |||||
| <1300cc 5 - 15Ah 15 - 30Ah 35 - 45Ah - 60 - 110Ah | |||||
| >1300cc - -45 - 65Ah 45 - 65Ah 60 - 110Ah | |||||
| Diesel - - 60 - 90Ah 60 - 90Ah 60 - 110Ah | |||||
IMPORTANT: Before charging a maintenance-type battery, always check the electrolyte level in the chambers. To ensure a longer battery life, the electrolyte levels must be kept at or close to the maximum levels inside the chambers. When topping up the electrolyte, ALWAYS wear protective eyewear and rubber gloves. Always use distilled water to fill and never use regular tap water. After the electrolyte has been topped up, leave the caps off while charging if the battery manufacturer's instructions suggest to do so.
Battery Type Selector
- Use this button to select the correct type of battery
12V Regular: Regular lead acid. Higher short burst of energy. SLI (starting, lighting, ignition) batteries. Main purpose is to start an engine.
12V Deep Cycle: Wet cell, flooded (FLA) and valve-regulated lead acid (VRLA), leisure batteries. Provides steady rate of energy to power caravans and motorhomes etc. Main purpose is to perform a high number of recharge/discharge cycles without battery-health loss.
12V AGM/GEL: AGM (absorbed glass mat) and GEL cell batteries. Deep-cycle batteries requiring a specific charge rate.
6V Regular: Regular lead acid. Higher short burst of energy. SLI (starting, lighting, ignition) batteries. Main purpose is to start an engine.
Charge Start Selector
- Use this button to select the desired charge mode
Fast Charge: For charging batteries faster with a higher current output. Mainly used for a quicker charge to batteries in vehicles that may require a jump start. This mode is not recommended for general charging or for deep-cycle batteries.
Normal Charge: Used for a regular, slower charge. Can be used to charge all battery types. Start: Used to provide a temporary AC to DC boost to vehicles that are trying to be started. (See 'Selecting 'Start' Mode')
Connecting to a battery (in vehicle)
- This charger is suitable for use on 6V/12V, negative earth, vehicle electrical systems only, when charging with the battery fitted in the vehicle
- Marine batteries must ALWAYS be moved to dry land for charging. This charger is not designed for use in a marine environment
- If appropriate, check battery fluid level before charging. Top up with distilled water if required. Check battery manufacturer's guidance as to whether cell caps should be removed for charging
- Ensure that the engine is stopped and all electrical accessories (lights, radio, etc.) are switched off. Keep vehicle bonnet, boot or access panels open during battery charging
- Locate battery and identify battery terminals. The positive terminal is usually marked with a '+' symbol; the negative terminal is usually marked with a '-' symbol. If you are unsure of which terminal is which, seek professional assistance
- Refer to vehicle manufacturer's handbook to determine whether terminals should be disconnected for charging. Follow manufacturer's guidance
For charging:
- Disconnect the negative '-' battery connection cable
- Disconnect the positive '+' battery connection cable
- If the battery terminals are corroded or dirty, clean them with a suitable wire brush
- Attach the Red Positive Clamp (9) to the positive '+' battery terminal
- Attach the Black Negative Clamp (8) to the negative '-' battery terminal
- Check that clamps are securely connected, and will not loosen during the charging process
For Start mode boost:
Note: This is not a jump start machine. The charger provides a boost to a drained but healthy battery.
- If the battery terminals are corroded or dirty, clean them with a suitable wire brush
- Attach the Red Positive Clamp (9) to the positive '+' battery terminal
- Attach the Black Negative Clamp (8) to the negative '-' battery terminal
- Check that clamps are securely connected, and will not loosen during the starting process
Connecting to a battery (freestanding)
- This charger is only suitable for use with 6V and 12V lead acid (wet cell) batteries, deep cycle (leisure) batteries, and AGM/GEL batteries
- If appropriate, check battery fluid (electrolyte) level before charging. Top up with distilled water if required. Check battery manufacturer's guidance as to whether cell caps should be removed for charging
- Ensure the battery and charger are placed in stable, flat, well-ventilated areas away from children
-
Identify battery terminals. The positive terminal is usually marked with a '+' symbol; the negative terminal is usually marked with a '-' symbol. If you are unsure of which terminal is which, seek professional assistance
-
Disconnect the negative '-' battery connection cable
-
Disconnect the positive '+' battery connection cable
-
If the battery terminals are corroded or dirty, clean them with a suitable wire brush
-
Attach the Red Positive Clamp (9) to the positive '+' battery terminal
-
Attach the Black Negative Clamp (8) to the negative '-' battery terminal
-
Check that the clamps are securely connected and will not loosen during the charging process
Note: If the clamps are correctly connected, the display will show the voltage and 'connected' will be illuminated. If the poles are reversed, the display will show 0.0 and 'connected' will not illuminate.
Operation
WARNING: Only use the 'Fast Charge' mode under the Charge Start Selector (6) for a short amount of time. Do not leave the battery unattended while in 'Fast Charge' charging mode.
WARNING: Never charge a battery where the water level is low. These will produce a higher level of explosive/flammable gas and damage the battery.
IMPORTANT: This is a three-stage automatic charger. Under 'Normal' charge mode, the charger can remain connected to the battery for long periods of time. Monitor the battery's charge progress, then disconnect the charger after the battery has reached the desired percentage level.
IMPORTANT: Ensure the battery is in a well-ventilated area before commencing charging to prevent the build-up of flammable gases.
IMPORTANT: This is an earthed device and must be connected to an earthed mains socket.
IMPORTANT: It is recommended to use this battery charger to charge only one battery at a time. Full information regarding how to charge batteries in series or parallel with this charger is beyond the scope of this manual. However, it is important to match: voltage, capacity, state of charge, relative age and ideally brand and model of each battery to ensure correct charging for both series and parallel. It is also important that battery banks have a final voltage of 6V or 12V and the combined Ah rating is within the range stated in the specification.
WARNING: DO NOT switch polarity, for example negative clamp to positive battery terminal and positive clamp to negative terminal. Doing so could cause damage to the device and the battery, and could cause explosion.
Charging batteries
Note: Follow the correct procedure for either 'Connecting to a battery (in vehicle)' or 'Connecting to a battery (freestanding)' before continuing.
- Check that the clamps are securely connected to the correct terminals and will not loosen during the charging process
- Turn the automatic charger on at the power supply
- Check the Battery Type Selector (5) is set to the correct battery and the Charge Start Selector (6) is set to the required Charge Start mode (see 'Battery Type Selector' and 'Charge Start Selector' for information)
- To cycle through the modes and selections using the Digital Display Selector (4), the Battery Type Selector (5), or the Charge Start Selector (6), press the individual selector button repeatedly until the light reaches the desired display mode/battery type/charge start mode
Note: Regularly monitor the charge level on the Digital Display (1) by checking the light next to the charge level:
Connected: battery detected and the battery charger is connected correctly
Charging: the battery is charging correctly
- Charged: the battery has reached its full-charge capacity and the charger can now be switched off then disconnected
- Once the battery reaches the desired amount of charge, or is fully charged, switch off the automatic battery charger at the mains power source then disconnect the Black Negative Clamp (8) followed by the Red Positive Clamp (9)
- When charging very cold batteries, the initial charge rate may increase as the battery warms. Do not attempt to charge a frozen battery
- Internally damaged (shorted) batteries will draw very high current, without charging. If the battery has been charging for 5\~10 minutes and shows no reduction in charging current, the battery may be damaged. Stop charging and have the battery professionally tested
- Refit battery in vehicle if removed, ensuring positive terminal is connected before the negative terminal
IMPORTANT: Disconnect the charger from the mains power supply, then disconnect the battery after use. Leaving the battery connected may result in overcharging and permanent battery damage.
Selecting 'Start' Mode
This mode briefly delivers 75A to bridge a drained or weak battery to assist in jump starting.
IMPORTANT: Only exit this mode by unplugging the Mains Power Cord (11).
WARNING: Ensure all of the connections are as described and are made in the correct order, otherwise damage may occur to electronic systems in the vehicle. Proceeding against the specifications in this manual is done with your own responsibility and at your own risk.
IMPORTANT: This function is not suitable for batteries that are below 45Ah as it could cause damage to the batteries.
Note: To protect the battery from damage, the battery charger has a built-in analysis programme for checking issues such as sulphation or rapid voltage drops. If the charger is connected to a severely drained or heavily stressed battery it will not turn on. During this analysis process, the battery is being charged with lower currents, which is indicated by the charging light, and the Digital Display will read '0'. This means the Start mode function cannot be used, which will protect the battery from damage. If this occurs, restart the automatic charger and then first charge the battery using either the 'Fast Charge' or 'Normal Charge' modes. (See 'Charging Batteries').
Note: Diesel vehicles and large-volume engines require amperages above 75A for jump starting. Charge the battery to at least 60% (monitor the 'Battery %' on the Digital Display (1)). Exit this mode by unplugging the Mains Power Cord (11).
When using this mode:
- Ensure the battery has some charge; the automatic battery charger is not a jump starter but can assist starting vehicles with partly depleted batteries by providing a boost
Note: For a quick charge to refresh a partially drained battery, charge the battery for 5-10 minutes with the Battery Type Selector (5) set to the correct battery and the Charge Start Selector (6) set to 'Fast Charge' mode.
- Ensure the vehicle's terminals are connected correctly to the battery terminals: positive '+' to positive, and negative '-' to negative
- Plug the battery charger's Mains Power Cord (11) in to the mains power
- Connect the Red Positive Clamp (9) to the battery's positive '+' terminal
- Connect the Black Negative Clamp (8) to the battery's negative ^1-2 terminal
- If connected correctly, the charger will automatically choose the correct battery type; however, review this and change the battery type by cycling through the battery types and pressing the Battery Type Selector (5) button
- Select the 'Start' mode by pressing the Charge Start Selector (6) until the correct mode is selected
- The Digital Display (1) should read '0'
- Turn on the vehicle's ignition and attempt to start the vehicle, which will show a '5' on the Digital Display and initiate a countdown: 2 seconds priming/analysis and 3 seconds jump start function at 75A
-
During this countdown, the charger will briefly deliver 75A to bridge the battery to attempt to start the car, which will be followed by a safety 180 second pause to protect the battery
-
After the pause, the 5 second cycle will restart followed by another pause
Only do this for 5 cycles
- After 5 cycles, if the vehicle has not started, allow the battery to cool then revert to another charge mode to charge the battery more before attempting the Start mode again
- After the vehicle has been started, select 'Alternator' mode on the Digital Display (1) to see if the alternator is working. If the alternator reads 100, then it is working effectively. If it is not reading 100, there may be a problem with the vehicle's alternator and will need to be checked by a professional mechanic as soon as possible
- If you are unable to start the vehicle after charging the battery again then using the 'Start' mode, the battery might be faulty or there might be another mechanical fault with the vehicle. Seek advice from a professional mechanic
Disconnecting from the battery
- Remove the Black Negative Clamp (8) from the battery's negative '-' terminal
- Remove the Red Positive Clamp (9) from the battery's positive '+' terminal
- Unplug the Mains Power Cord (11)
- Replace any covers for battery terminals/cells, if applicable
Note: If reconnecting the battery to the vehicle:
reconnect the battery's positive '+' terminal
reconnect the battery's negative '-' terminal
- replace any covers for battery terminals/cells, if applicable
Accessories
- Your Silverline stockist will have a wide range of other quality automotive products. Contact your local stockist for more information
Maintenance
WARNING: Always ensure that the battery charger is disconnected from the mains power supply and the battery before performing any maintenance procedure.
Replacing the Fuse
- On occasion the Fuse (7) may need to be replaced
- If the Fuse blows, correct the issue that caused it to blow before attempting to fit a replacement
- Remove the fuse cover by gently pressing in the sides
- Unscrew the Fuse with the correct open-ended spanner
- When replacing the Fuse, ensure it is replaced with the exact rating (80A) and type of Fuse. Contact your Silverline stockist for a replacement part
- Retighten the fittings
• Always replace the Fuse cover before re-using the machine
Note: The internal fuse is not accessible and if blown will need to be replaced by a qualified Silverline technician.
Cleaning
- Generally, this machine is considered 'maintenance free'
- Keep your machine clean. Do not allow waste to collect on any part of the device
-
Clean the metal and plastic parts of the machine with a dry cloth
-
Do not allow the machine to become wet
- Do not use any solvents or abrasive cleaners
Storage
- Store this tool carefully in a secure, dry place out of the reach of children
Disposal
Always adhere to national regulations when disposing of electrical equipment that is no longer functional and not viable for repair.
- Do not dispose of waste electrical and electronic equipment (WEEE) with household waste
- Contact your local waste disposal authority for information on the correct way to dispose of electrical equipment
Troubleshooting
| Problem Possible cause Solution | ||
| Fuse (7) has blown | Black Negative Clamp (8) & Red Positive Clamp (9) have touched | Replace Fuse and ensure clamps are kept apart |
| Black Negative Clamp (8) & Red Positive Clamp (9) are reversed | Replace Fuse and ensure clamps are fitted to the correct terminals of the battery | |
| Battery internal fault Replace Fuse and battery | ||
| Discharged battery not charging | Poor connection | Check Black Negative Clamp (8) & Red Positive Clamp (9) are firmly connected to battery terminals. Clean terminals if necessary |
| Battery sulphated Consult vehicle battery specialist to de-sulphate battery or replace battery | ||
| Fuse has blown Replace Fuse | ||
| 12V battery but set to 6V output Use correct voltage setting | ||
| Discharged battery charging at a slow rate | Battery at low temperature Charge rate will increase as battery warms | |
| Battery water level has reduced and there is bubbling and gassing of the water | Battery is being excessively over-charged | Disconnect battery charger from the mains supply immediately and ensure area is fully ventilated. Do not smoke or allow open flames near battery. Top up battery with distilled water (follow battery manufacturer instructions) and carefully check if battery is still in serviceable condition |
| Charger left in Fast Charge mode | ||
| 6V battery is being charged at 12V | ||
Silverline Tools Guarantee
This Silverline product comes with a 3 year guarantee
Register this product at www.silverlinetools.com within 30 days of purchase in order to qualify for the 3 year guarantee. Guarantee period begins according to the date of purchase on your sales receipt.
Registering your purchase
Registration is made at silverlinetools.com by selecting the Guarantee Registration button. You will need to enter:-
- Your personal details
• Details of the product and purchase information
Once this information is entered your guarantee certificate will be created in PDF format for you to print out and keep with your purchase.
Terms & Conditions
Guarantee period becomes effective from the date of retail purchase as detailed on your sales receipt.
PLEASE KEEP YOUR SALES RECEIPT
If this product develops a fault within 30 days of purchase, return it to the stockist where it was purchased, with your receipt, stating details of the fault. You will receive a replacement or refund.
If this product develops a fault after the 30 day period, return it to:
Silverline Tools Service Centre
PO Box 2988
Yeovil
BA21 1WU, UK
The guarantee claim must be submitted during the guarantee period.
You must provide the original sales receipt indicating the purchase date, your name, address and place of purchase before any work can be carried out.
You must provide precise details of the fault requiring correction.
Claims made within the guarantee period will be verified by Silverline Tools to establish if the deficiencies are related to material or manufacturing of the product.
Carriage will not be refunded. Items for return must be in a suitably clean and safe state for repair, and should be packaged carefully to prevent damage or injury during transportation. We may reject unsuitable or unsafe deliveries.
All work will be carried out by Silverline Tools or its authorized repair agents.
The repair or replacement of the product will not extend the period of guarantee
Defects recognised by us as being covered by the guarantee shall be corrected by means of repair of the tool, free of charge (excluding carriage charges) or by replacement with a tool in perfect working order.
Retained tools, or parts, for which a replacement has been issued, will become the property of Silverline Tools.
The repair or replacement of your product under guarantee provides benefits which are additional to and do not affect your statutory rights as a consumer.
What is covered:
The repair of the product, if it can be verified to the satisfaction of Silverline Tools that the deficiencies were due to faulty materials or workmanship within the guarantee period.
If any part is no longer available or out of manufacture, Silverline Tools will replace it with a functional replacement part.
Use of this product in the EU.
What is not covered:
Silverline Tools does not guarantee repairs required as a result of:
Normal wear and tear caused by use in accordance with the operating instructions eg blades, brushes, belts, bulbs, batteries etc.
The replacement of any provided accessories drill bits, blades, sanding sheets, cutting discs and other related items.
Accidental damage, faults caused by negligent use or care, misuse, neglect, careless operation or handling of the product.
Use of the product for anything other than normal domestic purposes.
Change or modification of the product in any way.
Use of parts and accessories which are not genuine Silverline Tools components.
Faulty installation (except installed by Silverline Tools).
Repairs or alterations carried out by parties other than Silverline Tools or its authorized repair agents.
Claims other than the right to correction of faults on the tool named in these guarantee conditions are not covered by the guarantee.
Introduction
12 V CC, 2 A (charge normale)
Silverline Tools Service Centre
PO Box 2988
Yeovil
Silverline Tools Service Centre
PO Box 2988
Yeovil
BA21 1WU, GB
Silverline Tools Service Centre
PO Box 2988
Yeovil
BA21 1WU, GB
Silverline Tools Service Centre
PO Box 2988
Yeovil
BA21 1WU, UK
natural_image
Exterior view of a silver electrolytic cell (5V/12V) with coiled and clamp probes, no visible text or symbols on the device body.GB 3 Year Guarantee. Register online within 30 days. Terms and Conditions apply.
- Automatic Battery Starter Charger 12A 6/12V 8-180Ah Capacity
- Introduction
- Description of Symbols
- Specification
- General Safety
- Save all warnings and instructions for future reference.
- Work area safety
- Electrical safety
- Personal safety
- Power tool use and care
- Service
- Battery Charger Safety
- Product Familiarisation
- Intended Use
- Unpacking Your Tool
- Before Use
- Battery Type Selector
- Charge Start Selector
- Connecting to a battery (in vehicle)
- For charging:
- For Start mode boost:
- Connecting to a battery (freestanding)
- Operation
- Charging batteries
- Selecting 'Start' Mode
- Disconnecting from the battery
- Accessories
- Maintenance
- Replacing the Fuse
- Cleaning
- Storage
- Disposal
- Silverline Tools Guarantee
- This Silverline product comes with a 3 year guarantee
- Registering your purchase
- Terms & Conditions
- PLEASE KEEP YOUR SALES RECEIPT
- Silverline Tools Service Centre
- PO Box 2988
- Yeovil
- BA21 1WU, UK
- What is covered:
- What is not covered:
- BA21 1WU, GB
Brand : SILVERLINE
Model : 549095
Category : Battery charger