
282625 - Battery charger SILVERLINE - Free user manual and instructions
Find the device manual for free 282625 SILVERLINE in PDF.
| Product Type | Battery and Charging System Tester |
| Brand | Silverline |
| Model | 282625 |
| Display | Analog dial with zero reset |
| Compatible Voltages | 6 V and 12 V |
| Voltage Measurement Range | 0 to 16 V (DC) |
| Capacity Range (CCA) | 200 to 1,000 CCA |
| Operating Temperature | 0 to 55 °C |
| Maximum Altitude | ≤ 2,000 m |
| Dimensions (L x W x H) | 300 x 150 x 60 mm |
| Weight | 0.98 kg |
| Main Functions | Battery test, charging system test, starter test |
| Intended Use | Indoor household or workshop, non-commercial use |
| Maintenance and Cleaning | Clean with a soft brush or dry cloth; do not use water or caustic products |
| Safety | Wear PPE required (eye protection, gloves); do not use on wet battery; allow 1 min cool down between tests |
| Warranty | 3 years (registration required within 30 days at silverlinetools.com) |
| Country of Origin | United Kingdom (Toolstream Ltd.) |
| Spare Parts and Repairability | Repair by authorized center; unspecified parts |
Frequently Asked Questions - 282625 SILVERLINE
User questions about 282625 SILVERLINE
0 question about this device. Answer the ones you know or ask your own.
Ask a new question about this device
Download the instructions for your Battery charger in PDF format for free! Find your manual 282625 - SILVERLINE and take your electronic device back in hand. On this page are published all the documents necessary for the use of your device. 282625 by SILVERLINE.
USER MANUAL 282625 SILVERLINE
Battery & Charging System Tester 6V & 12V
natural_image
Exterior view of a silver line capacitor with visible measurement dial and terminal connectors (no text or symbols on body)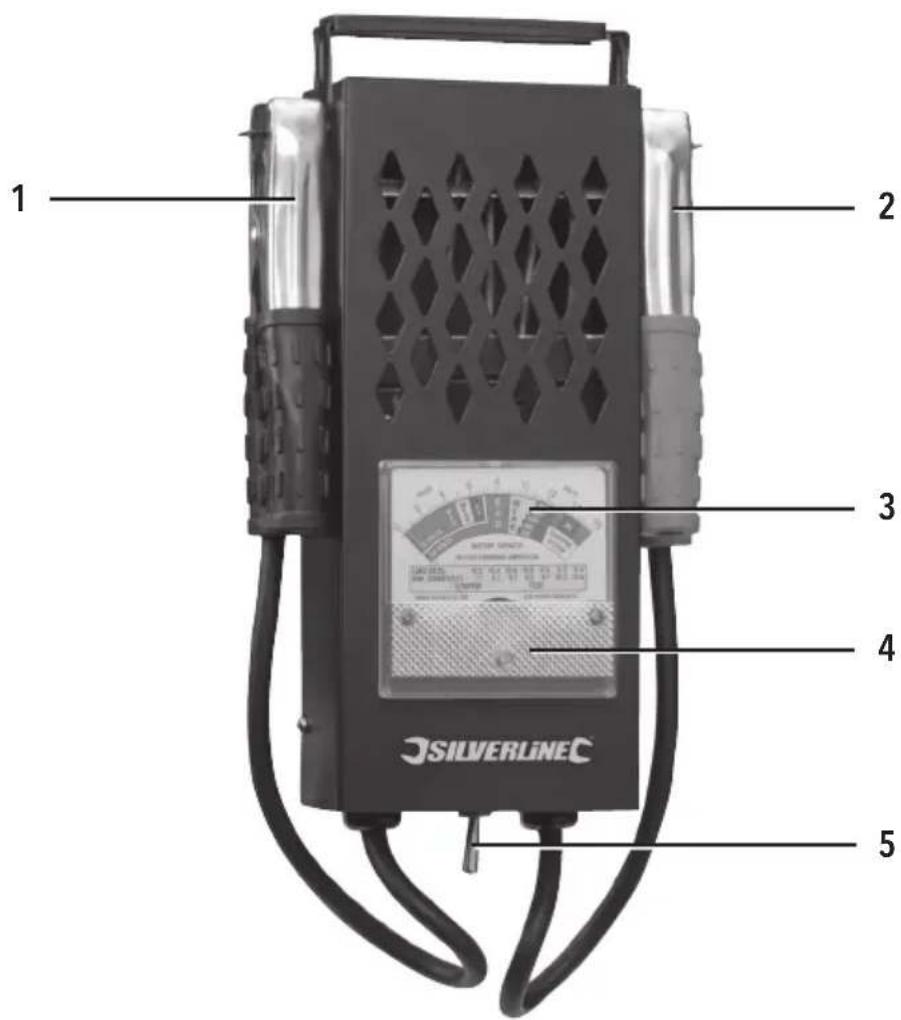
English ......04
Français ......08
Deutsch......12
Español......16
Italiano ......20
Nederlands ......24
Polski ......28
Introduction
Thank you for purchasing this Silverline product. This manual contains information necessary for safe and effective operation of this product. This product has unique features and, even if you are familiar with similar products, it is necessary to read this manual carefully to ensure you fully understand the instructions. Ensure all users of the product read and fully understand this manual. Keep these instructions with the product for future reference.
Description of Symbols
The rating plate on your product may show symbols. These represent important information about the product or instructions on its use.

Wear eye protection Wear head protection

Wear hand protection

WARNING: To reduce the risk of injury, user must read instruction manual

Caution! Refer to the manual

Environmental Protection
Waste electrical products should not be disposed of with household waste. Please recycle where facilities exist. Check with your local authority or retailer for recycling advice.

Manual available online

Conforms to relevant legislation and safety standards
Technical Abbreviations Key
| °C Degree Celsius | |
| V Volts | |
| d.c. Direct current | |
| CCA Cold Cranking Amps | |
| m Metre | |
| mm Millimetre | |
| kg Kilogram |
Specification
Display: Analogue dial with zero-point correction
Maximum permitted temperature: 0 - 55°C
Suitable battery voltage(s): 6V or 12V
Voltage measurement range: 0 - 16V(d.c.)
Battery capacity range: 200 - 1000 CCA
Altitude range: ≤2000m
Dimensions (L x W x D): 300 x 150 x 60mm
Weight: 0.98kg
General Safety Warnings
⚠ WARNING: Read all safety warnings, instructions, illustrations and specifications provided with this power tool. Failure to follow all instructions listed below may result in electric shock, fire and/or serious injury.
Save all warnings and instructions for future reference.
a) Even when used as prescribed it is not possible to eliminate all residual risk factors. Use with caution.
b) If you are at all unsure of the correct and safe manner in which to use this product, do not attempt to use it.
c) Accidents can occur where work areas are cluttered or dirty. Keep floors clear, and make yourself aware of all potential slip and trip hazards.
d) Children and pets should always be kept well away from your work area. DO NOT allow children, or untrained persons to use this product.
e) DO NOT wear loose fitting clothing, neckties, jewellery, or other items which may become caught.
f) Long hair should be covered or tied back.
g) DO NOT overreach, always keeping proper footing. DO NOT work on an unstable surface.
h) Before use, check if any part of this product is damaged or missing. Any part that is damaged should be immediately repaired or replaced by an authorised service centre. DO NOT use if defective.
i) Always wear appropriate personal protective equipment for the job that you are to do.
Specific Battery & Charging System Tester Safety Warnings
a) Ensure tester is kept dry. DO NOT use to test wet batteries or charging systems.
b) DO NOT use in adverse weather conditions. Weather with high levels of atmospheric humidity (such as fog) or strong electrostatic fields (such as thunderstorms) could cause injury or harm and produce inaccurate results.
c) DO NOT use if you suspect the presence of flammable liquids or ignitable dust either on the tester, the testing subject or in the area surrounding both. Clean all terminals thoroughly before testing.
d) When carrying the tester, ensure all cables are secure. DO NOT allow cables to trail loose.
e) When loading, the tester can potentially become hot. Ensure you follow instructions on load times and that your hand protection has adequate heat resistance.
f) Ensure that there is adequate ventilation around the tester. DO NOT allow the ventilation holes to become obscured in any way.
g) Ensure enough clearance is left for the safe disconnection of the tester from the testing subject.
h) Ensure any non-conductive protectors, such as the handles for the lead ends, are in good condition.
Product Familiarisation
| 1 Earth Lead |
| 2 Positive Lead |
| 3 Dial |
| 4 Zero Adjustment Screw |
| 5 Load Switch |
Intended Use
Battery and Charging System Tester for applying high current load tests, measuring the condition of suitable 6V and 12V lead-acid batteries and checking the performance of charging systems. For indoor home or workshop use.
Not intended for commercial use.
The product must ONLY be used for its intended purpose. Any use other than those mentioned in this manual will be considered a case of misuse. The operator, and not the manufacturer, shall be liable for any damage or injury resulting from such cases of misuse. The manufacturer shall not be liable for any modifications made to the product, nor for any damage resulting from such modifications.
Before Use
⚠ WARNING: Ensure engine is stopped, and all loads disconnected.
Note: On some vehicles it may be desirable to remove the battery from the vehicle.
- The needle of the Dial (3) should point to '0' when the tester is not in use. Adjust the position of the needle by rotating the Zero Adjustment Screw (4) to ensure an accurate reading.
- Ensure battery terminals are clean and free from corrosion.
Operation
Testing a battery
- Connect the Positive Lead (2) to the positive (+) terminal of the battery.
- Connect the Earth Lead (1) to the negative (-) terminal of the battery.
- Check the readout. If a 12V battery reads below 12V, or if a 6V battery reads below 6V, it will need to be recharged before further testing.
WARNING: Do not hold the Load Switch (5) in the 'ON' position for more than 10 seconds. During the load test, the tester may get hot. - Move the load switch to the 'ON' position (to the right), and allow the Dial (3) needle to stabilise. See table below:
| Needle position Battery condition | |
| Green 'OK' section | Battery is in good condition and is ready for use. |
| Yellow 'WEAK' section | Battery is in poor condition, needs recharging, or may be damaged. |
| Red 'BAD' section | Battery is in very poor condition and will require a full recharge or replacement. |
WARNING: Allow at least 1 full minute for the tester to cool before performing another test.
Note: 6V and 12V batteries have separate scales on the dial. Check that you are referring to the correct scale for your battery. The green section of the 12V battery section is stepped to indicate a good condition for different battery capacities, refer to the battery's CCA rating to determine the correct range.
Battery test analysis
If the tester confirms a yellow section or red section result during the battery's test, the battery could be defective or partly discharged. Further information can be understood on the battery's condition by using a hydrometer and following the manufacturer's instructions.
Testing a charging system
⚠ WARNING: This test requires the vehicle's engine to be running. Internal combustion engines produce carbon monoxide, and other harmful fumes. Never conduct tests with the vehicle in any kind of enclosed area, good ventilation is essential for your safety.
⚠ WARNING: This test is not suitable for 6V systems.
Note: DO NOT flip the Load Switch (5) at any point during this test.
- Connect the leads to the battery as described in steps 1-2 in 'Testing a battery'.
- Start the engine, and allow to idle steadily (between 1200-1500min ^-1 ).
- Read the Dial (3) and consult the table below:
| Needle position within 'CHARGING SYSTEM' Result | |
| Left red section System is undercharging battery | |
| Within green 'OK' section System is nominal | |
| Right red section System is overcharging battery |
Testing the starter
WARNING: This test requires you to disable the ignition system of the engine to prevent it starting. Refer to vehicle manufacturer's guidance for information on how to safely do this.
Note: The battery should be fully charged, in good condition and the engine at normal operating temperature for this test.
- Ensure ignition system is disabled.
- Perform the actions under 'Testing a battery', noting the volts given on the Dial (3) while under load.
- Check the table below (and on the Dial) to find your result. Below this will be the minimum required voltage when the engine is cranked.
- Have an assistant crank the engine. Observe the reading on the Dial and note the result.
- If the result is lower than specified in the table for the minimum cranking volts, the starter is potentially faulty and may require qualified inspection.
| Load volts 10.2 10.4 10.6 | 10.8 11.0 | 11.2 11.4 | |||||
| Minimum cranking volts | 7.7 8.2 | 8.7 9.2 9.7 | 10.2 10.6 |
*This table is for engines over 3600cc. If the starter being tested is for an engine below 3600cc, increase the minimum cranking volts required up by one step in the table, e.g. 9.7 minimum cranking volts required for 11.0 load volts becomes 10.2 instead.
Maintenance
Cleaning
⚠ WARNING: ALWAYS wear protective equipment including eye protection and gloves when cleaning this tool.
- Keep your tool clean at all times. Dirt and dust will cause internal parts to wear quickly, and shorten the device's service life.
- Clean the body of your tool with a soft brush, or dry cloth.
- Never use caustic agents to clean plastic parts. If dry cleaning is not sufficient, a mild detergent on a damp cloth is recommended.
• Water must never come into contact with the tool. - Ensure the tool is thoroughly dry before using it.
- If available, use clean, dry, compressed air to blow through the ventilation holes (where applicable).
Storage
- Store this tool carefully in a secure, dry place out of the reach of children.
Contact
For technical or repair service advice, please contact the helpline on (+44) 1935 382 222
Web: www.silverlinetools.com
UK Address:
Toolstream Ltd.
Boundary Way
Lufton Trading Estate
Yeovil, Somerset
BA22 8HZ, United Kingdom
EU Address:
Toolstream B.V.
Hogeweg 39
5301 LJ Zaltbommel
The Netherlands
Disposal
Always adhere to national regulations when disposing of power tools that are no longer functional and are not viable for repair.
- Do not dispose of power tools, or other waste electrical and electronic equipment (WEEE), with household waste.
- Contact your local waste disposal authority for information on the correct way to dispose of power tools.
Silverline Tools Guarantee
This Silverline product comes with a 3 year guarantee
Register this product at www.silverlinetools.com within 30 days of purchase in order to qualify for the 3 year guarantee. Guarantee period begins according to the date of purchase on your sales receipt.
Registering your purchase
Registration is made at silverlinetools.com by selecting the Guarantee Registration button. You will need to enter:-
- Your personal details
• Details of the product and purchase information
Once this information is entered your guarantee certificate will be created in PDF format for you to print out and keep with your purchase.
Terms & Conditions
Guarantee period becomes effective from the date of retail purchase as detailed on your sales receipt.
PLEASE KEEP YOUR SALES RECEIPT
If this product develops a fault within 30 days of purchase, return it to the stockist where it was purchased, with your receipt, stating details of the fault. You will receive a replacement or refund.
If this product develops a fault after the 30-day period, return it to:
Silverline Tools Service Centre
PO Box 2988
Yeovil
BA21 1WU, UK
The guarantee claim must be submitted during the guarantee period.
You must provide the original sales receipt indicating the purchase date, your name, address and place of purchase before any work can be carried out.
You must provide precise details of the fault requiring correction.
Claims made within the guarantee period will be verified by Silverline Tools to establish if the deficiencies are related to material or manufacturing of the product.
Carriage will not be refunded. Items for return must be in a suitably clean and safe state for repair, and should be packaged carefully to prevent damage or injury during transportation. We may reject unsuitable or unsafe deliveries.
All work will be carried out by Silverline Tools or its authorised repair agents.
The repair or replacement of the product will not extend the period of guarantee
Defects recognised by us as being covered by the guarantee shall be corrected by means of repair of the tool, free of charge (excluding carriage charges) or by replacement with a tool in perfect working order.
Retained tools, or parts, for which a replacement has been issued, will become the property of Silverline Tools.
The repair or replacement of your product under guarantee provides benefits which are additional to and do not affect your statutory rights as a consumer.
What is covered:
- The repair of the product, if it can be verified to the satisfaction of Silverline Tools that the deficiencies were due to faulty materials or workmanship within the guarantee period.
- If any part is no longer available or out of manufacture, Silverline Tools will replace it with a functional replacement part.
What is not covered:
Silverline Tools does not guarantee repairs required as a result of:
- Normal wear and tear caused by use in accordance with the operating instructions e.g. blades, brushes, belts, bulbs, batteries etc.
- The replacement of any provided accessories such as drill bits, blades, sanding sheets, cutting discs and other related items.
- Accidental damage, faults caused by negligent use or care, misuse, neglect, careless operation or handling of the product.
- Use of the product for anything other than normal domestic purposes.
- Change or modification of the product in any way.
- Use of parts and accessories which are not genuine Silverline Tools components.
- Faulty installation (except if installed by Silverline Tools).
- Repairs or alterations carried out by parties other than Silverline Tools or its authorised repair agents.
- Claims other than the right to correction of faults on the tool named in these guarantee conditions are not covered by the guarantee.
Introduction
Silverline Tools Service Centre
PO Box 2988
Yeovil
Silverline Tools Service Centre
PO Box 2988
Yeovil
Silverline Tools Service Centre
PO Box 2988
Yeovil
BA21 1WU, VK
Silverline Tools Service Centre
PO Box 2988
Yeovil
BA21 1WU, UK
EN 3 Year Guarantee. Register online within 30 days. Terms and Conditions apply.
- Battery & Charging System Tester 6V & 12V
- Introduction
- Description of Symbols
- Environmental Protection
- Specification
- General Safety Warnings
- Specific Battery & Charging System Tester Safety Warnings
- Product Familiarisation
- Intended Use
- Before Use
- Operation
- Testing a battery
- Battery test analysis
- Testing a charging system
- Testing the starter
- Maintenance
- Cleaning
- Storage
- Contact
- UK Address:
- EU Address:
- Disposal
- Silverline Tools Guarantee
- This Silverline product comes with a 3 year guarantee
- Registering your purchase
- Terms & Conditions
- PLEASE KEEP YOUR SALES RECEIPT
- Silverline Tools Service Centre
- PO Box 2988
- Yeovil
- BA21 1WU, UK
- What is covered:
- What is not covered:
- BA21 1WU, VK
Brand : SILVERLINE
Model : 282625
Category : Battery charger