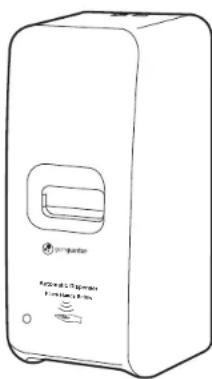
SD495 - Soap dispenser PureGuardian - Free user manual and instructions
Find the device manual for free SD495 PureGuardian in PDF.

| Product Type | Automatic soap and sanitizer dispenser |
| Brand | PureGuardian |
| Model | SD495 |
| Power Supply | 4 AA batteries (LR6) |
| Bottle Capacity | 1000 ml |
| Dispensing Type | Infrared sensor, single or double cycle |
| Interchangeable Pumps | Foam (yellow), gel (green), liquid (blue) |
| Material | Plastic |
| Installation | Wall-mounted, with screws and anchors provided |
| Minimum distance from furniture | 20 cm (8 in) |
| Indicator Light | Green (ready), red (low batteries or sensor blocked) |
| Cleaning | Clean the nozzle regularly; remove batteries before cleaning |
| Precautions | Do not immerse; use only compatible soaps/sanitizers |
| Warranty | Limited 1 year (original buyer, USA and Canada) |
| Customer Service | 1-866-603-5900 (USA and Canada) |
| Replacement Parts | Pumps, key, screws, refill bottle (original Guardian Technologies) |
| Battery Type | Alkaline recommended |
| Operating Temperature | Indoor, avoid direct sun exposure |
| Dimensions | Approximately 20 x 12 x 8 cm (estimated) |
| Weight | Approximately 400 g (estimated) |
Frequently Asked Questions - SD495 PureGuardian
User questions about SD495 PureGuardian
0 question about this device. Answer the ones you know or ask your own.
Ask a new question about this device
Download the instructions for your Soap dispenser in PDF format for free! Find your manual SD495 - PureGuardian and take your electronic device back in hand. On this page are published all the documents necessary for the use of your device. SD495 by PureGuardian.
USER MANUAL SD495 PureGuardian
To the consumer, Guardian Technologies LLC warrants this product to be free of defects in materials or workmanship commencing upon the date of the original purchase. In order to be eligible for this Limited Warranty, an original sales receipt or comparable substitute proof of purchase bearing the date of original purchase is required. Refer to the original product carton or specific product/model page on the Guardian Technologies website for warranty length for your particular model. This warranty applies only to the original purchaser of this product from the original date of purchase. This warranty covers product purchased from authorized distributors only. This warranty does not cover Guardian Technologies products that are used outside of the US and Canada as the appliance must be plugged directly into a 120V AC electrical outlet without the use of an adapter.
This warranty applies to repair or replacement of product found to be defective in materials or workmanship. This warranty does not apply to damage resulting from unusual wear, commercial, abusive, unreasonable use or supplemental damage. This warranty does not cover damage from unauthorized repairs or from any use not in accordance with the instruction manual. Defects that are the result of normal wear and tear will not be considered manufacturing defects under this warranty.
If this product should become defective within the warranty period, we will repair or replace any defective parts free of charge. All warranty repairs must be completed by Guardian Technologies LLC. This warranty gives you specific legal rights and you may also have other rights (other rights may vary from state to state in the U.S.A.)
To submit product under warranty the complete machine must be delivered pre-paid to Guardian Technologies LLC. Please include complete information including: the problem, the model number of the product, the day of purchase, and a copy of the original sales receipt along with your name, address, and telephone (email optional). Address returns to the attention of: Customer Service, at the address below. Additional questions or comments can be made toll free to the number listed below.
USA and Canada
Guardian Technologies LLC
26251 Bluestone Blvd.
Euclid, Ohio 44132
1.866.603.5900
www.guardiantechnologies.com
Please go to www.guardiantechnologies.com to register your product. We consider the registration process important to ensuring superior service to our customers, however submitting the registration is optional and does not affect your rights to utilize this warranty according to the conditions stated above.
Additional copies of the instruction manual can be obtained by accessing and printing directly from our website or calling customer service.

guardian
technologies™
Guardian Technologies LLC
26251 Bluestone Blvd. • Euclid, OH 44132
1.866.603.5900 • www.guardiantechnologies.com
©2016 Guardian Technologies LLC

guardian
technologies™
USE & CARE INSTRUCTIONS
Wall Mount
Soap & Sanitizer Dispenser
Model No. SD495
1-Year Limited Warranty
Customer Service 1.866.603.5900
www.guardiantechnologies.com
Date Purchased month ____ year ____
English E - 1 French F - 1 Spanish S - 1
Use GENUINE Guardian Technologies replacement parts only.
REV0321
READ AND SAVE THESE INSTRUCTIONS WARNINGS
Failure to comply with the warnings listed below may result in electric shock or serious injury.

This product should be used only in accordance with the specifications outlined in this manual. Usage other than what has been specified here may result in serious injury.
When using electrical appliances, basic precautions should always be followed to reduce the risk of fire, electric shock and injury to persons, including the following:
• Always use the designated spout for liquid, foam or gel soaps/sanitizers.
- Use caution when using hand sanitizers that contain flammable ingredients. Read and follow soap/sanitizer manufacturer instructions before use.
- For normal "automatic dispensing," do not mix water with liquid soap, sanitizer or lotion.
- Do not rinse, submerge, or allow liquid to enter the battery compartment.
- Do not immerse the unit in water to avoid the malfunction of the inner electrical parts of the unit.
- Do not expose the unit directly to strong sunlight otherwise it will cause the malfunction of the infrared sensor.
- Do not allow to be used as a toy. Close attention is necessary when used by or near children.
- If appliance is not working as it should, has been dropped, damaged, left outdoors or dropped in water, call Customer Service.
- Remove batteries before any routine cleaning or maintenance.
- Leaks from battery cells can occur under extreme conditions. If the liquid gets on the skin (1) wash quickly with soap and water or (2) neutralize with a mild acid such as lemon juice or vinegar. If the liquid gets into the eyes, flush them immediately with clean water for a minimum of 10 minutes. Seek medical attention.
- Use only 4 AA batteries (4).

WARNING: Cancer or Reproductive Harm.
For more information go to www.P65Warnings.ca.gov.
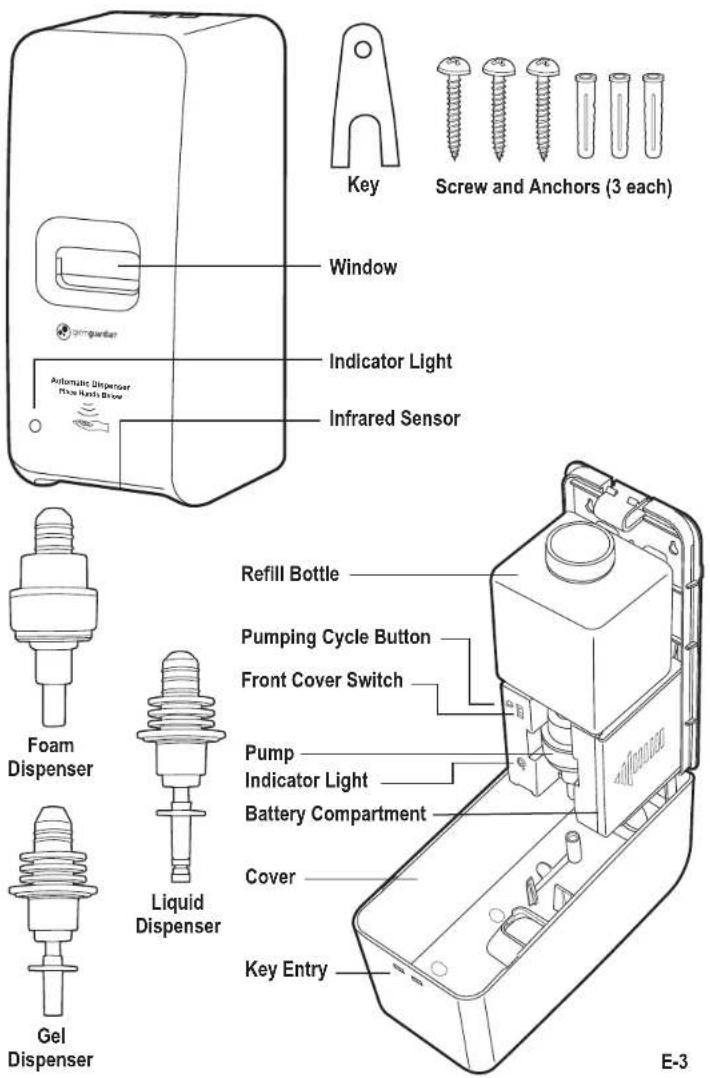
PRODUCT SPECIFICATIONS AND PARTS
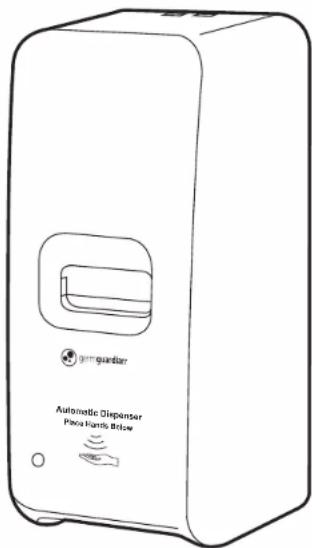
Dispenser Installation
The automatic soap dispenser must be installed at least 8" away from other furniture.
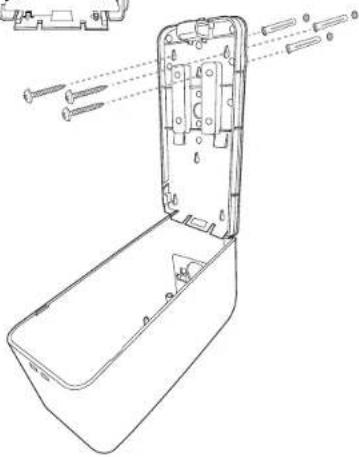
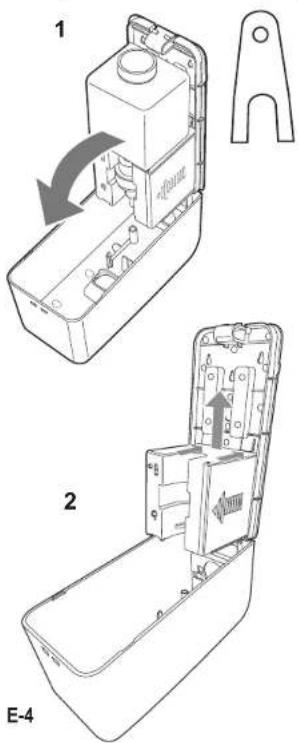
- Insert the anti-theft key in the keyhole at the top of the dispenser, grip the top of the back of the dispenser while holding the top of the cover by hand, and open it gently downward. The cover will be on the bottom of the dispenser (see figure 1).
- Remove the liner refill bottle and pump head by sliding it out. Remove the battery compartment by pressing the two tabs above the compartment and slide the whole assembly upward to release (see figure 2).
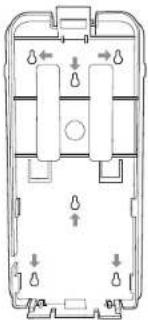
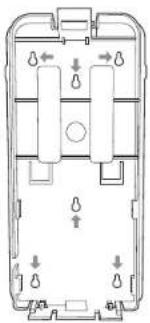
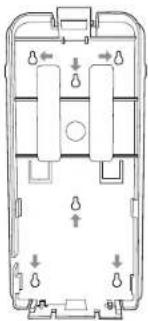
- There are 2 options for installing wall anchors (see figure 3). After choosing wall anchor installation, place the dispenser on the wall where you want to install dispenser.
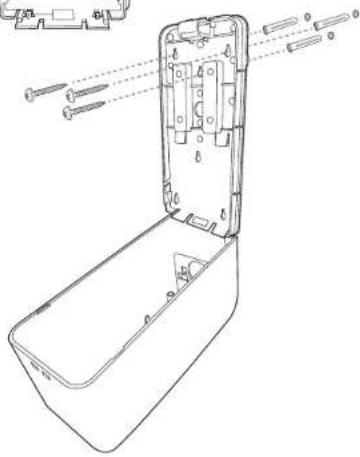
- Mark the wall anchor locations and drill a hole for each wall anchor (4-6 mm). Insert the anchor into the wall. Align the dispenser (check to make sure it is facing the right direction and open cover is at the bottom of the dispenser) and secure with screws (see figure 4).
- Replace the liner refill bottle, pump head and battery compartment.
3
natural_image
Top-down schematic of a device casing with internal compartments and mounting points (no text or labels)
Battery Installation
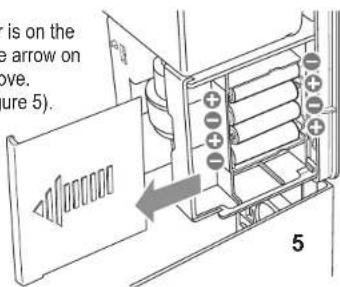
Open the soap dispenser. The battery holder is on the right side facing the soap dispenser. Note the arrow on the cover and slide the cover forward to remove. Insert four (4) AA batteries as shown (see figure 5). Return the battery cover by sliding it back over the side of the compartment.
Adding Soap or Sanitizer
- Remove the soap dispenser refill bottle and pump from the dispenser.
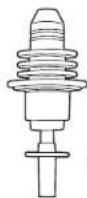
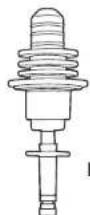
- Select the proper pump for the type of soap or sanitizer being added. See chart below:
Foam
ispenser
(Yellow)
Gel
Dispenser
(Green)
Liquid Dispenser (Blue)
Note: if switching the type of soap/sanitizer, be sure the refill bottle is completely empty.
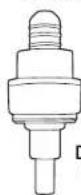
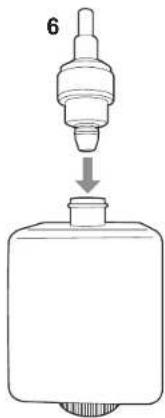
- First install selected pump by sliding it into refill bottle opening at the bottom of the bottle. It will be a snug fit (see figure 6).
- After the correct pump is installed, open the cap of the refill bottle and pour in the soap or sanitizer. The bottle will hold up to 1000ml. Return and secure cap.
- Use the window to see when it's time to refill the liquid in the bottle.
Note: Clean the nozzle periodically to remove soap or sanitizer build up, especially if a gel solution is used. This will prevent the nozzle head from blocked and not working.
Installation of the Refill Bottle and Pump
- Return the refill bottle to the dispenser. The refill bottle markings should face outward to be lined up correctly.
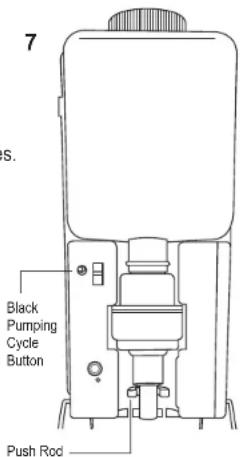
- Gently slide the refill bottle and pump head into the dispenser, it will sit on top of the battery compartment. The pump will fit within the battery compartment grooves. Make sure the push rod engages in the empty position 1 on top of the discharge nozzle of the pump (see figure 7).
- You can select a single or double dispensing cycle. To select single or double dispensing cycle you press the black pumping cycle button (see figure 7).
Tip: A double dispensing may be preferred with a thick gel or foam soap.
Light will flash 3 times for single cycle dispensing. Light will flash twice rapidly 3 times for double cycle dispensing.
- Close and lock dispenser cover.
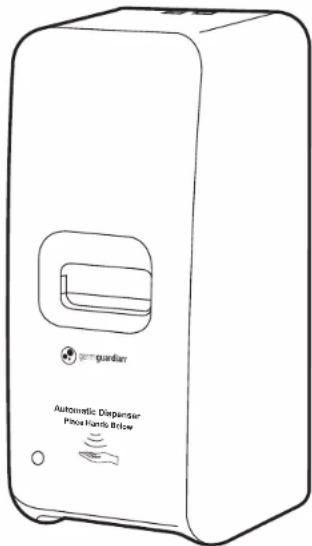
Product Usage
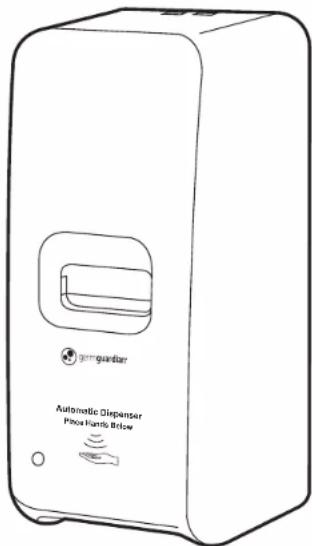
- The indicator light on the front of the dispenser will be green when it's ready to use.
- Place hands under the dispenser to activate the infrared sensor.
- The light turns red when the batteries are low or the sensor is still activated by a hand or object, even though the cycle is complete.
Indicator Light
natural_image
Line drawing of a portable electronic device with ventilation slots and indicator lights (no text or symbols)TROUBLE SHOOTING GUIDE
| PROBLEM | SOLUTION |
| Unit won't power on. | Make sure batteries are inserted properly.Replace with new batteries. |
| Too much/too little soap is being dispensed. | Adjust the liquid volume (see filling instructions). |
| No liquid is being dispensed. | Make sure batteries are working properly.Confirm dispenser is connected and in the liquid.Refill soap.Remove any soap build up from pump. |
| Unit turns off. | Make sure batteries are working properly. |
| Indicator light is Red. | Batteries are low.The unit sensor is still activated by a hand or object, even though the cycle is complete. Remove hand/object. |
GARANTIE LIMITÉE
Guardian Technologies LLC
26251 Bluestone Blvd.
Euclid, Ohio 44132
1 866 603-5900
www.guardiantechnologies.com
Guardian Technologies LLC
26251 Bluestone Blvd. • Euclid, OH 44132
1.866.603.5900 • www.guardiantechnologies.com
©2016 Guardian Technologies LLC

guardian
technologies™
UTILISATION ET INSTRUCTIONS D'ENTRETIEN
natural_image
Technical line drawing of a mechanical device with internal components and a separate view showing a clamp (no text or symbols)3
natural_image
Top-down schematic of a device casing with internal compartments and mounting points (no text or labels)
natural_image
Technical line drawing of an open electronic device casing with internal components and external connectors (no text or symbols)Installation des piles
natural_image
Line drawing of a portable electronic device with a ventilation grille and control buttons (no text or symbols on the device itself)GUIDE DE DÉPANNAGE
Guardian Technologies LLC
26251 Bluestone Blvd.
Euclid, Ohio 44132
1.866.603.5900
www.guardiantechnologies.com
Guardian Technologies LLC
26251 Bluestone Blvd. • Euclid, OH 44132
1.866.603.5900 • www.guardiantechnologies.com
©2016 Guardian Technologies LLC

guardian
technologies™
UTILISATION ET INSTRUCTIONS D'ENTRETIEN
Montaje en la pared
natural_image
Technical line drawing of a mechanical device with a clamping tool and component assembly (no text or symbols)3
natural_image
Pure technical diagram of a mechanical or electrical component with no text, numbers, or symbols
natural_image
Technical line drawing of a mechanical device with labeled parts (no readable text or symbols)