RE 282 Plus - Pressure washer STIHL - Free user manual and instructions
Find the device manual for free RE 282 Plus STIHL in PDF.
| Product type | High-pressure cleaner |
| Brand | Stihl |
| Model | RE 282 Plus |
| Operating pressure | 16 MPa (160 bar) |
| Maximum permissible pressure | 20 MPa (200 bar) |
| Maximum water flow rate | 760 l/h |
| Power (EU) | 3.5 kW |
| Power supply | 400V / 3~ / 50 Hz |
| Recommended fuse | 10 A (characteristic C or K) |
| Dimensions (L x W x H) | 392 x 390 x 1164 mm |
| Weight | Approximately 42 kg |
| High-pressure hose length | 15 m, DN 06 |
| Maximum feed water temperature | 60 °C (pressure), 40 °C (suction) |
| Maximum suction height | 1 m |
| Protection class | I |
| Type of protection | IP X5 |
| Sound pressure level | 73.4 dB(A) |
| Sound power level | 87.6 dB(A) |
| Vibration level | Less than 2.5 m/s² |
| Main functions | Pressure/flow regulation, turbo nozzle, detergent supply, automatic stop, rest mode, hose reel |
| Maintenance and cleaning | Oil level check, water inlet strainer cleaning, nozzle cleaning, oil change by authorized dealer |
| Safety | Residual current device (30 mA), overpressure safety device, gun lock, automatic stop |
| Spare parts and repairability | Use only original STIHL parts; repairs by authorized STIHL dealer |
| General information | Operating manual available in multiple languages; warranty according to STIHL conditions |
Frequently Asked Questions - RE 282 Plus STIHL
User questions about RE 282 Plus STIHL
0 question about this device. Answer the ones you know or ask your own.
Ask a new question about this device
Download the instructions for your Pressure washer in PDF format for free! Find your manual RE 282 Plus - STIHL and take your electronic device back in hand. On this page are published all the documents necessary for the use of your device. RE 282 Plus by STIHL.
USER MANUAL RE 282 Plus STIHL
Guide to Using this Manual 37
Safety Precautions and Working
Techniques 37
Assembling the Unit 44
Transporting the Unit 45
Fitting, removing spray lance 46
Fitting, removing high-pressure hose 46
Connecting the water supply 47
Connecting to a pressureless water supply 48
Connecting to Power Supply 48
Switching On 49
Working 50
Adding detergent 51
Tips for operation 53
Switching Off 53
After Finishing Work 54
Storing the Machine 55
Maintenance and Care 56
Maintenance 57
Checking the oil level 58
First use after long periods of storage 58
Minimize Wear and Avoid Damage 59
Main Parts 60
Specifications 64
Troubleshooting 66
Maintenance and Repairs 68
Disposal 68
EC Declaration of Conformity 68
STIHL
This instruction manual is protected by copyright. All rights reserved, especially the rights to reproduce, translate and process with electronic systems.
RE 232, RE 272 PLUS, RE 282 PLUS
Guide to Using this Manual Safety Precautions and Working Techniques
Pictograms
All the pictograms attached to the machine are shown and explained in this manual.
Symbols in text

WARNING
Warning where there is a risk of an accident or personal injury or serious damage to property.

NOTICE
Caution where there is a risk of damaging the machine or its individual components.
Engineering improvements
STIHL's philosophy is to continually improve all of its products. For this reason we may modify the design, engineering and appearance of our products periodically.
Therefore, some changes, modifications and improvements may not be covered in this manual.

Special safety precautions must be observed when using this machine because it uses electrical power.

It is important you read and understand the Instruction Manual before first use and keep the manual in a safe place for future reference.

Non-observance of the Instruction Manual may result in serious or even fatal injury.

WARNING
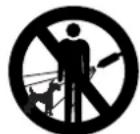
- Children or youngsters should never be allowed to use the machine.
Supervise children to ensure that they do not play with the machine. - The machine should only be provided or loaned to people familiar with this model and its operation. The instruction manual should always be handed over with the machine.
- Do not use the machine if anyone not wearing protective clothing is in the working area.
Before starting any work on the machine, e. g., cleaning, servicing, replacement of parts – unplug the power plug! - Aerosols may form when using a high-pressure cleaner. Inhaling aerosols can be harmful to health. To determine the measures necessary for protection against aqueous aerosols, before starting work a risk assessment should be
English
carried out according to the surface to be cleaned and the surrounding area. Respiratory masks of class FFP2 or higher offer protection against aqueous aerosols.
Comply with national safety regulations issued, e.g. by employers' liability insurance associations, social security institutions, occupational safety and health authorities or other organizations.
When the machine is not in use, shut it off so that it does not endanger others. Ensure that the machine cannot be used without authorization; unplug the power plug.
The machine may only be used by persons who have been duly trained to use and handle it or who can demonstrate that they can operate the machine safely.
The machine can be used by persons with limited physical, sensory or mental capacity or with little experience and know-how as long as they are supervised and have been instructed on how to handle
the machine safely and understand the associated risks.
The user is responsible for avoiding injury to third parties or damage to their property.
If you have not used this machine model before: Have your STIHL dealer or another expert show you how to use it safely.
In some countries, operation of machines that emit noise may be restricted by municipal regulations. Observe national regulations.
Always check that the machine is in good working order before starting work. Pay particular attention to the connecting cord, power plug, high-pressure hose, spray attachment and safety mechanisms.
Never operate the machine with a defective high-pressure hose - ensure that it is replaced immediately.
The machine may only be used when all parts are in perfect working order.
The high-pressure hose must not be driven over, pulled, buckled or twisted.
Do not use the high-pressure hose or connecting cord to pull or transport the machine.
The high-pressure hose must be approved for the permissible excess pressure of the machine.
The permissible excess pressure, the maximum permitted temperature and the date of manufacture are stated on the cladding of the high-pressure hose. The permissible pressure and date of manufacture are specified on the fittings.
Accessories and Spare Parts
WARNING
- High-pressure hoses, fittings and couplings are important for machine safety. Only high-pressure hoses, fittings, couplings and other accessories which have been approved by STIHL for this machine or technically equivalent parts may be mounted on the machine. If you have
any questions in this respect, consult a servicing dealer. Use only high-quality accessories. Otherwise, there may be a risk of accidents or damage to the unit.
STIHL recommends the use of genuine STIHL parts and accessories. These have been optimized for the product and the user's requirements.
Do not modify the machine - otherwise the safety may be endangered. STIHL excludes all liability for personal injury and damage to property caused while using unauthorized attachments.
Physical suitability
The machine may only be operated by people who are rested, in good physical condition and mental health. If you have any condition that might be aggravated by strenuous work, check with your doctor before operating this machine.
Anyone who has consumed alcohol, medicines affecting their ability to react or drugs must not operate the machine.
Areas of application
The high-pressure cleaner can be used to clean surfaces, motor vehicles, machines, tanks, facades or stables and to remove rust without dust or sparks.
Other uses are not permitted and may lead to accidents or damage to the machine.
Do not operate the machine at temperatures near or below 0^ (32°F).
Clothing and equipment
Wear shoes with non-slip soles.

WARNING

To reduce the risk of eye injuries, wear tight-fitting safety goggles conforming to standard EN 166. Make sure that the safety goggles fit correctly.
Wear protective clothing. STIHL recommends that a boiler suit be worn in order to reduce the risk of injury due to accidental exposure to the high-pressure jet.
Transport
When transporting in and on vehicles:
- Secure the high-pressure cleaner in accordance with the regulations applicable in the country of use to prevent toppling over and damage
- Drain the detergent tank and secure it to prevent toppling over
English
Antifreeze is recommended if the machine and accessories are to be transported at temperatures near or below 0^ (32 F)-see "Storage".
Detergents

WARNING
- The machine was designed for use with the detergents offered or recommended by the manufacturer.
Use only detergents that are approved for use with high-pressure cleaners. Use of unsuitable detergents can cause damage to health, as well as to the machine and the object to be cleaned. If you have any questions in this respect, consult a servicing dealer.
Always use detergent in the specified dosage follow the corresponding instructions for use of the detergent.
Chemical detergents may contain physiologically harmful (toxic, caustic, irritant), flammable or explosive substances. In the event of skin or eye contact with detergent, flush the affected body parts with plenty of clean water immediately. If detergent is swallowed, seek medical attention immediately. Note the manufacturer's safety data sheets!
Before starting work
Do not connect the high-pressure cleaner directly to the drinking water main.
Only connect the high-pressure cleaner to the drinking water main in conjunction with a back flow preventer - see "Special accessories".

WARNING
- If drinking water has passed through the back flow preventer, it can no longer be regarded as drinking water.
Do not use the machine with dirty water.
If there is a risk that dirty water will occur (e. g., flowing sand), an appropriate water filter must be used.
Inspect the high-pressure cleaner

WARNING
- The high-pressure cleaner should only be used if it is in full working order and undamaged - risk of accident!
- It must be possible to move the switch to the 0 position easily
- The switch must be in the 0 position
- Do not use the machine with a damaged high-pressure hose, spray attachment and safety devices
High-pressure hose and spray attachment in good condition (clean, moving easily) and correctly assembled
- For good control of the machine, the handles should be clean and dry with no oil or dirt on them
- Check oil level
- Never attempt to modify the controls or safety devices in any way
- Set up the machine so that it cannot slip or tip over. Only operate the machine on a stable and level ground
Electrical connection
WARNING
Minimize the risk of electrical shock:
Voltage and frequency of the machine (see rating plate) must match the voltage and frequency of the mains supply
- Examine the connecting cord, power plug and extension cord for damage. Do not use the machine with a damaged connecting cord, extension cord or damaged power plug
- Only connect the machine to a correctly installed power socket
- The insulation on the connecting cord and any extension cord, the plug and the coupling must be fully intact
- Never touch the power plug, connecting cord and extension cord, and electrical plug connections with wet hands
WARNING
Route the connecting cord and extension cord properly:
- Observe the minimum cross-section of the individual cords - see "Connecting the machine to the power supply"
- Route and mark the power cord so that it cannot become damaged and no one is endangered - risk of stumbling!
Use of unsuitable extension cords can be dangerous. Use only extension cords that are approved for outdoor use and are correspondingly marked and have a sufficient cross-section - The connector and coupling of the extension cord must be waterproof and must not lie in water
It is advisable to keep the plug connection at least 60~mm above the ground/floor, e. g. by using a cable reel - Don't let the cord rub against edges or pointed or sharp objects
English
- Don't squeeze the cord under doors or windows
If cords become snarled – unplug the power plug and unsnarl the cord
Always unroll the power cord from the cable reel completely, to avoid risk of fire due to overheating.
During operation

WARNING
- Never draw in fluids containing solvents or undiluted acids and solvents (e. g., gasoline, heating oil, paint thinner or acetone). These substances damage the materials used in the machine. The spray is highly combustible, explosive and poisonous.
The plug must be disconnected immediately if the cord is damaged - danger of electrocution!
Never direct the high-pressure jet or water hose against the machine itself or against other electrical appliances and equipment - danger of short-circuiting!
Never direct the high-pressure jet or water hose against electrical equipment, connections and power cords - danger of short-circuiting!
Never direct the high-pressure jet against yourself or other people, not even to clean clothing or shoes - risk of injury!
Ensure you always have a firm and safe footing.
The machine may only be operated in an upright position.
Beware of slipping on ice, water, snow or uneven ground!
Keep the high-pressure cleaner as far away as possible from the object being cleaned.
Do not cover the machine. Ensure adequate motor ventilation.
Do not direct the high-pressure jet toward animals.
Do not direct the high-pressure jet onto places you cannot see.
Keep children, animals and bystanders at a safe distance.
Hazardous substances (e.g. asbestos or oil) must not be allowed to escape into the environment unchecked when working with the machine. The applicable environmental regulations must be observed without fail.
Surfaces of asbestos cement must never be cleaned with a high-pressure jet. Hazardous, breathable asbestos fibers may be released in addition to the dirt. The danger is greatest when the washed surface has dried.
Delicate parts made of rubber, fabric or similar materials must not be cleaned with a pencil jet, e. g. from the rotary nozzle. Maintain a sufficient distance between the high-pressure hose and the surface when cleaning to avoid any damage to the surface being cleaned.
The trigger on the spray gun must move easily and automatically return to its starting position when released.
Hold the spray attachment firmly with both hands in order safely to withstand the kickback force and additional torque produced when using spray attachments with an angled spray lance.
Do not buckle or loop the high-pressure hose.
Ensure that the connecting cord and the high-pressure hose are not damaged by being driven over, squashed or pulled; protect them against heat and oil.
Do not touch the connecting cord with the high-pressure jet.
If the machine is subjected to a strain for which it was not designed (e. g., heavy impact or a fall), always check that it is in good condition before continuing work - refer also to the chapter "Before starting work". Also make certain that the safety mechanisms are working properly. Never continue using a machine that is not in perfect working order. In case of doubt, have the unit checked by your servicing dealer.
Before leaving the machine unattended: Switch off the machine - unplug the power plug.
Safety equipment
When the safety equipment is activated, excessive pressure is returned to the intake side of the pump via a safety valve. This safety feature has been set by the manufacturer and must not be adjusted.
After finishing work
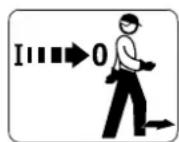
Switch off the machine before leaving it!
- Unplug the power plug from the socket
- Disconnect water intake hose between machine and water supply
Never unplug the power plug by pulling on the connecting cord: always grip the plug itself.
Maintenance and repairs

WARNING
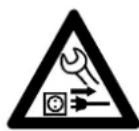
Before starting any work on the machine: Unplug the mains plug from the socket.
Do not touch hot surfaces.
English
Use only high-quality spare parts. Otherwise, there may be a risk of accidents or damage to the unit. If you have any questions, consult a STIHL dealer.
- To avoid risks, work on the machine (e.g. replacing a damaged connecting cord) may only be carried out by authorized dealers or qualified electricians.
Clean plastic parts with a cloth. Harsh detergents may damage the plastic.
Clean ventilation slots in motor housing as needed.
The machine must be serviced regularly. Do not attempt any maintenance or repair work not described in the Instruction Manual. All other work should be carried out by a servicing dealer.
STIHL recommends the use of genuine STIHL spare parts. These have been optimized for the machine and the user's requirements.
STIHL recommends that maintenance and repair work be carried out only by
authorized STIHL dealers. STIHL dealers receive regular training and are supplied with technical information.
Assembling the Unit
Various accessory parts must be mounted on the machines before starting for the first time.
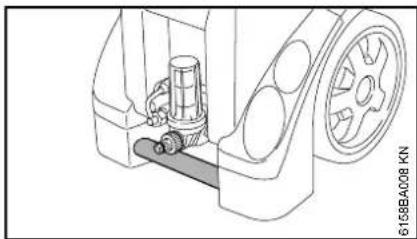
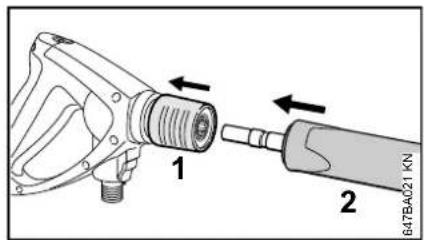
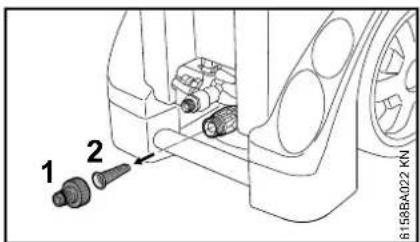
Hose connection at the water intake
without water filter
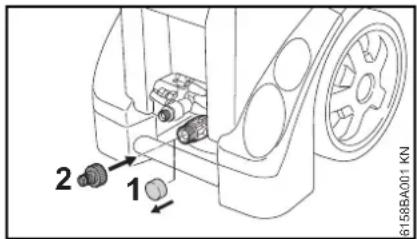
- Remove protective cap (1) from the connector
Ensure that the water intake strainer is present in the connector. - Attach the hose connector (2) and tighten it by hand
with water filter

- Remove protective cap (1) from the water inlet
Fit and attach the union nut of the water filter (2) and tighten it by hand - Attach the hose connector (3) and tighten it by hand
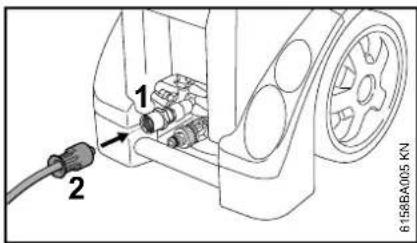
Machines without hose reel
Connector on high-pressure connection

- Push seal (1) unto the high-pressure hose
Screw on and tighten the connecting element (2)
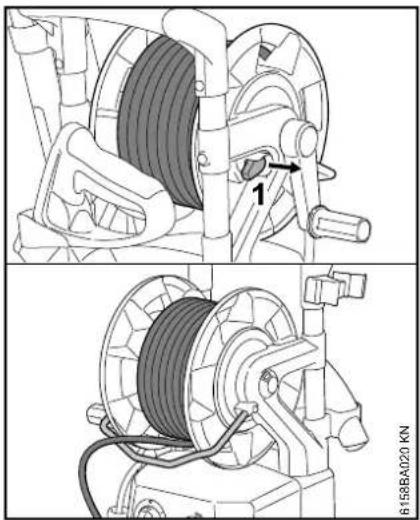
Machines with hose reel
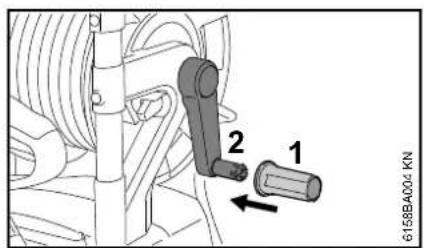
- Push the knob (1) unto the crank (2) of the hose reel until it engages
Transporting the Unit
Pushing the pressure washer
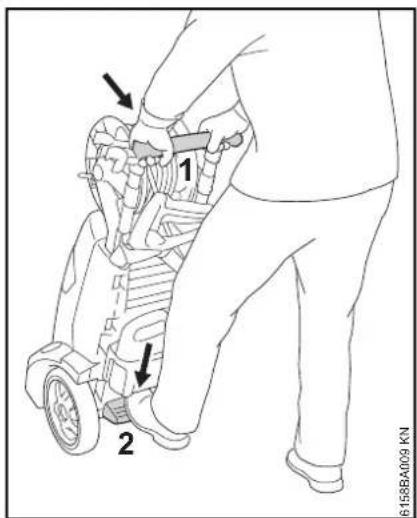
Hold the pressure washer firmly with both hands on the pushbar (1)
Steady the pressure washer with your foot on the kick plate (2), press pushbar (1) downward and balance the pressure washer
English
Carrying handle
The pressure washer can be carried using the carrying handle.
Transporting the machine in and on vehicles
- Secure the pressure washer in accordance with the regulations in force in the country to prevent tipping over and damage
Lay the pressure washer flat for transport
- Place the pressure washer on its back for transport
- Remove the detergent tank - see "Fitting, removing detergent tank"
- Empty the detergent tank or secure it so that it cannot tip over
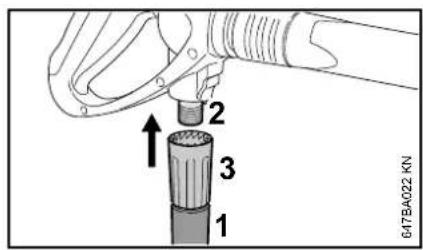
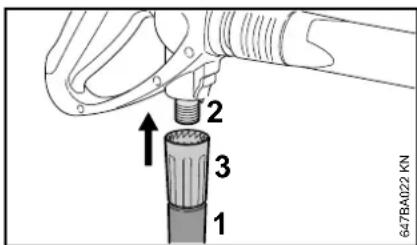
Fitting, removing spray lance
- Remove protective cap from the spray lance and save for later use
Pull back and hold the coupling (1)
- Push the spray lance (2) into the mount on the spray gun, or pull it out to remove the spray gun, respectively
- Release the coupling (1)
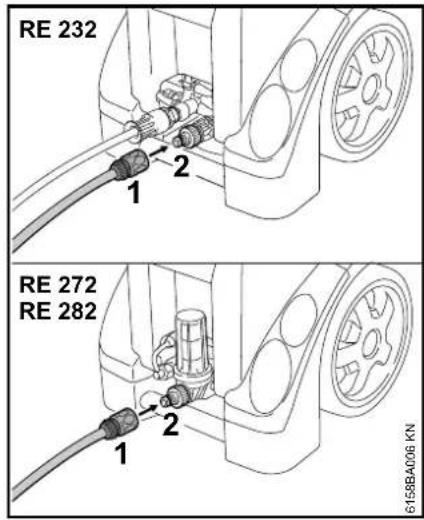
Fitting, removing high-pressure hose
Machine without hose reel
Connecting the high-pressure hose
- Push high-pressure hose onto the connector (1)
Fit and attach the union nut (2) and tighten it by hand
Disconnecting the high-pressure hose
Unscrew the union nut (2)
Pull high-pressure hose off of connector (1)
Machine with hose reel
The high-pressure hose is already connected.
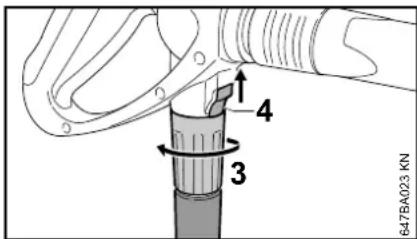
High-pressure hose and spray gun
Fitting
- Push the high-pressure hose (1) onto the connector (2)
Fit and attach the union nut (3) and tighten it by hand
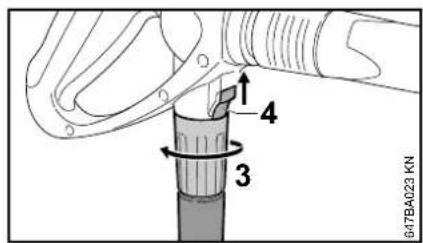
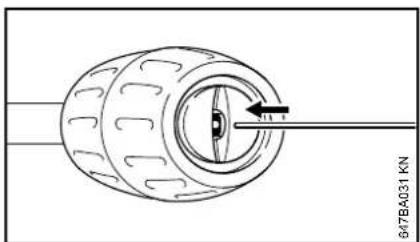
Removing
-Push the coupling (4) in the direction of the arrow and hold it
-Loosen the union nut (3) and unscrew it from the connector in the direction of the arrow
High-pressure hose extension
Always use only one high-pressure hose extension (special accessory).
Connect the high-pressure hose extension between the high-pressure hose and spray gun.
RE 232, RE 272 PLUS, RE 282 PLUS
Connecting the water supply
- Connecting the water hose
Briefly rinse out the water hose before connecting it to the machine to prevent sand and other particles from entering the machine and to purge the air from the water hose.
| Diameter of water hose: 3/4" | |
| Length of water hose: | min. 10 m (to absorb pres-sure surges) |
| max. 25 m |
- Push the coupling (1) on to the hose connector (2)
- Turn on water supply
To vent the system:
- Actuate the spray gun (without spray lance mounted) until a uniform water jet emerges
Connection to the drinking water main
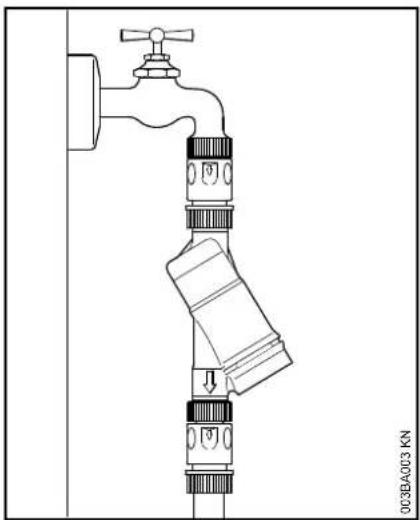
When hooking up to the drinking water main, a backflow preventer must be installed between the water tap and the hose. The design of the backflow preventer must comply with the applicable country-specific regulations.
If drinking water has passed through the backflow preventer, it can no longer be regarded as drinking water.
Follow the rules laid down by the local water supply company to prevent water flowing back from the high-pressure cleaner into the drinking water main.
English
Connecting to a pressureless water supply
The high-pressure cleaner can only be used in suction operation with the suction set (special accessory).

NOTICE
As a rule, it is advisable to use a water filter.
Connect the machine to the pressurized water supply and start it up briefly in accordance with the Instruction Manual
- Switch off the machine
- Disconnect the spray attachment from the high-pressure hose
-Unscrew the hose connector from the water connection
Connect the suction set to the water connection with the included connector
Always use the connector included in the suction set. The hose connectors included as standard with the high-pressure cleaner are not leakproof in suction operation and thus are not suitable for drawing in water.
- Fill the suction hose with water and immerse the suction cup of the suction hose in the water tank - do not use dirty water
Hold down the high-pressure hose by hand -
Switching on the machine
Wait until a steady jet exits the high-pressure hose -
Switch off the machine
Connect spray attachment - Switch on the machine with the spray gun open
- Actuate the spray gun several times briefly in order to bleed the air out of the machine as quickly as possible
Connecting to Power Supply
The voltage and frequency of the machine (see rating plate) must match the voltage and frequency of the power connection.
The minimum fuse protection of the power connection must comply with the specifications - see "Specifications".
The machine must be connected to the power supply via an earth-leakage circuit breaker to disconnect the power supply if the differential current to earth exceeds 30mA for 30ms .
The power connection must correspond to IEC 60364-1 and relevant national regulations.
When the machine is switched on, voltage fluctuations that occur under unfavorable mains conditions (high power line impedance) may negatively affect other connected electrical appliances. Trouble is not anticipated at power line impedances less than 0.15
The extension cord must have the following minimum cross-section depending on the mains voltage and cord length.
Cord length Minimum cross-section
| 400 V / 3~: | |
| 400 V - 415 V / 3~: | |
| up to 20 m 1.5 mm | 2 |
| 20 m to 50 m 2.5 mm | 2 |
| 230 V / 1~: | |
| 230 V / 3~: | |
| up to 20 m 2.5 mm | 2 |
| 20 m to 50 m 4 mm | 2 |
| 230 V - 240 V / 1~: | |
| up to 20 m 2.5 mm | 2 |
| 20 m to 50 m 4 mm | 2 |
| 200 V / 3~: | |
| up to 10 m 3.5 mm | 2 |
| 10 m to 30 m 5.5 mm | 2 |
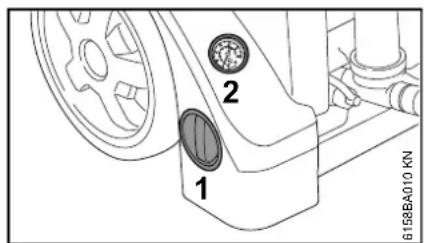
Connection to the power supply socket
Before connection to the power supply, check that the machine is switched off - see "Switching off the machine"
- Remove the power plug from the upper holder (1)
- Swivel the lower holder (2) upward and remove the power cord
Plug the power cord or extension cord into a properly installed outlet
Switching On
- Turn on water supply
NOTICE
The machine may only be switched on when the water intake hose is connected and the water supply has been turned on. Otherwise the machine may be damaged due to lack of water.
Completely unroll the high-pressure hose
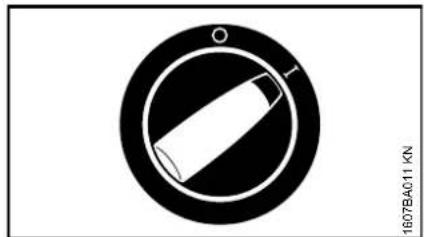
- Turn the master switch to 1 - now the machine is in standby mode
- Point the spray gun at the object to be cleaned - never at persons!
When the machine is switched on, voltage fluctuations that occur under unfavorable mains conditions (high power line impedance) may negatively affect other connected electrical appliances.
Trouble is not anticipated at power line impedances less than 0.15 ohms.
English
Machine with hose reel
NOTICE
Always completely unroll the high-pressure hose from the hose reel. The high water pressure causes the high-pressure hose to expand. This can also damage the hose reel or high-pressure hose.
Pull out hose reel stop (1)
Completely unroll the high-pressure hose
English
Working
Actuate the spray gun
- Point the spray gun at the object to be cleaned - never at persons!
- Point the rotary nozzle downwards when starting (if fitted)
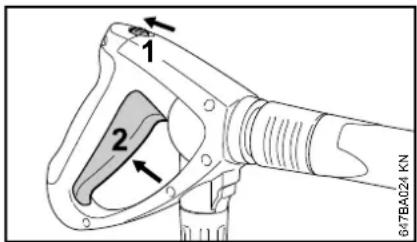
- Press the safety latch (1) in the direction of the arrow - the lever (2) is unlatched
Squeeze the lever (2)
The engine starts automatically and stops again as soon as the lever (1) is released. The machine is then in standby mode.
Standby mode
NOTICE
The machine must not be operated in standby mode for more than 5 minutes.
Switch off the machine at the master switch - see "Switching off the machine",
- if work is interrupted for more than 5 min,
during breaks,
if the machine is left unattended.
Pressure/quantity control on the machine
Only RE 272 PLUS, RE 282 PLUS
Working pressure and water flow rate can be set on the high-pressure pump for long-term adjustment in line with the cleaning job concerned.
- Turn the knob (1) to set the working pressure and water flow rate
The pressure in the high-pressure pump is indicated by a pressure gauge (2).
High-pressure hose
NOTICE
Do not buckle or loop the high-pressure hose.
Do not place any heavy objects on the high-pressure hose, and do not drive any vehicles over it.
Adding detergent
Detergent cannot be used when a high-pressure hose extension is installed.
Detergent can only be drawn into the machine in low-pressure operation.
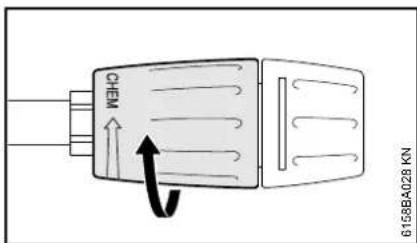
- Turning of the nozzle sleeve of the nozzle as far as possible towards "CHEM" = low-pressure operation
RE 232
- Slide the intake hose as far as possible into the separate container
RE 272 PLUS, RE 282 PLUS
Fitting, removing detergent tank
The detergent tank can be removed from the unit for filling, emptying and cleaning.
RE 232, RE 272 PLUS, RE 282 PLUS
-Unscrew the cap with intake hose from the detergent container
Pull the detergent tank out of the holder
Drawing detergent from the detergent tank
- Fill detergent tank with detergent diluted as specified
- Slide the intake hose as far as possible into the container
Using detergent from a separate container
-Unscrew the cap with intake hose from the detergent container
Screw the cap with intake hose onto a separate container
The cap has a standard thread and fits all standard separate containers.
- Slide the intake hose as far as possible into the separate container
All versions
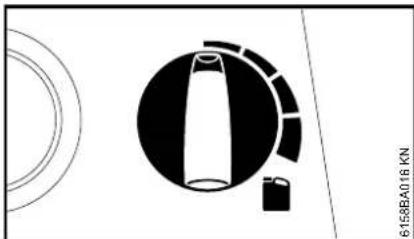
Use the detergent metering knob to adjust the amount of detergent to be added
Detergent metering knob to the left: 0% (min)
Detergent metering knob to the right: 5% (max)
English
- When applying detergent, start at the bottom and work upwards
Detergent must not be allowed to dry on the object to be cleaned
If detergent is no longer to be added:
-
Set the detergent metering knob to 0% (min)
-
Let the high-pressure cleaner continue to run with the spray gun open until no more detergent comes out of the nozzle
After finishing work
- Empty the detergent tank and rinse it with clear water
-Immerse the intake hose in clean water - Actuate the spray gun and flush out the residual detergent
Precisely calculating/setting the detergent concentration
For a few detergents, the concentration must be very precisely set. In this case, measure water flow rate and consumption of cleaning agent.
-
Set the detergent metering knob to "0% (min)"
Hold the spray gun in a suitable empty receptacle (>20I) and actuate for exactly 1 minute
Measure the quantity of water "Q" in the container -
Pour 2 liters of detergent diluted as directed into a suitable container (with a scale of 0.1~l ) - STIHL recommends the use of genuine STIHL detergents
Hold the intake hose in the container - Set the detergent metering knob to the desired concentration: 0% (min) bis 5% (max)
- Hold the spray gun in a suitable empty receptacle (>20 l) and actuate for exactly 1 minute
-Read the detergent consumption "QR" on the scale
Calculating the actual detergent concentration:
QR × V = concentration
- QR = amount of consumed detergent (in l/min)
- Q = Water without detergent (in l/min)
V = Predilution of detergent (in %)
If the actual concentration deviates from the desired concentration, reset dosing knob and repeat measurement if necessary.
Calculating the predilution of the detergent in %
If the predilution is not indicated as a percentage, it can be calculated using the following table:
Ratio value
$$ \begin{array}{l} 1: 1 = 50 \% \ 1:2 = 33.3\% \ 1:3 = 25\% \ 1:5 = 16.6\% \ 1: 10 = 9 \% \ \end{array} $$
Example:
Calculation ratio of 1:2
$$ \begin{array}{l} - \quad A = 1 \ - \quad B = 2 \ \end{array} $$
$$ \begin{array}{l} \frac {A}{(A + B)} \times 100 = \text {value in \%} \ \frac {1}{(1 + 2)} \times 100 = 33.3 \% \ \end{array} $$
Tips for operation Switching Off
The following information and examples of application make work easier and contribute to achieving an optimum cleaning result.
Operating pressure and water throughput
High pressure dissolves dirt better. The higher the water throughput, the easier it is to remove the dirt that has been loosened.
Clean delicate parts and surfaces (e. g. car paint, rubber) by applying low pressure or at a greater distance to avoid damage. 100 bar pressure is sufficient for cleaning vehicles.
Nozzles
Fan-jet nozzle
All-purpose - to clean parts and (sensitive) surfaces.
Applications:
- Cleaning vehicles and machines
- Cleaning floors and surfaces
- Cleaning roofs and facades
Rotary nozzle
To remove stubborn dirt on hardwearing surfaces.
Extremely dirty surfaces
Soak extremely dirty surfaces with water before cleaning them.
RE 232, RE 272 PLUS, RE 282 PLUS
Detergents:
The cleaning effect can be improved by using detergents. The corresponding exposure time (dependent on the detergent used) increases the cleaning performance.
Do not allow the detergent to dry.
Always use detergent in the specified dosage and follow the corresponding instructions for use of the detergent.
Mechanical cleaning:
The additional use of e. g. rotary nozzles or washing brushes helps to remove highly adhesive layers of dirt.
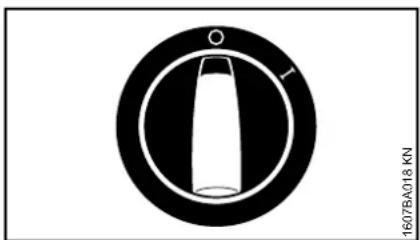
- Turn the master switch to 0
- Turn off water supply
- Actuate the spray gun until water only drips from the spray head (the machine is now depressurized)
Release trigger
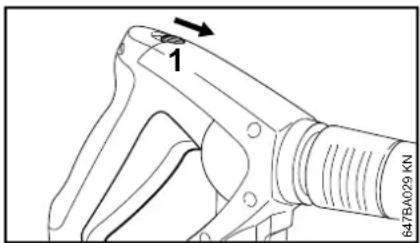
- Press the safety latch (1) in the direction of the arrow - the spray gun is locked to prevent inadvertent operation
English
After Finishing Work
Unplug the power plug from the socket
- Disconnect hose from the water supply and from the machine
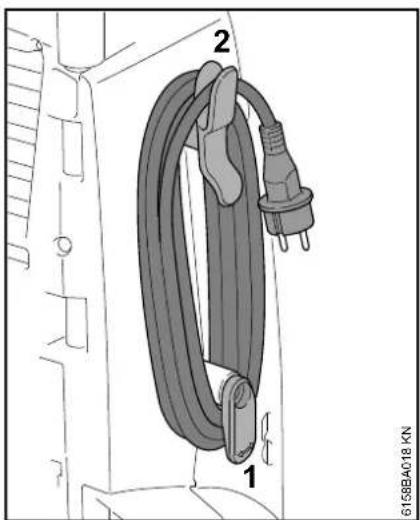
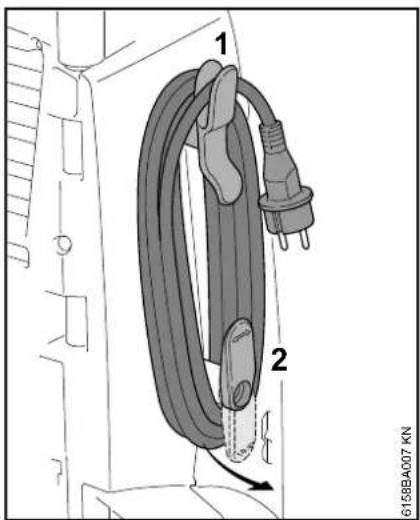
Connecting cord
Swivel lower holder (1) downward
- Roll up the connecting cord and hook onto the holder (2)
Rolling up the high-pressure hose and storing the spray attachment
RE 232
Insert gun and spray lance into the holders
Roll up high-pressure hose and hook onto the holder
RE 272 PLUS, RE 282 PLUS
Insert gun and spray lance into the holders
Roll up high-pressure hose
Storing the Machine
Store the machine in a dry room where it is protected from frost.
If protection from frost cannot be guaranteed, draw glycol-based antifreeze - like that used in motor vehicles - into the pump:
Insert water intake hose in container with antifreeze
-Insert spray gun without spray lance in the same container
- Switch on the machine with the spray gun open
- Actuate the spray gun until a uniform jet emerges
- Keep leftover antifreeze in a sealed container
Maintenance and Care
| The following intervals apply for normal operating conditions. If your daily working times are longer, shorten the specified intervals accordingly. If you only use the too occasionally, extend the intervals accordingly. | Before starting work | At the end of work and/or daily | Weekly | Monthly | RE 232 every 200 operating hours | RE 272, 282 every 300 oper- aling hours | If faulty | If damaged | As required | |
| Complete machine | Visual inspection (condition, leaks) X | |||||||||
| Clean X | X | |||||||||
| Oil level of the high-pressure pump check | X | |||||||||
| Oil of the high-pressure pump Have it changed by a servicing dealer1) | \( X^{2} \) | \( X^{2} \) | ||||||||
| Connectors on high-pressure hose | cleaning X | X | ||||||||
| greasing X | ||||||||||
| Plug-type coupling of the spray lance and the coupling sleeve of the spray gun | cleaning X | X | ||||||||
| Water intake screen3) in the high-pres-sure inlet | cleaning X | X | ||||||||
| replace X | ||||||||||
| Water filter3) | Visual inspection (Dirt) X | |||||||||
| Clean X | ||||||||||
| replace X | ||||||||||
| High-pressure nozzle | cleaning X | |||||||||
| replace X | ||||||||||
| Ventilation openings cleaning X | ||||||||||
| Machine supports | check X | |||||||||
| replace X | ||||||||||
1) STIHL recommends STIHL dealers
2) Once after the first 50 hours of operation
3) depending on equipment version
Maintenance
Always unplug the power cord before servicing or cleaning the machine.
In order to ensure trouble free operation, we recommend carrying out the following steps whenever the machine is used:
Rinse the water hose, high-pressure hose, spray lance and accessories with water before fitting them
- Remove all sand and dust from the plug-type coupling of the spray lance and the coupling sleeve of the spray gun
Cleaning the high-pressure nozzle
Since the pump pressure increases if the nozzle is clogged, it must be cleaned immediately.
- Switch off the machine
- Actuate the spray gun until water merely drips from the spray head – the machine is now depressurized
- Remove spray lance
Clean nozzle with a suitable needle
NOTICE
Always remove the spray lance before cleaning the nozzle
Rinse spray lance with water from the nozzle end
Cleaning the water filter
Clean the water filter when dirty.
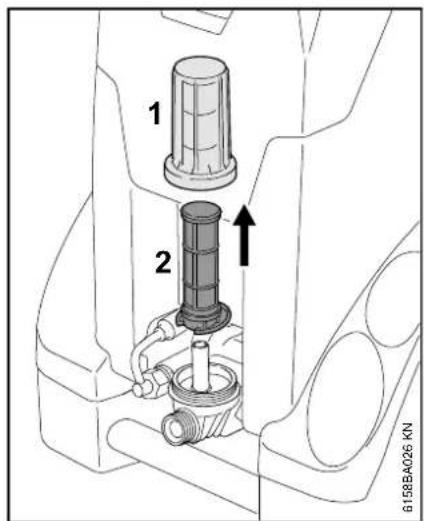
Unscrew lid (1)
- Lift the filter insert (2) up and off
Thoroughly rinse the lid (1) with clear water
Thoroughly rinse the filter insert from the inside to the outside with clear water
-Check filter insert - exchange if filter insert is damaged
Cover outlet opening (3) with finger
Rinse filter housing thoroughly with clear water.
Lubricate the O-ring (4) in the filter housing and the O-ring in the lid with multipurpose grease
Fit filter insert
Screw on and tighten lid
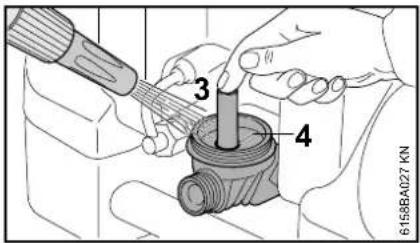
Cleaning the water intake screen
If the unit does not have a water filter, clean the water intake screen once a week or more often as necessary.
- Disconnect hose connector (1).
Carefully release the strainer (2) with pliers and rinse it.
Before refitting the strainer, ensure that it is undamaged and replace if necessary
English
Cleaning the ventilation openings
The machine must be kept clean so that cooling air can flow freely through the openings in the machine.
Lubricating the connections
Lubricate the connections on the high-pressure hose with multipurpose grease as necessary.
Checking the machine supports
The two front machine supports must be replaced if damaged or worn, to ensure the stability of the machine.
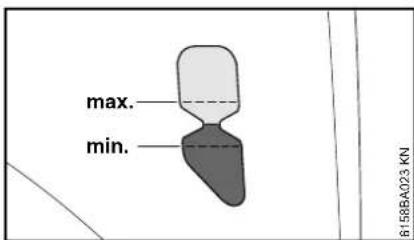
Checking the oil level
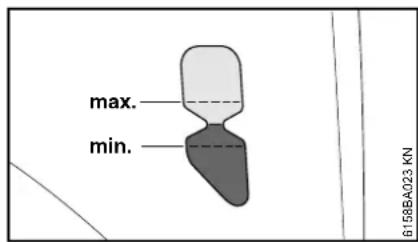
Check oil level weekly and after transport.
- Place the machine on a flat horizontal surface
Check that the oil level is between the "min" and "max" marks. If it is not, contact your servicing dealer. STIHL recommends STIHL servicing dealers
First use after long periods of storage
During long periods of storage, mineral residue from the water may be deposited in the pump. This may cause the motor to start with difficulty or not at all.
- Connect the machine to the water supply and flush thoroughly with tap water, leave the power cord unplugged while doing so
Plug the power plug into the wall socket - Switch on the machine with the spray gun open
Minimize Wear and Avoid Damage
Compliance with the specifications of this owner's manual will avoid excessive wear and damage to the machine.
The machine must be used, maintained and stored as carefully as described in this owner's manual.
The user is responsible for all damage caused by failure to comply with the safety, operating and maintenance instructions. This applies in particular for:
Product modifications not authorized by STIHL
Use of accessories that are not approved for the machine, unsuitable or of inferior quality
Use of the machine in a manner not in keeping with the intended use
Use of the machine in sporting events or competitions
Consequential damages due to continued use of a machine with defective components
- Damage due to freezing
- Damage due to improper power supply voltage
- Damage due to poor water supply (e.g., cross-section of the intake hose too small)
Maintenance work
All of the tasks listed under "Maintenance and Repairs" must be carried out periodically. If the user does
not carry out these maintenance tasks him- or herself, they should be delegated to a dealer.
STIHL recommends that maintenance and repair work be carried out only by authorized STIHL dealers. STIHL dealers receive regular training and are supplied with technical information.
If these tasks are not performed or are performed improperly, this may result in damage for which the user is responsible. Among other things, this includes:
- Damage to machine components due to delayed or insufficient performance of maintenance
Corrosion damage and other consequential damages due to improper storage - Damage to the machine as a result of using replacement parts of inferior quality
Wear parts
Some parts of the machine are subject to normal wear and tear even when the machine is used in conformity with its intended use. These parts must be replaced in due time, depending on the nature and duration of use. These include, among others:
High-pressure nozzles
High-pressure hoses
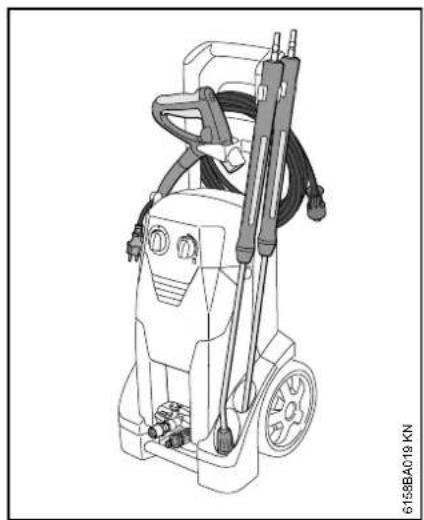
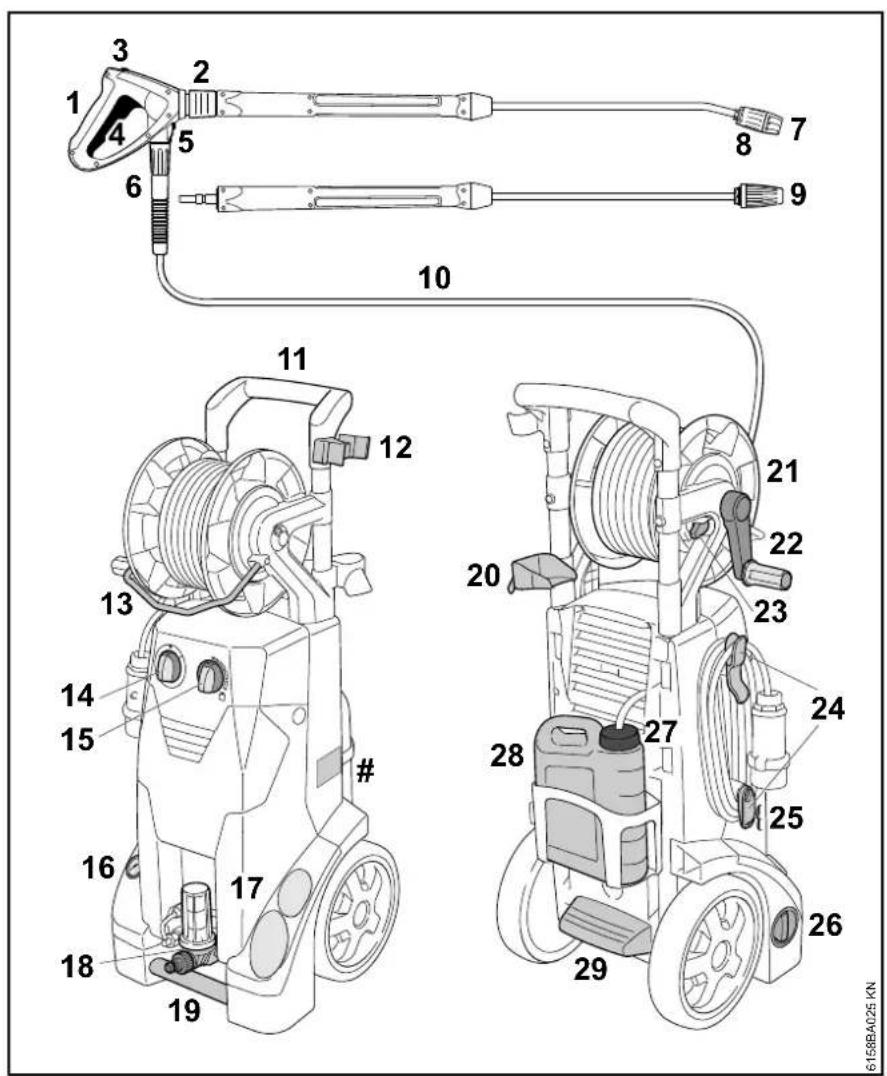
Main Parts

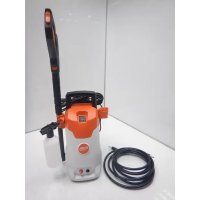
RE 232
1 Spray gun
2 Coupling for spray lance
3 Safety catch
4 Lever
5 Safety latch for high-pressure hose
6 Union nut for high-pressure hose
7 Nozzle
8 Nozzle sleeve for detergent intake
9 High-pressure hose
10 Pushbar
11 Spray lance holder
12 Spray gun holder
13 Detergent metering knob
14 Machine switch
15 Bracket for spray lance
Model plate
English
RE 232
16 Hose connection water intake
17 High-pressure hose connector
18 Carrying handle
19 Water filter 1)
20 Holder for high-pressure hose
21 Suction hose for detergent
22 Power cord holder
23 Oil level display
24 Kick plate
Model plate
English
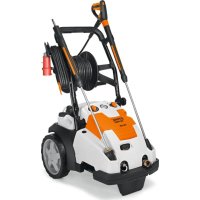
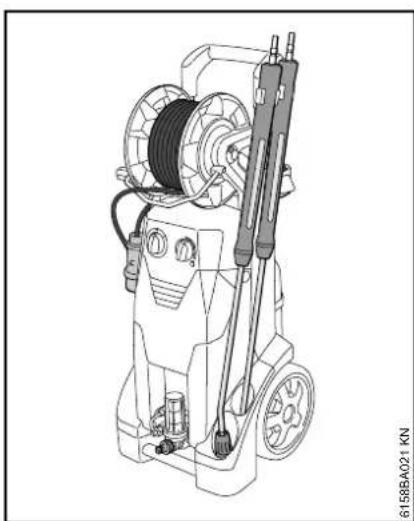
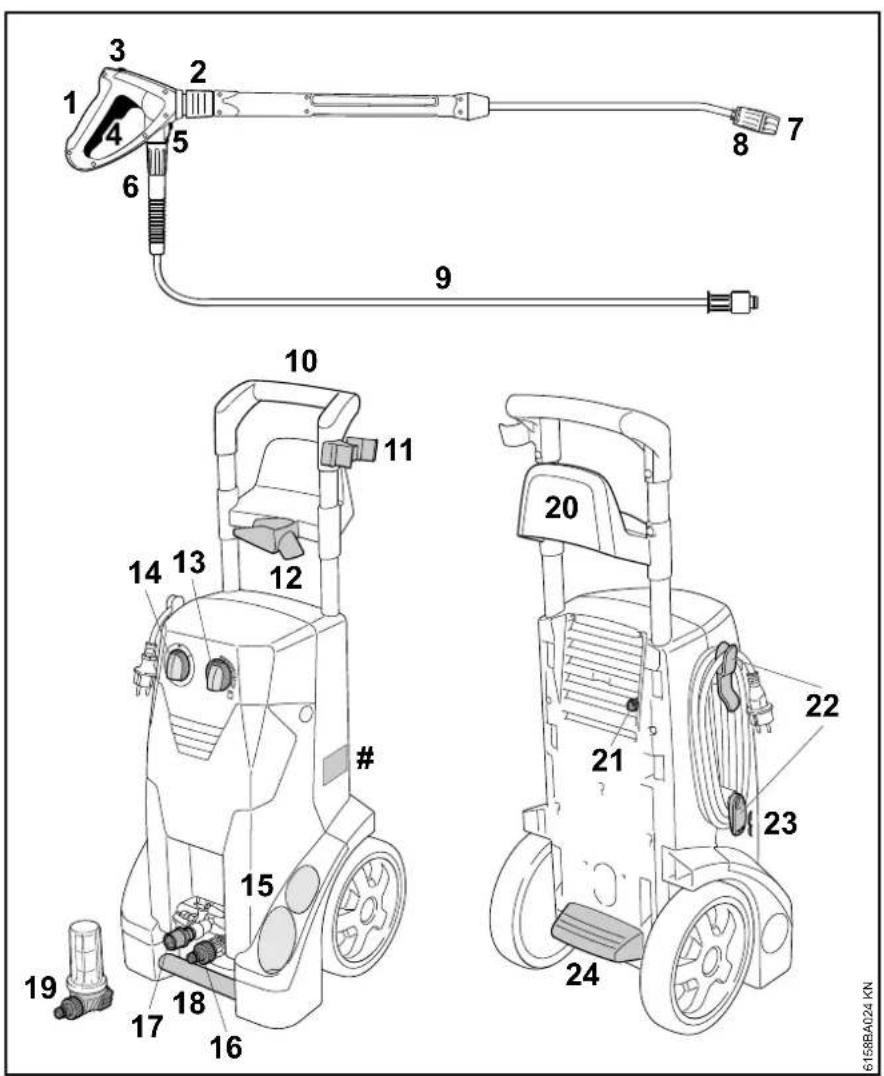
RE 272 PLUS, RE 282 PLUS
1 Spray gun
2 Coupling for spray lance
3 Safety catch
4 Lever
5 Safety latch for high-pressure hose
6 Union nut for high-pressure hose
7 Nozzle
8 Nozzle sleeve for detergent intake
9 Rotary nozzle
10 High-pressure hose
11 Pushbar
12 Spray lance holder
13 Guide clip
14 Machine switch
15 Detergent metering knob
16 Pressure gauge
Model plate
English
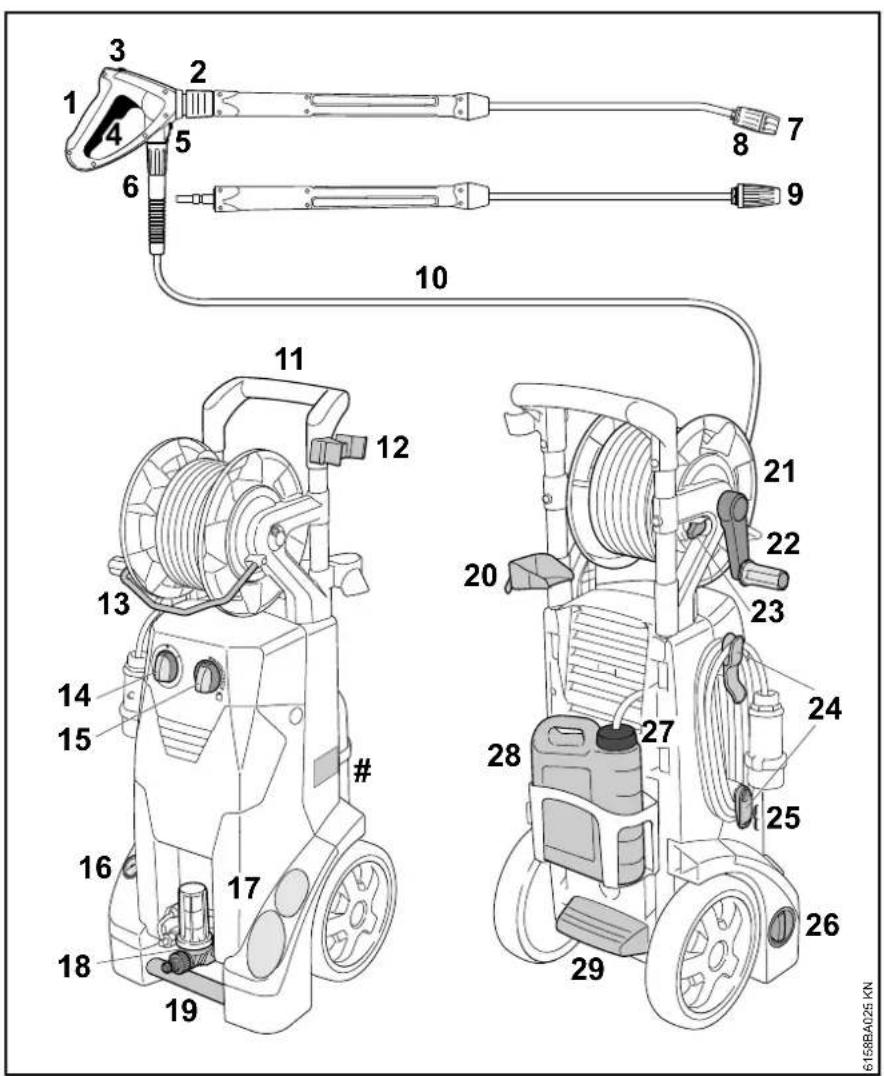
RE 272 PLUS, RE 282 PLUS
17 Bracket for spray lance
18 Water intake with water filter and hose connector
19 Carrying handle
20 Spray gun holder
21 Hose reel
22 Crank handle for hose reel
23 Hose reel stop
24 Power cord holder
25 Oil level display
26 Pressure/quantity control knob
27 Cap for detergent tank
28 Detergent tank
29 Kick plate
Model plate
Specifications
| RE 232 RE 232 | 1) | RE 232 RE 272 | PLUS RE 272 PLUS4) | RE 282 PLUS | |
| Power supply: 230 V | 1~50 Hz | 230 V1~50 Hz | 220 V1~60 Hz | 230 V1~50 Hz | 220 V1~50 Hz |
| Performance(EU) 2019/1781 §2(2) (j): | 3.3 kW | 3 kW | 3.1 kW | 3 kW | 3 kW |
| Fuse (characteristic "C" or "K"): | 16 A | 13 A | 15 A | 16 A | 16 A |
| Protection class: | I | I | I | I | I |
| Degree of protection: | IP X5 | IP X5 | IP X5 | IP X5 | IP X5 |
| Working pressure: | 14.5 MPa(145 bar) | 12.5 MPa(125 bar) | 13.5 MPa(135 bar) | 15 MPa(150 bar) | 15 MPa(150 bar) |
| Max. permissible pressure: | 20 MPa(200 bar) | 18 MPa(180 bar) | 20 MPa(200 bar) | 20 MPa(200 bar) | 20 MPa(200 bar) |
| Max. water feed pressure: | 1 MPa (10 bar) | 1 MPa (10 bar) | 1 MPa (10 bar) | 1 MPa (10 bar) | 1 MPa (10 bar) |
| Max. water throughput: | 660 l/h | 660 l/h | 610 l/h | 620 l/h | 620 l/h |
| Water throughput as per EN 60335-2-79: | 590 l/h | 590 l/h | 560 l/h | 560 l/h | 560 l/h |
| Max. suction lift: | 1 m | 1 m | 1 m | 1 m | 1 m |
| Max. water feed tempera-ture in the pressurized water supply: | 60 °C (> 40 °CMax. 1h) | 60 °C (> 40 °CMax. 1h) | 60 °C (> 40 °CMax. 1h) | 60 °C (> 40 °CMax. 1h) | 60 °C (> 40 °CMax. 1h) |
| Max. water feed tempera-ture in suction operation: | 40 °C | 40 °C | 40 °C | 40 °C | 40 °C |
| Max. kickback force: | 24.6 N2) | 24.1 N2) | 21 N2)22.3 N3) | 22.7 N2)24.2 N3) | 22.7 N2)24.1 N3) |
| Length approx.: | 392 mm | 392 mm | 392 mm | 392 mm | 392 mm |
| Width approx.: | 390 mm | 390 mm | 390 mm | 390 mm | 390 mm |
| Height approx.: | 1164 mm | 1164 mm | 1164 mm | 1164 mm | 1164 mm |
English
Sound and Vibration Levels
| RE 232 RE 232 | 1) | RE 232 RE 272 | PLUS RE 272 PLUS4) | RE 282 PLUS | |
| Weight (with spray attachment and high-pressure hose): | approx. 36 kg | approx. 36 kg | approx. 37 kg | approx. 42 kg | approx. 42 kg |
| Length of high-pressure hose (steel braided): | 10 m, DN 06 | 10 m, DN 06 | 10 m, DN 06 | 15 m, DN 06 | 15 m, DN 06 |
| 1) United Kingdom2) Fan-jet nozzle3) Rotary nozzle4) Argentina |
| RE 232 | RE 272 PLUS | RE 272 PLUS \( {}^{1)} \) | RE 282 PLUS | |
| Sound pressure level \( {\mathrm{L}}_{\mathrm{p}} \) according to ISO 3744 (at a distance of \( 1\mathrm{\;m} \) ) | 75.7 dB(A) | 72.4 dB(A) | 76 dB(A) | 73.4 dB(A) |
| Sound power level \( {\mathrm{L}}_{\mathrm{{wa}}} \) accord- ing to ISO 3744 | 89.9 dB(A) | 86.6 dB(A) | 86.6 dB(A) | 87.6 dB(A) |
| Vibration level \( {a}_{h\nu } \) at the handle according to ISO 5349 | \( < {2.5}\mathrm{\;m}/{\mathrm{s}}^{2} \) | \( < {2.5}\mathrm{\;m}/{\mathrm{s}}^{2} \) | \( < {2.5}\mathrm{\;m}/{\mathrm{s}}^{2} \) | \( < {2.5}\mathrm{\;m}/{\mathrm{s}}^{2} \) |
| 1) Argentina |
The K-factor in accordance with Directive 2006/42/EC is 2.0 dB(A) for the sound pressure level and sound power level; the K-factor in accordance with Directive 2006/42/EC is 2.0m / s^2 for the vibration level.
REACH
REACH is an EC regulation and stands for the Registration, Evaluation, Authorisation and Restriction of Chemical substances.
For information on compliance with the REACH regulation (EC) No. 1907/2006 see www.stihl.com/reach.
Troubleshooting
Before working on the machine, unplug the power cord, turn off the water supply and actuate the spray gun until the pressure has been relieved.
| Fault Cause Remedy | ||
| Motor does not run when switched on (hums when switched on) | Mains voltage is too low or improper Check electrical connection Check plug, cable and switch | |
| Cable extension with wrong cross-section | Use an extension cord with a sufficient cross-section, see "Connecting the machine to the power supply" | |
| Cable extension too long Connect the machine without an extension cord or with a shorter one | ||
| Electric circuit-breaker has been tripped Switch off the appliance, operate the spray gun until water only drips from the spray head, insert the safety lever, switch on the mains fuse | ||
| Spray gun not actuated Actuate spray gun when switching on the machine | ||
| Motor constantly switches on and off | High-pressure pump or spray attachment is leaky | Have the machine checked by a servicing dealer 1) |
| The engine stops Machine switches off because the motor is overheating | check whether the supply voltage and machine voltage match; let the motor cool down for at least 5 minutes | |
| Weak, ragged, unclean jet | Nozzle fouled | Clean nozzle, see "Maintenance" |
| Pressure fluctuates or drops | Insufficient water | Open water tap completely comply with permissible suction lift (suction mode only) |
| High-pressure nozzle in spray head is dirty | Clean high-pressure nozzle; see "Maintenance" | |
| Water intake strainer in pump inflow clogged | Clean water intake strainer; see "Maintenance" | |
| Water filter at pump intake is dirty | Clean water filter; see "Maintenance" | |
| High-pressure pump is leaky, valves are defective | Have the machine checked by a servicing dealer 1) | |
| Nozzle clogged | Clean the nozzle | |
English
Before working on the machine, unplug the power cord, turn off the water supply and actuate the spray gun until the pressure has been relieved.
| Fault Cause Remedy | ||
| No detergents Detergent tank empty Top | Top up the detergent container | |
| Detergent intake is clogged Eliminate clog | ||
| Injector worn Have the machine checked by a | servicing dealer 1) |
Maintenance and Repairs Disposal
Users of this machine may only carry out the maintenance and service work described in this user manual. All other repairs must be carried out by a servicing dealer.
STIHL recommends that you have servicing and repair work carried out exclusively by an authorized STIHL servicing dealer. STIHL dealers are regularly given the opportunity to attend training courses and are supplied with the necessary technical information.
When repairing the machine, only use replacement parts which have been approved by STIHL for this power tool or are technically identical. Only use high-quality replacement parts in order to avoid the risk of accidents and damage to the machine.
STIHL recommends the use of original STIHL replacement parts.
Original STIHL parts can be identified by the STIHL part number, the STIHL logo and the STIHL parts symbol (the symbol may appear alone on small parts).

High-pressure cleaner, accessories and packaging must be collected and recycled in an environmentally beneficial manner.

Do not dispose of high-pressure cleaner, accessories and packaging as household waste.
Information concerning disposal is available from a STIHL servicing dealer.
High-pressure cleaner, accessories and packaging must be disposed of in accordance with the regulations and in an environmentally beneficial manner.
EC Declaration of Conformity
declare under our sole responsibility that
Designation: High-pressure wash
Make:STIHL
Series: RE 232
Serial identification 4788 number:
Series: RE 272 PLUS
Serial identification 4788
Series: RE 282 PLUS
Serial identification 4788
conforms to the relevant provisions of Directives 2011/65/EC, 2006/42/EU, 2014/30/EC and 2009/125/EU and has been developed and manufactured in compliance with the following standards in the versions valid on the date of production:
EN ISO 12100-1, EN ISO 12100-2, EN 55014-1, EN 55014-2, EN 60335-1, EN 60335-2-79, EN 61000-3-2, EN 61000-3-11, EN 50581
The measured and guaranteed sound power levels were determined according to Directive 2000/14/EC, Annex V.
Measured sound power level
RE 232 89.9 dB(A)
RE 272 PLUS 86.6 dB(A)
RE 282 PLUS 87.6 dB(A)
English
Guaranteed sound power level
RE 232 91 dB(A)
RE 272 PLUS 89 dB(A)
RE 282 PLUS 90 dB(A)
Technical documents deposited at:
The year of construction of the machine and the country of manufacture are shown on the CE plate on the machine.
Waibingen, 25.01.2021
Head of Product Data, Regulations and Licensing

Table des matieres
Indications concernant la presente
Notice d'emploi 71
Principales pieces 97
Chere cliente, cher client,
Waibingen, 25/01/2021
Eliminar as perturbacoes de service 208
Indicaoes de reparacao 210
Eliminação 210
Unicamente as RE 272 PLUS, RE 282 PLUS
Lubrificar as unioes
Eliminar as perturbacoes de service
Sigmaoloynon mXavnpatoc 258
Metaopopa tou 甲 x avnuaTOc 259
EeYxoc staeun5aiou 272
Oeon oE aeitoupyia eTa aTo
eYaLo dIaotma axpnaic 273
IepiopiaoCΦOpaCkai aTTOuyn Znuiw 273
Kupia npou xavnato 275
TeXVIkαxpakntpiotikα 279
Avntuotwnn 281
O8nyiec EITIOKEUNs 283
AToPpI
△λωσιμιρφωσης EE
283
283
Ayantnte TELaTn,
EUXAPIOUe 0epua yia nvy afoaan oac va ayopaeTe eva poiov TIOIOTnTcnsTIHL.
To Tpoiov auto exei kataokvaotei e ouyxpoeves eboobouc npaywyngkai katw ato ektevi nepta diaafoianns Toiotnac. Ato tnv napeu pa aesoupe katabaale kahe duvatni pooattaeia oate to uxavnauto va avtanokpvetai otic poookiecs oac kai va oac egaofalizepyaia xwpic TpoBnmuata.
Av exete oTOIEoBnTote aTOpiec oxetiká to uXavnpaOac, aTeuBuvThe OToV
avITpOswTO aTto Tov OTIO TO
ayopaae, n aTEuBiaC OToV
Eiaywya.
△iKoSσaS,

.Nikolas Stihl
oriony
xipdohouno
Oidmyx SldmX onarpnnny dDx 30
HO-010981000000
1206-299-89p0
2020 2020
STIHL
Oi napoues oynie xpiogntipoatauovnai ato dikaiwmu nveuapntic idkntnoic. Etniuadoovtai oia ta dikaiuupata, iokaiuvaavatapaywnc, metepaans kai emepyaaic me nektpovika ouimata.
EYKekipuEvwV TPOOAPUoOeVwv EpyaIew.
Σωματική κατασταση
Ppokéiévou va epyaoteite μe
TO uynxavna, pétnei va eioTe
kala OTnv uyia, ekoupaotoc
kai OE kALn yuxoayikn
kataaon. Av ia loyouc
uyiac npetie va aTPOEUYET
TN oWATIK KOTTOWAN,
pWTNTe Tov yiatpo oac av
μTOpEITE va epyaoteite μe
uynavma autou tou iDouc.
ATayopeuei n xpnoi tou
unxavmaTc oEa aTio Ayn
aalko0la, vapkwtikwv n
apakwTV Tou eiwovuTv
IkavotnA vtiopaanC.
Toueis xphangs
To Tluotiko uynanncpiocn civai kataaanlo yia to kaapiaqa eTiaaveiw, oxmuawv, mxaowv, doxiewv, TPOOwv, OaBawv kai yia Tnv aphioeon oKoupiac xomega tbnoupyia oKovnckai OTIVpWv.
To unxavna 6ev EITpETTAEIva xpoioutoieiTai ia kavev av aAlo oKoTTO, kaWc
εμηνικα
μTOpεi va πpokληθouv atuxμata n ζημia σTo μnxavμα.
Mn xpnoiopoieiTo umxavna oE 0epmuokaies yupw n kaw aTouc 0^
Evupuaia kai EoTlaiooc
Na φopáte uTóðnμata με avTIOλIσθηntiKn σóλ.

PPOEIADONIOIH∑H

Na fopate yuaia aaaiaac stevn c apoync uu fo wva e to npotto EN 166 ia va uieiwetai o kivduvoctpaumatiou twv maiv. dovticetwe ta yuaia aaoaiaic va efapuoov owta.
Atoovvdoan oawlya uynnncieons
-εβδωτε to παειρδούνδεος (2).
AToauovdeTeTovawnva uynnns TIEa nC aTO tOto aOIO auveoNc (1).
Mnxavnputa me aven
O oWAnVAs uynAns TiEoNc Eivai nOn Ouvoevoc.
SUVoan oawnva uynnc Tioa TIOIaIKTOEuaOng
ToTtoEeTnAn
Piepaote tov oawna uwnanpiocn (1) 0to otoio ouvdeonc (2).
Biodwote Kai ophiTe To Taiaudi Ouvoeonc (3) 1e To xepi.
Aphiεση
PioteTov ouptn4) npoc nV KATEuovon Tou bAouc KkpatneTov.
EoΦiETo TnAeIaOuVbEoNc (3) KAI EβIOwTe TO aTTO aTOpIO OuvbEsO uMooVA eTO bEoC.
PpOekTaaon oAAnva uynAns mEons
Mn xpnoiopoioite Tepioootepe c aioia npoektaoeis tou oaniva uynanics (TpooBetoc EoTriauoc).
k a o n o u 0wlnva uynanc trioan c avaeoa otov wlnva uynanc trioan c kai to TIOI EKTOEeuaon.
EeYxos taOuNs laoiou
EeYxETnOaBunTOAUoouiafopa TnV EoopaKaI eTAtro KaTe aetopap.
ToTIOeTHoTe To uNxavnua oE eva EITIeEO, opiovTO UTOaTPwua.
Béβaiωθeite otn ααθμn tou λαδiou βpiaketai avαεσα σα Αημδια «min» kai «max». Av ωx, επιοκεθeite εva εδιkeμενo καταπμα. H STIHL auviotá va ateuθuνθeite oτov πιοτοιημενo avitipóωτο ng STIHL.
Oeσe λeitoupyia eTa aTó μεyálo δiασtnμα αxρησiα
Av to mnxavnma Tapaueivektoc
xnois ia yalao biatnma, mtopouv
va etikaanouv alata aTO vepo otnv
avla.Auto exi wcaTATEaOa, o
Kivntnpac va aeitoupye i e duokolia n
kai kaohou.
UVDEOTE TO mXavnma OTO biktuo UOpEuAns KAI EETIAUVTE TO EITIeAws To vepo Tns BPuaang, Xwpi va SuVDEOETO KAALWIO Tpofoosiaic.
UV O TE to
ΘΕΟTE TO μηχανημα οελειουργία, ΜE TO TIIOTOI αονΙXΤΟ.
Iepiopiouc Oopac kai aTOnouyn Znuiwv
TnpwrtacautcTGOnyicxpnans
muopeitevaatoouyeteUntepboiikn thopakai 0To mnxavna.
H xphan, n ouvtnpnan kai n
aTOnhkeuAn Tou mXavnmuo TpETeI
va yivovtaI e TIOt n npnan twv
obnyiw xphans.
O xpiotnc fepei tnv eunvnyia kae Znmuia nou ophiiaeai oe n npnan twv onyiw aphiiaic, xepiou ou ouvtnpanc. Autio ixuei Eikotepa yia:
Alambdae cTo TPOiov Tou 8ev exouv EykipEi aTn STIH
XpnoTn TapeAkoEvwTvouEevoxuv EykiOe i ivai aKataaannayia to unxavma, ivai nioiTkaUToTepa Tou xxavmaTOC
AvtikavovikxpnTou mXavmuo
XpnnTou mnxavmuoC a0anTKEc EKONwOeI n aywve
Emuoez nuiots Tou npokalouvta aTo ouvexioeyn xpnoTou mXavnatoC ME eAattwatak aEapntmuata
Znmuies TAYETOU
Zημες λόγω εσφαλμένης τάσς τροφόδοσις
Znmues aTo kaK npofoosia vepou (π.x. TIOAU μIKpni biatoi tou taopoxyns)
Epyaiec ouvtnpnoans
OLeGoi Epyaies Tou avapepovtaI OTo Kefalao "OOnyie GuvtnpnsKai Kaepiaou" TpeTt va TpayaTOIOUVTAkTIKA.2E TepiTTwAn Tou O xPnATnc Dv Evivai 8e Thea VekTei Movoc Tou autc TIG Epyaies ouvtnpns, TpeTt VA TIC aavBoei OE iDKEuEvo KataoTma.
H STIHLOvviota va avaheoeTIC
epyaies ouvtnpnKai ETIaKeunc
aTOKAEOTiKa OTouc EITIOUc
avTTPOoWtouc TCS TSIHL. OI EITIOU
avTTPOoWtio TCS STIHLOXovTN
duvatotnta va IABouv epoc e TAKTKA
TPOpyaMATA EKTAIDeUoN KAI Exov
Otndiaeon Touc Tc anapaitntcs
TEVVIKES TAnpoOpieC.
Av oEpyaies autes dev EKTEAOuVTai Eykaip a npaymuatotiouovtai e akataaannlo poto, mtopeia v Tpokntheoov zetae, nV EUOuvniaTc OTIOIEs fepei o ibios xphntg. S'autes ouykataaeyovtai meta SuAwwv:
Waibingen, 25/01/2021