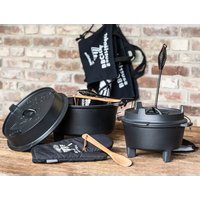
Dutch Oven - Saucepan Skandika - Free user manual and instructions
Find the device manual for free Dutch Oven Skandika in PDF.
User questions about Dutch Oven Skandika
0 question about this device. Answer the ones you know or ask your own.
Ask a new question about this device
Download the instructions for your Saucepan in PDF format for free! Find your manual Dutch Oven - Skandika and take your electronic device back in hand. On this page are published all the documents necessary for the use of your device. Dutch Oven by Skandika.
USER MANUAL Dutch Oven Skandika
08 Safety note
08 Before first use
08 Baking the Dutch Oven - how it works
09 Treatment of rust stains
10 How do I clean my Dutch Oven?
10 Properly storing the Dutch Oven
11 Guarantee conditions
Please visit the Skandika Service portal on our website for FAQs and downloadable instructions. For more information about Skandika, simply visit our main page www.skandika.com

Operating and care instructions
Please read the following instructions carefully before first use and follow all information given.
SAFETY NOTE

Attention! The Dutch Oven gets very hot on all parts during use. To avoid burns, only lift the lid with heat-resistant gloves or a special lid lifter. Never touch or carry the pot during use without heat protection. Always place the Dutch Oven on a suitable, heat-resistant surface and do not quench it with cold water.
Before first use
Before using the pot for the first time, be sure to rinse it thoroughly with hot water. Do not use washing-up liquid or other cleaning agents! A light protective layer is already in place for transport and interim storage so that it is ready for use immediately on arrival. However, we still recommend that you bake it before using it for the first time to create a thicker patina as a basis for long-term use and to protect it from rust stains in the long term.
Baking the Dutch Oven - how it works
Completely grease the pot and the lid from the inside and outside - either with a special care paste, neutral oil or vegetable fat. For example, coconut oil, sunflower or rapeseed oil, but also all other high-temperature resistant fats are suitable - olive oil, however, is unsuitable.
It is important that the baking takes place in a closed cooking space. Therefore, make sure that the oven or gas grill has reached the appropriate temperature of approx. 230 - 250 degrees and, in the best case, place the pot and lid next to each other on the rack. Now it is time to wait. The oil must now slowly evaporate. The cast iron is quite coarse-pored, so the oil can penetrate the coarse pores and seal the cast iron. After about 15-20 minutes, all the oil should have evaporated. Residues can be removed with a paper towel. Then oil the pot again and put it in the oven for another 10-15 minutes. After cooling, it is crucial that a light film of oil remains on the surface. The oil that has soaked into the pores now acts as a natural protective layer (the so-called patina). In the near future, the Dutch Oven should no longer rust and can be used without worry.
If the patina has been damaged after repeated use and rust spots have formed, the stoving process can also be repeated.
Treatment of rust stains
In the case of rust stains, these should first be removed with a wire brush and then the pot should be thoroughly cleaned with warm and clear water and dried well. Now the baking of the patina must be done again.
How do I clean my Dutch Oven?
Because it is made of cast iron, a Dutch oven requires thorough cleaning after each use. With proper attention and care, the pot will allow for great ease of use even after many years.
After use, the pot must be completely cooled down. Only warm water is needed for cleaning. It is essential to add water only after the pot has cooled down, otherwise thermal shock may occur and the material may warp or, in the worst case, crack. In addition, never use washing-up liquid or put the pot in the dishwasher - this is extremely important, as otherwise the fat is removed from the pot and the previously built-up patina is destroyed, which in turn leads to rust.
To scrub off food residues, use a standard dishwashing sponge or a brush. Now just dry the pot with a kitchen towel or a lint-free tea towel and then seal the cast iron again with a light layer of oil. That is all that is needed for cleaning. Any remaining germs will die off during the next cooking process at the latest, as the pot is always well preheated before use.
Properly storing the Dutch Oven
The pot should always be stored in a place that is as dry as possible. To absorb any moisture, kitchen paper can be placed in the pot. It is also advisable to place a piece of kitchen paper or cardboard folded several times between the lid and the pot - this allows the air to circulate well.
GUARANTEE CONDITIONS
For our devices we provide a warranty as defined below.
- In accordance with the following conditions (numbers 2-5) we repair defect or damage to the device free of charge, if the cause is a manufacturing defect. Therefore, these defects / damages need to be reported to us without delay after appearance and within the warranty period of 24 months after delivery to the end user. The warranty does not cover parts, which easily break (e.g. glass or plastic). The warranty does not cover slight deviations of the product, which are insignificant for usability and value of the device and damage caused by chemical or electrochemical effects and damages caused by penetration of water or generally force majeure damage.
- The warranty achievement is the replacement or repair of defective parts, depending on our decision. The cost of material and labor will be borne by us. Repairs at customer site cannot be demanded. The proof of purchase along with the date of purchase and / or delivery is required. Replaced parts become our property.
- The warranty is void if repairs or adjustments are made, which are not authorized by us or if our devices are equipped with additional parts or accessories that are not adapted to our devices. Furthermore, the warranty is void if the device is damaged or destroyed by force majeure or due to environmental influences and in case of improper handling / maintenance (e.g. due to non-observance of the instruction manual) or mechanical damages. The customer service may authorize you to replace or repair defective parts after telephone consultation. In this case, the warranty is not void.
- Warranty services do not extend the warranty period nor do they initiate a new warranty period.
- Further demands, especially claims for damages which occurred outside the device, are excluded as long as a liability is not obligatory legal.
- Our warranty terms - which cover the requirements and scope of our warranty conditions - do not affect the contractual warranty obligations of the seller.
- Parts of wear and tear are not included in the warranty.
- The warranty is void if not used properly.
In accordance with our policy of continual product improvement, we reserve the right to make technical and visual changes without notice.
For spare parts please contact: service@skandika.de Service centre: MAX Trader GmbH, Wilhelm-Beckmann-Straße 19, 45307 Essen, Germany