Vastervik - Tent Skandika - Free user manual and instructions
Find the device manual for free Vastervik Skandika in PDF.


| Product Type | Camping Tent |
| Brand | Skandika |
| Model | Vastervik |
| Capacity | 2-3 persons |
| Flysheet Material | Polyester with PU coating |
| Groundsheet Material | Polyethylene tub-style |
| Pole Material | Fiberglass |
| Pole Configuration | Geodesic 3-pole or similar |
| Dimensions (Pitched) | Approx. 240 x 210 x 130 cm (L x W x H) |
| Weight | Approx. 5.5 kg |
| Features | Color-coded poles, ring-and-pin system, tension bands, guy ropes, mesh vents |
| Setup Time | Approx. 10-15 minutes with two people |
| Waterproof Rating | Not specified; typical for Skandika: 2000-3000 mm |
| Care Instructions | Avoid prolonged sunlight, dry before storage, clean with mild soap solution |
| Safety Warnings | Keep away from fire; tent material is highly flammable |
| Included Accessories | Rainfly, inner tent, poles, pegs, guy ropes, groundsheet |
Frequently Asked Questions - Vastervik Skandika
User questions about Vastervik Skandika
0 question about this device. Answer the ones you know or ask your own.
Ask a new question about this device
Download the instructions for your Tent in PDF format for free! Find your manual Vastervik - Skandika and take your electronic device back in hand. On this page are published all the documents necessary for the use of your device. Vastervik by Skandika.
USER MANUAL Vastervik Skandika
natural_image
Green camping tent with open vent and side panels, no visible text or symbols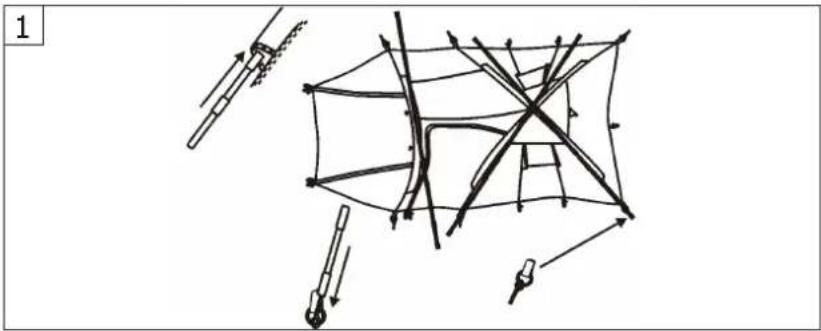
natural_image
Technical line drawing of a mechanical assembly with no visible text or symbols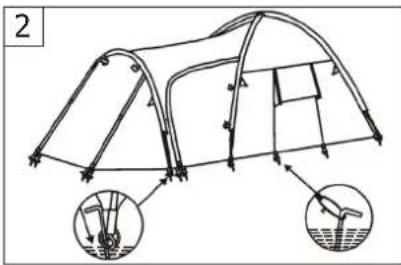
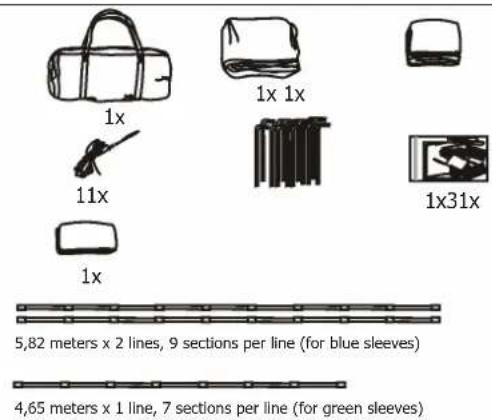
MITGELIEFERTES ZUBEHÖR · CONTENTS CHECK LIST · INVENTAIRE DU CONTENU
HOLEN SIE DAS BESTE AUS IHREM NEUEN ZELT HERAUS
Please read this information carefully. It gives you useful tips on how to erect, use and care for your tent, helping you to get the best out of it.
BEFORE YOU PITCH YOU TENT:
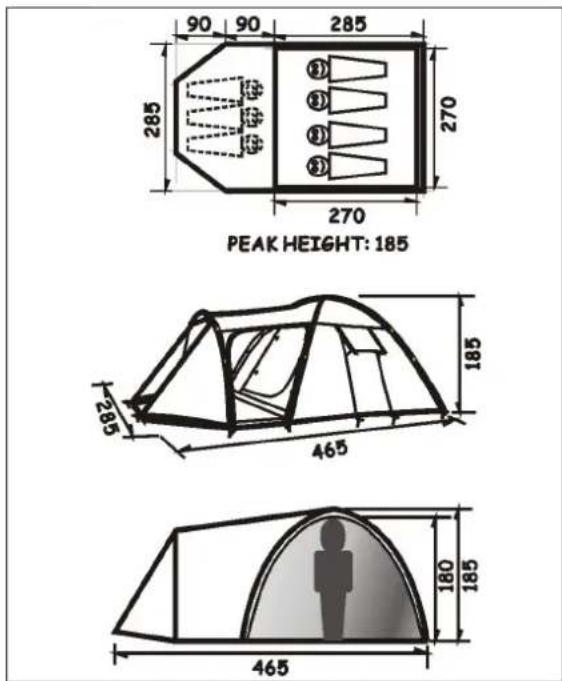
- Look carefully at the tent diagram. It shows you how your tent should look when erected.
- Read the assembly instructions carefully before you pitch your tent for the first time.
- Check whether you have all the parts and that they are not damaged in any way.
WHEN PITCHING YOUR TENT:
Poles
- Inserting poles: Do not force the poles into or through the pole sleeves. You should not push longer poles into the sleeves, but instead push the material onto the pole. Do this by gathering small lengths of the sleeve and gradually feeding it onto the pole.
- Positioning poles: Push the poles into an arch, if possible while still flat on the ground.
- With tents with diagonal poles, form the first arch flat on the ground and then form the second arch while the centre of the pole is being held upright. You may need some help for this. This is particularly the case with longer poles and larger tents.
- With 3-pole geodesic tent designs, push the shorter pole into an arch first.
- If you have problems getting the ends of the arched poles to fit the eyelets in the pole anchor straps or ring and pin system, please check along the length of the pole sleeves: sometimes snagging can occur, particularly at pole joints.
Tent Material - Tension
- Tension bands and flysheet adjuster straps should be fully loosened while erecting the tent.
- Tension bands, guy lines and tent material should not be over tightened as this strains and damages seams, doorways, pegging points and zips. The tent material could also rip in strong winds.
- Nylon tent material slackens when wet. If the material is likely to dry out quickly, e.g. after a rain shower in warm weather, then do not re-tighten and guy lines etc. The material will re-tighten naturally while it dries.
Tent pegs
- Pegs give the best hold when pegged into the ground at an angle, ideally 45^ . They should be in line with the tent seams. Pegging points on the flysheet should not be over tightened.
- Ring-and-Pin System: Insert the pin into the metal ferrule on one end of the pole. Holding the pole at the other end, bend it into an arch and then insert the pin into the ferrule as with the first end. Fix the poles by pegging through the ring into the ground, ideally at 45^ , in order to obtain max. hold.
Pitch your tent at home first. This helps familiarise you with the various parts and how to erect your tent and is extremely useful, especially if you then have to pitch your tent in bad weather conditions or in the dark.
CARE OF YOUR TENT
- Pitching: Find a suitable, well drained pitch and remove any sharp objects which may damage your groundsheet. Avoid areas prone to flooding. Pitch with doorways facing away from the wind. Do not pitch under trees as these drip long after rain has stopped and also pose the threat of falling branches in high winds.
- Sunlight: Prolonged exposure to strong sunlight may weaken and fade the material, making it brittle. However, with careful use your tent should last for many years. Avoid leaving your tent pitched in strong sunlight for long periods.
• Rain: Do not touch the inside of wet tent material as this causes water seepage through the material. - Zips: Never force zips closed. All zips should be closed while the tent is being erected.
- Fire: Tent material and fire don't get along! Tent material is highly inflammable. Keep away from naked flames. Never use camping stoves inside the tent.
- Condensation: All tents are prone to condensation when the air inside is warmer than the air outside. Keep vents in the flysheet open and doors partially open to increase ventilation and thus reduce condensation.
- Packing Up: All the adjustment straps on poles and pegging points should be loosened before dismantling your tent. This makes it easier to pitch and tension the tent next time.
- When folding, unzip doorways first and then fold towards the doorways to release trapped air. Do not pull poles out of the sleeves as shock corded poles could come apart inside the sleeves. Push the poles through and gradually pull short lengths of material off the poles.
- Ideally, tents should be packed up when dry. If your tent is wet, dry it thoroughly before long term storage.
- Inner and outer tents should be packed separately if the inside of the flysheet is wet from condensation.
- Dirt and stains should be removed before long term storage. Use a mild soap solution. Never use detergent. Rinse and dry thoroughly.
UTILISEZ AU MIEUX VOTRE TENTE
Thank you for choosing your new tent from the Skandika range. It provides you with a lot of room and high level of comfort in the well-known superior quality of Skandika. Before you go on holiday with the new tent, please built it once.
1 a) Lay the rain fly on the ground as flat as possible.
b) Insert the color coded poles to the corresponding sleeves.
c) Insert the pins found at the bottom of the tent into the poles.
2 a) Clip the hooks to the poles.
b) Stake down the poles and the other tent corners.
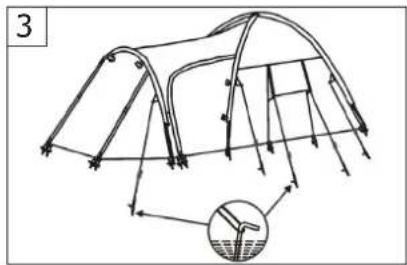
3 Pull the guy ropes and stake down - this will keep the tent more stable in the strong winds.
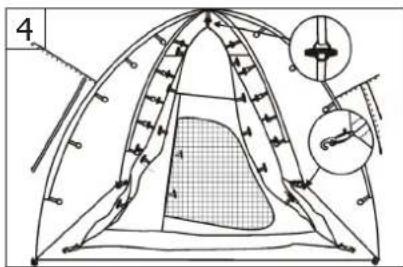
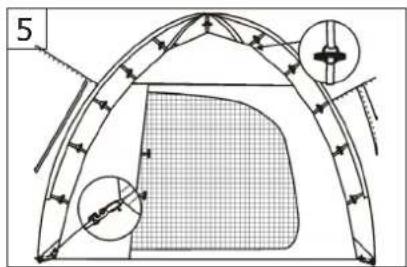
4 Hang the inner tent with toggles and hooks to the fly.
5 Lay the tub style groundsheet and hooks the corners to the tent.

Brand : Skandika
Model : Vastervik
Category : Tent