GP1000 Jet LCD - Pump SCHEPPACH - Free user manual and instructions
Find the device manual for free GP1000 Jet LCD SCHEPPACH in PDF.
| Product type | Garden pump with LCD display |
| Brand | Scheppach |
| Model | GP1000 Jet LCD |
| Dimensions (L x W x H) | 452 x 175 x 309 mm |
| Weight | 7.9 kg |
| Power supply | 230 V ~ / 50 Hz |
| Input power | 1000 W |
| Max flow rate | 4400 l/h |
| Max delivery head | 42 m |
| Max delivery pressure | 5 bar |
| Max suction height | 8 m |
| Pressure and suction connection | G1" (approx. 25.4 mm) |
| Max water temperature | 35 °C |
| Protection class | IPX4 |
| Operating mode | S1 (continuous operation) |
| Sound level (L_WA) | 88 dB(A) |
| Main functions | LCD display, programmable timer (Time Mode), automatic operation, integrated pre-filter |
| Usage | Watering, irrigation, rainwater harvesting, pond, well |
| Maintenance and cleaning | Clean the pre-filter regularly, drain in case of frost, check rotor rotation |
| Safety | Thermal protection, 30 mA residual current circuit breaker recommended, do not use in swimming pools |
| Spare parts and repairability | Wear parts: seals, pre-filter. Repairs by qualified electrician |
Frequently Asked Questions - GP1000 Jet LCD SCHEPPACH
User questions about GP1000 Jet LCD SCHEPPACH
0 question about this device. Answer the ones you know or ask your own.
Ask a new question about this device
Download the instructions for your Pump in PDF format for free! Find your manual GP1000 Jet LCD - SCHEPPACH and take your electronic device back in hand. On this page are published all the documents necessary for the use of your device. GP1000 Jet LCD by SCHEPPACH.
USER MANUAL GP1000 Jet LCD SCHEPPACH
natural_image
Exterior view of a black industrial pump with digital display and control buttons (no visible text or symbols)GP1000 Jet LCD
| DE | HauswasserautomatOriginalbedienungsanleitung | 05 |
| GB | Automatic domestic water pumpTranslation of the original instruction manual | 19 |
| FR | Station de pompage d'eau domestiqueTraduction des instructions d'origine | 30 |
| LV | Üdens apgādes automāts mājaiAz eredeti használati útmutató fordítása | 42 |
| LT | Automatinis hidroforas be rezervuaroVertimas originali naudojimo instrukcija | 53 |
| EE | VeeautomaatTölge Originaalkasutusjuhend | 64 |
| FI | TalousvesiautomaattiAlkuperäisen käyttöohjeen käännös | 75 |
| SE | HushållsvattenautomatÖversättning av originalbruksanvisningen | 86 |
1

text_image
1 2 3 4 5 6 7 8 9 10 112

text_image
Technical diagram of a motor with labeled parts including pump, screw, and housing
flowchart
graph TD
    A["3"] --> B["Automatic Mode"]
    B --> C["CHECK"]
    B --> D["SET"]
    B --> E["MODE"]

flowchart
graph TD
    A["Power On"] --> B["CHECK"]
    A --> C["SET"]
    A --> D["MODE"]

flowchart
graph TD
    A["Time Mode"] --> B["CHECK"]
    A --> C["SET"]
    A --> D["MODE"]

flowchart
graph TD
    A["6"] --> B["Time Now 00:00"]
    B --> C["Save Set Exit"]
    D["CHECK"] --> E["SET"]
    F["MODE"] --> G["MODE"]

flowchart
graph TD
    A["7"] --> B["Time Mode NOT SET"]
    C["CHECK"] --> D["SET"]
    E["MODE"] --> F["SET"]
text_image
8 Ever - On Mode Not Recommend CHECK SET MODE
text_image
9 Time Now 00:00 Next + - CHECK SET MODE
flowchart
graph TD
    A["Time Now\nSave"] --> B["00:00\nSet"]
    B --> C["EXIT"]
    D["CHECK"] --> E["SET"]
    F["MODE"] --> G["SET"]
11
Time On 00:00
Save Set Exit
CHECK
SET
MODE
12
Time Off 00:00
Save Set
CHECK
SET
MODE
13
Time On 00:00
Time Off 00:00
CHECK
SET
MODE
14
Time Mode
00:00:00
CHECK
SET
MODE
Günzburger Straße 69
D-89335 Ichenhausen
Verehrter Kunde
Explanation of the symbols on the equipment
The use of symbols in this manual is intended to draw your attention to possible risks. The safety symbols and the explanations that accompany them must be perfectly understood. The warnings in themselves do not remove the risks and cannot replace correct actions for preventing accidents.
 | Read instruction manual and safety instructions before starting up and pay attention! |
 | Use hearing protection. |
| ⚠ Attention! | In this operating manual, we have used this sign to mark all sections that concern your safety. |
Table of contents: Page:
- Introduction ...... 21
- Device description.... 22
- Scope of delivery 22
- Intended use....22
- Safety notes 23
- Technical data 24
- Unpacking 25
- Attachment / Before starting the equipment 25
- Initial operation....26
- Cleaning and Maintenance 27
- Transport 28
- Storage....28
- Disposal and recycling 28
- Troubleshooting 29
1. Introduction
Manufacturer:
scheppach
Günzburger Straße 69
D-89335 Ichenhausen
Dear customer,
We hope your new tool brings you much enjoyment and success.
Note:
According to the applicable product liability laws, the manufacturer of the device does not assume liability for damages to the product or damages caused by the product that occurs due to:
- Improper handling,
• Non-compliance of the operating instructions, - Repairs by third parties, not by authorized service technicians,
• Installation and replacement of non-original spare parts,
• Application other than specified, - A breakdown of the electrical system that occurs due to the non-compliance of the electric regulations and VDE regulations 0100, DIN 57113 / VDE0113.
We recommend:
Read through the complete text in the operating instructions before installing and commissioning the device.
The operating instructions are intended to help the user to become familiar with the machine and take advantage of its application possibilities in accordance with the recommendations.
The operating instructions contain important information on how to operate the machine safely, professionally and economically, how to avoid danger, costly repairs, reduce downtimes and how to increase reliability and service life of the machine.
In addition to the safety regulations in the operating instructions, you have to meet the applicable regulations that apply for the operation of the machine in your country. Keep the operating instructions package with the machine at all times and store it in a plastic cover to protect it from dirt and moisture.
Read the instruction manual each time before operating the machine and carefully follow its information. The machine can only be operated by persons who were instructed concerning the operation of the machine and who are informed about the associated dangers. The minimum age requirement must be complied with. In addition to the safety instructions in this operating manual and the separate regulations of your country, the generally recognised technical rules for operating woodworking machines must also be observed.
We accept no liability for accidents or damage that occur due to a failure to observe this manual and the safety instructions.
2. Device description
- Pressure connection
- Transport handle
- LCD monitor
- MODE button
- SET button
- CHECK button
- Bracket for screws
- Water filling plug
- Water drain plug
- Suction connection
- Screw-on pre-filter cap
- Pre-filter
3. Scope of delivery
- Operating manual
• Automatic domestic water pump
4. Intended use
The equipment is to be used only for its prescribed purpose. Any other use is deemed to be a case of misuse. The user / operator and not the manufacturer will be liable for any damage or injuries of any kind caused as a result of this.
To use the equipment properly you must also observe the safety information, the assembly instructions and the operating instructions to be found in this manual. All persons who use and service the equipment have to be acquainted with this manual and must be informed about the equipment's potential hazards.
It is also imperative to observe the accident prevention regulations in force in your area. The same applies for the general rules of health and safety at work. The manufacturer will not be liable for any changes made to the equipment nor for any damage resulting from such changes.
Area of application
- For watering and irrigation of green areas, vegetable beds and gardens.
- For operating lawn sprinklers.
- With pre-filter for drawing water from ponds, streams, rainwater barrels, rainwater cisterns and wells.
Pumped media
- For pumping clear water (fresh water), rainwater or light detergent solutions / domestic water.
- The maximum temperature of the pumped liquid must not exceed +35°C.
- This pump must not be used to pump flammable, gaseous or explosive liquids.
- The pumping of aggressive liquids (acids, lyes, silo seepage juice etc.), as well as liquids with abrasive (sanding) materials (sand) must also be avoided.
The machine may only be operated with original parts and original accessories from the manufacturer.
Any other use is considered to be not intended. The manufacturer excludes any liability for resulting damages, the risk is exclusively borne by the user.
Please note that our equipment has not been designed for use in commercial, trade or industrial applications. Our warranty will be voided if the equipment is used in commercial, trade or industrial businesses or for equivalent purposes.
5. Safety notes
- This device is not designed to be operated by persons (including children) with impaired physical, sensory or mental capabilities, or who have insufficient experience and/or insufficient knowledge unless they are being supervised by a person who is responsible for their safety or they are receiving instruction about how this device is to be used. Children should not be left unattended, to ensure they do not play with the device.
- Keep packaging films out of the reach of babies and children. Risk of suffocation!
- The user is responsible for third parties in the working area of the device.
- Prior to commissioning, it must be ensured by means of expert testing that the required electrical protective measures are in place.
- m Warning! The pump may only be used in and around stagnant water, garden and swimming ponds with a residual current circuit breaker with a rated residual triggering current of up to 30 mA (per VDE 0100 parts 702 and 738).
- The pump is not suitable for use in swimming pools, paddling pools of any kind and other waters where persons or animals may be present during operation.
- Operating the pump while humans or animals are in the danger zone is not permitted. Ask your electrician!
- Always carry out a visual inspection of the unit before use. Do not use the unit if safety devices are damaged or worn out. Never disable safety devices.
- Only use the device for the purpose specified in these original operating instructions.
- You are responsible for safety in the work area.
- If the connection cable of this unit is damaged, it must be replaced by the manufacturer or their service department or a similar qualified person in order to avoid hazards. The voltage of 230 volts AC indicated on the type plate of the pump must correspond to the mains voltage present.
- Never lift, transport or fasten the pump by the mains cable.
• Make sure that the electrical plug connections are located in a flood-proof area or are protected against moisture.
- Before any work on the pump, pull out the mains plug.
- Ensure that the pump is not exposed to a direct water jet.
- The operator is responsible for compliance with local safety and installation regulations (ask a qualified electrician if necessary).
- The user must implement suitable measures (e.g. installation of an alarm system, reserve pump or similar) to prevent consequential damage caused by flooding of rooms in the event of pump faults.
- If the pump fails, repair work may only be carried out by a qualified electrician or by customer service.
- Only use original spare parts.
- The pump must never be allowed to run dry or be operated with a fully closed suction line. Damage to the pump caused by dry running will invalidate the manufacturer's warranty.
- The pump must not be used for swimming pool operation.
- The pump must not be installed in the drinking water circuit.
Remaining hazards
The machine has been built using modern technology in accordance with recognized safety rules. Some remaining hazards, however, may still exist.
- Injury through electric current if incorrect electric connection leads are used.
- Even when all safety measures are taken, some remaining hazards which are not yet evident may still be present.
- Remaining hazards can be minimized by following the safety instructions as well as the instructions in the chapter Authorized use and in the entire operating manual.
• Health hazard due to electrical power, with the use of improper electrical connection cables. - Release the handle button and switch off the machine prior to any operations.
- Avoid accidental starts of the machine: Do not press the start button while inserting the plug into the socket.
- Use the tools recommended in this manual to obtain the best results from your machine.
• Always keep hands away from the work area when the machine is running.
Warning! This electric tool generates an electromagnetic field during operation. This field can impair active or passive medical implants under certain conditions. In order to prevent the risk of serious or deadly injuries, we recommend that persons with medical implants consult with their physician and the manufacturer of the medical implant prior to operating the electric tool.
6. Technical data
| Dimensions L x B x H | 452 x 175 x 309 mm |
| Mains connection 230V~ / 50 Hz | |
| Power rating 1000 W | |
| Max. delivery rate 4400 l/h | |
| Max. delivery head | 42 m |
| Max. delivery pressure | 5 bar |
| Max. suction height | 8 m |
| Pressure and suction connector | G1" |
| Max. water temperature | 35°C |
| Protection class I | |
| Protection type IPX4 | |
| Operating mode* S1 | |
Weight 7,9 kg
Subject to technical changes!
Operating mode* S1: Continuous operation at constant load
Noise
⚠ Warning: Noise can have serious effects on your health. If the machine noise exceeds 85 dB (A), please wear suitable hearing protection.
Noise data
Open the packaging and remove the device carefully.
Remove the packaging material as well as the packaging and transport bracing (if available). Check that the delivery is complete.
Check the device and accessory parts for transport damage. In case of complaints the dealer must be informed immediately. Subsequent complaints will not be accepted.
If possible, store the packaging until the warranty period has expired. Read the operating manual to make yourself familiar with the device prior to using it.
Only use original parts for accessories as well as for wearing and spare parts. Spare parts are available from your specialized dealer. Specify our part numbers as well as the type and year of construction of the device in your orders.
ATTENTION
The device and packaging materials are not toys! Children must not be allowed to play with plastic bags, film and small parts! There is a risk of swallowing and suffocation!
8. Attachment/ Before starting the equipment
Installation of a suction line
- Screw a suction hose (plastic hose min. 19 mm (3/4") directly or with a threaded nipple, approx. 25.4 mm (1"), to the suction line connection on the pump.
- Lay the suction line from the water pickup point to the pump in a continuously rising slope. Ensure that the suction line is not laid above the pump height; air bubbles in the suction line delay and prevent the suction process.
- The suction and pressure lines must be installed in such a way that they do not exert any mechanical pressure on the pump.
- The suction valve should be located deep enough in the water to prevent the pump from running dry if the water level drops.
- A leaking suction line will prevent the water from being sucked in due to air ingress.
- Avoid sucking in foreign bodies (sand etc.).
Installation of a pressure line
- The pressure line (should be at least 19 mm (3/4")) must be connected directly or via a threaded nipple approx. 25.4 mm (1") to the pressure line connection on the pump.
- During the suction process the shut-off devices (spray nozzles, valves etc.) in the delivery line must be fully opened to allow the air in the suction line to escape freely.
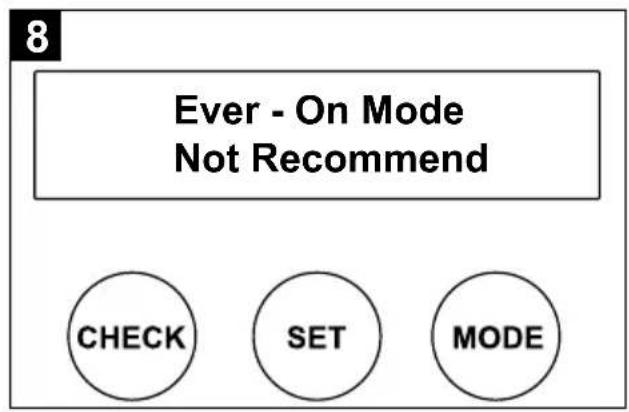
Explanation of the display functions (Fig. 3 - 8)
Power On
Pump is connected to an electrical power source
Automatic Mode
Pump is running automatically
Time Mode
To set the time
Time Now
To set the current time
Time Mode NOT SET
Current time has not been set
Ever - On Mode (Not Recommend)
Pump runs continuously, not recommended
9. Initial operation
IMPORTANT!
You must fully assemble the appliance before using it for the first time!
Setting the time and the "Time Mode" timer (Fig. 5, 9 - 14)
- Connect the pump to the power supply.
- Press the "Mode button" (4) several times until "Time mode" is displayed (Fig. 5). After a brief waiting time, "Time Now" appears in the display (Fig. 9).
-
Press the "Set button" (5) to activate the time setting function (Fig. 10).
-
Now set the current time.
Note: 00:00 (hh/mm) – 24h time mode. You can set the current time by pressing the “Set button” (5) for “+” and the “Mode button” (4) for “-”. Pressing the “Check button” (6) changes from the hours setting to the minutes setting. - Pressing the "Check button" (6) again for "Next" changes to "Time On" Timer mode (Fig. 11).
- To set the time when the pump is to switch on "Time On", repeat points 3 - 4. To confirm the setting, press the "Check button" (6) to continue.
- To set the time when the pump is to switch off "Time Off", repeat points 3 - 4. Press the "Check button" (6) to confirm the setting and continue.
- The switch-on and switch-off times then appear in the display "Time On / Time Off" (Fig. 13). It is not necessary to press the "Check button" (6) again.
- After a brief waiting time, "Time Mode" (Fig. 14) appears in the display showing the time set.
Electrical connection
The electrical motor installed is connected and ready for operation. The connection complies with the applicable VDE and DIN provisions.
Damaged electrical connection cable
The insulation on electrical connection cables is often damaged.
This may have the following causes:
• Passage points, where connection cables are passed through windows or doors.
- Kinks where the connection cable has been improperly fastened or routed.
- Places where the connection cables have been cut due to being driven over.
• Insulation damage due to being ripped out of the wall outlet.
• Cracks due to the insulation ageing.
Such damaged electrical connection cables must not be used and are life-threatening due to the insulation damage.
Check the electrical connection cables for damage regularly. Make sure that the connection cable does not hang on the power network during the inspection.
Electrical connection cables must comply with the applicable VDE and DIN provisions. Only use connection cables with the marking „H05RN-F“.
The printing of the type designation on the connection cable is mandatory.
For single-phase AC motors, we recommend a fuse rating of 16A (C) or 16A (K) for machines with a high starting current (starting from 3000 watts)!
AC motor 230 V\~/ 50 Hz Mains voltage 230 V\~/ 50 Hz.
The mains connection and the extension cable have to be three-core cables = P + N + SL. - (1/N/PE).
Extension cables up tp 25m long must have a minimum cross-section of 1.5 mm². Mains fuse protection is 16 A maximum.
10. Cleaning and Maintenance
Attention!
Only carry out maintenance, cleaning and adjustment work when the mains plug is pulled out. We recommend that you clean the device directly after every use.
Clean the device at regular intervals using a damp cloth and a little soft soap.
Do not use any cleaning products or solvents - they could attack the plastic parts of the universal machine stand. Make sure that no water can penetrate the device interior.
- The pump is largely maintenance-free. However, for a long service life, we recommend regular checking and care.
- Before extended periods of inactivity or through the winter, the pump should be thoroughly flushed through with water, emptied completely and then stored dry.
• To empty the pump housing, loosen the water drain screw (9) and tilt the pump slightly. - If there is a risk of frost the pump must be completely emptied.
• After longer periods of storage check the pump by switching on/off briefly in order to check that the rotor turns normally. - In the event of the pump being jammed connect the pressure line to the water supply line and remove the suction hose. Open the water supply line. Switch the pump on for ca. two seconds several times. This method rectifies blockages in most cases.
- To clean the pre-filter (12), unscrew the pre-filter cap (11) and remove the filter unit. Clean the pre-filter with warm water.
Connections and repairs
Connections and repairs of electrical equipment may only be carried out by an electrician.
Please provide the following information in the event of any enquiries:
• Type of current for the motor
• Machine data - type plate
• Motor data - type plate
Service information
Please note that the following parts of this product are subject to normal or natural wear and that the following parts are therefore also required for use as consumables.
Wear parts*: Seals, pre-filter
* Not necessarily included in the scope of delivery!
11. Transport
Use only the transport handle (2) for transporting the device.
12. Storage
Store the device and its accessories in a dark, dry and frost-proof place that is inaccessible to children. The optimum storage temperature is between 5 and 30^ . Cover the electrical tool in order to protect it from dust and moisture. Store the operating manual with the electrical tool.
13. Disposal and recycling
The equipment is supplied in packaging to prevent it from being damaged in transit. The raw materials in this packaging can be reused or recycled. The equipment and its accessories are made of various types of material, such as metal and plastic.
Defective components must be disposed of as special waste. Ask your dealer or your local council.
Old devices must not be disposed of with household waste!
This symbol indicates that this product must not be disposed of together with domestic waste in compliance with the Directive (2012/19/EU) pertaining to waste electrical and electronic equipment (WEEE). This product must be disposed of at a designated collection point. This can occur, for example, by handing it in at an authorised collecting point for the recycling of waste electrical and electronic equipment. Improper handling of waste equipment may have negative consequences for the environment and human health due to potentially hazardous substances that are often contained in electrical and electronic equipment. By properly disposing of this product, you are also contributing to the effective use of natural resources. You can obtain information on collection points for waste equipment from your municipal administration, public waste disposal authority, an authorised body for the disposal of waste electrical and electronic equipment or your waste disposal company.
14. Troubleshooting
The table below contains a list of error symptoms and explains what you can do to solve the problem if your tool fails to work properly. If the problem persists after working through the list, please contact your nearest service workshop.
| Problem Possible Cause Remedy | ||
| Motor does not start | No mains voltage Check mains voltage | |
| Pump impeller jammed Disassemble and clean the pump | ||
| Pump does not suck | Suction valve not in the water | Insert the suction valve in the water |
| No water in the pump housing | Fill water into the pump housing | |
| Air in the suction line Check for leaks in the suction line | ||
| Suction valve leaking Clean suction valve | ||
| Suction strainer (suction valve) clogged | Clean suction strainer | |
| Max. suction height exceeded | Check suction height | |
| Inadequate pump delivery | Suction height too high Check suction height | |
| Suction strainer clogged Clean suction strainer | ||
| Water level dropping rapidly Position suction valve lower | ||
| Pump performance reduces due to hazardous substances | Clean pump and replace worn parts | |
| Thermostat shuts pump down | Motor overloaded, friction from foreign matter too high | Disassemble and clean the pump, prevent foreign matter from being sucked in (filter) |
Günzburger Straße 69
D-89335 Ichenhausen
Godātais klient!
Günzburger Straße 69
D-89335 Ichenhausen
Gerbiamas kliente,
Günzburger Straße 69
D-89335 Ichenhausen
Austatud klient!
Günzburger Straße 69
D-89335 Ichenhausen
Arvoisa asiakas,
Günzburger Straße 69
D-89335 Ichenhausen
Bästa Kund!
text_image
Exploded view diagram of a mechanical assembly with numbered parts for identificationCE - Declaration of Conformity
text_image
2014/29/EU 2004/22/EC 89/686/EC_96/58/EC 2000/14/EC_2005/88/EC Annex V Annex VI Noise: measured LWA = xx dB(A); guaranteed LWA = xx dB(A) P = xx KW; L/Ø = cm Notified Body: Notified Body No.: x 2006/42/EC Annex IV Notified Body: Notified Body No.: Certificate No.: 2010/26/EC Emission. No:Standard references:
EN 55014-1:2007; EN 55014-2:2015; EN 61000-3-2:2019; EN 61000-3-3:2013+A1
The object of the declaration described above fulfils the regulations of the directive 2011/65/EU of the European Parliament and Council from 8th June 2011, on the restriction of the use of certain hazardous substances in electrical and electronic equipment.
Apparent defects must be notified within 8 days from the receipt of the goods. Otherwise, the buyer's rights of claim due to such defects are invalidated. We guarantee for our machines in case of proper treatment for the time of the statutory warranty period from delivery in such a way that we replace any machine part free of charge which provably becomes unusable due to faulty material or defects of fabrication within such period of time. With respect to parts not manufactured by us we only warrant insofar as we are entitled to warranty claims against the upstream suppliers. The costs for the installation of the new parts shall be borne by the buyer. The cancellation of sale or the reduction of purchase price as well as any other claims for damages shall be excluded.