
21852 - Lawn mower TORO - Free user manual and instructions
Find the device manual for free 21852 TORO in PDF.

| Product Type | Rotary Self-Propelled Lawn Mower |
| Brand | Toro |
| Model | 21852 |
| Cutting Width | 52 cm |
| Power Source | Lithium-ion battery 60V MAX (model 81860 included, compatible with 81850/81875) |
| Charger | Lithium-ion battery charger 60V MAX model 81802 (included) |
| Cutting Height | 32 mm to 95 mm, adjustable to 7 positions |
| Cutting Functions | Mulching, bagging, side discharge |
| Self-Propulsion | Yes, with speed control |
| Blade Speed | Adjustable: Auto (adaptive) or Max (constant) |
| Starting | Electric start with button and safety bar |
| Battery | Lithium-ion 6Ah, 324Wh, nominal voltage 54V, max 60V |
| Runtime | Variable depending on conditions (2A charger) |
| Operating Temperature | Machine: 0°C to 49°C; Battery: -30°C to 49°C |
| Handlebar Folding | Yes, for vertical storage |
| Maintenance | Clean under the machine after each use; no lubrication needed |
| Safety | Automatic stop when the bar is released; removable battery; lockouts |
| Spare Parts | Genuine Toro parts recommended; repair by authorized dealer |
| Repairability | Blade replacement possible, self-propulsion cable adjustment |
| Warranty | Refer to the declaration of conformity provided separately |
| Compliance | Applicable European directives |
Frequently Asked Questions - 21852 TORO
User questions about 21852 TORO
0 question about this device. Answer the ones you know or ask your own.
Ask a new question about this device
Download the instructions for your Lawn mower in PDF format for free! Find your manual 21852 - TORO and take your electronic device back in hand. On this page are published all the documents necessary for the use of your device. 21852 by TORO.
USER MANUAL 21852 TORO
natural_image
Line drawing of a lawn mower with visible blades and wheels (no text or symbols)ThisproductcomplieswithallrelevantEuropean directives;fordetails,pleaseeseetheseparateproduct specificDeclarationofConformity(DOC)sheet.
Introduction
This rotary-blade, walk-behindlawnmowerisintended tobeused by residential homeowners. It is designed primarily for cutting grasson well-maintained lawns on residential properties. It is not designed for cutting brushor for agricultural uses. It is designed to use lithium-ion battery pack Model 81860 (provided with Model 21852) and 81850 or 81875; it can also use battery pack Model 81825. These battery packs are designed to be charged only by battery charger Model 81802 (provided with Model 21852) or Model 81805. Using these products for purposes other than their intended use could be proved in our study by and bystanders.
Model21852Tdoesnotincludeabatteryora charger.
Readthisinformationcarefullytolearnhowtooperate andmaintainyourproductproperlyandtoavoid injuryandproductdamage.Youareresponsiblefor operatingtheproductproperlyandsafely.
Visitwww.Toro.comformoreinformation,including safetytips,trainingmaterials,accessoryinformation, helpfindingadealer,ortoregisteryourproduct.
Whenever you needs service, genuine T or parts, or additional information, contact an Authorized Service Dealer or Toro Customer Service and havethemodel and serial numbers of your product ready. Figure 1 identifies the location of the model and serial numbers on the product. Writing numbers in the space provided.
Important: With your mobile device, you can scan the QR code on the serial number decal (if equipped) to access warranty, parts, and other product information.
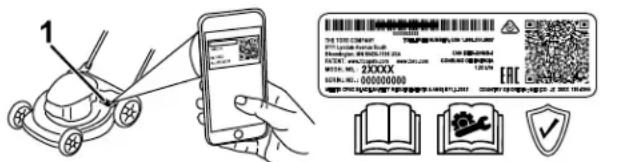
Figure1
1. Modelandserialnumberlocation
ModelNo. ____
SerialNo. ____
Thismanualidentifiespotentialhazardsandhas safetymessagesidentifiedbythesafety-alertsymbol (Figure2),whichsignalsahazardthatmaycause seriousinjuryordeathifyoudonotfollowthe recommendedprecautions.

Figure2
Safety-alertsymbol
g000502
Thismanualuses2wordstohighlightinformation. Importantcallsattentiontospecialmechanical informationandNoteemphasizesgeneralinformation worthyofspecialattention.
Contents
Safety....3
SafetyandInstructionalDecals....6
Setup......8
1MountingtheBatteryCharger (Optional)....8
2AssemblingtheGrassBag....8
3UnfoldingtheHandle....9
ProductOverview....10
Specifications....10
BeforeOperation....11
InstallingtheBatteryPack....11
AdjustingtheCuttingHeight....12
DuringOperation....13
StartingtheMachine....13
UsingtheSelf-PropelDrive....13
AdjustingtheBladeSpeed....13
RecyclingtheClippings....14
BaggingtheClippings....14
Side-DischargingtheClippings....15
ShuttingOfftheMachine....15
RemovingtheBatteryPackfromthe Machine....15
OperatingTips....16
AfterOperation....17
ChargingtheBatteryPack....17
CleaningundertheMachine....17
FoldingtheHandle....18
StoringtheMachineintheVertical-Stow Position....18
Maintenance....19
LubricatingtheMachine....19
ReplacingtheBlade....19
AdjustingtheSelf-PropelDrive....20
PreparingtheBatteryPackfor Recycling....20
Storage....21
Troubleshooting....22
Safety
IMPORTANT SAFETY INSTRUCTIONS
WARNING—When using an electric machine, always read and follow basic safety warnings and instructions to reduce risk of fire, electric shock, or injury, including the following:
I. Training
The operator of the machine is responsible for any accidents or hazards occurring to others or their property.
☐onotallowchildrentouseorplaywiththe machine,batterypack,orthebatterycharger; localregulationsmayrestricttheageofthe operator.
Donotallowpeoplewithreducedphysical, sensory,ormentalcapabilitiesorwithout experienceandknowledgetousethemachine, batterypack,orbatterychargerunlessthey receiveinstructionorsupervisiononusingit safelyandunderstandthehazardsinvolved whileusingit.
Beforeusingthemachine,batterypack,and batterycharger,readalltheinstructionsand cautionarymarkingsontheseproducts.
Becomefamiliarwiththecontrolsandproper useofthemachine,batterypack,andbattery charger.
II.Preparation
Keepbystanders,especiallychildrenandpets, outoftheoperatingarea.
Donotoperatethemachinewithoutallguards andsafetydevices,suchasdeflectorsandgrass catchers,inplaceandfunctioningproperlyon themachine.
Ibspecttheareawhereyouwillusethemachine andremovealobjectsthatcouldinterferewith theoperationofthemachineorthatthemachine couldthrow.
Beforeusingthemachine,ensurethattheblade, bladebolt,andbladeassemblyarenotwornor damaged.Replaceanydamagedorunreadable labels.
UseonlythebatterypackspecifiedbyT oro. Usingotheraccessoriesandattachmentsmay increasetheriskofinjuryandfire.
Pluggingthebatterychargerintoanoutletthat isnot100to240Vcancauseafireorelectric shock.Donotplugthebatterychargerintoan outletotherthan100to240V.Foradifferent
styleofconnection, useanattachmentplug adapteroftheproperconfigurationforthepower outletifneeded.
-
Donotuseadamagedormodifiedbattery packorbatterycharger, which may exhibit unpredictable behavior that results in fire, explosion, or risk of injury.
-
If the supply cord to the battery charger is damaged, contact an Authorized Service Dealer to replace it.
-
Donotusenon-rechargeable batteries.
-
Chargethebatterypackwithonlythebattery chargerspecifiedbyT oro.Achargersuitablefor 1typeofbatterypackmaycreateariskoffire whenusedwithanotherbatterypack.
-
Chargethebatterypackinawell-ventilated area only.
-
Donotexposeabatterypackorbatterycharger tofireortotemperatureshigherthan68°C (154°F).
-
Followallcharginginstructionsanddo notchargethebatterypackoutsideofthe temperaturerangespecifiedintheinstructions. Otherwise,youmaydamagethebatterypack andincreasetheriskoffire.
-
Dress properly—Wear appropriate clothing, including eyeprotection; long pants; substantial, slip-resistant footwear (not barefootor wearing sandals); and hearing protection. Tie back long hair and donot wear loose jewelry that can get caught in moving parts. Wear dust mask in dusty operating conditions. Use of rubber gloves is recommended.
III.Operation
-
Contactwiththemovingbladewillcauseserious injury. Keepyourhandsorfeetawayfromthe cuttingareaandallmovingpartsofthemachine. Keepclearofanydischargeopening.
-
Using this machine for purposes other than intended use could proved dangerous you and bystanders.
-
Disengagetheself-propeldrive(ifequipped) beforestartingthemachine.
-
Donottilttheappliancewhenstartingthemotor.
-
Prevent unintentional starting—Ensure that the electric-start button is removed from the ignition before connecting the battery pack and handling the machine.
-
Use your full attention while operating the machine. Donot engage in any activity that causes distractions; otherwise, injury or property damage may occur.
-
Stophemachine, removetheelectric-start button, removethebatterypack from the machine, and wait for all movement to stop before adjusting, servicing, cleaning, or storing the machine.
-
Removethebatterypackandelectric-start buttonfromthemachinewheneveryouleaveit unattendedorbeforechangingaccessories.
-
Donotforcethemachine—Allowthemachineto dothejobbetterandsaferattherateforwhichit wasdesigned.
-
Stayalert—Watch what you are doing and use commonsense when operating the machine. Donotusethemachinewhileill, tired, or under the influence of alcohol or drugs.
-
Operatethemachineonlyingoodvisibilityand appropriateweatherconditions.Donotoperate themachinewhenthereistheriskoflightning.
-
Use extremec caution when reversing or pulling them machinetoward you.
-
Keepproperfootingandbalanceatalltimes, especiallyonslopes.Mowacrosstheface ofslopes,neverupanddown.Useextreme cautionwhenchangingdirectionsonslopes.Do notmowexceedinglysteepslopes.Walk,never runwiththemachine.
-
Donotdirectthedischargematerialtoward anyone.Avoiddischargingmaterialagainsta wallorobstruction;materialmayricochettoward you.Stoptheblade(s)whencrossinggravel surfaces.
-
Watchforholes, ruts, bumps, rocks, orother hiddenobjects. Uneventerraincouldcauseyou toloseyourbalanceorfooting.
-
Wetgrassorleavescancauseseriousinjuryif youslipandcontacttheblade.Avoidmowingin wetconditionsorwhenitisraining.
-
If themachinestrikes an object start to vibrate, immediately shutoff the machine, remove the electric-start button, remove the battery pack, and wait for all movement to stop before examining the machine for damage. Make all necessary repairs before resuming operation.
-
Stophemachine and remove the electric-start button before loading them machine for hauling.
-
Underabusive conditions, the battery pack may eject liquid; avoid contact. If you accidentally come into contact with the liquid, flush with water. If the liquid contacts you are yes, seek medical help. Liquidejected from the battery pack may cause irritation or burns.
IV. Maintenance and Storage
-
Stophemachine, removetheelectric-start button, removethebatterypack from the machine, and wait for all movement to stop before adjusting, servicing, cleaning, or storing the machine.
-
Donotattempttorepairthemachineexceptas indicatedintheinstructions.HaveanAuthorized ServiceDealerperformserviceonthemachine usingidenticalreplacementparts.
-
Wearglovesandeyeprotectionwhenservicing themachine.
-
Sharpenadullbladeonbothsidestomaintain balance. Cleanthebladeandensurethatitis balanced.
-
Replacetheblade ifitisbent, worn, or cracked. An unbalanced blade causes vibration, which could damage the motor cause personal injury.
-
Whenservicingtheblade, beawarethatthe bladecanstillmoveeventhoughthepower sourceisoff.
-
Check the grass collection bag frequently for deterioration or wear, and replace a worn bag with a Toro [replacement] bag.
-
For best performance, use only genuine Toro replacement parts and accessories. Other replacement parts and accessories could be dangerous, and such use could void the product warranty.
-
Maintain the machine—Keep cutting edges sharp and clean for the best standards fastest performance. Keep handles dry, clean, and free from oil and grease. Keep guards in place and in working order. Keep bladess sharp. Use identical replacement blades only.
-
Checkthemachinefordamagedparts—If there are damaged guards or other parts, determine whether them machinewilloperate properly. Checkformisalignedandbindingmovingparts, brokenparts, mounting, and any other condition that may affect its operation. Unless indicated in the instructions, have an Authorized Service Dealer repair or replace a damaged guard or part.
-
Whenthebatterypackisnotinuse, keepit awayfrommetalobjectssuchaspaperclips, coins, keys, nails, and screwsthatcanmakea connectionfrom1terminaltoanother.Shorting thebatteryterminalsmaycauseburnsorafire.
-
Checktheblade and motormounting bolts frequently fortightness.
-
When you are not using the machine, store it indoors inadry, secure place out of there each of children.
-
CAUTION—Amistreated batterypack may presentariskoffireorchemicalburn.Donot disassemblethe batterypack.Donotheatthe batterypackabove68°C(154°F)orincinerate it.Replacethe batterypackwithagenuineToro batterypackonly;usinganother type of battery packmaycausea fireorexplosion.Keep batterypacksoutofthereachofchildren and in the original packaging until you are ready to usethem.
-
Donotdisposeofthebatteryinafire. The cellmayexplode. Checkwithlocalcodesfor possiblespecialdisposalinstructions.
SAVETHESE INSTRUCTIONS
SafetyandInstructionalDecals

Safetydecalsandinstructionsareeasilyvisibletotheoperatorandarelocatednearanyarea ofpotentialdanger.Replaceanydecalthatisdamagedormissing.
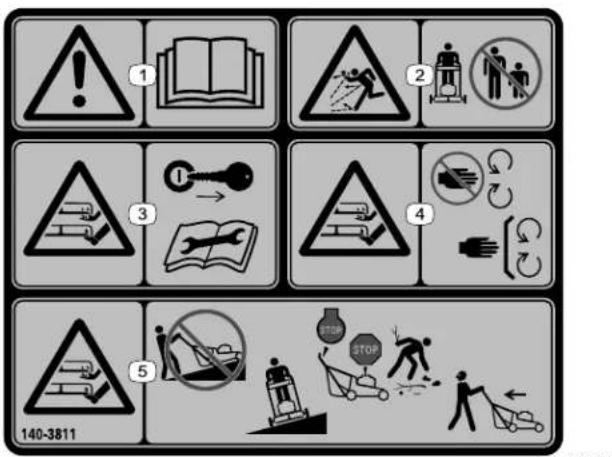
140-3811
-
Warning—read the Operator's Manual.
-
Thrownobject hazard—keepbystanders away.
-
Cutting/dismember hazard, mower blade—removethekey andreadtheOperator's Manual/beforeperforming maintenance.
-
Cutting/dismember hazard, mower blade—stayaway from movingparts; keepall guardsandshieldsin place.
-
Cutting/dismember hazard,mowerblade—do notmowupordown slopes;onlymowacross slopes;shutofftheengine, waitformovingpartsto stop,andpickupdebris beforemowing;look behindyouwhenmowing inreverse.
Model81860

137-9489
decal137-9489
-
Read the Operator's Manual.
-
Recycle5. Donotexposetorain.
-
Contains lithium ions; do not discard.
-
Keepawayfromopen flames.

137-9495
decal137-9495
- Read the Operator's Manual.
-
Donotdiscard.4. Doubleinsulated
-
Forindooruse.

137-9496
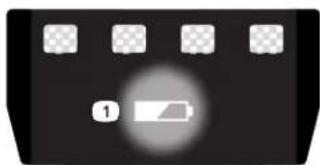
decal137-9496
- The batterypackischarging. 3. The batterypackisoverorundertheappropriatetemperature range.
- The batterypackisfullycharged.4. Batterypackchargingfault
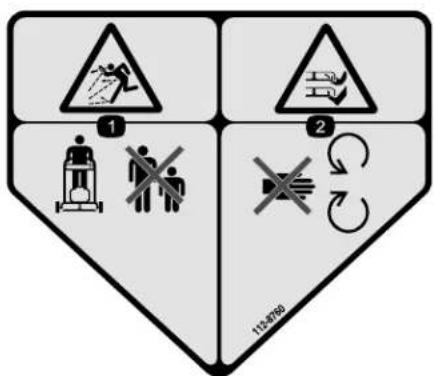
112-8760
decal112-8760
- Thrownobjecthazard—keepbystandersaway.
- Cutting/dismembermenthazardofhandorfoot, mower blade—stayawayfrommovingparts.
natural_image
Black control panel with four square buttons and a highlighted indicator (no readable text or symbols)137-9461
decal137-9461
- Batterychargestatus

144-3175
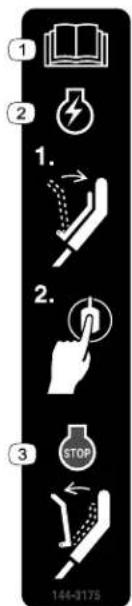
decal144-3175
- Read the Operator's Manual.
-
Tostartthemachine, squeezethebartothe handleandpressthe button.
-
Toshutoffthemachine, releasethebar.

134-4691
decal134-4691
1.Autospeed2.Maxspeed
Setup
Note: The batterypackis not fully charged when it is purchased. Before using the machine for the first time, referto Charging the Battery Pack(page 17).
1
MountingtheBattery Charger(Optional)
Partsneededforthisprocedure:
2
Mountinghardware(notincluded)
Procedure
Ifdesired, mountthebatterychargersecurelyona wallusingthewall-mountkeyholesonthebackof thecharger.
Mountitindoors(suchasagarageorotherdryplace), nearapoweroutlet, and outofthereachofchildren.
RefertoFigure3forassistanceinmountingthe charger.
Slidethechargerovertheappropriatelypositioned hardwaretosecurethechargerinplace(hardware notincluded).
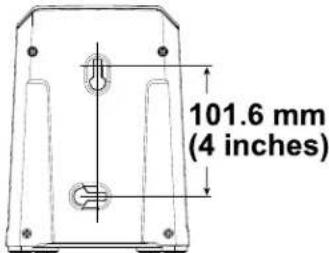
Figure3
2
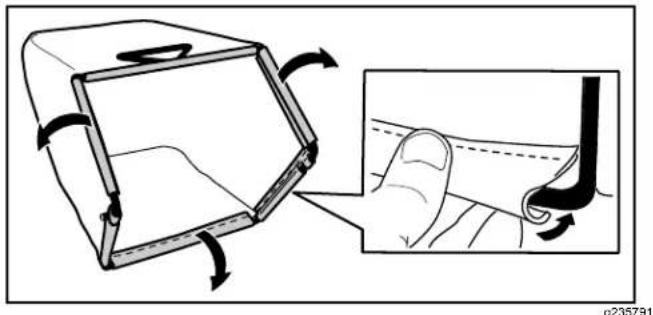
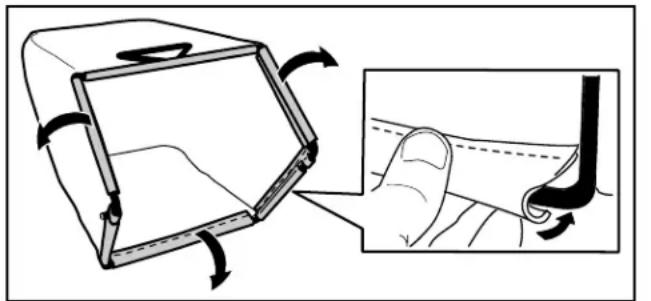
AssemblingtheGrassBag
NoPartsRequired
Procedure
natural_image
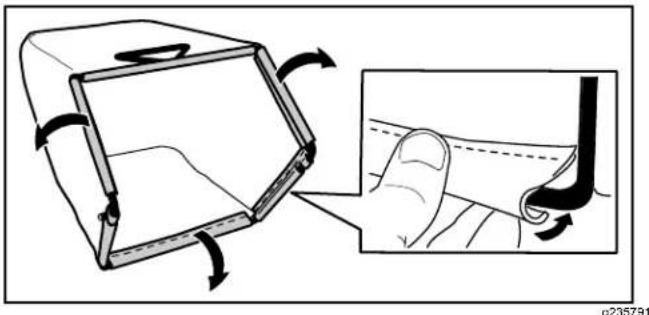
Illustration of a hand holding a small object with arrows indicating motion, alongside a magnified inset showing the interior detail (no text or symbols)Figure4
3
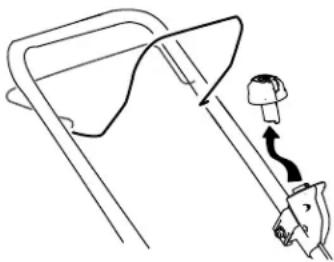
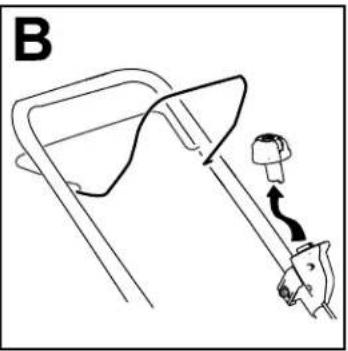
UnfoldingtheHandle
NoPartsRequired
Procedure
WARNING
Unfoldingthehandleimproperlycandamagethecables,causinganunsafeoperating condition.
- Donotdamagethecable(s)whenfoldingorunfoldingthehandle.
- Ensure that the cable(s)arerouted to the outside of the handle.
•Ifacableisdamaged,contactanAuthorizedServiceDealer.
Important: Remove and discard the protective plastics sheet that cover them motor and any other plastic or wrapping on the machine.
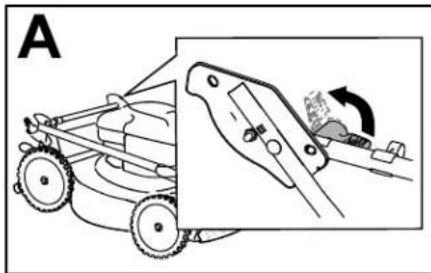
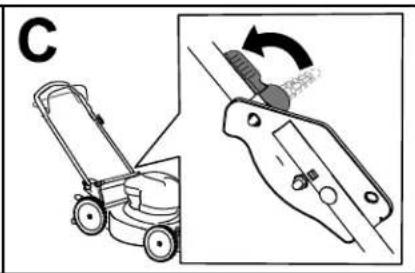
- Unlock the handle locks (AofFigure5).
- Movethehandlerearwardtotheoperatingposition(BofFigure5).
- Hold the handle while engaging the handle lock to avoid pinching your hands.
- Engagethehandlelockuntilthepinclicksinplatelockthehandleintotheoperatingposition(Cof Figure5).
natural_image
Diagram of a grass law vehicle with a close-up view showing the wheel being pulled by a hand (no text or symbols present)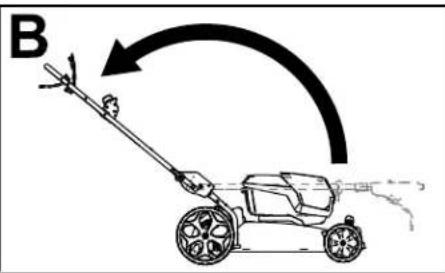
natural_image
Diagram showing a lawn mower and its tool with a rotating knob (no text or symbols)Figure5
g332165
ProductOverview

Figure6
- Blade-controlbar
6.Self-propeldrivebar - Electric-startbutton
7.Grassbag - Handlelock(2)8. Cutting-heightlever(2)
- Reardeflector9. Side-dischargechute
- Batterycompartment
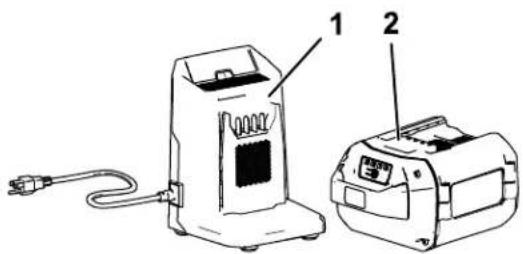
Figure7
- BatterychargerModel 81802(includedwith Model21852)
2.BatterypackModel81860 (includedwithModel 21852)
Specifications
BatteryPack
| Model81860 | |
| Batterypackcapacity | 6.0Ah |
| 324Wh | |
| Batterymanufacturerrating=60Vmaximumand54Vnominal.Actualvoltagevarieswithload. | |
BatteryCharger
| Model81802 | |
| Type | 60VMAXLithium-IonBatteryCharger |
| Input | 100to240VAC50/60HzMax2.0A |
| Output60VMAXDC2.0A | |
Appropriate Temperature Ranges
| Charge/storethebatterypack at | 5°C(41°F)to40°C(104°F)* |
| Usethebatterypackat | -30°C(-22°F)to49°C(120°F)* |
| Usethemachineat | 0°C(32°F)to49°C(120°F)* |
*Chargingtimewillincreaseifyoudonotchargethe batterypackwithinthisrange.
Storethemachine, batterypack, and batterycharger in an enclosed clean, dry area.
Operation
Note: Determinetheleftandrightsidesofthemachinefromthenormaloperatingposition.
BeforeOperation
InstallingtheBatteryPack
Important:Operatethebatterypackonlyintemperaturesthatarewithintheappropriaterange;refer toSpecifications(page10).
- Makesurethattheventsonthebatteryareclearofanydustanddebris.
- Liftupthebattery-compartmentlid(AofFigure8).
3.Lineupthecavityinthebatterypackwiththetongueonthemachineandslidethebatterypackintothe compartmentuntilillocksintoplace(BofFigure8). - Closethebattery-compartmentlid(CofFigure8).
Note: If the battery-compartment liddoes not close completely, the battery is not fully installed.
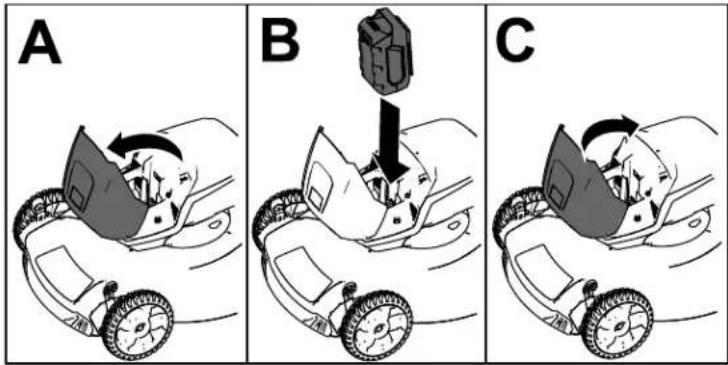
Figure8
g251221
AdjustingtheCuttingHeight
WARNING
Adjustingtheheight-of-cutcouldbringyourhandsintocontactwithamovingbladeand resultinseriousinjury.
- Shutoffthemotor,removethebattery,andwaitforallmovingpartstostopbeforeadjusting thecuttingheight.
- Donotputyourfingersunderthehousingwhenadjustingthecuttingheight.
Adjust the cutting height as desired Seal wheels the same cutting height (Figure 9).
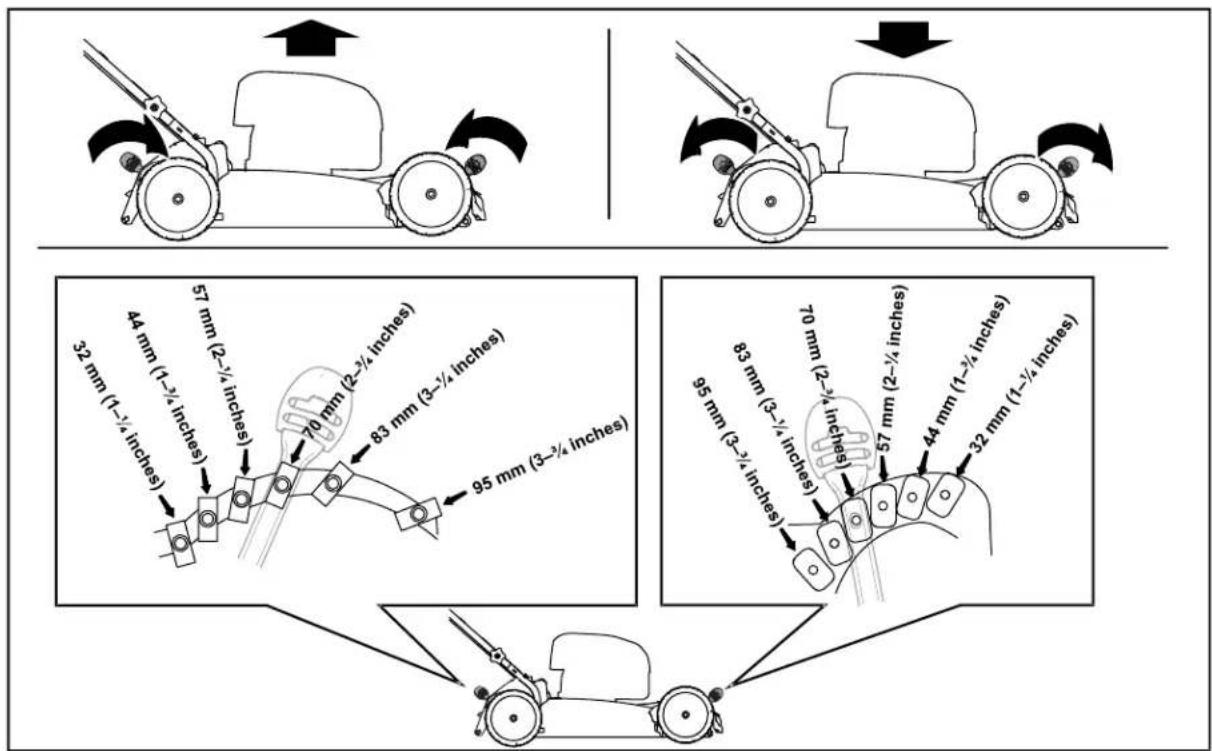
Figure9
g390235
DuringOperation
StartingtheMachine
- Ensure that the battery pack is charged and installed in the machine; referto Installing the Battery Pack (page 11).
Iaserthelectric-starbuttonintdhelectricstarteswitch(AoFigure 0).
- Squeezetheblade-controlbarandholdittothehandle (BofFigure10).
Pressthelectric-starbuttonandkeeppresseduntithemotostarts(0 Figure 10).
natural_image
Simple line drawing of a mechanical device with a spring and lever, no text or symbols present
natural_image
Diagram of a hand holding a tool with an arrow indicating rotation (no text or symbols present)
natural_image
Illustration of a hand using a tool to lift a car (no text or symbols present)Figure10
g332149
UsingtheSelf-PropelDrive
•Toengagetheself-propeldrive,pullthe self-propel-drivebartothehandleandholdit (Figure11).
•Todisengagetheself-propel-drive,releasethe self-propeldrivebar.
Note: Toreducethegroundspeed, increasethe spacebetweentheself-propeldrivebarandthe handle.
natural_image
Illustration of a hand using a tool to lift a chair, showing motion arrows and angle marker (no text or symbols)Figure11
g240765
- Self-propel-drivebar
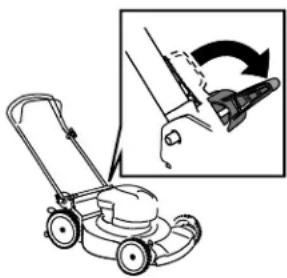
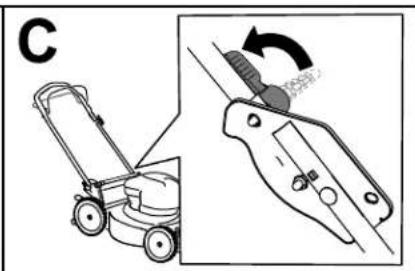
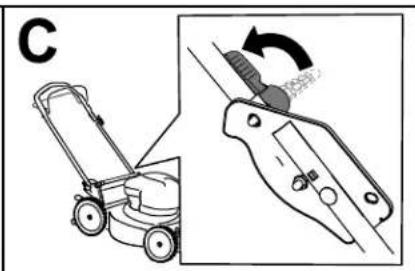
AdjustingtheBladeSpeed
Thismachinehas2blade-speedsettings:AUTOand MAX.
- WhensettotheAUTOposition,thebladespeed isadjustedautomaticallyforgreaterefficiency; changesincuttingconditionsaredetectedand thebladespeedincreaseswhennecessaryto maintainqualityofcut.
- WhensettotheMAXposition, thebladespeed remainsatthehighestspeedatalltimes.
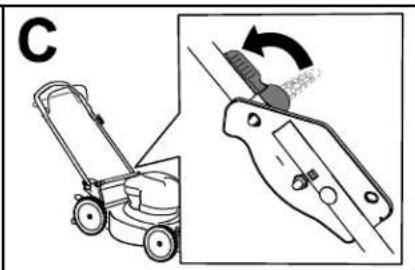
Turnthekeyinthekeyswitchtoeitherpositionto adjustthebladespeedsetting(Figure 12).
Figure12
g337279
Aposposition
RecyclingtheClippings
Yourmachinecomesfromthefactoryreadytorecyclethegrassandleafclippingsbackintothelawn.
If the grass bag is on them machine, remove it before recycling the clippings. Referto Removing the Grass Bag (page 14).
BaggingtheClippings
Usethegrassbagwhenyouwanttocollectgrassandleafclippingsfromthelawn.
InstallingtheGrassBag
- Liftupthereardeflector(AofFigure13).
Iasertherodendsofhegrassbagntthenotchesinthelandlebrackets(BoFigure13).
3.Allowthereardeflectortorestonthebag.

natural_image
Diagram of a mechanical device with a rotating component and hands, labeled 'A' (no text or symbols on the diagram itself)
natural_image
Illustration of a person pushing a cart with motion lines, showing mechanical components and motion (no text or symbols)Figure13
g332150
RemovingtheGrassBag
Toremovethebag,reversethestepsinInstallingtheGrassBag(page14).
Side-Dischargingthe Clippings
InstallingtheSide-Discharge Chute
- Liftupthereardeflector(Figure14).
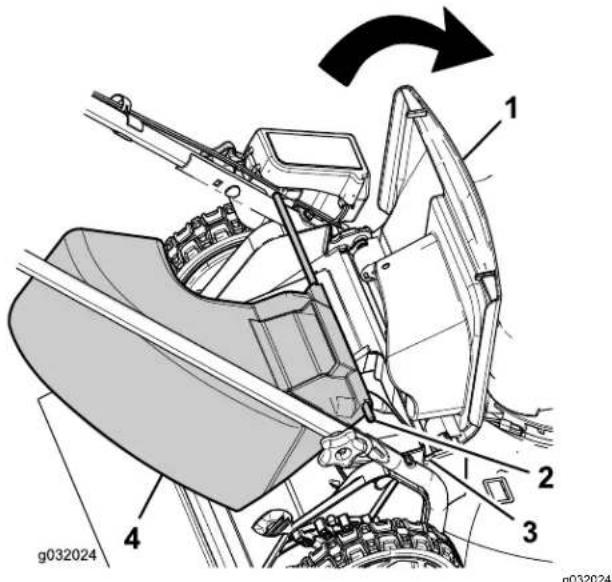
Figure14
-
Reardeflector
-
Notchinthehandle bracket(2)
-
Rodend(2)4. Side-dischargechute
Note: If the grassbag is on them machine, remove it; referto Removing the Grass Bag (page 14).
-
Inserttherodendsoftheside-dischargechute intothenotchesonthehandlebrackets (Figure 14).
-
Allow thereardeflectortorestonthechute.
RemovingtheSide-Discharge Chute
- Liftupthereardeflector(Figure 14).
- Lifttheside-dischargechuteoutformthe notchesonthehandlebracketsandremovethe chutefromthemachine.
3.Closethereardeflector.
ShuttingOfftheMachine
- Releasetheblade-controlbar(AofFigure15).
- Removethelectric-startbuttonfromtheelectric starter(BofFigure15).
- Removethebatterypack; refertoRemovingthe BatteryPackfromtheMachine(page15).
Note: Whenever you are not using the machine, removethe battery pack.
natural_image
Illustration of a lawn mower with a hand operating a tool, showing a close-up view of the blade (no text or symbols present)
natural_image
Diagram of a mechanical device with a lever and adjustment knob, labeled 'B' (no text or symbols on the diagram itself)Figure15
RemovingtheBatteryPack fromtheMachine
- Liftupthebattery-compartmentlid.
- Pressthebattery-packlatchtoreleasethe batterypackandremovethebatterypack.
- Closethebattery-compartmentlid.
OperatingTips
GeneralMowingTips
- Inspecttheareawhereyouwillusethemachine andremovealobjectsthatthemachinecould throw.
- Avoidstrikingsolidobjectswiththeblade.Never deliberatelymowoveranyobject.
- If themachinestrikes an objector start to vibrate, immediately shutoff the engine, wait for all moving part stop, disconnect the wire from the spark plug, and examine them machine for damage.
- Forbestperformance, installanewT oroblade before the cutting season begins or when necessary.
CuttingGrass
- Cutonlyaboutathirdofthegrassbladeatatime. Forimprovedqualityofcut, runtime, andbagging, cutgrassatahigherheightofcut.
- Donotcutbelow51mm(2inches)unlessthe grassissparseoritislatefallwhengrassgrowth beginstoslowdown.
- Whencuttinggrassover15cm(6inches)tall, mowatthehighestcuttingheightsettingandwalk slower;thenmowagainatalowersettingforthe bestlawnappearance.Ifthegrassistoolong,the machinemayplugandcausethemotortostall.
- Wetgrassandleavestendtoclumpontheyard andcancausethemachinetoplugorthemotorto stall.Avoidmowinginwetconditions.
- Beawareofapotentialfirehazardinverydry conditions, followalllocalfirewarnings, and keep themachinefreeofdrygrassandleafdebris.
•Alternatethemowingdirection. This helps dispersetheclippingsoverthelawnforeven fertilization. - Ifthefinishedlawnappearanceisunsatisfactory, try1ormoreofthefollowing:
-Replacethebladeorhaveitsharpened.
—Walkataslowerpacewhilemowing.
-Raisethecuttingheightonyourmachine.
-Cutthegrassmorefrequently. - Overlapcuttingswathsinsteadofcuttingafull swathwitheachpass.
CuttingLeaves
• Aftercuttingthelawn, ensure that half of the lawn show through the cut leaf cover. You may need to make more than a single pass over the leaves.
- If there are more than 13cm (5 inches) of leaves on the lawn, mowata higher cutting height and then again at the desired cutting height.
- Slowdownyourmowingspeedifthemachine doesnotcuttheleavesfinelyenough.
AfterOperation
ChargingtheBatteryPack
Important: The batterypackis not fully charged when you purchase it. Before using the tool for the first time, placethe battery pack in the charger and charge until the LED display indicate the battery pack is fully charged. Read all safety precautions.
Important: Chargethebatterypackonlyin temperaturesthatarewithintheappropriate range; refertoSpecifications(page10).
Note: Atanytime, pressthebattery-charge-indicator buttononthebatterypacktodisplaythecurrent charge(LEDindicators).
- Ensure that the event on the battery and charger are clear of any dust and debris.
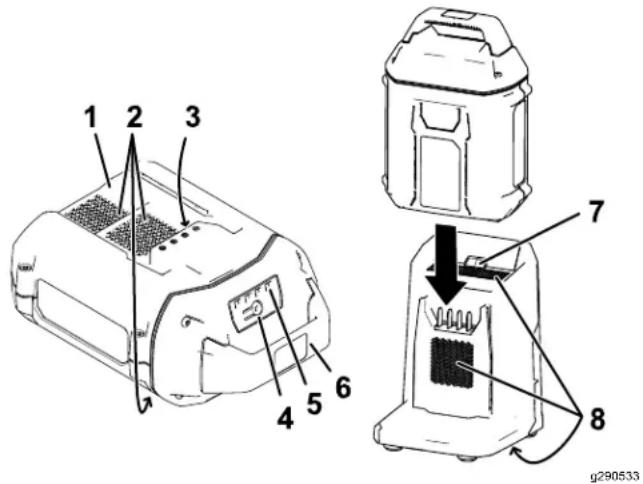
Figure16
- Batterypackcavity
- LED indicators(current charge)
- Batterypackventingareas6. Handle
- Batterypackterminals
- ChargerLEDindicator light
- Battery-charge-indicator button
- Chargerventing areas
2.Lineupthecavityinthebatterypack(Figure16) withthetongueonthecharger.
3.Slidethebatterypackintothechargeruntilitis fullyseated(Figure16). - Toremovethebatterypack, slidethebattery backwardoutofthecharger.
- Referto the following table to interpret the LED indicator light on the battery charger.
| Indicator light | Indicates |
| Off | Nobatterypackinserted |
| Green blinking | Batterypackischarging |
| Green | Batterypackischarged |
| Red | Batterypackand/orbatterychargerisoverorunder theappropriatetemperaturerange |
| Red blinking | Batterypackchargingfault* |
*RefertoTroubleshooting(page22)formore information.
Important: The battery can be left on the charger for short periods between uses.
If the battery will not be used for longer periods, removethe battery from the charger; referto Storage(page21).
CleaningundertheMachine
ServiceInterval: Beforeeachuseordaily
CleaningundetheMachine
ServiceInterval: Aftereachuse
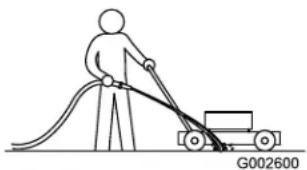
Forbestresults, cleanunderthemachinesoonafter youhavecompletedmowing.
- Lowerthemachinetoitslowestcutting-height setting.
- Movethemachineontoapavedlevelsurface.
- With themotorrunning and the blade engaged, sprayastream of water in front of the right, rear wheel (Figure 17).
Note: Thewaterwillsplashintothepathofthe blade, cleaningouttheclippings.
natural_image
Line drawing of a person pushing a cart with a curved ramp, labeled G002600 (no text or symbols on the diagram itself)Figure17
g002600
- Whennomoreclippingscomeout, stop the water and movethemachinetoadry area.
- Runthemotorforafewminutestodrythe undersideofthemachine.
Cleaning under the Machine the Vertical-Stow Position
- Setthemachineinthevertical-stowposition; refertoStoringtheMachineintheVertical-Stow Position(page18).
- Washouttheclippingsfromunderthemachine.
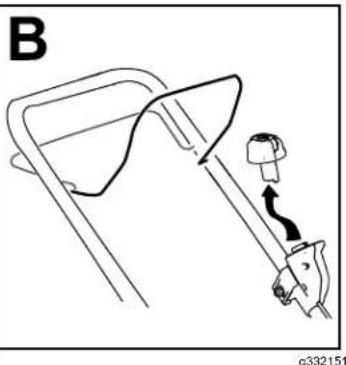
FoldingtheHandle
WARNING
Foldingorunfoldingthehandleimproperly candamagethecables,causinganunsafe operatingcondition.
- Donotdamagethecableswhenfoldingor unfoldingthehandle.
- Ifacableisdamaged,contactan AuthorizedServiceDealer.
- Removethelectric-startbutton(Figure18).
natural_image
Line drawing of a mechanical device with a lever and handle (no text or symbols)Figure18
g332163
- Removethebatteryfromthemachine.
- Hold the handle while disengaging the handle lock to avoid pinching your hands.
- Disengagethehandlelocksuntilyoucanmove theupperhandlefreely.
- Fold the handle forward to the fully forward position as shown in Figure 20.
Important: Routethecablestotheoutside ofthehandlelocksasyoufoldthehandle.
- Tounfoldthehandle, referto3UnfoldingtheHandle(page9).
StoringtheMachineinthe Vertical-StowPosition
Youcanstoreyourmachineintheverticalpositionto minimizestoragespace.
WARNING
Foldingorunfoldingthehandleimproperly candamagethecables,causinganunsafe operatingcondition.
-
Donotdamagethecableswhenfoldingor unfoldingthehandle.
•Ifacableisdamaged,contactan AuthorizedServiceDealer. -
Removethelectric-startbuttonandbattery fromthemachine.
-
Ensure that the cutting height setting on the machine is 44mm (1-3/4 inches) or higher; if it is not, raise it; refer to Adjusting the Cutting Height (page 12).
-
Disengagethehandlelocks(Figure19).
natural_image
Illustration of a lawn mower with a magnified inset showing the blade being cut (no text or symbols present)Figure19
g297000
- Foldthehandlefullyforward. Important: Routethecablestotheoutside of the handlelocksasyoufoldthehandle.
- Engagethehandlelocks.
- Liftthefrontofthemachinebythehandleand moveitintoastoragespace(Figure20).
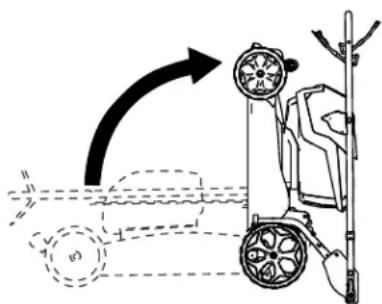
Figure20
g332177
Maintenance
Removethelectric-startbuttonandbatterypack fromthemachinebeforemaintainingorcleaningthe machine.
Useonlythemanufacturer's recommended replacementpartsandaccessories.
Inspectandmaintainthemachineregularly.Have themachinerepairedonlybyan Authorized Service Dealer.
LubricatingtheMachine
Youdonotneedtolubricatethemachine;allthe bearingshavebeenlubricatedatthefactoryforthe lifeofthemachine.
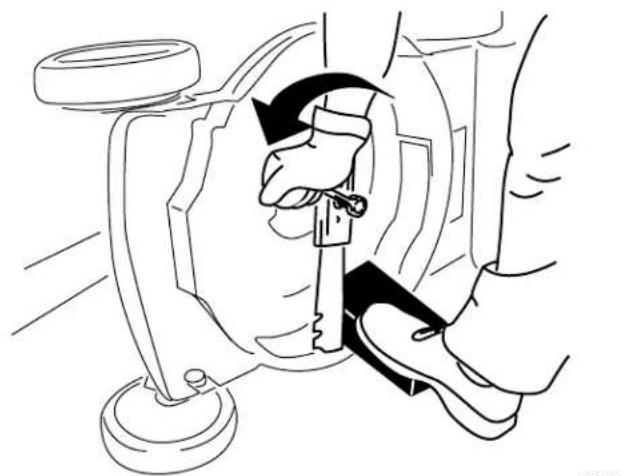
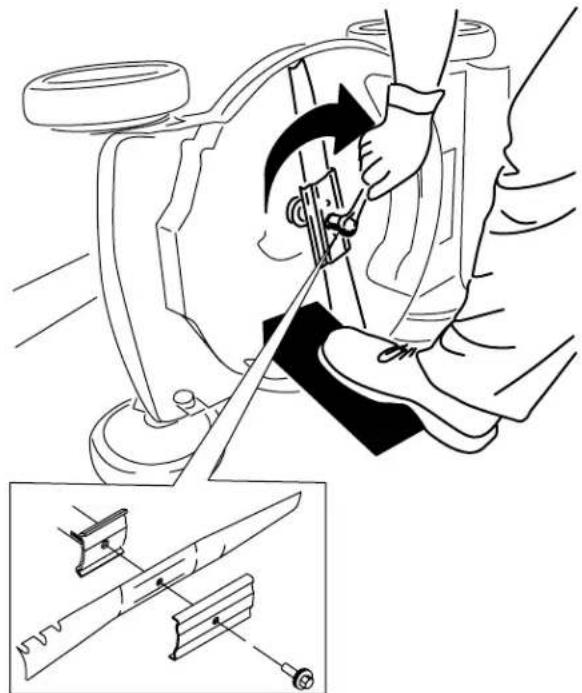
ReplacingtheBlade
ServiceInterval: Yearly
Important: Youwillneedatorquewrenchto installthebladeproperly.Ifyoudonothavea torquewrenchorareuncomfortableperforming thisprocedure,contactanAuthorizedService Dealer.
Ifthebladeisdamagedorcracked,replaceit immediately. Ifthebladeedgeisdullornicked,have itsharpenedandbalanced,orreplaceit.
WARNING
Whenservicingtheblade,beawarethatthe bladecanstillmoveeventhoughthepower sourceisoff.Thebladeissharp;contacting thebladecanresultinseriouspersonalinjury.
Weargloveswhenservicingtheblade.
-
Removethelectric-startbutton and battery pack from the machine.
-
Useablockofwoodtoholdthebladesteady (Figure21).
-
Removethebladebolt, bracket, and blade; save the bracket and blade bolt (Figure 21).
natural_image
Line drawing of a mechanical assembly with hands operating a tool (no text or symbols)Figure21
- Installthenewblade,bracket,andbladebolt (Figure22).

natural_image
Technical illustration of a mechanical assembly with a tool and component, showing a close-up of a cutting tool (no text or symbols present)Figure22
Important: Position the curved end of the blade facing up toward the machine housing.
- Useatorquewrenchtotightenthebladebolt to68N·m(50ft-lb).
AdjustingtheSelf-Propel Drive
Whenever you install an new self-propel cable or if the self-propel drive is out of adjustment, adjust the self-propel drive cable.
- Loosenthecable-supportnut(Figure23).
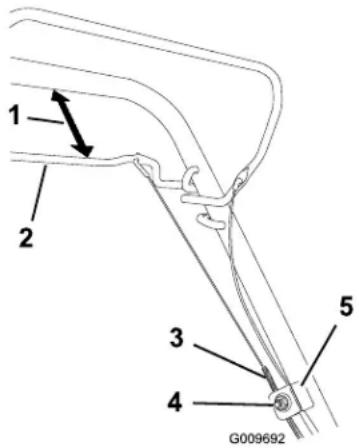
Figure23
1.25to38mm(1to1-1/2 inches)
4. Cable-supportnut
2. Self-propel-drivebar5. Cablesupport
3.Cablejacket
- Hold the self-propel-drive bar 25 to 38 mm (1 to 1-1/2 inches) from the handle (Figure 23).
- Pulldownthecablejacket(towardthemachine) untilthereisnoslackinthecable(Figure23).
- Tightenthenutonthecablesupport.
- Releasetheself-propel-drivebarandensure that the cable is loose.
Note: The cable must beloose with the self-propeldrivebarin thereleased position; otherwise, themachinemaycreep when you disengagethebar.
PreparingtheBatteryPack forRecycling
Important: Uponremoval, covertheterminalsof thebatterypackwithheavy-dutyadhesivetape. Donotattempttodestroyordisassemblethe batterypackorremoveanyofitscomponents.
Contact your local municipality your authorized Toro distributor form more information on how to responsibly recycle the battery.
Storage
Important: Storethemachine, batterypack, and chargeronlyintemperaturesthatarewithinthe appropriaterange; refertoSpecifications(page 10).
Important: If you are storing the battery pack for the off-season, charge it until 2 or 3 LED indicator turn green on the battery. Donot store a fully charged or fully depleted battery. When you are ready to set them machine again, charge the battery pack until the left indicator light turns green on the charger or all 4 LED indicator turn green on the battery.
- Disconnect the product from the powersupply (i.e., removethe battery pack and electric-start button) and check for damage after use.
- Donotstorethemachineorchargerwiththe batterypackinstalled.
- Cleanallforeignmaterialfromtheproduct.
- When not in use, store them machine, electric-start button, batterypack, and battery charger out of the reach of children.
- Keepthemachine, batterypack, and battery charger away from corrosive agents, such as gardenchemicals and de-icingsalts.
• Toreducetheriskofseriouspersonalinjury, do notstorethebatterypackoutsideorinvehicles. - Storethemachine, batterypack, and battery chargerinanenclosedclean, dryarea.
Troubleshooting
Performonlythestepsdescribedintheseinstructions.Allfurtherinspection,maintenance,andrepairwork mustbeperformedbyanauthorizedservicecenterorasimilarlyqualifiedspecialistifyoucannotsolvethe problemyourself.
| Problem | PossibleCauseCorrectiveAction | |
| Themachinedoesnotstart. | 1.Thebatteryisnotfullyinstalledinthe machine.2.Thebatterypackisnotcharged.3.Thebatterypackisdamaged.3.Replaceebatterypack.4.Thereisanotherelectricalproblem withthemachine. | 1.Removeandthenreplacethebattery intothemachine,makingsurethatitis fullyinstalledandlatched.2.Removethebatterypackfromthe machineandchargeit.3.batterypack.4.ContactanAuthorizedServiceDealer. |
| Themachinedoesnotrunordoesnotrun continuously. | 1.Thereismoistureontheleadsofthe batterypack.2.Thebatteryisnotfullyinstalledintothe tool. | 1.Allowthebatterypacktodryorwipeit dry.2.Removeandthenreplacethebattery intothetoolmakingsurethatitisfully installedandlatched. |
| Themachinedoesnotreachfullpower. | 1.Thebatterypackchargecapacityis toolow.2.Theairventsareblocked. | 1.Removethebatterypackfromthe machineandfullychargethebattery pack.2.Cleantheairvents. |
| Thebatterypackloseschargequickly. | 1.Thebatterypackisoverorunderthe appropriatetemperaturerange.2.Themachineisoverloaded | 1.Movethebatterypacktoaplace whereitisdryandthetemperatureis between 5^(41^) and 40^(104^) .2.Cutthegrassatahigherheightofcut orwalkataslowerpacewhilemowing. |
| Thebatterychargerisnotworking. | 1.Thebatterychargerisoverorunder theappropriatetemperaturerange.2.Theoutletthatthebatterychargeris pluggedintodoesnothavepower. | 1.Unplugthebatterychargerandmove ittoaplacewhereitisdryandthe temperatureisbetween 5^(41^) and 40^(104^) .2.Contactyourlicensedelectricianto repairtheoutlet. |
| Themachinedoesnotself-propel. | 1.Theself-propeldrivecableisoutof adjustmentorisdamaged. | 1.Adjusttheself-propeldrivecable.Replacehecableifnecessary. |
| TheLEDindicatorlightonthebattery chargerisred. | 1.Thebatterychargerand/orbattery packisoverorundertheappropriate temperaturerange. | 1.Unplugthebatterychargerandmove thebatterychargerandbatterypack toaplacewhereitisdryandthe temperatureisbetween 5^(41^) and 40^(104^) . |
| TheLEDindicatorlightonthebattery chargerisblinkingred. | 1.Thereisanerrorinthecommunication betweenthebatterypackandthe charger.2.Thebatterypackisweak. | 1.Removethebatterypackfromthe batterycharger,unplugthebattery chargerfromtheoutlet,andwait10 seconds.Plugthebatterychargerinto theoutletagainandplacethebattery packonthebatterycharger.IftheLED indicatorlightonthebatterychargeris stillblinkingred,repeatthisprocedure again.IftheLEDindicatorlighton thebatterychargerisstillblinkingred after2attempts,properlydisposeof thebatterypackatabatteryrecycling facility.2.Contactyourauthorizedservicedealer ifthebatteryisinwarranty,orproperly disposeofthebatterypackatabattery recyclingfacility. |
| Themachineisproducingabeeping sound. | 1.Thebatterypackisnotcharged.2.Themachineisinanunsafeposition foroperation.3.Themachineisoverloaded.4.Thereisanotherelectricalproblem withthemachine. | 1.Removethebatterypackfromthe machineandchargeit.2.Ensurethatthemachineisnotatan extremeanglewhileoperating.3.Cutthegrassatahigherheightofcut orwalkataslowerpacewhilemowing.4.Attempttheothertroubleshooting actions,ifthealarmstillsounds, contactanAuthorizedServiceDealer. |
| Thequalityofcutisdecreasedor unsatisfactory. | 1.Thebladeisdull.1.Havethebladesharpened 2.Thecuttingdeckhasdebrisbuildup. | orreplaced.2.Cleanunderthemachine. |
| Thebaggingisdecreasedor unsatisfactory. | 1.Themachineisoverloaded | 1.Cutthegrassatahigherheightofcut. |
| 1.Thebladeisdull.1.Havethebladesharpened 2.Thecuttingdeckisdamaged. | orreplaced. Themachineiscuttingunevenly.2.ContactanAuthorizedServiceDealer. | |
| Themachineisvibrating.1.Thebladeisbentordamaged. | 1.Inspectthebladeandreplaceif necessary. | |
EEA/UKPrivacyNotice
Toro'sUseofYourPersonallInformation
The Toro Company("Toro") respects your privacy. When you purchase products when may collect certain personal information about you either directly from you through your local Tor company dealer. To use this information difficult to contract obligations such a register your warranty, process your warranty claim or to contact you in the event of a product recall and/or legitimate business purposes such as a gauge customer satisfaction improvement products provide you with product information which maybe interest. To may share your information without subsidiaries, affiliates dealers, the business partners connection these activities. We may also disclose personal information where required by law in connection with the sale purchase merger of business. We will be solely your personal information can other company marketing purposes.
RetentionofyourPersonalInformation
TorowilkeepyoupersonalinformationalongsitselevanfotheabovepurposesandaccordancewithlegarequirementsFomoreinformation aboutapplicableretentionperiodspleasecontactlegal@toro.com.
Toro's CommitmenttoSecurity
YoupersoninformationmayprocessedtheUranothercountrywhichmayhavesstrictlatoprotectionlawthanyourcountryofesidence. Whenevertransfyourinformationoutsideyourcountryofesidencewewiltakelegallyrequiredstepstensurdhatappropriatesafeguardsareinplacetoprotectyourinformationandtomakesureitistreatedsecurely.
AccessandCorrection
You may have her right to correct review your personal data about object restriction processing your data does please contact by email alegal@toro.com/you have concerns about the way which or has handled your information we encourage you raise this directly with us. Plesenotethat European residents have her right to complaint your Data Protection Authority.
Bedienungsanleitung
Flex-ForcePowerSystem ^TM 60VMAX52cmRecycler ^® Rasenmäher
natural_image
Line drawing of a lawn mower with visible blades and wheels (no text or symbols)natural_image
Black rectangular button with a circular indicator and four patterned buttons (no text or symbols)137-9461
decal137-9461
1.Akkuladestatus
144-3175
decal144-3175
Bild3
2
MontierendesFangkorbs
natural_image
Diagram showing a hand holding a curved object with arrows indicating motion, alongside a magnified inset illustrating the process (no text or symbols present)Bild4
3
AufklappendesHolms
natural_image
Diagram of a lawn mower with a close-up view showing the blade and wheel (no text or symbols)
natural_image
Diagram showing a lawn mower and its blade tool with rotation arrow (no text or symbols)Bild5
g332165
Produktübersicht
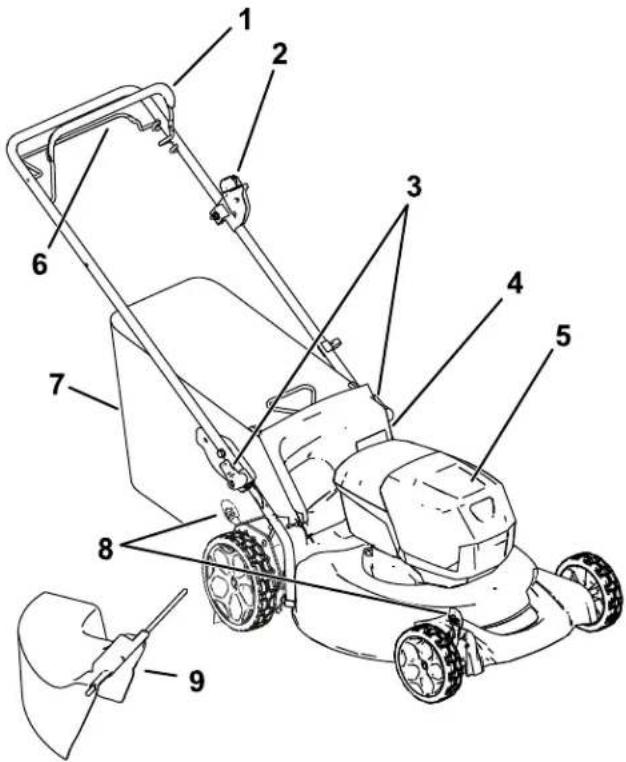
Bild6
g337137
Bild7
g292995
natural_image
Simple line drawing of a mechanical device with a lever and adjustment knob (no text or symbols)
natural_image
Diagram of a hand using a tool to lift a curved object, with an arrow indicating rotation (no text or symbols present)
natural_image
Line drawing of a hand using a tool to lift a car (no text or symbols)Bild10
g332149
natural_image
Diagram of a hand gripping a car handle with directional arrows indicating motion (no text or symbols)Bild11
g240765
natural_image
Mechanical diagram showing a lever mechanism with a rotating component and a curved arrow indicating rotation (no text or symbols present)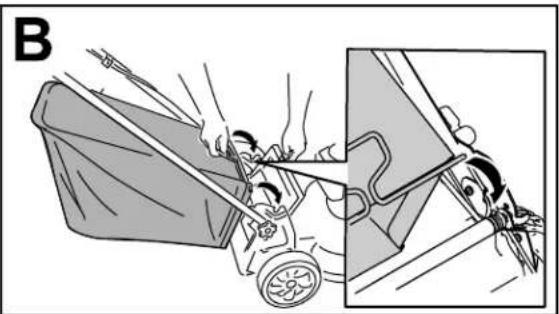
natural_image
Illustration of a person pushing a cart with motion lines, showing hand movement and a close-up view of the car (no text or symbols)Bild13
g332150
EntfernendesGrasfangkorbs
natural_image
Illustration of a lawn mower with a magnified inset showing the blade and handle (no text or symbols)Bild15
g332151
natural_image
Simple line drawing of a person using a cart to lift a curved ramp, labeled G002600 (no text or symbols on the diagram itself)Bild17
g002600
natural_image
Line drawing of a mechanical device with a handle and lever mechanism (no text or symbols)Bild18
g332163
natural_image
Illustration of a lawn mower with a magnified inset showing the blade being cut (no text or symbols)Bild19
g297000
Bild20
g332177
Wartung
natural_image
Line drawing of a hand adjusting a mechanical component with arrows indicating motion (no text or symbols)Bild21
g231389
natural_image
Line drawing of a mechanical assembly with hands adjusting parts (no text or symbols)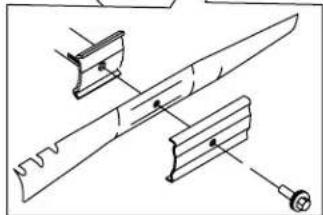
natural_image
Technical line drawing of a mechanical assembly with no visible text or symbolsBild22
g231390
natural_image
Line drawing of a lawn mower with visible blades and wheels (no text or symbols)Figura1
g275230
natural_image
Black rectangular button with four patterned buttons and a white indicator light at the bottom (no text or symbols)137-9461
decal137-9461
144-3175
decal144-3175
- Leaelmanualdel operador.
-
Paraarrancarlamáquina, aprietelabarracontrael manillarypulseelbotón.
-
Paraapagarlamáquina, sueltelabarra.

134-4691
decal134-4691
Figura3
g290534
2
natural_image
Diagram showing a device with rotation arrows and a magnified inset of a finger pressing a curved tool (no text or symbols)Figura4
3
Cómodesplegarelmanillar
Nosenecesitanpiezas
Procedimiento
ADVERTENCIA
natural_image
Diagram of a manual lawn mower with a close-up view showing the blade and wheel (no text or labels)
natural_image
Diagram showing a lawn mower and its clamping mechanism with a rotation arrow (no text or symbols)Figura5
g332165
Elproducto

g337137
Figura6
-
Barradecontroldela cuchilla
-
Barradecontrol delatransmisión autopropulsada
g292995
Figura7
natural_image
Simple line drawing of a device with a handle and lever, no text or symbols present
natural_image
Diagram of a hand using a tool to lift a curved object, showing rotational motion (no text or symbols)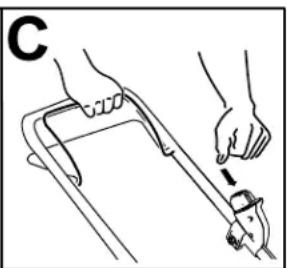
natural_image
Line drawing of a hand using a tool to lift a car (no text or symbols)Figura10
g332149
natural_image
Diagram of a hand gripping a mechanical component with arrows indicating motion (no text or symbols)Figura11
natural_image
Diagram of a mechanical device with a rotating component and directional arrow (no text or symbols)
natural_image
Illustration of a person pushing a cart with motion lines, showing a close-up of the vehicle (no text or symbols present)Figura13
g332150
Retiradadelrecogedor
natural_image
Illustration of a lawn mower with a hand holding a tool, showing a close-up view of the blade (no text or symbols present)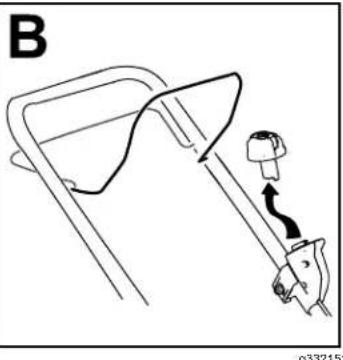
natural_image
Line drawing of a mechanical device with a belt and handle, no text or symbols presentFigura15
natural_image
Line drawing of a person using a cart to lift a curved ramp, labeled G002600 (no text or symbols on the diagram itself)Figura17
g002600
- Cuandoyanosalganmásrecortes, cierreel grifodelaguaymuevalamáquina aunazona seca.
- Hagafuncionarelmotorduranteunosminutos parasecarlaparteinferiordelamáquina.
natural_image
Simple line drawing of a lampshade with a handle and lamp (no text or symbols)Figura18
g332163
natural_image
Line drawing of a lawn mower with an inset showing the blade being cut (no text or symbols)Figura19
g297000
Figura20
g332177
Mantenimiento
natural_image
Line drawing of a mechanical assembly with hands operating a tool (no text or symbols)Figura21
4.Instalelacuchillanueva,elsoporteyelperno delacuchilla(Figura22).
natural_image
Technical line drawing of a mechanical assembly with a tool inserted, showing a close-up of the component (no text or symbols present)Figura22
g231390
natural_image
Line drawing of a lawn mower with visible blades and wheels (no text or symbols)natural_image
Pure electrical circuit lines without any symbols137-9461
decal137-9461
144-3175
decal144-3175
Figure3
2
Montagedubacàherbe
Aucunepiècerequise
Procédure

natural_image
Illustration of a hand holding a small object with a magnified inset showing the tip and curved edge (no text or symbols)Figure4
3
Dépliageduguidon
Aucunepiècerequise
Procédure
ATTENTION
natural_image
Diagram of a lawn mower with a close-up view showing the blade and wheel assembly (no text or labels)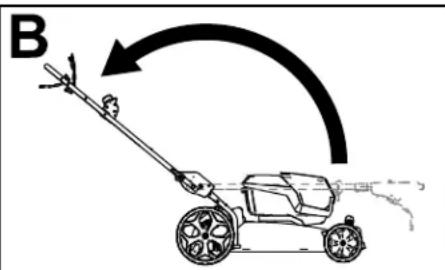

natural_image
Diagram showing a lawn mower and its tool interacting with a clip (no text or symbols present)Figure5
g332165
Figure6
Figure7
natural_image
Simple line drawing of a device with a plug and connector, no text or symbols present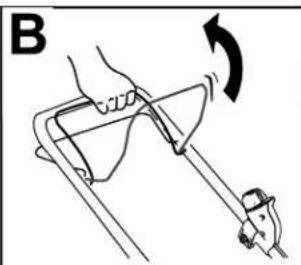
natural_image
Diagram of a hand using a tool to lift a curved object, with an arrow indicating rotation (no text or symbols present)
natural_image
Line drawing of hands using a tool to lift a cart (no text or symbols)Figure10
g332149
natural_image
Illustration of a hand using a tool to lift a chair, showing a curved arrow and fish (no text or symbols)Figure11
g240765
- Barred'autopropulsion
Réglagedelavitessedela lame
Cettemachinedisposede2réglagesdevitessedela lame:AutoetMAX.
natural_image
Diagram of a mechanical device with a rotating component and directional arrow (no text or symbols)
natural_image
Illustration of a person pushing a cart with a tool, showing motion and safety (no text or symbols)Figure13
g332150
Retraitdubacàherbe
natural_image
Illustration of a lawn mower with a magnified inset showing hand positioning and tool path (no text or symbols)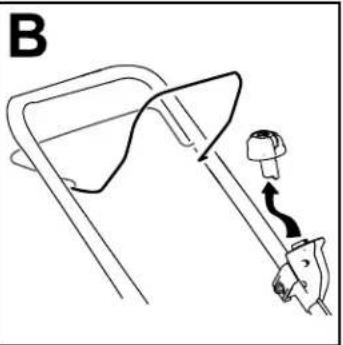
natural_image
Diagram of a car seatbelt mechanism with a hook and belt (no text or symbols)Figure15
Retraitdelabatteriedela machine
- Soulevezlecouvercleducompartimentdela batterie.
- Appuyezsurleverroudelabatteriepourla débloqueretl'enlever.
- Refermezlecouvercleducompartimentdela batterie.
natural_image
Line drawing of a person using a cart to lift a curved ramp, labeled G002600 (no text or symbols on the diagram itself)Figure17
g002600
natural_image
Line drawing of a mechanical device with a lever and handle, no text or symbols presentFigure18
g332163
natural_image
Illustration of a lawn mower with a magnified inset showing the blade being cut (no text or symbols present)Figure19
g297000
Figure20
g332177
Entretien
natural_image
Line drawing of a hand adjusting a mechanical component with arrows indicating motion (no text or symbols)Figure21
g231369
- Montezlanouvellelame, lesupportetleboulon delame (Figure22).

natural_image
Technical illustration of a mechanical assembly with a tool and component, showing a close-up of a cutting tool (no text or symbols present)Figure22
g231390
Important: Dirigezlesailettesdelalame verslecarterdelamachine.
5.Àl'aided'uneclédynamométrique,serrezle boulondelalameà68N·m.
Réglagedel'autopropulsion
natural_image
Line drawing of a lawn mower with visible blades and wheels (no text or symbols)natural_image
Black rectangular button with a white indicator light and four patterned buttons (no text or symbols)137-9461
decal137-9461
144-3175
decal144-3175
Figura3
g290534
2
natural_image
Diagram showing a hand holding a tool with arrows indicating motion, alongside a magnified inset of the tool's tip (no text or symbols present)Figura4
3
Aperturadellastegola
Nonoccorronoparti
Procedura
AVVERTENZA
natural_image
Diagram of a lawn mower with a close-up view showing the blade and wheel assembly (no text or labels)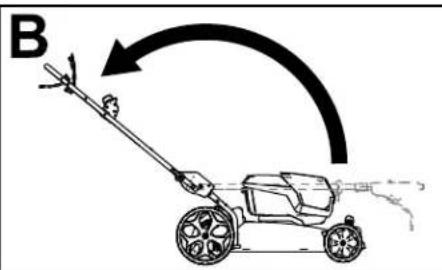

natural_image
Diagram showing a lawn mower and its clamping mechanism with a rotating press (no text or symbols)Figura5
g332165
Figura6
g337137
Figura7
g292895
natural_image
Simple line drawing of a mechanical device with a lever and handle, no text or symbols present
natural_image
Diagram of a hand holding a device with an arrow indicating rotation (no text or symbols present)
natural_image
Line drawing of hands using a tool to lift a cart (no text or symbols)Figura10
g332149
natural_image
Diagram of a hand gripping a mechanical component with directional arrows indicating motion (no text or symbols)Figura11
natural_image
Diagram of a mechanical device with a rotating component and hands, labeled 'A' (no text or symbols on the diagram itself)
natural_image
Illustration of a person pushing a cart with motion lines, showing a close-up of the motion (no text or symbols)Figura13
g332150
natural_image
Line drawing of a mechanical device with a lever and adjustment knob (no text or symbols)0332151
natural_image
Line drawing of a person using a cart to lift a curved ramp, labeled G002600 (no text or symbols on the diagram itself)Figura17
g002600
natural_image
Line drawing of a mechanical device with a handle and lever (no text or symbols)Figura18
g332163
natural_image
Line drawing of a lawn mower with an inset showing the blade being cut (no text or symbols)Figura19
g297000
Figura20
g332177
Manutenzione
natural_image
Line drawing of a hand adjusting a mechanical component with arrows indicating motion (no text or symbols)Figura21
g231369
- Montatelanuovalama, lastaffaeilbullone dellalama (Figura22).

natural_image
Technical line drawing of a mechanical assembly with a tool inserted, showing a close-up of the component (no text or symbols present)Figura22
g231390
Importante: Leestremitàcurvedellalama devonoessererivolteversolascoccadel tosaerba.
- Utilizzateunachiavetorsiometricaper serrareilbullonedellalamaa68N·m.
natural_image
Line drawing of a lawn mower with visible blades and wheels (no text or symbols)Demachinesmeren....20
Hetmaaimesvervangen....20
natural_image
Black rectangular object with a circular light source and four small square buttons on top (no text or symbols)137-9461
decal137-9461
- Laadstatusvanaccu
144-3175
decal144-3175
Figuur3
2
Degrasvangermonteren
Geenonderdelenvereist
Procedure
natural_image
Illustration of a hand holding a curved object with directional arrows, showing a close-up of the interior (no text or symbols)Figuur4
3
Deduwboomuitklappen
Geenonderdelenvereist
Procedure
⚠ WAARSCHUWING
natural_image
Diagram of a lawn mower with a close-up view showing the blade and wheel (no text or symbols)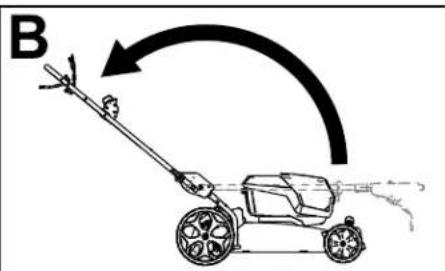
Figuur5
g332165
Figuur6
Figuur7
1.Acculadermodel81802 (meegeleverdmetmodel 21852)
2.Accupackmodel81860 (meegeleverdmetmodel 21852)
Specifications
Accupack
natural_image
Simple line drawing of a mechanical device with a lever and adjustment knob (no text or symbols)
natural_image
Diagram of a hand using a tool to lift a curved object, with an arrow indicating rotation (no text or symbols present)
natural_image
Line drawing of a hand using a tool to lift a car (no text or symbols)Figuur10
g332149
natural_image
Diagram of a hand gripping a mechanical component with arrows indicating motion (no text or symbols)Figuur11
natural_image
Diagram of a mechanical device with a rotating component and hands, labeled 'A' (no text or symbols on the diagram itself)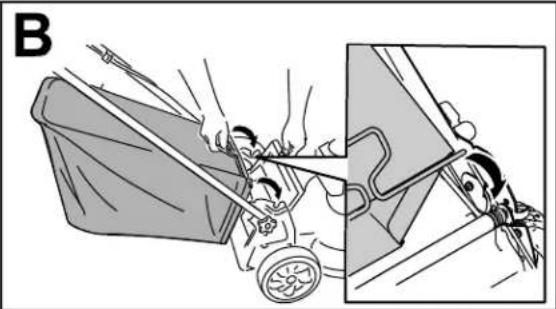
natural_image
Illustration of a person pushing a cart with a large bucket, showing motion and safety (no text or symbols)Figuur13
g332150
natural_image
Line drawing of a lawn mower with a magnified inset showing the blade and handle (no text or symbols)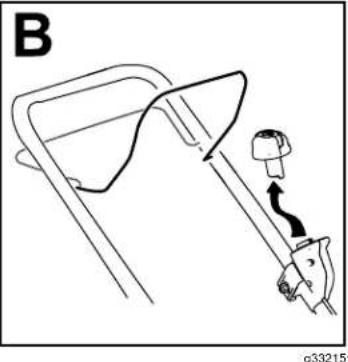
natural_image
Diagram of a car seatbelt with a hand holding a seatbelt, showing no text or symbolsFiguur15
natural_image
Line drawing of a person using a cart to lift a curved ramp, labeled G002600 (no text or symbols on the diagram itself)Figuur17
g002600
natural_image
Line drawing of a mechanical device with a handle and lever mechanism (no text or symbols)Figuur18
g332163
natural_image
Illustration of a lawn mower with a magnified inset showing the blade being cut (no text or symbols)Figuur19
g297000
Figuur20
g332177
Onderhoud
natural_image
Line drawing of a hand adjusting a mechanical component with arrows indicating motion (no text or symbols)Figuur21
g231369
- Monteerhetnieuwemes, debeugelende mesbout(Figuur22).

natural_image
Technical illustration of a mechanical assembly with a tool and component, showing a close-up of a cutting tool (no text or symbols present)Figuur22
g231390
natural_image
Line drawing of a lawn mower with visible blades and wheels (no text or symbols)Detteprodukteterisamsvarmedalle relevanteeuropeiskedirektiver. Seeget samsvarserklæringsskjemaforproduktetfordetaljert informasjon.
Innledning
Dennegressklipperenavskyvemodellmedroterende knivererberegnetforprivatbruk.Denerhovedsakelig beregnetpååklippegresspågodtvedlikeholdte plenerpåprivateeiendommer.Denerikkeberegnet pååklippekrattellerforjordbruksbruk.Dener utformetforbrukmedlitiumionbatteripakkeavmodell 81860(levertsammenmedmodell21852),81850 eller81875.Denkanogsåbrukebatteripakkenav modell81825.Dissebatteripakkeneerkunberegnet tilåbliladetmedbatteriladermodell81802(leveres medmodell21852)ellermodell81805.Hvisdubruker disseproduktenetilandreformålenndeerberegnet på,kanduutsettedegselvellerandreforfare.
Modell21852Tinkludererikkeetbatterielleren lader.
2Monteregressposen....8
3Foldeuthåndtaket....9
Oversiktoverproduktet....10
natural_image
Black rectangular button with four small square buttons and a circular indicator labeled '1' (no text or symbols beyond the indicator)137-9461
decal137-9461
Figur3
2
Monteregressposen
Ingendelerernødvendige
Prosedyre
natural_image
Illustration of a hand holding a finger with a curved tool, showing a step-by-step motion (no text or symbols)Figur4
3
Foldeuthåndtaket
Ingendelerernødvendige
Prosedyre
ADVARSEL
natural_image
Diagram of a grass law mower with a close-up view showing the wheel and gear (no text or labels)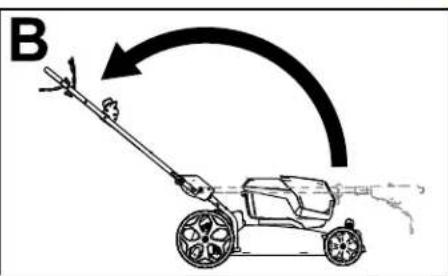

natural_image
Diagram showing a lawn mower and its blade being adjusted, with no text or symbols present.Figur5
g332165
Figur6
1.Knivkontrollbøyle
6.Selvdriftsbøyle
2.Elektriskstart-knapp
- Gresspose
3.Händtakslås(2)
Figur7
natural_image
Simple line drawing of a medical or surgical device with a tool inserted, no text or symbols present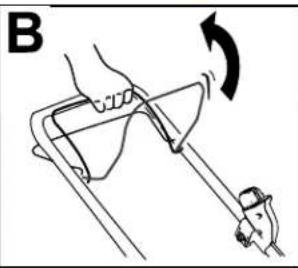
natural_image
Diagram of a hand holding a tool with an arrow indicating rotation (no text or symbols present)
natural_image
Line drawing of hands using a tool to lift a cart (no text or symbols)Figur10
g332149
Brukselvdrift
- Foråbrukemaskinenmedselvdriftklemmer duselvdriftsbøylenmothåndtaketogholder den(Figur11).
- Foråkoblefraselvdriften,slipp selvdriftsbøylen.
Merk: Foråreduserebakkehastigheten, øk avstandenmellomselvdriftsbøylenoghändtaket.
Figur11
g240765
1.Selvdriftsbøyle
natural_image
Mechanical diagram showing a lever mechanism with a rotating component and a curved arrow indicating rotation (no text or symbols present)
natural_image
Illustration of a person pushing a cart with motion lines, showing mechanical components and motion (no text or symbols)Figur13
g332150
Fjernegressposen
natural_image
Illustration of a lawn mower with a magnified inset showing hand holding a tool (no text or symbols)
natural_image
Line drawing of a mechanical device with a lever and adjustment knob (no text or symbols)Figur15
Fjernbatteripakkenfra maskinen
natural_image
Line drawing of a person using a cart to lift a curved ramp, labeled G002600 (no text or symbols on the diagram itself)Figur17
natural_image
Simple line drawing of a lampshade with a handle and lever (no text or symbols)Figur18
g332163
2.Fjernbatterietframaskinen.
3. Holdhändtaketmensdudeaktiverer håndtakslåseneforäunngåatduklemmer hendene.
4. Løsnehåndtakslåsenetildukanflyttedetøvre håndtaketfritt.
5. Foldhåndtaketframtilheltfremstestillingsom vistiFigur20.
ViktigFørledningenepåutsidenav håndtakslåsenenårdufoldersammen håndtaket.
- Folduthåndtaket. Se3 Foldeuthåndtaket (side 9).
Oppbevaremaskineniver- tikaloppbevaringsstilling
Dukanoppbevaremaskinenivertikalstillingforå brukeminstmuligplass.
ADVARSEL
natural_image
Illustration of a lawn mower with a close-up inset showing the blade being cut (no text or symbols)Figur19
g297000
4.Foldhändtaketheltfram.
Viktig:Førledningenepåutsidenav håndtakslåsenenårdufoldersammen håndtaket.
Figur20
g332177
Vedlikehold
natural_image
Line drawing of a mechanical assembly with hands operating a tool (no text or symbols)Figur21
g231389
- Monterdennyekniven, brakettenogknivbolten (Figur22).

natural_image
Technical illustration of a mechanical assembly with a tool and component, showing a close-up of a bracket assembly (no text or symbols present)Figur22
g231390
Viktig:Plasserknivensbueformedeender slikatdeervendtmotmaskinhuset.
5.Stramknivboltenmedenmomentnøkkeltil 68Nm.
Justereselvdrift
natural_image
Line drawing of a lawn mower with visible blades and wheels (no text or symbols)natural_image
Black rectangular button with four small square buttons and a circular indicator labeled '1' (no readable text or symbols beyond the indicator)137-9461
decal137-9461
Rysunek3
2
Montażworkanatrawę
natural_image
Diagram showing a hand holding a tool with a magnified inset illustrating the process (no text or symbols present)Rysunek4
3
Rozkładanieuchwytu
natural_image
Diagram of a lawn mower with a close-up view showing the blade and wheel (no text or labels)

Rysunek5
g332165
Przeglądproduktu

g337137
Rysunek6
g292895
Rysunek7
natural_image
Simple line drawing of a mechanical device with a handle and lever, no text or symbols present
natural_image
Diagram of a hand holding a device with an arrow indicating rotation (no text or symbols present)
natural_image
Line drawing of hands using a tool to lift a car (no text or symbols)Rysunek10
g332149
natural_image
Diagram of a hand gripping a mechanical component with arrows indicating motion (no text or symbols)Rysunek11
natural_image
Diagram of a mechanical device with a rotating component and directional arrow (no text or symbols)
natural_image
Illustration of a person pushing a cart with motion lines, showing a close-up of the vehicle (no text or symbols present)Rysunek13
g332150
natural_image
Diagram of a car seatbelt mechanism with a hook and belt, no text or symbols presentRysunek15
natural_image
Line drawing of a person using a cart to lift a curved ramp, labeled G002600 (no text or symbols on the diagram itself)Rysunek17
g002600
natural_image
Line drawing of a mechanical device with a lever and handle (no text or symbols)Rysunek18
g332163
natural_image
Illustration of a lawn mower with a close-up inset showing the blade being cut (no text or symbols)Rysunek19
g297000
Rysunek20
g332177
Konserwacja
natural_image
Line drawing of a mechanical assembly with hands operating a tool (no text or symbols)Rysunek21
g231369
natural_image
Line drawing of a mechanical assembly with hands adjusting parts (no text or symbols)
natural_image
Technical line drawing of a mechanical assembly with no visible text or symbolsRysunek22
g231390
natural_image
Line drawing of a lawn mower with visible blades and wheels (no text or symbols)natural_image
Black rectangular button with four small square buttons and a circular indicator labeled '1' (no readable text or symbols beyond the indicator)137-9461
decal137-9461
Figur3
g290534
2
natural_image
Illustration of a hand holding a curved object with directional arrows indicating motion (no text or symbols)Figur4
g235791
3
Fällaupphandtaget
Ingadelarkrävs
Tillvägagångssätt
WARNING
Omdufällerupphandtagetpåfelsättkandettaskadakablarnaochledatillettfarligt driftstillständ.
- Skadaintekabeln/kablarnanärdufälleruppochnedhandtaget.
- Kontrolleraattallakablarärdragnapåutsidanavhandtaget.
natural_image
Diagram of a lawn mower with a hand operating the wheel, showing motion and angle (no text or labels)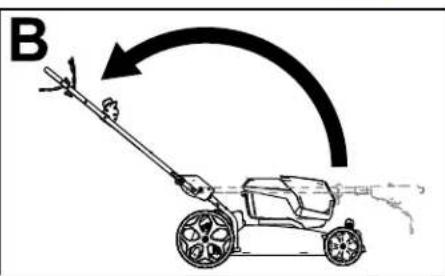

natural_image
Diagram showing a lawn mower and its clamping mechanism with a rotating tool (no text or symbols)Figur5
g332165
Produktöversikt

Figur6
Figur7
natural_image
Simple line drawing of a mechanical device with a person inside, no text or symbols present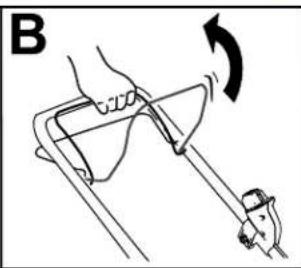
natural_image
Diagram of a hand holding a tool with an arrow indicating rotation (no text or symbols present)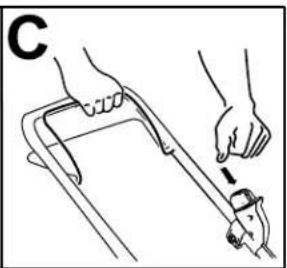
natural_image
Illustration of a hand using a tool to lift a car (no text or symbols present)Figur10
g332149
natural_image
Illustration of a hand using a tool to lift a car, showing motion arrows and component labels (no text or symbols)Figur11
g240765
- Självdrivningsstång
Justeraknivhastighet
natural_image
Diagram of a mechanical device with a rotating component and hand motion indicator (no text or symbols)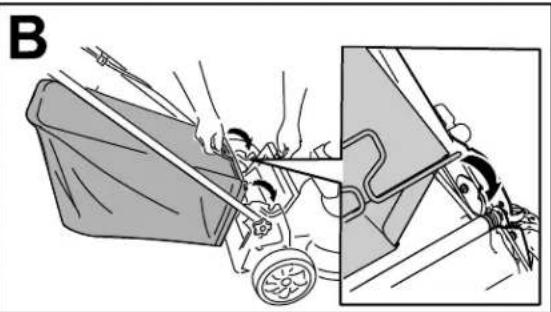
natural_image
Illustration of a person pushing a cart with motion lines, showing mechanical components and motion (no text or symbols)Figur13
g332150
natural_image
Illustration of a lawn mower with a hand holding a tool, showing a close-up view (no text or symbols present)Figur15
natural_image
Diagram of a car seatbelt mechanism with a belt and seat, showing no text or symbolsg332151
Taubatteripaketetur maskinen
natural_image
Line drawing of a person using a cart to lift a curved ramp, with no text or symbols present.Figur17
g002600
natural_image
Line drawing of a mechanical device with a handle and lever mechanism (no text or symbols)Figur18
g332163
natural_image
Illustration of a lawn mower with a magnified inset showing the blade being cut (no text or symbols present)Figur19
g297000
Figur20
g332177
Underhåll
natural_image
Line drawing of a mechanical assembly with hands operating a tool (no text or symbols)Figur21
g231389
- Monteradennyakniven, fästetochknivskruven (Figur22).

natural_image
Technical line drawing of a mechanical assembly with a tool inserted, showing a close-up of the component (no text or symbols present)Figur22
g231390