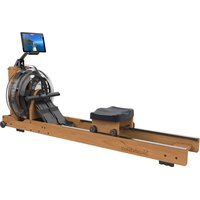
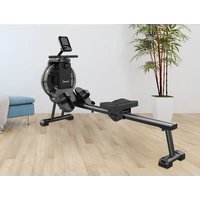
Regatta Oxford Pro Plus - Rowing Machine Skandika - Free user manual and instructions
Find the device manual for free Regatta Oxford Pro Plus Skandika in PDF.

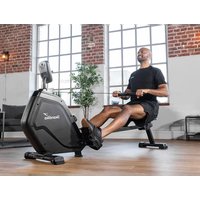
| Product type | Rowing machine |
| Brand | Skandika |
| Model | Regatta Oxford Pro Plus |
| Maximum user weight | 120 kg |
| Maximum user height | 1.85 m |
| Resistance | 10 adjustable levels via knob |
| Computer | Display SCAN, TIME, COUNT, T.COUNT, DIST, CALORIES |
| Power supply | 2 AAA batteries (not included) |
| Folding | Yes, with locking screw |
| Smartphone holder | Yes, under the computer |
| Warranty | 24 months |
| Usage | Household only |
| Spare parts | Available on request (full list in the manual) |
| Maintenance | Clean with a damp cloth; regularly check the tightness of screws |
| Safety | Not to be used by children or pregnant women; consult a doctor before any exercise |
Frequently Asked Questions - Regatta Oxford Pro Plus Skandika
User questions about Regatta Oxford Pro Plus Skandika
0 question about this device. Answer the ones you know or ask your own.
Ask a new question about this device
Download the instructions for your Rowing Machine in PDF format for free! Find your manual Regatta Oxford Pro Plus - Skandika and take your electronic device back in hand. On this page are published all the documents necessary for the use of your device. Regatta Oxford Pro Plus by Skandika.
USER MANUAL Regatta Oxford Pro Plus Skandika
natural_image
Line drawing of a stationary exercise machine with levers and legs (no text or symbols)GB Assembly instructions and user guide
text_image
QR code image containing encoded data, no visible human-readable text
WARNUNG
text_image
Technical diagram of a device's internal components with numbered parts, likely for assembly or manufacturing purposes.Garantiebedingungen
Assembly instructions....19
Folding....21
Adapt tension....21
Computer operation 22
Battery replacement 23
Warm-up and cool-down....24
Exercise instructions....25
Parts list....26
Exploded diagram....27
Guarantee Conditions....28
Visit our website for further information www.skandika.com
Scan the QR code with your smartphone

text_image
QR code image containing encoded data, no visible human-readable text
WARNING
To reduce risk of injury, read and understand this instruction manual before using the device! This machine is intended for home use only in accordance with the instructions provided in this manual. Read the instruction manual carefully before using this device and keep the instruction manual for future use.
IMPORTANT SAFETY NOTICE
- The item's high level of security can only be kept, if regularly checked for damages and abrasion.
- If you pass on this device to another person or if you allow another person to use it, make sure that that person is familiar with the content and instructions in these instructions.
- Only one person should use the exerciser at a time. The maximum load of this device is 120 kg (265 lbs).
- Before the first use and regularly later on, make sure that all screws, bolts and other joints are properly tightened and firmly seated.
- Before you start your work-out, remove all sharp-edged objects around the equipment.
- Only use the device for your work-out if it works flawlessly.
- Any broken, worn or defective part must immediately be replaced and/or the device must no longer be used until it has been properly maintained and repaired.
- Keep children and pets away from the machine at all times. Do not leave children unattended in the same room with the machine.
• Not suitable for children or pregnant woman! - This device is only suitable for persons with a body height of 1.85 ~m maximum.
- Please make sure, that for set-up and use enough space is available around the item (at least 0.5m).
- Incorrect and excessive exercise can harm your health.
- Please pay attention, that levers or other adjusting mechanisms do not interfere with the moving area during exercise.
- Set-up the item on a clean and even flat surface, so that the item is stable.
- Always wear appropriate clothing and shoes which are suitable for your work-out on the device. The clothes must be designed in a way so that they will not get caught in any part of the device during the work-out due to their form (for example, length). Be sure to wear appropriate shoes which are suitable for the work-out, firmly support the feet and which are provided with a non-slip sole.
- Before beginning any exercise program, consult your physician. This is especially important for individuals over the age of 35 or persons with pre-existing health problems.
- This device is NOT suitable for any therapeutic or commercial use (suitable only for home use). It may only be used in the way described in this manual.
- Be sure to set up the device in a dry and even place and always protect it from humidity. If you wish to protect the place particularly against pressure points, contamination, etc., it is recommended to put a suitable, non-slip mat under the device.
IMPORTANT SAFETY NOTICE
- The general rule is that devices and training devices are no toys. Therefore, they must only be used by properly informed or instructed persons.
- Stop your workout immediately in case of dizziness, nausea, chest pain or any other physical symptoms. In case of doubt, consult your physician immediately.
• Take care not to injure your back while lifting or moving the equipment. Always use proper lifting techniques and/or seek assistance if necessary. - Do not work out immediately after meals!
Checklist
| A1 | A2 | A3 | A4 | A5 |
| A6 | A7 | A8 | 71 | 72 |
| 70 |
A1 Main frame
A2 Front stabilizer
A3 Seat
A4 Rail with seat bracket
A5 Rear stabilizer
A6 Pedal axle
A7 Left pedal
A8 Right pedal
70 Wrench / Screwdriver, size S10/13/14/17 (2 pieces)
71 Allen wrench, size 5
72 Allen wrench, size 6
Assembly instructions
Step 1
Fix the rear stabilizer (A5) on the rail (A4) with the screws (57), spring washers (58) and washers (60). Now attach the seat (A3) to the seat bracket (4) with the screws (62) and washers (63).
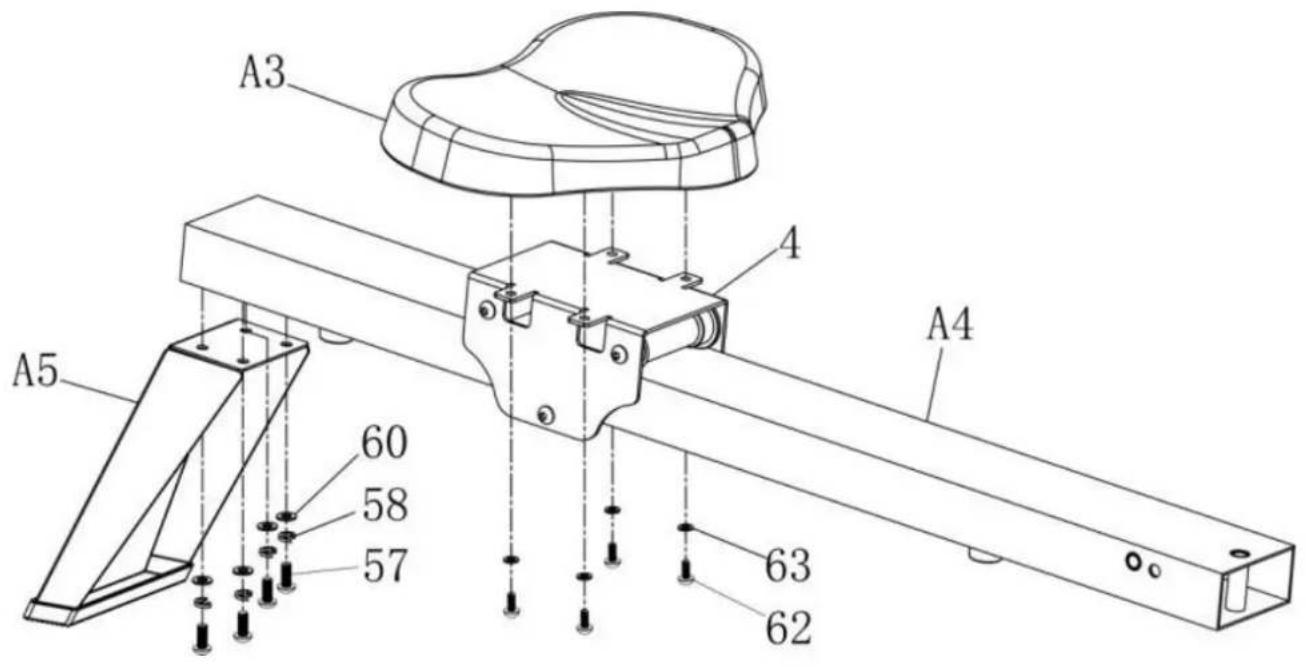
text_image
A3 A4 A5 60 58 57 63 62Step 2
Mount the front stabilizer (A2) with 2 screws (66), 2 washers (60) and 2 nuts (65) on the underside of the main frame (A1).
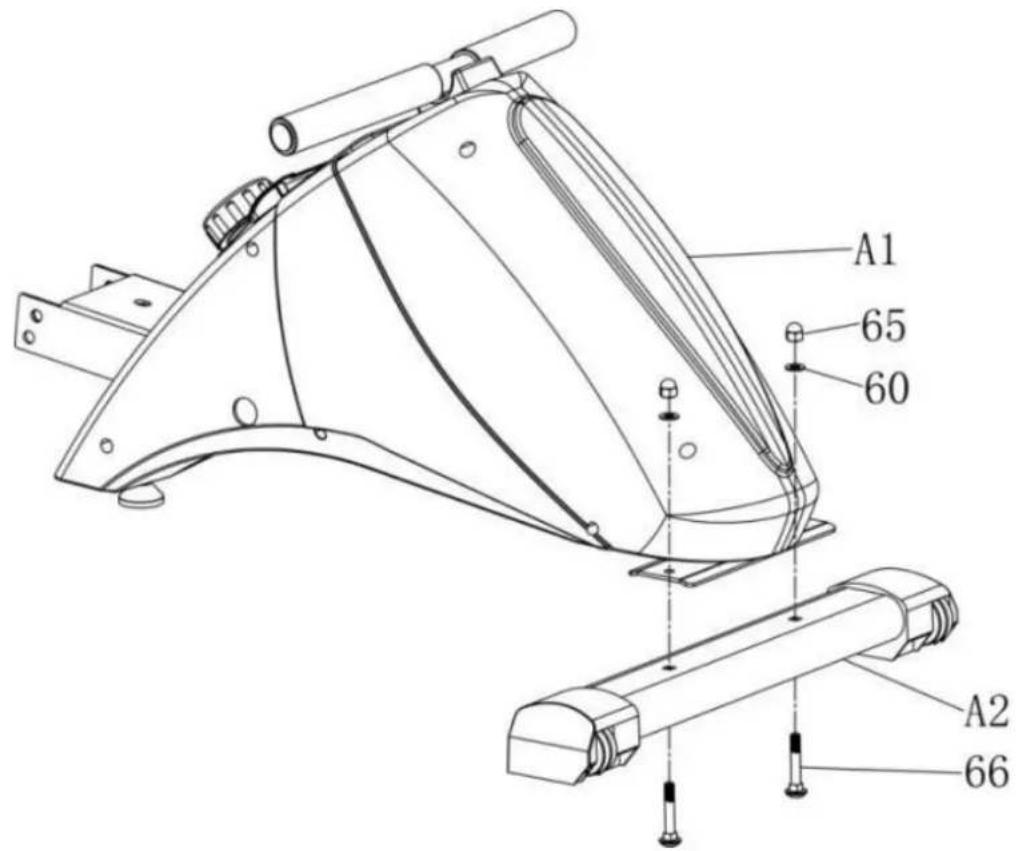
text_image
A1 65 60 A2 66Step 3
Fix the rail (A4) on main frame (A1) as shown. You need the screws (51) and (62), 2 washers (55) and the plum knob (25).
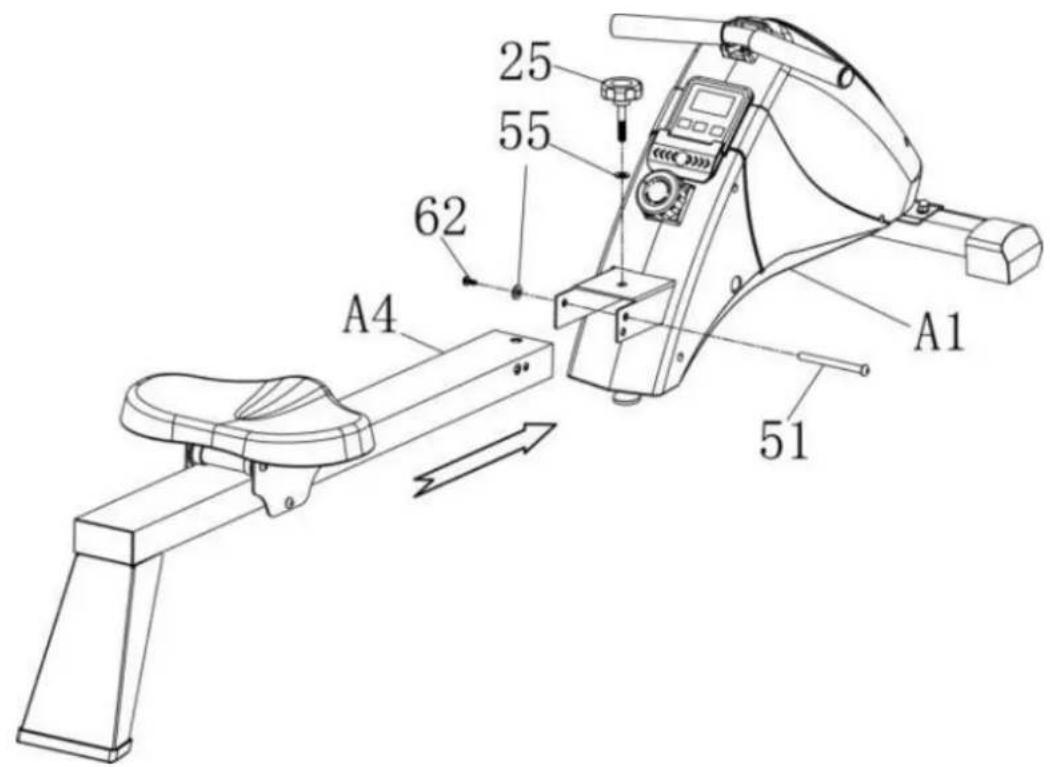
text_image
25 55 62 A4 A1 51Step 4
Insert the pedal axle (24) with the plastic bushings (13) into the drillings on main frame (A1) and fix the pedals (A7/A8) afterwards with the nuts (64) and washers (54).
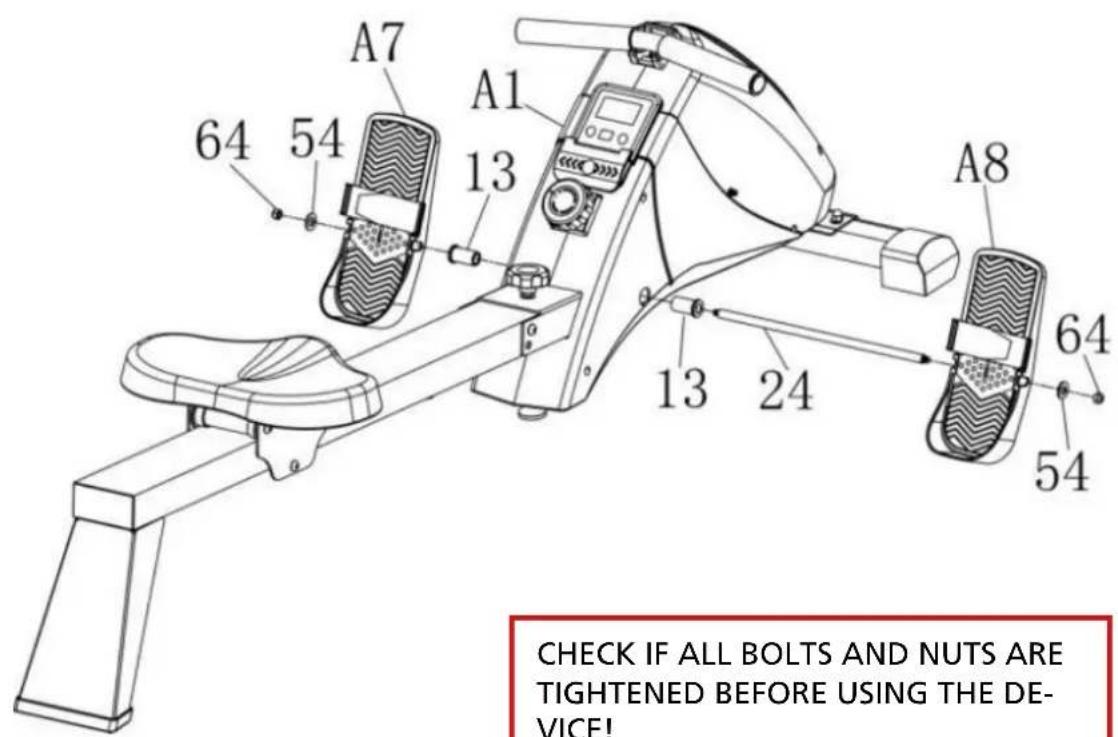
text_image
CHECK IF ALL BOLTS AND NUTS ARE TIGHTENED BEFORE USING THE DE-VICE!CHECK IF ALL BOLTS AND NUTS ARE TIGHTENED BEFORE USING THE DEVICE!
Folding
To fold the device, loose the plum knob (25) and the washer (55), fold the rail with seat (A4) upwards and secure the rail in this folded position with the plum knob (25) and the washer (55). To unfold, proceed vice versa.
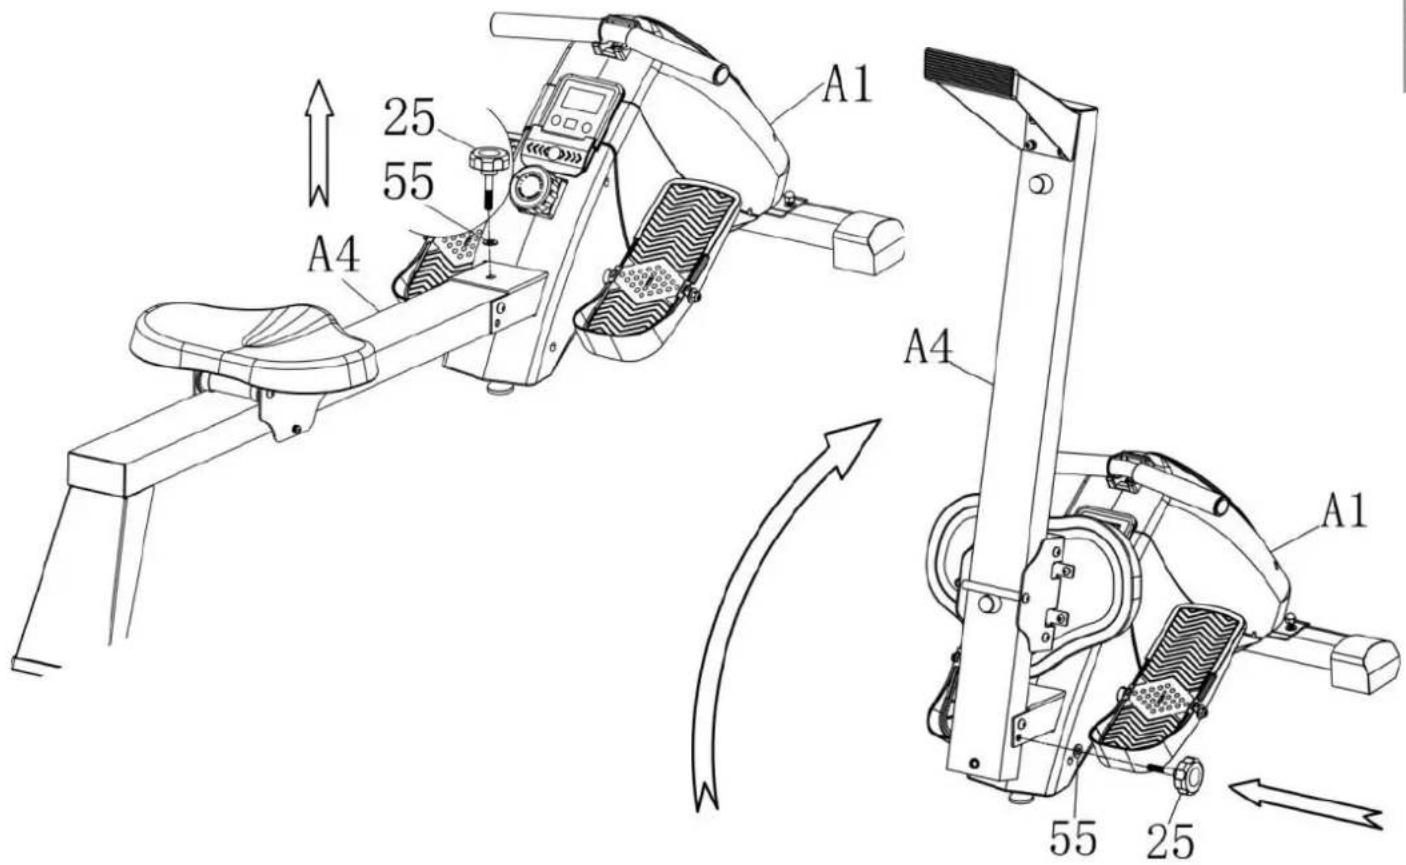
text_image
A1 25 55 A4 A4 A1 55 25Adapt tension
Adjusting knob for tension control:
With the adjusting knob you can control the tension in 10 steps (1=easy and 10=difficult).

text_image
1 - TENSION 2 3 4 5 6 7 8 9 10 + CONTROLComputer operation
The computer is designed for easy use and provides an easy-to-read display. It will start working automatically when exercising or pressing the button. After approx. 4 minutes without any activity the computer will automatically switch off.
The buttons and their meaning
| MODE | Switches between the lower described functions SCAN, TIME, COUNT, T.COUNT, DIST and CALORIES. The selected function is displayed accordingly. If “Scan” is selected, an automatic display change is active: each value will be displayed for appr. 4 seconds. |
| SET | With this button you can preset values for some functions. How this all works in detail, we will explain later in this manual. |
| RESET | Press and hold this button when „Time“, „Count“ or „Calories“ is active and you will set these values to 0 accordingly (reset). |
The computer functions
With the help of the MODE-button you can select one function. This function then will be shown in the display. Also when selected, you can edit this value for presetting (not all functions are pre-settable).
SCAN Automatically scans through each function in sequence every 4 seconds. The display will show one value for 4 seconds in the display and then switch to the next.
TIME Displays current exercise elapsed time (from 00:00' to 99:59' minutes). How to enter a preset time value: You may set a target time before exercise. Time then will countdown from your preset value when start to exercise. As soon as 0:00 is reached, the computer will beep to remind you that your time is over. Select TIME with the MODE-button and use the SET-button to set your target time.
COUNT If you have chosen this function the display shows the strokes of your actual workout. Display range: 0 - 9999 How to enter a preset value: You may preset a target figure for strokes. Please proceed as described under point "Time" accordingly. The strokes are then counting downwards.
T-COUNT The display shows the accumulated strokes done with this device. If batteries will be removed, the value will be set to zero. Display range: 0 - 9999
DIST If you have chosen this function the display shows the current distance rowed. Display range: 0 - 9999
CALORIES
Accumulates calorie consumption during training. The displayed value for calorie-consumption has to be understood as a rough guide only. This value is an approximate value for a person with an average constitution exercising constantly with an average intensity. Your correct personal value may vary significantly!
Display range: 0 - 999,9 kcal
Presetting a calorie target value:
You may preset a target value for calories. Please follow the instructions given under "Time" accordingly.
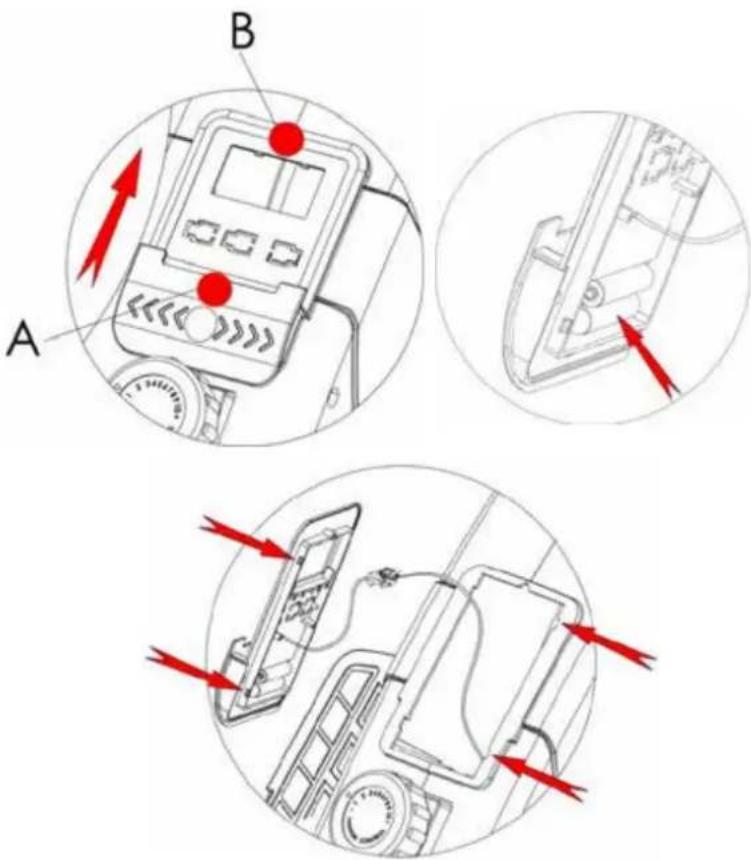
Battery replacement
Grasp the computer on points A and B and pull it to front upper direction to separate it from the device.
Carefully disconnect the cables.
Now replace the batteries (2 x AAA) on the rear side of the computer.
Reconnect the cable ends and put the computer onto its initial position.
text_image
Technical diagram showing three views (A, B, and C) of a device's internal components with red arrows indicating directional flow or movement.Remark:
The device is equipped with a mobile phone holder below the computer. This enables you to e.g. listen to music or watch a video while you are exercising.
WARM-UP and COOL-DOWN
Each workout session should consist of 3 phases: warm-up, exercise and cool-down. Always start with a warm-up, in which your body's temperature and the oxygen-flow will be increased. For this phase gymnastic exercises with a duration of 5 to 10 minutes are recommended. After this the exercise phase should begin. The training intensity should be low for the first few minutes and should then be increased to the final intensity for a period of 15 to 30 minutes. In order to support your blood circular system and to prevent strains and stiffness, you should do a "cool-down phase" after the exercise phase. In this phase light stretches and gymnastic exercises should be done for about 5 to 10 minutes.
Warm-Up
This stage helps to improve the blood circulation and prepares the muscles for your workout. It additionally helps to reduce the risk of injury or cramps. It is recommended to do some stretching exercises as shown here below. Hold each stretching position for approximately 30 seconds. Never force or jerk yourself into a stretching position – if you feel pain, STOP immediately.
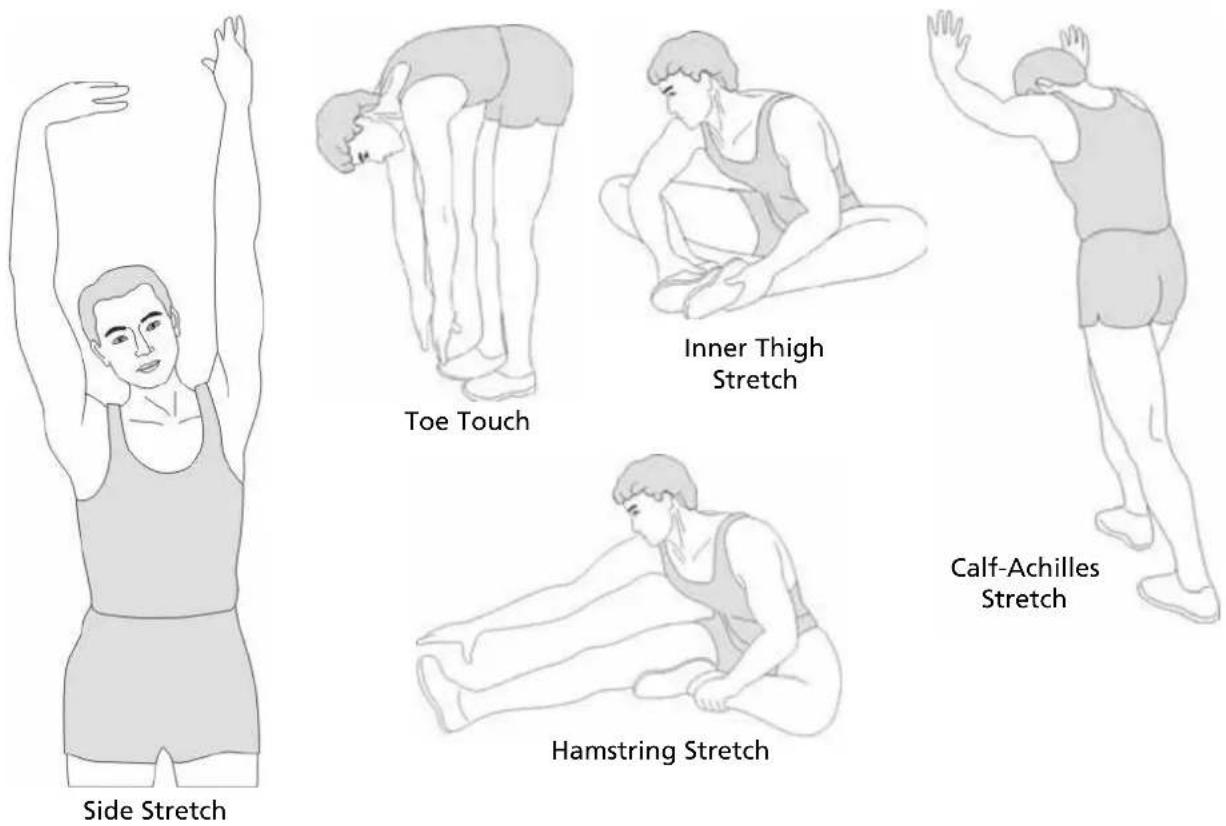
Cool-down
This stage helps to soothe your muscles and your cardiovascular system after your workout.
At the end of your workout, reduce the speed and exercise for approximately 5 minutes at this lower speed level. Afterwards, repeat the warm-up exercises as described above - and don't forget: Never force yourself into a stretching position.
Important: Before starting any exercise please consult your physician/doctor! All recommendations in this manual are valid only for persons without health problems and are not suitable for persons with heart/blood-circular diseases! All hints are a rough guide only. Your individual constitution may affect a special training program.
Exercise instructions
Advantages of a rowing training
A rowing training affects all main muscle groups, like leg-, arm-, shoulder- and back-muscles. Especially in today's time it is necessary to work your back- and shoulder-muscles to avoid early degeneration. In addition, rowing exercise is a very effective heart-/blood-circular- and endurance-training.
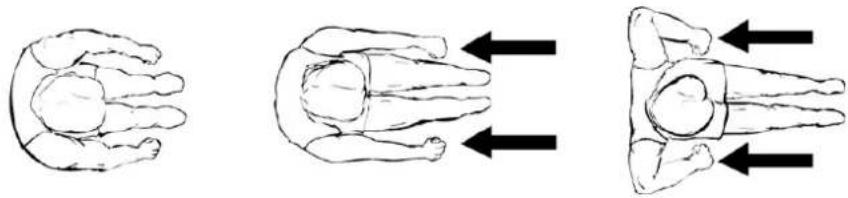
natural_image
Three line drawings of human hand positions with arrows indicating movement or pressure direction (no text or symbols)The rowing movement
Seat on the seat and bring yourself into front position (the knees are bended). Place your feet on the pedals. Grip both handgrips and pay attention you will keep you back as straight as possible throughout the whole movement. Slowly begin to stretch your legs and move your arms backwards until you legs are ALMOST completely stretched (do not stretch them completely!). Afterwards slowly return to initial position while bending your legs slowly when the handgrips reach knee level.
In the following we will provide a sample program for beginner's and for advanced. This may give you an idea of how to organize a workout in consultation with your doctor.
Sample exercise program for beginners:
Training frequency: week 1 and 2: 2 workouts per week; week 3 and 4: 3 workouts per week
week 1 and 2: Warm up – 3 minutes rowing, 2 minutes rest, 3 minutes rowing, 1 minute rest, 2 minutes rowing – Cool-down
week 3 and 4: Warm up – 3 minutes rowing, 2 minutes rest, 3 minutes rowing, 1 minute rest, 3 minutes rowing – Cool-down
You may vary the tension / difficulty from easy to medium (according to your personal assessment).
Sample exercise program for advanced:
Training frequency: week 1 and 2: 3 workouts per week; week 3 and 4: 4 workouts per week
week 1 and 2: Warm up – 3 minutes rowing, 2 minutes rest, 3 minutes rowing, 1 minute rest, 3 minutes rowing – Cool-down
week 3 and 4: Warm up – 5 minutes rowing, 2 minutes rest, 4 minutes rowing, 1 minute rest, 4 minutes rowing – Cool-down
You may vary the tension / difficulty from medium to hard (according to your personal assessment).
Mistakes to be avoided:
- Avoid complete straightening of arms and legs. This may lead to over-stretched bands and other joint-problems!
- Keep your back straight! Even if the movement gets easier, avoid bending your back! It is better to adjust to a lower difficulty level!
- As a beginner practise the rowing movement before start to exercise. The correct movement can best be learned using very low resistance and slow strokes. Regular exercising should only be started, when you are safe in the movement itself.
We wish you lots of fun and success with your rowing machine!
Parts list
| Part no | Description Q'ty | Part no | Description Q'ty | ||
| 1 Seat pulley 4 | 37 | Rear supporting board | 1 | ||
| 2 Seat 1 | 38 | Rear cushion | 1 | ||
| 3 Seat pulley spacer 2 | 39 | 50X100 square cap | 1 | ||
| 4 Seat bracket 1 | 40 | Limit for cushion | 2 | ||
| 5 Limitation tube 1 | 41 | Cushion Limit holder | 1 | ||
| 6 Ball bearing 4 | 42 Limit holder | 1 | |||
| 7 | Computer | 1 | 43 | Line clip | 2 |
| 8 | Chain cover (right) | 1 | 44 | Limit casing | 1 |
| 9 | Chain cover (left) | 1 | 45 | Magnetic wheel limit casing | 1 |
| 10 | Front end cap (left) | 1 | 46 | Rotating wheel seat | 1 |
| 11 | Front end cap (right) | 1 | 47 | Cross bolt ST4.2*25 | 4 |
| 12 | Front Stabilizer | 1 | 48 | Cross bolt M5x12 | 6 |
| 13 Plastic Bushing 2 | 49 | Lock nut M5 | 2 | ||
| 14 | Magnetic control wheel | 1 | 50 | Spring washer 6mm | 2 |
| 15 | Ribbon wheel set | 1 | 51 | Screw ø10*110*M6 | 1 |
| 16 | Ribbon axis | 1 | 52 | Bolt M8x80 | 1 |
| 17 | Adjustable foot pad | 1 | 53 | Nut M6 | 3 |
| 18 | Handgrip pad | 1 | 54 | Washer 8*22*2 | 2 |
| 19 | Ribbon pulley | 1 | 55 Washer 10*20*2 | 2 | |
| 20 | Handle grip | 2 | 56 | Screw ST3*10 | 2 |
| 21 | Tube plug | 2 | 57 | Bolt M8x20 | 4 |
| 22 | Shaking tube | 1 | 58 | Spring Washer 8mm | 4 |
| 23 | Pedal | 2 | 59 | Pedal Velcro | 2 |
| 24 | Axle for pedal | 1 | 60 | Washer 8*16*1.5 | 9 |
| 25 | Plum knob | 1 | 61 | Screw M8*130 | 2 |
| 26 | Main frame set | 1 | 62 | Screw M6 x15 | 5 |
| 27 | Ball bearing 4 | 63 | Washer 6*12*1.5 | 4 | |
| 28 | Square sensor | 1 | 64 | Nut M8 | 6 |
| 29 | Pulley limit tube | 2 | 65 | Nut M8 | 6 |
| 30 | Elastic string pulley | 3 | 66 | Bolt M8*55/ø8*8 | 2 |
| 31 | Pulley spacer | 6 | 67 | Bolt M6*35 | 3 |
| 32 | Tension control (10 levels) | 1 | 68 | Washer ø10*ø28*2.0 | 1 |
| 33 | Elastic string | 1 | 69 | Screw ST4.2*19 | 4 |
| 34 | Ribbon | 1 | 70 | Wrench&screwdriver 10/13/14/17 | 2 |
| 35 | Ball bearing 2 | 71 | Allen Wrench 5 | 1 | |
| 36 | Rail tube set | 1 | 72 | Allen Wrench 6 | 1 |
Exploded diagram
In case of mechanical problems use this explosion drawing. All parts are marked with a specific part number in it. Tell us this number in order to replace the respective part (within warranty time this service may be free of charge). If necessary, you may additionally use the free user manual in pdf-format, available on www.skandika.com. You may enlarge the explosion drawing there with a factor up to 500 %.

text_image
Technical diagram of a device's internal components with numbered parts, likely for assembly or manufacturing purposes.Guarantee conditions
For our devices we provide a warranty as defined below.
- In accordance with the following conditions (numbers 2-5) we repair defect or damage to the device free of charge, if the cause is a manufacturing defect. Therefore, these defects / damages need to be reported to us without delay after appearance and within the warranty period of 24 months after delivery to the end user. The warranty does not cover parts, which easily break (e.g. glass or plastic). The warranty does not cover slight deviations of the product, which are insignificant for usability and value of the device and damage caused by chemical or electrochemical effects and damages caused by penetration of water or generally force majeure damage.
- The warranty achievement is the replacement or repair of defective parts, depending on our decision. The cost of material and labor will be borne by us. Repairs at customer site cannot be demanded. The proof of purchase along with the date of purchase and / or delivery is required. Replaced parts become our property.
- The warranty is void if repairs or adjustments are made, which are not authorized by us or if our devices are equipped with additional parts or accessories that are not adapted to our devices. Furthermore, the warranty is void if the device is damaged or destroyed by force majeure or due to environmental influences and in case of improper handling / maintenance (e.g. due to non-observance of the instruction manual) or mechanical damages. The customer service may authorize you to replace or repair defective parts after telephone consultation. In this case, the warranty is not void.
- Warranty services do not extend the warranty period nor do they initiate a new warranty period.
- Further demands, especially claims for damages which occurred outside the device, are excluded as long as a liability is not obligatory legal.
- Our warranty terms - which cover the requirements and scope of our warranty conditions - do not affect the contractual warranty obligations of the seller.
- Parts of wear and tear are not included in the warranty.
- The warranty is void if not used properly or if used in gyms, rehabilitation centers and hotels. Even if most of our units are suitable for a professional use, this requires a separate agreement.
Environmental protection

At the end of its life cycle, this product must not be disposed of with household waste but must be taken to a collection unit for the recycling of electric and electronic equipment. The symbol on the product, the instructions for use or the packaging express mention of this. The basic materials can be recycled as specified on the labelling.
When recycling the materials and finding other utilisation for used equipment, you are making a significant contribution towards protecting our environment. Ask at your council about the respective local disposal sites.
For service, accessories and spare parts, please contact: info@skandika.com
Service centre: MAX Trader GmbH, Wilhelm-Beckmann-Straße 19, 45307 Essen, Germany
In accordance with our policy of continual product improvement, we reserve the right to make technical and visual changes without notice.
Notizen / Notes
Contenu
text_image
skandika PROFESSIONELL TRAINEREN I'm infinite Fitness. Class: Stasse, Gymnasiums, Pauwertmannia. We are the best fitness and performance tool for a multi-precision task. The 2018 data is made for the use of the specialized sessions in the training room. In addition, we have been used to create a new training session. Why you TEMPLET DE HIGH TEMPERATURE FOR THE PROFESSIONELL AMKENSING Find us more expensive. Scales are also being used with different types of training. The 2018 data is made for the use of the professional training room. Our Research Team provides all the information provided by the staff.
text_image
QR code image containing encoded data, no visible human-readable text
AVERTISSEMENT
text_image
Technical diagram of a device's internal components with numbered parts and Chinese labelstext_image
skandika PROFESSIONELL TRAINICERN An introduction of the 2016-2017 experience-based training exercises, the use of the first three sessions is supported by the 2016-2017 experience-based training exercises. The 2016-2017 experience-based training exercises are supported by the 2016-2017 experience-based training exercises. The 2016-2017 experience-based training exercises are supported by the 2016-2017 experience-based training exercises.
text_image
QR code image containing encoded data, no visible human-readable text