E0389 - Weather Station Emos - Free user manual and instructions
Find the device manual for free E0389 Emos in PDF.

User questions about E0389 Emos
0 question about this device. Answer the ones you know or ask your own.
Ask a new question about this device
Download the instructions for your Weather Station in PDF format for free! Find your manual E0389 - Emos and take your electronic device back in hand. On this page are published all the documents necessary for the use of your device. E0389 by Emos.
USER MANUAL E0389 Emos
text_image
User Agreement and Privacy Policy I agree to the content of the Software's User Agreement and Privacy Policy. Exit Agree

text_image
We'll need to get location information right away to help the device to automate local time and weather information. Please tap Agree. Confirm2

text_image
EZ MODE AP mode Please enter the Wifi password J578 Only supports 2.4GHz Wifi network Next View help ?
text_image
Confirm that the SCAN and WIFI are flashing. SCAN Otherwise, please press and hold the Wi-Fi button for two seconds (or plug or unplug the power supply for three times) to switch to the above display. View help Cancel Confirm Successfully added device! 14:44 MY CLOCK + E0389 WIFI 27°C 50°C Temperature Humidity3
text_image
Back E03B9 WIFI Basic settings > Alarm settings Off > Weather settings Preview > Firmware version V3.1.2803.30 > Remove the device >
text_image
BACK BASIC SETTINGS Touch-tone 24 hours format Day-Month format Degrees Celsius Normal-brightness 100% Backlight duration Always on >

text_image
Back NORMAL BRIGHTNESS 30% 60% 100%
text_image
Back BACKLIGHT DURATION 15 Second 30 Second 60 Second Always on4
text_image
Back ALARM SETTINGS 09:35 Alarm 1, Single time 00:00 Alarm 2, Single time
text_image
Cancel 07 08 09 10 11 ALARM 1 33 34 35 36 37 Save Repeat Sunday Monday Tuesday Wednesday Thursday Friday Saturday5
flowchart
graph TD
    A["WEATHER SETTINGS"] --> B["Regional Settings"]
    A --> C["Server"]
    A --> D["Today's weather"]
    B --> E["Please enter city or zip code"]
    B --> F["Přerov,Olomoucký kraj"]
    C --> G["Data source1"]
    C --> H["NO.1"]
    I["Regional SETTINGS"] --> J["Back"]
    I --> K["SERVER"]
    I --> L["Today's weather"]
    M["Regional Settings"] --> N["Back"]
    M --> O["Forecast"]
6
text_image
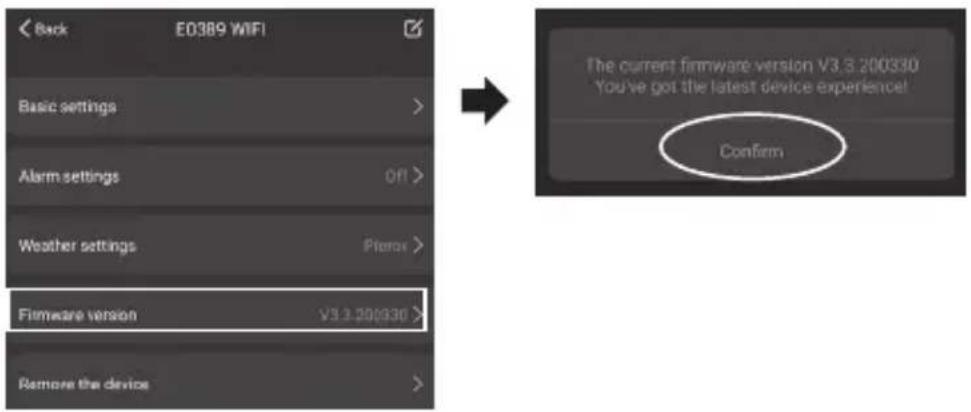
< Back ED389 WIFI Basic settings > Alarm settings Off > Weather settings Peters > Firmware version V3.3.200330 > Remove the device > The current firmware version V3.3.200330 You've got the latest device experience! Confirm7
text_image
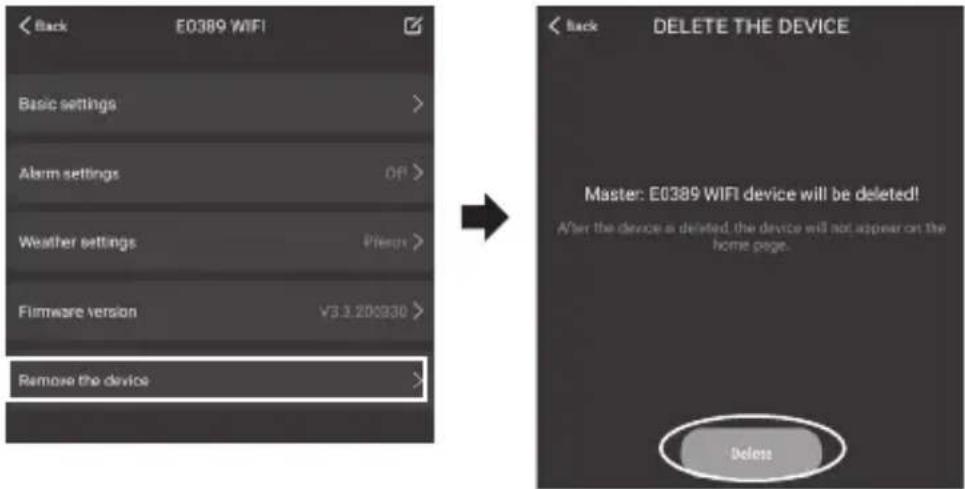
< Back E0389 WIFI Basic settings > Alarm settings OP > Weather settings Please > Firmware version ¥3.20030 > Remove the device > < back DELETE THE DEVICE Master: E0389 WIFI device will be deleted! After the device is deleted, the device will not appear on the home page. Delete8
text_image
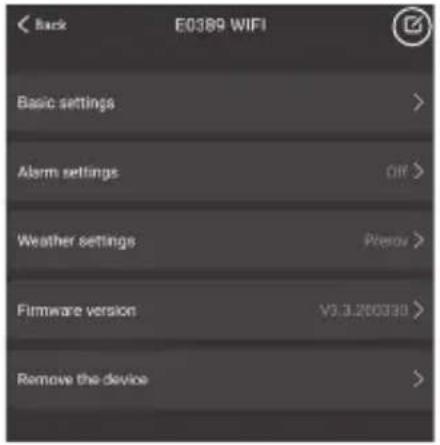
Back E0389 WIFI Basic settings > Alarm settings OFF > Weather settings Please > Firmware version V3.3.260330 > Remove the device >
text_image
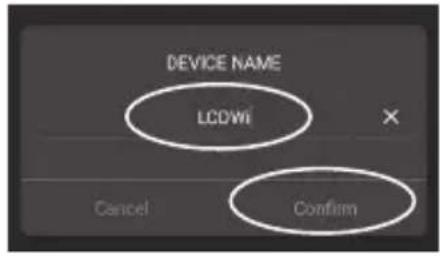
DEVICE NAME LCDWi Cancel ConfirmC
| 1 | HOT | 8 15 22 | 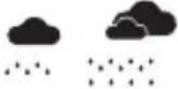 |  | ||
| 2 | COLD[G340] | 9 16 23 | cc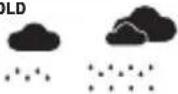 | [X4D6] | ||
| 3 10 | 17 24  |  |  | |||
| 4 11 | 18 25  |  |  | |||
| 5 12 | 19 26  | COLD |  |  | ||
| 6 13 | 20 27 | 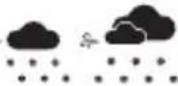 | 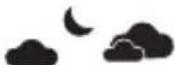 | |||
| 7 14 | 21 28  | 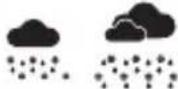 | 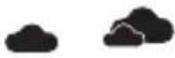 |
GB | Wi-Fi Wireless Weather Station
Read this manual carefully before using the product.
Specifications
Wi-Fi controlled clock
time format: 12/24 h
indoor temperature: -10 °C to +50 °C, 0.1 °C resolution
outdoor temperature: based on server data, 1 °C resolution
accuracy of temperature measurement: ±1 °C for 0 °C to +50 °C range, ±1.5 °C for other ranges
indoor and outdoor humidity: 10 % to 99 % RH, 1 % resolution
accuracy of humidity measurement: ±5 % for 30 % to 80 % RH range, ±8 % for 20 % to 29 % and for 81 % to 95 % RH
±12 % for 1 % to 19 % range and 96 % to 99 % range
temperature and humidity measurement cycle: every 60 seconds
barometric pressure measurement range: based on server data
unit of pressure: hPa/mb
transmission frequency: 2.4 GHz, max. 25 mW e.i.r.p.
power supply:
main station: 3× 1.5 V AA batteries (not included)
adapter: 230 V AC/5 V DC, 1,200 mA (included)
size:
main station: 30 × 200 × 130 mm
Weather Station – Screen Icons (See Fig. A)
1 - visibility
2 - pressure value, pressure trend arrow
3 - outdoor temperature
4 - weather forecast
5 - outdoor humidity
6 - highest and lowest temperature for the current day
7 - indoor temperature
8 - indoor humidity
9 - time
10 - month
11-day of the week
12-day,alarm,snooze
13, 14, 15, 16 – weather forecast date and highest/lowest temperatures for the 3rd day
17, 18, 19, 20 – weather forecast date and highest/lowest temperatures for the 2nd day
21, 2 2, 23, 24 – weather forecast date and highest/lowest temperatures for tomorrow
25 - wind direction and speed
Description of the Station (See Fig. B)
1 - MODE button
2 - connector for plugging in the power adapter
3 - hole to hang the sensor on the wall
4 - stand
5 - battery compartment
A mobile application (iOS/Android) is required to set and use the weather station!
The mobile device and the weather station must be connected to the same Wi-Fi network!
Download the WifiClock app onto your device.

iOS

Signing into the Application and Pairing with Wi-Fi
- Login to the Wi-Fi network on your device (only supports 2.4 GHz networks).
- Sign into the WifiClock app. A User Agreement will open; tap Agree, then tap the + icon.
-
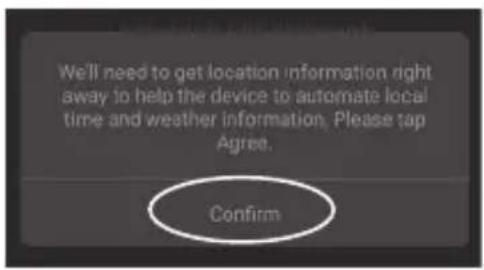
Enable (Confirm) the app access to the location of the device (fig. 1).
-
A menu for choosing the Wi-Fi network will open up – choose the network name, enter password and tap Next.
-
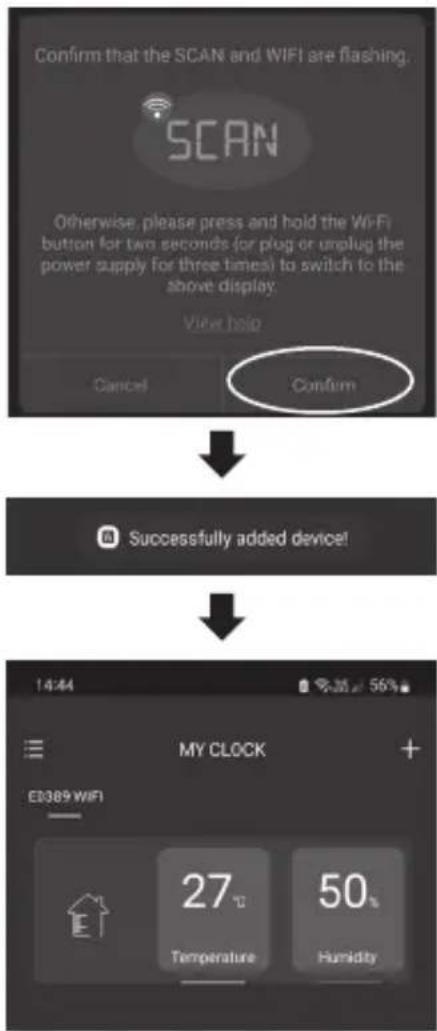
A SCAN table will appear; tap Confirm.
-
Connect the power adapter to the weather station and long-press the MODE button; SCAN will appear on the screen and the 📋 will be flashing.
-
If pairing has been successful, "Successfully added device" will appear on the screen and the station will load and display all forecast and time information. The screen will display the icons.
-
The main screen of the paired station will open in the app, showing the indoor temperature and humidity (fig. 2).
If pairing of the station with the app fails or „The device is offline“ is displayed on the screen, repeat the process from step 1.
If you wish to change Wi-Fi networks, long-press the MODE button on the station; SCAN will appear on the screen and you can repeat the pairing process in the app.
Always use the power adapter when connected to Wi-Fi, otherwise the batteries will quickly drain! Data is automatically synchronised every 30 minutes.
Putting the Device into Operation
-
Connect the power adapter to the weather station, then insert batteries (3× 1.5 V AA) into the station. When inserting the batteries, make sure the polarity is correct to avoid damaging the weather station. Only use 1.5 V alkaline batteries of the same type; do not use rechargeable 1.2 V batteries. The lower voltage may cause both of the units to not function.
-
Pair the app with the station (see Signing into the Application and Pairing with Wi-Fi).
-
If the low battery icon 📄 appears, replace batteries in the station.
Setting the Weather Station
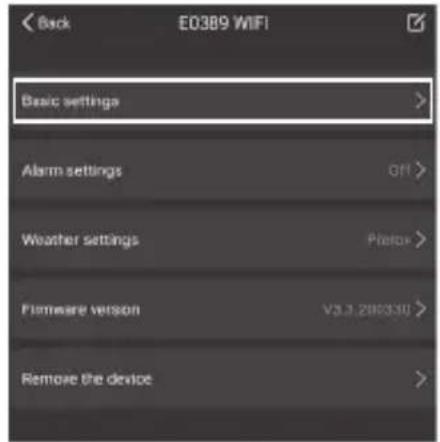
Tap the main screen with indoor temperature and humidity in the application.
A station settings menu will open.
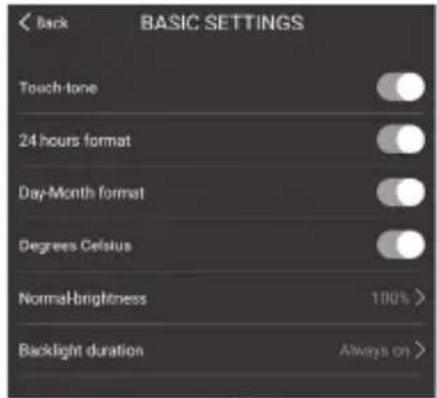
1. Basic Settings (Fig. 3)
Touch tone - activation/deactivation of button sound
24 hours format - activation/deactivation of 24 h time format
Day-Month format – day.month/month-day date format
Degrees Celsius - °C/°F unit of temperature
Normal-brightness – brightness level of station screen backlighting 30/60/100 %
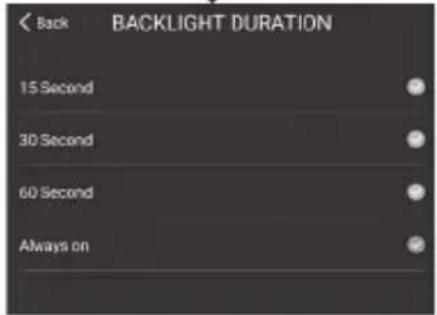
Backlight duration – backlighting duration: 15/30/60 seconds/*permanent
*only works with the power adapter connected

function activation

function deactivation
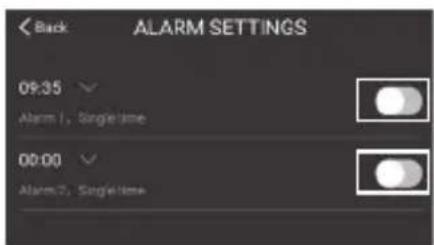
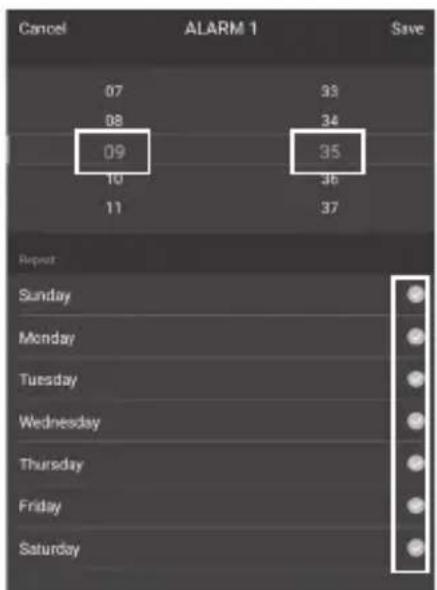
2. Alarm Settings (Fig. 4)
The station has two alarms.
Select alarm 1/2 or both and set the time, choose the alarm days and confirm by tapping Save.
Activate

/deactivate

You can end the ringing of the alarm (icon flashing) by pressing the MODE button or by deactivating it in the app.
The alarm will trigger on the next set day.
If you have not selected a day, the alarm will activate only 1× and the 📄icon will not be displayed.
If you do not press any button while the alarm is ringing, the ringing will stop automatically after 1 minute.
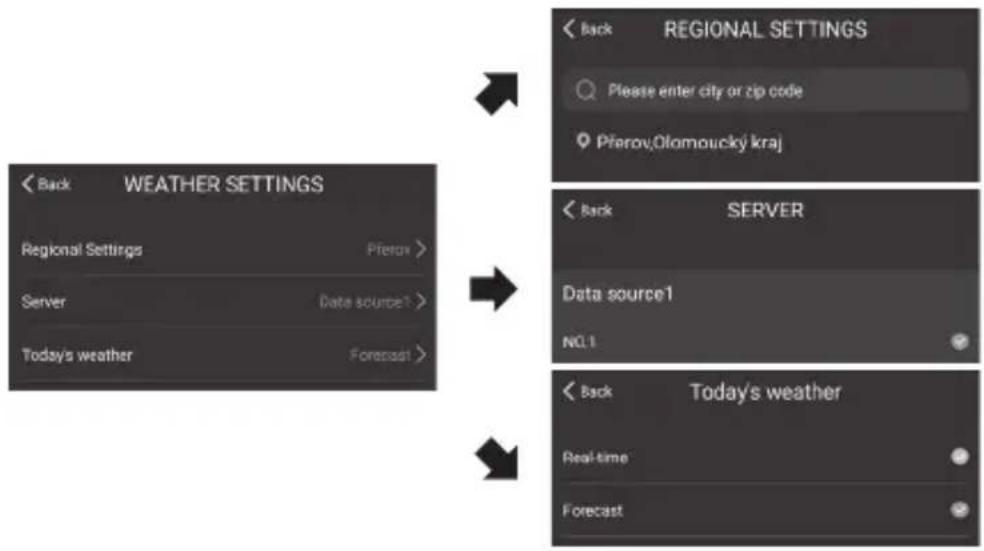
3. Weather Settings (Fig. 5)
Regional Settings – sets location for forecasting
Server – selects data server 1/2/3
Today's weather:
Real-time - shows current state of the weather
Forecast – shows the weather forecast
-
Firmware version – information about software version (fig. 6)
-
- Remove the device – removes the weather station from the app (fig. 7)
Confirm removal by tapping Delete.
-
- Renaming the Station (Fig. 8)
Tap the icon, tap the name line, rename and tap Confirm.
Pressure Trend
| pressure trend indicator | |||
| rising constant | falling |
Wind Direction and Speed
Wind direction and speed are displayed in field no. 25.
Wind speed is displayed as a level number.
Level 0 = 0 km/h Level 10 = 89–102 km/h
Level 1 = 1-5 km/h Level 11 = 103-117 km/h
Level 2 = 6-11 km/h Level 12 = 117-134 km/h
Level 3 = 12–19 km/h Level 13 = 134–149 km/h
Level 4 = 20–28 km/h Level 14 = 150–166 km/h
Level 5 = 29–38 km/h Level 15 = 167–183 km/h
Level 6 = 39–49 km/h Level 16 = 184–201 km/h
Level 7 = 50–61 km/h Level 17 = 202–220 km/h
Level 8 = 62–74 km/h Level 18 ≥ 221 km/h
Level 9 = 75–88 km/h
Station Screen Backlighting
When the station is powered by the adapter, you can set the duration and level of station screen backlighting in the app; see Basic Settings.
When the station is only powered by 3×1.5 V AA batteries, screen backlighting is turned off. Pressing the MODE button activates backlighting for 15 seconds, then it deactivates again. When the station is only powered by batteries, permanent screen backlighting cannot be activated!
Note: The inserted batteries serve as backup for the measured/set data.
If batteries are not inserted and you unplug the adapter, all data will be erased.
Weather Forecast
The station forecasts weather for the next 3 days based on data from the Internet weather server.
The forecast icon is displayed in field no. 4.
As the weather forecast may not be 100 % accurate, neither the manufacturer nor the seller can be held responsible for any loss caused by an incorrect forecast.
Weather Forecast Icons (Fig. C)
| 1 – hot | 11 – sporadic thunderstorm |
| 2 – cold | 12 – freezing drizzle |
| 3 – smog | 13 – drizzle |
| 4 – foggy | 14 – light rain |
| 5 – mist | 15 – heavy rain |
| 6 – breeze | 16 – cold rain |
| 7 – windy | 17 – microsnow |
| 8 – storm | 18 – light snow |
| 9 – thunderstorm | 19 – heavy snow |
| 10 – localised thunderstorm | 20 – blizzard |
21 - sleet
25 - partly cloudy (night)
22 - sunny (day)
26 - mostly cloudy
23 - clear sky (night)
27 - mostly cloudy (night)
24 - partly cloudy
28 - cloudy
The snowflake icon will be flashing at outdoor temperature between 0 °C and +2.9 °C.
The snowflake icon ⚙! will remain on the screen at outdoor temperature below 0 °C.
Upkeep and Maintenance
The product is designed to serve reliably for many years if used properly. Here are some tips for proper operation:
- Read the manual carefully before using the product.
- Do not expose the product to direct sunlight, extreme cold and humidity and sudden changes in temperature. This would reduce measuring accuracy. Do not place the product in locations prone to vibration and shocks – may cause damage.
- Do not subject the product to excessive force, impacts, dust, high temperatures or humidity – doing so may cause malfunction, shorten battery life, damage batteries and deform plastic parts.
- Do not expose the product to rain or moisture if it is not designed for outdoor use.
- Do not place any open flame sources on the product, e.g. a lit candle, etc.
- Do not put the product in places with inadequate air flow.
- Do not insert any objects into the product's vents.
- Do not tamper with the internal electrical circuits of the product – doing so may damage the product and will automatically void the warranty. The product should only be repaired by a qualified professional.
- To clean the product, use a slightly moistened soft cloth. Do not use solvents or cleaning agents - they could scratch the plastic parts and cause corrosion of the electric circuits.
- Do not immerse the product in water or other liquids.
- The product may not be exposed to dripping or splashing water.
- In the event of damage or defect of the product, do not perform any repairs by yourself. Have it repaired in the shop where you bought it.
- This device is not intended for use by persons (including children) whose physical, sensory or mental disability or whose lack of experience or knowledge prevents them from using it safely. Such persons should be instructed in how to use the device and should be supervised by a person responsible for their safety.
Hereby, EMOS spol. s r. o. declares that the radio equipment type E0389 is in compliance with Directive 2014/53/EU. The full text of the EU declaration of conformity is available at the following internet address: http://www.emos.eu/download.
| Level 0 = 0 km/h | Level 10 = 89–102 km/h |
| Level 1 = 1–5 km/h | Level 11 = 103–117 km/h |
| Level 2 = 6–11 km/h | Level 12 = 117–134 km/h |
| Level 3 = 12–19 km/h | Level 13 = 134–149 km/h |
| Level 4 = 20–28 km/h | Level 14 = 150–166 km/h |
| Level 5 = 29–38 km/h | Level 15 = 167–183 km/h |
| Level 6 = 39–49 km/h | Level 16 = 184–201 km/h |
| Level 7 = 50–61 km/h | Level 17 = 202–220 km/h |
| Level 8 = 62–74 km/h | Level 18 ≥ 221 km/h |
| Level 9 = 75–88 km/h |
Level 3 = 12–19 km/h Level 13 = 134–149 km/h
Level 4 = 20–28 km/h Level 14 = 150–166 km/h
Level 5 = 29–38 km/h Level 15 = 167–183 km/h
Level 6 = 39–49 km/h Level 16 = 184–201 km/h
Level 7 = 50–61 km/h Level 17 = 202–220 km/h
Level 8 = 62–74 km/h Level 18 ≥ 221 km/h
Level 9 = 75–88 km/h
Podsvietenie displeja stanice
Level 13 = 134–149 km/h
Level 4 = 20–28 km/h
Level 14 = 150–166 km/h
Level 5 = 29–38 km/h
Level 15 = 167–183 km/h
Level 6 = 39–49 km/h
Level 16 = 184-201 km/h
Level 7 = 50–61 km/h
Level 17 = 202–220 km/h
Level 8 = 62–74 km/h
Level 18 ≥ 220 km/h
Level 9 = 75–88 km/h
urni format: 12/24 h
notranja temperatura: -10 °C do +50 °C z ločljivostjo 0,1 °C
| Level 0 = 0 km/h | Level 10 = 89–102 km/h |
| Level 1 = 1–5 km/h | Level 11 = 103–117 km/h |
| Level 2 = 6–11 km/h | Level 12 = 117–134 km/h |
| Level 3 = 12–19 km/h | Level 13 = 134–149 km/h |
| Level 4 = 20–28 km/h | Level 14 = 150–166 km/h |
| Level 5 = 29–38 km/h | Level 15 = 167–183 km/h |
| Level 6 = 39–49 km/h | Level 16 = 184–201 km/h |
| Level 7 = 50–61 km/h | Level 17 = 202–220 km/h |
| Level 8 = 62–74 km/h | Level 18 ≥ 221 km/h |
| Level 9 = 75–88 km/h |
Level 14 = 150–166 km/h
Level 5 = 29–38 km/h
Level 15 = 167–183 km/h
Level 6 = 39–49 km/h
Level 16 = 184-201 km/h
Level 7 = 50–61 km/h
Level 17 = 202-220 km/h
Level 8 = 62–74 km/h
Level 18 ≥ 221 km/h
Level 9 = 75–88 km/h
Level 14 = 150–166 km/h
Level 5 = 29–38 km/h
Level 15 = 167–183 km/h
Level 6 = 39–49 km/h
Level 16 = 184-201 km/h
Level 7 = 50–61 km/h
Level 17 = 202-220 km/h
Level 8 = 62–74 km/h
Level 18 ≥ 221 km/h
Level 9 = 75–88 km/h
| Tase 0 = 0 km/h | Tase 10 = 89–102 km/h |
| Tase 1 = 1–5 km/h | Tase 11 = 103–117 km/h |
| Tase 2 = 6–11 km/h | Tase 12 = 117–134 km/h |
| Tase 3 = 12–19 km/h | Tase 13 = 134–149 km/h |
| Tase 4 = 20–28 km/h | Tase 14 = 150–166 km/h |
| Tase 5 = 29–38 km/h | Tase 15 = 167–183 km/h |
| Tase 6 = 39–49 km/h | Tase 16 = 184–201 km/h |
| Tase 7 = 50–61 km/h | Tase 17 = 202–220 km/h |
| Tase 8 = 62–74 km/h | Tase 18 ≥ 221 km/h |
| Tase 9 = 75–88 km/h |
station principale: 3× pile de 1,5 V de type AA (pas fournies)
adaptateur: AC 230 V/DC 5 V, 1 200 mA (fourni)
dimensions:
station principale: 30 × 200 × 130 mm
Level 3 = 12–19 km/h Level 13 = 134–149 km/h
Level 4 = 20–28 km/h Level 14 = 150–166 km/h
Level 5 = 29–38 km/h Level 15 = 167–183 km/h
Level 6 = 39–49 km/h Level 16 = 184–201 km/h
Level 7 = 50–61 km/h Level 17 = 202–220 km/h
Level 8 = 62–74 km/h Level 18 ≥ 221 km/h
Level 9 = 75–88 km/h
Level 4 = 20–28 km/h Level 14 = 150–166 km/h
Level 5 = 29–38 km/h Level 15 = 167–183 km/h
Level 6 = 39–49 km/h Level 16 = 184–201 km/h
Level 7 = 50-61 km/h Level 17 = 202-220 km/h
Level 8 = 62–74 km/h Level 18 ≥ 221 km/h
Level 9 = 75-88 km/h
| Level 0 = 0 km/h | Level 10 = 89–102 km/h |
| Level 1 = 1–5 km/h | Level 11 = 103–117 km/h |
| Level 2 = 6–11 km/h | Level 12 = 117–134 km/h |
| Level 3 = 12–19 km/h | Level 13 = 134–149 km/h |
| Level 4 = 20–28 km/h | Level 14 = 150–166 km/h |
| Level 5 = 29–38 km/h | Level 15 = 167–183 km/h |
| Level 6 = 39–49 km/h | Level 16 = 184–201 km/h |
| Level 7 = 50–61 km/h | Level 17 = 202–220 km/h |
| Level 8 = 62–74 km/h | Level 18 ≥ 221 km/h |
| Level 9 = 75–88 km/h |
GB | Do not dispose with domestic waste. Use special collection points for sorted waste. Contact local authorities for information about collection points. If the electronic devices would be disposed in landfill, dangerous substances may reach groundwater and subsequently food chain, where it could affect human health.