
AL 26 Plus - Laser level Laserliner - Free user manual and instructions
Find the device manual for free AL 26 Plus Laserliner in PDF.
| Product type | Laser level |
| Brand | Laserliner |
| Model | AL 26 Plus |
| Dimensions (L x H x D) | 190 x 145 x 135 mm |
| Weight | 1400 g (without accessories) |
| Accuracy (standard deviation) | 1.5 mm / km |
| Magnification | 26 x |
| Minimum staff distance | 0.5 m |
| Lens aperture | 40 mm |
| Field of view | 1° 20' |
| Compensator | Air damping |
| Compensator operating range | ± 15' |
| Compensator accuracy | 0.4" |
| Compensation time | < 2 s |
| Horizontal circle | 360° with 1° graduation |
| Bubble accuracy | 8' / 2 mm |
| Working conditions | -20°C to 50°C, max RH 80% |
| Protection | IP64 (water and dust tight) |
| Tripod thread | 5/8" |
| Main functions | Automatic horizon adjustment, angle measurement, distance determination, quick sight, alignment mirror |
| Maintenance | Clean with damp cloth, avoid solvents, store dry |
| Safety | Do not aim at the sun or laser sources, do not touch lenses, keep out of reach of children |
Frequently Asked Questions - AL 26 Plus Laserliner
User questions about AL 26 Plus Laserliner
0 question about this device. Answer the ones you know or ask your own.
Ask a new question about this device
Download the instructions for your Laser level in PDF format for free! Find your manual AL 26 Plus - Laserliner and take your electronic device back in hand. On this page are published all the documents necessary for the use of your device. AL 26 Plus by Laserliner.
USER MANUAL AL 26 Plus Laserliner
natural_image
Laserliner surveying instrument with black and white components, no visible text or symbols on the device itself.Laserliner
Laserliner
natural_image
Illustration of a surveying instrument on a tripod with a long pole, surrounded by shrubs and vegetation (no text or symbols)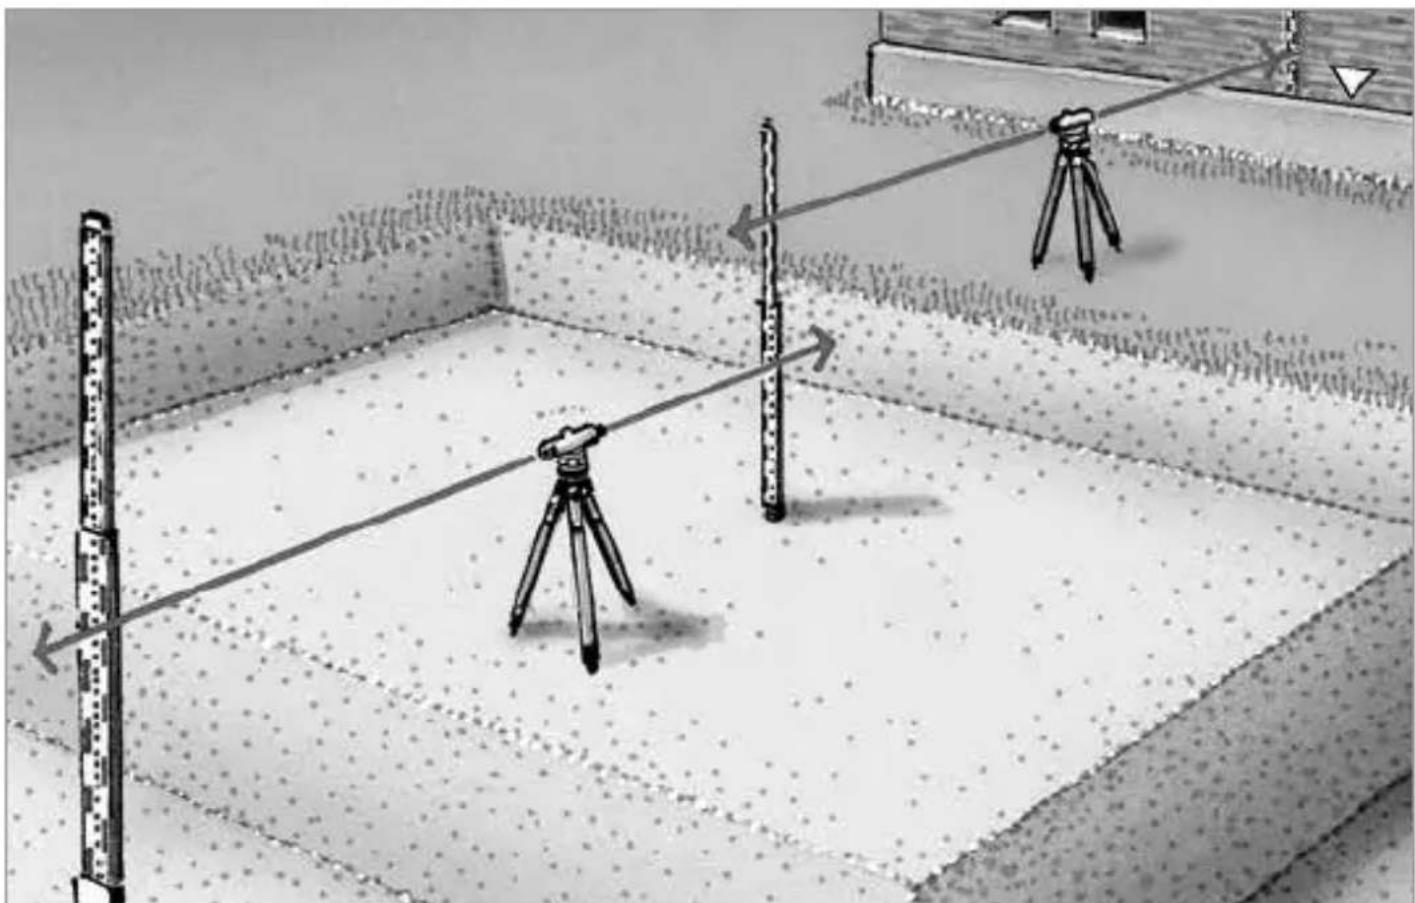
!

Completely read through the operating instructions, the „Warranty and Additional Information“ booklet as well as the latest information under the internet link at the end of these instructions. Follow the instructions they contain. This document must be kept in a safe place and passed on together with the device.
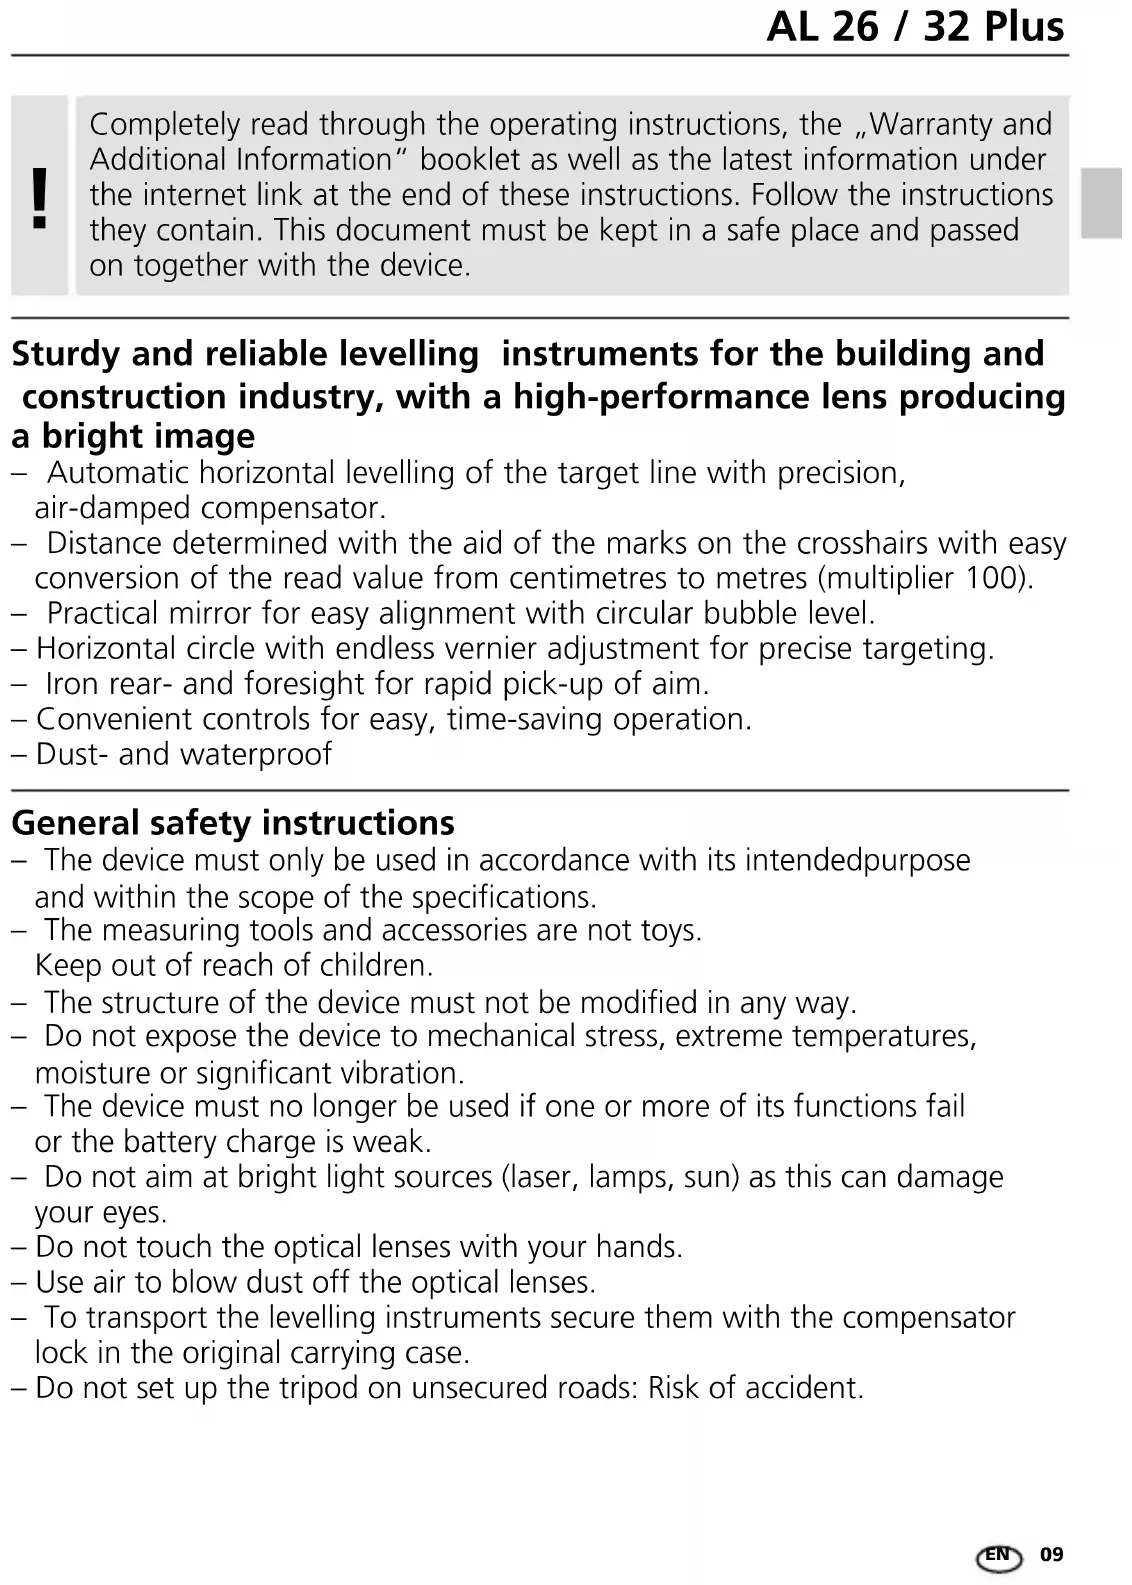
Sturdy and reliable levelling instruments for the building and construction industry, with a high-performance lens producing a bright image
- Automatic horizontal levelling of the target line with precision, air-damped compensator.
- Distance determined with the aid of the marks on the crosshairs with easy conversion of the read value from centimetres to metres (multiplier 100).
- Practical mirror for easy alignment with circular bubble level.
– Horizontal circle with endless vernier adjustment for precise targeting.
– Iron rear- and foresight for rapid pick-up of aim. - Convenient controls for easy, time-saving operation.
– Dust- and waterproof
General safety instructions
- The device must only be used in accordance with its intended purpose and within the scope of the specifications.
- The measuring tools and accessories are not toys.
Keep out of reach of children. - The structure of the device must not be modified in any way.
- Do not expose the device to mechanical stress, extreme temperatures, moisture or significant vibration.
- The device must no longer be used if one or more of its functions fail or the battery charge is weak.
- Do not aim at bright light sources (laser, lamps, sun) as this can damage your eyes.
- Do not touch the optical lenses with your hands.
- Use air to blow dust off the optical lenses.
- To transport the levelling instruments secure them with the compensator lock in the original carrying case.
- Do not set up the tripod on unsecured roads: Risk of accident.

1 Objektive
2 Telescope
3 Fast sighting
4 Focussing (rear)
5 Okular / focussing crosshairs
6 Levelling screw
7 Horizontal dial
8 Calibration screw, levelling bubble
9 Levelling bubble
10 Mirror
11 Lateral fine adjustment

To rule out inaccuracies, the device should be placed at the measuring location 15 minutes before taking a measurement to allow it to assume ambient temperature.
1 Alignment
- Bring crosshairs into focus (5)
- Initial alignment of the telescope towards the graduated staff is done by hand, using the iron sights.
- Focus the image of the staff, by operating the focusing knob, turn crosshairs onto the staff centre.
- Make sure focusing is free of parallax. The focusing is alright when crosshairs and graduation of the staff don't change their positions even when looked at from different angles (keep changing position of the eye in front of the eyepiece).
The AL 32 has segmentation within the crosshairs for accurate targeting.
AL 26 AL 32
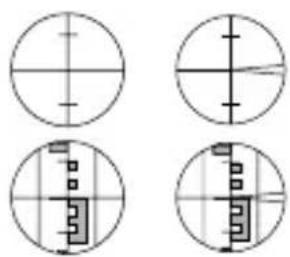

Remaining inclinations of the crosshairs which are left after the levelling bubble has been centred will be eliminated by the compensator. The compensator, however, will not eliminate any inclinations caused by faulty calibration of the levelling bubble or the crosshairs. Therefore, the positions of both gadgets should be checked before measuring (seecalibration).
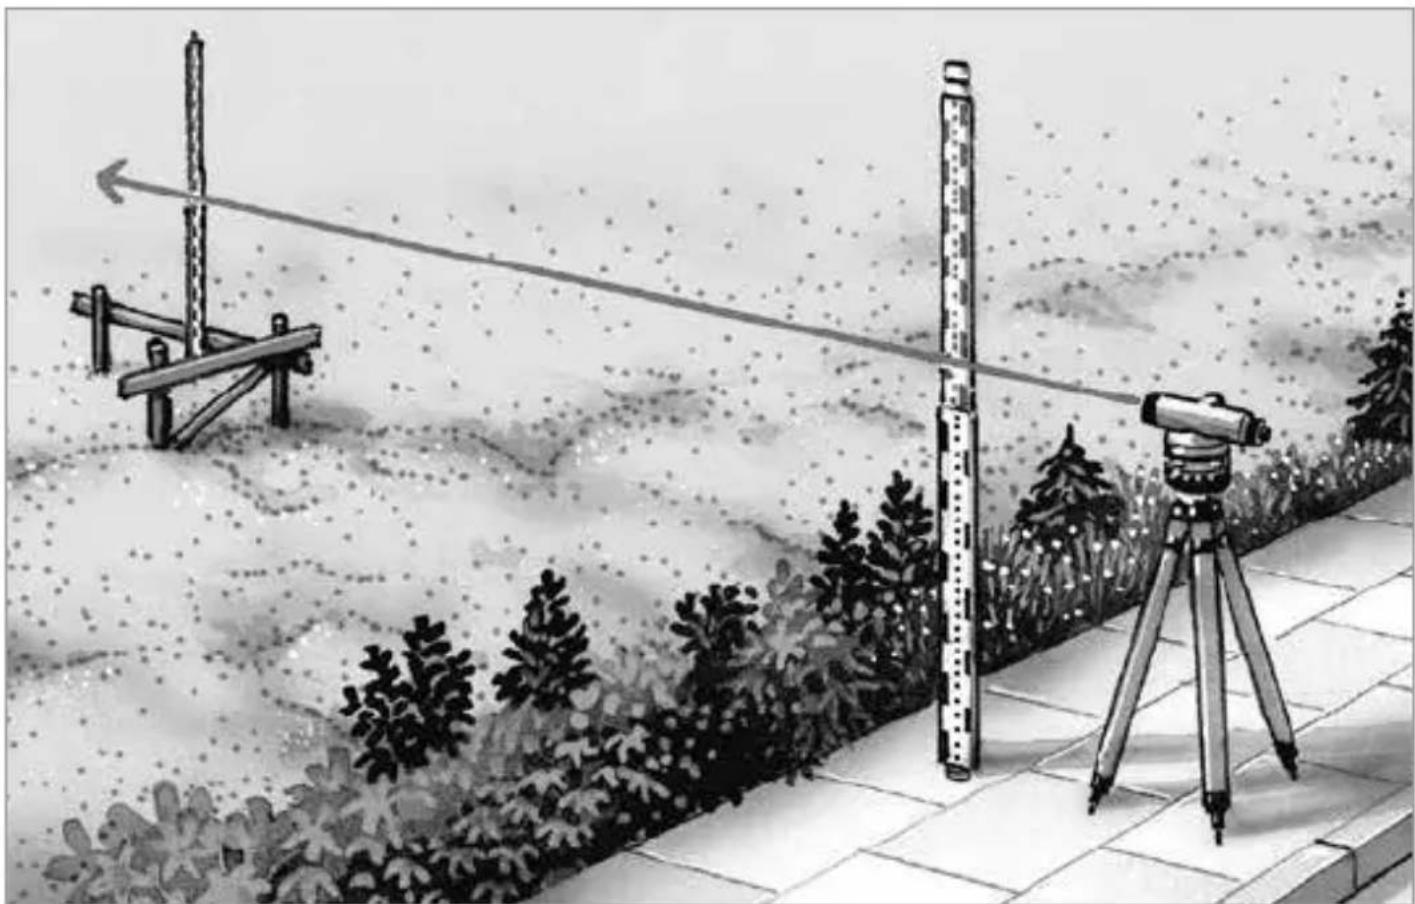
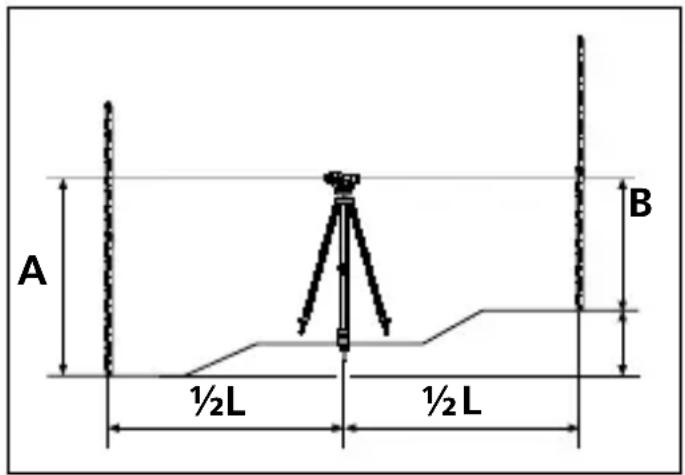
2 Determination of a height difference
- Place instrument halfway between the positions of staves A and B. Aim instrument at staff A and read the value of the graduation of the staff at your crosshairs (e.g. A = 140 cm). Turn instrument towards rod B and get the reading from the graduation (e.g. B = 90 cm).
- The difference (A-B) results in a height difference H = +50 cm
between B and A. The point B is 50 cm higher than point A.
The difference H turns negative when point B is lower than point A.
3 Distance determination
- Read values of the upper graduation mark (0 = 1.44 m) and the lower graduation mark (e.g. U = 1.36 m).
- Multiply the difference by the factor 100 (E=100xe), the result is the distance E=8m.


To achieve reliable results make sure the levelling staff is precisely aligned vertically.
4 Angle measurement
- Attach the plumb line to the hook and set up the tripod with the tripod head such that the plumb is roughly over the ground point. Tread legs of tripod firmly into the ground.
- Attach instrument to tripod and fix it. Now centre the plumb bob exactly over the point by adjusting the lenghts of the tripod legs or by changing the position of the instrument on the tripod.
- With the aid of your iron sights, aim telescope at the first aim, align by using the lateral fine adjustment. Now turn knurled ring until the index and the zero position of the horizontal dial are congruent (turn dial onto zero).
- Aim telescope at the second aim and read the angle function under the index marking.
5 Calibration
Levelling bubble
-
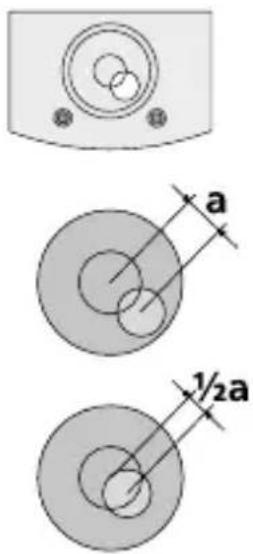
Control: Set horizontal dial onto 0^ . Place bubble right into the centre of the circle on the levelling bubble by turning the levelling screws (6). Turn telescope through 180^/200 gon. The circular bubble level is correctly aligned when the bubble is still in the centre.
-
Adjustment: In case the bubble is now out of the centre marking, set half of the deviation „a“ which is (fi a) by operating the three calibration screws on the levelling bubble. After that, adjust levelling bubble by using the levelling screws, then check calibration by turning the whole instrument through 180°/200 gon.
-
Repeat control and calibration until the bubble of the levelling bubble remains in the inner circle after each turn of the instrument.
The measuring device should be calibrated and tested on a regular basis to ensure it is accurate and working properly. We recommend the measuring device is calibrated every year. If necessary, contact your distributor or the UMAREX-LASERLINER service department.
Crosshairs
1. Control:
Set up and align the instrument in the middle between two fixed level-ling staff positions A and B approx. 30 m apart.
Read off the value a_1 from the levelling staff A and the value b_1 from the levelling staff B. Calculate the height difference (a_1 - b_1) .
Now place instrument in a distance of approx. 2 m away from staff A and read the value a_2 .
Now direct the levelling instrument at levelling staff B. Read the value b_2 and calculate the height difference, which is (a_2-b_2) .
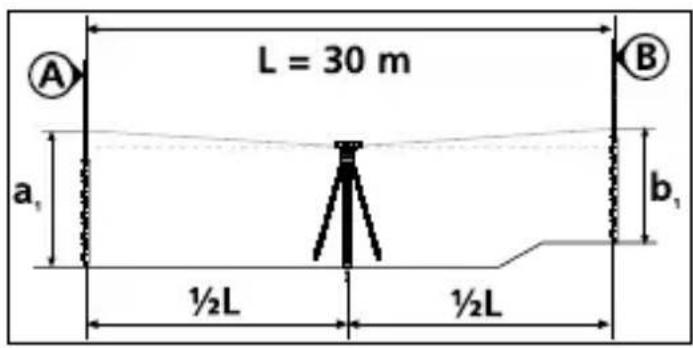
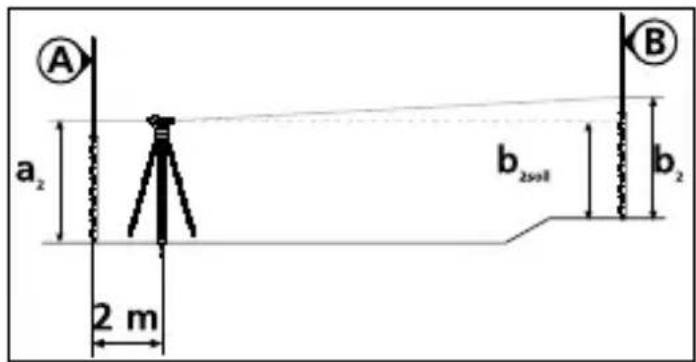
The adjustment of the level is correct when you get the reading (a_1-b_1)=(a_2-b_2) . This means that the values of the height differences achieved with the first and the second measurement are equal, and the instrument operates error-free.

Adjustment will be required if the height differences are not the same. Contact your authorised dealer or else the UMAREX-LASERLINER Service Department.
6 Information on maintenance and care
Clean all components with a damp cloth and do not use cleaning agents, scouring agents and solvents. Remove the battery before storing for longer periods. Store the device in a clean and dry place.
| Technical data (Subject to technical alterations. 21W37) | |
| Standard deviation | 1.5 mm / km (AL 26)1.0 mm / km (AL 32) |
| Telescope | |
| Magnification 26 x (AL 26) / 32 x (AL 32) | |
| Minimum range 0.5 m | |
| Objective diameter 40 mm | |
| Field of view 1° 20' | |
| Compensator | |
| Damping Air damping | |
| Range of operation ± 15' | |
| Accuracy 0.4" (AL 26) / 0.3" (AL 32) | |
| Compensation time < 2 s | |
| Horizontal dial 360° | |
| Graduation 1° | |
| Levelling bubble | |
| Accuracy 8' / 2 mm | |
| General | |
| Operating conditions | -20°C ... 50°C, max. humidity 80% rH, no condensation, max. working altitude 4000 m above sea level |
| Storage conditions -30°C ... | 60°C, max. humidity 80% rH |
| Degree of protection IP 64 | |
| Tripod adapter 5/8" thread | |
| Dimensions (W x H x D) 190 x 145 x 135 mm | |
| Weight 1400 g (without accessories) | |
EU directives and disposal
This device complies with all necessary standards for the free movement of goods within the EU.
Further safety and supplementary notices at:
http://laserliner.com/info?an=AGM

!
natural_image
Architectural rendering of a modern building with a surveying instrument on a paved walkway, surrounded by trees and water (no text or symbols)SERVICE

Umarex GmbH & Co. KG
- Laserliner -
- Laserliner
- !
- Sturdy and reliable levelling instruments for the building and construction industry, with a high-performance lens producing a bright image
- General safety instructions
- Alignment
- Determination of a height difference
- Distance determination
- Angle measurement
- Calibration
- Levelling bubble
- Crosshairs
- Control:
- Information on maintenance and care
- EU directives and disposal
- Umarex GmbH & Co. KG
Brand : Laserliner
Model : AL 26 Plus
Category : Laser level