
Sonicare Power Flosser 3000 HX3711 - Interdental brush PHILIPS - Free user manual and instructions
Find the device manual for free Sonicare Power Flosser 3000 HX3711 PHILIPS in PDF.
User questions about Sonicare Power Flosser 3000 HX3711 PHILIPS
0 question about this device. Answer the ones you know or ask your own.
Ask a new question about this device
Download the instructions for your Interdental brush in PDF format for free! Find your manual Sonicare Power Flosser 3000 HX3711 - PHILIPS and take your electronic device back in hand. On this page are published all the documents necessary for the use of your device. Sonicare Power Flosser 3000 HX3711 by PHILIPS.
USER MANUAL Sonicare Power Flosser 3000 HX3711 PHILIPS
natural_image
White electric toothbrush with 'PHILIPS SONICARE' model, displayed on a clean appliance control panel (no visible text or symbols on the device itself)
natural_image
Simple line drawing of an open book with a grid layout and an arrow indicating the open page (no text or symbols)1

text_image
1 2 3 4 5 6 7 8 9 10 11 12 13 14 PHILIPS Electric cream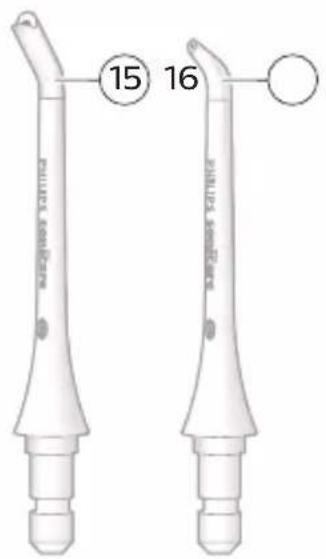
text_image
15 16 PILLIUS SODIERS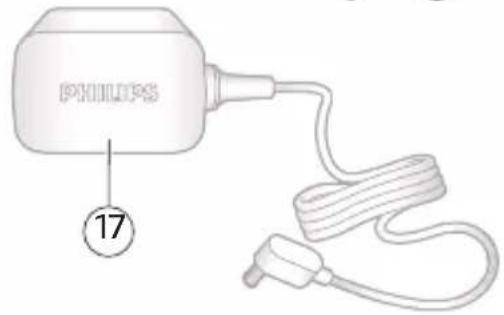
text_image
PHILIPS 17-1
-1
1_
1
English 6
Deutsch 24
Español 45
Français 64
Italiano 84
Nederlands 104
Português 124
Türkçe 144
Important safety information
Read this important information carefully before you use the appliance and save it for future reference.
DANGER
- Keep the power adapter away from water.
- Do not place or store product where it can fall or be pulled into a tub or sink.
- Do not reach for a product that has fallen into water. Unplug immediately.
- Do not immerse the power adapter or base in water or any other liquid.
- After cleaning, make sure the power adapter is completely dry before you connect it to the mains.
WARNINGS
To reduce the risk of burns, electrocution, fire or injury to persons:
- Only use the power adapter (WAC1001) provided with the Power Flosser.
- If the product is damaged in any way (power adapter, base, handle, hose or nozzle), stop using it.
- Always replace the power adapter with one of the original type in order to avoid a hazard.
- Keep cord away from heated surfaces
- This appliance contains no user serviceable parts. If the appliance is damaged, contact the Consumer Care Center in your country (see 'Warranty and support').
- Do not use the product outdoors
- The maximum altitude of use is 4420 meters.
- This product is not intended for use by persons (including children) with reduced physical, sensory, or mental capabilities, or lack of experience and knowledge, unless they have been given supervision or instruction concerning use of the product by a person responsible for their safety.
- Children (ages 6+) should be supervised to ensure that they do not play with the product.
- Do not fill the reservoir with hot water. Hot water may cause burns.
- Philips Sonicare Power Flosser is a personal care device and is not intended for use by multiple users.
- If you are not going to use the product for an extended period of time, unplug it from the electrical outlet, clean it and store it in a cool and dry place away from direct sunlight.
CAUTION
- To avoid damage to the product, do not place the product or parts in the dishwasher for cleaning unless otherwise instructed.
- If you have had oral or gum surgery in the previous 2 months, consult your dentist before you use the Philips Sonicare Power Flosser.
- Consult your dentist if excessive bleeding occurs after using this toothbrush or if bleeding continues to occur after 1 week of use.
- The Philips Sonicare Power Flosser complies with the safety standards for electromagnetic devices. If you have a pacemaker or other implanted device, contact your physician or the manufacturer of the implanted device prior to use.
- If you have medical concerns, consult your doctor before you use the Philips Sonicare Power Flosser.
- This product has only been designed for cleaning teeth and gums. Do not use it for any other purpose. (for e.g. eyes, nose and ears). Stop using the appliance and contact your doctor if you experience any discomfort or pain.
- Do not use other nozzles than the ones recommended by Philips Sonicare.
Electromagnetic fields (EMF)
This Philips appliance complies with all applicable standards and regulations regarding exposure to electromagnetic fields.
Introduction
Welcome to Philips! Congratulations on your new Sonicare Power Flosser. To fully benefit from the support that Philips offers, register your product at philips.com/welcome.
Intended Use
The Philips Sonicare Power Flosser is an oral irrigator intended to remove plaque and food debris between teeth and the tooth surface in order to reduce tooth decay and improve and maintain gum health. This product is intended for consumer home use, normally used at least once a day. Use by children (ages 6+) should be with adult supervision.
Your Philips Sonicare Power Flosser (Fig. 1)
1 Reservoir lid
2 Reservoir
3 Mode button
4 Mode indicator
5 On/off button
6 Intensity dial
7 Hose
8 Hose storage compartment
9 Base
10 Handle dock
11 Handle
12 Pause switch
13 Nozzle eject button
14 Quad Stream nozzle*
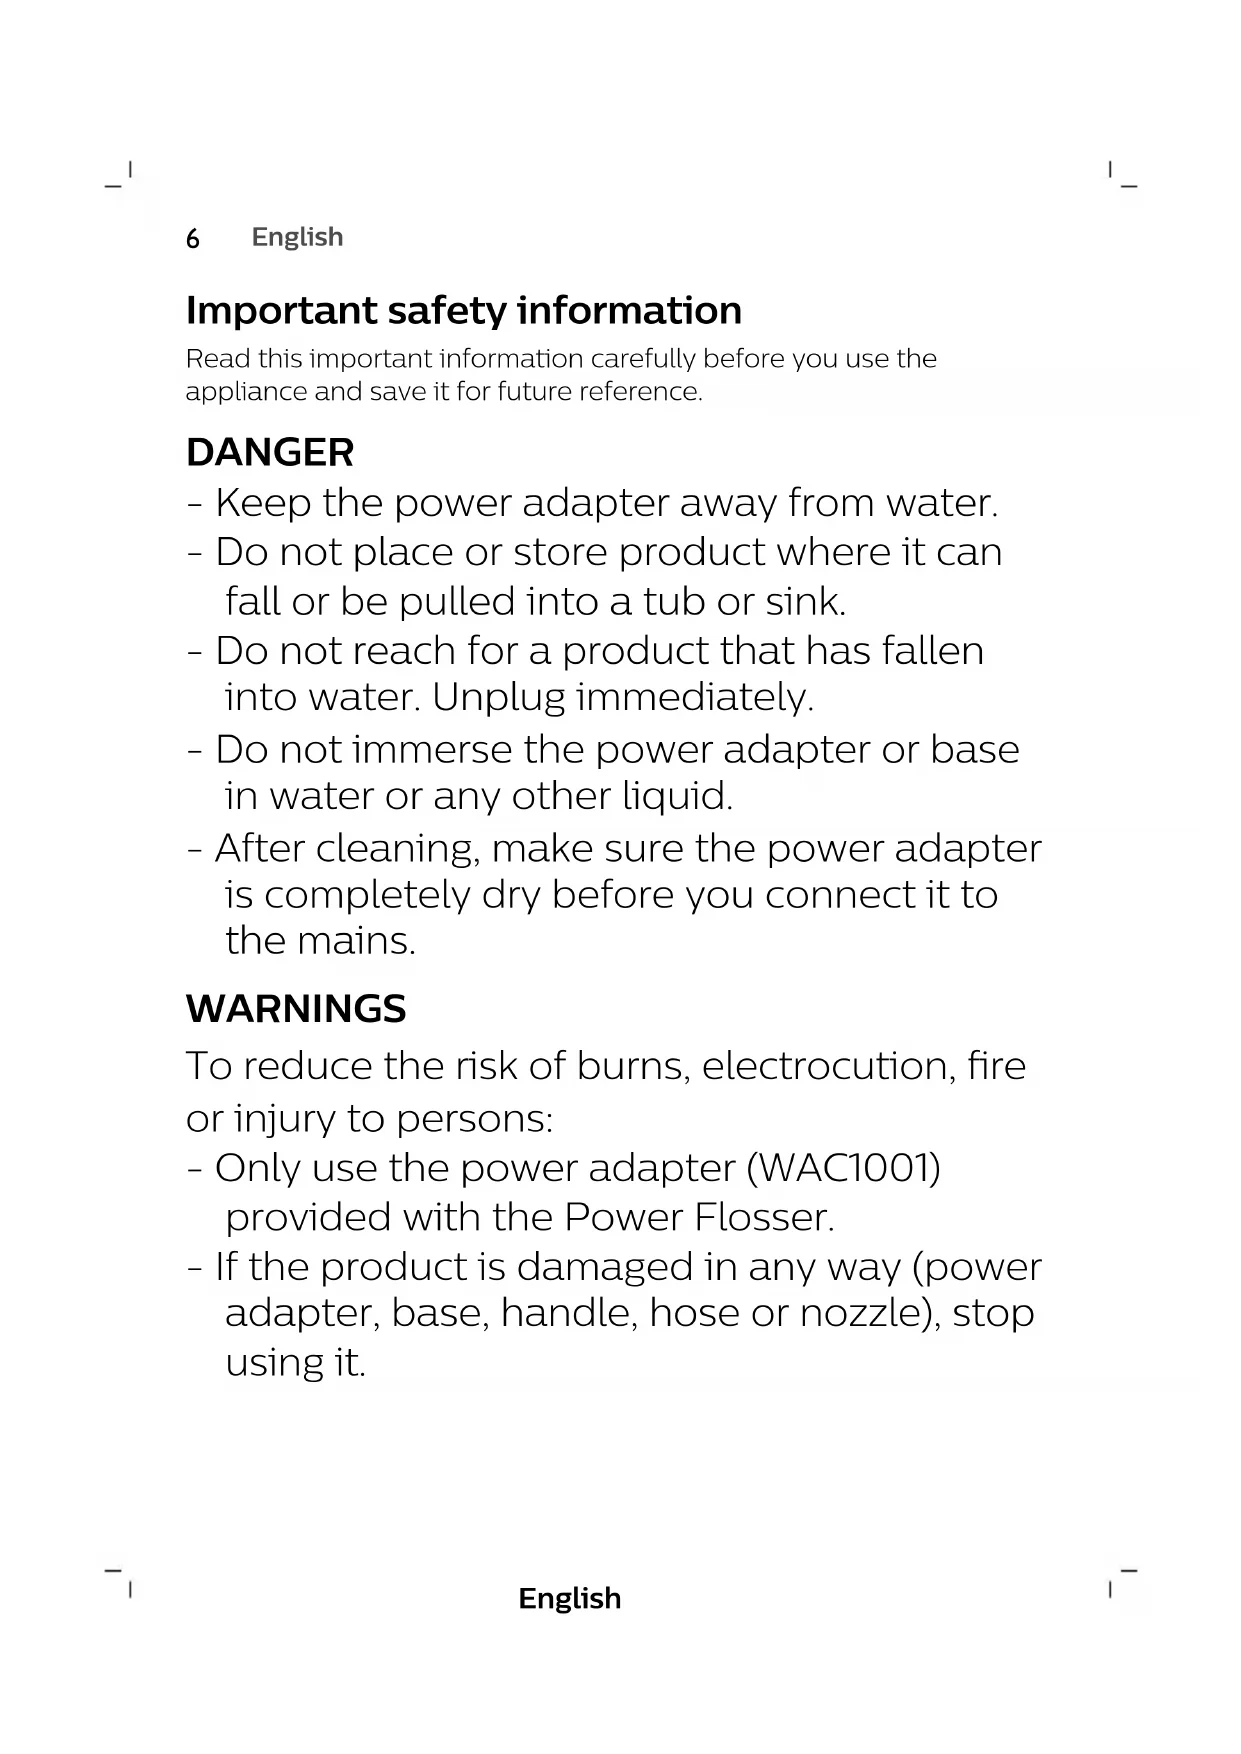
15 Comfort nozzle*
16 Standard nozzle*
17 Power adapter
*Note: The contents of the box may not include all items shown depending on the product configuration purchased.
Nozzles
To see what type of nozzles you have, check the code at the base of the nozzle. Each nozzle type provides different benefits.
natural_image
Three technical illustrations of a dental tool with circular cross-sectional views showing different angles (no text or symbols present)Nozzle label F1 F2 F3
| Nozzle Name Standard nozzle | Comfort nozzle Quad Stream nozzle | |
| Benefit Standard nozzle with a single stream of water for removing debris and plaque. | Soft rubber nozzle for comfort and ease of positioning for those with sensitive gums. | Soft rubber nozzle that directs water into a cross-shaped stream that gently removes plaque for an effortlessly thorough clean. |
Modes
Your Power Flosser is equipped with two modes:
Clean
This mode, with pacer, provides standard water pressure for a great clean.
Deep clean
This mode, with Pulse Wave technology, provides strong and gentle pulses of water for a thorough clean.
Note: For details on "Pulse Wave technology" and "pacer" (see 'Features').
Selecting modes
1 Turn on the device by pressing the on/off button.
12 English
2 Press the mode button to select desired mode.
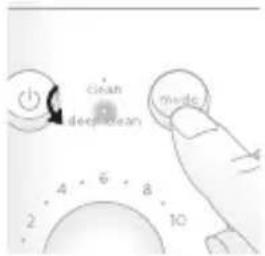
text_image
clean deep/mean mode 2 4 6 8 10Intensity Settings
Your power flosser comes with 10 different intensity settings. To manually change the intensity, turn on the base and turn the intensity dial to the setting you prefer.

text_image
deep clean 10 2 4 6 8Note: For first time use, start the device from the lowest setting. It is recommended to increase the intensity you use over the course of a few weeks. This can give better cleaning benefits as you are able to tolerate higher settings.
Features
Pacer
The clean mode has a pacer. This feature indicates when you are supposed to move to the next section of your mouth via a short pause in the waterflow.

text_image
30 sec. 30 sec.Note: This feature is on clean mode only.
Activating or deactivating pacer
You can activate or deactivate the pacer feature by holding the on/off button and the mode button simultaneously for 5 seconds.
- When deactivated, all the lights will flash once.
- When activated, all the lights will flash twice.
Pulse Wave technology
The deep clean mode has a "Pulse Wave technology" feature. The flow of the water increases and decreases in intensity, providing a brief pause during which you can move the nozzle to the next space between your teeth.
Getting started
1 Connect the small plug into the bottom of the base and connect the power plug in any 100-240V power outlet.
2 Remove the reservoir from the base.
Note: Make sure the product is powered off before you remove the reservoir.
3 Open the lid, fill the reservoir with lukewarm water to the MAX fill line.
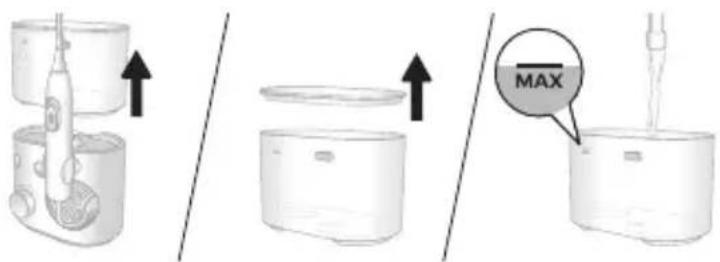
text_image
Diagram illustrating the process of an electric toothbrush with a MAX indicator, showing step-by-step assembly and mounting.4 Close the lid. Place the reservoir back on the base.
Note: Press down firmly to ensure there is no gap between the reservoir and the base.

natural_image
Diagram showing two steps of a food cleaning or packaging process: one with a lid removed, the other with an electric toothbrush inside a container (no text or symbols)14 English
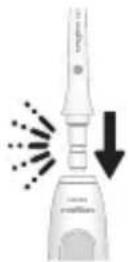
5 Insert your preferred nozzle into the handle. Press the nozzle down until you hear a "click".
6 Press the on/off button on the base station to turn on the product. Select your desired mode and intensity.
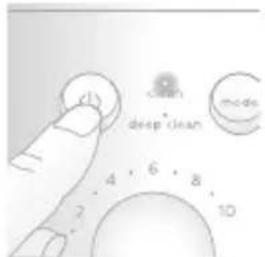
text_image
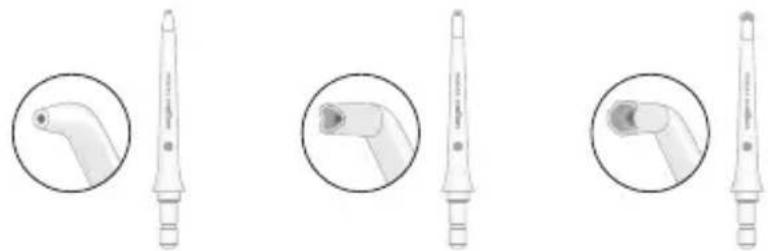
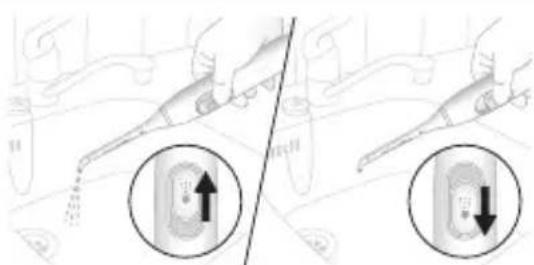
small clean mode deep clean 4 6 8 2 107 Remove the handle from the base and point the tip of the nozzle into the sink. Slide the pause switch on the handle to the 'on' (up) position and wait until the water stream comes out of the tip of the nozzle. Stop the flow of water by sliding the pause switch to the 'off' (down) position.
Note: This step is for first time use after purchase only.
natural_image
Illustration of a hand using a pipette to remove a component, with two circular insets showing internal structures (no text or symbols)8 Press the on/off button on the base again to turn off the product.
Using your Power Flosser
1 Make sure that the pause switch on the handle is in the 'off' position.
2 Press the on/off button on the base to turn on the product.

text_image
dry deep clean mode 2 4 6 8 103 Place the nozzle tip in your mouth. Lean over the sink and partially close your lips over the nozzle to avoid splashing. Leave enough space to allow water to flow from your mouth into the sink.

natural_image
Illustration of a person using a tool to interact with a magnified inset showing the head profile (no text or symbols)Standard and Comfort Nozzle
With the base station turned on:
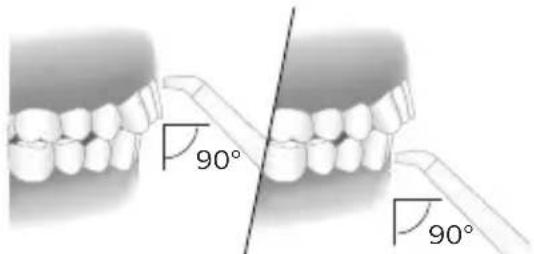
a Position the nozzle tip just above the gum line at a 90° angle.
text_image
90° 90°b Slide the pause switch on the handle to the 'on' position to start the water flow.
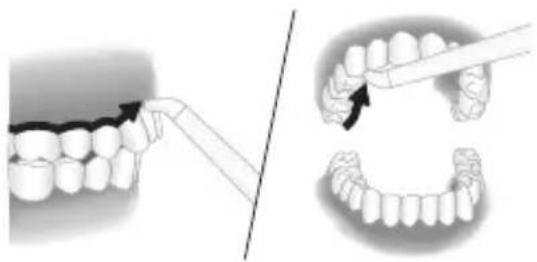
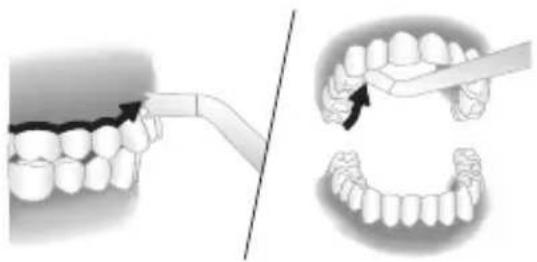
c Starting from your back teeth in your upper or lower jaw, slide the nozzle tip along the gum line and pause briefly between each tooth. Continue to clean both inside and outside of your teeth in one arch of your mouth for 30 seconds.
English
natural_image
Illustration showing dental procedure steps: before and after using a tool to adjust teeth (no text or symbols present)Note: Remember to clean the inside of your teeth.
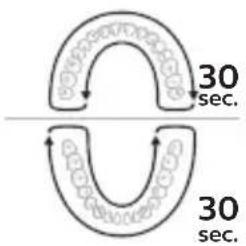
d Repeat in the other arch of your mouth for another 30 seconds until all spaces around and between your teeth have been cleaned for a total of at least one minute.
text_image
30 sec. 30 sec.Note: You can stop the water flow during use by sliding the pause switch on the handle to the 'off' position (motor will pause).
Quad Stream Nozzle
With the base station turned on:
a Position the nozzle tip just above the gum line at a 90^ angle. Press gently so that the nozzle tip is in contact with the gum line and the teeth.
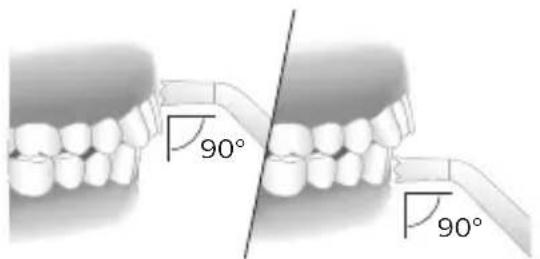
text_image
90° 90°b Slide the pause switch on the handle to the 'on' position to start the water flow.
c Starting from your back teeth in your upper or lower jaw, slide the nozzle tip along the gum line and pause briefly between each tooth. Continue to clean both inside and outside of your teeth in one arch of your mouth for 30 seconds.
natural_image
Illustration showing dental procedure steps: before and after using a tool to adjust teeth (no text or symbols present)Note: Remember to clean the inside of your teeth.
d Repeat in the other arch of your mouth for another 30 seconds until all spaces around and between your teeth have been cleaned for a total of at least one minute.

text_image
30 sec. 30 sec.Note: You can stop the water flow during use by sliding the pause switch on the handle to the 'off' position (motor will pause).
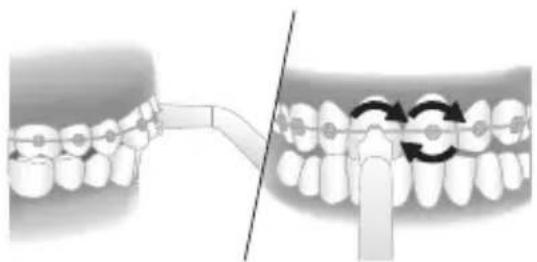
Cleaning orthodontic brackets with the Quad Stream nozzle
a To clean around orthodontic brackets, place the nozzle tip over each bracket.
b Gently rotate the nozzle tip around the bracket in a small circle before moving to the bracket on the next tooth.
natural_image
Illustration of dental arching technique showing tooth alignment before and after treatment (no text or symbols)After each use
1 When you are finished, turn off the product.
2 Pick up and empty the reservoir.
3 Remove the nozzle from the handle by pushing the eject button on the back of the handle.
18
English
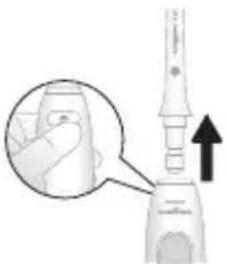
natural_image
Illustration of a hand inserting a device into a toothbrush, with an arrow indicating upward motion (no text or symbols present)4 Rinse the nozzle under the tap.
5 Insert the nozzle back into the handle.

6 Dry any excess water off the tether and handle.
Cleaning
The product needs to be cleaned once a week.
Clean the device and the accessories as follows:
Reservoir and lid
| ✓ | ✓ | ✓ |
Gently remove the reservoir from the unit. The reservoir can be hand washed with warm water and mild soap or cleaned in the dishwasher.
Base and handle
| ✓ | × | × |
When necessary, you can clean the outside of the base and the handle with a soft cloth and mild soap.
Nozzles
| ✓ | ✓ | ✓ |
Regular Cleaning:
Remove the nozzle from the handle. Rinse the tip under warm water.
Every few months, or if your nozzle becomes clogged:
Soak the nozzle in a container of 2 parts water and 1 part white vinegar for 5 minutes. Rinse the nozzle with warm water.
Internal components, hose and handle
Fill the reservoir with warm water and add 1-2 tablespoons of white vinegar. Remove the handle, point the nozzle at the sink and turn on the product to run the solution through the unit until the reservoir is empty. Rinse by repeating with a full reservoir of clean warm water.
Storage
If you are not going to use the product for an extended period of time, unplug it from the electrical outlet, clean it and store it in a cool and dry place away from direct sunlight.
Replacement
Replace nozzles every 6 months or immediately when damaged. To buy accessories or spare parts, visit philips.com or go to your local Philips Sonicare dealer. You can also contact the Philips Consumer Care Center in your country (see the international warranty leaflet for contact details).
The following spare parts are available:
- Standard nozzle
- Comfort nozzle
- Quad Stream nozzle
Note: The availability of spare parts may differ by country.
Frequently asked questions
Question Answer
Can I use mouthwash or essential oils in my reservoir?
It is not recommended to use essential oils in the reservoir. Mouthwash can be mixed with water and used in the reservoir. After using mouthwash, rinse the device to prevent clogging by partially filling reservoir with warm water and running product with tip pointed into sink until reservoir is empty.
Question Answer
| Will other nozzles fit on my Philips Sonicare Power Flosser? | Only Philips Sonicare Power Flosser nozzles will work with this device. Nozzles from other brands and Philips AirFloss nozzles are not compatible with this product. |
| How often do I need to replace my nozzle? | We advise you to replace your nozzle after 6 months of use. You can find more information about buying replacement parts at philips.com |
Troubleshooting
This chapter summarizes the most common problems you could encounter with the appliance. If you are unable to solve the problem with the information below, visit www.philips.com/support for a list of frequently asked questions or contact the Consumer Care Center in your country.
Problem Possible cause Solution
| use.Device does not "Prime" (water does not comes out of the nozzle upon first use.) | - Reservoir is not fully seated. - The device was not on long enough to prime correctly. - The pause switch on the handle is in the "pause" position. | - Ensure that the reservoir is fully seated by pushing it down onto the base. - Ensure that the pause switch on the handle is in the “on” position - Run the product for 30 seconds at high intensity to make sure there is enough time for the product to prime (see 'Getting started'). |
22 English
Problem Possible cause Solution
| Product turns off and all of the LEDs start to blink. | - The product was running for too long and it overheated. | - Unplug the device and don't use it for two hours.- After two hours, plug it back and if the LEDs are still blinking, call customer service. |
| Device does not power on after pushing the power button. | - Device is not plugged in- There is damage to the power cord.- Product malfunction. | - Ensure that the device is plugged in properly, both to the wall outlet and into the bottom of the device.- Check the power cord for damage.- If issue is still not identified, call customer service. |
| Mechanical Dock comes off device. | - Device was dropped. | - Push the mechanical dock back into place. |
| Reservoir is rattling | - Reservoir is not fully seated | - Ensure that the reservoir is fully seated on the base of the device by pushing down slightly. |
Locating the model number
Look on the bottom of the base for the model number (HX37XX).
Warranty and support
Philips warrants its products for two years after the date of purchase. Defects due to faulty materials and workmanship will be repaired or replaced at Philips' expense provided that convincing proof of purchase in the qualifying period is provided. Philips recommends use of genuine Sonicare Nozzles for optimal performance. Use of other Nozzles may damage your PowerFlosser and limit your warranty protection.
For product information, support and online user instructions, please visit: www.philips.com/support or read the international warranty leaflet.
Warranty restrictions
The terms of the international warranty do not cover the following:
- Reservoir
- Nozzles
- Damage caused by use of unauthorized replacement parts or unauthorized nozzles
- Damage caused by misuse, abuse, neglect, alterations or unauthorized repair
- Normal wear and tear, including chips, scratches, abrasions, discoloration or fading
Recycling

- This symbol means that this product shall not be disposed of with normal household waste (2012/19/EU).
- Follow your country's rules for the separate collection of electrical and electronic products. Correct disposal helps prevent negative consequences for the environment and human health.
natural_image
Three medical or dental tool designs shown in separate circular views, no text or symbols present.Düsenetikett F1 F2 F3
text_image
30 sec. 30 sec.text_image
Diagram illustrating the step-by-step process of an electric cooker, showing top-down view and MAX indicator.natural_image
Diagram showing a food item being processed from a container to an electric toothbrush (no text or symbols present)text_image
down mode deep cleansnatural_image
Illustration of a hand using a pipette to apply liquid, with two circular insets showing internal components (no text or symbols)text_image
deep clean mid-thnatural_image
Illustration of a person using a tool to examine teeth, with an inset showing the same tooth profile (no text or symbols)natural_image
Illustration showing dental procedure steps: before and after using a tool to adjust teeth (no text or symbols present)text_image
30 sec. 30 sec.natural_image
Illustration showing dental procedure steps: before and after using a tool to adjust teeth (no text or symbols present)text_image
30 sec. 30 sec.natural_image
Diagram showing dental alignment with a toothbrush and a magnified view of teeth (no text or symbols)Nach jedem Gebrauch
natural_image
Illustration of a dental tool with an arrow indicating the insertion point (no text or symbols present)natural_image
Three medical or dental tool tips shown in separate circular views, no text or symbols present.Etiqueta de la boquilla F1 F2 F3
text_image
clean declean mode 4 6 8 10text_image
30 sec. 30 sec.text_image
Diagram illustrating the step-by-step process of an electric toothbrush, showing before/after states and a MAX indicator.natural_image
Diagram showing a kitchen appliance with a lid and a hand holding a toothbrush, both without any text or symbols.natural_image
Illustration of a hand using a tool to interact with a device, showing two states of action (no text or symbols present)natural_image
Illustration of a person brushing teeth with an inset showing the head profile (no text or symbols)natural_image
Illustration showing dental procedure steps: before and after using a tool to trim teeth (no text or symbols present)text_image
30 sec. 30 sec.natural_image
Illustration showing dental procedure steps: before and after using a tool to adjust teeth (no text or symbols present)text_image
30 sec. 30 sec.natural_image
Diagram showing dental alignment before and after using a tool, with no visible text or symbolsDespués de cada uso
natural_image
Illustration of a hand holding a small object next to a toothbrush, with an arrow indicating upward motion (no text or symbols present)natural_image
Three technical illustrations of a dental implant tool, shown from front, side, and top views with no visible text or symbols.text_image
30 sec. 30 sec.text_image
Diagram showing three-step cleaning process of an electric oven, with an 'MAX' label highlighting the maximum level.natural_image
Diagram showing a food item being processed from a container to an electric toothbrush (no text or symbols present)text_image
deep clean 10natural_image
Illustration of a hand holding a tool with a magnified inset showing internal components (no text or symbols)74 Français
natural_image
Illustration of a person using a tool to examine facial features, with an inset showing the same face profile (no text or symbols)natural_image
Illustration showing dental tool application on upper teeth (no text or symbols present)text_image
30 sec. 30 sec.natural_image
Illustration showing dental procedure steps: before and after using a tool to adjust teeth (no text or symbols present)text_image
30 sec. 30 sec.natural_image
Diagram showing dental alignment with a toothbrush and a finger inserted into the arch (no text or symbols present)natural_image
Illustration of a hand holding a small object next to a dental screwdriver, with an arrow indicating upward motion (no text or symbols present)natural_image
Three technical illustrations of a dental tool with circular cross-sectional views showing different angles (no text or symbols present)Etichetta del F1 F2 F3 beccuccio
text_image
clean. desplean modetext_image
30 sec. 30 sec.text_image
Diagram illustrating the step-by-step process of an electric toothbrush, showing before/after states with an 'MAX' label.92 Italiano
natural_image
Diagram showing a food item being processed from a container to an electric toothbrush (no text or symbols present)natural_image
Illustration of a hand using a tool to clean or wash a surface, with two circular insets showing internal patterns (no text or symbols)natural_image
Illustration of a person using a tool to examine facial features, with an inset circular view of the same face (no text or symbols present)Beccuccio Standard e Comfort
Con la base accesa:
natural_image
Illustration showing dental tool application on upper teeth (no text or symbols present)text_image
30 sec. 30 sec.natural_image
Illustration showing dental procedure steps: before and after using a tool to adjust teeth (no text or symbols present)text_image
30 sec. 30 sec.natural_image
Illustration of dental braces with a toothbrush, showing alignment and rotation (no text or symbols)Dopo ogni uso
natural_image
Illustration of a hand using a dental tool to adjust or install teeth (no text or symbols visible)De Philips Sonicare Power Flosser (afb. 1)
natural_image
Four technical illustrations of a dental tool with circular insets showing different angles (no text or symbols)Code spuitkop F1 F2 F3
| Naam spuitkop | Standaardspuit kop | Comfort-spuitkop | Quad Stream-spuitkop |
110 Nederlands
text_image
30 sec. 30 sec.text_image
Diagram showing three steps of an electric cooker with an orange lamp, indicating the process is to reach maximum speed.natural_image
Diagram showing a kitchen appliance with a lid and a water bottle, both without any text or symbols.natural_image
Illustration of a hand using a tool to interact with a device, showing two circular insets highlighting internal components (no text or symbols present)natural_image
Illustration of a person using a tool to examine facial features, with an inset circular detail showing the same face (no text or symbols present)Standaard- en Comfort-spuitkop
natural_image
Illustration showing dental tool application on upper teeth (no text or symbols present)text_image
30 sec. 30 sec.natural_image
Illustration showing dental procedure steps: before and after using a tool to adjust teeth (no text or symbols present)text_image
30 sec. 30 sec.natural_image
Diagram showing dental alignment with a toothbrush and a finger inserted into the arch (no text or symbols present)Na gebruik
natural_image
Diagram of a dental screw with an arrow indicating upward motion (no text or symbols present)4 Spoel de spuitkop af onder de kraan.
natural_image
Three technical illustrations of dental prosthetic tools with circular cross-sectional views showing different angles (no text or symbols present)Etiqueta do bocal
F1 F2 F3
text_image
clean deep/teach modetext_image
deep clean made 2 4 6 8 10text_image
30 sec. 30 sec.text_image
Diagram illustrating the process of an electric toothbrush with a magnified view showing the MAX level on a component.natural_image
Diagram showing two steps of a food item: adding a lid to a container and then using an electric toothbrush (no text or symbols present)natural_image
Illustration of a dental procedure with two views: one showing tooth removal and another showing a tooth filling (no text or symbols present)natural_image
Illustration of a person using a tool to examine facial features, with an inset showing the same object (no text or symbols present)Bocal Standard e Bocal Conforto
natural_image
Illustration showing dental tool application on upper teeth (no text or symbols present)text_image
30 sec. 30 sec.natural_image
Illustration showing dental procedure steps: before and after using a tool to adjust teeth (no text or symbols present)text_image
30 sec. 30 sec.natural_image
Diagram showing dental alignment with a toothbrush and a magnified view of teeth (no text or symbols)natural_image
Illustration of a hand holding a small object next to a toothbrush, with an arrow indicating upward motion (no text or symbols present)natural_image
Three technical illustrations of a dental tool with circular views showing different angles (no text or symbols present)text_image
30 sec. 30 sec.text_image
Diagram illustrating the step-by-step process of an electric cooker, showing battery insertion and maximum suction level indicator.natural_image
Diagram showing a food item being processed from a container to a machine, with no visible text or symbols.text_image
down down clean down mode down 4 6 8 10natural_image
Illustration of a hand using a tool to lift water, showing two views of the pipe with arrows indicating direction (no text or symbols present)natural_image
Illustration of a person using a tool to examine facial features, with an inset circular detail showing the same face (no text or symbols present)natural_image
Illustration showing dental procedure steps: before and after using a tool to adjust teeth (no text or symbols present)text_image
30 sec. 30 sec.natural_image
Illustration showing dental procedure steps: before and after using a tool to adjust teeth (no text or symbols present)text_image
30 sec. 30 sec.natural_image
Diagram showing dental alignment with a toothbrush and a magnified view of the same teeth (no text or symbols present)natural_image
Close-up of a dental screw with a magnified inset showing the tooth structure (no text or symbols)natural_image
Diagram of an open book with a grid layout and an arrow indicating the direction (no text or symbols)www.philips.com/Sonicare
©2021 Koninklijke Philips N.V. (KPNV). All rights reserved. Philips and the Philips shield are trademarks of KPNV. Sonicare and the Sonicare logo are trademarks of Philips Oral Healthcare, LLC and/or KPNV.
3000.053.8785.2 (18/06/2021)
