B 95 RS Bp - Scrubber Kärcher - Free user manual and instructions
Find the device manual for free B 95 RS Bp Kärcher in PDF.
| Product type | Hard floor scrubber |
| Brand | Kärcher |
| Model | B 95 RS Bp |
| Application | Professional (indoor) |
| Nominal voltage | 24 V |
| Battery capacity | 170 to 198 Ah (5h) |
| Average power consumption | 1950 W |
| Traction motor power | 600 W |
| Suction motor power | 750 W (650 mm) / 550 W (750 mm) / 750 W (750 mm R) |
| Brush motor power | 2 × 600 W |
| Working width | 650 mm or 750 mm depending on head |
| Brush diameter | 105 mm (cylindrical brushes) / 365 mm (discs) |
| Brush speed | 1200 rpm (cylindrical) / 140 rpm (discs) |
| Travel speed | 6 km/h |
| Max. gradient | 10% |
| Theoretical cleaning area | 3900 to 4500 m²/h depending on head |
| Clean water tank volume | 95 L |
| Dirty water tank volume | 95 L |
| Waste tray volume (R head) | 6 L (650 mm) / 7 L (750 mm) |
| Dimensions (L × W × H) | 1525 × 760-810 × 1470 mm |
| Total permissible weight | 500 kg |
| Transport weight | 325 to 330 kg |
| Sound pressure level LpA | 68 dB(A) (depending on head) |
| Sound power level LWA + KWA | 85 dB(A) |
| Integrated charger (option) | 230 V, 50-60 Hz, 4.2 A |
Frequently Asked Questions - B 95 RS Bp Kärcher
User questions about B 95 RS Bp Kärcher
0 question about this device. Answer the ones you know or ask your own.
Ask a new question about this device
Download the instructions for your Scrubber in PDF format for free! Find your manual B 95 RS Bp - Kärcher and take your electronic device back in hand. On this page are published all the documents necessary for the use of your device. B 95 RS Bp by Kärcher.
USER MANUAL B 95 RS Bp Kärcher
natural_image
Technical line drawing of a cleaning or cleaning machine with visible internal components and mounting brackets (no text or labels)Deutsch 3
English 16
Français 29
Italiano 42
Nederlands 55
Español 68
Português 81
Dansk 94
Norsk 107
Svenska 120
Suomi 133
Ελληνικά 146
Türkçe 160
Русский 173
Magyar 187
Čeština 200
Slovenščina 213
Polski 226
Românește 239
Slovenčina 252
Hrvatski 265
Srpski 278
Български 291
Eesti 305
Latviešu 331
Lietuviškai 344
Українська 357
text_image
Technical diagram of a car's internal components with numbered parts, including dashboard, engine, and wheel assembly.natural_image
Technical line drawing of a mechanical assembly with rotating components (no text or symbols)natural_image
Technical line drawing of a cleaning machine with downward arrows indicating motion (no text or symbols)natural_image
Technical schematic of a mechanical assembly with directional arrows indicating flow or movement (no text or labels)natural_image
Technical line drawing of a mechanical lifting device with labeled components (no text or symbols present)1 Verriegelung Batterieeinschub
natural_image
Technical diagram of a mechanical assembly with labeled components (no readable text or symbols)4.035.097.0, 4.035-165.0
1 Abstandshalter 380x55x30
text_image
Technical diagram of a device's internal components with labeled parts 1 and 24.035-164.0
natural_image
Technical line drawing of a mechanical assembly with no visible text or symbols4.035-166.0
1 Abstandshalter 380x55x30
ACHTUNG
natural_image
Technical line drawing of a mechanical assembly with mounting holes and a black arrow indicating a specific component (no text or symbols present)natural_image
Mechanical assembly diagram showing gear and rotor components with no visible text or symbolsnatural_image
Mechanical assembly diagram showing components with arrows indicating motion (no text or labels)natural_image
Diagram of a robotic vacuum cleaner with coiled hose and control panel (no text or symbols)text_image
Technical diagram of a truck showing structural components with directional arrows and cross-sectional viewsnatural_image
Technical line drawing of a mechanical assembly with arrows indicating motion or force directions (no text or symbols present)natural_image
Technical line drawing of a mechanical assembly with mounting brackets and a central housing (no text or symbols)text_image
Technical diagram showing a mechanical assembly with numbered components and directional arrows indicating motion or assembly steps.text_image
R 2 1 D 1 2natural_image
Technical line drawing of a vehicle's internal components, showing dashboard and steering wheel assembly (no text or labels)natural_image
Technical line drawing of a mechanical component with two arrows pointing to features (no text or symbols present)natural_image
Technical line drawing of a mechanical component with no visible text or symbols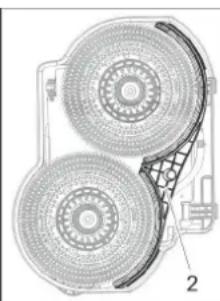
natural_image
Technical diagram of a mechanical component with two circular components and a grid-patterned base (no text or symbols)
Chairman of the Board of Management

Director Regulatory Affairs & Certification
71364 Winnenden (Germany)
Tel.: +49 7195 14-0
Fax: +49 7195 14-2212
Winnenden, 2021/02/01

Please read and comply with these original instructions prior
to the initial operation of your appliance and store them for later use or subsequent owners.
Contents
Safety instructions ..... EN .. 1
Function.... EN .. 1
Proper use ..... EN .. 1
Environmental protection .... EN .. 1
Control elements..... EN .. 2
Before Commissioning ..... EN .. 4
Operation.... EN .. 5
Grey Intelligent Key ..... EN .. 7
Transport. EN 8
Storage.... EN .. 8
Care and maintenance ..... EN .. 8
Troubleshooting ..... EN . 10
Technical specifications ..... EN . 12
Accessories and Spare Parts. EN. 13
Warranty ..... EN . 13
EU Declaration of Conformity. EN. 13
Declaration of Conformity .... EN . 13
Safety instructions
Before using the appliance for the first time, read and observe these operating instructions and the accompanying brochure: Safety information for brush cleaning units 5.956-251.0.
The appliance has been approved for use on surfaces with max. gradients as listed under "Technical Specifications".
Safety Devices
Safety devices serve to protect the user and must not be rendered in operational or their functions bypassed.
Emergency-stop button
To put all functions out of operation immediately: Press emergency-stop button.
Safety Switch
The device only drives if the user stands on the safety switch in the rear area of the platform.
Symbols on the machine

△CAUTION
Risk of injury on account of being crushed.
Keep hands away from this area while swivelling down the waste water tank.
DANGER
Increased risk of accidents due to high speed. Drive slowly on slopes.
Danger or hazard levels
⚠️DANGER
Immediate danger that can cause severe injury or even death.
⚠ WARNING
Possible hazardous situation that could lead to severe injury or even death.
△CAUTION
Pointer to a possibly dangerous situation, which can lead to minor injuries.
ATTENTION
Pointer to a possibly dangerous situation, which can lead to property damage.
Function
The scrubbing vacuum cleaner is used for the wet cleaning of level floors.
It can be easily adjusted to the cleaning task by setting the water quantity and the dirt water suction.
- By selecting a suitable cleaning programme via the programme selection switch, you can easily adapt to the cleaning task at hand.
- A working width of 650 mm, or 750 mm (depending on the selected cleaning head) and a capacity of the fresh water tank of 95 l enable effective cleaning with long working times.
– The appliance is self-driven.
– The batteries can be charged using the built-in charger.
Note:
The appliance can be equipped with various accessories depending on the cleaning task. Please request our catalogue or visit us on the Internet at www.kaercher.com.
Proper use
Use this appliance only as directed in these operating instructions.
- This device is suitable for commercial use, e.g. in skilled crafts and trades, in hotels, schools, hospitals, factories, shops, offices, and rental companies.
- The appliance may only be used for the cleaning of hard surfaces that are not sensitive to moisture and polishing operations.
- This appliance is intended for inside use.
- The application temperature ranges from +5°C to +40°C.
- The appliance is not suited for the cleaning of frozen grounds (e.g. in cold stores).
- The appliance is suitable for a max. water depth of 1cm . Do not drive into an area where there is a risk of this max. water height being exceeded.
- The appliance may only be equipped with original accessories and spare parts.
- When using chargers or batteries, only the components approved in the operating instructions may be used. A different combination must be confirmed by the responsible charger and/or battery supplier.
– The appliance is not intended for the cleaning of public traffic routes.
- The machine should not be used on surfaces that are sensitive to pressure. Please consider the allowed load per surface unit of the floor. Details of load per surface unit can be found in the technical data.
- The appliance is not suited for the use in potentially explosive environments.
- The machine should not be used to suck in inflammable gases, undiluted acids or solvents.
This includes petrol, thinning agents or hot oil that can form an explosive mixture when it comes in contact with sucked air. Do not use acetone, undiluted acids and solvents as they are aggressive towards the materials from which the appliance is made.
Environmental protection

The packaging materials are recyclable. Please do not throw packaging in the domestic waste but pass it on for recycling.

Old units contain valuable recyclable materials. Batteries, oil and similar substances may not be released into the environment. Therefore please dispose of old units through suitable collection systems.
Notes about the ingredients (REACH)
You will find current information about the ingredients at:
www.kaercher.com/REACH
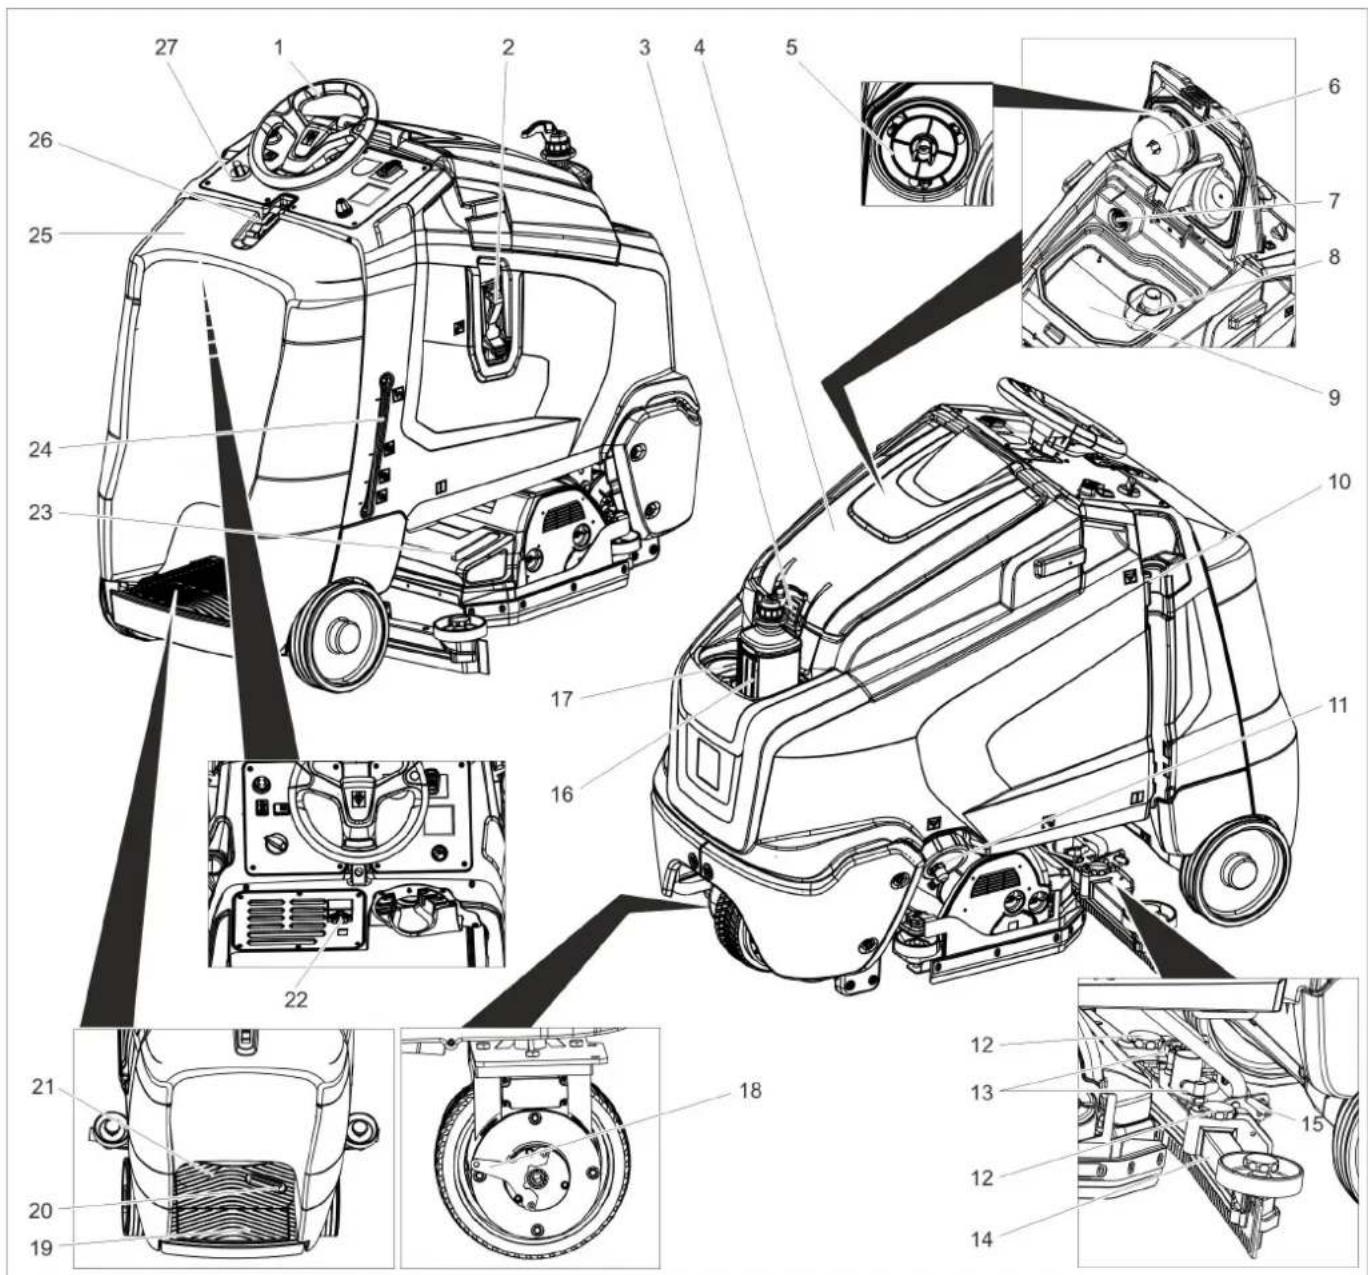
Control elements

text_image
Technical diagram of a car's front and side views with numbered components for identification.1 Steering wheel
2 Filling system
3 Lock, waste water tank
4 Cover waste water tank
5 Protective turbine strainer (under the float)
6 Float
7 Fluff filter
8 Coarse dirt trap
9 waste water tank
10 Dirt water discharge hose
11 Closure fresh water tank with fresh water filter
12 Height adjustment of suction bar
13 Wing nuts for fastening the vacuum bar
14 Vacuum bar *
15 Clamping lever for tilting the suction bar
16 Detergent bottle (only Dose model)
17 Fresh water tank cover
18 Unlocking lever for immobilising brake
19 Safety button
20 Drive pedal
21 Standing area for operator
22 IEC connector for charging cable
23 Waste container (only with R cleaning head) *
24 Fresh water level display
25 Battery cover
26 Lock battery cover
27 Operating field
* not included in the delivery
Colour coding
- The operating elements for the cleaning process are yellow.
- The controls for the maintenance and service are light gray.
Operator console
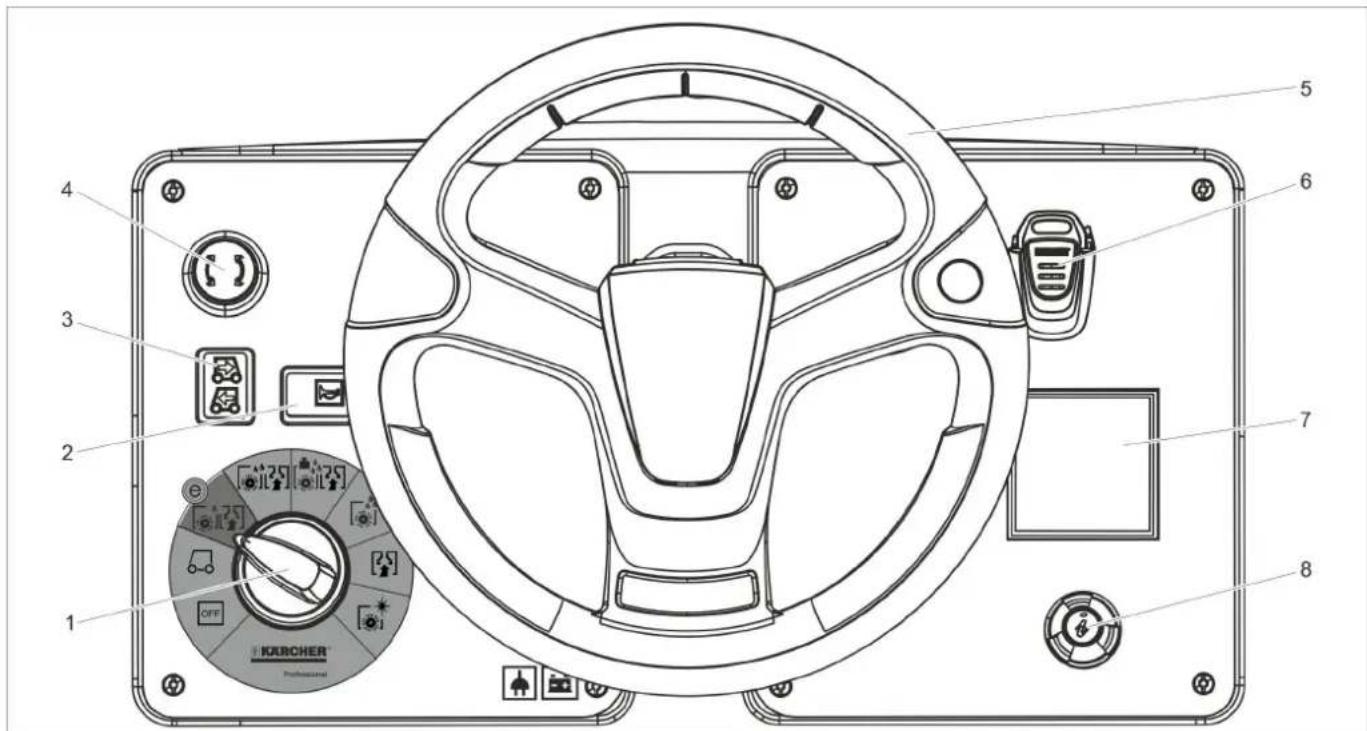
text_image
1 2 3 4 5 6 7 8 OFF KERCHER® Professional1 Programme switch
2 Horn
3 Drive direction switch
4 Emergency-stop button
5 Steering wheel
6 Intelligent Key
7 Display
8 Info button
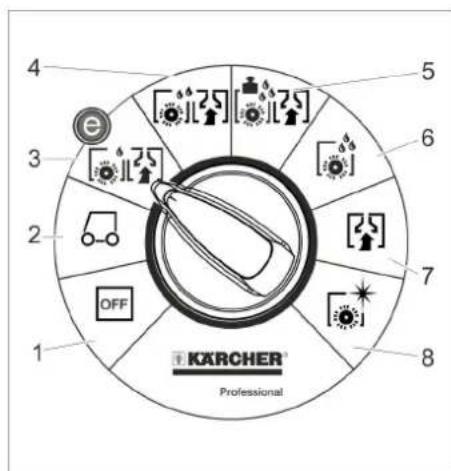
text_image
4 5 6 7 8 1 2 OFF 3 4 e KARCHER Professional1 OFF
Device is switched off
2 Transport run
Driving to the Place of Use.
3 Eco programme
Wet clean the floor (with reduced brush speed) and vacuum up wastewater (with reduced suction).
4 Scrubbing suction
Wet clean the floor and vacuum up dirt water.
5 Heavy programme
Wet clean the floor (with increased brush contact pressure) and vacuum up dirt water.
6 Scrubbing
Wet clean the floor and allow the deter- gent to react.
7 Vacuuming
Suck in the dirt fleet.
8 Polishing
Polishing the floor without the application of liquid.
Programme switch Symbols on the machine
 | Lashing point |
 | Mop holder ** |
 | Water connection filling system |
 | Filling level fresh water tank |
 | Drain outlet fresh water tank |
 | Drain outlet waste water tank |
option
Before Commissioning
Pushing the device
While standing, the device is protected against rolling off with the help of an electrical immobilising brake. To push the device, you need to first unlock the immobilising brake.
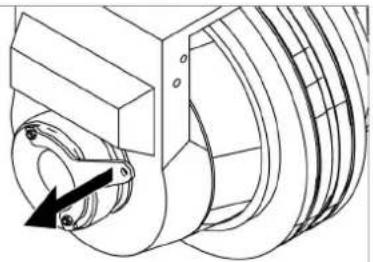
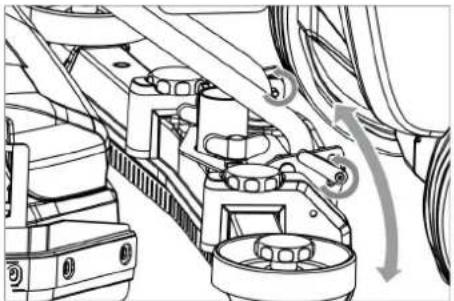
natural_image
Technical line drawing of a mechanical assembly with no visible text or symbols→ Pull the unlocking lever to unlock the parking brake.
ATTENTION
Risk of damage. Do not push the device faster than 7 km/h.
Unloading
Note:
Take the foot off the accelerator pedal and press the emergency-stop pushbutton to immediately switch off all functions.
→ Remove the cardboard.
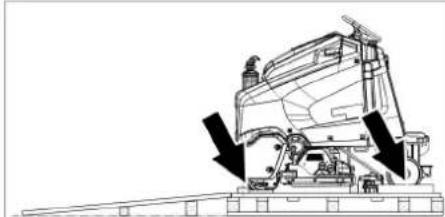
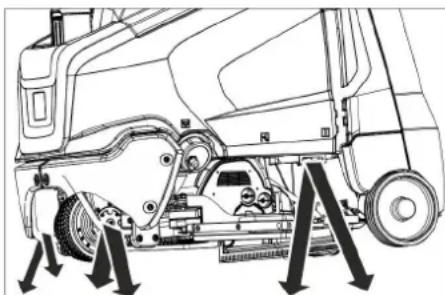
natural_image
Technical line drawing of a cleaning or maintenance device with downward arrows indicating motion (no text or symbols)→ Loosen the fixing at the wheels.

natural_image
Pure mechanical assembly diagram without any text, numbers, or symbols→ Create ramp by repositioning the pallet as shown above and screwing it together. → Pull the brake lever and push the appliance down the ramp with the level pulled.
or
→ Plug in the Intelligent Key.
→ Release emergency-stop button by turning.
→ Set programme selector switch to transport run.
→ Stand on platform and operate safety switch.
→ Set the travel direction switch to "forward".
→ Actuate the accelerator pedal.
→ Drive the appliance off the pallet. The brushes must be installed before the initial operation (see "Maintenance work").
Batteries
 |  |
 | Wear eye protection |
 | Keep children away from acid and batteries |
 | Danger of explosion |
 | Fire, sparks, naked flames and smoking must be strictly avoided |
 | Danger of chemical burns |
 | First aid |
 | Warning note |
 | Disposal |
 | Do not throw the battery into the regular waste |
| Pb |
DANGER
Risk of explosion!
Do not place tools or similar items on the battery. Risk of short-circuit and explosion. Risk of injury. Ensure that wounds never come into contact with lead. Always clean your hands after having worked with batteries.
Recommended battery sets
| Order No. | Volume [ m^3 ]* | Air flow [ m^3/h ]** | |
| 170 Ah - maintenance-free | 4.035-164.0 | 3,3 1,32 | |
| 180 Ah - maintenance-free | 4.035-097.0 | 3,8 1,52 | |
| 180 Ah, - low maintenance | 4.035-165.0 | 14,85 5,94 | |
| 195 Ah - low maintenance | 4.035-166.0 | 22,28 8,94 | |
| * Minimum volume of the battery charging room** Minimum air flow between the battery charging room and the surroundings | |||
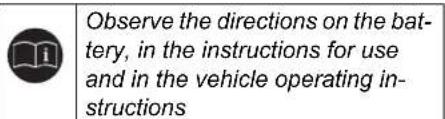
Insert batteries and connect
The "Pack" model contains built-in batteries.
→ Press emergency-stop button.
→ Remove the Intelligent Key.
→ Open the lock of the battery cover.
→ Tilt the battery cover backwards.
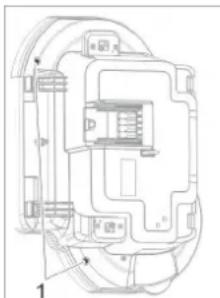
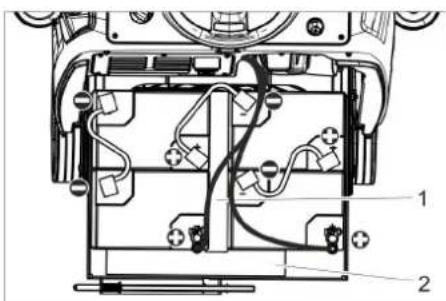
natural_image
Technical line drawing of a mechanical lifting device with labeled components (no text or symbols present)1 Locking the battery insert
→ Push the lock of the battery insert towards the left and tilt it downward.
→ Pull the battery insert towards the rear.
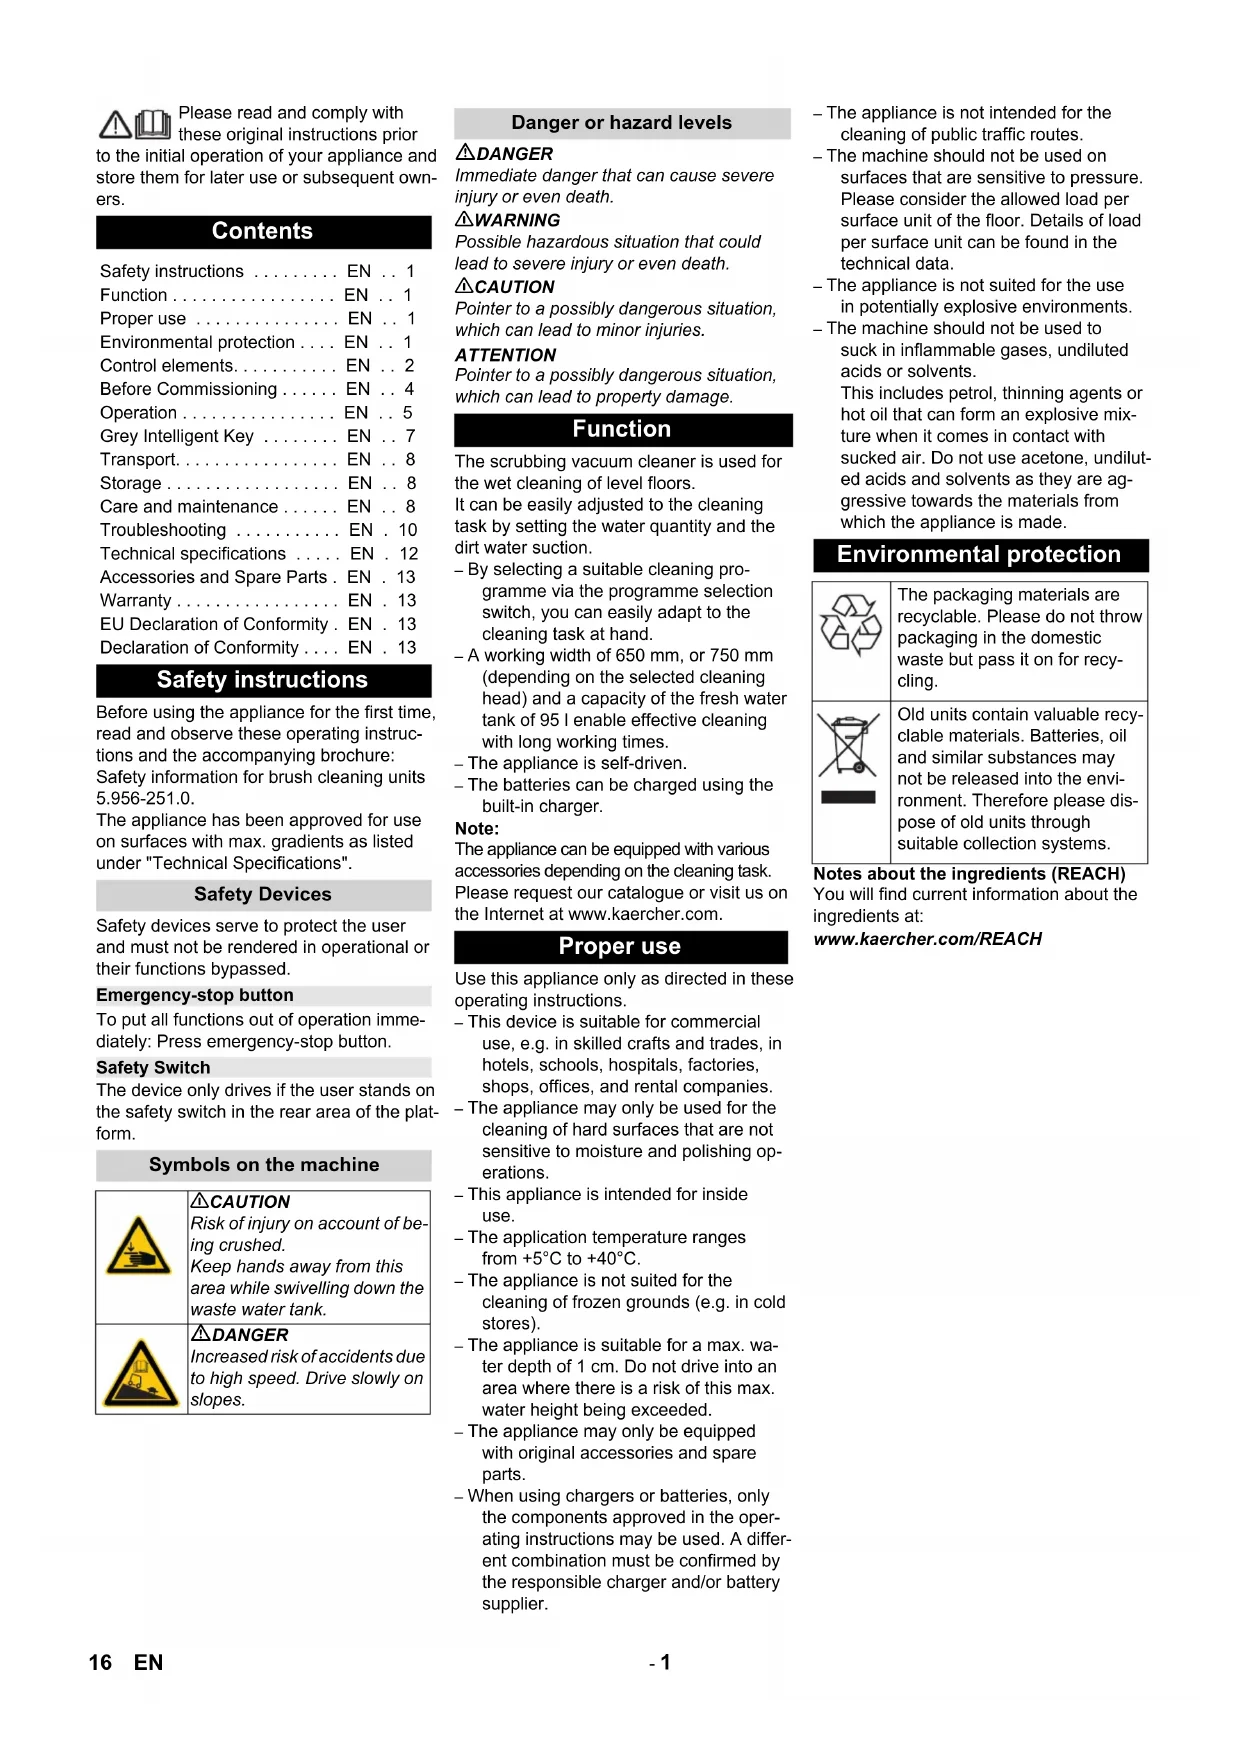
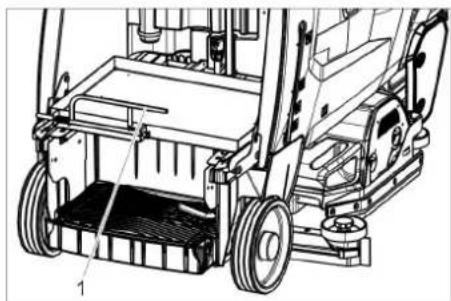
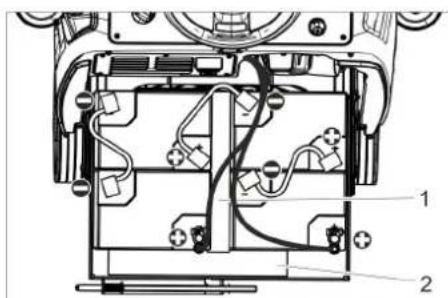
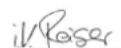
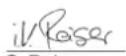
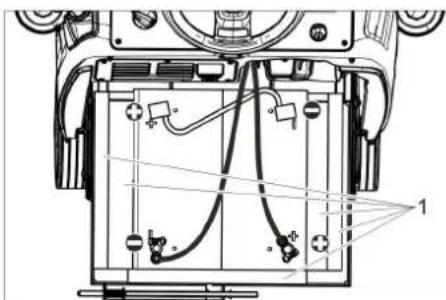
natural_image
Technical diagram of a mechanical device with internal components and wiring (no text or symbols)4.035.097.0, 4.035-165.0
1 Spacer 380x55x30
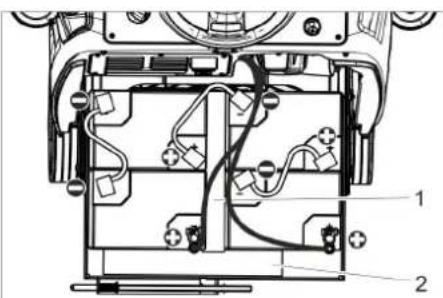
text_image
Technical diagram of a device's internal components with labeled parts 1 and 24.035-164.0
1 Spacer 345x60x47
2 Spacer 380x55x30
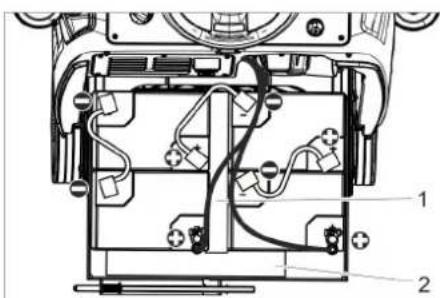
text_image
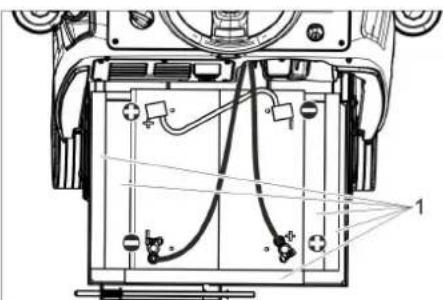
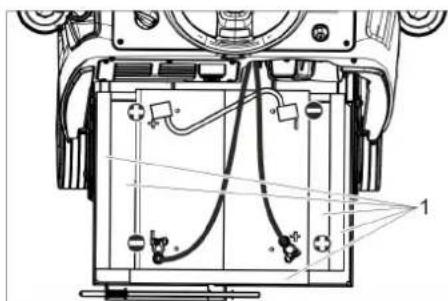
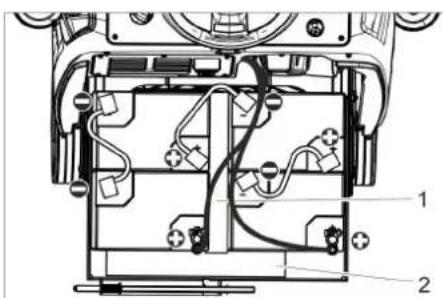
Technical diagram of a device's internal components with labeled parts and wiring4.035-166.0
1 Spacer 380x55x30
ATTENTION
Risk of damage. Mind correct polarity.
→ Connect pole using the enclosed connecting cable.
→ Connect the connection cable to the free battery poles (+) and (-).
→ Push the battery insert towards the front.
→ Lock in the battery insert lock.
→ Set the battery type (see Chapter "Grey Intelligent Key".
ATTENTION
Risk of damage due to total discharge. Charge the batteries before commissioning the appliance.
Charge the batteries
Note:
The appliance is equipped with a total discharge protection, i.e. if the still admissible minimum of the capacity is reached, the appliance can only be driven. The display shows the message "Battery low - cleaning not possible" and "Battery empty - please charge".
→ Drive the appliance directly to the charging station; avoid any steep gradients in the process.
Note:
When using other batteries (e.g. batteries from other manufacturers), the total discharge protection level for the respective battery must be reset by the Kärcher after-sales service.
DANGER
Risk of electric shock. Observe supply network and fuse protection. Only use the charger in dry rooms with sufficient ventilation!
Note:
Average charging time is approx. 10 - 12 hours.
The charger automatically switches off the charging process.
DANGER
Danger of explosion. The room, where the machine is kept to charge the battery, must feature a minimum volume and an air exchange with a minimum flow rate, depending on the type of battery (see "Recommended Batteries").
Risk of explosion. Batteries may only be charged while the battery cover is open.
→ Open the lock of the battery cover.
→ Tilt the battery cover backwards.
→ Connect the power cable with the IEC connector on the appliance.
→ Connect the mains cable to the power supply system.
A battery symbol and the state of charge of the battery is shown on the display. The display lighting goes out.
→ Do not close the battery cover during charging!
Note:
During the charging process all cleaning and driving functions are blocked. When the battery is fully charged, "Charging completed" is shown on the display.
→ Pull the mains plug out of the socket and unplug the cable from the appliance after the charging process.
Low maintenance batteries (wet batteries)
→ Add distilled water one hour before the charging process comes to an end; follow the correct acid level. There are corresponding indicators on the battery. At the end of the charging process, all cells must gas.
⚠️DANGER
Danger of causticization!
Adding water to the battery in its discharged state can cause the acid to leak. Use safety glasses while handling battery acid and follow the safety instructions to avoid personal injury or damage to clothes. Should the acid spray on to the skin or clothes, rinse immediately with lots of water.
ATTENTION
Use only distilled or desalinated water (EN 50272-T3) for filling the battery. Do not add any substances (so-called performance improving agents), else warranty claims will not be entertained.
Maximum battery dimensions
| Length 390 mm | |
| Width 540 mm | |
| Height 375 mm |
Battery compartment size: 546 mm x 391 mm
Information on the initial charge
Note:
With the initial charge, the control will not yet be able to detect which battery type has been installed. In this case, the battery indicator still works inaccurately.
A "V" to the right of the bar of the battery indicator shows that the initial charge has not been performed yet.
→ Charge the battery until the display shows the maximum charge condition.
→ Use the appliance until the deep discharge protection switches off the brush motor and the turbine after the initial charge of the batteries.
→ Then correctly and completely charge the batteries.
After the initial charge, the "V" to the right of the battery indicator disappears.
Now the battery indicator works accurately.
Note:
If a battery type is selected in the battery menu, the procedure described above must be performed again. This is also the case if the already set battery type is reselected.
Battery display
The charge condition of the batteries is shown on the display of the control panel.
– The length of the bar indicates the charge condition of the battery.
– During the last 30 minutes the remaining operating time is indicated in minutes.
Install cleaning head
The procedure for changing the cleaning head is described in the chapter "Maintenance Tasks".
Note:
On some models, the cleaning head is already installed.
Installing the Brushes
The installation of the brushes is described in the chapter "Maintenance Tasks".
Installing the Vacuum Bar
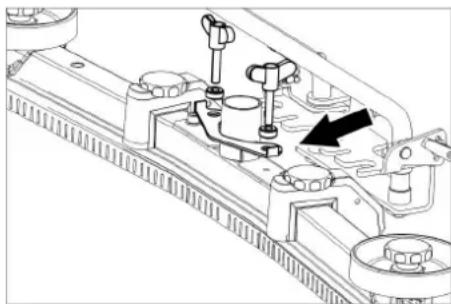
natural_image
Technical line drawing of a mechanical assembly with mounting holes and a black arrow indicating a specific component (no text or symbols present)→ Insert the vacuum bar into the vacuum bar suspension in such a manner that the profiled sheet is positioned above the suspension.
→ Tighten the wing nuts.
→ Insert the suction hose.
Operation
Note:
Take the foot off the accelerator pedal and press the emergency-stop pushbutton to immediately switch off all functions.
Turning on the Appliance
→ Plug in the Intelligent Key.
→ Release emergency-stop button by turning.
→ Turn the programme switch to the desired function.
→ Wait until the device is ready for operation.
→ Stand on platform and operate safety switch.
→ If the relevant indication appears on the display, perform the maintenance task.
| Display Activity | |
| MaintenanceVacuum bar | Clean the vacuum bar. |
| MaintenanceFresh water Fil-ter | Clean the fresh water fil-ter. |
| MaintenanceSuction lip | Check vacuum lips for set-ting and wear and tear. |
| MaintenanceTurbine strainer | Clean protective turbinestrainer. |
| MaintenanceBrush head | Check brush for wear andtear and clean it. |
→ Press Info button.
→ Reset the counter for the corresponding maintenance (see "Care and maintenance/resetting counter").
Note:
If the counter is not reset, the maintenance indicator appears again with every start-up of the device.
Check parking brake
DANGER
Risk of accident. Prior to every operation, the parking brake must be checked for proper function on a level ground.
→ Turn on the appliance.
→ Set the travel direction switch to "forward".
→ Set programme selector switch to transport run.
→ Stand on platform and operate safety switch.
→ Gently depress drive pedal.
→ The brake must unlock audibly. The machine must roll easily on a plane surface. When the pedal is released, the brake locks audibly. Switch off the machine and call the aftersales service if the above-mentioned events do not occur.
Driving
DANGER
Risk of accident. If the device does no longer show any braking effect, proceed as follows:
If the device does not come to a halt on a ramp with a gradient of 2% when you release the accelerator pedal, for safety reasons, the Emergency-stop button may be pressed only if the mechanical functioning of the parking brake has been checked properly before every startup of the device.
→ Switch off the machine only after it comes to a complete halt (on an even surface) and call up the aftersales service!
→ Further, follow all warning instructions for braking.
⚠️DANGER
Danger of tipping if gradient is too high.
→ The gradient in the direction of travel should not exceed 10%. Drive only lengthwise on uphill and downhill gradients, do not turn.
Danger of tipping when driving round bends at high speed.
Danger of slipping on wet floors.
→ Drive slowly when cornering.
Danger of tipping on unstable ground.
→ Only use the machine on sound surfaces.
Danger of tipping with excessive sideways tilt.
Driving
→ Plug in the Intelligent Key.
→ Release emergency-stop button by turning.
→ Set programme selector switch to transport run.
→ Stand on platform and operate safety switch.
→ Set the drive direction using the drive direction button at the operator console.
→ Determine the driving speed by pressing the drive pedal.
→ Stop the machine: Release the drive pedal.
Note:
The direction of travel can also be changed while driving. This way even very dull spots can be polished by driving back and forth several times.
Overload
In case of overloading, the drive motor automatically switches off after a certain period. A fault message is displayed on the console. The concerned unit gets switched off if the controls get overheated.
→ Allow machine to cool down at least for 15 minutes.
→ Turn the programme switch to "OFF", wait for a short period of time and turn it back to the desired programme.
Filling in detergents
Detergent
ATTENTION
Risk of damage. Only use the recommended detergents. With other detergents, the operator bears the increased risk regarding the operational safety, risk of accident and reduced service life of the appliance. Only use detergents that are free of solvents, hydrochloric acid and hydrofluoric acid.
Follow the safety instructions for using detergents.
Note:
Do not use highly foaming detergents.
| Application Detergent | |
| Routine cleaning of all water resistant floors | RM 746RM 780 |
| Routine cleaning of glossy surfaces (e.g. granite) | RM 755 es |
| Routine cleaning and basic cleaning of industrial floors | RM 69 ASF |
| Routine cleaning and basic cleaning of fine stoneware tiles | RM 753 |
| Routine cleaning of tiles in sanitary areas | RM 751 |
| Cleaning and disinfection in sanitary areas | RM 732 |
| Removal of coating from all alkali-resistant floors (e.g. PVC) | RM 752 |
| Removal of coating from li-noleum floors | RM 754 |
Fresh water
→ Connect the water hose to the connection neck on the filling system.
→ Open water supply (maximum 60 °C). Once the maximum fill level is reached, the built-in floater valve will stop the water inflow.
→ Shut off water supply.
→ Remove the water hose.
→ Pour in detergent.
Note:
If detergent is added to the detergent tank first before the water, this can result in a formation of a lot of foam.
Metering system (only Dose model)
Detergent is added to the fresh water on the way to the cleaning head with the help of a dosaging device.
→ Place the detergent bottle into the device.
→ Close the bottle lid.
→ Insert the suction hose of the dosaging equipment into the bottle.
Note:
The dosing unit can be used to add 3% detergent at maximum. With higher dosage the detergent must be put into the fresh water tank.
ATTENTION
Risk of clogging due to dried detergent when the detergent is added to the fresh water tank of the Dose version. The flow meter of the dosing equipment can agglutinate on account of drying detergent and hamper the functioning of the dosing equipment. Subsequently rinse the fresh water tank and the device with clear water. For rinsing, select cleaning programme with application of water at the programme selector switch. Set the water quantity to the highest value, set the detergent dosing unit to 0%
Note:
The appliance is equipped with a fresh water indicator in the display. If the fresh water tank is empty, the function of adding detergent gets deactivated. The cleaning head continues to work without liquid supply.
Setting the parameters
With yellow Intelligent Key
Parameters for the different cleaning programmes are preset in the appliance. Depending on the authorisation of the yellow Intelligent Key, individual parameters can be changed.
The modification of the parameters is only valid until another cleaning programme is selected via the programme selection switch.
If you wish to permanently change the parameters, you must use a grey Intelligent Key. This adjustment procedure is described in the section "Grey Intelligent Key".
Note:
Almost all displayed text regarding parameter adjustment is self-explanatory. The only exception is the parameter FACT:
– Fine Clean: Lower brush speed for removing the grey film on fine stone floors.
- Whisper Clean: Medium brush speed for regular cleaning with reduced noise level.
– Power Clean: High brush speed for polishing, crystallising and sweeping.
→ Turn the program selection switch to the desired cleaning program.
→ Turn the info button until the desired parameter is displayed.
→ Press Info button - the set value blinks.
→ Set the desired value by turning the info button.
→ Confirm the changed setting by pressing the Info button or wait till the set value is automatically accepted after 10 seconds.
Setting the Vacuum Bar
Oblique position
To improve the vacuuming result on tiled floors the vacuum bar can be turned to an oblique position of up to 5^ .
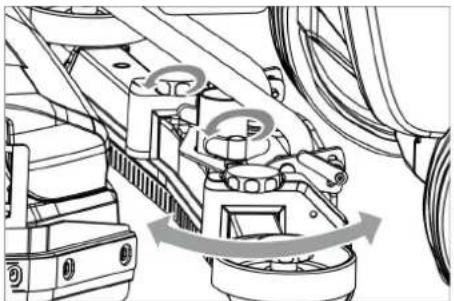
natural_image
Mechanical assembly diagram showing gear and wheel components with no visible text or symbols→ Release the wing nuts.
→ Turn the vacuum bar.
→ Tighten the wing nuts.
Inclination
If the vacuum result is unsatisfactory the inclination of the straight vacuum bar can be modified.

natural_image
Technical line drawing of a mechanical assembly with no visible text or symbols→ Loosen both clamping levers.
→ Adjust the inclination of the suction bar.
→ Tighten both clamping levers.
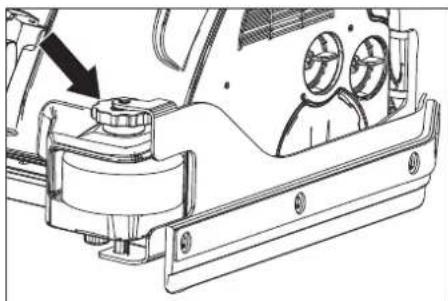
Emptying the waste Water tank
Note:
Overflow waste water tank. When the wastewater tank is full, the suction turbine switches off and "Waste water tank full" is shown on the display.
⚠ WARNING
Please observe the local provisions regarding the wastewater treatment.
→ Take the dirt water discharge hose from the support and lower above a suited collection device.
Note:
The wastewater flow can be controlled by squeezing the dosing unit.
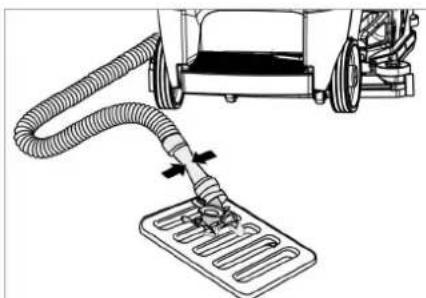
natural_image
Diagram of a robotic arm with hoses and a slide, no text or symbols present→ Let off water by opening the dosage device at the discharge hose.
→ The rinse the dirt water reservoir with clear water.

text_image
Technical diagram of a truck showing structural components with arrows indicating direction and cross-sectional views→ Press the wastewater hose into the holder on the appliance.
Emptying the Fresh Water Tank
→ Open the lock of the fresh water reservoir.
→ Drain the fresh water.
→ Attach the closure of the fresh water tank.
Empty waste container (only with R cleaning head)
→ Check the waste container. If needed, remove and empty waste container after work.
Shutting down
→ Remove the Intelligent Key.
→ Secure the machine with wheel chocks to prevent it from rolling away.
→ Charge battery, if required.
Grey Intelligent Key
→ Plug in the Intelligent Key.
→ Select the desired function by turning the Info button.
The different functions are described in the following.
Transport run
→ Turn programme selector switch to "transport run".
→ Press Info button.
In the transport run menu the following settings can be made:
Key management
In this menu item the authorisations for yellow intelligent keys as well as the language of the display texts are selected.
→ Turn the info button until "key managem." is shown on the display.
→ Press Info button.
→ Remove the grey Intelligent Key and insert the yellow Intelligent Key to be programmed.
→ Select the desired menu item to be modified by turning the Info button.
→ Press Info button.
→ Adjust the menu item by turning the Info button.
→ Confirm the setting by pressing the menu item.
→ Select the next menu item to be modified by turning the Info button.
→ In order to save the authorisations, call the "Save?" menu by turning the info button and then press the info button.
→ "Continue key menu":
Yes: Programme further Intelligent Key.
No: Exit key menu.
Yes: Programme further Intelligent Key.
No: Exit key menu.
→ Press Info button.
Selecting the brush shape
This function is required when changing the cleaning head.
→ Turn the info button until "brush head" is shown on the display.
→ Press Info button.
→ Turn the info button until the desired brush shape is highlighted.
→ Press Info button.
→ Move the hoist drive for replacement of the cleaning head by turning the info button:
up: Raise
down: Lower
OFF: Stop
→ Exit menu: Select "OFF" by turning the info button and press the info button.
When exiting the menu, the control performs a restart.
Stopping times
→ Turn the info button until "stopping times" is shown on the display.
→ Press Info button.
→ Turn the info button until the desired assembly is highlighted.
→ Press Info button.
→ Turn the info button until the desired stopping time is reached.
→ Press Info button.
Setting the battery type
→ Turn the info button until "Battery menu" is displayed.
→ Press Info button.
→ Turn the info button until the desired battery type is highlighted.
→ Press Info button.
Standard setting
Changes of the parameters of the individual cleaning programmes that were made during the operation are reset to the basic setting after switching off the appliance.
→ Turn the info button until "Basic setting" is displayed.
→ Press Info button.
→ Turn the info button until the desired cleaning programme is displayed.
→ Press Info button.
→ Turn the info button until the desired parameter is displayed.
→ Press Info button - the set value blinks.
→ Set the desired value by turning the info button.
→ Press Info button.
Setting the language
→ Turn the info button until "Language" is displayed.
→ Press Info button.
→ Turn the info button until the desired language is highlighted.
→ Press Info button.
Factory setting
The factory settings of all parameters are restored.
Cleaning Programs
Parameters that are adjusted with the grey Intelligent Key, are kept until another setting is selected.
→ Turn the program selection switch to the desired cleaning program.
→ Press the info button - the first adjustable parameter is displayed.
→ Press Info button - the set value blinks.
→ Set the desired value by turning the info button.
→ Confirm the changed setting by pressing the Info button or wait till the set value is automatically accepted after 10 seconds.
→ Select the next parameter by turning the Info button.
→ After all desired parameters have been modified, turn the info button until "Exit menu" is displayed.
→ Press the info button - you will exit the menu.
Transport
DANGER
Risk of injury! When loading or unloading the machine, it may only be operated on gradients of max. 10%. Drive slowly.
△CAUTION
Risk of personal injury or damage! Mind the weight of the appliance during transport.
natural_image
Technical line drawing of a truck's internal components and suspension system (no text or symbols)→ When transporting in vehicles, secure the appliance according to the guidelines from slipping and tipping over.
With mounted D cleaning head
→ Remove brushes from the brush head.
Storage
⚠CAUTION
Risk of personal injury or damage! Consider the weight of the appliance when storing it.
→ This appliance must only be stored in interior rooms.
→ Select the storage site for the appliance taking into consideration the permissible total weight of the appliance in order not to impact its stability.
Care and maintenance
DANGER
Risk of injury!
During cleaning or maintenance or when replacing parts or upon changing the device to another function, the positive terminal of the battery must be disconnected and the mains plug of the charger must be unplugged.
→ Drain and dispose of the dirt water and the residual fresh water.
△CAUTION
Risk of injury due to overrun of the suction turbine.
Suction turbine will continue to run for a while after switch-off. Carry out maintenance tasks only after the suction turbine has come to a halt.
Maintenance schedule
After the work
ATTENTION
Risk of damage. Do not sluice the appli- ance with water and do not use aggressive detergents.
→ Drain off dirt water.
→ Rinse the waste water tank with clear water.
→ Clean protective turbine strainer.
→ Only with R cleaning head Remove bulk waste container and empty it.
→ Clean the outside of the appliance with a damp cloth which has been soaked in mild detergent.
→ Clean the vacuum lips and the wiping lips, check for wear and replace if required.
→ Check the brushes for wear, replace if required.
→ Do not close the lids of the fresh water and waste water tanks so that the tanks can dry up.
→ Charge the battery: If the charging state of the battery is under 50%, charge the battery fully and without interruption. If the charging state of the battery is over 50%, only recharge the battery if the entire operation duration will be required when next used.
Weekly
→ When used regularly, charge the battery fully and without interruption at least once a week.
Monthly
→ During long operating pauses: Carry out refill charging for the battery.
→ Check battery poles for oxidation, brush off if necessary. Ensure firm seating of the connection cable.
→ Clean the seals between waste water tank and cover and check for tightness, replace if required.
→ Check the acid density of the cells if the batteries are not maintenance-free batteries.
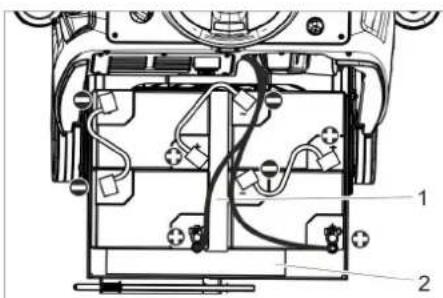
→ Clean the brush tunnel (only R cleaning head)
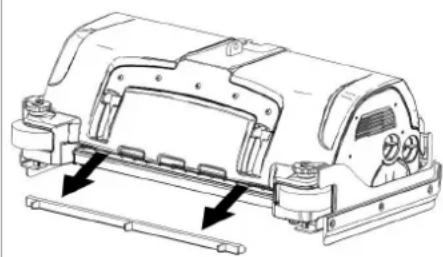
natural_image
Technical line drawing of a mechanical assembly with mounting brackets and a central housing (no text or symbols)→ Remove the water distribution strip from the cleaning head and clean water canal (only R cleaning head).
→ For long periods of disuse, only turn the device off when the battery is fully charged. Fully recharge the battery at least every month.
Yearly
→ Have the prescribed inspection carried out by the customer service.
Reset the counter
When a maintenance task indicated in the display has been performed, the relevant maintenance counter must be reset afterwards.
→ Plug in the Intelligent Key.
→ Release emergency-stop button by turning.
→ Set programme selector switch to transport run.
→ Press Info button.
→ Turn the info button until "Maintenance counter" is displayed.
→ Press Info button.
The counter readings are displayed.
→ Press Info button.
"Delete counter" is indicated.
→ Turn the info button until the counter to be deleted is highlighted.
→ Press Info button.
→ Select "YES" by turning the info button.
→ Press Info button.
The counter is deleted.
Note:
The service counter can only be reset by the customer service.
The service counter indicates the time until the next service by the customer service is due.
Maintenance contract
To ensure a reliable operation of the appliance maintenance contracts can be concluded with the competent Kärcher sales office.
Maintenance Works
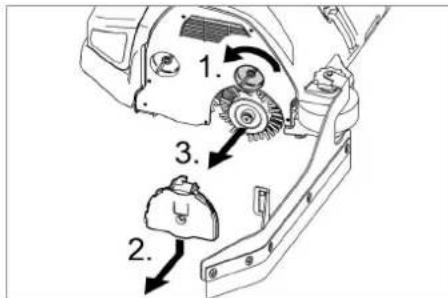
Cleaning the protective turbine strainer
→ Open the cover of the waste water tank.
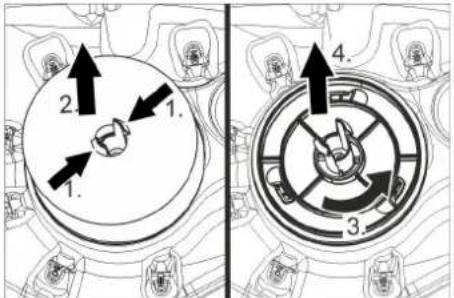
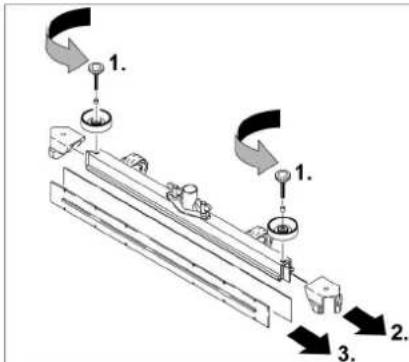
text_image
1. 2. 3. 4.→ Squeeze the locking hooks.
→ Pull off the float.
→ Turn the protective turbine strainer in a counter-clockwise direction.
→ Remove protective turbine strainer.
→ Rinse dirt off the protective turbine strainer with water.
→ Reattach protective turbine strainer.
→ Attach float.
Replacing the vacuum lips
→ Remove the vacuum bar.
→ Unscrew the star grips.
text_image
Technical diagram showing a mechanical assembly with numbered components and directional arrows indicating motion or assembly steps.→ Remove the plastic parts.
→ Remove the vacuum lips.
→ Insert new vacuum lips.
→ Insert the plastic parts.
→ Screw in and tighten the star grips.
Install cleaning head
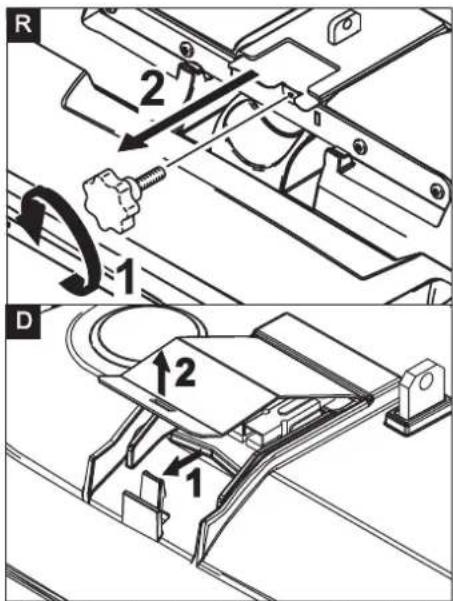
text_image
R 2 1 D 1 2 1→ R cleaning head: Unscrew the star handle and remove the lid.
→ D cleaning head: Remove the lid of the cleaning head.
→ Place the cleaning head centrally under the device.
→ Connect the power cord of the cleaning head to the appliance (same colours must meet).
→ R cleaning head: Slide the lid in and tighten the screw.
→ D cleaning head: Replace the lid and lock it.
→ Connect the hose couplers on the cleaning head to the hose on the appliance.
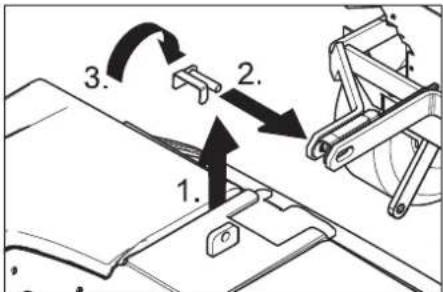
text_image
1. 2. 3.→ Insert the tab into the middle of the cleaning head, between the fork of the lever.
→ Align the lever so that the drilled holes in the lever and the cleaning head match.
→ Insert the retaining pin through the drilled holes and swivel the locking plate downwards so that it snaps into place.
Mount splash guard

natural_image
Technical line drawing of a mechanical assembly with no visible text or symbols→ Select the floor clearance of the spray guard by turning the adjustment wheel.
Replacing the brush rollers
→ Lift the cleaning head.
text_image
1. 2.→ Loosen the lock of the wiper flap.
→ Swivel the wiping flap out of the way.
text_image
1. 2. 3.→ Loosen the lock of the wiper flap.
→ Push the bearing lid down and remove.
→ Pull out the brush roller.
→ Insert a new brush roller.
→ Reattach the bearing lid and the wiper flap in reverse sequence.
→ Repeat process on the opposite side.
Replacing the Disk Brushes
→ Lift the cleaning head.

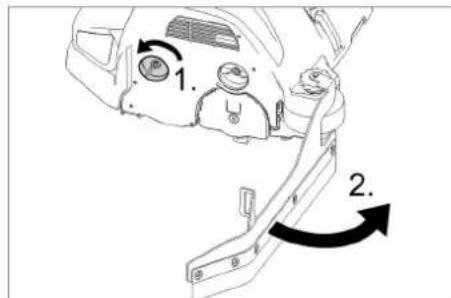
natural_image
Technical line drawing of a mechanical component with two arrows pointing to features (no text or symbols present)→ Press the pedal for changing the brushes downward beyond its resistance.
→ Pull the disc brush out of the side below the cleaning head.
→ Hold the new disc brush under the cleaning head, push upward and lock.
Frost protection
In case of danger of frost:
→ Empty the fresh and dirt water reservoirs.
→ Store the appliance in a frost-protected room.
Removing the batteries
→ Open the lock of the battery cover.
→ Tilt the battery cover backwards.
→ Push the lock of the battery insert towards the left and tilt it downward.
→ Pull the battery insert towards the rear.
→ Clamp off the minus pole of the battery.
→ Clamp off the remaining cables from the battery.
→ Remove the batteries.
→ Dispose of the used batteries according to the local provisions.
Troubleshooting
DANGER
Risk of injury!
During cleaning or maintenance or when replacing parts or upon changing the device to another function, the positive terminal of the battery must be disconnected and the mains plug of the charger must be unplugged.
→ Drain and dispose of the dirt water and the residual fresh water.
△CAUTION
Risk of injury due to overrun of the suction turbine.
Suction turbine will continue to run for a while after switch-off. Carry out maintenance tasks only after the suction turbine has come to a halt.
In case of faults that cannot be remedied using the table below please contact the customer service.
Fault indication
If errors appear on the display, then proceed as follows:
Fault indication as text
→ Execute instructions on the display.
→ Acknowledge the fault by pressing the info button.
Fault indication as numerical code
→ Turn the program selection switch to "OFF".
→ Wait till the text on the display has disappeared.
→ Turn the programme switch into the previous position.
Only carry out the troubleshooting measures in the indicated order if the error occurs again. The key switch must be in the "0" position and the emergency stop button pressed.
→ If the fault cannot be repaired, call customer service and mention the error message.
Note:
Fault messages that are not listed in the following table indicate faults that cannot be rectified by the operator. Please contact the aftersales service.
Faults with display
| Display Cause Remedy | ||
| Release accelerator! The gas pedal is depressed when the main switch is on. | → Release drive pedal and reactivate. | |
| No direction of travel! Travel direction switch or cable connection defective. | → Call customer service. | |
| Battery discharged! Battery voltage too low. → Charge battery. | ||
| Battery voltage inadmissible! | Battery voltage is above or below the admissible range. | → Call customer service. |
| Charger defective! Error on the charger, charging is not possible. | → Check the charger. | |
| Brush pressure not reached! | Timeout brush contact pressure control. | → Check brush wear, replace brush if required.→ Check the function of the brush heads: lowering, raising. |
| Brake defective! Brake defective. → Do not drive the appliance. | ||
| Propulsion motor hot! Allow to cool down! | Motor protection was triggered → | Bring the safety switch into the "0" position.→ Allow machine to cool down at least for 15 minutes.→ Contact aftersales service in case of recurrence. |
| Horn defective! Horn defective. → Call customer service. | ||
| Control is hot! Allow to cool down! | Performance electronics of lift module (A4) too hot | → Bring the safety switch into the "0" position.→ Allow control to cool down at least 5 minutes.→ Significantly reduce the brush pressure with rough ground.→ Contact aftersales service in case of recurrence. |
| Brush motors overloaded! | Load of the brush heads asymmetric. | → Adjust brush level. |
Faults without display on the console
| Fault Remedy | |
| Appliance cannot be started Release emergency-stop button by turning. | |
| Insufficient water quantity Check fresh water level, refill tank if necessary. | |
| Heavy water leak on the side during the use of the D cleaning head | Reduce water volume.Dismount Aqua-Mizer (see below). |
| Insufficient vacuum performance | Clean the seals between waste water tank and cover and check for tightness, replace if required. |
| Check protective turbine strainer for soiling, clean if necessary. | |
| Clean the vacuum lips on the vacuum bar, turn or replace if required | |
| Check if the cover on the dirt water discharge hose is closed | |
| Check suction hose for blockages; clean if required. | |
| Check the suction hose for tightness; replace if required. | |
| Check the setting of the vacuum bar. | |
| Attach additional weight (accessory) to the vacuum bar. | |
| Insufficient cleaning result Select a more intensive cleaning program. | |
| Brushes do not turn Check if foreign matters block the brushes; remove foreign matter if required. | |
| Drain hose for dirty water is blocked | Open dosing equipment at the drain hose. Pull out the suction hose from suction beam and close it by hand. Set the program selection switch to suction or vacuuming. The blockage will be sucked out from the drain hose into the dirt water tank. |
| Detergent metering Dose (only Dose) does not function properly | Inform Customer Service. |
Dismounting Aqua-Mizer
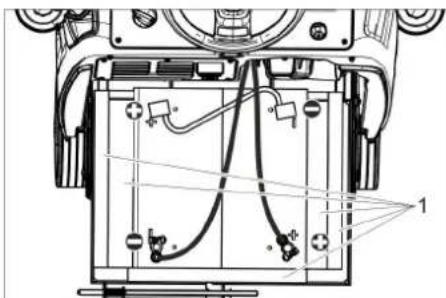
natural_image
Technical line drawing of a mechanical component with no visible text or symbols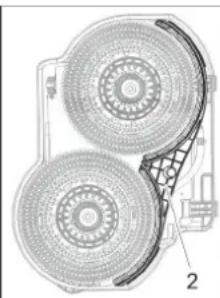
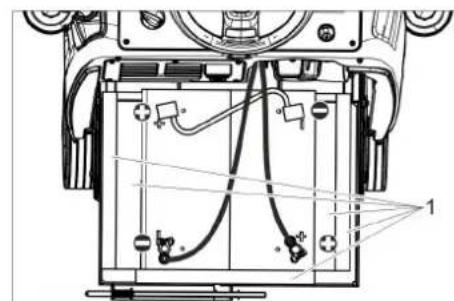
natural_image
Technical diagram of a mechanical component with two circular components and a grid-patterned base (no text or symbols)1 Screw
2 Aqua-Mizer
→ Unscrew 2 screws.
→ Remove Aqua-Mizer.
Technical specifications
| B 95 R 65 D 65 R 75 | ||||
| Power | ||||
| Nominal voltage V 24 | ||||
| Battery capacity Ah (5h) 170...198 | ||||
| Average power consumption W 1950 | ||||
| Nominal power engine W 600 | ||||
| Suction engine output W 750 550 750 | ||||
| Brush engine output W 2x600 | ||||
| Vacuuming | ||||
| Cleaning power, air quantity I/s 20,5 | ||||
| Cleaning power, negative pressure | kPa | 12,0 | ||
| Cleaning brushes | ||||
| Working width | mm | 650 | 750 | |
| Brush diameter | mm | 105 365 | 105 | |
| Brush speed | 1/min | 1200 | 140 | 1200 |
| Dimensions and weights | ||||
| Driving speed | km/h | 6 | ||
| Slope max. | % | 10 | ||
| Theoretical surface cleaning performance | m2/h | 3900 | 4500 | |
| Fresh/waste water tank volume | l | 95 | ||
| Capacity coarse dirt container | l | 6 | - | 7 |
| Water pressure filling system**, waste water tank rinsing system**, max. | MPa(bar) | 1 (10) | ||
| Length | mm | 1525 | ||
| Width (without vacuum bar) | mm | 760 750 | 810 | |
| Height | mm | 1470 | ||
| Permissible overall weight | kg | 500 | ||
| Transport weight | kg | 325 | 330 | |
| Admissible temperature range | °C | 5...40 | ||
| Surface load (with driver and full fresh water tank) | ||||
| Front wheel | N/cm2 | 66 | ||
| Rear wheel | N/cm2 | 54 | ||
| Values determined as per EN 60335-2-72 | ||||
| Vibration total value on arms m/s | 2 | 0,2 | ||
| Uncertainty K | m/s2 | 2 | ||
| Sound pressure level LpA | dB(A) | 68 | 67 | 68 |
| Uncertainty KpA | dB(A) | 2 | ||
| Sound power level LWA + Uncertainty KWA | dB(A) | 85 | ||
| Built-in charger (option) | ||||
| Nominal voltage V 230 | ||||
| Frequency | Hz | 50-60 | ||
| Rated current | A | 4,2 | ||
** option
Accessories and Spare Parts
Only use original accessories and spare parts, they ensure the safe and trouble-free operation of the device.
For information about accessories and spare parts, please visit www.kaercher.com.
Warranty
The warranty terms published by the relevant sales company are applicable in each country. We will repair potential failures of your appliance within the warranty period free of charge, provided that such failure is caused by faulty material or defects in manufacturing. In the event of a warranty claim please contact your dealer or the nearest authorized Customer Service center. Please submit the proof of purchase.
EU Declaration of Conformity
We hereby declare that the machine described below complies with the relevant basic safety and health requirements of the EU Directives, both in its basic design and construction as well as in the version put into circulation by us. This declaration shall cease to be valid if the machine is modified without our prior approval.
Product: Floor cleaner
Type: 1.006-xxx
Relevant EU Directives
2006/42/EG (+2009/127/EG)
2014/30/EU
2014/53/EU (TCU)
Applied harmonized standards
EN 60335-1
EN 60335-2-29
EN 60335-2-72
EN 62233: 2008
EN 55012: 2007 + A1: 2009
EN 61000-6-2: 2005
EN 55014-1: 2017 + A11: 2020
EN 55014-2: 2015
EN 61000-3-2: 2014
EN 61000-3-3: 2013
TCU
EN 301 511 V12.5.1
EN 300 440 V2.1.1
EN 300 328 V2.2.2
EN 300 330 V2.1.1
Applied national standards
The signatories act on behalf of and with of the authority of the company management.

Chairman of the Board of Management
Director Regulatory Affairs & Certification
Documentation supervisor:
S. Reiser
Alfred Kärcher SE & Co. KG
71364 Winnenden (Germany)
Tel.: +49 7195 14-0
Fax: +49 7195 14-2212
Winnenden, 2021/02/01
Declaration of Conformity
We hereby declare that the product described below complies with the relevant provisions of the following UK Regulations, both in its basic design and construction as well as in the version put into circulation by us. This declaration shall cease to be valid if the product is modified without our prior approval.
Product: Floor cleaner
Type: 1.006-xxx
Currently applicable UK Regulations
S.I. 2008/1597 (as amended)
S.I. 2016/1091 (as amended)
S.I. 2017/1206 (as amended)
Designated standards used
EN 60335-1
EN 60335-2-29
EN 60335-2-72
EN 62233: 2008
EN 55012: 2007 + A1: 2009
EN 61000-6-2: 2005
EN 55014-1: 2017 + A11: 2020
EN 55014-2: 2015
EN 61000-3-2: 2014
EN 61000-3-3: 2013
TCU
EN 301 511 V12.5.1
EN 300 440 V2.1.1
EN 300 328 V2.2.2
EN 300 330 V2.1.1
National standards used
The signatories act on behalf of and with of the authority of the company management.


Documentation supervisor:
S. Reiser
Alfred Kärcher SE & Co. KG
71364 Winnenden (Germany)
Tel.: +49 7195 14-0
Fax: +49 7195 14-2212
Winnenden, 2021/02/01
www.kaercher.com/REACH
text_image
Technical diagram of a truck's internal components with numbered parts, including dashboard, engine, and wheel assembly.natural_image
Technical line drawing of a mechanical assembly with rotating components (no text or symbols)natural_image
Technical line drawing of a mechanical device with downward arrows indicating motion or assembly (no text or symbols)natural_image
Pure technical diagram of a mechanical assembly with arrows indicating direction (no text or symbols)natural_image
Technical line drawing of a mechanical lifting device with labeled components (no text or symbols present)natural_image
Technical diagram of a vehicle battery pack with wiring and components (no text or labels)4.035.097.0, 4.035-165.0
1 Entretoise 380x55x30
text_image
Technical diagram of a device's internal components with numbered labels pointing to various parts.4.035-164.0
1 Entretoise 345x60x47
2 Entretoise 380x55x30
text_image
Technical diagram of a device's internal components with labeled parts, showing wiring and connectors4.035-166.0
1 Entretoise 380x55x30
ATTENTION
natural_image
Technical line drawing of a mechanical assembly with mounting holes and a black arrow indicating a specific component (no text or symbols present)natural_image
Technical line drawing of a mechanical assembly with rotating components (no text or symbols)natural_image
Mechanical assembly diagram showing gear and wheel components with directional arrows (no text or labels)natural_image
Line drawing of a robotic arm handling a flexible hose and a rectangular base (no text or symbols)text_image
Technical diagram of a truck showing internal components with directional arrows and cross-sectional viewsnatural_image
Technical line drawing of a mechanical assembly with arrows indicating motion or force directions (no text or symbols)natural_image
Technical line drawing of a mechanical assembly with mounting brackets and internal components (no text or symbols)text_image
Technical diagram showing two mechanical components with numbered parts and directional arrows indicating motion or assembly.text_image
Technical diagram showing a mechanical assembly with numbered components and directional arrows indicating motion or assembly steps.natural_image
Technical line drawing of a mechanical assembly with no visible text or symbolsnatural_image
Technical line drawing of a mechanical component with two arrows pointing to features (no text or symbols present)natural_image
Technical line drawing of a mechanical component with no visible text or symbols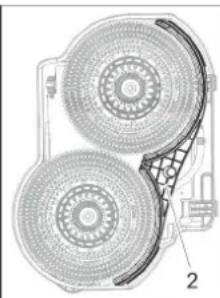
natural_image
Technical diagram of a dual circular fan or disc assembly with labeled parts (no text or symbols present)1 Vis
2 Aqua-Mizer
H. Jenner
Chairman of the Board of Management

S. Reiser
Director Regulatory Affairs & Certification
71364 Winnenden (Germany)
Tel.: +49 7195 14-0
Fax: +49 7195 14-2212
Winnenden, 2021/02/01

www.kaercher.com/REACH
text_image
Technical diagram of a car's internal components with numbered parts, including dashboard, engine, and wheel assembly.natural_image
Technical line drawing of a mechanical assembly with rotating components (no text or symbols)natural_image
Technical line drawing of a cleaning or maintenance machine on a platform, showing mechanical components and directional arrows (no text or symbols)natural_image
Pure mechanical assembly diagram without any text, numbers, or symbolsnatural_image
Technical line drawing of a forklift lifting a pallet, showing structural components and mounting base (no text or symbols)natural_image
Technical diagram of a mechanical assembly with internal components and wiring (no text or symbols)4.035.097.0, 4.035-165.0
text_image
Technical diagram of a device's internal components with numbered labels pointing to various parts.4.035-164.0
text_image
Technical diagram of a mechanical device with labeled components and wiring, showing internal wiring connections.4.035-166.0
natural_image
Technical line drawing of a mechanical assembly with mounting holes and a black arrow indicating a specific component (no text or symbols present)natural_image
Mechanical assembly diagram showing gear and rotor components with no visible text or symbolsnatural_image
Mechanical assembly diagram showing components with arrows indicating motion (no text or labels)natural_image
Diagram of a robotic vacuum cleaner with hoses and a base platform (no text or symbols)text_image
Technical diagram of a vehicle showing structural components with arrows and cross-sectional views highlighting internal features.natural_image
Technical line drawing of a mechanical assembly with arrows indicating force or movement (no text or symbols)natural_image
Technical line drawing of a mechanical assembly with mounting brackets and a central component (no text or symbols)text_image
Technical diagram showing a mechanical assembly with numbered components and directional arrows indicating motion or flow.natural_image
Technical line drawing of a vehicle's internal components, showing dashboard and air vent system (no text or labels)natural_image
Technical line drawing of a mechanical component with two downward arrows indicating features (no text or symbols present)natural_image
Technical line drawing of a mechanical component with two views (labeled 1 and 2), showing internal structure and assembly details (no text or symbols present)1 Vite
2 Aqua-Mizer
→ Svitare 2 viti.

Chairman of the Board of Management

S. Reiser
Director Regulatory Affairs & Certification
71364 Winnenden (Germany)
Tel.: +49 7195 14-0
Fax: +49 7195 14-2212
Winnenden, 2021/02/01
www.kaercher.com/REACH
Bedieningselementen

text_image
Technical diagram of a car's internal components with numbered parts, including dashboard, engine, and wheel assembly.natural_image
Technical line drawing of a mechanical assembly with rotating components (no text or symbols)natural_image
Technical line drawing of a cleaning or cleaning machine with downward arrows indicating components (no text or symbols)natural_image
Pure mechanical assembly diagram without any text, numbers, or symbolsnatural_image
Technical line drawing of a forklift assembly with labeled components (no text or symbols present)1 Vergrendeling batterijkast
natural_image
Technical diagram of a mechanical assembly with labeled components (no readable text or symbols)4.035.097.0, 4.035-165.0
1 Afstandhouder 380x55x30

text_image
Technical diagram of a device interior with labeled components and wiring connections4.035-164.0
text_image
Technical diagram of a mechanical assembly with labeled components and wiring connections4.035-166.0
1 Afstandhouder 380x55x30
LET OP
natural_image
Technical line drawing of a mechanical assembly with mounting holes and a black arrow indicating a specific component (no text or symbols present)natural_image
Mechanical assembly diagram showing gear and housing components with no visible text or symbolsnatural_image
Technical line drawing of a mechanical assembly with no visible text or symbols→ Zet beide klemhendels los.
→ Verstel de helling van de zuigbalk.
→ Zet beide klemhendels vast
Vuilwatertank leegmaken
Instructie:
natural_image
Diagram of a robotic arm handling a motor or cart with hoses and a control panel (no text or symbols)text_image
Technical diagram of a truck showing structural components with arrows indicating direction and cross-sections for inspection or repair.natural_image
Technical line drawing of a mechanical assembly with arrows indicating motion or force directions (no text or symbols present)natural_image
Technical line drawing of a mechanical assembly with mounting brackets and a control panel (no text or symbols)text_image
Technical diagram showing mechanical assembly with numbered components and directional arrows indicating motion or flow.natural_image
Technical line drawing of a mechanical assembly with no visible text or symbolstext_image
Technical diagram showing mechanical assembly with numbered components and directional arrows indicating motion or movement.natural_image
Technical line drawing of a mechanical component with two arrows pointing to features (no text or symbols present)natural_image
Technical line drawings of a device showing internal components and two views (no text or symbols)1 Schroef
2 Aqua-Mizer
H. Jenner Chairman of the Board of Management
S. Reiser Director Regulatory Affairs & Certification
71364 Winnenden (Germany)
Tel.: +49 7195 14-0
Fax: +49 7195 14-2212
Winnenden, 2021/02/01
www.kaercher.com/REACH
Elementos de mando

text_image
Technical diagram of a truck's internal components with numbered parts, including dashboard, engine, and wheel assembly.natural_image
Technical line drawing of a mechanical assembly with no visible text or symbolsnatural_image
Technical line drawing of a cleaning machine on a platform, showing mechanical components and directional arrows (no text or symbols)text_image
Technical diagram showing mechanical assembly with directional arrows and labeled componentsnatural_image
Technical line drawing of a forklift assembly with labeled components (no text or symbols present)natural_image
Technical diagram of a mechanical assembly with labeled components (no readable text or symbols)4.035.097.0, 4.035-165.0
1 Distanciador 380x55x30
text_image
Technical diagram of a device's internal components with labeled parts 1 and 24.035-164.0
text_image
Technical diagram of a device rear panel with labeled components and wiring connections4.035-166.0
1 Distanciador 380x55x30
CUIDADO
natural_image
Technical line drawing of a mechanical assembly with mounting holes and a black arrow indicating a specific component (no text or symbols present)natural_image
Mechanical assembly diagram showing gear and rotor components with no visible text or symbolsnatural_image
Mechanical assembly diagram showing gear and motor components with no visible text or symbolsnatural_image
Diagram of a robotic arm handling a flexible hose and a rectangular base (no text or symbols)text_image
Technical diagram of a truck showing internal components with directional arrows and cross-sectional viewsnatural_image
Technical line drawing of a mechanical assembly with arrows indicating downward motion (no text or symbols)natural_image
Technical line drawing of a mechanical assembly with no visible text or symbolstext_image
Technical diagram showing two mechanical components with numbered parts and directional arrows indicating motion or assembly.text_image
Technical diagram showing a mechanical assembly with numbered components and directional arrows indicating motion or assembly steps.natural_image
Technical line drawing of a mechanical assembly with no visible text or symbolstext_image
Technical diagram showing a mechanical component with labeled parts and directional arrows indicating rotation or assembly.text_image
Technical diagram showing mechanical assembly with numbered components and directional arrows indicating motion or movement.natural_image
Technical line drawing of a mechanical component with two arrows pointing to features (no text or symbols present)natural_image
Technical line drawing of a mechanical component with no visible text or symbols
natural_image
Technical diagram of a dual circular fan or disc assembly with internal structure, labeled with number 2 (no text or symbols beyond label)1 Tornillo
2 Aqua-Mizer
71364 Winnenden (Germany)
Tel.: +49 7195 14-0
Fax: +49 7195 14-2212
Winnenden, 2021/02/01
www.kaercher.com/REACH
text_image
Technical diagram of a truck's internal components with numbered parts, including dashboard, engine, and wheel assembly.natural_image
Technical line drawing of a mechanical assembly with rotating components (no text or symbols)natural_image
Technical line drawing of a mechanical device with downward arrows indicating motion or assembly (no text or symbols)natural_image
Pure mechanical diagram showing internal components and directional arrows without any text or symbolsMontar e conectar as baterias
natural_image
Technical line drawing of a mechanical lifting device with labeled components (no text or symbols present)natural_image
Technical diagram of a mechanical or electronic component with internal wiring and labeled parts (no readable text or symbols)4.035.097.0, 4.035-165.0
1 Separador 380x55x30

text_image
Technical diagram of a device's internal components with numbered labels pointing to different parts.4.035-164.0
1 Separador 345x60x47
2 Separador 380x55x30
natural_image
Technical line drawing of a mechanical device with internal components and wiring (no text or symbols)4.035-166.0
1 Separador 380x55x30
ADVERTÊNCIA
Carregar as baterias
Aviso:
natural_image
Technical line drawing of a mechanical assembly with mounting holes and a black arrow indicating a specific component (no text or symbols present)natural_image
Technical line drawing of a mechanical assembly with no visible text or symbolsnatural_image
Mechanical assembly diagram showing components like gears and levers with directional arrows (no text or labels)natural_image
Line drawing of a cleaning or cleaning device with hoses and a base plate (no text or symbols)text_image
Technical diagram of a truck's internal structure with labeled parts and directional arrows indicating assembly or inspection.natural_image
Technical line drawing of a mechanical assembly with arrows indicating force or movement (no text or symbols)natural_image
Technical line drawing of a mechanical assembly with mounting brackets and a central component (no text or symbols)text_image
Technical diagram showing two mechanical components with numbered parts and directional arrows indicating motion or assembly.text_image
Technical diagram showing mechanical assembly steps with numbered annotationsnatural_image
Technical line drawing of a mechanical assembly with no visible text or symbolstext_image
Technical diagram of a mechanical assembly with numbered parts and directional arrows indicating motion or assembly steps.natural_image
Technical line drawing of a mechanical component with two arrows pointing to features (no text or symbols present)Desmontar as baterias
natural_image
Technical line drawing of a mechanical component with no visible text or symbols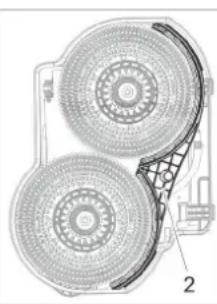
natural_image
Technical diagram of a mechanical component with two circular components and a grid-like structure (no text or symbols)1 Parafuso
2 Aqua-Mizer
→ Retirar 2 parafusos.
→ Remover o Aqua-Mizer.
Dados técnicos

Chairman of the Board of Management
S. Reiser
Director Regulatory Affairs & Certification
71364 Winnenden (Germany)
Tel.: +49 7195 14-0
Fax: +49 7195 14-2212
Winnenden, 2021/02/01
www.kaercher.com/REACH
Betjeningselementer

text_image
Technical diagram of a car's internal components with numbered parts, including dashboard, engine, and wheel assembly.natural_image
Technical line drawing of a mechanical assembly with a rotating component and threaded shaft (no text or symbols)natural_image
Technical line drawing of a mechanical device with downward arrows indicating motion or assembly (no text or symbols)natural_image
Pure mechanical cross-section diagram without any text, numbers, or symbolsnatural_image
Technical line drawing of a mechanical lifting or mounting assembly (no text or symbols visible)natural_image
Technical diagram of a mechanical assembly with labeled components (no readable text or symbols)4.035.097.0, 4.035-165.0
1 Afstandsholder 380x55x30
text_image
Technical diagram of a device's internal components with numbered labels pointing to various parts.4.035-164.0
1 Afstandsholder 345x60x47
2 Afstandsholder 380x55x30
text_image
Technical diagram of a device's internal components with labeled parts and wiring4.035-166.0
1 Afstandsholder 380x55x30
BEMÆRK
Risiko for beskadigelse. Sørg for korrekt polaritet.
natural_image
Technical line drawing of a mechanical assembly with mounting holes and a black arrow indicating a specific component (no text or symbols present)natural_image
Mechanical assembly diagram showing motor components and gear mechanism (no text or labels)natural_image
Technical line drawing of a mechanical assembly with no visible text or symbolsnatural_image
Line drawing of a robotic arm with a coiled cable and attached flat base (no text or symbols)text_image
Technical diagram of a truck showing internal components with directional arrows and cross-sectional viewsnatural_image
Technical line drawing of a mechanical assembly with arrows indicating motion or force directions (no text or symbols)natural_image
Technical line drawing of a mechanical assembly with mounting brackets and a central housing (no text or symbols)text_image
Technical diagram showing two circular components with numbered arrows and directional arrows, likely illustrating a mechanical or electrical assembly.text_image
Technical diagram showing a mechanical assembly with numbered components and directional arrows indicating motion or assembly steps.text_image
R 2 1 D 12 1natural_image
Technical line drawing of a mechanical assembly with no visible text or symbolstext_image
Technical diagram of a mechanical assembly with numbered parts, likely illustrating gear or motor components.natural_image
Technical line drawing of a mechanical component with two arrows pointing to features (no text or symbols present)natural_image
Technical line drawing of a mechanical component with no visible text or symbols
natural_image
Technical diagram of a mechanical component with two circular components and a grid-patterned base (no text or symbols)1 Skrue
2 Aqua-Mizer
→ Skru 2 skruer ud.
→ Fjern aqua-mizer.
Tekniske data

Chairman of the Board of Management

Director Regulatory Affairs & Certification
71364 Winnenden (Germany)
Tel.: +49 7195 14-0
Fax: +49 7195 14-2212
Winnenden, 2021/02/01
www.kaercher.com/REACH
Betjeningselementer
text_image
Technical diagram of a car's front and rear assembly with numbered parts for identification1 Ratt
2 Påfyllingssystem
3 Forrigling, bruktvannstank
4 Deksel spillvannstank
5 Turbinbeskyttelsesil (under flottøren)
6 Flottør
7 Losil
8 Smussfanger
9 Spillvannstank
10 Avløpsslange spillvann
11 Lås rentvannstank med filter for rent vann
12 Høyderegulering sugebom
13 Vingemuttere for festing av sugebom
14 Sugebom*
15 Klemmehåndtak for justering av vinkel på sugebom
16 Rengjøringsmiddelflaske (kun Dosevarianter)
17 Deksel friskvanntank
18 Låsehendel parkeringsbremse
19 Sikkerhetsbryter
20 Kjørepedal
natural_image
Technical line drawing of a mechanical assembly with rotating components (no text or symbols)natural_image
Technical line drawing of a cleaning machine with downward arrows indicating motion (no text or symbols)natural_image
Technical schematic of a mechanical assembly with directional arrows indicating flow or movement (no text or labels present)natural_image
Technical line drawing of a mechanical lifting device with gears and levers (no text or symbols)1 Låsing batteriinskyvning
natural_image
Technical diagram of a mechanical or electronic component with internal wiring and labeled parts (no readable text or symbols)4.035.097.0, 4.035-165.0
1 Hold avstand 380x55x30
text_image
Technical diagram of an electrical device with labeled components, showing internal wiring and connections4.035-164.0
1 Hold avstand 345x60x47
2 Hold avstand 380x55x30
text_image
Technical diagram of a mechanical device with labeled components and wiring, showing internal wiring connections.4.035-166.0
1 Hold avstand 380x55x30
OBS
natural_image
Technical line drawing of a mechanical assembly with no visible text or symbols→ Sett sugebommen slik i sugebomopphenget at formplaten ligger over opphenget.
→ Stram vingemutrene.
→ Monter slangen.
Drift
Merknad:
natural_image
Technical line drawing of a mechanical assembly with rotating components (no text or symbols)→ Løsne vingemutrene.
→ Drei sugebommen.
→ Stram vingemutrene.
Helling
Ved utilstrekkelig oppsugningsresultat kan den rette sugebommens helling endres.
natural_image
Mechanical assembly diagram showing components with no visible text or symbols→ Løsne begge klemhåndtakene.
→ Still helningen på sugebommene.
→ Sett fast begge klemmehåndtakene.
natural_image
Diagram of a robotic arm with hoses and a slide, no text or symbols presenttext_image
Technical diagram of a truck showing structural components with directional arrows and cross-sectional views→ Sett bruktvannslangen i holderen på maskinen.
natural_image
Technical line drawing of a mechanical assembly with arrows indicating downward motion (no text or symbols)natural_image
Technical line drawing of a mechanical assembly with mounting brackets and a central housing (no text or symbols)text_image
Technical diagram showing two circular components with numbered arrows and directional arrows, likely illustrating a mechanical or electrical assembly.text_image
Technical diagram showing a mechanical assembly with numbered components and directional arrows indicating motion or assembly steps.→ Ta av kunststoffdelene.
→ Trekk av sugeleppen.
→ Skyv på plass ny sugeleppe.
→ Sett på plass kunststoffdelene.
→ Sett på plass kryssgrepskruen og skru den godt til.
Stille inn sprutevern
natural_image
Technical line drawing of a mechanical assembly with no visible text or symbolstext_image
Technical diagram showing a mechanical assembly with labeled components and directional arrows indicating motion or movement.→ Løsne läsingen på avstrykerleppe.
→ Sving ut avstrykerleppe.

text_image
Technical diagram showing mechanical assembly steps with numbered components and directional arrows indicating motion or movement.natural_image
Technical line drawing of a mechanical component with two arrows pointing to features (no text or symbols present)natural_image
Technical line drawing of a mechanical component with no visible text or symbols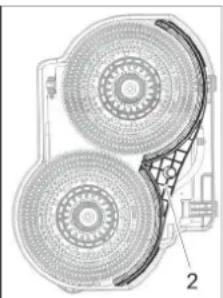
natural_image
Technical diagram of a mechanical component with two circular components and a grid-patterned base (no text or symbols)1 Skrue
2 Aqua-Mizer
→ 2 skruer dreies ut.
→ Fjerne Aqua-Mizer
| Tekniske data | ||||
| B 95 R 65 D 65 R 75 | ||||
| Effekt | ||||
| Nettspenning V24 | ||||
| Batterikapasitet Ah(5h) 170...198 | ||||
| Gjennomsnittlig effektbehov W 1950 | ||||
| Nominell ytelse motor W 600 | ||||
| Sugemotoreffekt W 750 550 750 | ||||
| Børstemotoreffekt W 2x600 | ||||
| Støvsuging | ||||
| Sugeeffekt, luftmengde l/sek. 20,5 | ||||
| Sugeeffekt, vakuum | kPa | 12,0 | ||
| Rengjøringsbørster | ||||
| Arbeidsbredde | mm | 650 | 750 | |
| Diameter børste | mm | 105 365 | 105 | |
| Børsteturtall | p/min. | 1200 | 140 | 1200 |
| Mål og vekt | ||||
| Kjørehastighet | km/t | 6 | ||
| Terrengstigning, maks. | % | 10 | ||
| Teoretisk flateeffekt | m^2/t | 3900 | 4500 | |
| Volum rent-/bruktvannstank | l | 95 | ||
| Volumer grovsmussbeholder | l | 6 | - | 7 |
| Vanntrykk fyllesystem**, spillvannstankspylesystem**, maks. | MPa(bar) | 1 (10) | ||
| Lengde | mm | 1525 | ||
| Bredde (uten sugebom) | mm | 760 750 | 810 | |
| Høyde | mm | 1470 | ||
| Tillatt totalvekt | kg | 500 | ||
| Transportvekt | kg | 325 | 330 | |
| Tillatt temperaturområde | °C | 5...40 | ||
| Flatebelastning (med fører og full friskvannstank) | ||||
| Fronthjul | N/cm^2 | 66 | ||
| Bakhjul | N/cm^2 | 54 | ||
| Registrerte verdier etter EN 60335-2-72 | ||||
| Totalt vibrasjonsnivå armer | m/s^2 | 0,2 | ||
| Usikkerhet K | m/s^2 | 2 | ||
| Støytrykksnivå L_pA | dB(A) | 68 | 67 | 68 |
| Usikkerhet K_pA | dB(A) | 2 | ||
| Støyeffektnivå L_WA + usikkerhet K_WA | dB(A) | 85 | ||
| Innebygget lader (ekstrautstyr) | ||||
| Nettspenning V 230 | ||||
| Frekvens | Hz | 50-60 | ||
| Nominell strøm | A | 4,2 | ||
** Valgmulighet

Chairman of the Board of Management
S. Reiser
Director Regulatory Affairs & Certification
71364 Winnenden (Germany)
Tel.: +49 7195 14-0
Fax: +49 7195 14-2212
Winnenden, 2021/02/01
www.kaercher.com/REACH
Reglage

text_image
Technical diagram of a truck's internal components with numbered parts, including dashboard, engine, and wheel assembly.natural_image
Technical line drawing of a mechanical assembly with rotating components (no text or symbols)natural_image
Technical line drawing of a cleaning or maintenance device with downward arrows indicating components (no text or symbols)natural_image
Pure mechanical cross-section diagram without any text, numbers, or symbolsnatural_image
Technical line drawing of a mechanical lifting device with labeled components (no text or symbols present)1 Spärr batterifack
natural_image
Technical diagram of a mechanical assembly with labeled components (no readable text or symbols)4.035.097.0, 4.035-165.0
text_image
Technical diagram of a device's internal components with numbered labels pointing to various parts.4.035-164.0
natural_image
Technical line drawing of a mechanical device with internal components and wiring (no text or symbols)4.035-166.0
natural_image
Technical line drawing of a mechanical assembly with no visible text or symbolsnatural_image
Mechanical assembly diagram showing internal components and motion arrows (no text or symbols)→ Lossa vingmuttrar.
→ Vrid sugskena.
→ Drag fast vingmuttrar.
Lutning
natural_image
Mechanical assembly diagram showing components with directional arrows (no text or labels)natural_image
Line drawing of a robotic arm with hoses and a flatbed base (no text or symbols)text_image
Technical diagram of a truck showing internal components with directional arrows and cross-sectional viewsnatural_image
Technical line drawing of a mechanical assembly with arrows indicating motion or force direction (no text or symbols)natural_image
Technical line drawing of a vehicle chassis with mounting brackets and structural components (no text or symbols)text_image
Technical diagram showing two mechanical components with numbered parts and directional arrows indicating motion or assembly.text_image
Technical diagram showing a mechanical assembly with numbered components and directional arrows indicating motion or assembly steps.natural_image
Technical line drawing of a mechanical assembly with no visible text or symbolstext_image
Technical diagram showing a mechanical assembly with labeled components and directional arrows indicating motion or movement.natural_image
Technical line drawing of a mechanical component with two arrows pointing to features (no text or symbols present)natural_image
Technical line drawing of a mechanical component with two views (labeled 1 and 2), showing internal structure and assembly details (no text or symbols present)1 Skruv
2 Aqua-Mizer
→ Dra ut 2 skruvar.
→ Ta bort Aqua-Mizer.
Tekniska data

Chairman of the Board of Management
Director Regulatory Affairs & Certification
71364 Winnenden (Germany)
Tel.: +49 7195 14-0
Fax: +49 7195 14-2212
Winnenden, 2021/02/01
Sisällysluettelo
www.kaercher.com/REACH
Hallintalaitteet

text_image
Technical diagram of a truck's internal components with numbered parts, including dashboard, engine, and wheel assembly.natural_image
Technical line drawing of a mechanical assembly with no visible text or symbolsnatural_image
Technical line drawing of a mechanical device with downward arrows indicating motion or assembly (no text or symbols)natural_image
Pure mechanical assembly diagram showing shafts and housing components without any text, numbers, or symbolsnatural_image
Technical line drawing of a mechanical lifting device with labeled components (no text or symbols present)1 Akkukotelon lukitus
natural_image
Technical diagram of an electronic device showing internal components and wiring (no text or symbols)4.035.097.0, 4.035-165.0
text_image
Technical diagram of a mechanical device with labeled components, showing internal wiring and mounting points.4.035-164.0
natural_image
Technical line drawing of a mechanical assembly with no visible text or symbols4.035-166.0
natural_image
Technical line drawing of a mechanical assembly with mounting holes and a black arrow indicating a specific component (no text or symbols present)natural_image
Mechanical assembly diagram showing gear and motor components with no visible text or symbolsnatural_image
Mechanical assembly diagram showing components like gears and levers with directional arrows (no text or labels)natural_image
Diagram of a robotic arm connecting a flexible hose to a rectangular platform (no text or symbols)text_image
Technical diagram of a truck showing structural components with directional arrows and cross-sectional viewsnatural_image
Technical line drawing of a combine harvester under assembly, showing wheel, gear, and mounting components (no text or labels)natural_image
Technical line drawing of a mechanical assembly with mounting brackets and a central component (no text or symbols)text_image
Technical diagram showing two mechanical components with numbered parts and directional arrows indicating motion or assembly.text_image
Technical diagram showing a mechanical assembly with numbered components and directional arrows indicating motion or assembly steps.natural_image
Technical line drawing of a mechanical assembly with no visible text or symbolstext_image
Diagram showing a car interior with labeled parts and directional arrows indicating movement or change.natural_image
Technical line drawing of a mechanical component with two downward arrows indicating features (no text or symbols present)natural_image
Technical line drawings of a device showing internal components and two circular fan-like structures (no text or symbols)1 Ruuvi
2 Aqua-Mizer
→ Kierrä 2 ruuvia irti.
→ Irrota Aqua-Mizer.
Tekniset tiedot

Chairman of the Board of Management
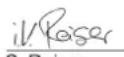
Director Regulatory Affairs & Certification
71364 Winnenden (Germany)
Tel.: +49 7195 14-0
Fax: +49 7195 14-2212
Winnenden, 2021/02/01
text_image
Technical diagram of a car's internal components with numbered parts, including dashboard, engine, and wheel assembly.natural_image
Technical line drawing of a mechanical assembly with no visible text or symbolsnatural_image
Technical line drawing of a mechanical device with downward arrows indicating motion or assembly (no text or symbols)natural_image
Pure mechanical cross-section diagram without any text, numbers, or symbolsnatural_image
Technical line drawing of a mechanical lifting device with labeled components (no text or symbols present)natural_image
Technical diagram of a mechanical or electrical component with no visible text, numbers, or symbols4.035.097.0, 4.035-165.0
text_image
Technical diagram of a device's internal components with numbered labels pointing to various parts.4.035-164.0
text_image
Technical diagram of a battery pack assembly with labeled components and wiring connections4.035-166.0
natural_image
Technical line drawing of a mechanical assembly with mounting holes and a black arrow indicating a specific component (no text or symbols present)natural_image
Technical line drawing of a mechanical assembly with no visible text or symbolsnatural_image
Mechanical assembly diagram showing gear and wheel components with directional arrows (no text or labels)natural_image
Diagram of a robotic arm handling a mechanical component with a coiled cable and directional arrows (no text or symbols)text_image
Technical diagram of a truck's internal structure with labeled components and directional arrows indicating movement or assembly.natural_image
Technical line drawing of a mechanical assembly with arrows indicating force or movement (no text or symbols)natural_image
Technical line drawing of a mechanical assembly with mounting brackets and internal components (no text or symbols)text_image
Technical diagram showing mechanical assembly steps with numbered components and directional arrows indicating motionnatural_image
Technical line drawing of a mechanical assembly with no visible text or symbolstext_image
Technical diagram showing a mechanical component with labeled parts and directional arrows indicating rotation or movement.natural_image
Technical line drawing of a mechanical component with two arrows pointing to features (no text or symbols present)natural_image
Technical line drawing of a mechanical component with no visible text or symbols
natural_image
Technical diagram of a dual fan or fan assembly with labeled parts (no text or symbols present)
Chairman of the Board of Management

S. Reiser
Director Regulatory Affairs & Certification
71364 Winnenden (Germany)
Tel.: +49 7195 14-0
Fax: +49 7195 14-2212
Winnenden, 2021/02/01

www.kaercher.com/REACH
Kumanda elemanları
text_image
Technical diagram of a car interior with numbered components and exploded views, likely for maintenance or assembly reference.natural_image
Technical line drawing of a mechanical assembly with rotating components (no text or symbols)natural_image
Technical line drawing of a cleaning machine with downward arrows indicating motion (no text or symbols)natural_image
Pure technical diagram of a mechanical assembly with arrows indicating direction (no text or symbols)natural_image
Technical line drawing of a mechanical lifting device with labeled components (no text or symbols present)natural_image
Technical diagram of a mechanical assembly with labeled components (no readable text or symbols)4.035.097.0, 4.035-165.0
text_image
Technical diagram of a device's internal components with numbered labels pointing to various parts.4.035-164.0
natural_image
Technical line drawing of a mechanical device with labeled components (no readable text or symbols)4.035-166.0
natural_image
Technical line drawing of a mechanical assembly with no visible text or symbolsnatural_image
Mechanical assembly diagram showing internal components with no visible text or symbolsnatural_image
Mechanical assembly diagram showing mechanical components and motion arrows (no text or symbols)natural_image
Diagram of a robotic arm with a coiled cable and attached flat plate (no text or symbols)text_image
Technical diagram of a truck showing internal components with directional arrows and cross-sectional viewsnatural_image
Technical line drawing of a mechanical assembly with no visible text or symbolsnatural_image
Technical line drawing of a mechanical assembly with mounting brackets and a central component (no text or symbols)text_image
Technical diagram showing a mechanical assembly with numbered components and directional arrows indicating motion or flow.natural_image
Technical line drawing of a vehicle chassis with mounting brackets and a directional arrow indicating motion (no text or symbols)natural_image
Technical line drawing of a mechanical component with two arrows pointing to features (no text or symbols present)natural_image
Technical line drawing of a device showing internal components and two views (no text or symbols)1 Civata
2 Aqua-Mizer
→ 2 cıvatayı sökün.

Chairman of the Board of Management
Director Regulatory Affairs & Certification
71364 Winnenden (Germany)
Tel.: +49 7195 14-0
Fax: +49 7195 14-2212
Winnenden, 2021/02/01

www.kaercher.com/REACH
Элементы управления

text_image
Technical diagram of a truck's internal components with numbered parts, including dashboard, engine, and wheel assembly.natural_image
Technical line drawing of a mechanical assembly with rotating components and a directional arrow (no text or symbols)natural_image
Technical line drawing of a cleaning or maintenance machine on a platform, showing mechanical components and directional arrows (no text or symbols)natural_image
Pure technical diagram of a mechanical assembly with no visible text, numbers, or symbolsnatural_image
Technical line drawing of a forklift with labeled components (no text or symbols present)natural_image
Technical diagram of a mechanical or electrical component with labeled parts (no readable text or symbols)4.035.097.0, 4.035-165.0
1 Прокладка 380x55x30

text_image
Technical diagram of a device interior with labeled components, showing internal wiring and mounting points.4.035-164.0
1 Прокладка 345x60x47
2 Прокладка 380x55x30
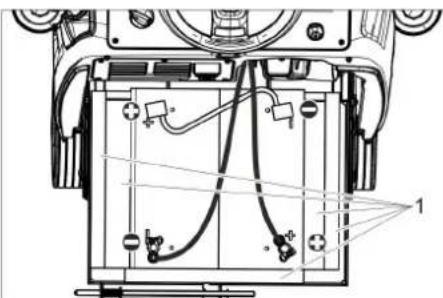
natural_image
Technical line drawing of an electronic device with internal components and wiring (no text or symbols)4.035-166.0
1 Прокладка 380x55x30
ВНИМАНИЕ
natural_image
Technical line drawing of a mechanical assembly with mounting holes and a black arrow indicating a specific component (no text or symbols present)natural_image
Technical line drawing of mechanical components with no visible text or symbolsnatural_image
Mechanical assembly diagram showing gear and shaft components with directional arrows (no text or labels)natural_image
Diagram of a robotic vacuum cleaner with coiled hose and control panel (no text or symbols)text_image
Technical diagram of a truck showing structural components with directional arrows and cross-sectional viewsnatural_image
Technical line drawing of a combine harvester with mounting brackets and structural components (no text or symbols)natural_image
Technical line drawing of a mechanical assembly with mounting brackets and a central component (no text or symbols)text_image
Technical diagram showing mechanical assembly steps with numbered components and directional arrows indicating motionnatural_image
Technical line drawing of a mechanical assembly with no visible text or symbolstext_image
Technical diagram showing a mechanical assembly with labeled components and directional arrows indicating motion or movement.text_image
Technical diagram showing mechanical components with numbered labels indicating parts of a device or assembly.natural_image
Technical line drawing of a mechanical component with two arrows pointing to features (no text or symbols present)natural_image
Technical line drawing of a mechanical component with no visible text or symbols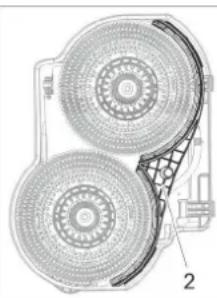
natural_image
Technical diagram of a mechanical component with two circular components and a grid-patterned base (no text or symbols)71364 Winnenden (Germany)
Tel.: +49 7195 14-0
Fax: +49 7195 14-2212
Winnenden, 2021/02/01
www.kaercher.com/REACH
Kezelési elemek

text_image
Technical diagram of a truck's internal components with numbered parts, including dashboard, engine, and wheel assembly.natural_image
Technical line drawing of a mechanical assembly with rotating components (no text or symbols)natural_image
Technical line drawing of a mechanical device with downward arrows indicating motion or assembly (no text or symbols)natural_image
Pure technical diagram showing mechanical components without any text, numbers, or symbolsnatural_image
Technical line drawing of a forklift lifting a pallet, showing components like wheels and a handle (no text or symbols)natural_image
Technical diagram of an internal electrical or mechanical component with labeled parts (no readable text or symbols)4.035.097.0, 4.035-165.0
1 Távtartó 380x55x30

text_image
Technical diagram of a device's internal components with numbered labels pointing to different parts.4.035-164.0
1 Távtartó 345x60x47
2 Távtartó 380x55x30
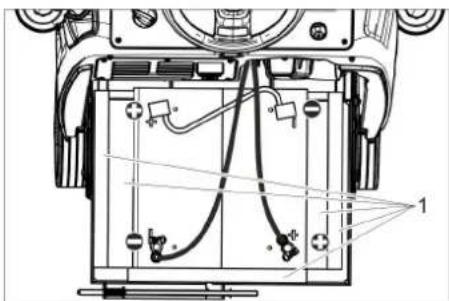
natural_image
Technical line drawing of a mechanical assembly with labeled components (no readable text or symbols)4.035-166.0
1 Távtartó 380x55x30
FIGYELEM
natural_image
Technical line drawing of a mechanical assembly with mounting holes and a black arrow indicating a specific component (no text or symbols present)natural_image
Mechanical assembly diagram showing gear and wheel components with no visible text or symbolsnatural_image
Technical line drawing of a mechanical assembly with no visible text or symbolsnatural_image
Diagram of a robotic arm with hoses and a foot pedal, no text or symbols presenttext_image
Technical diagram of a truck showing internal components with directional arrows and cross-sectional viewsnatural_image
Technical line drawing of a truck's rear wheel assembly with workers and arrows indicating maintenance or repair (no text or symbols)natural_image
Technical line drawing of a mechanical assembly with mounting brackets and a central component (no text or symbols)text_image
Technical diagram showing a mechanical assembly with numbered components and directional arrows indicating motion or assembly steps.text_image
R 2 1 D 1 2natural_image
Technical line drawing of a mechanical assembly with no visible text or symbolsnatural_image
Technical line drawing of a mechanical component with two arrows pointing to features (no text or symbols present)natural_image
Technical line drawing of a mechanical component with two views (labeled 1 and 2), showing internal structure and assembly details (no text or symbols present)1 Csavar
2 Aqua-Mizer

Chairman of the Board of Management
Director Regulatory Affairs & Certification
71364 Winnenden (Germany)
Tel.: +49 7195 14-0
Fax: +49 7195 14-2212
Winnenden, 2021/02/01
www.kaercher.com/REACH
Ovládací prvky

text_image
Technical diagram of a truck's internal components with numbered parts, including dashboard, engine, and wheel assembly.natural_image
Technical line drawing of a mechanical assembly with rotating components (no text or symbols)natural_image
Technical line drawing of a mechanical device with downward arrows indicating motion or assembly (no text or symbols)natural_image
Pure mechanical assembly diagram showing shafts and housing with arrows indicating direction (no text or symbols)natural_image
Technical line drawing of a forklift assembly (no text or symbols)natural_image
Technical diagram of a mechanical or electrical component with labeled parts (no readable text or symbols)4.035.097.0, 4.035-165.0
text_image
Technical diagram of a device's internal components with numbered labels pointing to various parts.text_image
Technical diagram of a device internal structure with labeled components and wiring connections4.035-166.0
natural_image
Technical line drawing of a mechanical assembly with mounting holes and a black arrow indicating a specific component (no text or symbols present)natural_image
Mechanical assembly diagram showing motor components and gear mechanism (no text or labels)natural_image
Mechanical assembly diagram showing components like gears and levers with directional arrows (no text or labels)natural_image
Diagram of a robotic arm with a coiled cable and attached slide, showing motion (no text or symbols)text_image
Technical diagram of a truck showing internal components and safety instructions with arrows indicating movement or inspection.natural_image
Technical line drawing of a mechanical assembly with arrows indicating downward motion (no text or symbols)natural_image
Technical line drawing of a mechanical assembly with mounting brackets and a central component (no text or symbols)text_image
Technical diagram showing two views of a mechanical component with numbered parts and directional arrows indicating motion or assembly.text_image
Technical diagram showing a mechanical assembly with numbered components and directional arrows indicating motion or assembly steps.text_image
R 2 1 D 12 1natural_image
Technical line drawing of a mechanical assembly with no visible text or symbolstext_image
Technical diagram showing a mechanical component with labeled parts and directional arrows indicating rotation or movement.natural_image
Technical line drawing of a mechanical component with two downward arrows indicating features (no text or symbols present)natural_image
Technical line drawing of a mechanical component with no visible text or symbols
natural_image
Technical diagram of a mechanical component with two circular components and a grid-patterned base (no text or symbols)1 Šroub
2 Aqua-Mizer
H. Jenner Chairman of the Board of Management

S. Reiser Director Regulatory Affairs & Certification
71364 Winnenden (Germany)
Tel.: +49 7195 14-0
Fax: +49 7195 14-2212
Winnenden, 2021/02/01
www.kaercher.com/REACH
Upravljalni elementi

text_image
Technical diagram of a truck's internal components with numbered parts, including dashboard, engine, and wheel assembly.natural_image
Technical line drawing of a mechanical assembly with rotating components (no text or symbols)→ Za deblokiranje fiksirne zavore potegnite ročico za deblokado.
POZOR
natural_image
Technical line drawing of a mechanical device with downward arrows indicating motion or assembly (no text or symbols)→ Odstranite fiksiranje na kolesih.

natural_image
Pure mechanical assembly diagram without any text, numbers, or symbolsnatural_image
Technical line drawing of a mechanical lifting device with labeled components (no text or symbols present)natural_image
Technical diagram of a mechanical or electronic component with labeled parts (no readable text or symbols)4.035.097.0, 4.035-165.0
1 Distančnik 380x55x30
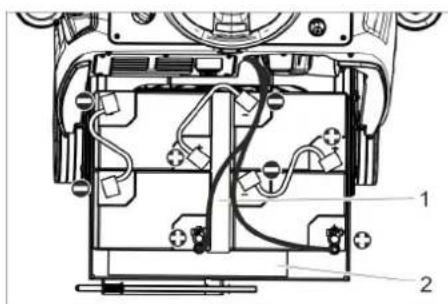
text_image
Technical diagram of a device's internal components with numbered labels pointing to different parts.4.035-164.0
natural_image
Technical line drawing of a mechanical assembly with no visible text or symbols4.035-166.0
1 Distančnik 380x55x30
POZOR
natural_image
Technical line drawing of a mechanical assembly with mounting holes and a black arrow indicating a specific component (no text or symbols present)→ Sesalni nosilec vstavite v njegovo obešenje tako, da oblikovna pločevina leži nad obešenjem.
→ Pritegnite krilate matice.
→ Nataknite gibko sesalno cev.
Obratovanje
Napotek:
natural_image
Mechanical assembly diagram showing gear and rotor components with rotational arrows (no text or labels)→ Sprostite krilate matice.
→ Obrnite sesalni nosilec.
→ Pritegnite krilate matice.
Nagib
natural_image
Mechanical assembly diagram showing components with no visible text or symbols→ Odvijte obe vpenjalni ročici.
→ Nastavite nagib sesalnega nosilca.
→ Pritegnite obe vpenjalni ročici.
natural_image
Line drawing of a robotic arm with hoses and a flat base (no text or symbols)→ Vodo izpustite iz izpustne cevi tako, da odprete dozirno napravo.
→ Potem posodo za umazano vodo spla- knite s čisto vodo.
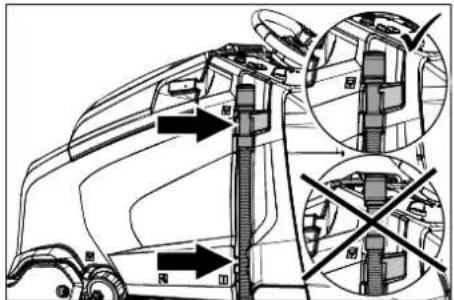
text_image
Technical diagram of a vehicle showing structural components with arrows and cross-sectional views highlighting different parts.natural_image
Technical line drawing of a truck's internal components with arrows indicating downward motion (no text or symbols)natural_image
Technical line drawing of a mechanical assembly with mounting brackets and internal components (no text or symbols)text_image
Technical diagram showing two mechanical components with numbered parts and directional arrows indicating motion or assembly.→ Zaskočni kavelj stisnite skupaj.
→ Snemite plovec.
→ Zaščitno sito turbine zavrtite v nasprotni smeri urinih kazalcev.
→ Snemite zaščitno sito turbine.
→ Umazanijo z zaščitnega sita turbine sperite z vodo.
→ Zaščitno sito turbine ponovno namestite.
→ Nataknite plovec.
text_image
Technical diagram showing a mechanical assembly with numbered components and directional arrows indicating motion or assembly steps.→ Snemite plastične dele.
→ Izvlecite sesalne brisalce.
→ Vrinite nove sesalne brisalce.
→ Nataknite plastične dele.
→ Privijte zvezdaste ročaje in jih zategnite.
natural_image
Technical line drawing of a mechanical assembly with no visible text or symbolstext_image
Technical diagram showing a mechanical assembly with labeled components and directional arrows indicating motion or movement.→ Sprostite blokado strgalnega brisalca.
→ Strgalni brisalec zasukajte v stran.
→ Sprostite blokado strgalnega brisalca. → Strgalni brisalec zasukajte v stran.
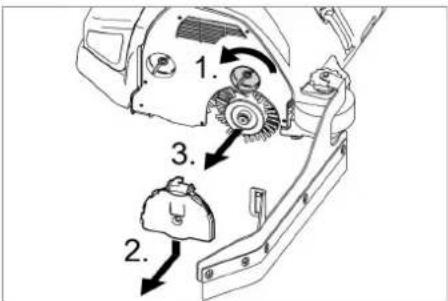
text_image
Technical diagram showing mechanical assembly steps with numbered components and directional arrows indicating motion or movement.→ Sprostite blokado ležajnega pokrova.
→ Ležajni pokrov pritisnite navzdol in snemite.
→ Izvlecite krtačni valj.
→ Vstavite nov krtačni valj.
→ Ležajni pokrov in strgalni brisalec ponovno pritrdite v obratnem vrstnem redu.
→ Postopek ponovite na drugi strani.
Zamenjava kolutnih krtač
→ Dvignite čistilno glavo.
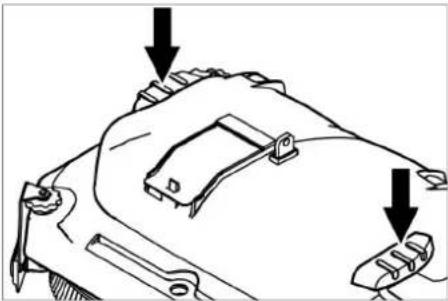
natural_image
Technical line drawing of a mechanical component with two arrows pointing to features (no text or symbols present)natural_image
Technical line drawing of a mechanical component with two views (labeled 1 and 2), showing internal components and assembly (no text or symbols present)1 Vijak
2 Aqua-Mizer
→ Izvijte 2 vijaka.
→ Odstranite Aqua-Mizer.
Tehnični podatki
Chairman of the Board of Management
S. Reiser
Director Regulatory Affairs & Certification
71364 Winnenden (Germany)
Tel.: +49 7195 14-0
Fax: +49 7195 14-2212
Winnenden, 2021/02/01
www.kaercher.com/REACH
Elementy obsługi

text_image
Technical diagram of a truck's internal components with numbered parts, including dashboard, engine, and wheel assembly.natural_image
Technical line drawing of a mechanical assembly with no visible text or symbolsnatural_image
Technical line drawing of a mechanical device with downward arrows indicating motion or assembly (no text or symbols)natural_image
Pure mechanical assembly diagram without any text, numbers, or symbolsnatural_image
Technical line drawing of a mechanical lifting device with wheels and a pallet (no text or symbols)natural_image
Technical diagram of a mechanical or electronic component with internal wiring and mounting holes (no text or symbols)4.035.097.0, 4.035-165.0
text_image
Technical diagram of a mechanical assembly with labeled components, showing internal wiring and housing layout.4.035-164.0
text_image
Technical diagram of a device rear panel with labeled components and wiring connections4.035-166.0
natural_image
Technical line drawing of a mechanical assembly with mounting holes and a black arrow indicating a specific component (no text or symbols present)natural_image
Technical line drawing of a mechanical assembly with rotating components (no text or symbols)natural_image
Mechanical assembly diagram showing gear and wheel components with directional arrows (no text or labels)natural_image
Diagram of a robotic cleaning machine with hoses and a foot pedal (no text or symbols)text_image
Technical diagram of a truck's internal structure with labeled parts and directional arrows indicating assembly or inspection.natural_image
Technical line drawing of a garbage truck with mechanical components and downward arrows indicating motion (no text or symbols)natural_image
Technical line drawing of a mechanical assembly with mounting brackets and a central component (no text or symbols)text_image
Technical diagram showing two mechanical components with numbered parts and directional arrows indicating motion or assembly.text_image
Technical diagram showing a mechanical assembly with numbered components and directional arrows indicating motion or assembly steps.natural_image
Technical line drawing of a mechanical assembly with no visible text or symbolstext_image
Diagram showing a mechanical component with labeled parts and directional arrows indicating motion or rotation.text_image
Technical diagram of a mechanical assembly with numbered parts and directional arrows indicating motion or assembly steps.natural_image
Technical line drawing of a mechanical component with two downward arrows indicating features (no text or symbols present)natural_image
Technical line drawings of a mechanical component, showing cross-sectional and exploded views (no text or symbols)1 Šruba
2 Aqua-Mizer
→ Wykręcić 2 śruby.
H. Jenner Chairman of the Board of Management

S. Reiser Director Regulatory Affairs & Certification
71364 Winnenden (Germany)
Tel.: +49 7195 14-0
Fax: +49 7195 14-2212
Winnenden, 2021/02/01
www.kaercher.com/REACH
Elemente de operare

text_image
Technical diagram of a truck's internal components with numbered parts, including dashboard, engine, and wheel assembly.natural_image
Technical line drawing of a mechanical assembly with rotating components (no text or symbols)→ Pentru deblocarea frânei de imobilizare trageti de maneta de deblocare.
ATENTIE
natural_image
Technical line drawing of a mechanical device with downward arrows indicating motion or force (no text or symbols)natural_image
Pure technical diagram of a mechanical or architectural cross-section without any text, numbers, or symbolsnatural_image
Technical line drawing of a mechanical lifting device with labeled components (no text or symbols present)natural_image
Technical diagram of a mechanical assembly with labeled components (no readable text or symbols)4.035.097.0, 4.035-165.0
text_image
Technical diagram of a device's internal components with labeled parts 1 and 24.035-164.0
natural_image
Technical line drawing of a mechanical assembly with no visible text or symbolsIndicator accumulator
natural_image
Technical line drawing of a mechanical assembly with mounting holes and a black arrow indicating a specific component (no text or symbols present)natural_image
Technical line drawing of mechanical components with no visible text or symbolsnatural_image
Mechanical assembly diagram showing components like gears and levers with directional arrows (no text or labels)natural_image
Line drawing of a robotic arm handling a flexible hose and a rectangular base (no text or symbols)text_image
Technical diagram of a truck showing internal components and directional arrows, with some views marked by cross symbols.natural_image
Technical line drawing of a mechanical assembly with no visible text or symbolsnatural_image
Technical line drawing of a mechanical assembly with mounting brackets and a central component (no text or symbols)text_image
Technical diagram showing two mechanical components with numbered parts and directional arrows indicating motion or assembly.text_image
Technical diagram showing a mechanical assembly with numbered components and directional arrows indicating motion or assembly steps.natural_image
Technical line drawing of a mechanical assembly with no visible text or symbolstext_image
Technical diagram showing a mechanical component with labeled parts and directional arrows indicating motion or assembly.natural_image
Technical line drawing of a mechanical component with two downward arrows indicating features (no text or symbols present)natural_image
Technical line drawing of a mechanical component with no visible text or symbols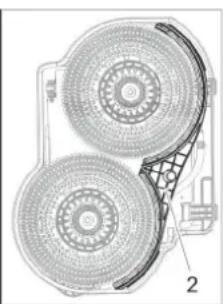
natural_image
Technical diagram of a dual-circled fan or fan assembly with labeled parts (no text or symbols present)1 Şurub
2 Aqua-Mizer
Directive UE respectate:
2006/42/EG (+2009/127/EG)
2014/30/EU
2014/53/EU (TCU)
Norme armonizate utilize:
EN 60335-1
EN 60335-2-29
EN 60335-2-72
EN 62233: 2008
EN 55012: 2007 + A1: 2009
EN 61000-6-2: 2005
EN 55014-1: 2017 + A11: 2020
EN 55014-2: 2015
EN 61000-3-2: 2014
EN 61000-3-3: 2013
TCU
EN 301 511 V12.5.1
EN 300 440 V2.1.1
EN 300 328 V2.2.2
EN 300 330 V2.1.1
71364 Winnenden (Germany)
Tel.: +49 7195 14-0
Fax: +49 7195 14-2212
Winnenden, 2021/02/01
www.kaercher.com/REACH
Ovládacie prvky

text_image
Technical diagram of a truck's internal components with numbered parts, including dashboard, engine, and wheel assembly.1 Volant
2 Systém plnenia
3 Uzáver, nádrž na znečistenú vodu
4 Kryt nádrže znečistenej vody
5 Ochranné sitko turbíny (pod plavákom)
6 Plavák
7 Filtračné sito
8 Zachytávanie hrubej nečistoty
9 Nádrž znečistenej vody
10 Vypúštacia hadica znečistenej vody
11 Uzáver nádrže na čistú vodu s filtrom na čistú vodu
12 Výškovo nastavitelný nasávací nadstavec
13 Krídlové matice na upevnenie sacej nadstavby
14 Sací nadstavec *
15 Upevňovacia páka na sklonenie nasá-
vacieho nosníka
16 F'ăša na čistiaci prostriedok (len variant Dose)
17 Veko nádrže na čistú vodu
18 Páka odblokovania aretačnej brzdy
19 Bezpečnostné spínače
20 Pedál pojazdu
21 Miesto na státie pre obsluhu
22 Studená zástrčka prístroja pre nabíjačku
23 Nádrž na hrubé nečistoty (len u čistiacej hlavy R) *
24 Zobrazenie stavu naplnenia čistou vodou
25 Kryt batérie
26 Uzáver krytu batérii
27 Ovládací panel
natural_image
Technical line drawing of a mechanical assembly with no visible text or symbolsnatural_image
Technical line drawing of a mechanical device with downward arrows indicating motion or assembly (no text or symbols)natural_image
Pure mechanical assembly diagram showing internal components and directional arrows without any text or symbols→ Vyrobte a zoskrutkujte rampu pomocou prestavby palety tak, ako je to znázornené hore.
→ Potiahnite páku brzdy a pri zatiahnutej páke stroj zosuňte z rampy.
alebo
natural_image
Technical line drawing of a forklift assembly with wheels and components (no text or symbols)1 Blokovanie nosiča batérie
→ Blokovanie nosiča batérie posuňte doľava a vyklopte nadol.
→ Nosič batérie potiahnite dozadu.

natural_image
Technical diagram of a mechanical assembly with labeled components (no readable text or symbols)4.035.097.0, 4.035-165.0
1 Udržiavač vzdialenosti 380x55x30

text_image
Technical diagram of a mechanical assembly with labeled components, showing internal wiring and housing layout.4.035-164.0
1 Udržiavač vzdialenosti 345x60x47
2 Udržiavač vzdialenosti 380x55x30
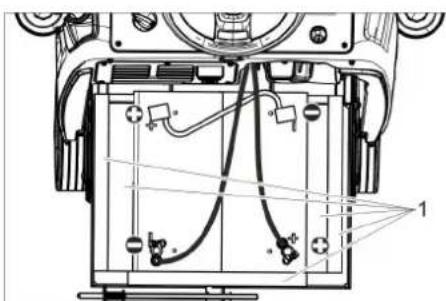
natural_image
Technical line drawing of a mechanical assembly with no visible text or symbols4.035-166.0
1 Udržiavač vzdialenosti 380x55x30
POZOR
Nebezpečenstvo poškodenia. Dbajte na správnu polaritu.
natural_image
Technical line drawing of a mechanical assembly with mounting holes and a black arrow indicating a specific component (no text or symbols present)natural_image
Mechanical assembly diagram showing gear and wheel components with no visible text or symbolsnatural_image
Technical line drawing of a mechanical assembly with no visible text or symbols→ Uvol'nite obe upevňovacie páčky.
→ Prestavte sklon sacieho nadstavca.
→ Utiahnite obe upínacie páčky.
natural_image
Line drawing of a robotic arm with a coiled hose and attached flatboard (no text or symbols)→ Vypustite vodu po otvorení dávkovacieho zariadenia na vypúšťacej hadici.
→ Nakoniec nádobu na znečistenú vodu vypláchnite čistou vodou.
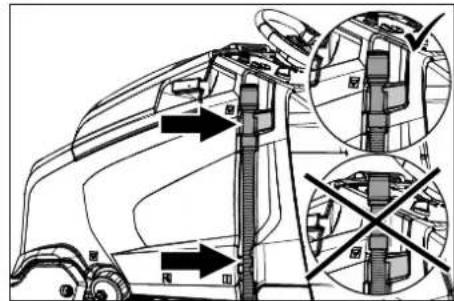
text_image
Technical diagram of a truck showing structural components with arrows indicating direction and cross-sections for inspection or clearance.natural_image
Technical line drawing of a mechanical assembly with arrows indicating force or motion (no text or symbols)natural_image
Technical line drawing of a mechanical assembly with mounting brackets and a central component (no text or symbols)text_image
Technical diagram showing a mechanical assembly with numbered components and directional arrows indicating motion or assembly steps.→ Stiahnite umelohmotné diely.
→ Stiahnite sacie stierky.
→ Zasuňte nové sacie stierky.
→ Nasuňte umelohmotné diely.
→ Zaskrutkujte a pevne dotiahnite krížové rukoväte.
text_image
R 2 1 D 1 2natural_image
Technical line drawing of a mechanical assembly with no visible text or symbolstext_image
Technical diagram showing a mechanical component with labeled parts and directional arrows indicating rotation or movement.natural_image
Technical line drawing of a mechanical component with two arrows pointing to features (no text or symbols present)natural_image
Technical line drawing of a mechanical component with no visible text or symbols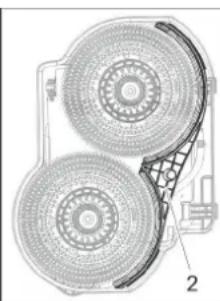
natural_image
Technical diagram of a mechanical component with two circular components and a grid-patterned base (no text or symbols)1 Skrutka
2 Aqua-Mizer
→ Vyskrutkujte 2 skrutky.
→ Odstránenie Aqua-Mizer.
Technické údaje

Chairman of the Board of Management

Director Regulatory Affairs & Certification
71364 Winnenden (Germany)
Tel.: +49 7195 14-0
Fax: +49 7195 14-2212
Winnenden, 2021/02/01
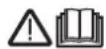
Prije prve uporabe Vašeg uređaja pročitajte ove originalne
www.kaercher.com/REACH
Komandni elementi

text_image
Technical diagram of a truck's internal components with numbered parts, including dashboard, engine, and wheel assembly.1 Upravljač
2 Sustav punjenja
3 Zatvarač spremnika prljave vode
4 Poklopac spremnika prljave vode
5 Zaštitna mrežica turbine (ispod plovka)
6 Plovak
7 Mrežica za skupljanje vlakana
8 Hvatač grube prljavštine
9 Spremnik prljave vode
10 Ispusno crijevo prljave vode
11 Zatvarač spremnika svježe vode s filtrom za svježu vodu
12 Namještanje visine usisne konzole
13 Leptir matice za pričvršćenje usisne konzole
14 Usisna konzola *
15 Stezna poluga za naginjanje usisne konzole
16 Boca sa sredstvom za pranje (samo izvedba Dose)
17 Poklopac spremnika svježe vode
18 Otkočna poluga pozicijske kočnice
19 Sigurnosna sklopka
20 Vozna pedala
21 Platforma za stajanje tijekom opsluživanja
22 IEC utikač kabela za punjenje
23 Spremnik za grubu prljavštinu (samo kod R bloka čistača) *
24 Pokazivač napunjenosti spremnika svježe vode
25 Poklopac akumulatora
26 Zatvarač poklopca akumulatora
27 Komandno polje
* nije u opsegu isporuke
Oznaka u boji
natural_image
Technical line drawing of a mechanical assembly with rotating components (no text or symbols)natural_image
Technical line drawing of a mechanical cleaning or maintenance device with downward arrows indicating components (no text or symbols present)→ Skinite pričvrsnike s kotača.
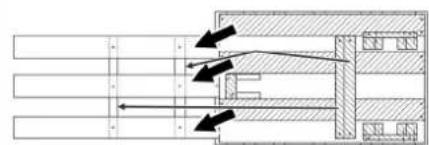
natural_image
Pure mechanical assembly diagram showing shafts and housing with directional arrows (no text or symbols)→ Preinačavanjem palete napravite rampu kao što je gore prikazano i učvrstite je vijcima.
→ Povucite polugu kočnice i s povučenom polugom spustite uređaj s rampe.
ili
→ Utaknite ključ "Intelligent Key".
→ Okretanjem deblokirajte prekidač za isključenje u nuždi.
→ Programski prekidač postavite u položaj za vožnju.
→ Stanite na platformu za stajanje i priti-snite sigurnosnu sklopku.
→ Prekidač za odabir smjera vožnje postavite na "naprijed".
→ Pritisnite voznu pedalu.
→ Spustite uređaj s palette.
Četke se moraju montirati prije stavljanja u pogon (pogledajte odlomak "Radovi na održavanju").
Akumulatori
 | Uzmite u obzir naputke na akumulatoru, u uputama za uporabu i u radnim uputama vozila |
 | Nosite zaštitne naočale |
 | Kiseline i akumulatore držite van domašaja djece |
 | Opasnost od eksplozije |
 | Zabranjeni su vatra, iskrenje, otvoren plamen i pušenje |
 | Opasnost od ozljeda kiselinom |
 | Prva pomoć |
 | Upozorenje |
 | Zbrinjavanje u otpad |
 | Akumulator se ne smije baciti u kantu za smeće |
△OPASNOST
Opasnost od eksplozije!
Ne polažite na akumulator nikakav alat niti slične predmete. Opasnost od kratkog spo- ja i eksplozije.
natural_image
Technical line drawing of a mechanical lifting device with labeled components (no text or symbols present)1 Zapor odjeljka akumulatora
natural_image
Technical diagram of a mechanical assembly with labeled components (no readable text or symbols)4.035.097.0, 4.035-165.0
1 Odstojnik 380x55x30

text_image
Technical diagram of a device's internal components with labeled parts 1 and 24.035-164.0
1 Odstojnik 345x60x47
2 Odstojnik 380x55x30
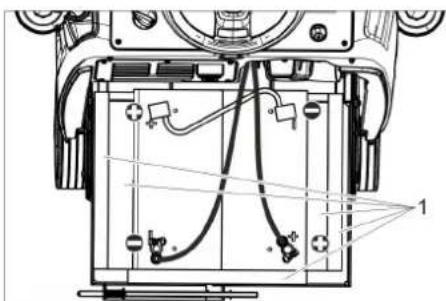
text_image
Technical diagram of a mechanical assembly with labeled components and wiring connections4.035-166.0
1 Odstojnik 380x55x30
PAŽNJA
Opasnost od oštećenja. Pazite na pravilno spajanje polova.
natural_image
Technical line drawing of a mechanical assembly with mounting holes and a black arrow indicating a specific component (no text or symbols present)→ Usisnu konzolu postavite u njen ovjes tako da se limeni profil nalazi iznad ovjesa.
→ Zategnite leptir matice.
→ Nataknite usisno crijevo.
U radu
Napomena:
natural_image
Mechanical assembly diagram showing gear and wheel components with no visible text or symbols→ Otpustite leptir matice.
→ Okrenite usisnu konzolu.
→ Zategnite leptir matice.
Nagib
natural_image
Technical line drawing of a mechanical assembly with no visible text or symbols→ Otpustite obje stezne poluge.
→ Namjestite nagib usisne konzole.
→ Pritegnite obje zatezne poluge.
natural_image
Diagram of a robotic arm with a coiled cable and attached flat plate (no text or symbols)→ Otvorite dozator te ispustite vodu kroz ispusno crijevo.
→ Nakon toga spremnik prljave vode isperite čistom vodom.

text_image
Technical diagram of a truck showing internal components with directional arrows and cross-sectional viewsnatural_image
Technical line drawing of a mechanical assembly with arrows indicating motion or force directions (no text or symbols present)natural_image
Technical line drawing of a mechanical assembly with mounting brackets and a central component (no text or symbols)→ Skinite letvicu za distribuciju vode s bloka čistača i očistite kanal za vodu (samo R blok čistača).
→ U slučaju duljeg razdoblja mirovanja uređaj spremite samo s do kraja napunjenim baterijama. Bateriju najmanje jednom mjesečno ponovno napunite do kraja.
Godišnje
→ Uređaj predajte servisnoj službi radi provođenja propisanog tehničkog pregleda.
Poništavanje brojača
text_image
Technical diagram showing two mechanical components with numbered parts and directional arrows indicating motion or assembly.text_image
Technical diagram showing mechanical assembly with numbered components and directional arrows indicating motion or flow.natural_image
Technical line drawing of a vehicle chassis with mounting brackets and a directional arrow indicating motion (no text or symbols)→ Namjestite razmak zaštite od prskanja od tla okretanjem kotačića za ugađanje.
text_image
Technical diagram showing a mechanical component with labeled parts and directional arrows indicating motion or assembly.→ Otpustite zapor gumica za prikupljanje prljavštine.
→ Pomaknite gumice za prikupljanje prljavštine u stranu.
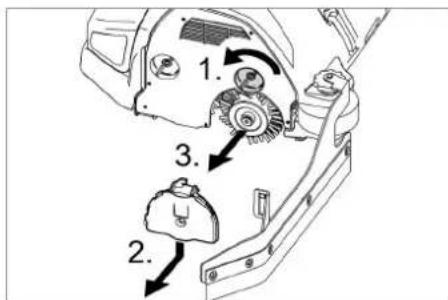
text_image
Technical diagram of a mechanical assembly with numbered parts and directional arrows indicating motion or assembly steps.→ Otpustite zapor poklopca ležaja.
→ Poklopac ležaja pritisnite prema dolje i skinite.
→ Izvucite valjkastu četku.
→ Umetnite novu valjkastu četku.
→ Poklopac ležaja i gumice za prikupljanje prljavštine ponovo pričvrstite obrnutim redoslijedom.
→ Postupak ponovite na suprotnoj strani.
natural_image
Technical line drawing of a mechanical component with two arrows pointing to features (no text or symbols present)→ Pedalu za zamjenu četke pritisnite prema dolje prelazeći pritom preko osjetnog otpora.
→ Izvucite pločastu četku bočno ispod bloka čistača.
→ Stavite novu pločastu četku ispod bloka čistača te ju pritisnite prema gore da dosjedne.
natural_image
Technical line drawing of a mechanical component with no visible text or symbols
natural_image
Technical diagram of a mechanical component with two circular components and a grid-patterned base (no text or symbols)1 Vijak
2 Aqua-Mizer
→ Izvijte 2 vijka.
→ Uklonite sustav Aqua-Mizer.
Tehnički podaci
| B 95 R 65 D 65 R 75 | ||||
| Snaga | ||||
| Nazivni napon V24 | ||||
| Kapacitet akumulatora Ah (5h) 170...198 | ||||
| Prosječna potrošnja energije W 1950 | ||||
| Nazivna snaga voznog motora W 600 | ||||
| Snaga usisnog motora W 750 550 750 | ||||
| Snaga motora za četke W 2x600 | ||||
| Usisivanje | ||||
| Snaga usisavanja, protok zraka l/s 20,5 | ||||
| Snaga usisavanja, podtlak | kPa | 12,0 | ||
| Četke za čišćenje | ||||
| Radna širina | mm | 650 | 750 | |
| Promjer četke | mm | 105 365 | 105 | |
| Broj okretaja četki | 1/min | 1200 | 140 | 1200 |
| Dimenzije i težine | ||||
| Brzina vožnje | km/h | 6 | ||
| Maks. uspon terena | % | 10 | ||
| Teoretski površinski učinak | m2/h | 3900 | 4500 | |
| Zapremnina spremnika svježe/prljave vode | l | 95 | ||
| Volumen spremnika za grubu prljavštinu | l | 6 | - | 7 |
| Tlak vode sustava punjenja**, sustav za ispiranje spremnika prljave vode**, maks. | MPa(bar) | 1 (10) | ||
| Duljina | mm | 1525 | ||
| Širina (bez usisne konzole) | mm | 760 750 | 810 | |
| Visina | mm | 1470 | ||
| Dopuštena ukupna težina | kg | 500 | ||
| Transportna težina | kg | 325 | 330 | |
| Dopušteno područje temperature | °C | 5...40 | ||
| Površinsko opterećenje (s vozačem i punim spremnikom svježe vode) | ||||
| Prednji kotač | N/cm2 | 66 | ||
| Stražnji kotač | N/cm2 | 54 | ||
| Utvrdene vrijednosti prema EN 60335-2-72 | ||||
| Ukupna vrijednost oscilacija na rukama | m/s2 | 0,2 | ||
| Nepouzdanost K | m/s2 | 2 | ||
| Razina zvučnog tlaka LpA | dB(A) | 68 | 67 | 68 |
| Nepouzdanost KpA | dB(A) | 2 | ||
| Razina zvučne snage LWA + nepouzdanost KWA | dB(A) | 85 | ||
| Ugrađeni punjač (opcija) | ||||
| Nazivni napon V 230 | ||||
| Frekvencija | Hz | 50-60 | ||
| Nazivna jačina struje | A | 4,2 | ||
** Opcija

Chairman of the Board of Management
Director Regulatory Affairs & Certification
71364 Winnenden (Germany)
Tel.: +49 7195 14-0
Fax: +49 7195 14-2212
Winnenden, 2021/02/01

Pre prve upotrebe Vašeg uređaja pročitajte ove originalno
www.kaercher.com/REACH
Komandni elementi

text_image
Technical diagram of a truck's internal components with numbered parts, including dashboard, engine, and wheel assembly.1 Upravljač
2 Sistem punjenja
3 Zatvarač rezervoara prljave vode
4 Poklopac rezervoara prljave vode
5 Zaštitna mrežica turbine (ispod plovka)
6 Plovak
7 Mrežica za skupljanje vlakana
8 Hvatač grube prljavštine
9 Rezervoar prljave vode
10 Ispusno crevo prljave vode
11 Zatvarač rezervoara sveže vode sa filterom za svežu vodu
12 Podešavanje visine usisne konzole
13 Leptir navrtke za pričvršćenje usisne konzole
14 Usisna konzola *
15 Stezna poluga za naginjanje usisne
konzole
16 Boca sa deterdžentom (samo verzija Dose)
17 Poklopac rezervoara sveže vode
18 Otkočna poluga pozicione kočnice
19 Sigurnosni prekidač
20 Vozna pedala
21 Platforma za stajanje tokom rada
22 IEC utikač kabla za punjenje
23 Rezervoar za grubu prljavštinu (samo kod R bloka čistača) *
24 Indikator napunjenosti rezervoara sveže vode
25 Poklopac akumulatora
26 Zatvarač poklopca akumulatora
27 Komandno polje
* nije u obimu isporuke
Oznaka u boji
- Komandni elementi za proces čišćenja su žuti.
- Komandni elementi za održavanje i servis su svetlo sivi.
Komandni pult

text_image
1 2 3 4 5 6 7 8 OFF KERCHER® Professional1 Programski prekidač
2 Sirena
3 Prekidač za izbor smera vožnje
4 Prekidač za isključenje u nuždi
5 Upravljač
6 Ključ "Intelligent Key"
7 Ekran
8 Dugme za poziv informacija
Programski prekidač Simboli na aparatu
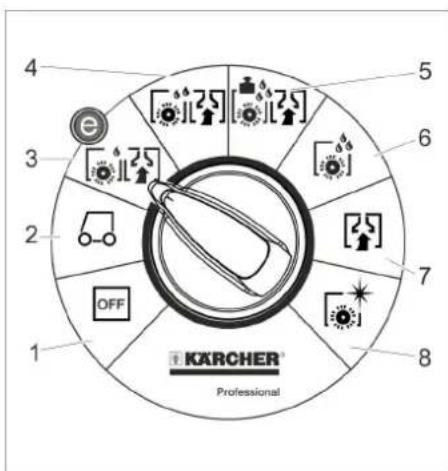
text_image
4 5 6 7 8 1 KARCHER Professional1 OFF
natural_image
Technical line drawing of a mechanical assembly with no visible text or symbols→ U tu svrhu treba povući otkočnu polugu pozicione kočnice.
PAŽNJA
natural_image
Technical line drawing of a mechanical device with downward arrows indicating motion or assembly (no text or symbols)natural_image
Technical schematic of a mechanical assembly with directional arrows indicating flow or movement (no text or labels)→ Pregrađivanjem palete napravite rampu kao što je gore prikazano i učvrstite je zavrtnjima.
→ Povucite polugu kočnice i s povučenom polugom spustite uređaj sa rampe.
ili
→ Utaknite ključ "Intelligent Key".
→ Okretanjem deblokirajte prekidač za isključenje u nuždi.
→ Programski prekidač postavite u položaj za vožnju.
→ Stanite na platformu za stajanje i pritisnite sigurnosni prekidač.
→ Prekidač za izbor smera vožnje postavite na "napred".
→ Pritisnite voznu pedalu.
→ Spustite uređaj s palette.
Pre stavljanja u rad moraju biti montirane četke (pogledajte "Radovi na održavanju").
Akumulatori
 | Uzmite u obzir instrukcije na akumulatoru, u uputstvu za upotrebu i u radnom uputstvu vozila |
 | Nosite zaštitne naočare |
 | Kiseline i akumulatore držite van domašaja dece |
 | Opasnost od eksplozije |
 | Zabranjeni su vatra, varničenje, otvoren plamen i pušenje |
 | Opasnost od povreda kiselinom |
 | Prva pomoć |
 | Upozorenje |
 | Otklanjanje u otpad |
 | Akumulator se ne sme baciti u kantu za smeće |
⚠ OPASNOST
Opasnost od eksplozije!
Ne stavljajte na akumulator nikakav alat niti slične predmete. Opasnost od kratkog spoja i eksplozije.
Opasnost od povreda. Rane nikad ne dovodite u kontakt sa olovom. Nakon radova sa akumulatorom uvek operite ruke.
Preporučeni akumulatorski blokovi
| kataloški br. | Zapremina [m3]* | Vazdušna struja [m3/h]** | |
| 170 Ah, bez potrebe za održavanjem | 4.035-164.0 | 3,3 1,32 | |
| 180 Ah, bez potrebe za održavanjem | 4.035-097.0 | 3,8 1,52 | |
| 180 Ah, laki za održavanje | 4.035-165.0 | 14,85 5 | ,94 |
| 195 Ah, laki za održavanje | 4.035-166.0 | 22,28 8 | ,94 |
| * Minimalna zapremina prostorije u kojoj se baterija puni** Minimalna vazdušna struja između prostorije u kojoj se baterija puni i okruženja | |||
natural_image
Technical line drawing of a mechanical lifting device with labeled components (no text or symbols present)1 Blokada pregrade akumulatora
→ Blokadu pregrade akumulatora gurnite ulevo i zaokrenite na dole.
→ Pregradu akumulatora povucite unazad.
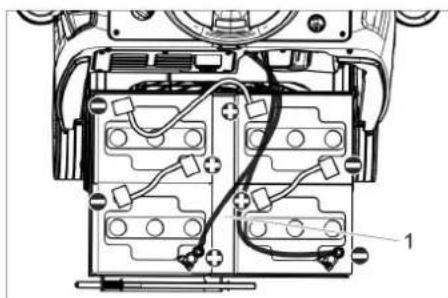
natural_image
Technical diagram of a vehicle battery pack with wiring and mounting points (no text or labels)4.035.097.0, 4.035-165.0
1 Odstojnik 380x55x30
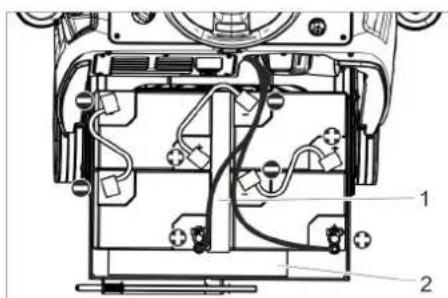
text_image
Technical diagram of a device's internal components with numbered labels pointing to various parts.4.035-164.0
1 Odstojnik 345x60x47
2 Odstojnik 380x55x30

text_image
Technical diagram of a device's internal components with labeled parts and wiring4.035-166.0
1 Odstojnik 380x55x30
PAŽNJA
Opasnost od oštećenja. Pazite na pravilno spajanje polova.
→ Polove spojite priloženim spojnim kablom.
→ Priključni kabl priključite na slobodne polove akumulatora (+) i (-).
→ Gurnite pregradu akumulatora prema napred.
→ Uglavite blokadu pregrade akumulatora.
→ Namestite tip baterije (vidi poglavlje Sivi ključ "Intelligent Key").
PAŽNJA
Opasnost od oštećenja usled prekomernog pražnjenja. Prije puštanja uređaja u rad napunite akumulatore.
Punjenje akumulatora
Napomena:
Uređaj je opremljen zaštitom od potpunog pražnjenja baterije. To znači da se pri dostizanju minimalnog kapaciteta uređaj može još samo voziti. Na ekranu se pojavljuje poruka "Baterija je slaba - čišćenje nije moguće" i „Baterija se ispraznila - napunite je".
→ Uređaj odvezite odmah do stacionarnog punjača i pritom izbegavajte uspone.
Napomena:
Pri korišćenju drugih baterija (npr. drugih proizvođača) servisna služba Kärcher na dotičnoj bateriji mora iznova podesiti zaštitu od potpunog pražnjenja.
△OPASNOST
Opasnost od strujnog udara. Obratite pažnju na električne vodove i sigurnosne mere. Punjač koristite samo u suvim i dovoljno provetrenim prostorijama.
Napomena:
Baterije se u proseku pune oko 10-12 sati. Punjač samostalno završava postupak punjenja.
△OPASNOST
Opasnost od eksplozije. Prostorija u kojoj je uređaj isključen radi punjenja akumulatora, mora imati minimalni volumen koji zavisi od tipa akumulatora i cirkulaciju vazduha sa minimalnom vazdušnom strujom (vidi poglavlje „Preporučeni akumulatori“).
natural_image
Technical line drawing of a mechanical assembly with mounting holes and a black arrow indicating a specific component (no text or symbols present)→ Usisnu konzolu postavite u njen nosač tako da se limeni profil nalazi iznad nosača.
→ Zategnite leptir matice.
→ Nataknite usisno crevo.
Rad
Napomena:
Za momentalno deaktiviranje svih funkcija sklonite nogu sa vozne pedale i pritisnite prekidač za isključenje u nuždi.
natural_image
Mechanical assembly diagram showing gear and wheel components with no visible text or symbols→ Otpustite leptir matice.
→ Okrenite usisnu konzolu.
→ Zategnite leptir matice.
Nagib
natural_image
Technical line drawing of a mechanical assembly with no visible text or symbols→ Otpustite obe stezne poluge.
→ Podesite nagib usisne konzole.
→ Zategnite obe zatezne poluge.
Pražnjenje rezervoara prljave vode
Napomena:
Prelivanje rezervoara prljave vode. Ako je rezervoar za prljavu vodu pun, usisna turbina se isključuje, a na ekranu se pojavljuje poruka „Rezervoar za prljavu vodu je pun“.
⚠UPOZORENJE
natural_image
Diagram of a robotic arm with a coiled cable and attached flat tray (no text or symbols)→ Otvorite dozator na ispusnom crevu i ispustite vodu.
→ Zatim rezervoar za prljavu vodu isperite čistom vodom.

text_image
Technical diagram of a truck showing internal components with directional arrows and cross-sectional viewsnatural_image
Technical line drawing of a truck under assembly with arrows indicating motion (no text or symbols)Prilikom transporta vozilima osigurajte uređaj od klizanja i nakretanja u skladu sa odgovarajućim važećim propisima.
Ako je D blok čistača montiran
→ Izvadite pločaste četke iz bloka četki.
Skladištenje
△OPREZ
Opasnost od povreda i oštećenja! Pri skladištenju imajte u vidu težinu uređaja.
natural_image
Technical line drawing of a mechanical assembly with mounting brackets and a control panel (no text or symbols)→ Skinite letvicu za distribuciju vode sa bloka čistača i očistite kanal za vodu (samo R blok čistača).
→ Kod dužeg perioda mirovanja, uređaj odložiti samo sa potpuno napunjenim akumulatorom. Najmanje jednom mesečno akumulator ponovo u potpunosti napuniti.
Godišnje
→ Uređaj predajte servisnoj službi radi sprovođenja propisanog tehničkog pregleda.
Poništavanje brojača
Ako je obavljeno održavanje prikazano na ekranu, treba poništiti odgovarajući brojač.
→ Utaknite ključ "Intelligent Key".
→ Okretanjem deblokirajte prekidač za isključenje u nuždi.
→ Programski prekidač postavite u položaj za vožnju.
→ Pritisnite dugme za poziv informacija.
text_image
Technical diagram showing a mechanical assembly with numbered components and directional arrows indicating motion or flow.→ Skinite plastične delove.
→ Skinite gumice za usisavanje.
→ Ugurajte nove gumice.
→ Nataknite plastične delove.
→ Zavijte i zategnite zvezdaste pričvrsnike.
natural_image
Technical line drawing of a mechanical assembly with no visible text or symbols→ Podesite rastojanje zaštite od prskanja od poda okretanjem točkića za podešavanje.
Zamena valjkaste četke
→ Podignite blok čistača.

text_image
1. 2.→ Otpustite bravicu gumica za prikupljanje prljavštine.
→ Pomerite gumice za prikupljanje prljavštine u stranu.

text_image
Technical diagram of a mechanical assembly with numbered parts and directional arrows indicating motion or assembly steps.→ Otpustite bravicu poklopca ležaja.
→ Poklopac ležaja pritisnite na dole i skinite.
→ Izvucite valjkastu četku.
→ Umetnite novu valjkastu četku.
→ Poklopac ležaja i gumice za prikupljanje prljavštine ponovo pričvrstite obrnutim redosledom.
→ Postupak ponovite na suprotnoj strani.
natural_image
Technical line drawing of a mechanical component with two arrows pointing to features (no text or symbols present)→ Pedalu za zamenu četke pritisnite na dole prelazeći pritom preko osetnog otpora.
→ Izvucite pločastu četku bočno ispod bloka čistača.
→ Stavite novu pločastu četku ispod bloka čistača pa je pritisnite na gore da se uglavi.
natural_image
Technical line drawing of a mechanical device showing internal components and two circular fan-like structures (no text or symbols)1 Zavrtanj
2 Aqua-Mizer
→ Izvijte 2 zavrtnja.
→ Uklonite sistem Aqua-Mizer.
Tehnički podaci
| B 95 R 65 D 65 R 75 | ||||
| Snaga | ||||
| Nominalni napon V 24 | ||||
| Kapacitet akumulatora Ah (5h) 170...198 | ||||
| Prosečna potrošnja energije W 1950 | ||||
| Nominalna snaga voznog motora W 600 | ||||
| Snaga usisnog motora W 750 550 750 | ||||
| Snaga motora za četke W 2x600 | ||||
| Usisivanje | ||||
| Snaga usisavanja, protok vazduha l/s 20,5 | ||||
| Snaga usisavanja, podpritisak | kPa | 12,0 | ||
| Četke za čišćenje | ||||
| Radna širina | mm | 650 | 750 | |
| Prečnik četke | mm | 105 365 | 105 | |
| Broj obrtaja četki | 1/min | 1200 | 140 | 1200 |
| Dimenzije i težine | ||||
| Brzina vožnje | km/h | 6 | ||
| Maks. uspon terena | % | 10 | ||
| Teoretski površinski učinak | m2/h | 3900 | 4500 | |
| Zapremina rezervoara sveže/prljave vode | l | 95 | ||
| Zapremina rezervoara za grubu prljavštinu | l | 6 | - | 7 |
| Pritisak vode sistema punjenja**, sistem za ispiranje rezervoara za prljavu vodu**, maks. | MPa(bar) | 1 (10) | ||
| Dužina | mm | 1525 | ||
| Širina (bez usisne konzole) | mm | 760 750 | 810 | |
| Visina | mm | 1470 | ||
| Dozvoljena ukupna težina | kg | 500 | ||
| Transportna težina | kg | 325 | 330 | |
| Dozvoljen raspon temperature | °C | 5...40 | ||
| Površinsko opterećenje (sa vozačem i punim rezervoarom sveže vode) | ||||
| Prednji točak | N/cm2 | 66 | ||
| Zadnji točak | N/cm2 | 54 | ||
| Izračunate vrednosti prema EN 60335-2-72 | ||||
| Ukupna vrednost oscilacija na rukama | m/s2 | 0,2 | ||
| Nepouzdanost K | m/s2 | 2 | ||
| Nivo zvučnog pritiska LpA | dB(A) | 68 | 67 | 68 |
| Nepouzdanost KpA | dB(A) | 2 | ||
| Nivo zvučne snage LWA + nepouzdanost KWA | dB(A) | 85 | ||
| Ugrađeni punjač (opcija) | ||||
| Nominalni napon V 230 | ||||
| Frekvencija | Hz | 50-60 | ||
| Nominalna jačina struje | A | 4,2 | ||
** Opcija
Pribor i rezervni delovi

Chairman of the Board of Management

S. Reiser
Director Regulatory Affairs & Certification
71364 Winnenden (Germany)
Tel.: +49 7195 14-0
Fax: +49 7195 14-2212
Winnenden, 2021/02/01

www.kaercher.com/REACH
Обслужващи елементи

text_image
Technical diagram of a truck's internal components with numbered parts, including dashboard, engine, and wheel assembly.natural_image
Technical line drawing of a mechanical assembly with rotating components (no text or symbols)natural_image
Technical line drawing of a mechanical device with downward arrows indicating motion or assembly (no text or symbols)natural_image
Pure technical diagram of a mechanical or architectural cross-section without any text, numbers, or symbolsnatural_image
Technical line drawing of a mechanical lifting device with labeled components (no text or symbols present)natural_image
Technical diagram of a mechanical assembly with labeled components (no readable text or symbols)4.035.097.0, 4.035-165.0
text_image
Technical diagram of a device interior with labeled components, showing internal wiring and housing layoutnatural_image
Technical line drawing of a mechanical assembly with no visible text or symbolsnatural_image
Technical line drawing of a mechanical assembly with mounting holes and a black arrow indicating a specific component (no text or symbols present)natural_image
Mechanical assembly diagram showing gear and components with no visible text or symbolsnatural_image
Mechanical assembly diagram showing gear and shaft components with directional arrows (no text or labels)natural_image
Diagram of a robotic vacuum cleaner with coiled hose and control panel (no text or symbols)text_image
Technical diagram of a vehicle showing structural components with directional arrows and cross-sectional viewsnatural_image
Technical line drawing of a mechanical assembly with arrows indicating motion or force directions (no text or symbols present)natural_image
Technical line drawing of a mechanical assembly with mounting brackets and control panel (no text or symbols)natural_image
Technical line drawing of a mechanical assembly with no visible text or symbolsnatural_image
Technical line drawing of a mechanical component with two arrows pointing to features (no text or symbols present)natural_image
Technical line drawing of a mechanical component with no visible text or symbols
natural_image
Technical illustration of a mechanical component with two circular components and a grid-like structure (no text or symbols)1 Винт
2 Aqua-Mizer
→ Развийте 2-та болта.
Chairman of the Board of Management

S. Reiser
Director Regulatory Affairs & Certification
71364 Winnenden (Germany)
Tel.: +49 7195 14-0
Fax: +49 7195 14-2212
Winnenden, 2021/02/01
www.kaercher.com/REACH
Teeninduselemendid

text_image
Technical diagram of a truck's internal components with numbered parts, including dashboard, engine, and wheel assembly.natural_image
Technical line drawing of a mechanical assembly with rotating components (no text or symbols)natural_image
Technical line drawing of a mechanical device with downward arrows indicating motion or assembly (no text or symbols)→ Eemaldage rataste fikseering.
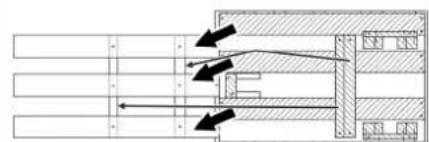
natural_image
Pure mechanical assembly diagram without any text, numbers, or symbolsnatural_image
Technical line drawing of a forklift assembly (no text or symbols)natural_image
Technical diagram of an electronic device showing internal components and wiring (no text or symbols)4.035.097.0, 4.035-165.0
1 Vahehoidja 380x55x30
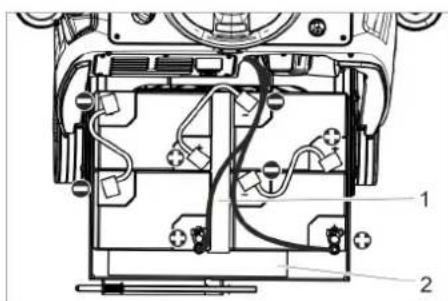
text_image
Technical diagram of a device interior with labeled components, showing internal wiring and housing layout4.035-164.0
1 Vahehoidja 345x60x47
2 Vahehoidja 380x55x30
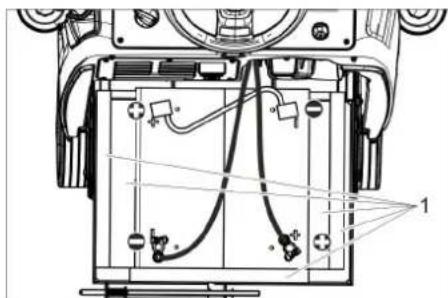
text_image
Technical diagram of a device's internal components with labeled parts and wiring4.035-166.0
1 Vahehoidja 380x55x30
TÄHELEPANU
natural_image
Technical line drawing of a mechanical assembly with no visible text or symbols→ Pange imivarb selliselt kinnitusse, et plekkdetail oleks kinnituse kohal.
→ Keerake tiibmutrid kinni.
→ Pange imivoolik kohale.
Käitamine
Märkus:
natural_image
Technical line drawing of a mechanical assembly with rotating components (no text or symbols)→ Vabastage tiibmutter.
→ Keerake imivarba.
→ Keerake tiibmutrid kinni.
Kalle
natural_image
Mechanical assembly diagram showing gear and wheel components with directional arrows (no text or labels)→ Vabastage mölemad kinnitushoovad.
→ Reguleerige imiotsaku kallet.
→ Pingutage mölemat kinnitushooba.
natural_image
Line drawing of a robotic arm handling a flexible hose and a rectangular base (no text or symbols)text_image
Technical diagram of a vehicle showing structural components with arrows indicating direction and cross-sectional viewsHall Intelligent Key
natural_image
Technical line drawing of a mechanical assembly with arrows indicating motion or force direction (no text or symbols)natural_image
Technical line drawing of a mechanical assembly with mounting brackets and a central component (no text or symbols)text_image
Technical diagram showing a mechanical assembly with numbered components and directional arrows indicating motion or assembly steps.→ Tõmmake plastmassist osad maha.
→ Tõmmake imihuuled maha.
→ Pange kohale uued imihuuled.
→ Lükake peale plastmassist osad.
→ Kruvige sisse tähtnupud ja keerake kinni.
Puhastuspea paigaldamine

text_image
R 2 1 D 1 2 1natural_image
Technical line drawing of a mechanical assembly with no visible text or symbolstext_image
Technical diagram showing a mechanical component with labeled parts and directional arrows indicating motion or assembly.natural_image
Technical line drawing of a mechanical component with two arrows pointing to features (no text or symbols present)Akude mahamonteerimine
Aqua-Mizer demonteerimine
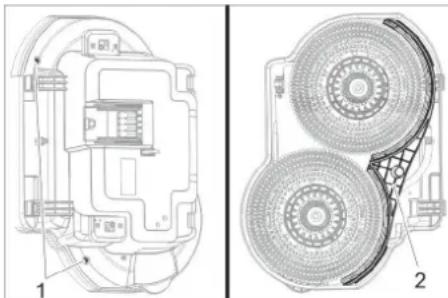
natural_image
Technical line drawings of a mechanical component, showing cross-sectional and top views (no text or symbols)1 Kruvi
2 Aqua-Mizer
→ Keerata 2 kruvi välja.
→ Eemaldada Aqua-Mizer.
Tehnilised andmed

Chairman of the Board of Management

S. Reiser
Director Regulatory Affairs & Certification
71364 Winnenden (Germany)
Tel.: +49 7195 14-0
Fax: +49 7195 14-2212
Winnenden, 2021/02/01
www.kaercher.com/REACH
Teeninduselemendid

text_image
Technical diagram of a truck's internal components with numbered parts, including dashboard, engine, and wheel assembly.natural_image
Technical line drawing of a mechanical assembly with rotating components (no text or symbols)natural_image
Technical line drawing of a mechanical device with downward arrows indicating motion or assembly (no text or symbols)→ Eemaldage rataste fikseering.
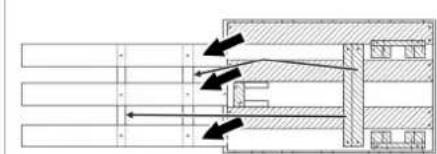
natural_image
Pure mechanical assembly diagram without any text, numbers, or symbolsnatural_image
Technical line drawing of a forklift assembly with labeled components (no text or symbols present)natural_image
Technical diagram of an electronic device showing internal components and wiring (no text or symbols)4.035.097.0, 4.035-165.0
1 Vahehoidja 380x55x30
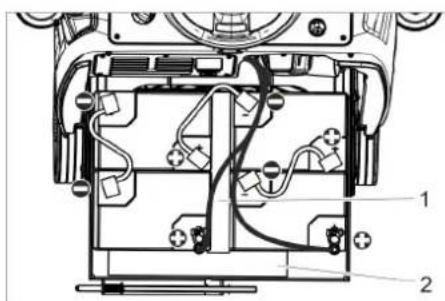
text_image
Technical diagram of a device's internal components with numbered labels pointing to various parts.4.035-164.0
1 Vahehoidja 345x60x47
2 Vahehoidja 380x55x30
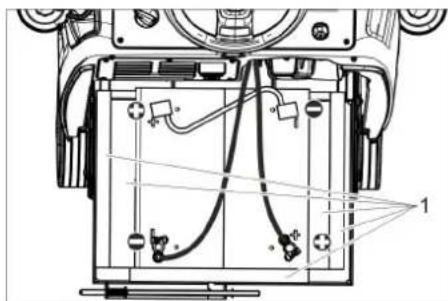
natural_image
Technical line drawing of a mechanical device with internal components and wiring (no text or symbols)4.035-166.0
1 Vahehoidja 380x55x30
TÄHELEPANU
natural_image
Technical line drawing of a mechanical assembly with no visible text or symbols→ Pange imivarb selliselt kinnitusse, et plekkdetail oleks kinnituse kohal.
→ Keerake tiibmutrid kinni.
→ Pange imivoolik kohale.
Käitamine
Märkus:
natural_image
Mechanical assembly diagram showing gear and rotor components with no visible text or symbols→ Vabastage tiibmutter.
→ Keerake imivarba.
→ Keerake tiibmutrid kinni.
Kalle
natural_image
Mechanical assembly diagram showing gear and wheel components with directional arrows (no text or labels)→ Vabastage mölemad kinnitushoovad.
→ Reguleerige imiotsaku kallet.
→ Pingutage mölemat kinnitushooba.
natural_image
Line drawing of a robotic arm handling a flexible hose and a flat base (no text or symbols)text_image
Technical diagram of a vehicle showing structural components with arrows indicating direction and cross-sectional viewsHall Intelligent Key
natural_image
Technical line drawing of a mechanical assembly with arrows indicating motion or force (no text or symbols)natural_image
Technical line drawing of a mechanical assembly with mounting brackets and a central component (no text or symbols)text_image
Technical diagram showing a mechanical assembly with numbered components and directional arrows indicating motion or assembly steps.→ Tõmmake plastmassist osad maha.
→ Tõmmake imihuuled maha.
→ Pange kohale uued imihuuled.
→ Lükake peale plastmassist osad.
→ Kruvige sisse tähtnupud ja keerake kinni.
Puhastuspea paigaldamine
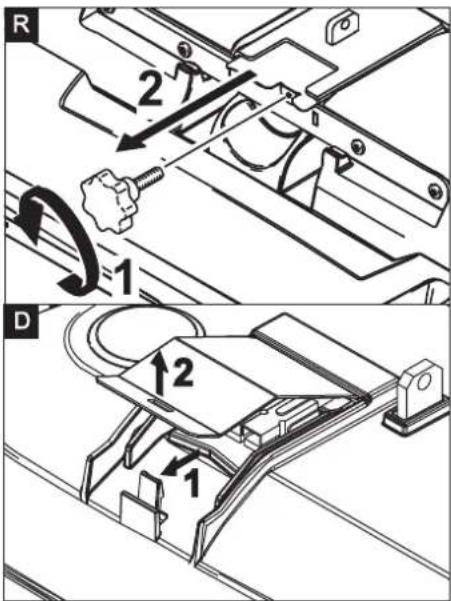
text_image
R 2 1 D 1 2 1natural_image
Technical line drawing of a mechanical assembly with no visible text or symbolstext_image
Technical diagram showing a mechanical component with labeled parts and directional arrows indicating motion or assembly.natural_image
Technical line drawing of a mechanical component with two arrows pointing to features (no text or symbols present)Akude mahamonteerimine
Aqua-Mizer demonteerimine

natural_image
Technical line drawing of a mechanical component with labeled parts (no readable text or symbols)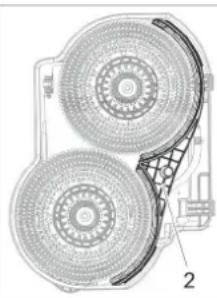
natural_image
Technical diagram of a mechanical component with two circular components and a grid-patterned base (no text or symbols)1 Kruvi
2 Aqua-Mizer
→ Keerata 2 kruvi välja.
→ Eemaldada Aqua-Mizer.
Tehnilised andmed

Chairman of the Board of Management

S. Reiser
Director Regulatory Affairs & Certification
71364 Winnenden (Germany)
Tel.: +49 7195 14-0
Fax: +49 7195 14-2212
Winnenden, 2021/02/01
www.kaercher.com/REACH
Vadības elementi

text_image
Technical diagram of a truck's internal components with numbered parts, including dashboard, engine, and wheel assembly.text_image
Technical diagram of a car steering wheel with labeled components and control panelnatural_image
Technical line drawing of a mechanical assembly with no visible text or symbolsnatural_image
Technical line drawing of a mechanical device with downward arrows indicating motion or assembly (no text or symbols)→ Nonemiet fiksatorus no riteniem.
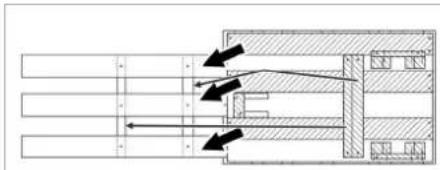
natural_image
Technical diagram of a mechanical assembly with directional arrows indicating motion or force (no text or symbols present)natural_image
Technical line drawing of a forklift assembly (no text or symbols)1 Bateriju nodalijuma fiksators
natural_image
Technical diagram of a mechanical assembly with labeled components (no readable text or symbols)4.035.097.0, 4.035-165.0
text_image
Technical diagram of a mechanical device with labeled components, showing internal wiring and housing layout.4.035-164.0
natural_image
Technical line drawing of a mechanical assembly with no visible text or symbols4.035-166.0
natural_image
Technical line drawing of a mechanical assembly with mounting holes and a black arrow indicating a specific component (no text or symbols present)natural_image
Mechanical assembly diagram showing motor components and gear mechanism (no text or labels)natural_image
Mechanical assembly diagram showing components like gears and levers with directional arrows (no text or labels)natural_image
Diagram of a vehicle's suspension system with hoses and a flatbed tray (no text or symbols)text_image
Technical diagram of a truck showing structural components with directional arrows and cross-sectional viewsnatural_image
Technical line drawing of a mechanical assembly with no visible text or symbolsnatural_image
Technical line drawing of a mechanical assembly with mounting brackets and internal components (no text or symbols)text_image
Technical diagram showing a mechanical assembly with numbered components and directional arrows indicating motion or assembly steps.natural_image
Technical line drawing of a mechanical assembly with no visible text or symbolstext_image
Technical diagram showing a mechanical component with labeled parts and directional arrows indicating rotation or assembly.text_image
Technical diagram showing mechanical assembly with numbered components and directional arrows indicating motion or movement.natural_image
Technical line drawing of a mechanical component with two arrows pointing to features (no text or symbols present)natural_image
Technical line drawing of a device showing internal components and two views (no text or symbols)1 Skrūve
2 Aqua-Mizer

Chairman of the Board of Management

Director Regulatory Affairs & Certification
71364 Winnenden (Germany)
Tel.: +49 7195 14-0
Fax: +49 7195 14-2212
Winnenden, 2021/02/01

www.kaercher.com/REACH
Valdymo elementai

text_image
Technical diagram of a car's internal components with numbered parts, including dashboard, engine, and wheel assembly.natural_image
Technical line drawing of a mechanical assembly with no visible text or symbolsnatural_image
Technical line drawing of a mechanical device with downward arrows indicating motion or assembly (no text or symbols)natural_image
Pure mechanical assembly diagram without any text, numbers, or symbolsnatural_image
Technical line drawing of a forklift assembly (no text or symbols)natural_image
Technical diagram of a mechanical assembly with labeled components (no readable text or symbols)4.035.097.0, 4.035-165.0
1 Tarpiklis 380x55x30
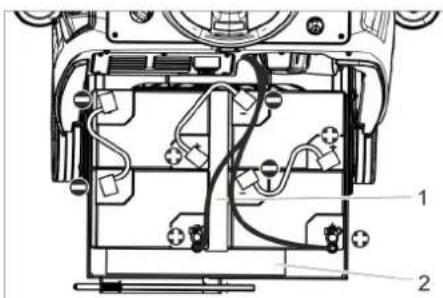
text_image
Technical diagram of a device's internal components with labeled parts 1 and 24.035-164.0
1 Tarpiklis 345x60x47
2 Tarpiklis 380x55x30

natural_image
Technical line drawing of a mechanical assembly with no visible text or symbols4.035-166.0
1 Tarpiklis 380x55x30
DÉMESIO
natural_image
Technical line drawing of a mechanical assembly with no visible text or symbolsnatural_image
Mechanical assembly diagram showing gear and wheel components with no visible text or symbols→ Atlaisvinkite sparnines veržles.
→ Pasukite siurbimo rémelj.
→ Tvirtai prisukite sparnines veržles.
Pakreipimas
Jei siurbimo efektas néra pakankamas, si-urbimo rémelj galima pakreipti.
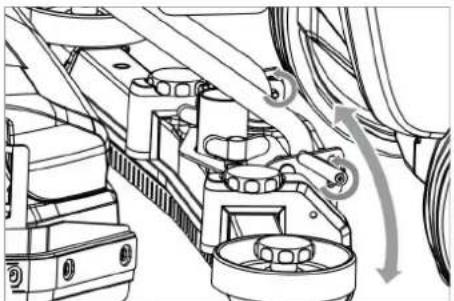
natural_image
Mechanical assembly diagram showing components with directional arrows (no text or labels)natural_image
Line drawing of a robotic arm with a coiled hose and attached flat base (no text or symbols)text_image
Technical diagram of a truck showing internal components with directional arrows and cross-sectional viewsnatural_image
Technical line drawing of a mechanical assembly with arrows indicating downward motion (no text or symbols)natural_image
Technical line drawing of a mechanical assembly with mounting brackets and a central component (no text or symbols)text_image
Technical diagram showing two mechanical components with numbered parts and directional arrows indicating motion or assembly.text_image
Technical diagram showing a mechanical assembly with numbered components and directional arrows indicating motion or assembly steps.text_image
R 2 1 D 12 1natural_image
Technical line drawing of a mechanical assembly with no visible text or symbolsnatural_image
Technical line drawing of a mechanical component with two arrows pointing to features (no text or symbols present)natural_image
Technical line drawing of a mechanical component with two views (labeled 1 and 2), showing internal structure and assembly details (no text or symbols present)1 Varžtas
2 Aqua-Mizer

Chairman of the Board of Management
Director Regulatory Affairs & Certification
71364 Winnenden (Germany)
Tel.: +49 7195 14-0
Fax: +49 7195 14-2212
Winnenden, 2021/02/01

www.kaercher.com/REACH
Елементи керування

text_image
Technical diagram of a car's internal components with numbered parts, including dashboard, engine, and wheel assembly.natural_image
Technical line drawing of a mechanical assembly with no visible text or symbolsnatural_image
Technical line drawing of a cleaning or maintenance device with arrows indicating downward motion (no text or symbols)natural_image
Pure mechanical cross-section diagram without any text, numbers, or symbolsnatural_image
Technical line drawing of a mechanical lifting device with wheels and components (no text or symbols)natural_image
Technical diagram of a mechanical assembly with labeled components (no readable text or symbols)4.035.097.0, 4.035-165.0
1 Прокладка 380x55x30
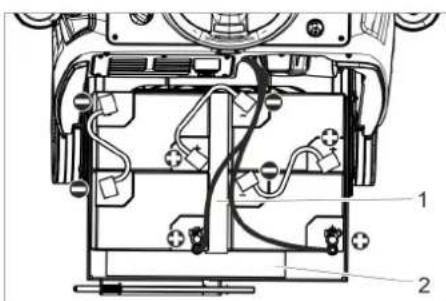
text_image
Technical diagram of a device's internal components with numbered labels pointing to different parts.4.035-164.0
1 Прокладка 345x60x47
2 Прокладка 380x55x30
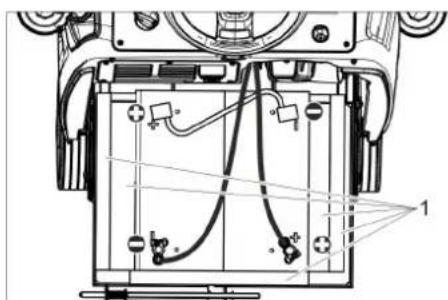
text_image
Technical diagram of a device rear panel with labeled components and wiring connections4.035-166.0
1 Прокладка 380x55x30
УВАГА
natural_image
Technical line drawing of a mechanical assembly with no visible text or symbolsnatural_image
Technical line drawing of a mechanical assembly with no visible text or symbolsnatural_image
Technical line drawing of mechanical components with no visible text or symbolsnatural_image
Line drawing of a robotic arm with a coiled hose and attached flat plate (no text or symbols)text_image
Technical diagram of a truck showing structural components with arrows and cross-sectional views highlighting different parts.natural_image
Technical line drawing of a mechanical assembly with arrows indicating motion or force directions (no text or symbols present)natural_image
Technical line drawing of a mechanical assembly with mounting brackets and a central housing (no text or symbols)text_image
Technical diagram showing two views of a mechanical component with numbered parts and directional arrows indicating motion or assembly.text_image
Technical diagram showing a mechanical assembly with numbered components and directional arrows indicating motion or flow.text_image
R 2 1 D 1 2natural_image
Technical line drawing of a mechanical assembly with no visible text or symbolstext_image
Technical diagram showing mechanical assembly steps with numbered componentsnatural_image
Technical line drawing of a mechanical component with two arrows pointing to features (no text or symbols present)natural_image
Technical line drawing of a mechanical component with labeled parts (no readable text or symbols)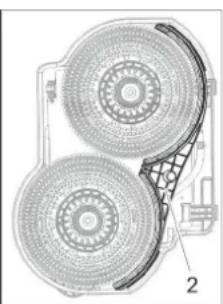
natural_image
Technical diagram of a mechanical component with two circular components and a grid-patterned base (no text or symbols)71364 Winnenden (Germany)
Tel.: +49 7195 14-0
Fax: +49 7195 14-2212
Winnenden, 2021/02/01

natural_image
Black silhouette of a hand giving a thumbs-up gesture (no text or symbols)THANK YOU!
MERCI! DANKE! iGRACIAS!

Register your product and benefit from many advantages.
www.kaercher.com/welcome


Rate your product and tell us your opinion.
natural_image
Icon showing a gear and wrench inside a square frame (no text or symbols)www.kaercher.com/dealersearch
Alfred Kärcher SE & Co. KG
Alfred-Kärcher-Str. 28-40
71364 Winnenden (Germany)
Tel.: +49 7195 14-0
Fax: +49 7195 14-2212