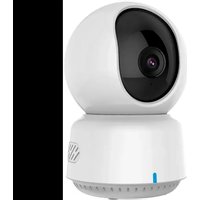
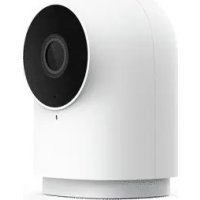
Camera Hub G3 - Surveillance Camera Aqara - Free user manual and instructions
Find the device manual for free Camera Hub G3 Aqara in PDF.
| Product type | PT surveillance camera with Zigbee hub |
| Brand | Aqara |
| Model | Camera Hub G3 (CH-H03) |
| Video resolution | 2K (2304 × 1296p) |
| Viewing angle | 110° |
| Horizontal PT rotation | 340° |
| Vertical PT rotation | 45° (up 30°, down 15°) |
| Zigbee hub | Yes, integrated Zigbee 3.0 |
| Wi-Fi connectivity | Wi-Fi 802.11b/g/n/a/ac, 2.4 and 5 GHz |
| Local storage | microSD card up to 128 GB (FAT32/exFAT) |
| Power supply | 5V ⎓ 2A (USB-C) |
| Power consumption | 10W max |
| Dimensions | 123.4 × 85.1 × 67.8 mm |
| Operating temperature | -10°C to 40°C |
| HomeKit compatibility | Yes, HomeKit Secure Video |
| Night vision | Yes, built-in |
| AI functions | Person recognition, motion detection |
| Infrared remote control | Yes, built-in module |
| Microphone and speaker | Built-in, two-way audio |
| Installation | On table or ceiling (optional mount) |
| LED indicator | Multi-color for different states |
| Video codec | H.264 |
| Maintenance and cleaning | Clean with a soft, dry cloth |
Frequently Asked Questions - Camera Hub G3 Aqara
User questions about Camera Hub G3 Aqara
0 question about this device. Answer the ones you know or ask your own.
Ask a new question about this device
Download the instructions for your Surveillance Camera in PDF format for free! Find your manual Camera Hub G3 - Aqara and take your electronic device back in hand. On this page are published all the documents necessary for the use of your device. Camera Hub G3 by Aqara.
USER MANUAL Camera Hub G3 Aqara
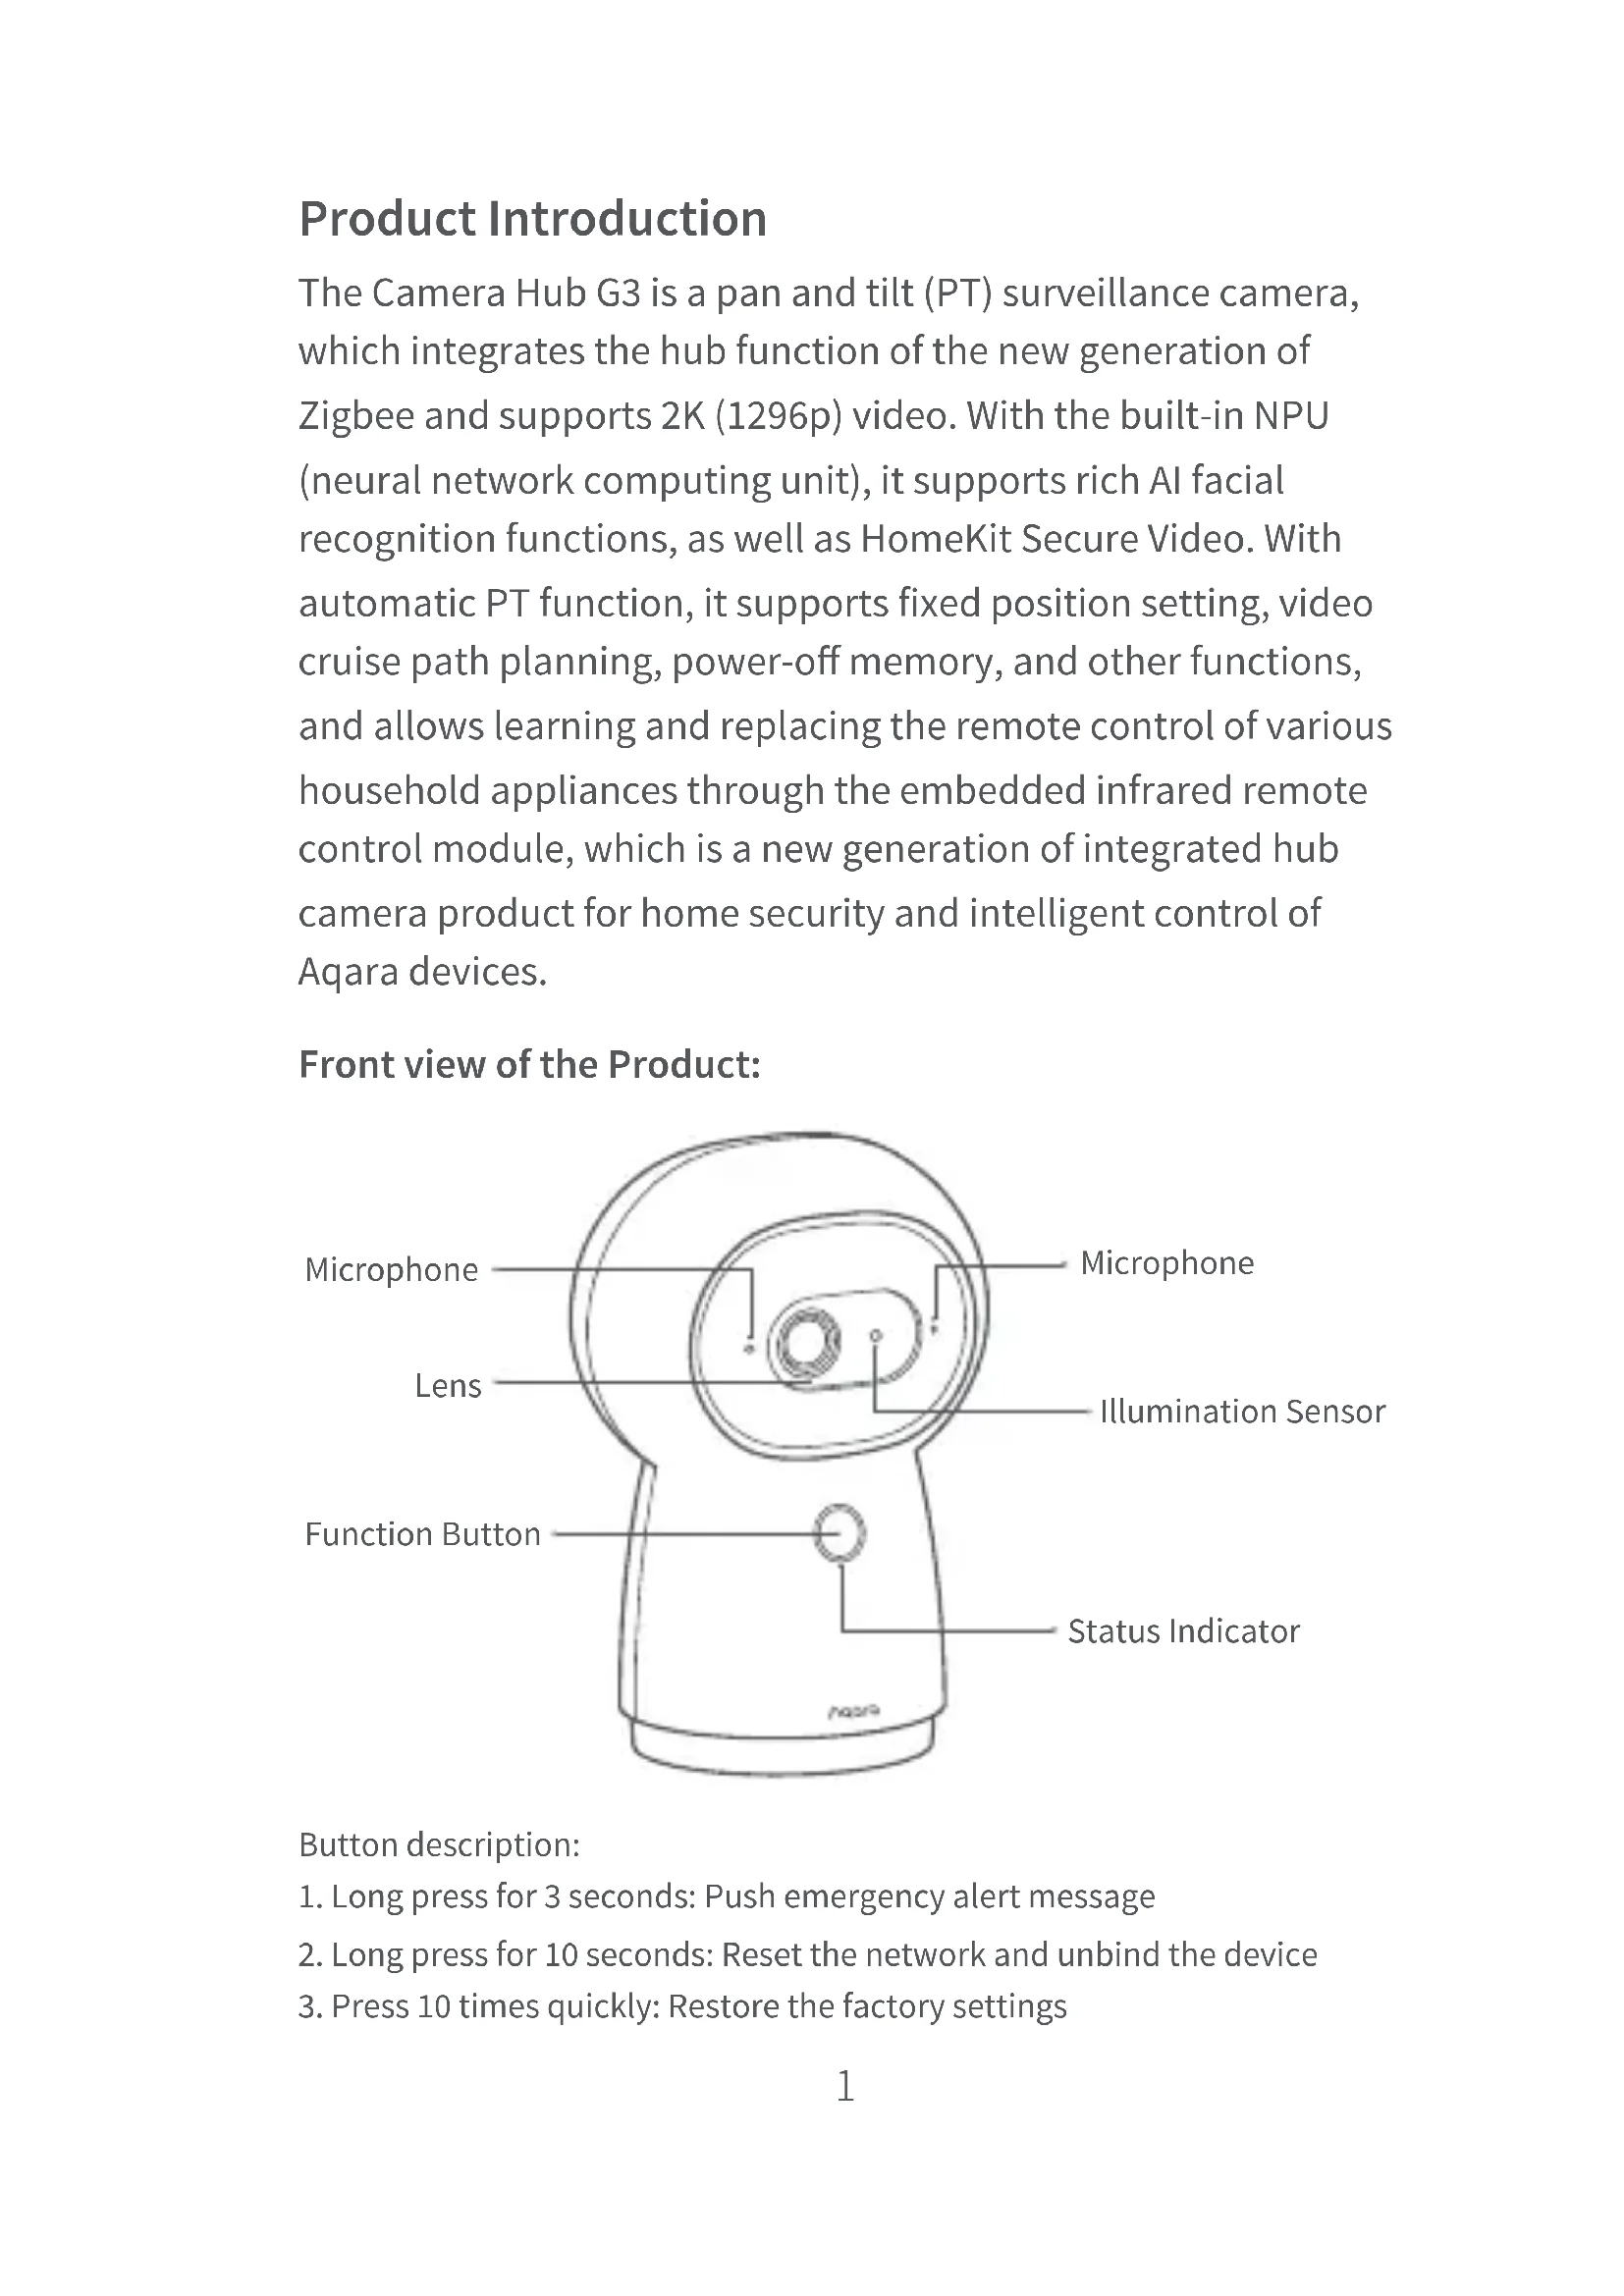
The Camera Hub G3 is a pan and tilt (PT) surveillance camera, which integrates the hub function of the new generation of Zigbee and supports 2K (1296p) video. With the built-in NPU (neural network computing unit), it supports rich AI facial recognition functions, as well as HomeKit Secure Video. With automatic PT function, it supports fixed position setting, video cruise path planning, power-off memory, and other functions, and allows learning and replacing the remote control of various household appliances through the embedded infrared remote control module, which is a new generation of integrated hub camera product for home security and intelligent control of Aqara devices.
Front view of the Product:

text_image
Microphone Lens Function Button Status Indicator Illumination Sensor MicrophoneButton description:
- Long press for 3 seconds: Push emergency alert message
- Long press for 10 seconds: Reset the network and unbind the device
- Press 10 times quickly: Restore the factory settings
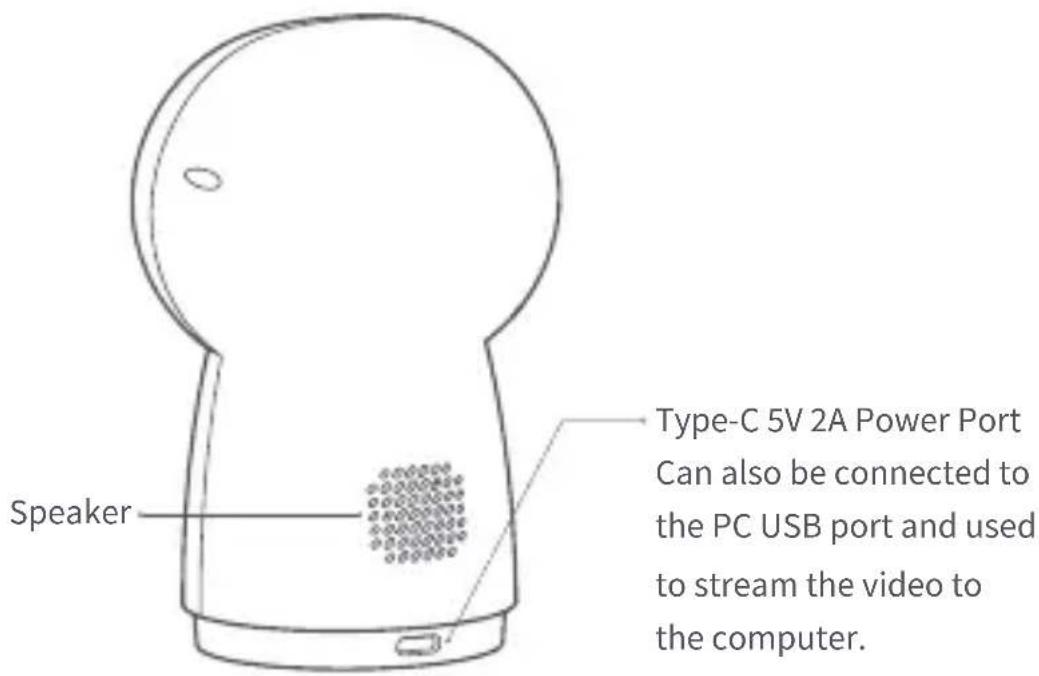
Rear view of the product:
text_image
Speaker Type-C 5V 2A Power Port Can also be connected to the PC USB port and used to stream the video to the computer.PT and microSD card slot:

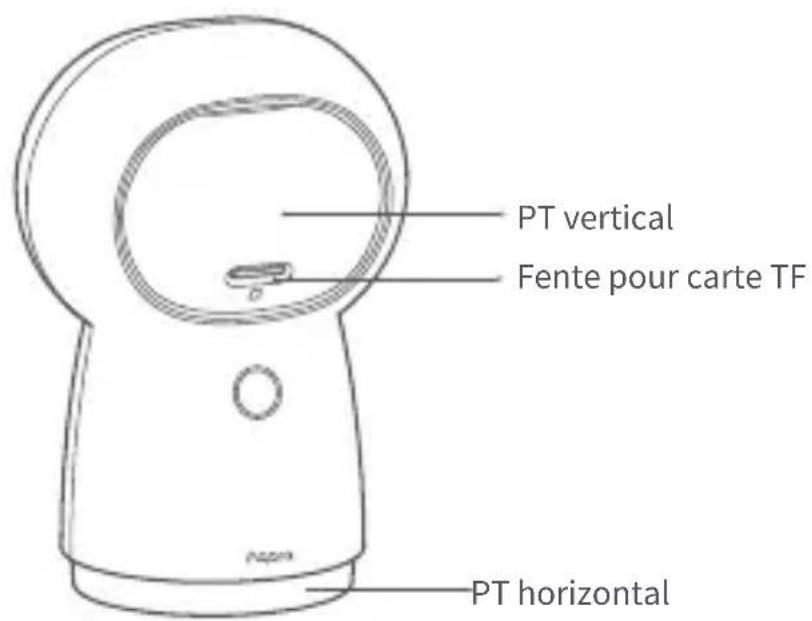
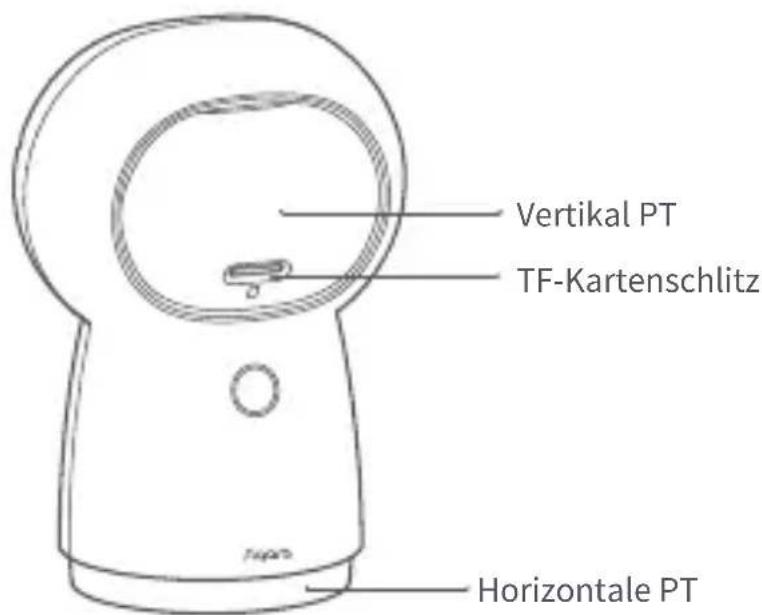
text_image
Vertical PT Mechanism MicroSD Card Slot Horizontal PT MechanismQuick Setup
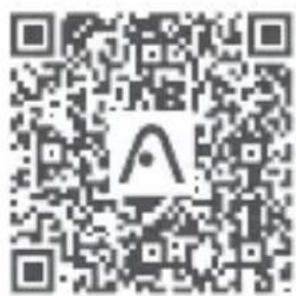
1 Download the Aqara Home app
Search for "Aqara Home" in the Apple App Store, Google Play, Xiaomi GetApps, Huawei App Gallery, or scan the following QR code to download the Aqara Home app.
text_image
QR code image with a central logo, likely linking to a digital resource or website.② Power up and turn on the camera
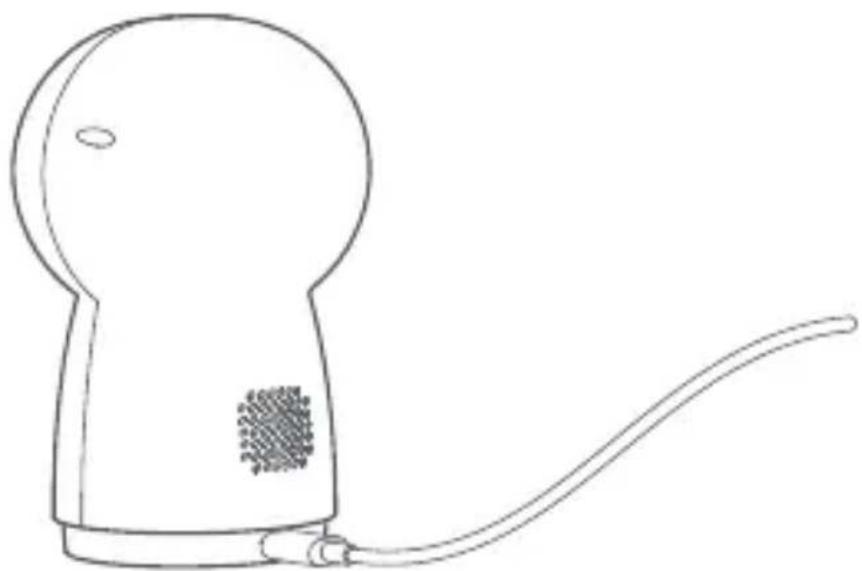
Locate the power interface at the bottom of the product and plug the Type-C power cord to connect the power adapter. When the camera is started, the status indicator will turn yellow and flash quickly.
natural_image
Line drawing of a small electronic device with a handle and spout, no text or symbols present* If the indicator is not yellow and does not flash quickly, please try to press the function button rapidly 10 times to restore the factory settings.
3 Add camera
Connect to Aqara Home
Open the Aqara Home app, click "+" in the upper right corner of the home page, select Camera Hub G3, and follow the instructions of the app to operate. After a successful connection, the status indicator of the device will be blue. If the device addition fails, please confirm the following points:
* The Wi-Fi name or password contains an unsupported special character, such as, @, #, %, -, \$, etc., resulting in a failure to connect to the router. Please change it to a commonly used character and try again.
* If the camera cannot recognize the QR code generated by the mobile phone. Please make sure that the screen size of the mobile phone is not less than 4.7 inches, and make sure that you don't use the backlight of the camera to shoot the QR code.
* Check whether the router has enabled the Wi-Fi anti-squatter setting, which causes the camera to be unable to connect to the Internet.
* Check whether the router has enabled AP isolation, which leads to the failure to search the camera on the mobile phone in the LAN.
Connect to Apple HomeKit
Open the Apple Home app, click the "+" in the upper right corner to go to the Add Accessories page, scan or manually enter the HomeKit setting code at the bottom of the camera, and bind the device to HomeKit.
Instructions for HomeKit Addition Failures
* It prompts that "Accessory failed to be added". Due to repeated adding failure, the error message cached in the iOS system cannot be released. Please restart the iOS device and reset the camera and try again.
* It prompts that "Accessories have been added". After restarting the iOS device and resetting the camera, manually enter the HomeKit setting code to add it again.
* It prompts that "No accessories are found". Please reset the camera, wait for 3 minutes, and then manually enter the HomeKit setting code to add it again.
4 Add accessory
After the camera is added successfully, please open the Aqara Home app and refer to the operation manual of the accessory to add.
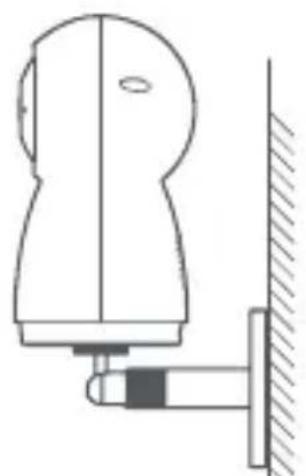
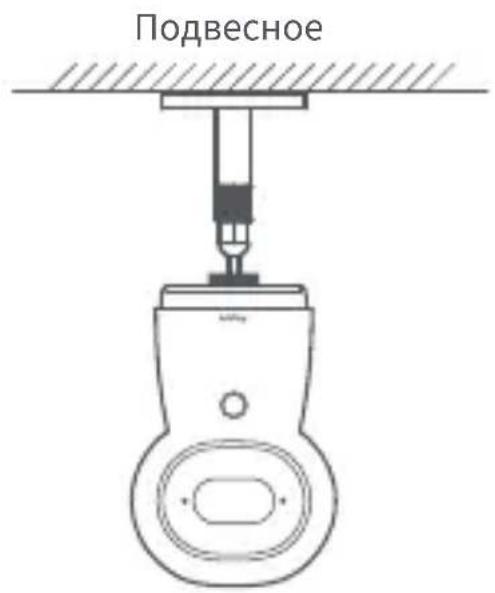
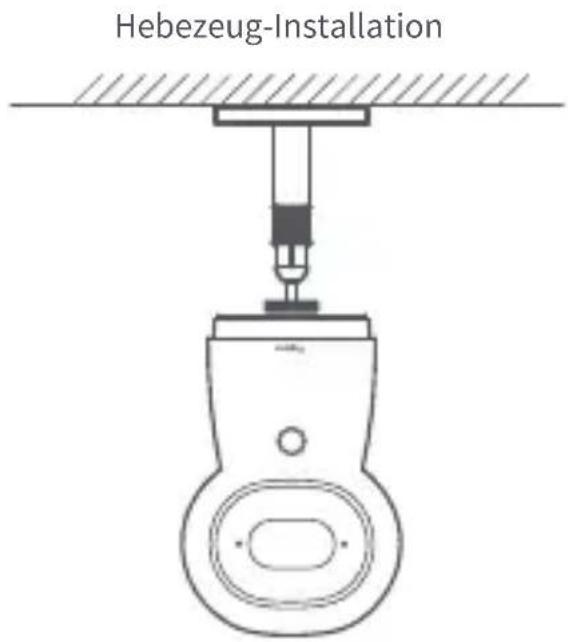
Product Installation
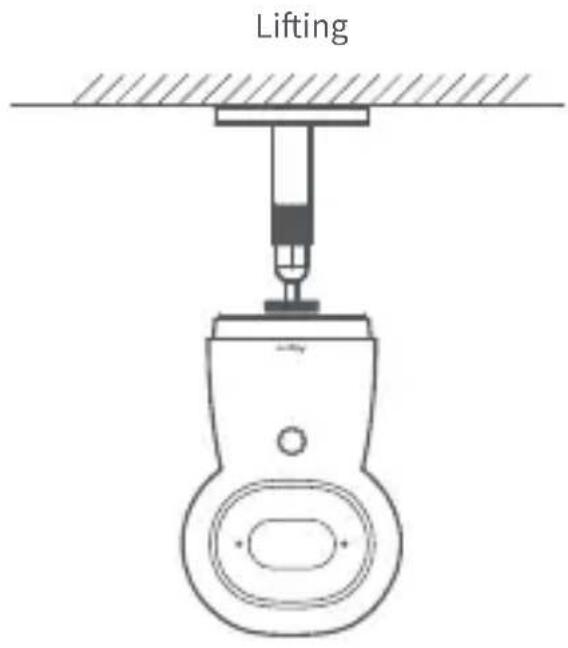
1 The packaging box of this product does not contain a bracket, but does support a 1/4-inch threaded screw. If wall mounting or lifting is required, the bracket or any other threaded screw-compatible mount shall be purchased separately.
② Please ensure that the camera is successfully added to the app before mounting it on the wall.
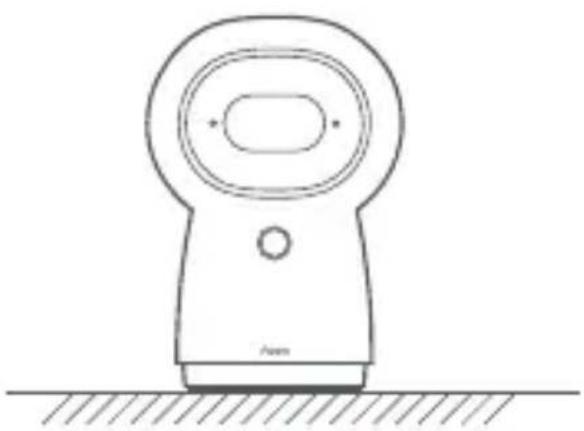
3 The camera can be placed on a writing desk, dining room table, bookcase, coffee table or other horizontal surfaces for use.
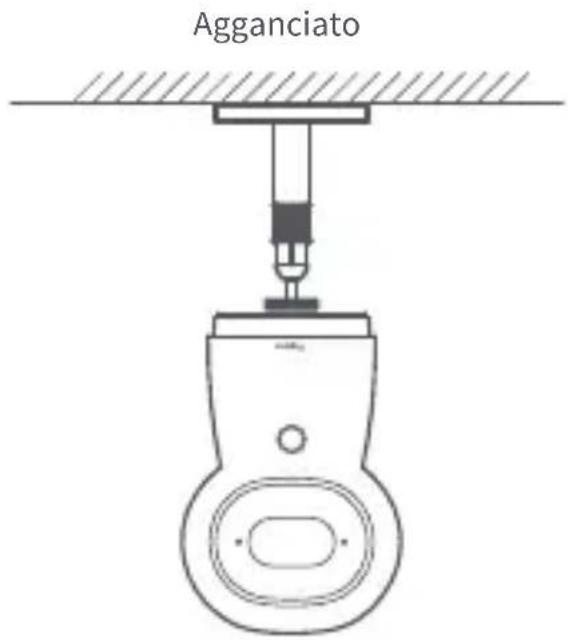
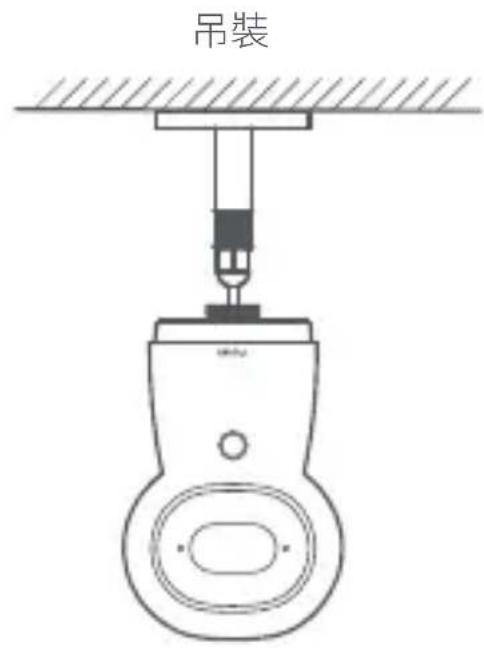
4 After mounting the camera in the lifting position, the image needs to be flipped in the Aqara Home app to be viewed normally.
* The camera should be placed within the range of wireless Wi-Fi signal coverage.
* Do not place it near a strong electromagnetic interference source.
* Avoid a direct light source to camera lens at close range.
* Make sure there are no obstructions around the device.
* This product is only for indoor use.
natural_image
Line drawing of a handheld device with a circular top and base, resting on a surface (no text or symbols)Flatwise
text_image
Lifting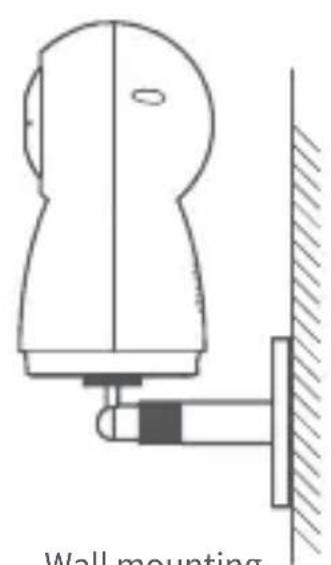
natural_image
Technical line drawing of a wall-mounted bracket assembly (no text or symbols)Wall mounting
The above diagram shows the installation methods. In case of using a bracket/mount purchased separately, please refer to its installation guide.
Description of Status Indicator
| Indicator status | Device status |
| The yellow indicator is on steady | The camera is turning on |
| The yellow indicator flashes quickly | Waiting to connect to the network |
| The blue indicator flashes quickly | Connecting to the network |
| The blue indicator flashes slowly | Connected to the network successfully and the account is being bound |
| The blue indicator is on steady | Working properly |
| The red indicator is on steady | Live video is in progress |
| The white indicator is on steady | No network is connected in 10 minutes after starting |
| The purple indicator flashes | Accessories are allowed to be added |
| The yellow indicator flashes slowly | Upgrading the firmware |
| Off | The indicator is turned off/the device sleeps/the device is not powered on |
Specifications
Product Model: CH-H03
Video Coding: H.264
Resolution: 2K (2304×1296p)
Power supply Input: 5V=2A
Viewing Angle: 110°
Overall Power Consumption: 10W (MAX)
Product Dimensions: 123.4 × 85.1 × 67.8 mm (4.86 × 3.35 × 2.67 in.)
Working Temperature: -10^ 40^ ( 14^ 104^ )
Pan/Tilt Angle: Horizontal 340^ , vertical 45^ (upward 30^ , downward 15^ )
Wireless Protocol: Wi-Fi IEEE 802.11b/g/n/a/ac 2.4/5GHz, Zigbee 3.0
Local Storage: MicroSD card (supports products with CLASS 4 or above, compatible with exFat and FAT32 file formats, and supports a maximum capacity of 128GB)
Notice
Use of the Works with Apple badge means that an accessory has been designed to work specifically with the technology
identified in the badge and has been certified by the developer to meet Apple performance standards. Apple is not responsible for the operation of this device or its compliance with safety and regulatory standards.
A 10-day recording history from your Camera Hub G3 is securely stored in iCloud and available to view in the Apple Home app on your iPhone, iPad, or Mac. You can add one camera to your
200GB plan or up to five cameras to your 2TB plan at no
additional cost. Camera recordings don't count against your iCloud storage limit.
Communication between iPhone, iPad, Apple Watch, HomePod, or Mac and the HomeKit- enabled Camera Hub G3 is secured by HomeKit technology.
Warnings
* This product is NOT a toy. Please keep children away from this product.
* This product is designed for indoor use only. Do NOT use in humid environments or outdoors.
* Beware of moisture, do NOT spill water or other liquids onto the product.
* Do NOT place this product near a heat source. Do NOT place it in an enclosure unless there is normal ventilation.
* Do NOT attempt to repair this product by yourself. All repairs should be performed by an authorized professional.
* This product is only suitable for improving the convenience of your home life and reminding you about the status of your devices. It should NOT be used as security equipment for home, building, warehouse, or any other places. If a user violates the product use instructions, the manufacturer will NOT be liable for any risks and property losses.
Under normal use of condition, this equipment should be kept a separation distance of at least 20 cm between the antenna and the body of the user.
| Wi-Fi Operation Frequency(2.4GHz) | 2412-2472 MHz |
| Wi-Fi Operation Frequency(5GHz) | CH36-CH48 5150-5250 MHzCH52-CH64 5250-5350 MHzCH100-CH140 5470-5725 MHzCH149-CH165 5725-5850 MHz |
| Wi-Fi Maximum Output Power | ≤20 dBm |
| Zigbee Operation Frequency | 2405-2480 MHz |
| Zigbee Maximum Output Power | ≤13 dBm |

EU Declaration of Conformity
Hereby, Lumi United Technology Co., Ltd declares that the radio equipment type Camera Hub G3, CH-H03 is in compliance with Directive 2014/53/EU. The full text of the EU declaration of conformity is available at the following internet address: https://www.aqara.com/DoC/.

UK Declaration of Conformity
CA Hereby, Lumi United Technology Co., Ltd declares that the radio equipment type Camera Hub G3, CH-H03 is in compliance with Directive 2017 (SI 2017 No. 1206, as amended by SI 2019 No. 696).
The full text of the UK declaration of conformity is available at the following internet address: http://www.aqara.com/DoC/.
WEEE Disposal and Recycling Information
All products bearing this symbol are waste electrical and electronic equipment (WEEE as in directive
2012/19/EU) which should not be mixed with unsorted household waste. Instead, you should protect human health and the environment by handing over your waste equipment to a designated collection point for the recycling of waste electrical and electronic equipment, appointed by the government or local authorities. Correct disposal and recycling will help prevent potential negative consequences to the environment and human health. Please contact the installer or local authorities for more information about the location as well as the terms and conditions of such collection points.
FCC ID: 2AKIT-CHH03
Federal Communications Commission (FCC) compliance statement:
- This device complies with part 15 of the FCC Rules. Operation is subject to the following two conditions:
(1) This device may not cause harmful interference.
(2) this device must accept any interference received, including interference that may cause undesired operation.
- Changes or modifications not expressly approved by the party responsible for compliance could void the user's authority to operate the equipment.
Note: This equipment has been tested and found to comply with the limits for a Class B digital device, pursuant to part 15 of the FCC Rules. These limits are designed to provide reasonable protection against harmful interference in a residential installation.
This equipment generates, uses, and can radiate radio frequency energy and, if not installed and used in accordance with the instructions, may cause harmful interference to radio communications. However, there is no guarantee that interference will not occur in a particular installation. If this equipment does cause harmful interference to radio or television reception, which can be determined by turning the equipment off and on, the user is encouraged to try to correct the interference by one or more of the following measures: -Reorient or relocate the receiving antenna.
-Increase the separation between the equipment and receiver.
-Connect the equipment into an outlet on a circuit different from that to which the receiver is connected.
-Consult the dealer or an experienced radio/TV technician for help.
RF Exposure statement:
This equipment complies with FCC radiation exposure limits set forth for an uncontrolled environment. This equipment should be installed and operated with minimum distance of 20 cm between the radiator and your body. This transmitter must not be co-located or operating in conjunction with any other antenna or transmitter.
IC: 22635-CHH03
IC NOTICE TO CANADIAN USERS
This device contains license-exempt transmitter(s)/receiver(s) that comply with Innovation, Science and Economic
Development Canada's license-exempt RSS(s). Operation is subject to the following two conditions:
(1) This device may not cause interference.
(2) This device must accept any interference, including interference that may cause undesired operation of the device.
This Class B digital apparatus complies with Canadian ICES - 003. This device complies with RSS - 247 of Industry Canada.
Operation is subject to the condition that this device does not cause harmful interference.
This equipment complies with IC radiation exposure limits set forth for an uncontrolled environment. This equipment should be installed and operated with minimum distance of 20 cm
between the radiator and your body. This transmitter must not be co-located or operating in conjunction with any other antenna or transmitter.
Manufacturer: Lumi United Technology Co., Ltd.
Address: 8th Floor, JinQi Wisdom Valley, No.1 Tangling Road, Liuxian Ave, Taoyuan Residential District, Nanshan District, Shenzhen, China.
Online Customer Service: www.aqara.com/support
Email: support@aqara.com
Описание продукта
text_image
QR code image with a central logo, likely linking to a digital resource or website.natural_image
Line drawing of a small electronic device with a handle and connector (no text or symbols)natural_image
Line drawing of a handheld device with a circular top and base, resting on a surface (no text or symbols)Горизонтальное
natural_image
Technical line drawing of a mechanical assembly with a vertical wall and a curved component (no text or symbols)Настенное
Адрес: 8th Floor, JinQi Wisdom Valley, No.1 Tangling
Road, Liuxian Ave, Taoyuan Residential District, Nanshan
District, Shenzhen, China
PT and microSD card slot:
text_image
QR code image containing encoded data, with a central logo or watermark symbolnatural_image
Line drawing of a small electronic device with a handle and spout, no text or symbols presentnatural_image
Line drawing of a handheld device with a circular top and rectangular body, resting on a surface (no text or symbols)text_image
Installation murale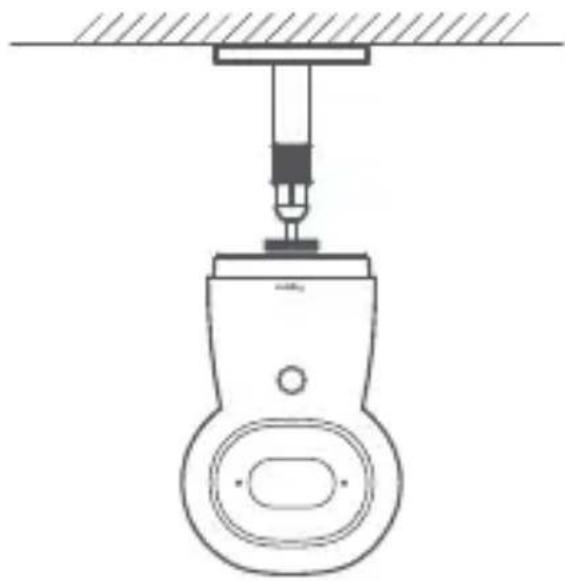
natural_image
Simple line drawing of a mechanical device with a lever and base, no text or symbols present.Avenue Liuxian, Rue Taoyuan, District Nanshan, Shenzhen, Chine
Website de service: www.aqara.com/support
Email: support@aqara.com
Produkt-Einführung
PT and microSD card slot:
text_image
Vertikal PT TF-Kartenschlitz Horizontale PTtext_image
QR code image with a central logo, likely linking to a digital resource or website.natural_image
Line drawing of a handheld device with a curved cable and a textured patch (no text or symbols)natural_image
Line drawing of a handheld device with a circular top and rectangular body, resting on a surface (no text or symbols)Flach-Installation
(4.86×3.35×2.67 in.)
Arbeitstemperatur: -10°C\~40°C (14°F\~104°F)
Road, Liuxian Avenue, Taoyuan Street, Nanshan District,
Shenzhen, China
Service-URL: www.aqara.com/support
Email: support@aqara.com
text_image
QR code image with a central logo, likely linking to a digital resource or website.natural_image
Line drawing of a small electronic device with a handle and connector (no text or symbols)natural_image
Line drawing of a handheld device with a circular top and base, resting on a surface (no text or symbols)natural_image
Simple line drawing of a mechanical device with a lever and base (no text or symbols)text_image
QR code image with a central logo, likely linking to a digital resource or website.Scansionare per scaricare Aqara Home App
natural_image
Line drawing of a handheld device with a curved cable and a textured patch (no text or symbols)natural_image
Line drawing of a handheld device with a circular top and rectangular body, resting on a surface (no text or symbols)Messo orizzontale
text_image
Agganciato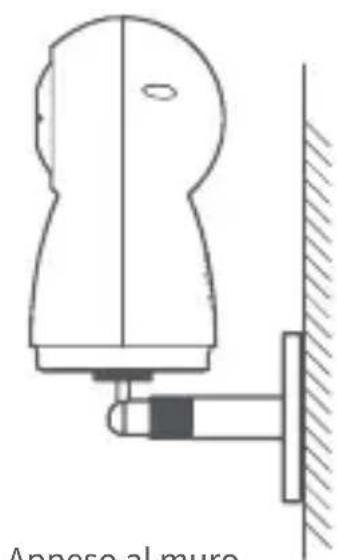
natural_image
Technical line drawing of a mechanical component with a vertical wall and bracket (no text or symbols)Appeso al muro
text_image
QR code image with a central logo, likely linking to a digital resource or website.掃碼下載Aqara Home app
2 攝像機通電開機
natural_image
Line drawing of a small electronic device with a handle and connector (no text or symbols)natural_image
Line drawing of a handheld device with a circular top and rectangular body, resting on a surface (no text or symbols)平放
text_image
吊装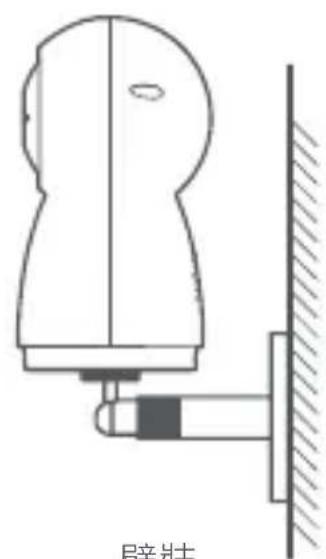
text_image
辟牀壁裝