
Revolution Air Compressor W8215240 - Compressor NUAIR - Free user manual and instructions
Find the device manual for free Revolution Air Compressor W8215240 NUAIR in PDF.

User questions about Revolution Air Compressor W8215240 NUAIR
0 question about this device. Answer the ones you know or ask your own.
Ask a new question about this device
Download the instructions for your Compressor in PDF format for free! Find your manual Revolution Air Compressor W8215240 - NUAIR and take your electronic device back in hand. On this page are published all the documents necessary for the use of your device. Revolution Air Compressor W8215240 by NUAIR.
USER MANUAL Revolution Air Compressor W8215240 NUAIR
REVOLUTION AIR COMPRESSOR
1 Manuale istruzioni 5
GB Instructions for use manual .....9
F Manuel utilisateur....13
D Betriebsanleitung .....18
E Manual de instrucciones .....23
P Manual de instruções .....28
NL Gebruiksaanwijzing 32
DK Brugsanvisning 36
S Instruktionsmanual 40
FIN Käyttöohjeet 44
GR Εγχειρίδιο οδηγιών 48
PL Instrukcje obsługi 53
HR Uputstvo za uporabu....58
SLO Navodila za obratovanje .....62
H Kezelési útmutató....66
CZ Příručka k obsluze 70
SK Návod na obsluhu 74
RUS Руководство по эксплуатации .....78
N Bruksanvisning 83
TR Kullanma talimati 87
RO Manual de utilizare 91
BG Ръководство по експлоатацията ...95
SRB Uputstvo za upotrebu .....100
LT Instrukciju vadovélis .....104
EST Kasutamisjuhend 108
LV Instrukciju rokasgrāmata ....112
SuperBoxy

natural_image
Product photo of a NU Air Revolution air compressor with attached hoses and control knobs (no visible text or symbols on main body)| I | DATI TECNICI | Tensione di alimentazione | Potenza nominale | Corrente assorbita | Capacità se baloo | Pressione massima Ana aspirata | Giri motore Peso Dimensioni | Classe di protezione Grado di protezione | Rapporto d'interrittenza | |||
| GB | TECHNICAL DATA | Power supply | Rated power | Current take-off | Receiver capacity | Max. pressure | Air intake | Motor rpm | Weight | Dimensions | Protection Class Degree of protection | Intermittent Duty |
| F | CARACTERISTIQUES TECHNIQUES | Tension d'alimentation | Puissano nominale | Courant absorbée | Capacité du réservoir | Pression maximum | Air aspiré | Tours moteur | Poids | Dimensions | Classe de protection Degré de protection | Rapport d'interrittence |
| D | TECHNISCHE DATEN | Speisespannung | Nennielung | Stromaufnahme | Tankinhalt | Höchstkuck | Angesaugle Luft | Motorum-drehungen | Gewicht | Abmessungen | Schutzklasse Schulzari | Relative Einschaltlauer |
| E | DATOS TÉCNICOS | Tension de alimentación | Potencia nominal | Corriente absorida | Capacidad del deposito | Presión máxima | Aire aspirado | Revoluciones del motor | Masa | Dimensions | Classe de protección Grado de protección | Reacción de intermittencia |
| P | DADOS TÉCNICOS | Tensão de alimentação | Potência nominal | Corrente consumida | Capacidade do depósito | Pressão máxima | Ar aspirado | Rolações do motor | Massa | Dimensions | Classe de proteção Grau de proteção | Reação de intermittência |
| NL | TECHNISCHE GEGEVENS | Vosdingsspanning | Nominal vermogen | Stroomverbruik Inhou | Iank Maximundruk | Aangezogen lucht | Toerential motor | Gewicht | Almeingen | Beschermingsklasse Beschermingsgrad | Intermittierend bedrijf | |
| DK | TEKNISKE DATA | Forsyningsspending | Nomine effect | Stramforbrug | Tankkapacitat | Maks. tryk | Insugeit luft | Motorems omdrejningshestighed | Vægt Mål | Baskyltelesklasse Baskyltelesgrad | Intermittensforhold | |
| S | TEKNISKA DATA | Matringsapanning | Märkeffekt | Strömförunking | Behállarens volym | Max. tryck | Insugen luft | Motorvanthal | Vikt | Matt | Skydansklass Skydinnä | Intermittensfaktor |
| FIN | TEKNISET TIEDOT | Syctöjärmitis | Nimellsteho | Virrankulutus | Salilion tlevuus | Maksimpaine | Imetty ilina | Moctorin kierosluku | Paino | Mist | Suojausluorka Suojausaste | Jakcsitaisuhde |
| GR | TEXNIKA ŽTOXIEIA | Tsoń poprobocic | Ovupotankí roxúç | Atropopotouvo peuja | Xopotnóktro pačepõudpć | Möyost ničen | Avapropotouvo ospoč | Štopočs, jučne | Måfa | Διαστόσες | Klauotproctaočov Bedyrot προστοσού | Đokkočpitni Aktoupyia |
| PL | DANE TECHNICZNE | Napięcie zasiania | Moc nominalna | Prad pochlanany | Pojemność zbiomika | Maksymalne césienie | Poweltrze ssane Obrody silnika | Masa | Wymary | Klasa zabezpieczenia Stopení zabezpieczenia | Okresokość czlatenia | |
| HR | TEHNICKI PODATCI | Napon napajanja | Nazivna snaga | Potrošnja struje | Kaspidji sprenniks | Makshnani tlak | Ulsani zrak | Okretaji motora | Težina | Dimerzije | Klasa zaštite Stupan zaštite | Nach rada |
| SLO | TEHNIČNI PODATKI | Napajalna napatost | Nazivna moč | Tokovna poraba | Vsebina rezervačija | Najvilý tlak | Vsesan zrak | Vrijaji motora | Teža | Dimenzije | Vista zaštite Razrod zaštite | Trajanje viopa |
| H | MÜSZAKI ADATOK | Tapřeszültség | Néveges lejesilmiety | Áramfehasználás | Tartáy ürbatakın | Maximalis nyomás | Elszivot levegő | Motor forculatszém | Súly | Märsek | Vácettségi osztály Vedettségi fox | Szakaszos územelés |
| CZ | TECHNICKÉ UDAJE | Napájecí napětí | Nominální výkon | Spotfebovaný proud | Objem nácríze | Maximalní tlak | Množství nasávaného vzduchu | Otáčky mckoru | Váha | Rozměry | Třída ochrany Stupen ochrany | Pomer přenšení |
| SK | TECHNICKÉ UDAJE | Napajacie napálie | Nominální výkon | Spotřebovaný príd | Objem nádríze | Maximalny tlak | Množství nasávaného vzduchu | Otáčky motora | Váha | Rozměry | Trieda ochrany Stupen ochrany | Vztah prerutenia |
| RUS | TECHNIECKIE DAHNE | Напряжание питания | Номинальная мощность | Потребляемый ток Емость ресивера | Макикальное давление | Максималыв воздух | Отсасиваемый воздух | Число оборотов двигателя | Macca | Габариты | Класс защиты Степень защиты | Отношение проспектельности |
| N | TEKNISKE DATA | Matespenning | Nominel effekt | Stramtforbruk | Tankens kapastat | Maks. trykk | Innsaugd luft | Motorems omdreninger | Vakt | Mål | Beskyltesesklasse Beskyltesegrad | Driftsfortoid |
| TR | TEKNIK VERILER | Elektrik gerilmi | Nominal půp | Emilen akmi | Hazne kapasítasi | Azami basing | Emilen hava | Motor cevri | Aðyňík | Boyudiar | Koruma pejdi Koruma pěrcosi | Analkó kalıştima |
| RO | DATE TEHNICE | Tensiune de alimentare | Putera nominală | Consunt de oront | Capacitate rezervar | Presilne maximă | Aer aspirat | Turatji motor | Greulate | Dimensiuni | Classe de protezione Gradul de protezione | Report de intermittenza |
| BG | TECHNIECKI DANHI | Захранзацо напряжение | Номинална мощност | Поплията електрическа энергия | Вместимост на резерюра | Максимальная галяне | Засмукан въадух | Обороти на двигателя | Maca | Размери | Клас на защита Степен на защита | Отношение на нераномерност на работника режим: |
| SRB | TEHNICKI PODATCI | Napcon napajanja | Nominalna snaga | Potrošnja slruje | Kaspidet razervačea | Maksimalni prósek | Ussani vazduh | Obraj mckoru | Težina | Dimenzije | Klass zaštite Razred zaštite | Način rada |
| LT | TECHNINIAI DUOMENYS | Matrinimo Ilempa | Nominal gaia | Sunaudojama sové | Tvetmes jauda | Maksimalus stegis | Islurbiamas cras | Motora apgrezeni | Masé | Aporns | Apsaugos klase Apsaugos apsinis | Veikimas su petraukomis |
| EST | TEHNILISED ANDMED | Toltepinge | Nominsavömsus | Ávakasutatav rönk | Paagi vömsus | Maksmaalne rönk | lesüktas galiss | Motori pićórdac | Mass | Malt | Kalise klass Kalise base | Kasutustükkel |
| LV | TEHNISKIE PARAMETRI | Barošanas spreguns | Nominala jauda | Palárajama strava | Bako pajégumas | Maksimalis spiediens | Sissemetav čhk Motoro apsisukimai | Masa | Aminlys | Azsandržbas Klase Azsardžbas pakápe | Partraukumu atieciba | |
| 230 V 50 Hz | 1100W 1,5 HP | 5A | 2 lt | 8 bar | 180 lt/min | 3400 rpm | ≈9 kg | 150x555x 345(h) mm | II IP20 | S3-15 | ||
A
text_image
121214 13 Supper Body NUAIR REVOLUTION AIR COMPRESSOR 6 5 3 4 16 3a 10 9 8 11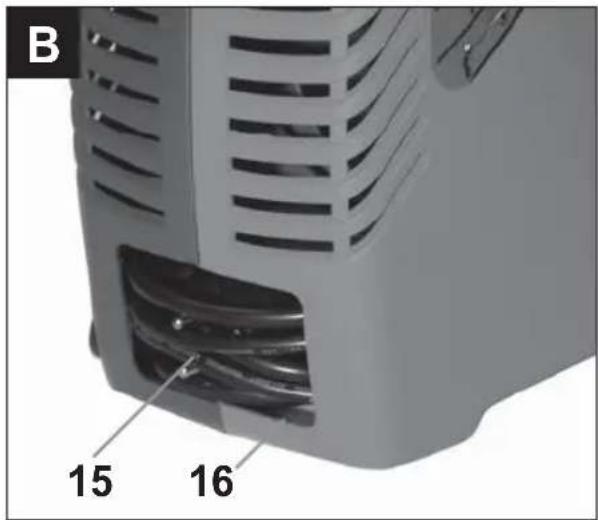
text_image
B 15 16
text_image
C 7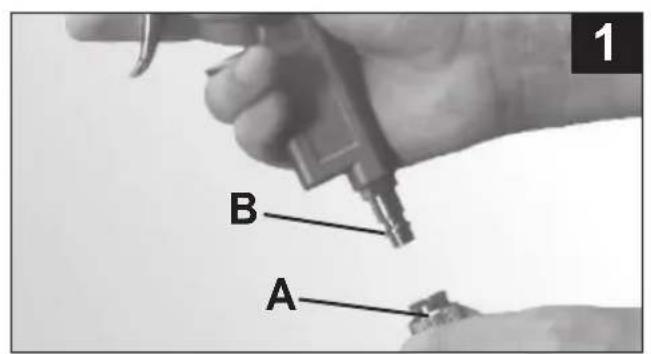
text_image
B A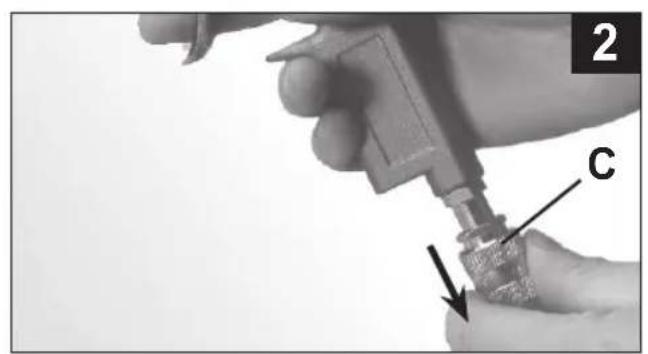
natural_image
Close-up of hands using a handheld tool to apply material, labeled with 'C' and an arrow (no text or symbols on the tool itself)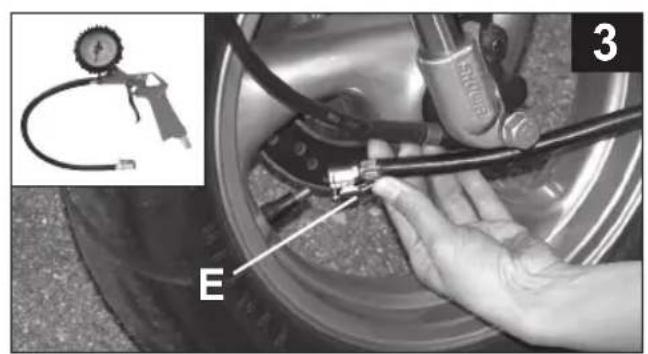
natural_image
Close-up of a car tire being adjusted for pressure, with a hand holding a tool near the wheel (no visible text or symbols)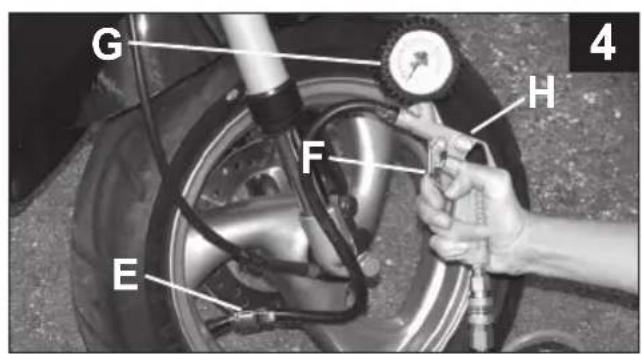
text_image
G F H E 4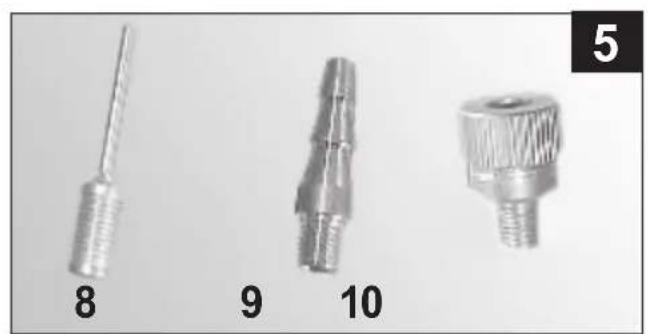
natural_image
Three metallic mechanical components labeled 8, 9, and 10, shown against a plain background (no text or symbols on the objects themselves)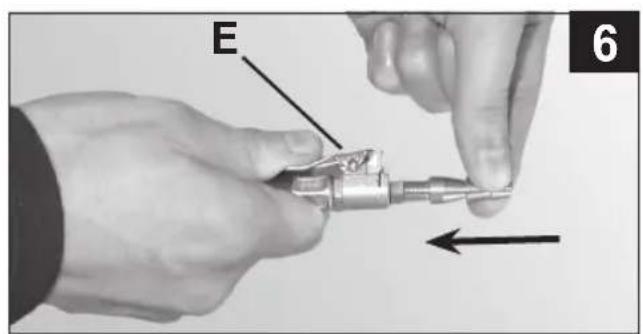
text_image
E 6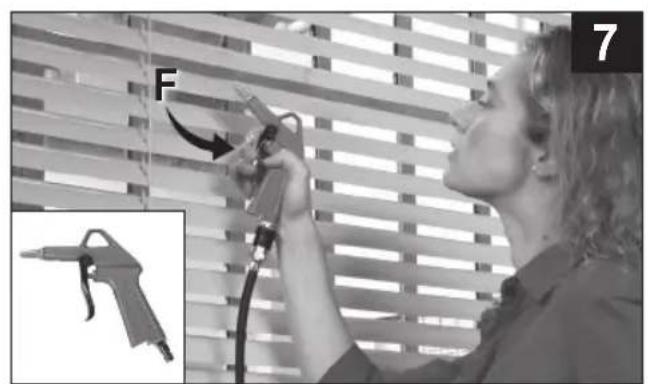
natural_image
Person using a spray gun on a window, with an inset showing a close-up of the gun (no text or symbols visible)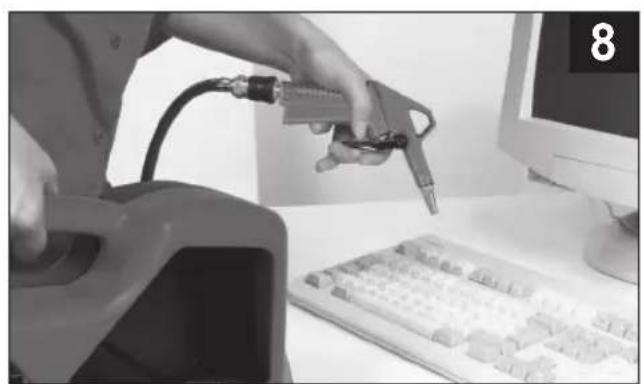
natural_image
Person using a handheld tool on a computer keyboard, no visible text or symbolsI LEGENDA SEGNALETICA DI SICUREZZA SUI PRODOTTI
GB KEY TO PRODUCT SAFETY SIGNS
F LEGENDE DES PICTOGRAMMES DE SECURITE FIGURANT SUR LES PRODUITS
NL VERKLARING WAARSCHUWINGSSYMBOLEN OP PRODUCTEN
DK SIGNATURFORKLARING TIL PRODUKTERNES SIKKERHEDSSKILTNING
S FÖRKLARING TILL SÄKERHETSSYMBOLER PÅ PRODUKTERNA
GB Before use, read the handbook carefully
GB Warning, hot surfaces
GB Danger - automatic control (closed loop)
GB Hearing, sight and respiratory protection must be worn
GB Preserve this handbook for future reference
Before using the compressor, read the instructions for use carefully and comply with the following safety precautions. Consult this handbook if you have any doubts regarding functioning
Preserve all the documentation so that anyone who uses the compressor can consult this beforehand.
1 SAFETY RULES

This symbol indicates warnings to be read before using the product so as to prevent injury to the user.

Compressed air is a potentially dangerous form of energy; always take great care when using the compressor and its accessories.

Warning: the compressor may restart when power is restored following a blackout.
An ACOUSTIC PRESSURE's value of 4 m. corresponds to the ACOUSTIC POWER's value stated on the yellow label located on the compressor, minus 20 dB.
DO'S
- The compressor must be used in a suitable environment (well ventilated with an ambient temperature of between +5°C and +40°C) and never in places with dust, acids, vapors, explosive or flammable gases.
- Keep the work area free. When operating, compressor must be placed on a stable surface.
- Safety goggles should be worn when using the compressor in order to protect the eyes against any foreign bodies lifted by the jet of air.
- If possible, when using air-powered accessories, wear safety clothing.
- Always maintain a safety distance of at least 2 meters between the compressor and the work area.
- Check for correspondence between the compressor
plate data with the actual specifications of the electrical system. A variation of ± 10% with respect of the rated value is allowed.
- Insert the plug of the electrical cable in a socket of suitable shape, voltage and frequency complying with current regulations.
- Use extension cables with a maximum length of 5 meters and with a cable cross-section of not less than 1.5 mm ^2 . Use of extension cables of different length and cross-section and also of adapters and multiple sockets should be avoided.
- Always use the handle to move the compressor.
- When using compressed air, you must know and comply with the safety precautions to be adopted for each type of application (inflation, air-powered tools, painting, washing with water-based detergents only, clinching, etc.).
- To avoid overheating of the electric motor, this compressor is designed for intermittent duty operation as indicated on the technical dataplate (for example, S3-25 means 1.5 minutes ON, 8.5 minutes OFF). In case of overheating, the thermal cutout of the motor is released, automatically cutting off the power when the temperature is too high due to excess current take-off. The motor restarts automatically when normal temperature conditions are restored.
DON'TS
- Never direct the jet of air towards persons, animals or your body.
- Never let the compressor come into contact with water or other liquids and never direct the jet of liquids sprayed by tools connected to the compressor towards the compressor: as the appliance is live, this could cause electrocution or short-circuits.
the Never use the appliance with bare feet or wet hands or feet. - Never yank the power cable to disconnect the plug from the power outlet or to move the compressor.
- Never leave the appliance exposed to adverse weather conditions (rain, sun, fog, snow).
- If this compressor is used outdoors, always remember to stow it after use in a covered or closed place.
-
Never use the compressor outdoors in rain or bad weather.
-
Never allow inexpert persons to use the compressor without suitable surveillance. Keep animals at a distance from the work area.
-
The compressed air produced by the compressor cannot not be used for pharmaceutical, food or medical purposes or to fill the air bottles of scuba divers.
-
Do not place flammable or nylon/fabric objects close to and/or on the compressor.
- Do not cover the air inlets on the compressor.
- Do not open or tamper with any part of the compressor. Contact an authorized Service Center.
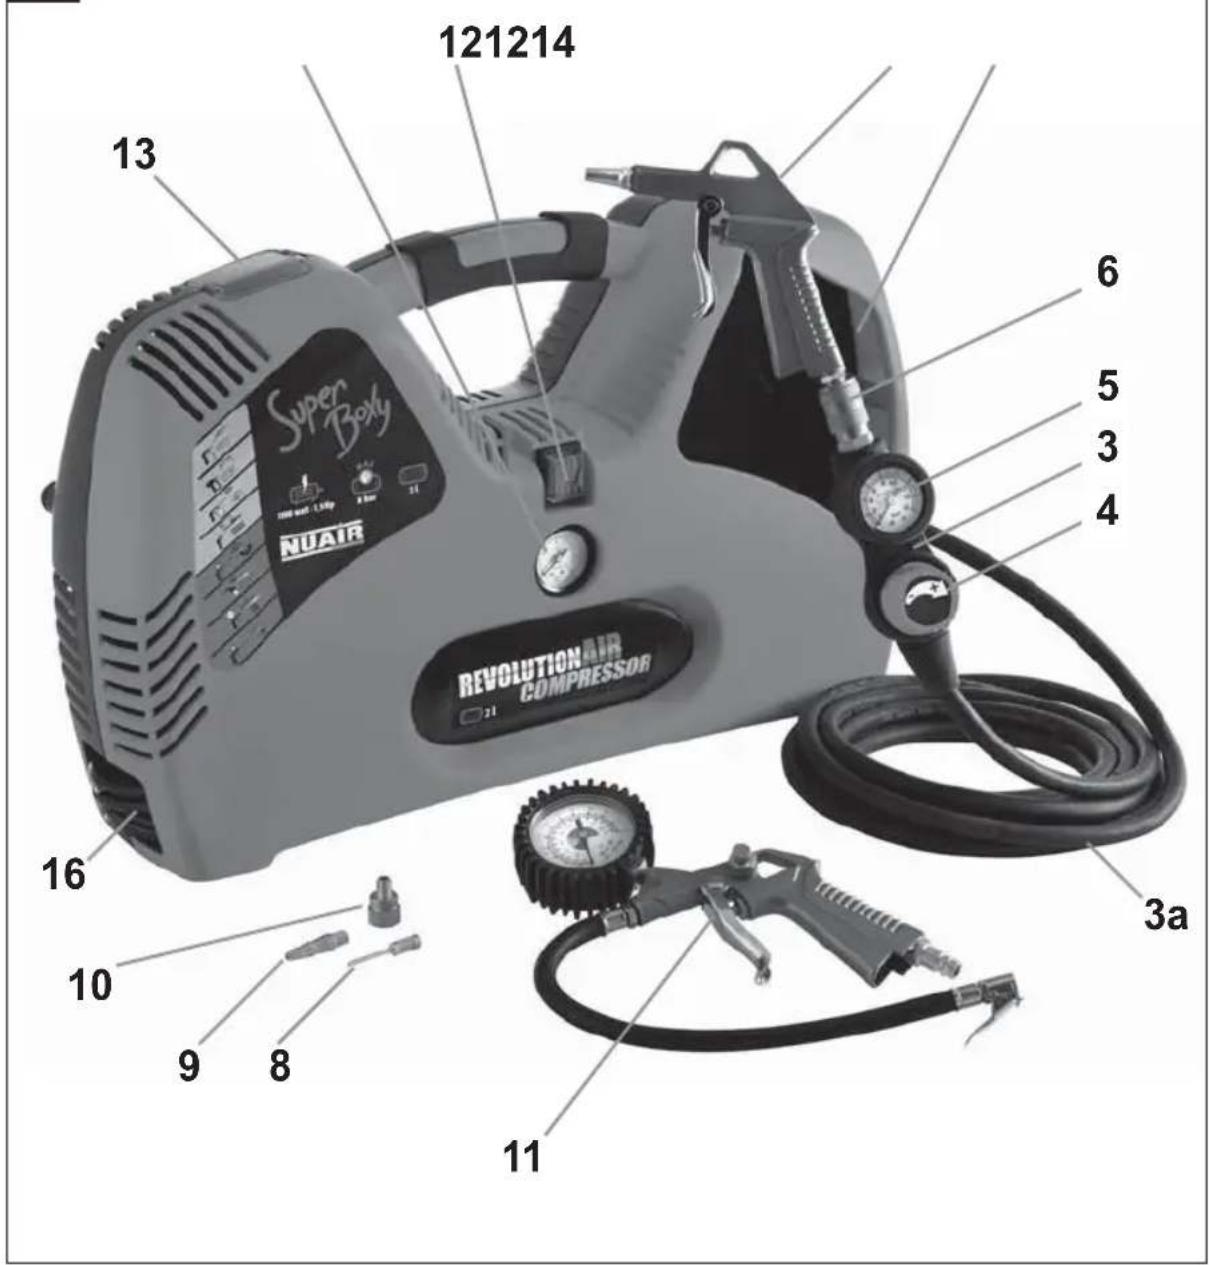
COMPONENTS (fig. A - B - C)
| 1 | On/off switch | 8,9,10 | Inflation adapters |
| 2 | Receiver air pressure gauge | 11 | Inflation gun |
| 3 | Remote Control | 12 | Blower gun |
| 3a | Rubber pipe | 13 | Inflation adaptors housing |
| 4 | Operating pressure adjustment knob | 14 | Remote Control and rubber pipe housing |
| 5 | Air used pressure gauge | 15 | Power cable |
| 6 | Compressed air outlet with quick connect | 16 | Power cable housing |
| 7 | Receiver condensation drainage tap |
2 CONNECTING ACCESSORIES TO THE COMPRESSOR

Before connecting accessories, always make sure that the compressor is OFF.
All accessories are connected to the compressor by means of the REMOTE CONTROL (3), which is fitted with quick-connect connector.
Connect selected accessory to the end (A) of Remote Control (fig. 1): push the accessory plug B firmly into A until you hear a metallic click (it means connection has been successful).
Once you finish, switch compressor off, empty compressed air tank by operating the connected accessory in vacuum (e.g. blow the jet in vacuum), then disconnect accessory from Remote Control, pulling the external flange of quick-connect connector C backwards (fig. 2).
3 USE OF THE COMPRESSOR
Connect selected accessory. Connect compressor to the electricity network by means of mains cable 15 situated in housing 16, in the lower left corner of the compressor.
Press switch 1 to start the compressor. The compressor will continue to operate until the
air receiver is completely full. On reaching maximum pressure (8 bar), the compressor will stop automatically. The pressure value of the air contained in the receiver is indicated on gauge 2.
For reasons of safety and for improved use, the accessories must operate at a specific pressure, indicated in table 1 and represented by the colored segments of the gauge 5. To adjust the specific operating pressure for each accessory, turn knob 4 in a clockwise direction (+) to increase the pressure and in a counterclockwise direction (-) to reduce it (check the precise pressure level on gauge 5).
Once you have set a suitable operating pressure, the accessory is ready for use.
It is normal for the compressor to stop and restart at intervals during use of the compressed air.
You can use compressed air also at a distance from a power source: fill the receiver contained inside beforehand following the procedure described above; disconnect the compressor from the power supply, take the compressor to the place where it is to be used, connect and use the accessory required. The time of use prior to another recharge depends on the volume of air you consume.
When you have finished using the compressor, switch off switch 1 and disconnect the power cable 15 from the current outlet, replacing it in the housing
16 on the back. Run the accessory connected dry until there is no more air in the receiver.
It is advisable to store all inflation adapters in its housing 13, in the upper left corner of the compressor.
It is advisable to store Remote Control in its housing
14, placed on the compressor front.
MAINTENANCE
Never clean the machine and its components with solvents, flammable or toxic liquids. Us only a damp cloth making sure you have unplugged the compressor from the current outlet.
After approx. 2 hours of use, the condensate that has formed must be drained from the receiver. First of all, vent all the air using the accessory connected, as described above. Back off vent valve 7 located underneath the compressor (switched off beforehand) by two turns, taking care to maintain the compressor in a vertical position. After draining all the water, draw up the valve tightly.

Warning: if the water that condenses is not drained, it may corrode the receiver, reducing its capacity and impairing safety. As it is a contaminating product, condensate must be DISPOSED of in accordance with laws on protection of the environment and current legislation.
The compressor must be disposed in conformity with the methods provided for by local regulations.
4 INFLATION GUN
For inflating tires, rubber dinghies, air beds, footballs and other objects

Warning: Do not direct the jet of compressed air towards people or animals.

Never inflate the objects above the recommended inflation pressure as this may be dangerous and cause damage and/or injuries.
USE
1) Connect the inflation gun 11 to the compressor as explained in chapter "2 - CONNECTING THE ACCESSORIES TO THE COMPRESSOR".
2) When inflating tires or certain bicycle tires, it is not necessary to insert any of the adapters (fig.
5). Press tab E (fig. 3) and connect the hose of the gun to the tire pushing the fitting on the valve and then releasing the tab.
3) Inflate the tire pressing lever F (fig. 4). Release the lever and read the pressure reached on gauge G of the gun. Repeat the operation until the pressure required is obtained. In the case of over-inflation, press button H to reduce inflation pressure.
Warning: do not hold down the lever too long before checking the pressure reached as this could cause explosion of the object being inflated.
4) When inflating footballs, rubber dinghies, certain bicycle tires and children's inflatable swimming-pools, you may have to use a suitable adapter (fig. 6).
Adapter 8 is used for footballs
Adapter 9 is used for rubber dinghies, air beds and children's swimming-pools
Adapter 10 is used for certain bicycles
Select the suitable adapter and push it in the inflation hose pressing tab E (fig. 6). Once it is inserted, release tab E.
To secure the adapter, turn it slightly in a clockwise direction
5) Inflate the object concerned as described in point 3).
TIPS FOR USING THE INFLATION GUN
Use the inflation gun at least once every two weeks in order to check that your tires are at the right pressure; this promotes fuel economy, increases the service life of your tires and improves safety as it reduces braking distances and improves handling of the vehicle.
MAINTENANCE
Do not clean the inflation gun and adapters with solvents or flammable or toxic liquids.
5 BLOWER GUN
To remove dust and dirt.
PRESSURE LEVEL: 4 - 8

Warning: it is advisable to wear safety goggles when using the blower gun.

Do not direct the jet of compressed air towards people or animals. Take care not to blow dust and dirt towards yourself or other persons.
USE
1) Connect the blower gun 12 to the compressor as explained in chapter "2 - CONNECTING THE ACCESSORIES TO THE COMPRESSOR".
2) Set operating pressure to the value indicated for this accessory (see table 1).
3) Direct the blower gun towards the surface to be cleaned and press the lever F (fig. 7). The flow of air can be regulated according to how far you press down lever F.
TIPS FOR USING THE BLOWER GUN
Clean the carpets of your home or car mats very efficiently using the blower gun. It is also ideal for keyboards, electrical items, refrigerators, cameras, TV cameras, glassware and the filters of vacuum cleaners (fig. 8).
Warning: when using the blower gun on delicate or precision equipment (TV cameras, camera lenses, etc.) reduce the pressure of the jet to minimum value.
MAINTENANCE
Do not clean the blower gun with solvents or flammable or toxic liquids.
6 OTHER USES
Other uses* are possible purchasing the accessories separately.
TABLE 1 – RECOMMENDED OPERATING PRESSURES
| FUNCTION APPLICATION | INFLATION PRESSURE (IN BAR) | OPERATING PRESSURE (IN BAR) | |
| Inflation | To inflate: footballs 0,8 - 1** | 1 - 4 | |
| Dinghies, air beds, children's swimming pools | 0,5 - 1** | ||
| Tires 2 - 3 | |||
| Ordinary bicycle tires 1 - 3 | |||
| Mountain bike tires 2 - 2,5 | |||
| Blowing | To remove dust from ordinary objects | 8 | |
| To remove dust from precision equipment | 4 | ||
| Painting* | To paint small surfaces at low pressure | 2 - 3 | |
| For airbrush work | 1,5 - 2 | ||
| Washing/spraying* | For washing with air/water gun | 8 | |
| To spray detersives on engines To spray water/products on plants/flowers | 8 | ||
| Clinching/Nailing* | For woodwork | 6 | |
** Consult the indications provided on the object to be inflated.
Please check that the air consumption and the maximum working pressure of the pneumatic tool to be used are compatible with the pressure set on the pressure regulator and with the amount of air supplied by the compressor.
⚠ NI U KOJEM SLUČAJU
6 UPORABA V DRUGE NAMENE
⚠️ NI U KOJEM SLUČAJU
⚠️ KO NEDRĪKST DARĪT
natural_image
Pure electrical circuit lines without any symbols230 V/50 HZ AC
9039159/A
CE