20991 - Polisher APA - Free user manual and instructions
Find the device manual for free 20991 APA in PDF.
| Product type | Polisher |
| Brand | APA |
| Model | 20991 |
| Rated power | 650 W |
| Polishing pad diameter | 150 mm |
| No-load speed | 2000 – 6400 min⁻¹ |
| Stroke | 9 mm |
| Weight | 1.90 kg |
| Dimensions (L x l x h) | 314 x 15 x 127 mm |
| Power supply | Mains, power cable |
| Supplied items | Polisher, polishing pad, polishing sponge, D-handle, auxiliary handle, fork wrench, Allen key, spare carbon brushes, instruction manual |
| Intended use | Polishing of car, boat, motorhome, caravan paints |
| Protection class | II (double insulation) |
| Speed adjustment | Adjustment wheel |
| Switch | On/Off |
| Safety | Disconnect before changing any accessory; wear safety goggles and hearing protection; do not use in rain or damp environments |
| Maintenance and cleaning | Clean after each use with a dry cloth; do not use solvents; clean the sponge with warm water and let it air dry |
| Spare parts | Fixed polishing sponge (ref. 20995), soft polishing sponge (ref. 20996) |
Frequently Asked Questions - 20991 APA
User questions about 20991 APA
0 question about this device. Answer the ones you know or ask your own.
Ask a new question about this device
Download the instructions for your Polisher in PDF format for free! Find your manual 20991 - APA and take your electronic device back in hand. On this page are published all the documents necessary for the use of your device. 20991 by APA.
USER MANUAL 20991 APA
natural_image
Exterior view of a power tool with labeled 'APA' and circular base (no additional text or symbols)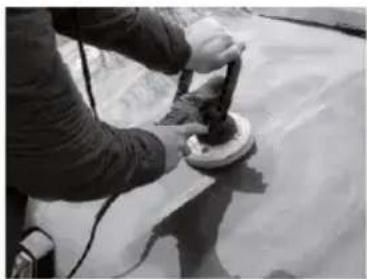
natural_image
Person using a power tool on a surface, no visible text or symbols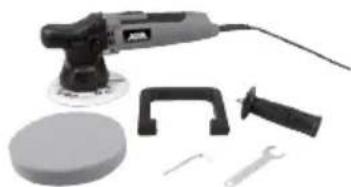
natural_image
Assorted cleaning tools including a power tool, screwdriver, clamp, and wrench (no text or symbols visible)Inhalt
text_image
Labeled diagram of a green power tool with numbered parts for identificationBild 1: Übersicht 1
text_image
⑦ 12000000000000000000000000000000000000000000000000000000000000000000000000000000000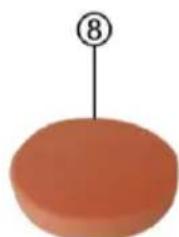
natural_image
Simple orange oval shape with a black number 8 above it, no text or symbols present.
text_image
⑩ ⑪ ⑫natural_image
Two views of a green mechanical device with a black circular component and a hand holding a tool, showing motion direction (no text or symbols)natural_image
Top-down view of a green and black electric shaver with directional arrows indicating force or movement (no text or symbols)natural_image
Three black mechanical components with a green connector, connected by an arrow to a large U-shaped bracket (no text or symbols visible)natural_image
Two mechanical components: a green and gray device and a black connector with a curved handle (no text or symbols visible)natural_image
Green and black electric shaver tool with directional arrows indicating compression or force (no text or symbols)natural_image
Green and black electric shaver tool with upward arrow indicator (no text or symbols)natural_image
Green and black electric shaver tool with a screwdriver inserted (no text or symbols visible)- Proper use of the product 7
- Scope of delivery 7
- Specifications 8
- Safety precautions 8
- Explanation of symbols 8
- Operating instructions 9
6.1 Overview 9
6.2 Prior to starting up 9
6.2.1 Mounting the disc sanding pad ____
6.2.2 Mounting the D-handle 9
6.2.3 Mounting the additional handle 10
6.2.4 Mounting the polishing sponge 10
6.3 Polishing 10
6.3.1 Applying polishing agent on the polishing sponge 11
6.3.2 Applying polishing agent on the paint 11
6.3.3 Polishing the paintwork 11 - Maintenance and care 11
- Notes regarding environmental protection 11
- Replacement parts and accessories 12
- Contact information 12

WARNING
Please read the operating instructions carefully prior to use and observe all safety instructions! Not observing such may lead to personal injury, damage to the device or to your property! Store the original packaging, the receipt and these instructions so that they may be consulted at a later date! When passing on the product, please include these operating instructions as well. Please check the contents of package for integrity and completeness prior to use!
1. Proper use of the product
The polishing machine is designed only for waxing and polishing the paintwork of cars, boats, caravans and mobile homes.
This device is not designed to be used by children or persons with limited mental abilities or without experience and/or lack of required specialist knowledge. Keep children away from the device.
The device is not designated for commercial use.
Use according to the intended purpose also includes the observance of all information in these operating instructions, particularly the observance of the safety notes. Any other utilisation is considered to be contrary to the intended purpose and may lead to material damage or personal injuries. EAL GmbH assumes no liability for damage resulting from improper use.
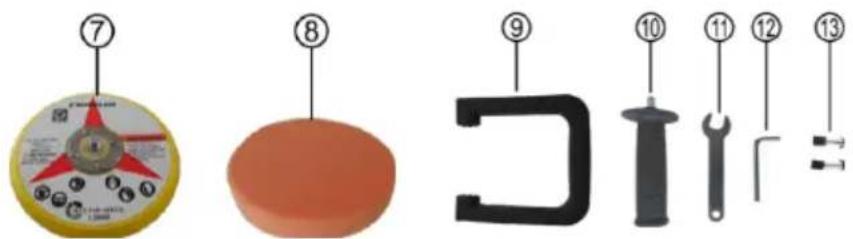
2. Scope of delivery
1 x Polishing machine 1 x polishing disc 1 x Polishing sponge
1 x D-handle 1 x additional handle 1 x spanner
1 x Allen key 1 x replacement carbon brushes 1 x instructions for use
3. Specifications
EinInput voltage: 230 - 240 V AC, 50 Hz Length of connection cable: 3.00 m
Performance: 650 W Diameter of polishing plate: 150 mm
Idle revolutions: 2000 – 6400 1/min Polishing stroke: 9 mm
Weight: 1.90 kg Dimensions: 314 x 15 x 127 [mm]
4. Safety precautions

- The warning triangle indicates all instructions which are important for safety. Always follow these otherwise you could injure yourself or damage the device.
• Children may not play with the device.
- Cleaning and user maintenance may not be carried out by children without supervision.
- Do not treat packaging material carelessly. This may become a dangerous plaything for a child!
- Only use this product for its designated purpose!
- Do not manipulate or disassemble the device!
- For your own safety, only use accessories and spare parts that are stated in these instructions or that are recommended by the manufacturer!
- Do not use the device if it is damaged.
- Clean the device after each use.
- Do not overload the device.
- Keep the polishing machine away from rain or moisture. The ingress of water into a power tool will increase the risk of an electrical shock.
- When using the polishing hoods, do not allow parts of the polishing hood to come loose, especially the fixing cords. Hide or shorten the fixing cords. Loose, rotating parts may catch your fingers or, for example, get caught in door handles.
• Work very carefully around corners and sharp edges. The rotating tool may bounce off or get trapped. This will lead to a loss of control and may result in injuries.
- Always pull the mains plug before replacing accessories or connection parts.
- Wear safety goggles.
- Wear hearing protection.
- Wearing personal protective equipment such as dust mask, anti-skid safety shoes, or safety helmet, depending on the type and use of polishing machine, reduces the risk of injuries.
- Wear suitable clothing. Do not wear loose clothing or jewellery. Keep your hair, clothes and gloves away from moving parts. Loose clothing, jewellery or long hair can get caught in moving parts.
- Also observe the safety precautions in the individual sections of the operating instructions


5. Explanation of symbols

Complies with EC directives

Devices with this symbol may only be operated indoors (dry environment)

Insulated housing (protection class II).

Labelled electrical products may not be disposed of in the household waste

Read the operating instructions
6. Operating instructions
6.1 Overview
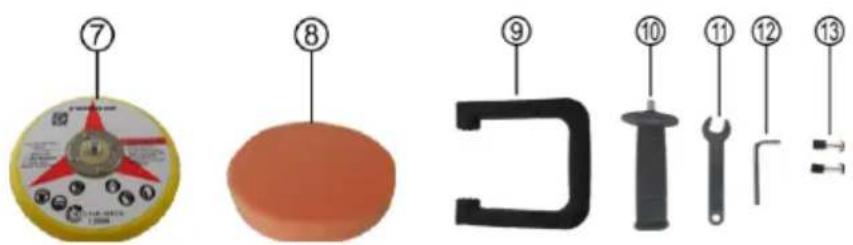
1 Power cable
2 Speed setting
3 ON/OFF switch
4 Threaded bushes for handle
5 Protective cover
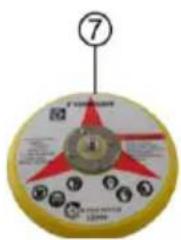
6 Mounts for disc sanding pads
7 Disc sanding pads
8 Polishing sponge
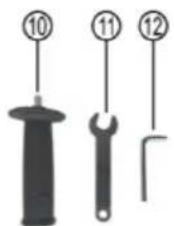
9 D-handle
10 Additional handle
11 Spanner
12 Allen key
13 Carbon brushes

text_image
Diagram of a green and black power tool with numbered parts labeled 1 through 6Figure 1: Overview 1
text_image
Diagram showing numbered parts of a mechanical or electrical component with numbered labels and symbolsFigure 2: Overview 2 Figure 3: Overview 3
6.2 Prior to starting up
6.2.1 Mounting the disc sanding pad
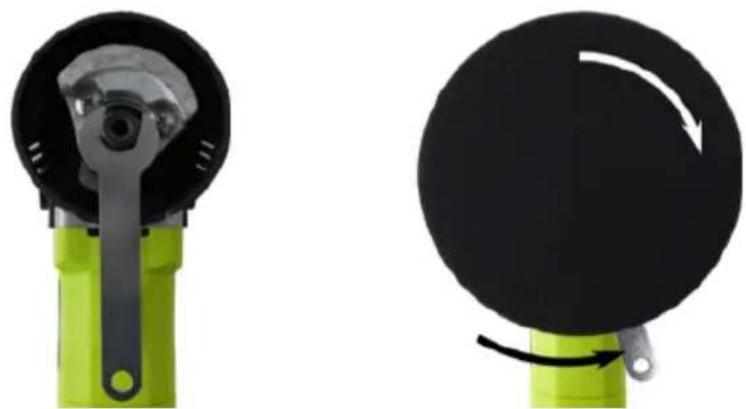
Make sure that the mains plug is removed from the socket. Place the spanner (position 11 in the overview) on the hexagonal bar of the mount for disc sanding pad (position 6 in the overview), image 4. Screw the threaded bolts of the disc sanding pad (position 7 in the overview) in clockwise direction on the polishing disc mount, image 5. Resist using the spanner and tighten the disc sanding pad.
natural_image
Two views of a green mechanical device with black components and a white arrow indicating rotation (no text or symbols)Figure 4: Place a wrench Figure 5: Screw the disc sanding pad on
6.2.2 Mounting the D-handle
Make sure that the mains plug is removed from the socket.
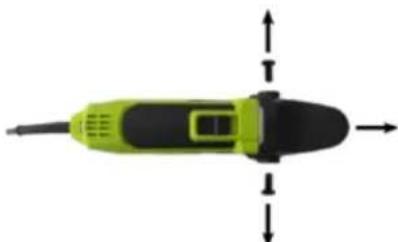
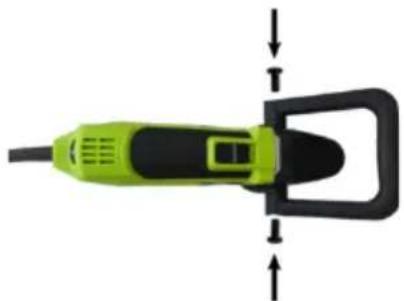
Unscrew both the Allen screws at the side of the protective cap (position 5 in the overview) using the Allen key (position 12 in the overview), image 6, and pull the protective cap to the front.
natural_image
Top-down view of a green and black electric shaver with directional arrows indicating force or movement (no text or symbols)Figure 6: Remove the protective cap
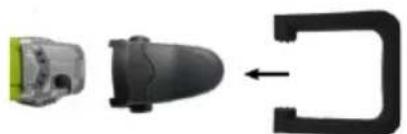
Press the D-handle (position 9 in the overview) on the mounts of the protective cap, image 7. Using knob grids, you can adjust the inclination of the handle.
natural_image
Three black electronic components with a green connector, shown in sequence and an arrow pointing to a curved black bracket (no text or symbols)Figure 7: Insert the D-handle
natural_image
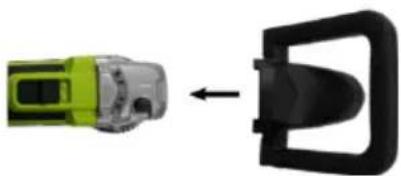
Two car parts: a green and silver vehicle and a black plastic buckle, connected by an arrow (no text or symbols visible)Figure 8: Position the protective cap
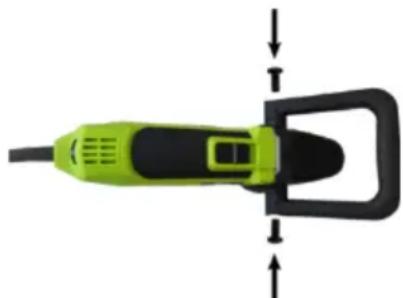
Place the protective cap with the D-handle on the polishing machine, image 8. Push the protective cap firmly onto the machine.
Reinsert the Allen screws, image 9, and tighten them.
natural_image
Green and black electric shaver tool with directional arrows indicating compression or force (no text or symbols)Figure 9: Screw the protective cap tightly
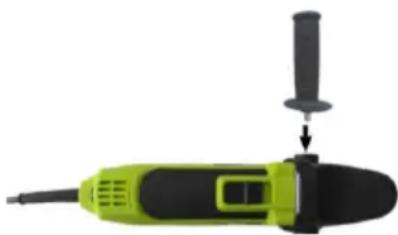
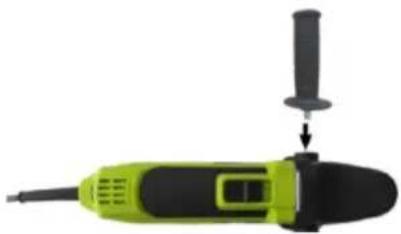
6.2.3 Mounting the additional handle
Make sure that the mains plug is removed from the socket.
Unscrew an Allen screw at the side of the protective cap (position 5 in the overview) using the Allen key (position 12 in the overview), at which you want to mount the additional handle (position 10 in the overview), image 10.
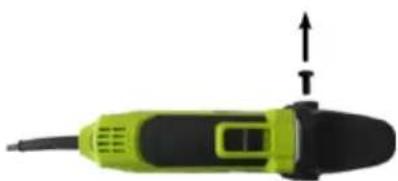
natural_image
Green and black electric shaver tool with upward arrow indicator (no text or symbols)Figure 10: Remove the Allen screw
natural_image
Green and black electric shaver tool with a screwdriver inserted (no text or symbols visible)Figure 11: Mount the additional handle
Turn the additional handle in the threaded bush and tighten it, image 11.
6.2.4 Mounting the polishing sponge
Make sure that the mains plug is removed from the socket.
Place the polishing sponge at the centre of the disc sanding pad using a Velcro loop and push it firmly with your hand. Check for correct position by manually turning the disc sanding pad for a few rotations.

Always use clean and undamaged polishing sponge. Dirt or deposits on the polishing sponge can damage the paint.
6.3 Polishing

Carefully clean the surface you wish to polish. The surface must be completely dry before polishing. Only use polishing and waxing products designed for use with polishing machines. Observe the instructions for the care products being used. Heavily weathered paintwork may require special pre-treatment. For information, inquire at the specialist dealership.
6.3.1 Applying polishing agent on the polishing sponge
Apply the care product evenly up to the edge of the polishing sponge. A continuous, thin coating must be ensured.

Applying excess care product will not improve the results, it will just make it more difficult to remove.

Polishing too long on the same spot may damage the varnish. Do not polish the vehicle in full sunlight or in very high temperatures.
6.3.2 Applying polishing agent on the paint
Apply the product only to painted surfaces, never to plastic parts or rubber seals. Using the polishing sponge, dab the care product onto various spots on the surface to be polished. Adjust the speed to the lowest level using an adjustment wheel (position 2 in the overview). Hold the device using both the hands. Rest the device with polishing sponge on the surface to be processed. Switch the device on using the ON/OFF switch (Position 3 in the overview). Pass the device evenly over the paintwork. Do not put pressure on the device. The work is carried out by the rotation process, not the pressure on the paintwork.
First treat the large, flat surfaces such as bonnet, root and boot lid. Then move on to smaller areas, such as doors and wings. For areas that cannot be reached using the polishing machine, remove the polishing sponge and polish by hand.
6.3.3 Polishing the paintwork
After you have evenly applied and worked in the care product, it must be removed and the paintwork must be polished. Depending on manufacturer/type, the applied polishing agent must be completely dry. Now completely remove the care product by polishing the paintwork in the same order in which you applied the polish. Set a suitable speed for your care product.

Reset the speed to the lowest level after every disconnection. Avoid accidents during the next restart.
7. Maintenance and care
Clean the polishing machine after each use. Pay particular attention to ensure the ventilations slots are clean To do this, use a dry, soft cloth. Do not use aggressive cleaning agents or solvents. Never allow liquids to get into the device. You can use compressed air at a low-pressure to blow-out the device.
The polishing sponge must be washed by hand in warm water. Leave the polishing sponge to air dry.
Store the polishing machine without the polishing sponge. Position the polishing machine in such a way that the polishing plate is not distorted. Do not place other objects on the polishing plate.

The carbon brushes may be replaced only after the expiry of warranty of an specialist electrical dealer.
8. Notes regarding environmental protection
Do not dispose of electrical devices with the household waste! Electrical and electronic scrap must be collected separately and disposed of in an environmentally responsible manner for recycling. Please contact your community or city administration regarding disposal options for electrical and electronic scrap.
9. Replacement parts and accessories
Item number 20995 Polishing sponge, solid, 30 mm, ∅ 150 mm (replacement for the polishing sponge supplied) Item number 20996 Polishing sponge, soft, 30 mm, ∅ 150 mm
10. Contact information
EAL GmbH
text_image
Labeled diagram of a green power tool with numbered parts for identificationtext_image
Diagram showing numbered parts of a mechanical or electrical component with numbered labels and a circular component.natural_image
Two views of a mechanical device with a green base and black circular component, showing a change in motion (no text or symbols)natural_image
Top-down view of a green and black electric shaver with directional arrows indicating force or movement (no text or symbols)natural_image
Three black plastic components with a green label, arranged in a row: front view, side view, and right-side arrow (no text or symbols)natural_image
Diagram showing a green and silver connector being inserted into a black plastic door (no text or symbols present)Figure 8: Placer le capuchon de protection
natural_image
Top-down view of a green and black electric shaver with directional arrows indicating force or movement (no text or symbols)natural_image
Green and black handheld tool with upward arrow indicator (no text or symbols)natural_image
Green and black electric shaver tool with a screwdriver inserted (no text or symbols visible)text_image
Labeled diagram of a green and black power tool with numbered parts for identification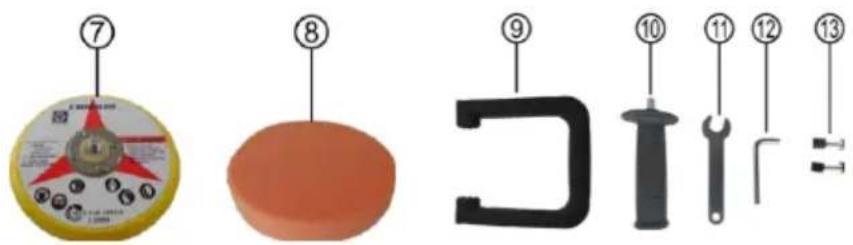
text_image
Diagram showing numbered parts of a mechanical or electrical component with numbered labels and symbolsnatural_image
Close-up of a green and black mechanical device with a handle (no visible text or symbols)
natural_image
Close-up of a black circular object with a white arrow indicating rotation, mounted on a green base (no text or symbols)natural_image
Top-down view of a green and black handheld device with directional arrows indicating movement or force (no text or symbols)natural_image
Three black plastic components with a green label, connected by an arrow to a large black bracket (no text or symbols visible)natural_image
Diagram showing a green and gray device connected to a black mechanical part with an arrow indicating rotation (no text or symbols)natural_image
Green and black electric shaver with directional arrows indicating motion (no text or symbols)natural_image
Green and black handheld tool with upward arrow indicator (no text or symbols)natural_image
Green and black electric shaver tool with a screwdriver inserted (no text or symbols visible)Afb. 11: Extra handgreep monteren
text_image
Diagram of a green and black power tool with numbered parts labeled 1 through 6Figura 1: Schema 1
text_image
Diagram showing numbered parts of a mechanical component with numbered labels and a circular component labeled 7.Figura 2: Schema 2 Figura 3: Schema 3
natural_image
Close-up of a green and black handheld device with a metallic lever handle (no visible text or symbols)
natural_image
Close-up of a black circular object with a white curved arrow indicating rotation, mounted on a green base (no text or symbols)natural_image
Top-down view of a green and black electric shaver with directional arrows indicating force or movement (no text or symbols)natural_image
Three black plastic components with a green label, connected by an arrow to a large black bracket (no text or symbols visible)natural_image
Diagram showing a green and yellow connector with a black handle, connected by an arrow (no text or symbols present)natural_image
Top-down view of a green and black electric shaver with directional arrows indicating force or movement (no text or symbols)natural_image
Green and black electric shaver tool with upward arrow indicator (no text or symbols)Figura 10: Rimuovere la vite a brugola