
ELB 400 - Lighting Elinchrom - Free user manual and instructions
Find the device manual for free ELB 400 Elinchrom in PDF.

User questions about ELB 400 Elinchrom
0 question about this device. Answer the ones you know or ask your own.
Ask a new question about this device
Download the instructions for your Lighting in PDF format for free! Find your manual ELB 400 - Elinchrom and take your electronic device back in hand. On this page are published all the documents necessary for the use of your device. ELB 400 by Elinchrom.
USER MANUAL ELB 400 Elinchrom
elinchrom® creative image lighting technology
is a registered trademark of ELINCHROM LTD, RENENS, SWITZERLAND
USER MANUAL
GEBRAUCHSANLEITUNG
MANUEL D'UTILISATION
natural_image
Exterior view of a Elb 400 flash lamp and charging station (no signage)TABLE OF CONTENTS
CONTROL PANEL 2
DISPLAY PANEL - DASHBOARD 3
DEDICATED BUTTON 3
MENU FEATURES 3
PHOTOCELL 4
MANUAL PRE-FLASH SETUP (FOR ADVANCED USERS) 4
EL-SKYPORT TRANSCEIVER FEATURES & SETUP 4
AUDIO 5
FLASH MODE 5
SEQUENCE SETUP 5
DELAY SETUP 6
STROBO SETUP 6
POWER SETTINGS 6
STATISTICS 7
TROUBLESHOOTING 7
SOFT RESET 7
FLASHTUBE REPLACEMENT 7
ERROR MANAGEMENT 8
TECHNICAL DATA 9
SUGGESTED VALUE TO SET ON THE ELB IN DELAYED MODE 10
QUADRA HEAD INFORMATION 11
BATTERY INFORMATION 12
CONTROL PANEL
EN
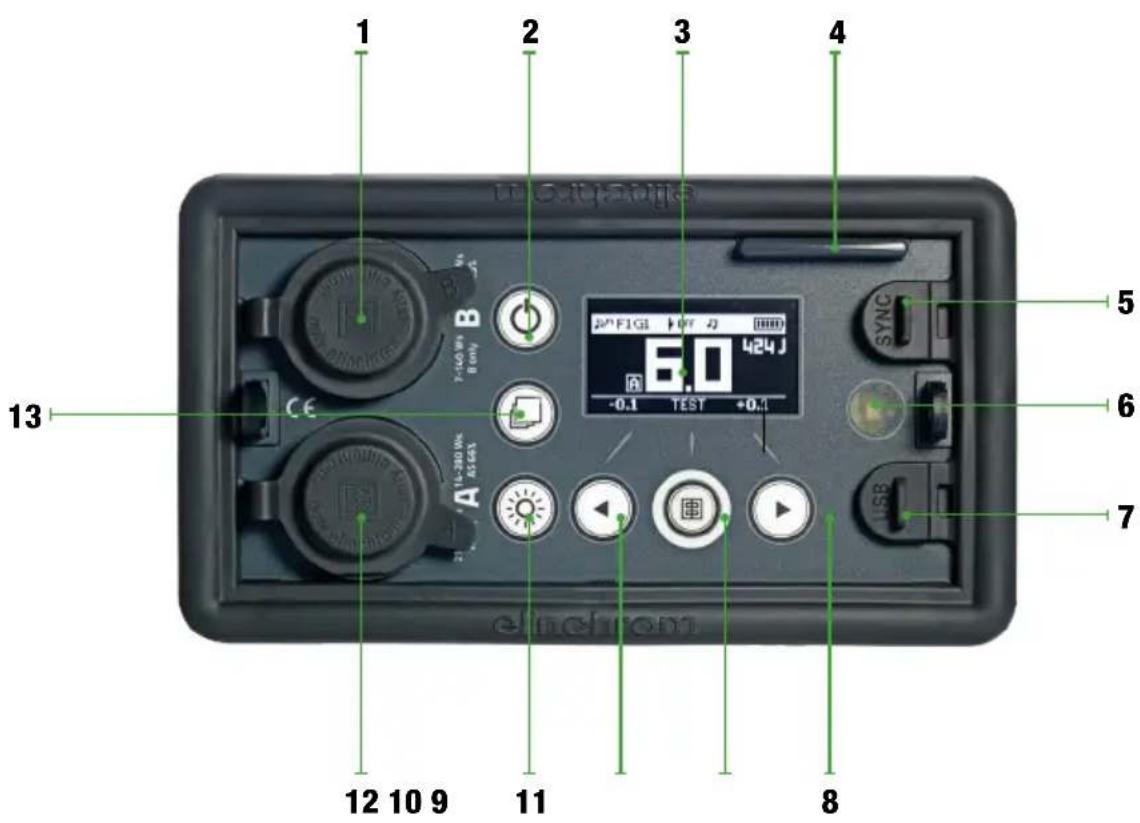
CONTROL PANEL
- Outlet B (33%)
- On / Off
- OLED display
- EL-Skyport antenna
- Synchronisation plug for 3.5 mm jack
- Photocell
-
Micro USB socket / Firmware Update
-
Right function button / Power up
- Test button / Enter menu function
- Left function button / Power down
- Modelling lamp button
- Outlet A (100%)
- Access menu button / Return function
DISPLAY PANEL - DASHBOARD
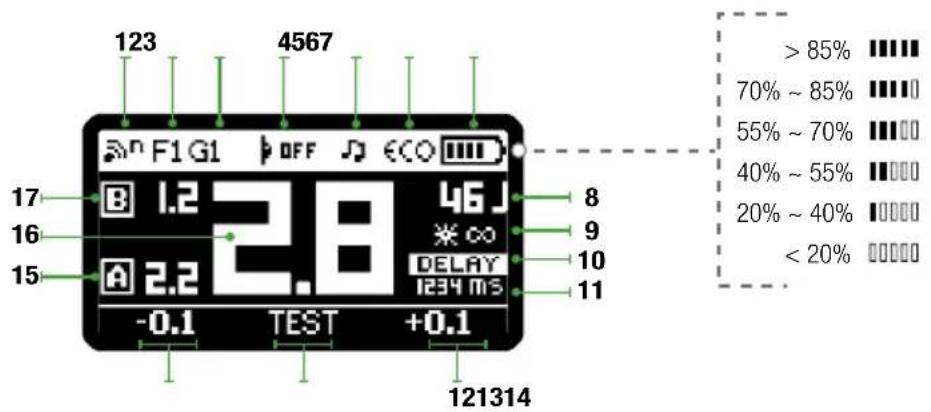
1 EL-Skyport synchronisation speed
2 EL-Skyport frequency channel
3 EL-Skyport group number
4 Photocell status
5 Ready beep
6 Recycling time
7 Battery level
8 Power in J
9 Pilot lamp timer
10 Flash function
11 Flash function value
12 Increase selected f-stop
13 Flash test
14 Decrease selected f-stop
15 Power of outlet A in f-stop
16 Total power in f-stop
17 Power of outlet B in f-stop
DEDICATED BUTTON
PILOT LAMP
A short press on the pilot lamp button turns on the pilotlight of the Quadra Head for 15 seconds. Values can be changed from 1 – 60 seconds. A long press keeps the LED pilotlight on for as long as there is battery power.
MENU FEATURES
DISPLAY PANEL - MAIN MENU
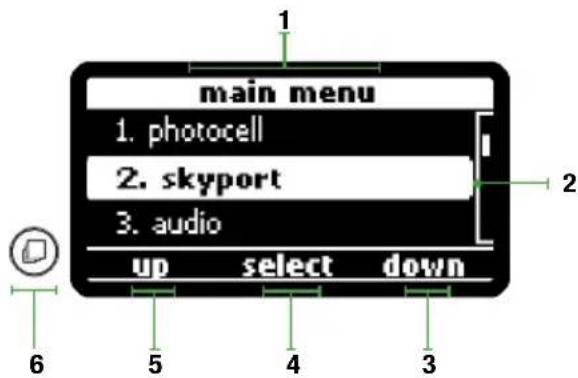
1 Menu title
2 Menu selected
3 Scroll down
4 Enter
5 Scroll up
6 Back to menu (Short press)
Back to dashboard (Long press)
PHOTOCELL
The photocell options allow you to switch the photocell on and off and to set up pre-flash for perfect synchronization with speedlites.
| DISPLAY OPTIONS SUB-OPTIONS | ||
| PHOTOCELL off | ||
| on | ||
| Pre-flash From 1 to 10 pre-flashes | ||
| set up pre-flash | auto / manual / block time / timeframe | |
When the photocell is on, the flash unit will trigger at any recognised flash impulse.
The pre-flash option can be adjusted manually if the number of pre-flashes of the speedlite is known. Otherwise, simply choose “set up pre-flash” and release a speedlite exposure. The number of pre-flashes will be automatically detected and stored. You are now ready to work with your speedlites.
MANUAL PRE-FLASH SETUP (FOR ADVANCED USERS)
In some cases depending on the technology of the speedlite unit, the automatic pre-flash detection may not work. In this case you can try a manual setup.
- manual: enter the number of pre-flashes from 1 to 20.
- block time: set the delay between each pre-flash from 0.5 to 5 ms.
- Timeframe : set the time window in which all pre-flashes, including the main flash, are released.
Note : We cannot suggest any values or settings here; this depends on the speedlite unit and must be tested until the correct synchronisation between the flash unit and the speedlite is achieved.
EL-SKYPORT TRANSCEIVER FEATURES & SETUP
The EL-Skyport options allow you to select the synchronisation speed and to define group and channel settings.
| DISPLAY OPTIONS SUB-OPTIONS | ||
| SKYPORT off r.0 | ||
| normal r.1 | ||
| speed r.2 | ||
| group From “group 1” to “group 4” | ||
| channel From “channel 1” to channel 20” | ||
If you work with the EL-Skyport system you can easily choose the synchronization speed. The “normal” synchronization mode is good when long distances are needed whereas the “speed” synchronization should be used when higher shutter speeds are needed with enabled digital cameras.
Finally you can choose in which group and frequency you would like to work. Change group settings to have a better control between main light and second lights. Change frequency channel to avoid interference.
AUDIO
The audio options give you the choice of different settings for when the capacitors are 100% charged and the unit is ready to flash.
| DISPLAY OPTIONS SUB-OPTIONS | ||
| AUDIO ready volume | From “off” to “max” | |
| error volume From “off” to “max” | ||
| key volume From “off” to “max” | ||
| ready tone From “tone 1” to “tone 2” | ||
The volume of the ready, error and key tones can be adjusted, enabling you to work silently if necessary. The ready tone can be chosen to improve acoustical recognition for when all flashes have fired and have recycled.
FLASH MODE
The flash mode menu enables you to configure your ELB unit to suit your style of shooting.
| DISPLAY OPTIONS SUB-OPTIONS | ||
| FLASH MODE flash before ready disabled / enabled | ||
| default sequence | unit address / total units/ seq. timeout | |
| delayed set delay (in ms) | ||
| strobo frequency / duration | ||
| Setup the activated mode | ||
The flash before ready feature gives you the choice between flashing the unit before full recycle or to be able to flash only when the unit has fully recycled.
Stay on default if you wish to do everyday flash photography.
SEQUENCE SETUP
Use sequence mode to catch a moving sequence with a number of indexed units, for example, of a jumping person in up to 20 different images. The following setup must be programmed in order to use the features.
- unit address : Every unit requires its own address; every time a trigger is released the corresponding flash unit will respond. Up to 20 units can be addressed.
- total units : Indicates the total number of addressed flash units.
- sequence timeout : Time after which the sequence restarts back to first addressed unit. The timeout can be programmed from 0.1s to 5s. This setting is necessary to flash the addressed units in the right order.
EN
DELAY SETUP
Set a delay to your ELB unit to flash with a specific delay after triggering (e.g. second curtain).
- Set delay (in ms): Time in which the unit should fire a flash after the camera shutter has been opened. The delay time can be programmed from 1ms (0.001 s.) to 10000ms (10 s.). Please see the suggested values in the table page 10 if you want to have second curtain sync via skyport.
Note : to fine-tune the milliseconds, the scale can be modified in 1, 10, 100 and 1000 steps. Press the User preset modelling lamp button to choose your step. This option is only active in the flash delay setup menu.
STROBO SETUP
Take an image with stroboscopic effects and open camera shutter. The overlapping moving sequence is visible in one image.
- Frequency : Number of flashes per second. Programmable from 1 to 10Hz.
- Duration window: Time during of the moving sequence you wish to capture. Programmable from 0.5 s. to 5 s.
Note : The unit must be set in fast recycling time in the “power settings” menu. If the error sound is heard, this means the recycling time cannot follow the settings. Please reduce the Hz setting or the flash power to a lower value.
POWER SETTINGS
Power settings help you define standby and when to auto-off to save energy. You can also define recycling time depending on the battery level left.
| DISPLAY OPTIONS SUB-OPTIONS | ||
| POWER SETTINGS auto standby | From disabled to [60min] in steps of 1 min - default 10 minutes | |
| auto-off | From disabled to [60min] in steps of 1 min - default 15 minutes | |
| pilot lamp timer | From [1 sec] to [60 sec] in steps of 1 sec - default 15 sec. | |
| recycling time eco / fast | ||
| step per push | From [0.1 f-stop] to [1.0 f-stop] - default 0.1 f-stop | |
The standby option lets you decide after how long the unit goes into standby mode, enabling you to quickly turn the unit back on when needed.
The auto-off option does just what its name suggests. When left unattended the unit will switch off automatically after the indicated time.
The pilot lamp timer is dedicated to the LED Pilot lamp of the Quadra heads.
Finally the step per push options enables you to modify in which steps you change the power on the dashboard.
STATISTICS
Check lifetime of the unit and the flashtube.
| DISPLAY OPTIONS | |
| STATISTICS unit life | |
| flash count | |
| power-on cnt |
You can easily check the current usage of the unit and the flashtube. Very useful for servicing or second-hand retail.
TROUBLESHOOTING
SOFT RESET
To reset all settings to default values, push the left and right buttons at the same time and hold for at least 1 second. The unit will reboot and will clear all working parameters.
This will not reset the counter in the "Statistics" menu.
FLASHTUBE REPLACEMENT
Flashtubes have a long life with general use however multi-flashing in long sequences can cause overheating of the electrodes leading to premature ageing. If the flashtube is broken or cracked, triggers only sporadically, or you notice an important colour temperature shift, it could be that the flashtube of the Quadra head needs replacing.
PREVIOUS GENERATION BATTERIES
The ELB 400 can also work in conjunction with the older generations of batteries of the Ranger Quadra whether they are Lead-Gel or Lithium-Ion.
EN
ERROR MANAGEMENT
| ERROR NUMBER | DESCRIPTION | SOLUTION |
| 1 | Capacitor over voltage | Switch the unit off, wait 2 minutes and switch the unit on again. If the error shows up again the unit requires a check up at an authorized Elinchrom service centre. |
| 3 | Discharge timeout error | |
| 4 | Charge timeout error | |
| 15 | Temperature sensor error | |
| 60 | Communication bus error | |
| 90 Safety stop system (generic error) | ||
| 2 | System over heat | Wait until the unit has cooled down. The unit will switch back to the normal operation as soon as the temperature decreases to a normal working level. |
| 11 | Battery low | The unit has detected a mains supply fault. Please check the mains/battery supply. It could be not working correctly. |
| 61 | Battery unseal error | Switch the unit off, wait 2 minutes and switch the unit on again. If the error shows up again the battery requires a check up at an authorized Elinchrom service centre. |
TECHNICAL DATA
| Energy (Ws/J) | 424 |
| Power distribution | Asymmetrical 2:1 |
| F-stop (lm, 100 ISO, reflector 48°) Pro Head | At 100% : 64.5 — At 66% : 45.8 — At 33% : 32.8 |
| Power range f-stop | 6.9 |
| Power range Ws | 100% : 21 - 424 — 66% : Output A : 14 - 280 — 33% : Output B : 7 - 140 |
| Power range | 1/1 – 1/32 |
| Power increments in f-stop | 1/10 to 5/10 - 1/1 |
| Flash duration t0.5 at max. power in s. : Pro/Action head | Output A (100%) : 1/1200 / 1/2800 — Output B (33%) : 1/3000 / 1/5700Output A+B (100%) : 1/1500 / 1/4000 |
| Recycling, FAST in s. | Output A : 0.3 - 1.6 — Output B : 0.17 - 0.7 |
| Recycling, ECO in s. | Output A : 0.5 - 3.5 — Output B : 0.3 - 1.2 |
| Colour temperature in °K at max. power | 5500 |
| Auto Power Dumping | Adjusts power settings automatically |
| Power stability | ± 0.5% |
| Modelling lamp mode | On, off, programmable timer and continuous |
| Flashes out of one charged battery at min. power, ECO / FAST recycle | 6000 / 5500 |
| Flashes out of one charged battery at max. power, ECO / FAST recycle | 350 / 350 |
| Battery | Lithium-Ion 14.4 V / 4.1 Ah |
| Quick charger : approx. recharge time | 1h30m |
| EL-Skyport (Built-in) | Integrated transceiver, 20 Frequency Channels and 4 Groups |
| Sync voltage | 5 V (compatible with all cameras) |
| Sync socket | 3.5 mm Jack |
| Weight : ELB 400 unit including battery // Battery alone | 2 kg // 0.73 |
| Supplied with | Battery, charger, sync cord and shoulder strap |
| Code number | 10279.1 |
SUGGESTED VALUE TO SET ON THE ELB IN DELAYED MODE\*
EN
| SYNC SPEED ON CAMERA EQUIVALENT IN MS SUGGESTED VALUE | ||
| 1/60 16.6 9 | ||
| 1/50 20 12 | ||
| 1/40 25 17 | ||
| 1/30 33.3 23 | ||
| 1/25 40 30 | ||
| 1/20 50 40 | ||
| 1/15 66.6 52 | ||
| 1/13 77 68 | ||
| 1/10 100 90 | ||
| 1/8 125 115 | ||
| 1/6 166.6 145 | ||
| 1/5 200 185 | ||
| 1/4 250 235 | ||
| 0.3" 300 290 | ||
| 0.4" 400 170 | ||
| 0.5" 500 470 | ||
| 0.6" 600 580 | ||
| 0.8" 800 750 | ||
| 1" 1000 | 950 | |
| 1.3" | 1300 | 1200 |
| 1.6" | 1600 | 1500 |
| 2" 2000 | 1900 | |
| 2.5" | 2500 | 2400 |
| 3.2" | 3200 | 2900 |
| 4" 4000 | 3800 | |
| 5" 5000 | 4800 | |
| 6" 6000 | 5800 | |
| 8" 8000 | 7700 | |
| 10" | 10000 | 9700 |
* tested with canon EOS 5D. Suggested for fullframe camera.
DECLARATION OF PERFORMANCE (DOP)
For more information please visit www.elinchrom.ch/....
Find declaration for EC conformity and conformity USA & Canada on the Elinchrom website. www.elinchrom.ch
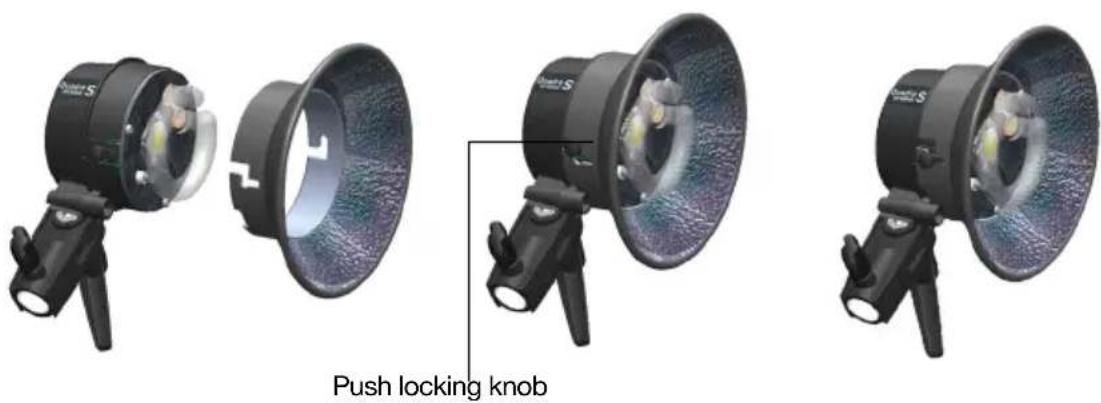
QUADRA HEAD INFORMATION FITTING REFLECTORS
- Always switch off the unit before connecting accessories and reflectors.
- Disconnect the flash cable from the ELB 400 pack.
- Mount the Quadra head to a tripod and lock the security screw.
- Place the reflector over the Quadra head, with the umbrella hole showing down.
- Press the Quadra head locking knob firmly down and turn the reflector to the right until you hear the snap-in noise.
- Check if the reflector is well fitted.
- Reconnect the flash cable to the pack and switch the unit on.
- Proceed in the same manner when exchanging reflectors.
FLASHTUBE REPLACEMENT
To exchange a user replaceable plug-in flashtube, please follow the instructions below: Switch the ELB 400 pack OFF.
- Disconnect the cable first from the pack and secondly from the Quadra head.
-
Once the Quadra head has cooled down, place the head on a dry and clean surface.
-
Attention: Use protective gloves to remove the flashtube:
-
Pull the flashtube firmly out of the terminals.
- If the tube is broken, use security gloves. Avoid cutting yourself!
-
Never touch the metal electrodes and ensure that the unit is discharged and disconnected from the pack! Use an insulated tool to pull out the electrodes.
-
Take the new flashtube. A protective gloves and/or insultated tissue MUST BE USED as any contact with your fingers on the glass may result in dark markings once the flashtube is in use.
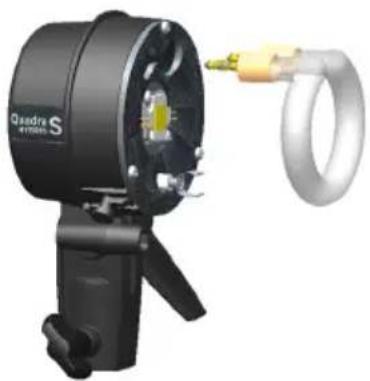
- For the Pro head use the horseshoe type flashtube / N° 24087
- For the Action head use the omega flashtube / N° 24086
-
Check that the tube is correctly aligned centrally and that the trigger contact is gripping the tube.
-
Re-connect and test the unit as usual.
natural_image
3D rendering of a Quadra S YF700S optical instrument with attached ring and probe (no text or symbols visible)
natural_image
3D rendering of a black quadrupedal lamp with attached metallic ring and two gold connectors (no text or symbols visible)Quadra Action head - N° 20151Quadra Pro head -
BATTERY INFORMATION
- The battery can be charged at an ambient temperature from 0^ C to +45^ C, if the temperature is exceeded, the safety circuitry of the battery will shut down to avoid damage to the Li-Ion cells.
- There is no memory-effect; our Lithium-Ion battery can be recharged from any charge level.
- A completely charged battery will need to be recharged latest every 3 months.
- Please refer to the battery guide to know how to take care of your battery in the best possible way.
BATTERY FUSE
The battery is secured with an ATO 20 A fuse. The topside of the battery includes transport pockets for two spare ATO 20 A fuses. When travelling by air and in general, remove the fuse to deactivate the battery and place the fuse into the free transport pocket!
- Insert the 20 A fuse into the battery.
- First connect the Elinchrom Li-Ion charger with the battery, and then connect the charger to the mains.
- Charge the battery until the Elinchrom Li-Ion charger status light turns to green.
- Press the battery button to check if the battery capacity is at 100% (4 green LEDs).
- Remove first the mains connection, and then remove the charger from the battery.
BATTERY STATUS
The Li-Ion battery implements a full-integrated monitoring circuitry, which allows the user to know exactly the available capacity of the battery when pressing the push button, located on the front of the battery LED's.
| 75% -100% | |
| 50% -75% | |
| 25% - 50% | |
| 10% - 25% | |
| < 10% | flashes |
INHALT
KONTROLLFELD 14
ANZEIGEFELD (DASHBOARD) 15
SPEZIAL TASTER - EINSTELLLICHT 15
MENÜ FUNKTIONEN 15
PHOTOZELLE 16
| DISPLAY OPTIONS SUB-OPTIONS | ||
| PHOTOCELL off | ||
| on | ||
| Pre-flash From 1 to 10 pre-flashes | ||
| set up pre-flash | auto / manual / block time / timeframe | |
AUTO PRE-FLASH
| DISPLAY OPTIONS SUB-OPTIONS | ||
| SKYPORT off r.0 | ||
| normal r.1 | ||
| speed r.2 | ||
| group From “group 1” to “group 4” | ||
| channel From “channel 1” to channel 20” | ||
| DISPLAY OPTIONS SUB-OPTIONS | ||
| AUDIO ready volume | From “off” to “max” | |
| error volume From “off” to “max” | ||
| key volume From “off” to “max” | ||
| ready tone From “tone 1” to “tone 2” | ||
| DISPLAY OPTIONS SUB-OPTIONS | ||
| FLASH MODE flash before ready disabled / enabled | ||
| default sequence | unit address / total units/ seq. timeout | |
| delayed set delay (in ms) | ||
| strobo frequency / duration | ||
| Setup the activated mode | ||
| DISPLAY OPTIONS SUB-OPTIONS | ||
| POWER SETTINGS auto standby | From disabled to [60min] in steps of 1 min - default 10 minutes | |
| auto-off | From disabled to [60min] in steps of 1 min - default 15 minutes | |
| pilot lamp timer | From [1 sec] to [60 sec] in steps of 1 sec - default 15 sec. | |
| recycling time eco / fast | ||
| step per push | From [0.1 f-stop] to [1.0 f-stop] - default 0.1 f-stop | |
natural_image
Three black-and-white product photos of a studio lighting fixture, showing lens, frame, and tripod views (no text or symbols visible)natural_image
3D rendering of a black Qadarm S camera with attached ring and cable (no text or symbols visible)
natural_image
3D rendering of a Quadra A precision optical instrument with two gold connectors (no text or symbols visible)Quadra Action Blitzkopf - N° 20151 Quadra Pro Blitzkopf -
BATTERIE INFORMATION
| 75% -100% | |
| 50% -75% | |
| 25% - 50% | |
| 10% - 25% | |
| < 10% | Blitze |
TABLE DES MATIÈRES
| PANNEAU DE COMMANDES | 26 | |
| PANNEAU D’AFFICHAGE – TABLEAU DE BORD | 27 | |
| TOUCHE DÉDIÉE | 27 | |
| CARACTÉRISTIQUES DU MENU | 27 | |
| CELLULE PHOTOÉLECTRIQUE | 28 | |
| PARAMÉTRAGE MANUEL DU MODE PRÉ-FLASH (RÉSERVÉ AUX UTILISATEURS AVANCÉS) | 28 | |
| CARACTÉRISTIQUESETPARAMÉTRAGEDEL’ÉMETTEUREL-SKYPORT 28 | ||
| AUDIO | 29 | |
| MODE FLASH | 29 | |
| PARAMÉTRAGE DES SÉQUENCES | 29 | |
| PARAMÉTRAGE DU RETARD | 30 | |
| PARAMÉTRAGE DU STROBOSCOPE | 30 | |
| PARAMÉTRAGE DE LA PUISSANCE | 30 | |
| STATISTIQUES | 31 | |
| RÉSOLUTION DES PROBLÈMES | 31 | |
| RÉINITIALISATION | 31 | |
| REEMPLACEMENT DU TUBE FLASH | 31 | |
| GESTION DES ERREURS | 32 | |
| DONNÉES TECHNIQUES | 33 | |
| SUGGESTIONS DES VALEURS À APPLIQUER À L’ELB EN MODE RETARD | 34 | |
| INFORMATIONS SUR LA TÊTE QUADRA | 35 | |
| INFORMATIONS SUR LA BATTERIE | 36 | |
| DISPLAY OPTIONS SUB-OPTIONS | ||
| PHOTOCELL off | ||
| on | ||
| Pre-flash From 1 to 10 pre-flashes | ||
| set up pre-flash | auto / manual / block time / timeframe | |
| DISPLAY OPTIONS SUB-OPTIONS | ||
| SKYPORT off r.0 | ||
| normal r.1 | ||
| speed r.2 | ||
| group From “group 1” to “group 4” | ||
| channel From “channel 1” to channel 20” | ||
| DISPLAY OPTIONS SUB-OPTIONS | ||
| AUDIO ready volume | From “off” to “max” | |
| error volume From “off” to “max” | ||
| key volume From “off” to “max” | ||
| ready tone From “tone 1” to “tone 2” | ||
| DISPLAY OPTIONS SUB-OPTIONS | ||
| FLASH MODE flash before ready disabled / enabled | ||
| default sequence | unit address / total units/ seq. timeout | |
| delayed set delay (in ms) | ||
| strobo frequency / duration | ||
| Setup the activated mode | ||
| DISPLAY OPTIONS SUB-OPTIONS | ||
| POWER SETTINGS auto standby | From disabled to [60min] in steps of 1 min - default 10 minutes | |
| auto-off | From disabled to [60min] in steps of 1 min - default 15 minutes | |
| pilot lamp timer | From [1 sec] to [60 sec] in steps of 1 sec - default 15 sec. | |
| recycling time eco / fast | ||
| step per push | From [0.1 f-stop] to [1.0 f-stop] - default 0.1 f-stop | |
REPLACEMENT DU TUBE FLASH
REPLACEMENT DU TUBE FLASH
natural_image
3D rendering of a Quadra S YF700S optical instrument with attached ring and probe (no text or symbols visible)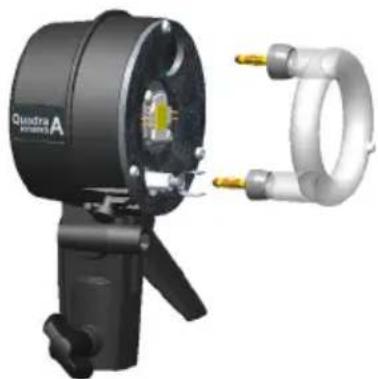
natural_image
3D rendering of a black quadrupedal lamp with attached metallic ring and two gold connectors (no text or symbols visible)| 75% -100% | |
| 50% -75% | |
| 25% - 50% | |
| 10% - 25% | |
| < 10% | Flashes |
INDICE
PANNELLO DI CONTROLLO 38
DISPLAY - DASHBOARD 39
PULSANTE DEDICATO 39
CARATTERISTICHE DEI MENU 39
FOTOCELLULA 40
CONFIGURAZIONE MANUALE PRE-FLASH (PER UTENTI ESPERTI) 40
CARATTERISTICHE E CONFIGURAZIONE DEL RICETRASMETTITORE EL-SKYPORT 40
AUDIO 41
MODALITÀ FLASH 41
| DISPLAY OPTIONS SUB-OPTIONS | ||
| PHOTOCELL off | ||
| on | ||
| Pre-flash From 1 to 10 pre-flashes | ||
| set up pre-flash | auto / manual / block time / timeframe | |
| DISPLAY OPTIONS SUB-OPTIONS | ||
| SKYPORT off r.0 | ||
| normal r.1 | ||
| speed r.2 | ||
| group From “group 1” to “group 4” | ||
| channel From “channel 1” to channel 20” | ||
| DISPLAY OPTIONS SUB-OPTIONS | ||
| AUDIO ready volume | From “off” to “max” | |
| error volume From “off” to “max” | ||
| key volume From “off” to “max” | ||
| ready tone From “tone 1” to “tone 2” | ||
| DISPLAY OPTIONS SUB-OPTIONS | ||
| FLASH MODE flash before ready disabled / enabled | ||
| default sequence | unit address / total units/ seq. timeout | |
| delayed set delay (in ms) | ||
| strobo frequency / duration | ||
| Setup the activated mode | ||
| DISPLAY OPTIONS SUB-OPTIONS | ||
| POWER SETTINGS auto standby | From disabled to [60min] in steps of 1 min - default 10 minutes | |
| auto-off | From disabled to [60min] in steps of 1 min - default 15 minutes | |
| pilot lamp timer | From [1 sec] to [60 sec] in steps of 1 sec - default 15 sec. | |
| recycling time eco / fast | ||
| step per push | From [0.1 f-stop] to [1.0 f-stop] - default 0.1 f-stop | |
natural_image
3D rendering of a black quadra S lighting device with attached ring and connector (no text or symbols visible)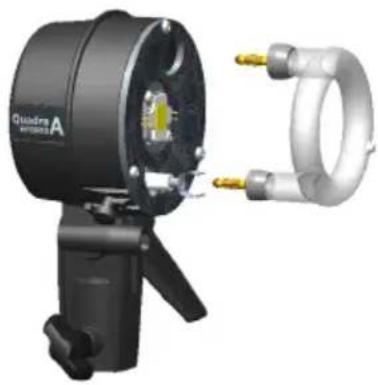
natural_image
3D rendering of a Quadra A lighting device with attached ring and metal components (no text or symbols visible)Quadra Action head - N° 20151 Quadra Pro head -
bar
| Range | Percentage (%) | |---|---| | 75% -100% | | | 50% -75% | Black (approximate) | | 25% - 50% | White (approximate) | | 10% - 25% | White (approximate) | | < 10% | White (approximate) | lampeggianteTABLA DE CONTENIDOS
PANEL DE CONTROL 50
| DISPLAY OPTIONS SUB-OPTIONS | ||
| PHOTOCELL off | ||
| on | ||
| Pre-flash From 1 to 10 pre-flashes | ||
| set up pre-flash | auto / manual / block time / timeframe | |
| DISPLAY OPTIONS SUB-OPTIONS | ||
| SKYPORT off r.0 | ||
| normal r.1 | ||
| speed r.2 | ||
| group From “group 1” to “group 4” | ||
| channel From “channel 1” to channel 20” | ||
| DISPLAY OPTIONS SUB-OPTIONS | ||
| AUDIO ready volume | From “off” to “max” | |
| error volume From “off” to “max” | ||
| key volume From “off” to “max” | ||
| ready tone From “tone 1” to “tone 2” | ||
| DISPLAY OPTIONS SUB-OPTIONS | ||
| FLASH MODE flash before ready disabled / enabled | ||
| defaultsequence | unit address / total units/ seq.timeout | |
| delayed set delay (in ms) | ||
| strobo frequency / duration | ||
| Setup the activated mode | ||
| DISPLAY OPTIONS SUB-OPTIONS | ||
| POWER SETTINGS auto standby | From disabled to [60min] in steps of 1 min - default 10 minutes | |
| auto-off | From disabled to [60min] in steps of 1 min - default 15 minutes | |
| pilot lamp timer | From [1 sec] to [60 sec] in steps of 1 sec - default 15 sec. | |
| recycling time eco / fast | ||
| step per push | From [0.1 f-stop] to [1.0 f-stop] - default 0.1 f-stop | |
natural_image
3D rendering of a black quadra S camera with attached ring and cable (no text or symbols visible)
natural_image
3D rendering of a black quadra A airship with attached metallic ring and yellow connectors (no text or symbols visible)Quadra Action Cabezal del Flash - N° 20151 Quadra Proc
INFORMACIÓN BATERÍA
| 75% -100% | |
| 50% -75% | |
| 25% - 50% | |
| 10% - 25% | |
| < 10% | flashes |
INHOUDSOPGAVE
BEDIENINGSPANEEL 62
DISPLAYPANEEL - DASHBOARD 63
SPECIALE KNOP 63
MENUFUNCTIES 63
FOTOCEL 64
HANDMATIGE PRE-FLASH-INSTELLING (VOOR PROFESSIONELE GEBRUIKERS) 64
EL-SKYPORT TRANSCEIVER FUNCTIES EN INSTELLINGEN 64
AUDIO 65
FLITSMODUS 65
SEQUENTIE-INSTELLINGEN 65
VERTRAGING INSTELLEN 66
STROBO-INSTELLINGEN 66
ENERGIE-INSTELLINGEN 66
STATISTIEKEN 67
PROBLEMEN OPLOSSEN 67
SOFT RESET 67
FLITSLAMP VERVANGEN 67
| DISPLAY OPTIONS SUB-OPTIONS | ||
| PHOTOCELL off | ||
| on | ||
| Pre-flash From 1 to 10 pre-flashes | ||
| set up pre-flash | auto / manual / block time / timeframe | |
| DISPLAY OPTIONS SUB-OPTIONS | ||
| SKYPORT off r.0 | ||
| normal r.1 | ||
| speed r.2 | ||
| group From “group 1” to “group 4” | ||
| channel From “channel 1” to channel 20” | ||
| DISPLAY OPTIONS SUB-OPTIONS | ||
| AUDIO ready volume | From “off” to “max” | |
| error volume From “off” to “max” | ||
| key volume From “off” to “max” | ||
| ready tone From “tone 1” to “tone 2” | ||
| DISPLAY OPTIONS SUB-OPTIONS | ||
| FLASH MODE flash before ready disabled / enabled | ||
| default sequence | unit address / total units/ seq. timeout | |
| delayed set delay (in ms) | ||
| strobo frequency / duration | ||
| Setup the activated mode | ||
| DISPLAY OPTIONS SUB-OPTIONS | ||
| POWER SETTINGS auto standby | From disabled to [60min] in steps of 1 min - default 10 minutes | |
| auto-off | From disabled to [60min] in steps of 1 min - default 15 minutes | |
| pilot lamp timer | From [1 sec] to [60 sec] in steps of 1 sec - default 15 sec. | |
| recycling time eco / fast | ||
| step per push | From [0.1 f-stop] to [1.0 f-stop] - default 0.1 f-stop | |
natural_image
Three black professional headsets with lens designs, shown from different angles (no text or symbols visible)Duw de vergrendelingsknop in.
NL
FLITSBUIS VERVANGEN
natural_image
3D rendering of a black Qadarm S optical instrument with attached metallic ring (no text or symbols visible)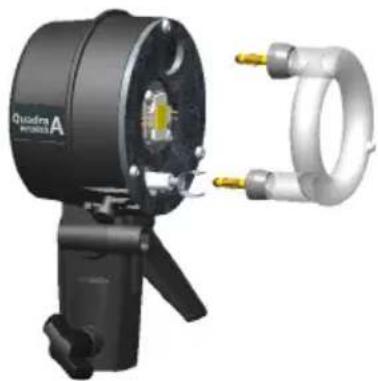
natural_image
3D rendering of a Quadra A precision optical instrument with two gold connectors (no text or symbols visible)Quadra Action Flitskop - N° 20151 Quadra Pro Flitsl
INFORMATIE OVER DE BATTERIJ
| DISPLAY OPTIONS SUB-OPTIONS | ||
| PHOTOCELL off | ||
| on | ||
| Pre-flash From 1 to 10 pre-flashes | ||
| set up pre-flash | auto / manual / block time / timeframe | |
| DISPLAY OPTIONS SUB-OPTIONS | ||
| SKYPORT off r.0 | ||
| normal r.1 | ||
| speed r.2 | ||
| group From “group 1” to “group 4” | ||
| channel From “channel 1” to channel 20” | ||
| DISPLAY OPTIONS SUB-OPTIONS | ||
| AUDIO ready volume | From “off” to “max” | |
| error volume From “off” to “max” | ||
| key volume From “off” to “max” | ||
| ready tone From “tone 1” to “tone 2” | ||
| DISPLAY OPTIONS SUB-OPTIONS | ||
| FLASH MODE flash before ready disabled / enabled | ||
| default sequence | unit address / total units/ seq. timeout | |
| delayed set delay (in ms) | ||
| strobo frequency / duration | ||
| Setup the activated mode | ||
| DISPLAY OPTIONS SUB-OPTIONS | ||
| POWER SETTINGS auto standby | From disabled to [60min] in steps of 1 min - default 10 minutes | |
| auto-off | From disabled to [60min] in steps of 1 min - default 15 minutes | |
| pilot lamp timer | From [1 sec] to [60 sec] in steps of 1 sec - default 15 sec. | |
| recycling time eco / fast | ||
| step per push | From [0.1 f-stop] to [1.0 f-stop] - default 0.1 f-stop | |
natural_image
Exterior view of a Qadru S System 3.0 optical device with attached ring and connector (no text or symbols visible)natural_image
Exterior view of a black quadra A device with attached metallic ring and two gold pins (no text or symbols visible)| 75% -100% | |
| 50% -75% | |
| 25% - 50% | |
| 10% - 25% | |
| < 10% |
目次
| DISPLAY OPTIONS SUB-OPTIONS | ||
| PHOTOCELL off | ||
| on | ||
| Pre-flash From 1 to 10 pre-flashes | ||
| set up pre-flash | auto / manual / block time / timeframe | |
| DISPLAY | OPTIONS SUB-OPTIONS | |
| SKYPORT | off r.0 | |
| normal r.1 | ||
| speed r.2 | ||
| group | From “group 1” to “group 4” | |
| channel | From “channel 1” to channel 20” | |
| DISPLAY OPTIONS SUB-OPTIONS | ||
| AUDIO ready volume | From “off” to “max” | |
| error volume | From “off” to “max” | |
| key volume | From “off” to “max” | |
| ready tone | From “tone 1” to “tone 2” | |
| DISPLAY OPTIONS SUB-OPTIONS | ||
| FLASH MODE | flash before ready | disabled / enabled |
| default sequence | unit address / total units/ seq. timeout | |
| delayed | set delay (in ms) | |
| strobo | frequency / duration | |
| Setup the activated mode | ||

| DISPLAY | OPTIONS | SUB-OPTIONS |
| POWER SETTINGS | auto standby | From disabled to [60min] in steps of 1 min - default 10 minutes |
| auto-off | From disabled to [60min] in steps of 1 min - default 15 minutes | |
| pilot lamp timer | From [1 sec] to [60 sec] in steps of 1 sec - default 15 sec. | |
| recycling time | eco / fast | |
| step per push | From [0.1 f-stop] to [1.0 f-stop] - default 0.1 f-stop |
natural_image
Exterior view of a black Osadra S optical instrument with attached metallic ring (no text or symbols visible)natural_image
Exterior view of a black quadra A device with attached metallic ring and two gold connectors (no text or symbols visible)1 EL-Skyport synchronisation speed
2 EL-Skyport frequency channel
3 EL-Skyport group number
4 Photocell status
5 Ready beep
6 Recycling time
7 Battery level
8 Power in J
9 Pilot lamp timer
10 Flash function
11 Flash function value
12 Increase selected f-stop
13 Flash test
14 Decrease selected f-stop
15 Power of outlet A in f-stop
16 Total power in f-stop
17 Power of outlet B in f-stop
专用按钮
指示灯
1 Menu title
2 Menu selected
3 Scroll down
4 Enter
5 Scroll up
6 Back to menu (Short press)
Back to dashboard (Long press)
光电管
| DISPLAY OPTIONS SUB-OPTIONS | ||
| PHOTOCELL off | ||
| on | ||
| Pre-flash From 1 to 10 pre-flashes | ||
| set up pre-flash | auto / manual / block time / timeframe | |
| DISPLAY OPTIONS SUB-OPTIONS | ||
| SKYPORT off r.0 | ||
| normal r.1 | ||
| speed r.2 | ||
| group From “group 1” to “group 4” | ||
| channel From “channel 1” to channel 20” | ||
| DISPLAY OPTIONS SUB-OPTIONS | ||
| AUDIO ready volume | From “off” to “max” | |
| error volume From “off” to “max” | ||
| key volume From “off” to “max” | ||
| ready tone From “tone 1” to “tone 2” | ||
| DISPLAY OPTIONS SUB-OPTIONS | ||
| FLASH MODE flash before ready disabled / enabled | ||
| default sequence | unit address / total units/ seq. timeout | |
| delayed set delay (in ms) | ||
| strobo frequency / duration | ||
| Setup the activated mode | ||
| DISPLAY OPTIONS SUB-OPTIONS | ||
| POWER SETTINGS auto standby | From disabled to [60min] in steps of 1 min - default 10 minutes | |
| auto-off | From disabled to [60min] in steps of 1 min - default 15 minutes | |
| pilot lamp timer | From [1 sec] to [60 sec] in steps of 1 sec - default 15 sec. | |
| recycling time eco / fast | ||
| step per push | From [0.1 f-stop] to [1.0 f-stop] - default 0.1 f-stop | |
natural_image
Three black professional headsets with lens designs, shown from different angles (no text or symbols visible)按下止动旋钮
CN
闪光管更换
natural_image
3D rendering of a black quadra S optical instrument with attached metallic ring and probe (no text or symbols visible)Quadra Pro 灯头——N° 20121

natural_image
Exterior view of a Quadra Ultrasonic A lighting device with attached ring and probe (no text or symbols visible)Quadra Action 灯头——N° 20151
