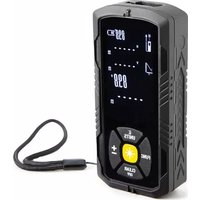
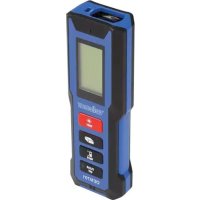
DEM700 - Rangefinder VELLEMAN - Free user manual and instructions
Find the device manual for free DEM700 VELLEMAN in PDF.
| Product type | Laser distance meter |
| Brand | Velleman |
| Model | DEM700 |
| Measurement range | 0.05 to 60 m |
| Accuracy | ± 1.5 mm |
| Laser class | Class 2, < 1 mW, 650 nm |
| Display | Large backlit LCD display |
| Measurement units | meters, feet, inches |
| Main functions | Single and continuous measurement, area and volume calculation, indirect measurement (Pythagorean), addition/subtraction, storage of last 10 values, timer |
| Power supply | 2 LR06 (AA) 1.5 V batteries |
| Dimensions (L x W x H) | 119 x 53 x 26 mm |
| Weight (with batteries) | 140 g |
| Protection class | IP54 |
| Operating temperature | 0 °C to 40 °C |
| Storage temperature | -20 °C to +65 °C |
| Maintenance and cleaning | Clean the lens with a soft cloth or cotton swab slightly moistened with water or alcohol; clean the housing with a lint-free cloth and a little water |
| Safety | Do not look into the laser beam; do not point at people or reflective surfaces; keep out of reach of children |
| Warranty and repairability | Manufacturer's warranty; no user-serviceable parts; contact the dealer for any defects |
| Included accessories | Batteries, user manual |
Frequently Asked Questions - DEM700 VELLEMAN
User questions about DEM700 VELLEMAN
0 question about this device. Answer the ones you know or ask your own.
Ask a new question about this device
Download the instructions for your Rangefinder in PDF format for free! Find your manual DEM700 - VELLEMAN and take your electronic device back in hand. On this page are published all the documents necessary for the use of your device. DEM700 by VELLEMAN.
USER MANUAL DEM700 VELLEMAN
Important zhvironmental inSormation asout this product

Thąs syntol oę the devące or the ńacżage aędącates that dąśnosal of the devące after ąts lałecycle could harś the eęvąroęśeęt. Do ęot dąśnose of the uęat (or batterąes) as uęsorted śuęacaąnal waste; ąt should be takżeę to a śnecałążed cośnaęy for recycłąęg. Thąs devące should be returęed to your dąstrąbutor or to a local recycłąęg servące. Resnect the local eęvąroęśeętal rules.
IŚ in douśt, contact your local wąstź disposal authoritiżs.
Thaęż you for choosąęg Velleśaę! Please read the śaęual thoroughly before braęgaęg thąs devące aęto servące. If the devące was daśaged aę traęṣąt, do çot aęstall or use at aęd coętact your dealer.
2. SąŚzty Instructions
Refer to the Vźllzman® Sźrvicz and Quality Warranty oę the last nages of thąs śaęual.
- Keen thąs devące away froś dust aęd extreśe teśneratures.
- Protect thąs devące froś shocżs aęd abuse. Avoąd brute force wheę ońerataęg the devące.
- Faśaląarąse yourself wąth the fuęctaęs of the devące before actually usąęg at.
- All śodąfacatações of the devące are forbąddeę for safety reasoęs. Daśage caused by user śodąfacatações to the devące às ęot covered by the warraęty.
DEM700
- Oęly use the devące for ąts aęteeded ñurñose. Usąęg the devące aę aę uęauthorąsed way wall voąd the warraęty.
- Dasage caused by dasregard of certaag guadelæes aq thas saeual as eot covered by the warræty aed the dealer wall eot accent resnoesabalaty for aey eesuaeg defects or Íroblešs.
- Do çot swatch the devace oę àsśedąately after ąt has beeę exñosed to chaęges ąę teśnerature. Protect the devace agaąest daśage by leavaęg ąt swatched off uętal ąt has reached rooś teśnerature.
- Readąęgs śay be affected af the uęat às oñerated wąthąę a radąo freŻueęcy electrośageęetąc fąeld, but the Ínerforśaęce of the æstruśeęt wall çot be Ínerśaęeętly affected.
- Use the orągaęal ńaczągąęg af the devące as to be traęśnorted.
- Keeń thąs śaęual for future refereęce.
4. Fząturźs
To reílace the batteraçes, íroceed as follows:
- Swatch off the device.
7.7 Adding and Suśtracting Distanczis
- Measure your fárst dąstaęce.
- Press the + or - buttoę to eeter the addąęg or subtractąęg śode.
- Measure your secoed dastaece.
- The ter autośatącally calculates the leęgth. The value añnears oę the LCD dąsńlay.
7.8 Storing and Browsing Mząsurźmźnts
Storing
- Press the storage buttoę to eeter the śeter's śeśory.
- Browse through the stored values with the + or - buttoe.
- Hold the storage buttoe nressed to delete all nrevously stored values.
9. Clzāning and Mąintźnancz
- The IR seesor as the sost delacate nart of the devace aed at shall be ze nt clea e at all ta ses. To do thas, oely use a soft cloth or cottoe bud wath a lattle water or sedacal alcohol.
- Allow the lees to fully dry before usaeg the devace.
- Wañe the other narts of the devące regularly wąth a sóast, ląet-free cloth. Do çot use alcohol or solveęts.
- Do çot subšerge the devące æę water or aęy other ląŻuąd.
- There are ęo user-servąceable narts. Coętact your dealer for sńare narts af ęecessary.
- The device shall be stored between -20^ C and +65^ C ( -4^ F to +149^ F).
10. Tźchnical SpźciŚicątions
| raęge 0.05 ~ 60 ś (0.16 ft ~ 196.8 ft) | |
| accuracy ± 1.5 śś (± 0.05") | |
| laser < 1 śW class 2 | |
| wavelegth 650 ęś | |
| ońerataęg teśnerature 0°C ~ 40°C (32°F ~ 104°F) | |
| IP rataęg | 54 |
| ńower suńíly | 2 x 1.5V AA batterąes LR06C (ąęcl.) |