
VTLD100 - Rangefinder VELLEMAN - Free user manual and instructions
Find the device manual for free VTLD100 VELLEMAN in PDF.


| Product type | Laser distance meter |
| Brand | Velleman |
| Model | VTLD100 |
| Measuring range | Up to 100 meters |
| Accuracy | ± 2 mm |
| Laser class | Class II (635 nm, < 1 mW) |
| Measurement units | m / ft / in |
| Display type | Backlit LCD |
| Main functions | Continuous measurement, addition, subtraction, indirect measurement (Pythagoras), area, volume |
| Memory | Last 10 values |
| Power supply | 2 AAA batteries (1.5 V) |
| Battery life | Up to 5000 measurements |
| Auto power off | Yes, after 3 minutes of inactivity |
| Dimensions | 120 × 50 × 25 mm |
| Weight | 120 g (without batteries) |
| Housing material | ABS plastic with rubber inserts |
| Operating temperature | 0 °C to 40 °C |
| Care and cleaning | Clean with a soft, dry cloth; do not use abrasive products |
| Safety | Do not look directly at the laser beam; turn off after use |
| Box contents | Distance meter, carrying case, strap, 2 AAA batteries, user manual |
| Warranty | 2 years |
| Spare parts and repairability | Batteries easily replaceable; no specific spare parts available |
Frequently Asked Questions - VTLD100 VELLEMAN
User questions about VTLD100 VELLEMAN
0 question about this device. Answer the ones you know or ask your own.
Ask a new question about this device
Download the instructions for your Rangefinder in PDF format for free! Find your manual VTLD100 - VELLEMAN and take your electronic device back in hand. On this page are published all the documents necessary for the use of your device. VTLD100 by VELLEMAN.
USER MANUAL VTLD100 VELLEMAN
HIGH-PRECISION LASER DISTANCE METER
LASER-AFSTANDSME:TER MET HOGE PRECISION
natural_image
Illustration of a battery pack with internal circuitry and mounting bracket (no text or symbols)B

flowchart
graph TD
    A["Device 1"] -->|Signal| B["Phone 1"]
    B -->|Signal| C["Phone 2"]
    C -->|Signal| D["Phone 3"]
    D -->|Signal| E["Phone 4"]
C

natural_image
Diagram showing light rays converging through a lens system with a wall, no text or symbols present
VTLD100
User manual
1. Int roduction
To all residents of the European Union
Important environmental information about this product
This symbol on the device or the package indicates that disposal of the device after its lifecycle could harm the environment. Do not dispose of the unit (or batteries) as unsorted municipal waste; it should be taken to a specialized company for recycling.
This device should be returned to your distributor or to a local recycling service. Respect the local environmental rules.
If in doubt, contact your local waste disposal authorities.
Thank you for choosing Velleman! Please read the manual thoroughly before bringing this device into service. If the device was damaged in transit, don't install or use it and contact your dealer.
The VTLD100 is a high precision laser distance meter designed for indoor use. Its functions include: adding, subtracting, calculating area, calculating volume, indirect measurements, 20 memory locations ...
2. Safety Instructions

Keep this device away from children and unauthorized users.

Use extreme caution when the laser beam is turned on.
When device is in use, do NOT look directly or indirectly
(reflectance) into the laser beam. NEVER point the laser
beam directly or via a reflecting surface towards: other people's or animals' eyes. Permanent eye damage will result.
Do not point the laser beam towards highly explosive gasses.
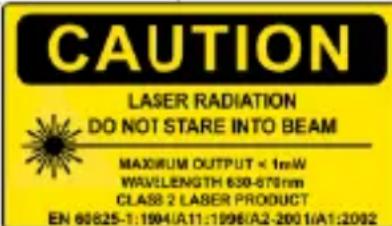
Visible laser radiation. Do not stare into the beam as eye damage may occur. This device contains a class 2 laser.
Output power does not exceed 1 mW, wavelength 630\~670nm.

Be careful when using the device while standing on a scaffold, ladder... Keep your balance at all times.
Follow all safety precautions applicable at the site where the device is used (e.g. road works, construction site ...).
VTLD100
3. General Guidelines
Refer to the Velleman® Service and Quality Warranty on the last pages of this manual.


Indoor use only. Keep this device away form rain, moisture, splashing and dripping liquids.
Keep this device away from dust and extreme temperatures.
Protect this device from shocks and abuse. Avoid brute force when operating the device.
- Familiarise yourself with the functions of the device before actually using it.
- All modifications of the device are forbidden for safety reasons. Damage caused by user modifications to the device is not covered by the warranty.
- Only use the device for its intended purpose. Using the device in an unauthorised way will void the warranty.
- Damage caused by disregard of certain guidelines in this manual is not covered by the warranty and the dealer will not accept responsibility for any ensuing defects or problems.
- Keep this manual for future reference.
4. Features
• large LCD with backlight
- choose between metric and imperial units
• calculate surface and volume
- indirect measurements using 2 or 3 measuring points
- add up and subtract functions
- last 20 measurements are retained in memory
• very large measuring range (50m) and very high precision (±1.5mm)
• automatic / manual switch-off
5. Overview
Refer to the illustrations on page 2 of this manual.
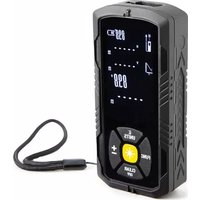
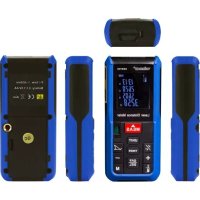
control panel
| a | ON/measuring button | f | decrease/subtract button |
| b | area/volume button | g | memory button |
| c | indirect measurement button | h | reference button |
| d | measuring mode (single/continuous) | i | backlight/unit button |
| e | increase/add button | j | clear/OFF button |
| VTLD100 | |||
| LCD | |||
| 1 | laser ON 5 single mode | ||
| 2 | reference level top 6 battery status | ||
| 3 | reference level bottom 7 memory address | ||
| 4 | measuring function 8 device error | ||
 area 9 max./min. indicationvolume 10 first value + unit 1^st indirect measurement 11 second value + unit 2^nd indirect measurement area 9 max./min. indicationvolume 10 first value + unit 1^st indirect measurement 11 second value + unit 2^nd indirect measurement | second value + unit | ||
| 12 last measurement or calculation result | |||
6. Measuring conditions
Measuring range
• The measuring range is limited to 50m.
- In dark environments or at night this range may increase.
- In very light environments or when a surface has very poor reflective properties, use a target plate.
Target surfaces
- Measuring errors will occur when pointing at colourless liquids (e.g. water) or glass, Styrofoam or similar semi-transparent surfaces.
- Aiming at very shiny objects will deflect the laser beam which will lead to errors.
- Measuring towards non-reflective dark surfaces may increase the measuring time.
- Do not aim the meter directly into the sun or other bright light source.
7. General functions
Refer to the illustrations on pages 2 and 3 of this manual.
• Make sure batteries are present inside the device. Refer to §11.
Switching ON/OFF
- Press the ON/measuring button [a] to switch the device and laser on.
- Press and hold the clear/OFF button [j] to switch the device off.
Note: the laser will automatically switch of after 30s, the device will switch off after 3 minutes of inactivity.
Clear button
- Press the clear/OFF button [j] to cancel the last action.
Reference level
- Press the reference button [h] to switch the reference level between top [2] and bottom [3] (refer to illustration B). The device produces a warning beep when the setting is changed.
[2] measuring starts at the top of the meter
[3] measurement includes length of meter (default)
VTLD100
Backlight
- Shortly press the backlight/unit button [i] to switch the backlight on or off.
Units of measurement
- Press and hold the backlight/unit button [i] to change the units between m (meter), inch (in), feet (ft) and fractional ft+in ( ^x/_16 ).
Addition/subtraction
- Press the increase/add button [e] to add the next measurement to the previous.
- Press the decrease/subtract button [f] to subtract the next measurement from the last.
Memory recall
- Press the memory button [g] to display memory content (reverse order, last stored value is shown first.
- Press the increase/add button [e] to display the next memory location, press the decrease/subtract button [f] to display the previous memory location.
- Press the clear/OFF [j] and store [g] buttons simultaneously to clear all data stored in memory.
8. Measuring
Refer to the illustrations on pages 2 and 3 of this manual.
Single direct measurement
- Press the ON/measuring button [a] to switch the laser on.
- Point the laser, hold the meter still and press the ON/measuring button [a] again. The distance is shown on the display
Continuous measurement/max. & min. measurement [C]
- In continuous mode the meter will measure the distance every 0.5s while displaying minimum and maximum measured values [9].
- The minimum measured value is shown on the first line of the display [10], the maximum value on the second line [11]. The last measured value is indicated on the bottom line [12].
- To start continuous measurement, press the measuring mode button [d] until the max./min. indications [9] are shown. Measurement starts immediately.
- Slowly move the laser beam over the surface tor determine the minimum and maximum distance towards it (see illustration C).
- To stop measuring, press the ON/measuring button [a] or clear/OFF button [j]. Note: measuring will automatically stop after 100 measurements.
VTLD100
Area measurement
- Press the area/volume button [b]. The area icon □ appears [4].
- Press the ON/measuring button [a] to measure the first side of the surface. The value appears in the first line [10].
- Press the ON/measuring button [a] again to switch on the laser and press again to measure the second side of the surface. The value appears in the second line [11].
- The resulting area is calculated and displayed on the third line [12].
Volume measurement
- Press the area/volume button [b] two times. The volume icon appears [4].
- Press the ON/measuring button [a] to measure the first side. The value appears in the first line [10].
- Press the ON/measuring button [a] again to switch on the laser and press again to measure the second side. The value appears in the second line [11].
- The area is calculated and displayed on the third line [12].
- Press the ON/measuring button [a] again to switch on the laser and press again to measure the third side. The value appears in the second line [11], the previous value moves to the first line [10].
- The volume is calculated and displayed on the third line [12].

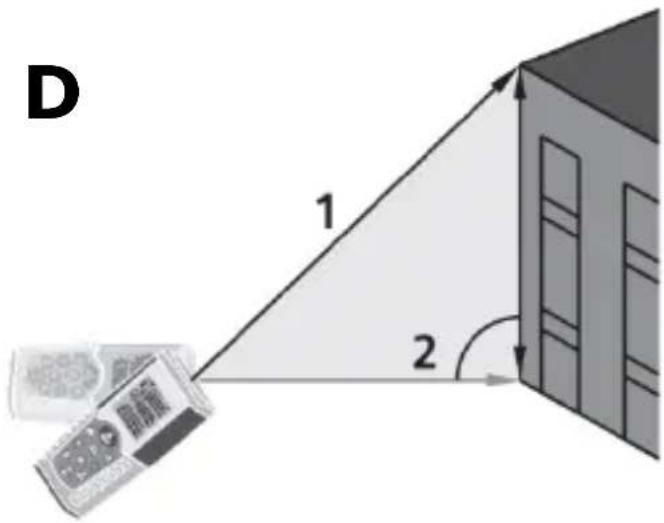
Indirect measurement - 2 measurements [D]
- Press the indirect measurement button [c]. The 1 ^st indirect measurement icon appears [4].
- Press the ON/measuring button [a] to measure the first distance (highest point, see illustration D). The value appears in the first line [10].
- Press the ON/measuring button [a] again to switch on the laser and press again to measure the second distance. The value appears in the second line [11]. Keep the reference point (top or bottom of the meter) as close as possible to the original position.
- The distance between the 2 measuring points is calculated and displayed on the third line [12].
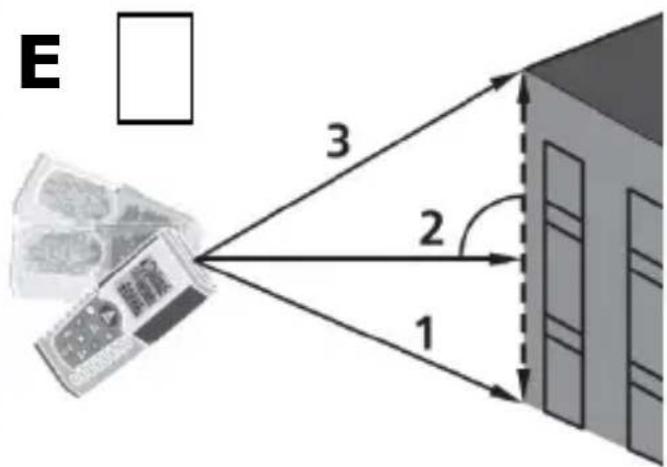
Indirect measurement - 3 measurements [E]
- Press the indirect measurement button [c] 2 times. The 2^nd indirect measurement icon appears [4].
- Press the ON/measuring button [a] to measure the first distance (bottom, see illustration E). The value appears in the first line [10].
- Press the ON/measuring button [a] again to switch on the laser and press again to measure the second distance. The value appears in the second line [11]. Keep the meter horizontally and the reference point (top or bottom of the meter) as close as possible to the original
VTLD100
position.
- Press the ON/measuring button [a] again to switch on the laser and press again to measure the third distance. The value appears in the second line [11], the previous value moves to the first line [10].
- The distance between the bottom and top measuring points is calculated and displayed on the third line [12].
9. Troubleshooting
When an error occurs, an error code is displayed on the LCD. Refer to the table below for an overview of these codes.
| Code | cause | solution |
| 204 | calculation error repeat procedure | |
| 208 | received signal too weak measurement time too long distance > 50m | use target plate split up and add measurements |
| 209 | received signal too strong (target too reflective) | use target plate |
| 252 | temperature too high let the device cool down | |
| 253 | temperature too low (gently) | heat up the device |
| 255 | hardware error Switch the device ON/OFF a couple of times, remove and re-insert the batteries.Contact your local dealer if the error remains. |
10. Maintenance
- Do not immerse the device in any liquid.
- Wipe the device regularly with a moist, lint-free cloth. Do not use alcohol or solvents.
- Keep the lens clean at all times to obtain best performance.
- Contact your dealer for spare parts if necessary.
11. Battery
- A flashing battery indicator [6] indicates that battery power is low and batteries must be replaced.
- Switch the device off [10].
- Open the battery cover at the back of the meter (see illustration A) and take out the old batteries.
- Insert two new 1.5V AAA batteries (LR03C) in accordance with the polarity markings inside the battery compartment.
- Close the battery compartment.
- If the device is not used for a longer period of time, remove the batteries to avoid leakage and risk of corrosion.
VTLD100

WARNING:
Malfunction may occur if the power is on when the battery is replaced. Dispose of batteries in accordance with local regulations. Keep batteries away from children.
12. Technical specifications
| range | 0.05~50m (0.16 ft ~164 ft) |
| accuracy | ± 1.5mm (± 0.06") up to 10m |
| laser | <1 mW class 2 |
| wavelength | 635 nm |
| operating temperature | 0°C~40°C (32°F ~ 104°F) |
| IP rating | 54 |
| power supply | 2 x 1.5V AAA batteries LR03C (incl.) |
| dimensions | 115 x 48 x 28mm |
| weight | 135g |
Use this device with original accessories only. Velle man nv cannot be held responsible in the event of damage or injury resulted from (incorrect) use of this device. For more info concerning this product, please visit our website www.velleman.eu. The information in this manual is subject to change without prior notice.
© COPYRIGHT NOTICE
This manual is copyrighted. The copyright to this manual is owned by Velleman nv. All worldwide rights reserved. No part of this manual may be copied, reproduced, translated or reduced to any electronic medium or otherwise without the prior written consent of the copyright holder.
GEBRUIKERSHANDLEIDING
1. Inl eiding
Addition/soustraction
natural_image
Symbol of a trash bin crossed with no visible text or labelsVelleman® Service and Quality Warranty
Velleman® has over 35 years of experience in the electronics world and distributes its products in more than 85 countries.
All our products fulfil strict quality requirements and legal stipulations in the EU. In order to ensure the quality, our products regularly go through an extra quality check, both by an internal quality department and by specialized external organisations. If, all precautionary measures notwithstanding, problems should occur, please make appeal to our warranty (see guarantee conditions).
General Warranty Conditions Concerning Consumer Products (for EU):
- All consumer products are subject to a 24-month warranty on production flaws and defective material as from the original date of purchase.
- Velleman® can decide to replace an article with an equivalent article, or to refund the retail value totally or partially when the complaint is valid and a free repair or replacement of the article is impossible, or if the expenses are out of proportion.
You will be delivered a replacing article or a refund at the value of 100% of the purchase price in case of a flaw occurred in the first year after the date of purchase and delivery, or a replacing article at 50% of the purchase price or a refund at the value of 50% of the retail value in case of a flaw occurred in the second year after the date of purchase and delivery.
- Not covered by warranty:
- all direct or indirect damage caused after delivery to the article (e.g. by oxidation, shocks, falls, dust, dirt, humidity...), and by the article, as well as its contents (e.g. data loss), compensation for loss of profits;
- frequently replaced consumable goods, parts or accessories such as batteries, lamps, rubber parts, drive belts... (unlimited list);
- flaws resulting from fire, water damage, lightning, accident, natural disaster, etc. ...;
- flaws caused deliberately, negligently or resulting from improper handling, negligent maintenance, abusive use or use contrary to the manufacturer's instructions;
- damage caused by a commercial, professional or collective use of the article (the warranty validity will be reduced to six (6) months when the article is used professionally);
- damage resulting from an inappropriate packing and shipping of the article;
- all damage caused by modification, repair or alteration performed by a third party without written permission by Velleman®.
- Articles to be repaired must be delivered to your Velleman® dealer, solidly packed (preferably in the original packaging), and be completed with the original receipt of purchase and a clear flaw description.
- Hint: In order to save on cost and time, please reread the manual and check if the flaw is caused by obvious causes prior to presenting the article for repair. Note that returning a non-defective article can also involve handling costs.
- Repairs occurring after warranty expiration are subject to shipping costs.
- The above conditions are without prejudice to all commercial warranties.
The above enumeration is subject to modification according to the article (see article's manual).
- VTLD100
- User manual
- Int roduction
- To all residents of the European Union
- Important environmental information about this product
- If in doubt, contact your local waste disposal authorities.
- Safety Instructions
- General Guidelines
- Features
- Overview
- Measuring conditions
- Measuring range
- Target surfaces
- General functions
- Switching ON/OFF
- Clear button
- Reference level
- Backlight
- Units of measurement
- Addition/subtraction
- Memory recall
- Measuring
- Single direct measurement
- Continuous measurement/max. & min. measurement [C]
- Area measurement
- Volume measurement
- Indirect measurement - 2 measurements [D]
- Indirect measurement - 3 measurements [E]
- Troubleshooting
- Maintenance
- Battery
- WARNING:
- Technical specifications
- © COPYRIGHT NOTICE
- GEBRUIKERSHANDLEIDING
- Inl eiding
- Addition/soustraction
- Velleman® Service and Quality Warranty
- General Warranty Conditions Concerning Consumer Products (for EU):
- - Not covered by warranty:
- The above enumeration is subject to modification according to the article (see article's manual).
Brand : VELLEMAN
Model : VTLD100
Category : Rangefinder