
TV621BT1 - Television BRANDT - Free user manual and instructions
Find the device manual for free TV621BT1 BRANDT in PDF.
| Product type | Ceramic hob |
| Brand | BRANDT |
| Model | TV621BT1 |
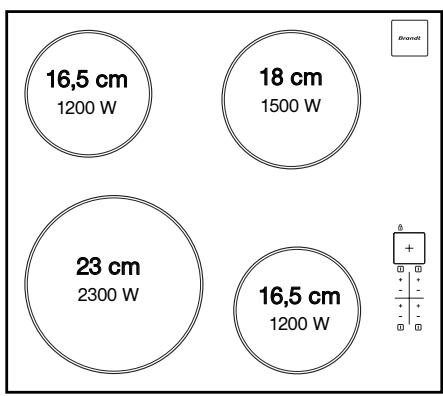
| Number of cooking zones | 4 (depending on TV621 model) |
| Dimensions of the hob (W x D) | Approximately 59 x 52 cm (standard for built-in) |
| Electrical supply | 220-240 V ~ / 400 V 2N ~ / 400 V 3~ (depending on connection) |
| Maximum total power | Up to 7.2 kW (depending on connection) |
| Main features | Radiant cooking zones, power setting 1-9, rotating timer, additional zone (depending on model) |
| Child safety | Locking of controls when turned off or during cooking |
| Auto-stop system | Automatic shut-off after 1 to 10 hours depending on power |
| Residual heat indicator | Display 'H' or indicator light |
| Surface material | Vitroceramic glass |
| Routine maintenance | Clean with sanitary sponge, special glass scraper, white vinegar or special vitroceramic cleaner |
| Environmental protection | Recyclable materials, WEEE compliance |
| Warranty | Refer to BRANDT customer service |
Frequently Asked Questions - TV621BT1 BRANDT
User questions about TV621BT1 BRANDT
0 question about this device. Answer the ones you know or ask your own.
Ask a new question about this device
Download the instructions for your Television in PDF format for free! Find your manual TV621BT1 - BRANDT and take your electronic device back in hand. On this page are published all the documents necessary for the use of your device. TV621BT1 by BRANDT.
USER MANUAL TV621BT1 BRANDT
EN GUIDE TO INSTALLATION AND USE
Chere Clients, Cher Client
EN 15
You have just acquired a BRANDT hob and we would like to thank you.
We have invested all our dedication and know-how in this appliance so that it would best meet your needs. With innovation and performance, we designed it to be always easy to use.
In the BRANDT product range, you will also find a wide choice of ovens, microwaves, ventilation hoods, cookers, dishwashers, washing machines, driers, fridges and freezers, that you can coordinate with your new BRANDT hob
Visit our website www.brandt.com where you will find all of our products, as well as useful and complementary information.
BRANDT
As part of our commitment to constantly improving our products, we reserve the right to make changes to them based on technical advances to their technical and functional features and appearance.

Warning
Before installing and using your appliance, please carefully read this Guide to Installation and Use, which will allow you to quickly familiarise yourself with its operation.
www.brandt.com
EN CONTENTS
- Safety instructions 17
Care of the environment 17
Description of your appliance 18
1 / INSTALLING YOUR APPLIANCE
Choice of location 19
Build-in 19
- Connection 20
2 / USING YOUR APPLIANCE
Description of the top 21
Cookware for vitroceramics 22
Description of control panel 23
- Switching on 23
- Adjusting the power level 23
- Switching off the hob 23
Additional cooking zone 23
- Setting the timer 23
- Using the child safety system 23
- Hob operating safety 24
3 / MAINTAINING YOUR APPLIANCE
Caring for your appliance 25
- Maintaining your appliance 25
4 / SPECIAL MESSAGES, DIFFICULTIES
- When using for the first time 26
- When switching on 26
- Whilst using 26
5/COOKING CHART 27
SAFETY INSTRUCTIONS
EN
SAFETYINSTRUCTIONS
We have designed this cooking hob for use by private individuals in their homes.
These cooking hobs are intended exclusively for cooking beverages and foodstuffs and do not contain any asbestos-based materials.
Residual heat
While an operating cooking zone is very hot, a lamp or "H" (depending on the models) for this zone, is lit in the indicator.
When a cooking zone is in a stop position and its temperature is high this display remains lit.
After a prolonged power cut another indicator light may appear; it will go out after any key is pressed. However, the temperature of the radiant cooking zones may remain high.

Warning
Do not touch these zones, burn risk.
Do not look for a long time at the halogen lamps in the cooking zones.
- Child safety feature
Your hob has a child safety feature which locks it when stopped or during cooking (see section: using the child safety feature).
Do not forget to unlock before using again.

Electrical danger
Ensure that the power cable of a connected electrical appliance near the hob is not in contact with the cooking zones.
If a crack appears in the surface of the glass, disconnect your appliance immediately to prevent a risk of electric shock.
To do this, remove the fuses or use the circuit breaker.
Do not use your hob until you have replaced the glass worktop.
CARE OF THE ENVIRONMENT
- This appliance's packing materials are recyclable. Recycle them and play a role in protecting the environment by depositing them in municipal containers provided for this purpose.
- Your appliance also contains many recyclable materials. It is therefore marked with this logo to indicate that used appliances must not be mixed with other waste. Recycling of the appliances organised by your manufacturer will thus
be undertaken in optimum conditions, in accordance with European directive 2002/96/CE relating to electrical and electronic equipment waste. Consult your city hall or your retailer to find the drop-off points for used appliances that is nearest to your home.
- We thank you for your help in protecting the environment.
EN
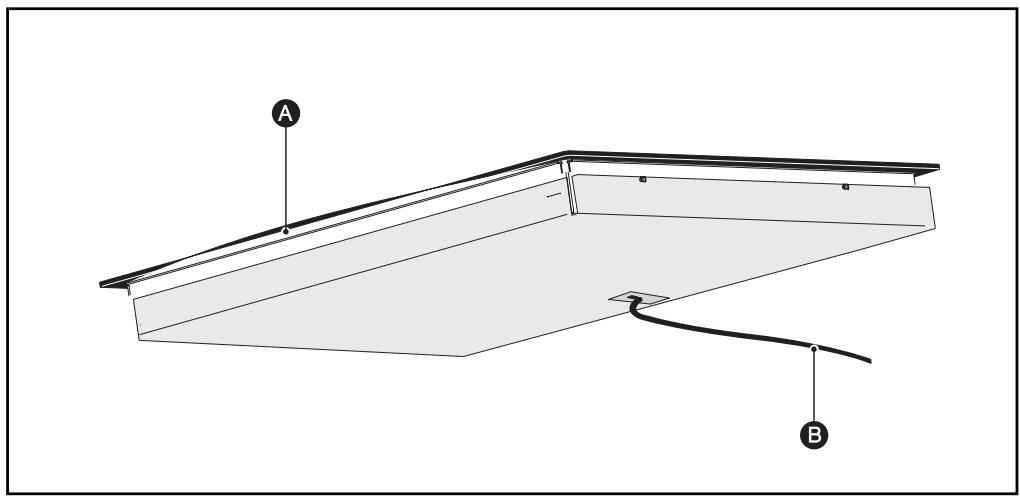
- DESCRIPTION OF YOUR APPLIANCE

A Vitroceramic glass
B Power cord
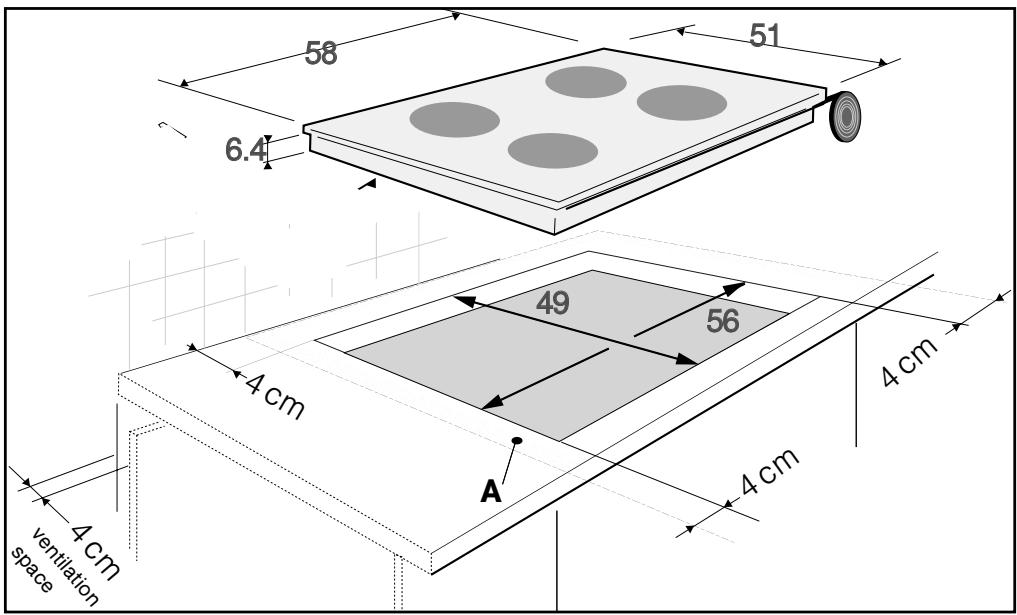
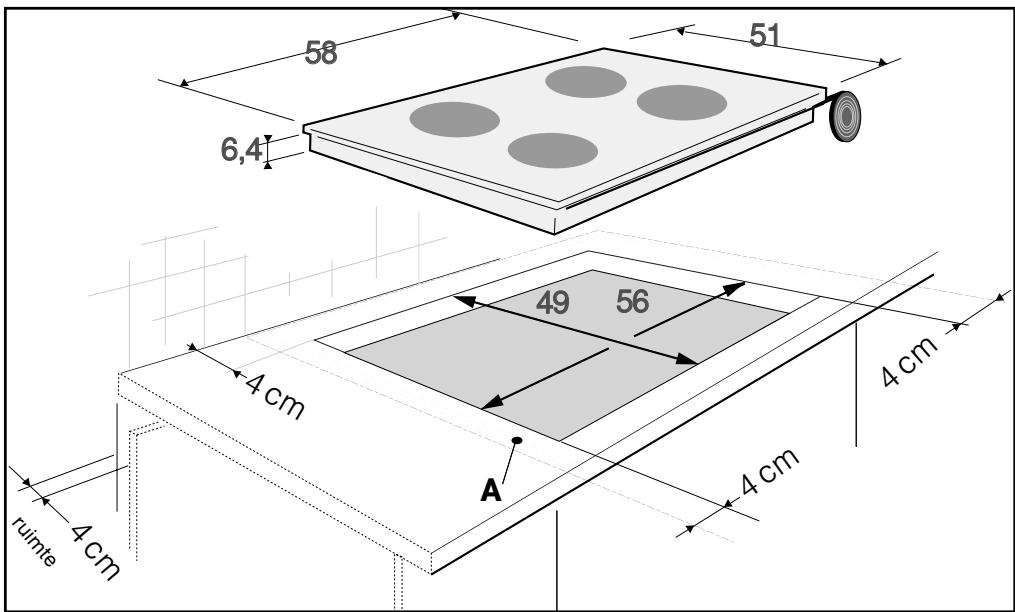
Your appliance should be positioned so that the mains switch is accessible.
The distance between the edge of your appliance and the side and rear walls (or partitions) must be at least four centimetres (area A).
The hob may be inserted directly in the worktop above the oven in the upper position. (minimum distance 10mm
BUILD-IN
Follow the diagram above.
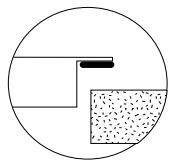
A joint provides the seal with the worktop.
- This joint is glued under your hob; insert the hob directly in the cut-out.
- This joint is supplied in the envelope; glue it under the hob.
EN
1 / INSTALLING YOUR APPLIANCE
- CONNECTION
These hobs must be connected to the mains using a socket in compliance with publication CEI 60083 or an all-pole circuit-breaker device in compliance with the installation rules in force.
When power is first supplied to your hob, or after an extended power cut, an indicator light will appear on the control panel. Wait for approximately 30 seconds until this information disappears before using your hob (This display is normal and it is intended, if applicable, for your after-sales service. In all cases, the user of the hob should disregard it).
- Connection of 400V 2N ~ - 16A
Separate the 2 phase wires (L1 and L2) before connection.
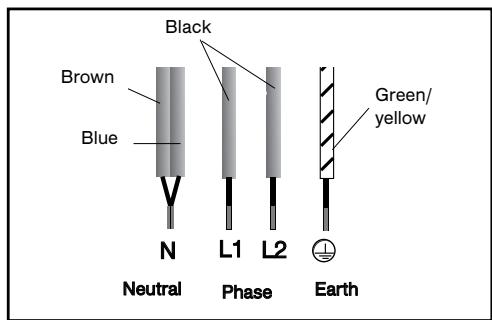
For a 400 V 2N triphase connection, if your hob malfunctions, check that the neutral conductor is properly connected.

Warning
If the cable is damaged it must be replaced by the manufacturer, its after-sales service or a person with a similar qualification to prevent danger.
- Connection of 220-240V ~

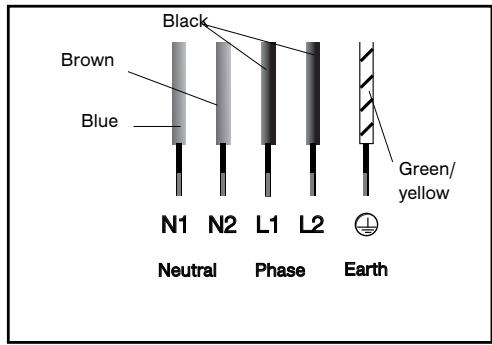
- Connection of 2x230V 2L+2N ~ - 16A Separate the wires before connection.
- Connection of 400V 3~ - 16A
2 / USING YOUR APPLIANCE
EN
DESCRIPTION OF THE TOP
TV 620
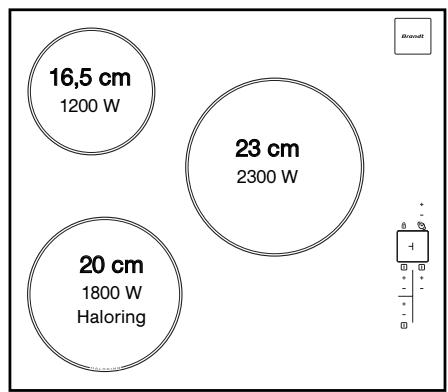
TV 621
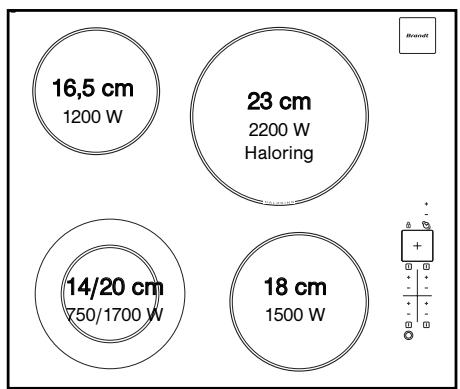
TV 623
EN 2 / USING YOUR APPLIANCE
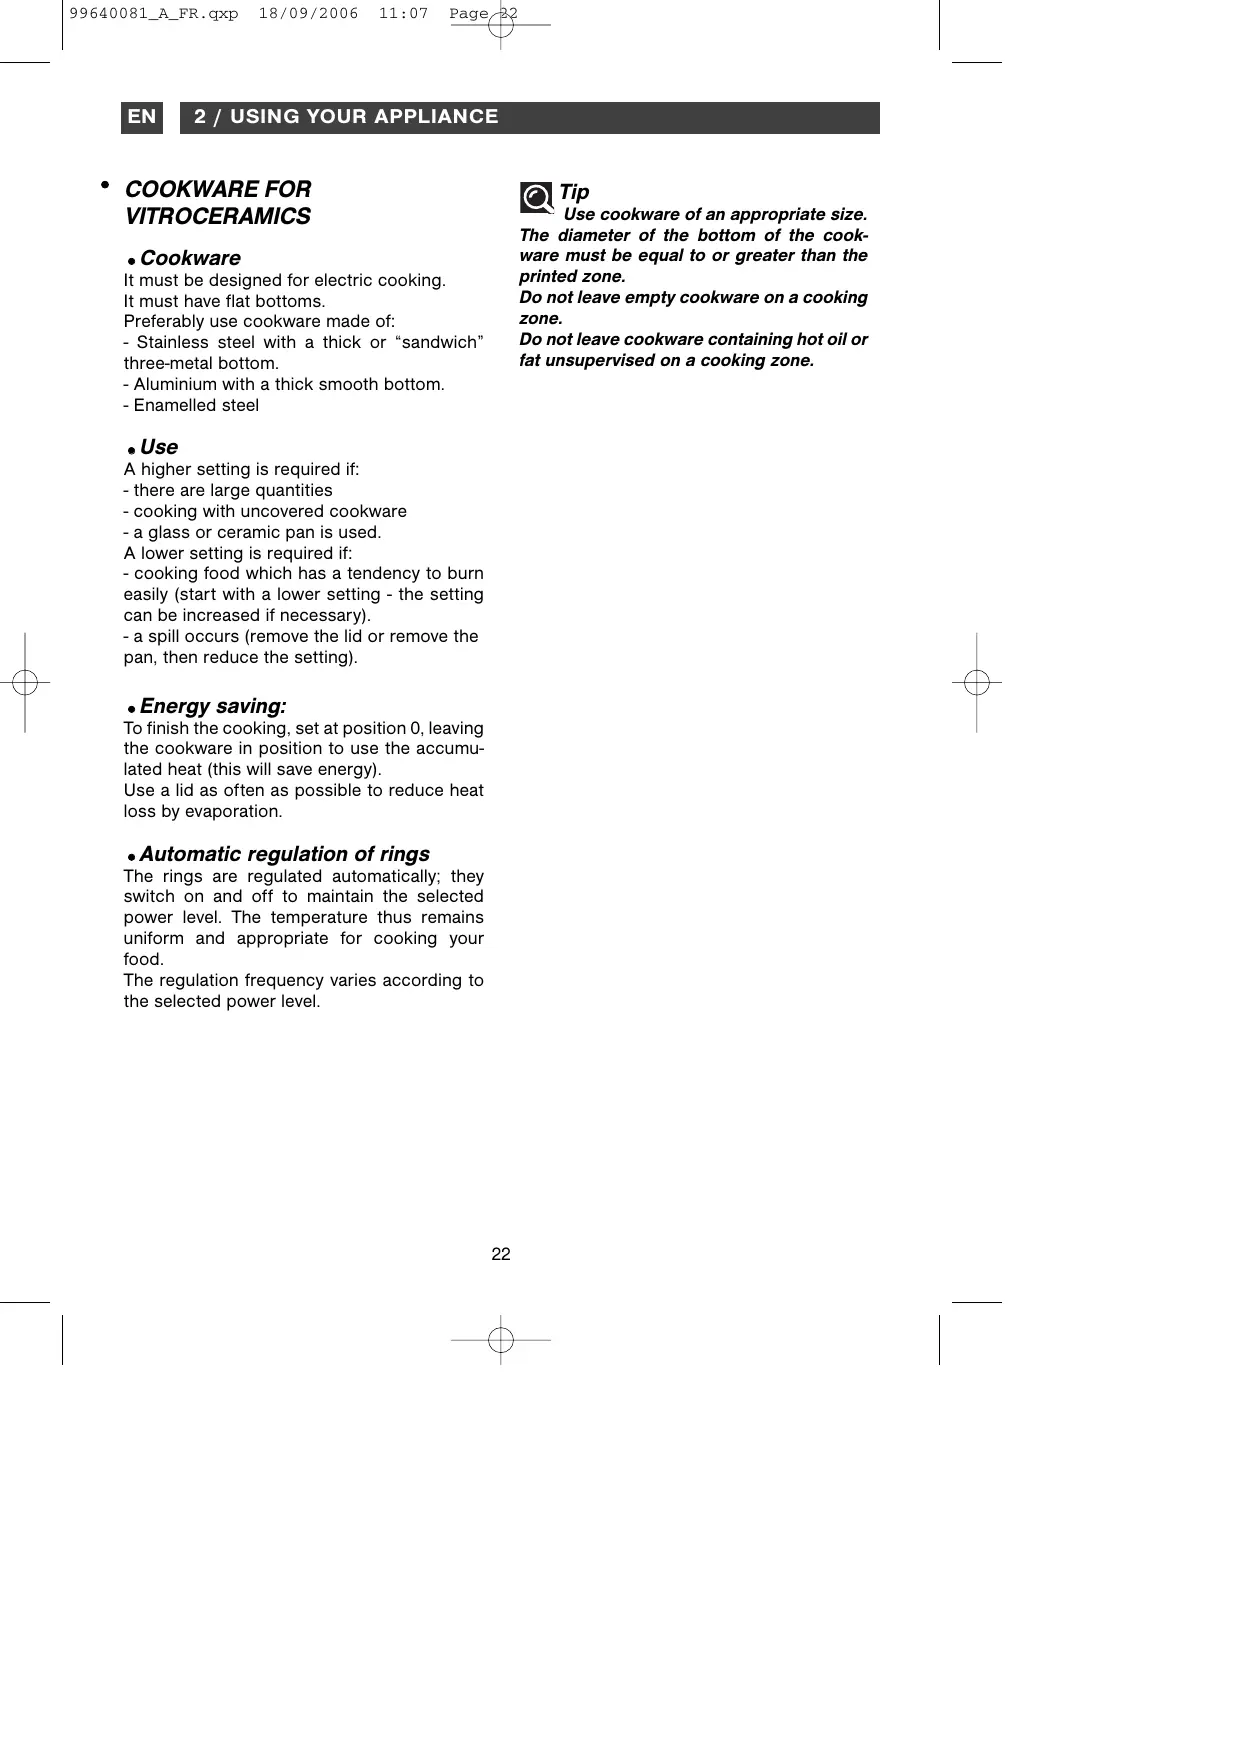
COOKWARE FOR VITROCERAMICS
Cookware
It must be designed for electric cooking.
It must have flat bottoms.
Preferably use cookware made of:
- Stainless steel with a thick or "sandwich" three-metal bottom.
- Aluminium with a thick smooth bottom.
- Enamelled steel
Use
A higher setting is required if:
- there are large quantities
- cooking with uncovered cookware
- a glass or ceramic pan is used.
A lower setting is required if:
- cooking food which has a tendency to burn easily (start with a lower setting - the setting can be increased if necessary).
- a spill occurs (remove the lid or remove the pan, then reduce the setting).
- Energy saving:
To finish the cooking, set at position 0, leaving the cookware in position to use the accumulated heat (this will save energy).
Use a lid as often as possible to reduce heat loss by evaporation.
Automatic regulation of rings
The rings are regulated automatically; they switch on and off to maintain the selected power level. The temperature thus remains uniform and appropriate for cooking your food.
The regulation frequency varies according to the selected power level.

Tip
Use cookware of an appropriate size.
The diameter of the bottom of the cookware must be equal to or greater than the printed zone.
Do not leave empty cookware on a cooking zone.
Do not leave cookware containing hot oil or fat unsupervised on a cooking zone.
2 / USING YOUR APPLIANCE
EN
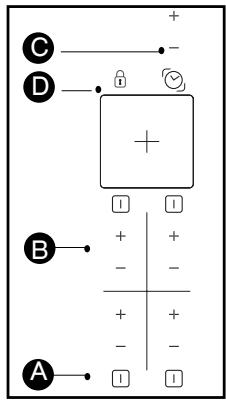
DESCRIPTION OF CONTROL PANEL
touch controls.

Start/stop

Power-+

Timer- +

Locking
- POWERING ON
Press the start/stop button for the cooking zone you want to use. A flashing 0 and a bip indicate that the cooking zone is on. You can then choose the desired power level. If you do not select a power level, the cooking zone will automatically turn itself off.
- Press keys - + of the cooking zone you wish to use to adjust the power level. Do the same operation for the other cooking zones.
STOP
Press on the start/stop button of the zone being used or on the “-” power button until the display disappears.
- ADDITIONAL ZONE
Depending on the model
The additional cooking zone can be used only when the main heating zone is in operation. To switch it on:
When switching on:
-
Setting the power level.
-
Press the touch control , a beep will confirm your action, alternatively the power setting and an "E" will be displayed, adjust the power if necessary.
To switch it off:
- Press the touch control , a beep will confirm your action.
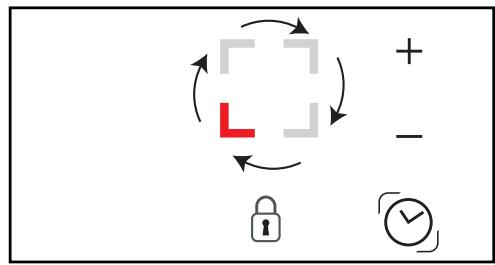
ADJUSTING THE TIMER
There is a timer for each cooking zone.
Use the button to select the cooking zone on which you would like to use the timer.
If you press this button several times, a rotating symbol will show which cooking zone the timer is being used for.
The rotating symbol and timer can only be modified for a zone if it is turned on.
To use the timer:
-
turn on the cooking zone
-
select the rotating symbol for this cooking zone.
The timer only operates if there is something on the cooking zone.
- adjust the timing by pressing "+" on the timer (or "-" adjusting from 99,98,97,...min).
When you have finished cooking, the cooking zone turns itself off, the timer shows 0 and a bip sounds. Press any button to stop the bip.
-
To change the timer settings, press the - or + buttons on the timer.
-
To stop the timer, press the button.
-
To use the timer on a different cooking zone, choose a new use by pressing the button several times.
When the previous timing stops, set your timing for the new cooking zone using the "+" or "-" buttons.
EN 2/USING YOUR APPLIANCE
- USING THE "CHILD SAFETY" FEATURE
Your cooking hob has a child safety feature which locks controls which are not in use (for cleaning, for example) or during cooking (to keep your settings).
For safety reasons, only the "stop" key is always active and and allows the heating zone to be switched off even if locked.

How do you lock it?
Keep the locking key held down until the LED above it lights up and a beep confirms your operation.
Hob locked in operation
The display of the cooking zones in operation indicates, in alternation, the power and the locking symbol.
When you press the power or timer keys of the zones in operation, the LED of the lock lights up; it will go out after a few seconds,
Only the "stop" key is always active
In the cooking zones which are not in operation, the symbol and the LED light up when you press the "on/off" keys.
This display disappears after a few seconds,
The hob is locked at stop
The LED above the lock key is unlit. Pressing this LED for a short time causes the LED to light up.
The LED is displayed when you press an on/off key in any zone.
- How do you unlock it?
Press the lock key until the LED goes out and a double beep confirms your operation.
Tip
Remember to unlock your hob before reusing it (see section "using child safety" feature).
HOB OPERATING SAFETY FUNCTIONS
- Auto-Stop system
If you forget to turn off a cooking zone your cooking hob has a safety function "Auto-Stop system" which automatically turns off the forgotten cooking zone after a predefined time (between 1 and 10 hours, depending on the power used).
If this safety function is activated, the disconnection of the cooking zone is signalled by the display "AS" or "A" in the control zone and a beep is emitted for approximately 2 minutes. Simply press any key of the controls to stop it. A double beep will confirm your action.
3 / MAINTAINING YOUR APPLIANCE
EN
CARING FOR YOUR APPLIANCE
Avoid hard shocks from cookware:
The vitroceramic glass surface is highly resistant, but not unbreakable.
Do not place any hot lids flat on your cooking hob. A "sucker" effect might damage the vitroceramic top.
Avoid rubbing cookware: in the long term this might cause damage to the decoration of the vitroceramic top.
Do not place cookware on your frame or trimmings (depending on model).
Avoid using cookware with rough or bumpy bottoms: they can capture and transfer particles that may produce stains or scratches on your hob.
These faults, which do not prevent operation or unsuitability for use, are not covered by the guarantee.
Do not store cleaning products or flammable products in the cabinet underneath your cooking hob.
Do not reheat an unopened tin: it might explode.
Of course, this precaution applies to all types of cooking.
For cooking, never use aluminium foil. Never place items wrapped in aluminium foil or packaged in aluminium dishes on your cooking hob.
The aluminium will melt and permanently damage your cooking appliance.
Objects not intended for cooking should never be placed on the hob (risk of powering on, scratches, etc.).
Steam cleaning should never be used. The steam jet could damage your hob.
MAINTAINING YOUR APPLIANCE
| TYPE OF STAINS/SPOTS | USE | WHAT TO DO | |
| Light. | Cleaning sponges | Thoroughly moisten the zone to be cleaned with hot water, then wipe off. | |
| Accumulation of baked-on stains/dirt. Sugar spills, melted plastics. | Cleaning sponges Scraper for glass. | Thoroughly moisten the zone to be cleaned with hot water. Use a scraper for glass to remove the large bits, follow with the rough side of a disinfectant sponge, and then wipe off. | |
| Rings and hard water residue. | White vinegar. | Apply warm white vinegar to the stain, let stand, then wipe with a soft cloth. | |
| Shiny metal colourings. Weekly maintenance. | Special vitroceramic glass product. | Apply a cleaning agent for vitroceramic glass (preferable one with silicone for its protective properties) to the surface. | |
| cream | special cleaning sponge for delicate crockery | powder | abrasive sponge |
EN 4/SPECIAL MESSAGES,INCIDENTS
- On first use
| YOU OBSERVE THAT: | POSSIBLE CAUSES: | WHAT YOU SHOULD DO: |
| A special lamp appears. | Working normally. | Nothing. |
| Your installation blows a fuse. | The electrical connection of your hob is incorrect. | Check that it is compliant. See section on electrical connection. |
| Only one side works. |
- On switching on
| YOU OBSERVE THAT: | POSSIBLE CAUSES: | WHAT YOU SHOULD DO: |
| The hob does not operate and the indicator lights on the control panel do not light up. | The machine is not connected to the power source. The power source or connection is defective. | Inspect the electrical circuit breaker and fuses. |
| the hob does not function, the information is displayed. | The hob is locked | See section on using the child safety system |
- Whilst in use
| YOU OBSERVE THAT: | POSSIBLE CAUSES: | WHAT YOU SHOULD DO: |
| The hob has stopped operating and is beeping every 10 seconds approximately and a • or F7 is displayed. | There was an overflow or an object is in contact with the control panel. | Clean the hob or remove the object, then begin cooking again. |
| A series of small • or F7 is displayed. | The electronic circuits have heated. | See “Build-in” section. |

Warning
In the event of breakage, crack or fissure, even minimal, of the vitroceramic glass, immediately disconnect your appliance to prevent a risk of electric shock.
Contact the After-Sales Service Department.
5 / COOKING CHART
EN
VITROCERAMIC
| FRYBRING TOA BOIL | COOK/BROWNRETURN TO BOILINGBOILING LIGHT BROTHS | COOK/SIMMER | KEEPWARM | ||
| 9 8 | 7 6 | 5 4 3 | 2 1 | ||
| SOUPS | BROTHS | ● | |||
| THICK SOUPS | |||||
| FISH | COURT BOUILON | ● | |||
| FROZEN FOODS | ● | ||||
| SAUCE | THICK, FLOUR-BASED | ||||
| BUTTER-BASED WITH EGGS(BEARNAISE, HOLLANDAISE)PREPARED SAUCES | ● | ||||
| 9 8 | 7 6 | 5 4 3 | 2 1 | ||
| VEGETABLES | ENDIVES, SPINACH | ● | |||
| DRIED BEANS | ● | ||||
| BOILED POTATOES | ● | ||||
| GOLDEN BROWN POTATOES | ● | ||||
| SAUTEED POTATOES | ● | ||||
| DEFROSTING VEGETABLES | ● | ||||
| MEAT | MEAT, NOT TOO THICK | ● | |||
| STEAKS, IN SKILLET | ● | ||||
| GRILLED MEATS (CAST IRON GRILL) | ● | ||||
| FRYING | FROZEN FRENCH FRIES | ● | |||
| FRESH FRENCH FRIES | ● | ||||
| 9 8 | 7 6 | 5 4 3 | 2 1 | ||
| MISCELLA-NEOUS | PRESSURE COOKER(ONCE IT STARTS WHISTLING) | ● | |||
| COMPOTES | |||||
| CRÈPES | ● | ||||
| CRÈME ANGLAISE | ● | ||||
| MELTED CHOCOLATE | |||||
| JAMS | ● | ||||
| MILK | ● | ||||
| EGGS, FRIED | ● | ||||
| PASTA | ● | ||||
| JARS OF BABY FOOD(DOUBLE BOILER) | ● | ||||
| MEAT STEW | ● | ||||
| SPANISH RICE | ● | ||||
| RICE PUDDING | |||||
PT
Brandt
1 / INSTALLATIE VAN HET APPARAAT
BESCHRIJVING VAN HET APPARAAT
A Glaskeramischeplaat
B Voedingskabel
NL 1 / INSTALLATIE VAN HET APPARAAT
KEUZE VAN DE PLAATS
- EN 15
- Warning
- EN CONTENTS
- / INSTALLING YOUR APPLIANCE
- / USING YOUR APPLIANCE
- / MAINTAINING YOUR APPLIANCE
- / SPECIAL MESSAGES, DIFFICULTIES
- SAFETY INSTRUCTIONS
- SAFETYINSTRUCTIONS
- Residual heat
- - Child safety feature
- Electrical danger
- CARE OF THE ENVIRONMENT
- EN
- - DESCRIPTION OF YOUR APPLIANCE
- BUILD-IN
- - CONNECTION
- DESCRIPTION OF THE TOP
- EN 2 / USING YOUR APPLIANCE
- COOKWARE FOR VITROCERAMICS
- Cookware
- Use
- - Energy saving:
- Automatic regulation of rings
- Tip
- DESCRIPTION OF CONTROL PANEL
- - POWERING ON
- STOP
- - ADDITIONAL ZONE
- EN 2/USING YOUR APPLIANCE
- - USING THE "CHILD SAFETY" FEATURE
- How do you lock it?
- Hob locked in operation
- The hob is locked at stop
- - How do you unlock it?
- HOB OPERATING SAFETY FUNCTIONS
- - Auto-Stop system
- CARING FOR YOUR APPLIANCE
- MAINTAINING YOUR APPLIANCE
- EN 4/SPECIAL MESSAGES,INCIDENTS
- / COOKING CHART
- PT
- Brandt
- / INSTALLATIE VAN HET APPARAAT
- BESCHRIJVING VAN HET APPARAAT
- NL 1 / INSTALLATIE VAN HET APPARAAT
- KEUZE VAN DE PLAATS
Brand : BRANDT
Model : TV621BT1
Category : Television