TI212BT1 - Hob BRANDT - Free user manual and instructions
Find the device manual for free TI212BT1 BRANDT in PDF.

User questions about TI212BT1 BRANDT
0 question about this device. Answer the ones you know or ask your own.
Ask a new question about this device
Download the instructions for your Hob in PDF format for free! Find your manual TI212BT1 - BRANDT and take your electronic device back in hand. On this page are published all the documents necessary for the use of your device. TI212BT1 by BRANDT.
USER MANUAL TI212BT1 BRANDT
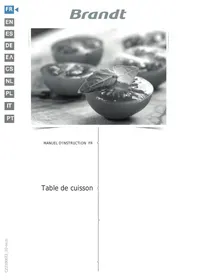
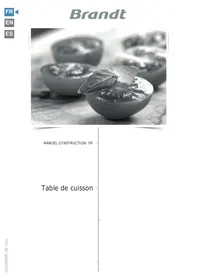
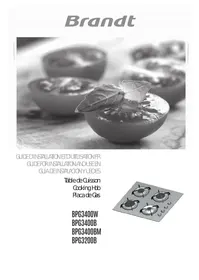
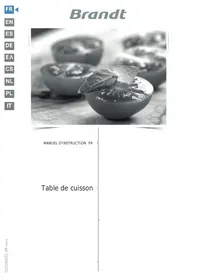
Induction hob operating and installation guide
NO
chemical
Diagram of electron configuration with positive and negative charges, showing electron delocalization and bonding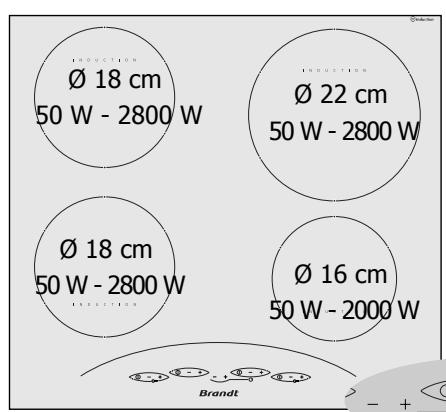
TI 212
TI 280
Using your hob in complete safety....15
Containers....17
Installing your hob in complete safety....18
Using your hob in all simplicity....20
Preserving and maintaining your hob....22
Cooking 24
In this Manual,

displays safety instructions

displays tips and hints
Dear Customer,
Thank you for purchasing a Brandt hob.
Our research teams have designed for you a new generation of appliances for pleasurable cooking every day.
With pure lines and a modern design, your new fits perfectly into your kitchen and is a perfect combination of easiness of use and cooking performance.
You will also find in the Brandt range a wide selection of ovens, extractor hoods, dishwashers and refrigerators that you can coordinate with your new Brandt hob.
Of course, constantly concerned with better satisfying your requirements, our consumer department can answer all your questions and welcomes all your suggestions (details at the end of this booklet).
At the cutting edge of innovation, Brandt contributes to the quality of daily life by giving you constantly improving products that are simple to use, respect the environment and are well-designed and reliable
BRANDT.
Using your hob in complete safety
We have designed this hob for private use in homes.
With a view to constantly improving our products, we reserve the right to make any changes to their technical, program or aesthetic features connected with their technical evolution.
These hobs are exclusively designed for cooking drinks and foodstuffs and contain no asbestos based components.
We suggest that you should periodically check that there are no objects (glass, paper, etc.) that could obstruct the air inlet under your induction hob (See fitting)
HOB safety
- A sensor continuously monitors the temperature of the components of your hob. The power output by the hob will automatically be reduced if this temperature becomes excessive.
- You only have to remove the recipient from the hob to stop power instantaneously. Push the "Off" touch control to turn off the heating zone completely.
SAUCEPAN safety
Each unit is equipped with a sensor that continuously
monitors the temperature of the bottom of the pan, so that overheating is impossible (empty saucepan, etc.).
METALLIC OBJECT safety
A small object such as a fork, spoon or a ring placed on your induction hob by itself is not detected as a pan. The display flashes and there is no output power.
Residual heat indicator
After intensive use, the cooking zone may remain hot for several minutes.
The letter "H" is displayed during this period. Do not touch the zones concerned
Automatic-Stop
Automatic stop is a safety function for your hob. It starts up automatically if ever you forget to turn off your cooking.
| Power consumed | The heating zone goes out automatically after |
| Between 1....4 | 8 hours |
| Between 5....7 | 2 hours |
| Between 8....Max | 1 hour |
The letter A is displayed for the heating zone concerned and the hob will bleep for about 2 minutes. The A will continue to be displayed until any control of the zone in question is touched. The hob will then bleep twice to confirm your action.

If your hob is placed above your oven (see "Choice of Installation") thermal protectors prevent it being used when the oven is being pyro-cleaned.
Your induction hob in complete safety
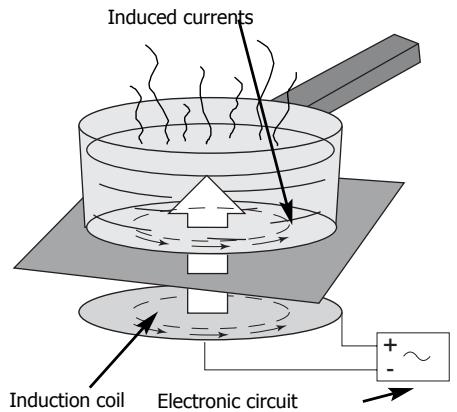
The principles of induction
When your induction hob is switched on and a heating power has been selected, the electronic circuits produce induced currents that instantaneously heat the bottom of the pan that transfers this heat to the food.
Thus cooking takes place with practically no energy loss between the induction hob and the food.
For the attention of wearers of pacemakers or other active implants:
The hob complies with all current standards on electromagnetic interference.
Your induction hob is therefore perfectly in keeping with legal requirements (89/336/CEE directives). It is designed not to create interference on any other electrical apparatus being used on condition that the apparatus in question also complies with this legislation.
Your induction hob generates short-range magnetic fields.
To avoid any interference between your induction hob and a pacemaker, the latter must be designed to comply with relevant regulations.
In this respect, we can only guarantee our own product conformity. Please consult the pacemaker manufacturer or your doctor concerning its conformity or any possible incompatibility.
If a crack appears in the glass surface, disconnect the appliance immediately to avoid any risk of electric shock. For disconnecting, remove the fuses or use the cutout switch.
Do not to use your hand with the glass surface has been changed.
Your hob must never be used as a storage space for any products whatsoever. When cooking never use aluminium foil and never place products wrapped in aluminium foil or products deep-frozen in aluminium packs on the hob. The aluminium will melt and damage your appliance irreparably.
containers
You probably already have some suitable pans.
Your induction hob is able to recognize most types of recipients.
Recipient test: Place your recipient on a ring, for example at
position 4; you know that your recipient is compatible if the display does not flash, but if it does flash then you cannot use this recipient for induction cooking. You can also test it with a magnet: if the magnet "sticks" to the recipient, then you can use it for induction cooking.
Recipients compatible with induction are:
- recipients made of enamel coated steel with or without a non-stick coating.
- cast iron recipients with or without enamel coated base.
An enamelled coated base will prevent the glass top of your hob from getting scratched.
- stainless steel recipients designed for induction cooking.
Most stainless steel recipients (saucepans, stewpans, frying recipients, deep frying recipients, etc.) are suitable for induction
cooking if they pass the recipient test.
- aluminium pans with special base. recipients which do not have a flat base may be suitable, however they must not be deformed too badly.
Choose a recipient marked with the

logo on its base or packaging to be sure that it is perfectly suitable for use on your induction hob under normal conditions of use.
A list of utensils is supplied with these instructions to help you make your choice.
- Note
Glass, ceramic, earthenware recipients, aluminium pans (without a special base) and copper recipients, and some non-magnetic stainless steel recipients are incompatible with induction cooking. You will be informed by the flashing display.
You should choose recipients with a thick flat base for uniform cooking (heat is better distributed).
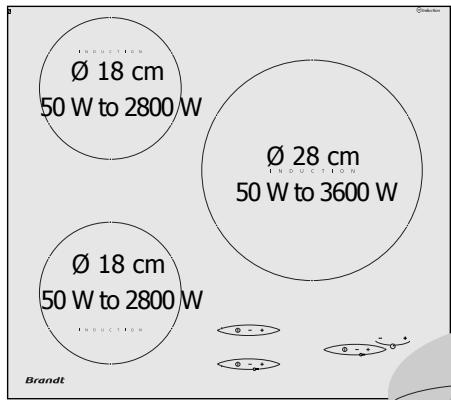
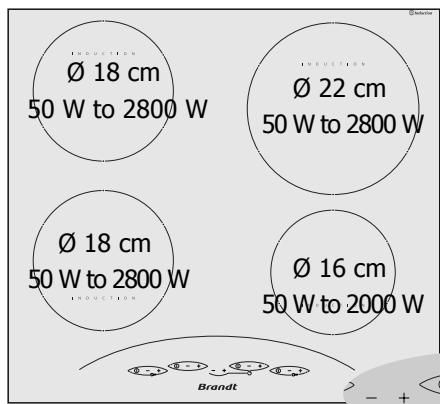
Using the cooking zones according to the recipient (depending on the model)
Multi recipients
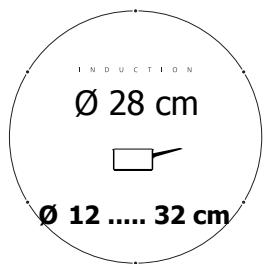
This 28 cm cooking zone:
- Automatically adapts to the recipient.
- Delivers optimal power.
- Provides excellent heat distribution.
- Supplies an even cooking temperature and consequently you can prepare wide pancakes, large fish etc..., or large quantities of small pieces, they will all be cooked in the same way.
Multi-service zone
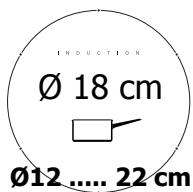
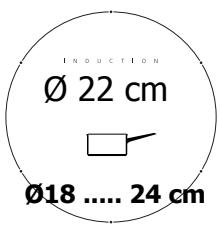
For small pans
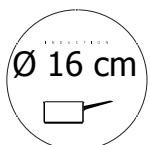
∅10 ..... 18 cm
Slow cooking (sauces, creams...).
Preparing small quantities or individual portions...
Installing your hob in complete safety
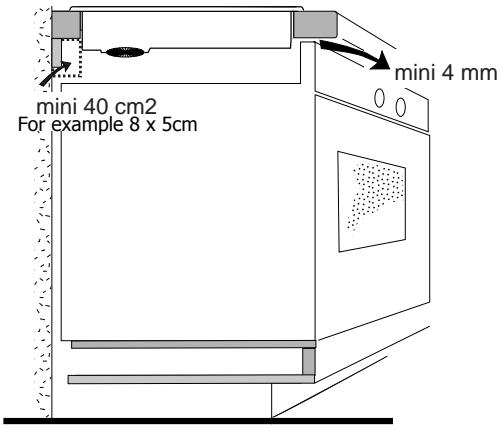
Above a cupboard or drawer unit
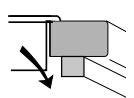
Ensure that the unit crossbar does not block the air passage, make a bevel if necessary.
When several heating zones are used simultaneously over long periods of time, or in hot climatic conditions, we recommend that openings be made in the side of the unit near the air escape to allow the hot air to be evacuated more easily.
Above an oven of the same make
Oven in the HIGH or LOW position
Above an oven of a different make
Oven in the LOW position
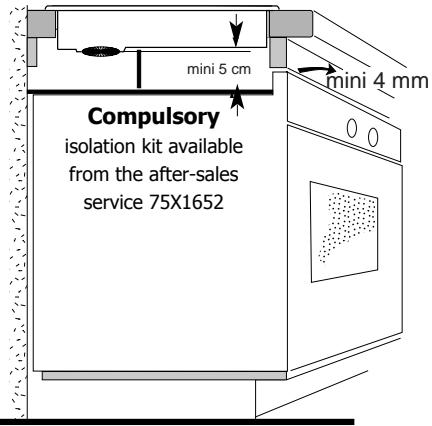
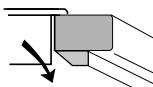
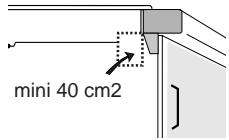
Your induction hob must always be adequately ventilated.
Make sure that the air inlet through the fan grid at the back is not obstructed.
If these recommendations are not adhered to, the hob may overheat, switch into the "safety" position and stop temporarily (F7 or a series of small lines can be seen on the display)
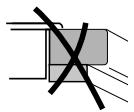
The hob must not be fitted above a washing machine, a refrigerator or a deep-freeze.
Installing your hob in complete safety
Fitting
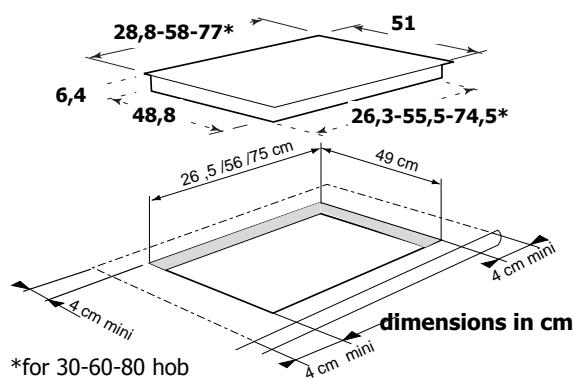
A seal exists for preventing any humidity getting under the hob. -Stick the seal under the rim of the hob and lower the hob into position on the worktop.
-This seal is supplied in the sachet; stick it in place beneath the hob.
Fix the clips into position (supplied in the sachet).
The unit must be installed so that the mains plug is easily accessible.
Connection
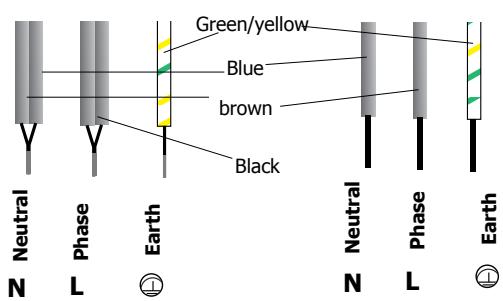
These hobs are delivered with type H 05 VVF power cable (1.5mm ^2 ) with 3/5 conductors (including a green/yellow earth wire), which must be connected to the power supply via a plug that complies with publication CEI 83 or an all-pole cut-out unit with contacts that open by at least 3mm.
If the cable is damaged, it must be replaced by the manufacturers, their After Sales Service or another similarly qualified person for avoiding any possible risk of accident.
When the power is switched on, or after a long power failure, a light code appears on the control panel. This disappears automatically after
about 30 seconds or as soon as any touch control is touched on the panel. This is normal, as the display is for use by the after-sales service when required. The user must not take this into account under any circumstances. If the unit has a 3 phase 400 V2N connection, and is not working correctly, check that the neutral wire is correctly connected. This precaution should also be taken for all your other electronic apparatus.
- 230 V monophase fuse 32/16 Amp
- 400 V 2N three-phase fuse : 16 Amp
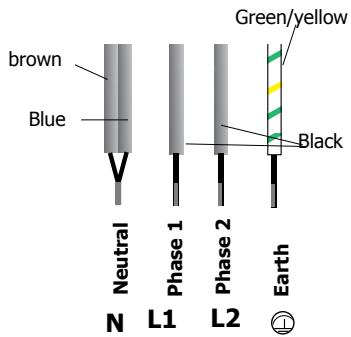
Separate the 2 phase wires L1 and L2 before connecting
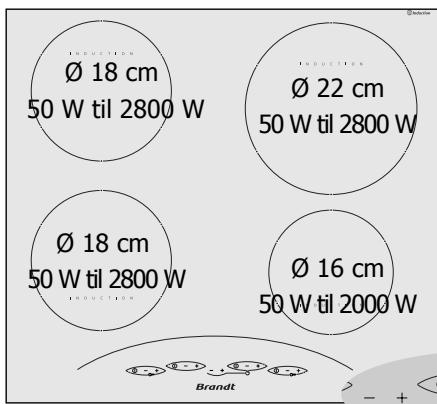
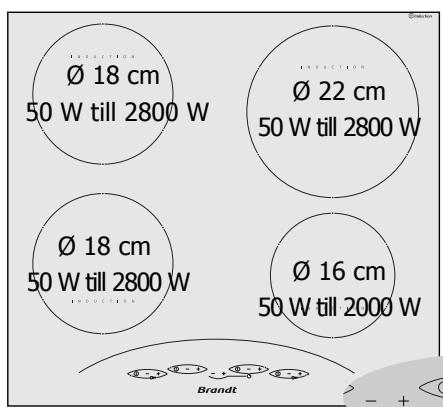
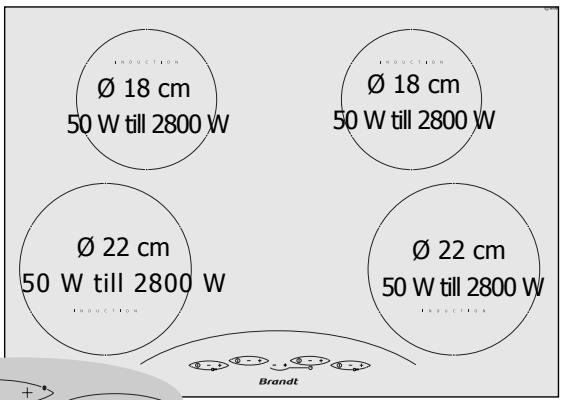
What your hob looks like?
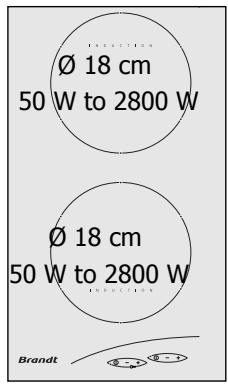
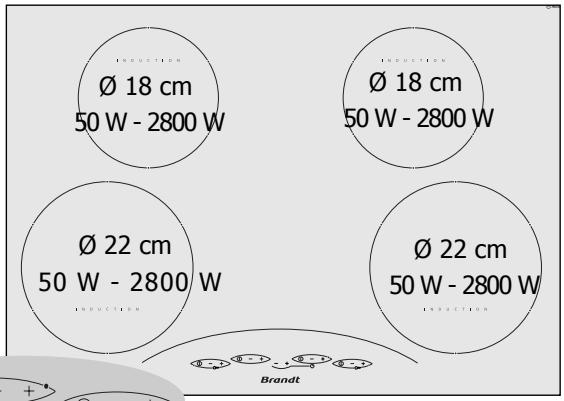
TI 200
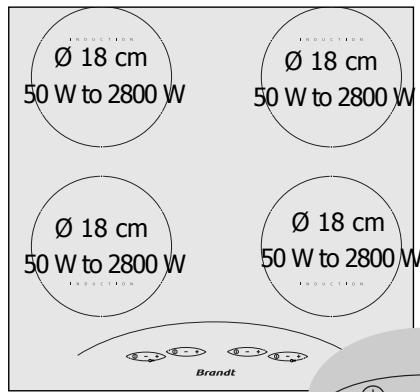
TI 210
TI 214
TI 212

TI 280
Using your hob in all simplicity
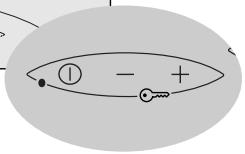
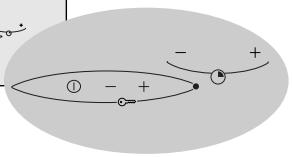
Start/Stop
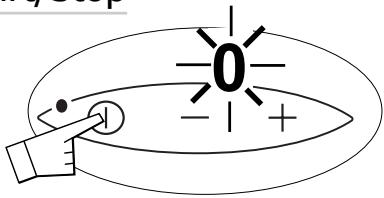
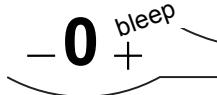
A beep and a flashing 0 show that the zone concerned has been lighted.
You can then choose the desired power.
If you do not set the power, the cooking zone will turn itself off automatically.
Setting manual power
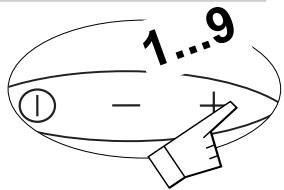
The two zones located on the same side have a total power of 2800 W, which is divided up automatically between them.
This implies, for example, that using maximum power in one zone will lead to the other zone's power being reduced automatically which will be shown on the power display.
The last instruction always has priority.
Setting the timer\*
;depending on the model
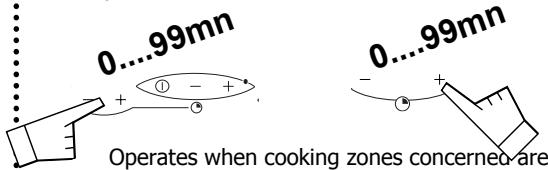
Operates when cooking zones concerned are working. You can modify cooking times and any time.
manual stopping
automatic stopping
To stop the beep press any control key in the cooking zone concerned. It will stop by default after about 1 minute.
*depending on the model
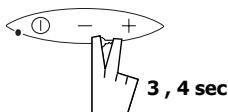
Child safety
Locked

Controls can be locked:
- Either when turned off (cleaning)
- Or during use (the operations in progress continue and the settings displayed stay active).
However when in the locked position, the "STOP"
touch control has priority and cuts off the power to the oven. The display turns off after a few seconds.
It can be reactivated by touching any touch control.
Unlocked
Preserving and maintaining your hob
- You must:
Avoid any shocks with recipients:
The glass surface is highly resistant but not unbreakable.
Avoid rubbing with recipients. as in time this will deteriorate the markings on the top of your ceramic hob.
Avoid using recipients with rough or dinted bases:
They may hold and transport matter liable to stain or scratch the hob.
Any such faults, which are not the cause of breakdowns nor make the hob impossible to use, are not included in the guarantee conditions.
Place your recipient in the middle of the heating zone.
- You must not
Leave metal cooking utensils, knives and forks, or metal objects on the hob. They will get hot if left close to any heating zone that is in use.
Store MAINTENANCE OR INFLAMMABLE products in the cupboard under your hob.
Leave an empty recipient on a heating zone.
Heat up a closed can. It may burst; this
recommendation applies to all methods of cooking.
Put the pans on your frame or plate (depending on the model)
Preheat at maximum temperature when using recipients with
non-stick inside surfaces (Teflon type). Use very little or no fat at all.
The maximum heating position is for boiling and frying only.
It is very easy to clean your countertop hob, especially if you follow these few recommendations:
| TYPE OF STAIN | WHAT TO DO | ACCESSORIES EMPLOYED | ||
| Minor | Soak the area to be cleaned with hot water, then wipe it. | Cleaning sponges | ||
| Accumulated burnt-on stains | Soak the area to be cleaned with hot water, use a special ceramic hob scraper to remove the worst, finish off with the rough side of a cleaning sponge, then wipe it clean. | Cleaning sponges special ceramic hob scraper | ||
| Rings and traces of limescale | Apply hot white spirit vinegar on the stain, leave to act then wipe off with a soft cloth.- Use a commercial cleaner. | Special ceramic hob cleaning paste | ||
| Burnt-on stains following sugar spillage, melted aluminium or plastic. | - Apply a special ceramic hob cleaner on the surface, preferably one which contains silicone (protective action). | Special ceramic hob cleaner | ||
 |  |  |  | |
| powder: abrasive-backed sponge cream ordinary sponge or special sponge for delicate items | ||||
Minor troubleshooting
You have doubts about whether your hob is working correctly .... this does not necessarily mean there is a breakdown. Nevertheless, check the following points
IF YOU REALIZE THAT
When you switch on, the display lights up
When you switch on, the fuse blows
When you switch on, only one side of the hob works
The fan keeps going for a few minutes after the hob has been switched off
The top of the hob is always warm (even when it is switched off).
The hob does not work. Displays on the keyboard do not come on
The hob stops working during operation, a , or F7 come on.
A series of little

(or F7) appears
The hob does not work, another message comes on
After having turned on a heating zone, the keyboard displays continue to flash.
The pans make a noise during cooking
The hob gives off a smell when first used for cooking
POSSIBLE CAUSES
The hob is working normally
Your hob is connected incorrectly
Your hob is connected incorrectly
The electronics are cooling down
The electronics are under power as for all other electronic apparatus (TV, transformers, etc.).
The apparatus is not under power. There is a power or connection problem.
Something has overflowed and or an object is touching the control panel.
Electronic circuits have overheated.
The electronic circuit is working badly.
The saucepan you use is unsuitable for induction cooking or its diameter is under 12 cm. (10 cm on the 160 mm zone).
This comes from vibrations made by energy going from the hob to the pan.
A new apparatus
WHAT SHOULD YOU DO?
NOTHING: see chapter Remarks on connections
Check the connection and make sure it complies with requirements.
This is normal.
This is normal.
Inspect the fuses and the cut-out switch.
Clean the hob or remove the object in question and start cooking again.
See "Fitting your hob".
Call the After Sales Service
See containers.
Under high power this phenomenon is normal with certain types of pans. There is no danger for the hob.
Use each heating zone for 12 hour with a pan full of water.
If the slightest break or crack appears in the ceramic glass surface, disconnect the unit immediately and contact your After Sales Service.
| DISHES | FRYINGBRINGING TO THE BOIL | COOKING/BROWNINGBRINGING BACK TO THE BOISTEADY SIMMERING | COOKINGSIMMERING | KEEPINGWARM | |||||
| 9 | 8 | 7 | 6 | 5 | 4 | 3 | 2 | ||
| SOUPS | BROTHTHICK SOUP | ||||||||
| FISH | STOCKFROZEN | ||||||||
| SAUCES | THICK, MADE WITH FLOURMADE WITH BUTTER AND EGGS(BEARNAISE, HOLLANDAISE) | ||||||||
| VEGETABLES | CHICORY, SPINACHPULSES,BOILED POTATOESFRIED POTATOESSAUTE POTATOESDEFROSTING VEGETABLES | ||||||||
| MEAT | THINLY SLICED MEATFRYING STEAKSGRILLING (CAST IRON GRILL PAN) | ||||||||
| DEEP FRYING | FROZEN CHIPSFRESH CHIPS | ||||||||
| MISCELLANEOUS | PRESSURE COOKERSEWED FRUITPANCAKESCUSTARDMELTING CHOCOLATEJAMMILKFRIED EGGSPASTABaby FOOD IN JARS (BAIN MARIE)STEWSCREOLE RICERICE PUDDING | ||||||||
maximum power is reserved for frying and quick boiling.
slow cooking fast cooking boil or fry

boil with cover add food
Innholdsfortegnelse
TI 212
TI 280