
Bolero CoolMarket Combi 495 inox - Fridge CECOTEC - Free user manual and instructions
Find the device manual for free Bolero CoolMarket Combi 495 inox CECOTEC in PDF.
| Product type | Combined refrigerator (bottom freezer) |
| Brand | Cecotec |
| Model | Bolero CoolMarket Combi 495 inox |
| Rated voltage | 220-240 V ~, 50 Hz |
| Rated current | 1.5 A |
| Climate class | SN, N, ST, T (+10°C to +43°C) |
| Refrigerant gas | R600a (isobutane), 60 g |
| Interior lighting | LED (energy efficiency class G) |
| Control panel | Touch electronic |
| Super Freeze function | Yes, activation by SUPER button, automatic deactivation after 52 h |
| Eco mode | Yes, activation by ECO MODE button (refrigerator at 6°C, freezer at -17°C) |
| Door alarm | Yes, after 2 min of opening |
| Automatic defrost | Yes (refrigerator), manual for the freezer if necessary |
| Door reversibility | Yes, reversible (tools and parts included) |
| Adjustable feet | Yes, at the front |
| Fresh drawer | Yes, for meat and fish (temperature about 1°C lower) |
| Vegetable bin with humidity control | Yes, humidity selector on the cover |
| Door balconies | Removable, height adjustable |
| Included accessories | Flexible wine rack (optional), ice tray, separate handle |
| Maintenance | Exterior cleaning with mild detergent; interior with baking soda; do not use abrasives |
| Safety | Door alarm, child lock not available, use from 8 years old |
| After-sales service | Contact Cecotec at +34 963210728 |
Frequently Asked Questions - Bolero CoolMarket Combi 495 inox CECOTEC
User questions about Bolero CoolMarket Combi 495 inox CECOTEC
0 question about this device. Answer the ones you know or ask your own.
Ask a new question about this device
Download the instructions for your Fridge in PDF format for free! Find your manual Bolero CoolMarket Combi 495 inox - CECOTEC and take your electronic device back in hand. On this page are published all the documents necessary for the use of your device. Bolero CoolMarket Combi 495 inox by CECOTEC.
USER MANUAL Bolero CoolMarket Combi 495 inox CECOTEC
natural_image
Exterior view of a white stainless steel refrigerator with dual doors and control handles (no visible text or symbols)Safety instructions 8
-
Parts and components 62
-
Before use 62
-
Installation 63
-
Control panel 68
-
Operation 69
-
Suggestions and useful tips 72
-
Cleaning and maintenance 73
-
Troubleshooting 75
-
Technical speci cations 76
B. Disposal of old electrical
and electronic appliances 77
-
Technical support and warranty 77
-
Copyright 77
INHALT
- Read the instructions carefully before using the device for the first time and keep this instruction manual for future reference or new users.
- It is important to make sure all users are familiar with its operation and safety features to prevent faults and unnecessary accidents.
- Make sure that the mains voltage in your house matches the voltage stated on the rating label of the product.
- This appliance can be used by children aged 8 and above, and persons with reduced physical, sensory, or mental capabilities or lack of experience and knowledge, as long as they have been given supervision or instruction concerning the use of the appliance in a safe way and understand the hazards involved. Children must not play with the appliance. The cleaning and maintenance of the appliance should not
be carried out by children without supervision.
- Keep the packaging material away from children, as there is a risk of suffocation.
- WARNING: if the interior light is damaged, contact the Cecotec Technical Support Service. Do not try to repair it on your own.
- WARNING: when positioning the appliance, make sure the power cord is not trapped or damaged. A crushed or damaged connector may heat up and cause a fire.
- Make sure you can access the device's main connector after the installation.
- Do not place food directly against the air outlet on the interior of the device.
- Keep the ventilation openings clear from obstructions.
- Do not place carbonated or fizzy drinks in the freezer compartment as this creates pressure in the container and could explode and damage the appliance.
- WARNING: do not use mechanical devices or other means to accelerate the defrosting process, other than those recommended by Cecotec.
- WARNING: do not damage the refrigeration circuit.
- If the cable is damaged, it must be replaced by the manufacturer, the supplier, or qualified personnel in order to avoid a hazard.
- WARNING: do not use electrical appliances inside the refrigerator.
- We recommend you check the power cord regularly to detect any sign of possible damage. Do not use the device if the cord is damaged.
- To avoid injuries or death caused by electric shock, do not use the device with your hands wet or over a wet surface.
- You should never use this refrigerator with an extension cord
or a multi-socket adaptor. Make sure the device is plugged in directly to a power supply.
- When installing the appliance, make sure that there is free space in the rear part, as this is the main heat outlet. This will allow for adequate ventilation.
- Do not place hot food or drinks in the refrigerator, allow them to cool down to room temperature beforehand.
- Do not place any other appliance on the refrigerator and do not wet it.
- Do not store explosive substances such as aerosols or flammable propellants in this appliance.
- This product is exclusively designed for household use. Do not use this unit outdoors or in damp environments.
- WARNING: to avoid any risk due to the instability of the refrigerator, you must install it according to the instructions.
- This device has a built-in earthed plug. Make sure the power supply in your house is properly grounded.
- Wait 5 minutes after a power failure before turning the appliance back on. Otherwise, the compressor may get damaged.
- This appliance is not intended to be operated by means of an external timer or separate remote-control system.
- Always handle the device carefully to avoid any damage on it.
- Frozen food can cause ice burns if consumed right after removing it from the freezer compartment.
- Do not remove or touch items in the freezer compartment with your hands wet, as it could cause skin abrasions or frost/freeze burns.
- Never use the base, drawers, or door as support.
-
Do not overload the door shelves or place too much food on the drawers to prevent items from falling off and damaging the device.
-
WARNING: do not attach multi-socket adaptors or multiple power supplies to the rear part of the device.
- The two-star compartments are suitable for storing pre-frozen food, storing, or making ice cream and making ice cubes.
- Compartments with one, two, or three stars are not suitable for freezing fresh food.
- Before carrying out any maintenance task, turn off the device and unplug it from the mains supply.
- It is advisable to wait for at least four hours before connecting the device to allow oil to flow through the compressor.
- Air must flow around the device: lack of air leads to overheating. To achieve good ventilation, follow the installation instructions.
- Whenever possible, the rear part of the product should not be too close to the wall to prevent it from touching or reaching the hot parts (the compressor and the condenser). To avoid risk of fire, follow the installation instructions.
- Make sure the power cord is accessible after the device's installation.
- All electrical work required to maintain this appliance must be carried out by a qualified electrician.
- Clean the surfaces that come into contact with food and with the accessible draining systems regularly.
Refrigerant
- Isobutane refrigerant (R600a) is contained within the refrigeration circuit of the appliance. It is a natural gas with a high level of environmental compatibility; however, it is flammable. Make sure that no components of the refrigeration circuit have been damaged during the transport and installation of the appliance.
- WARNING: the refrigerant and the insulator gas are flammable. When disposing of the device, only dispose of it at an authorised waste disposal facility. Do not expose it to flames.
- WARNING: the device contains refrigerant and gases in the insulation. The device and gases must be disposed of professionally as they may cause injuries to eyes or ignition. Make sure the refrigeration circuit pipe is not damaged before disposing of it correctly.
- WARNING: risk of fire. If the refrigeration circuit is damaged:
- Avoid open flames and sources of ignition.
- Completely air the room where the device is located.
INSTRUCTIONS DE SÉCURITÉ
A. Refrigerator compartment
B. Freezer compartment.
1. Refrigerator's structure
2. Interior lighting (LED)
3. Refrigerator compartment shelves
4. Flexible wine shelf (optional accessory)
5. Air outlet
6. Fresh Drawer cover
7. Fresh Drawer (ideal compartment to keep meat and fish fresh)
B. Crisper Drawer cover
9. Crisper Drawer (ideal compartment to keep fruit and vegetables fresh)
10. Freezer compartment's top and middle drawers
11. Freezer compartment's bottom drawer
12. Ice-cube tray (Interior)
13. Adjustable lower legs
14. Refrigerator compartment door
15. Door's top shelves
16. Bottle divider
17. Door's lower shelf
18. Door handle
19. Freezer compartment door
The graphics in this manual are schematic representations and may not exactly match the product.
2. BEFORE USE
This product includes a packaging designed to protect it during transport. Take the refrigerator out of the box. You can keep the original box and other elements in a safe place. This will help you prevent product damage when transporting it in the future. In case the original packaging is disposed of, make sure all packaging materials are recycled accordingly.
- Make sure all parts and components are included and in good conditions. If there is any piece missing or not in good condition, immediately contact the Technical Support Service of Cocotec.
Box contents:
- Bolero CoolMarket Combi 495 Inox Refrigerator
- Instruction manual
3. INSTALLATION
Before using the refrigerator for the first time, you must read these tips.
Warning
For proper installation, the refrigerator must be placed on a level surface of hard material and of same height as the rest of the floor. This surface must be strong enough to hold a completely loaded refrigerator.
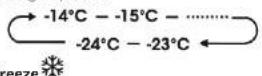
The wheels should only be used to move the refrigerator forwards or backwards. Moving the refrigerator sideways could damage the floor and roller heads. Fig. 2
Refrigerator ventilation
- To improve the refrigerator system's efficiency and to save energy, it is necessary to ensure proper ventilation around the freezer to dissipate the heat. For this reason, you should leave enough free space around the refrigerator.
- It is advisable to leave at least 50–70 mm of free space from the rear part of the refrigerator to the wall, at least 100 mm space from the surface to the ceiling, at least 100 mm from the side to the wall, and free space at the front to be able to open the door 130°. Check figure 3 for reference.
Please note
This refrigerator operates properly in the climate classes SN to T shown in the following table. If the room temperature is below or above the range for which the refrigerator was designed, it will not operate properly.
| Climate class Room temperature | |
| SN + 10°C | a + 32°C |
| N + 16°C | a + 32°C |
| ST + 16°C | a + 38°C |
| T + 16°C | a + 43°C |
- Place the refrigerator in a dry place to prevent moisture damage.
- Keep the refrigerator away from direct sunlight, rain, or frost. Keep the refrigerator away from heat sources like cookers, fires, or heaters.
ENGLISHENGLISH
Refrigerator stabilisation
Fig. 4
For sufficient stabilisation and air circulation at the lower rear part of the refrigerator, it may be necessary to adjust the lower legs. You can adjust them manually or using a suitable wrench.
- To allow doors to close automatically, tilt the upper part back by about 10-15 mm.
Figure 4
A. Adjustable lower legs
B. Front wheel
C. Rear wheel
Changing the opening direction of the door
If desired, you can change the door's opening direction, from the right side (by default) to the left side.
Warning:
- The refrigerator must not be connected to the power socket when you change the opening direction of the door. Make sure to disconnect the plug from the power socket.
- Check figure 5 to check the tools you need.
- It is advisable that two people change the door's opening direction.
Fig. 5
A. Tools not supplied
-
8-mm tube wrench
-
Flat-head screwdriver
-
Spatula
-
Crosshead screwdriver
-
Wrench
-
8-mm wrench
B. Additional parts (included in the plastic bag)
- Upper-left hinge
B. Upper-left hinge cover
-
Screw gap cover
-
Middle-left hinge
-
Left unblocker *2
-
Left doorstop ^2
-
Allen key (4 mm)
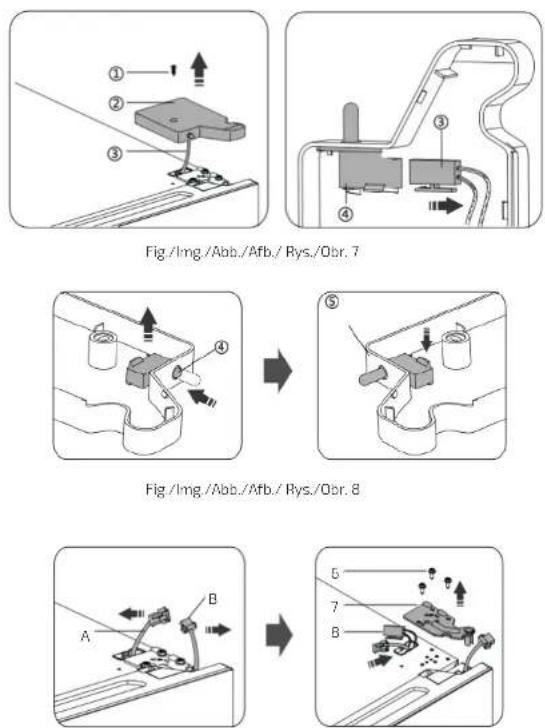
Fig. 7
-
Self-tapping screw
-
Upper-right hinge cover
-
Electrical connector
-
Door switch
Fig. 8
- Upper-left hinge cover
Fig. 9
-
Screws
-
Upper-right hinge
B. Electrical connector
Fig. 11
-
Screw gap cover
-
Left screw gap cover
Fig. 12
-
Upper-left side door cover
-
Left door connector
-
Upper-right side door cover
-
Right door connector
Fig. 13
-
Right upper door stop
-
Right upper door dowel
-
Self-tapping screw
-
Left upper door stop
-
Left upper door dowel
Fig. 15
-
Right lower door stop
-
Right lower door dowel
-
Self-tapping screw
-
Left lower door stop
-
Left lower door dowel
Fig. 17
-
Lower hinge
-
Special flange screw
-
Adjustable lower legs
ENGLISHENGLISH
Fig. 18
- Lower hinge pin
Fig. 21
- Upper door's upper-left hinge
Fig. 22
-
Upper door connector
-
Refrigerator connector
-
Refrigerator connector
Fig. 23
-
Self-tapping screw
-
Open the door, remove every door shelf (to prevent any damage) and then close the door. To remove the shelves, slightly press the shelf and move it upwards. Fig. 6
- Unscrew the screw on the upper-right hinge (1), then remove the upper hinge cover (2). Carefully unplug the electrical connector (3) underneath. Fig. 7
- Press the side of the door switch (4) and pull it upwards to separate it from the upper-right hinge cover (2). Insert the door switch (4) into the upper-left hinge cover (5) (included in the plastic bag). Keep the upper-right hinge cover (2). Fig. 8
- Unplug connectors (A) and (B). Then unscrew the screws (6) with an 8 mm drill or a spanner and remove the upper-right hinge (7). Then fit the connectors (A) and (B) into the hole as shown in figure 9. After this process, the refrigerator door will be unstable. Be sure to hold it in place so as not to damage it. Fig. 9
- Carefully lift the upper door to remove it from the middle hinge. Then place the upper door on a soft surface with the inside facing upwards. Fig. 10
- Insert the right screw gap cover (9) (included in the plastic bag) into the upper-right side where the upper-right hinge was located. Then, remove the left screw gap cover (10) from the upper-left side of the refrigerator and put it away. Fig. 11
- Remove the upper-left side door cover (11) and remove the connector (12). Remove the upper-right side door cover (13) and place the connector (14) inside. Replace the upper side door covers (11 and 13) Fig. 12
- On the upper door's right side, unscrew the screw (17) and remove the dowel (16) from the door stop (15). On the upper door's left side, insert the left door stop (18) and the left dowel (19) (included in the plastic bag) and secure it with the screw (17). Keep the right door stop and dowel. Fig. 13
- Use the Allen key (included in the plastic bag) and a Phillips screwdriver to loosen the screws and remove the upper-right hinge from the lower door. Then carefully lift the door up and remove it. Fig. 14
- Place the lower door on a soft surface with the inside facing up. On the lower door's right
side, unscrew the screw (22) and remove the dowel (21) from the door stop (20). On the lower door's left side, insert the left door stop (23) and the left dowel (19) (included in the plastic bag) and secure it with the screw (15). Keep the right door stop and dowel Fig. 15
- Replace the screw gap covers and screw the centre plate to the right. Fig. 16
- Tilt the refrigerator carefully to gain access to its base. Remove the two adjustable lower legs (27), then remove the lower hinge (25) by unscrewing the screws (26). Fig. 17
- Loosen the lower hinge pin and remove it. Rotate the hinge and reinsert the lower hinge pin (28), then tighten it. Fig. 18
- Place the lower hinge on the left side of the refrigerator base and secure it with the screws (26). Replace the adjustable lower legs and partially secure them. Fig. 19
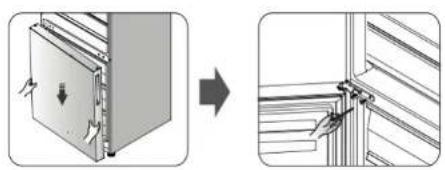
- Place the refrigerator in an upright position and carefully insert the lower door into the upper hinge of the lower door. At this point, the door will not be attached to the refrigerator. Hold it firmly so that it does not fall off. Install the left hinge (in the plastic bag) making sure that the lower door is secured in place. Fig. 20
- Position the upper door on the left side and place the middle hinge shaft in the upper door's bottom hole. Install the upper-left hinge (29) (included in the plastic bag) and screw it with the screws removed in step 9 (6). At this point, the door will not be attached to the refrigerator, but hold it firmly so that it does not fall off. Fig. 21
- Remove connectors 31 and 32 from the top left side of the refrigerator. Connect 30 to 31. Then plug connector 32 to the door switch located on the upper-left hinge cover. Fig. 22
- Install the upper left hinge cover (5) using the screw (33) as shown in figure 23, on the top of the refrigerator. Fig. 23
- Open the upper door, reinstall the shelves, and close the door.
Please note
- If the refrigerator has a handle, you must reverse its position by following these instructions:
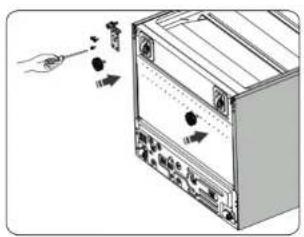
- Remove the covers from the handle screws and then loosen the screws. Pull the handle to remove it and replace it on the right side. Screw the screws back in and place the covers. Fig. 24
Fig. 24
- Handle covers
- Special screws
- Door handle
- Screw gap
ENGLISHENGLISH
4. CONTROL PANEL
When turning the refrigerator on for the first time, the backlighting of the icons on the control panel display will start operating. If you do not press any button and the doors are closed, the light will turn off. Fig. 25
Temperature control
For optimal food preservation, we recommend you set the temperature to 4°C upon switching the refrigerator on for the first time.
Warning
When you set the temperature, there will be an average temperature established in the whole refrigerator compartment. The temperature of each compartment may differ depending on the amount and temperature of food stored, its placement, and the frequency with which the doors are opened. Room temperature can also affect the interior temperature of the appliance.
Refrigerator compartment
- Press 'ZONE CHOICE' repeatedly until the corresponding icon turns on □.
- Then, press "SET TEMP". You can set the refrigerator temperature between 2 °C and 8 °C as desired. The control panel will display the corresponding values in the following sequence.

Freezer compartment
- Press 'ZONE CHOICE' repeatedly until the corresponding icon turns on □.
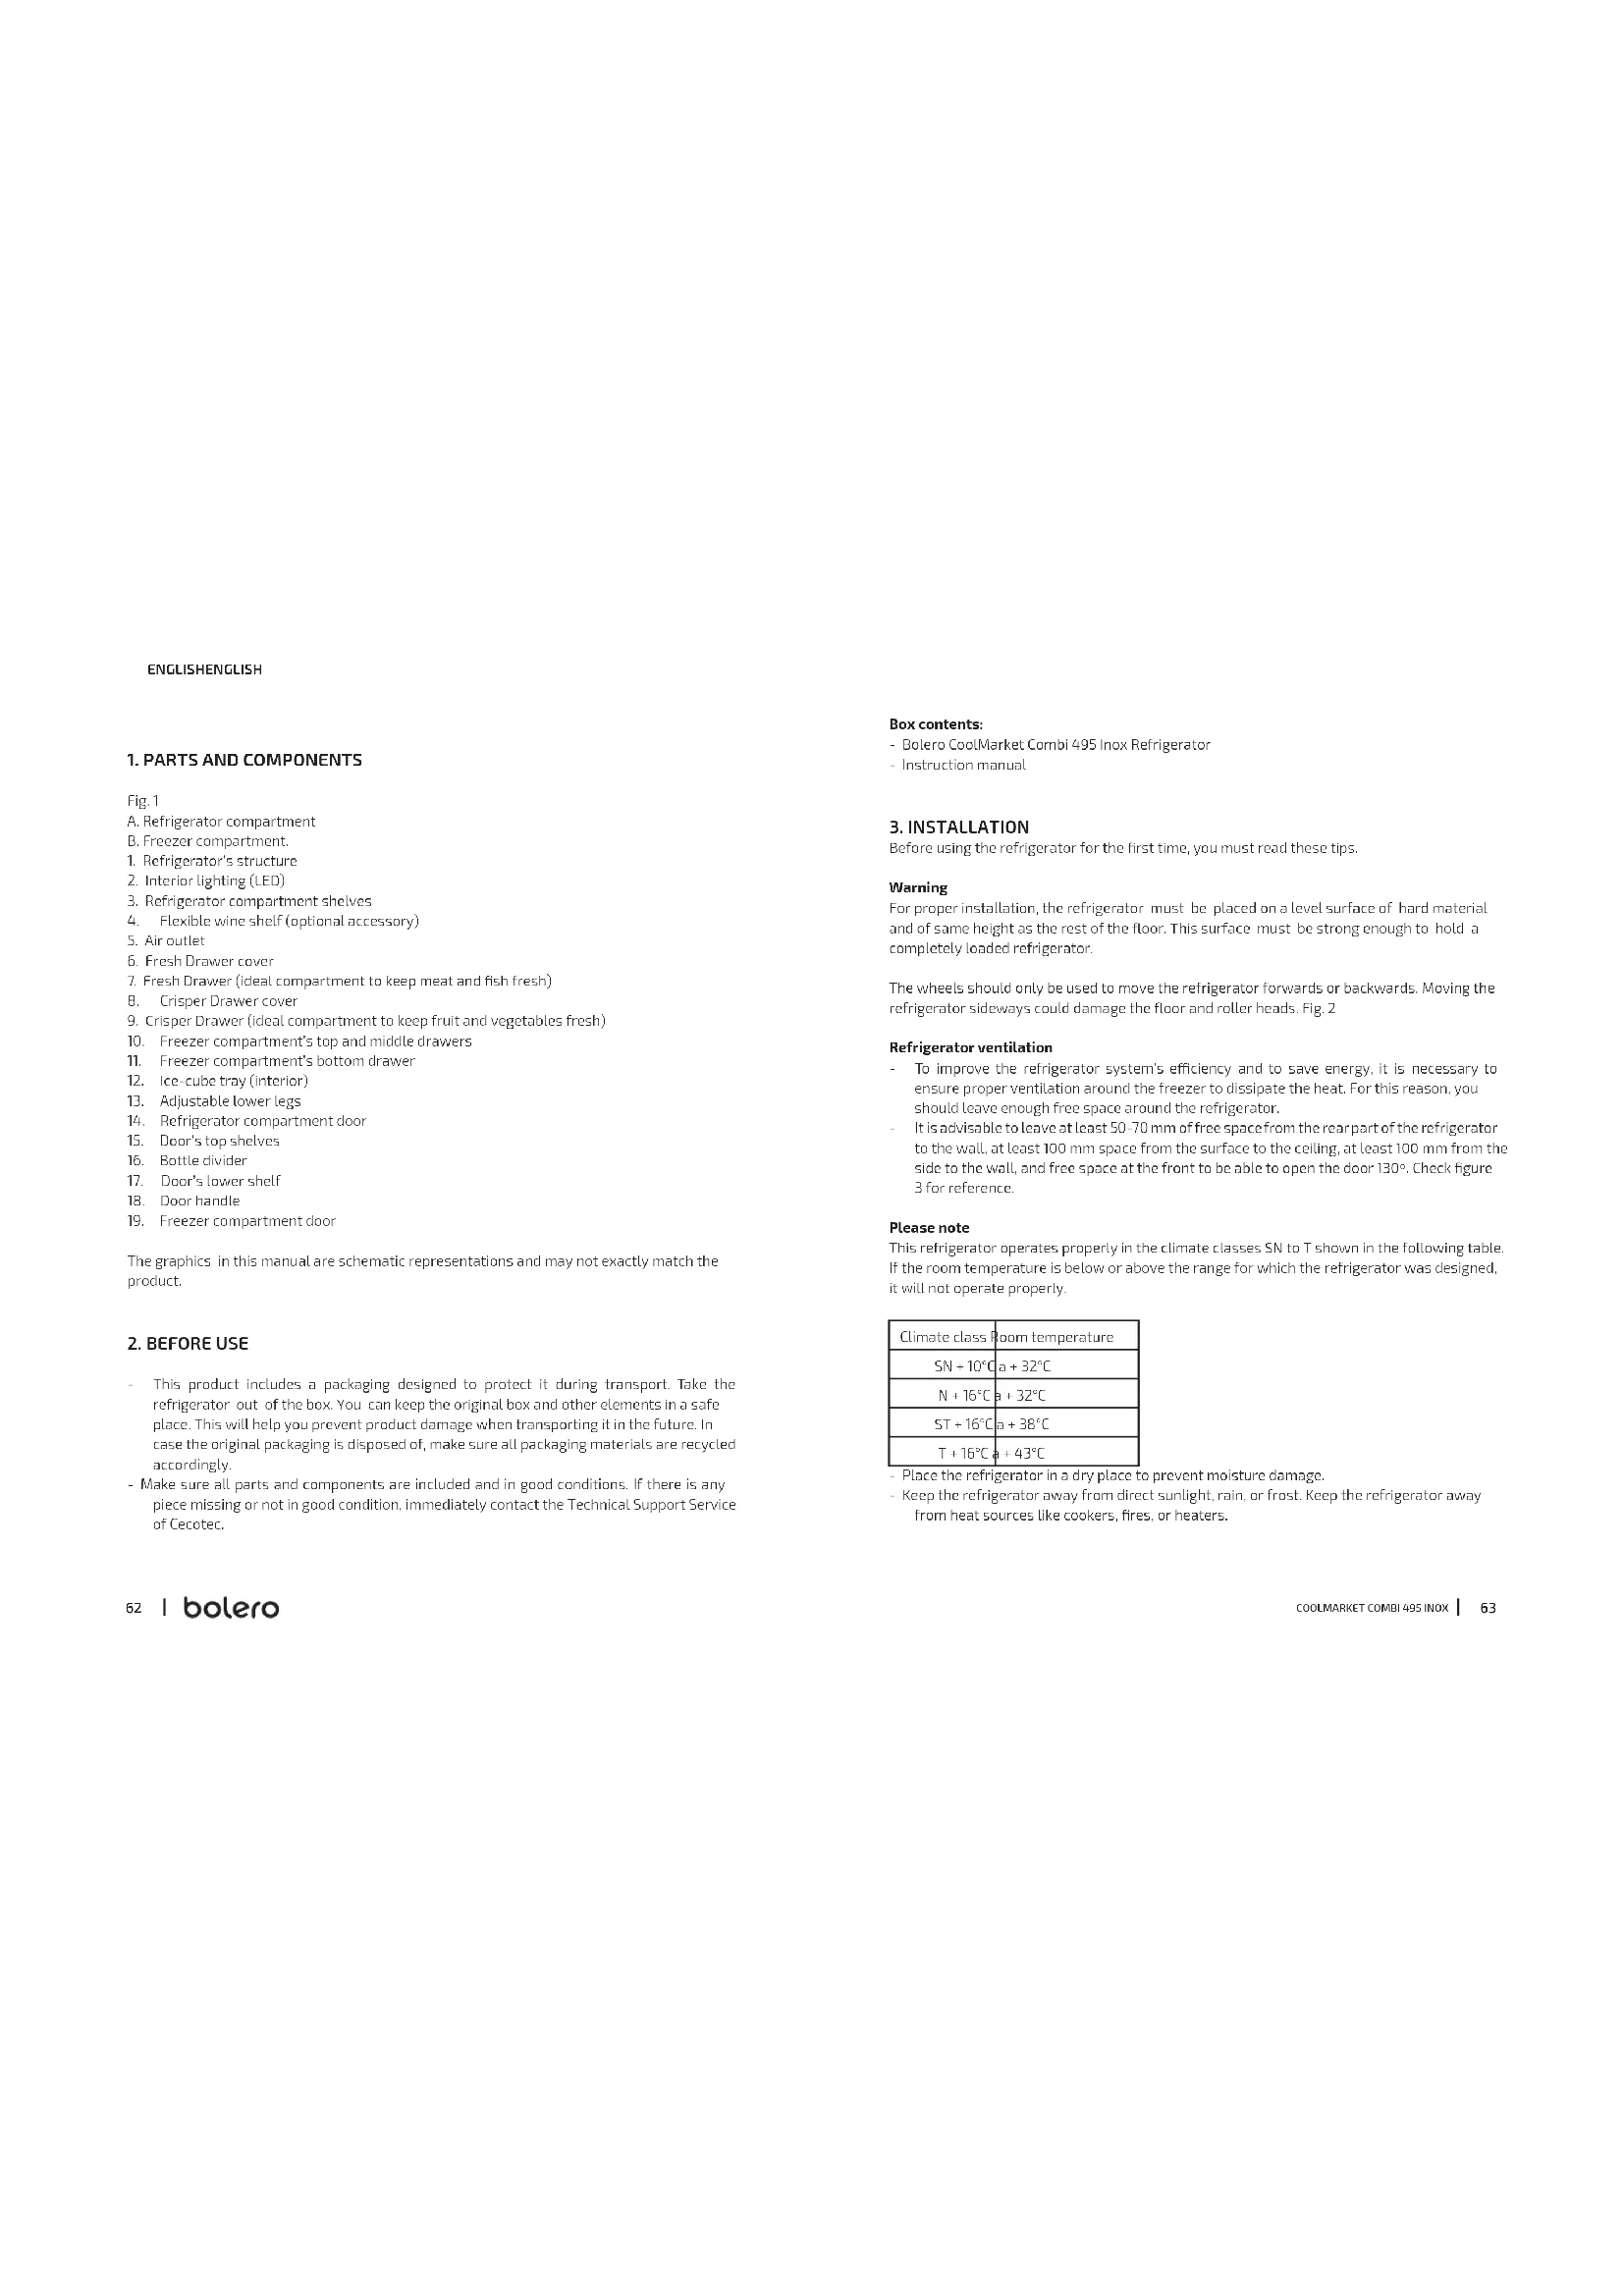
- Then, press "SET TEMP", You can set the freezer compartment temperature between -14 °C and -24 °C as required. The control panel will display the corresponding figures in the following sequence.
Super Freeze
- The "Super Freeze" mode decreases the freezer compartment temperature quickly to quickly freeze the food. This keeps the nutrients and vitamins in fresh food and keeps it fresh for longer.
- Use this mode to pre-freeze and quickly freeze food in the freezer compartment.
- To activate this mode press "SUPER".
- When you activate the "Super Freeze" mode, the corresponding icon will turn on. The freezer compartment temperature will be set to 24 °C.
- This mode will be automatically deactivated after 52 hours. The freezer compartment temperature will return to its previous setting.
Energy saving
- This function allows the freezer compartment to operate in a very useful energy saving mode to reduce energy consumption when you are away.
- To activate this mode, press "ECO MODE".
- When the energy saving mode is activated, the corresponding icon will turn on. The freezer compartment temperature is to be set to -17 °C and the refrigerator compartment temperature to 5 °C.
Power button
Turn the refrigerator on and off by pressing this button.
Press "①" for 3 seconds. The digital light will display "OFF" and the refrigerator will turn off.
- Press " * 3 seconds. The refrigerator will turn on.
Alarm
If the refrigerator door stays open for more than 2 minutes, the door alarm will sound. The door alarm beeps 3 times per minute and stops automatically after 8 minutes. To save energy, avoid leaving the door open for a long time when using the refrigerator. The door alarm can also be silenced by closing the door.
Please note
Frequent opening of refrigerator doors can cause food to spoil faster.
5. OPERATION
Door shelves
- They are ideal to store eggs, canned liquids, bottles, packed food, etc. Do not place too many heavy items on these shelves.
- The door's shelves can be placed at different heights if needed. Remove food from the shelf before repositioning it. Fig. 26
- All the door shelves are removable for cleaning
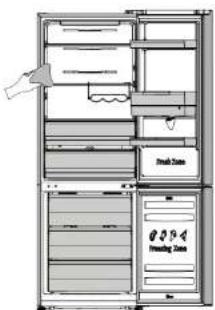
Refrigerator compartment shelves
The refrigerator compartment shelves can be removed for cleaning. Fig. 27
Flexible wine shelf (optional accessory)
Ideal for storing wine bottles or other beverages; it can be removed for cleaning.
Please note
Do not place wine or bottles directly in front of the air outlet, as they may freeze.
ENGLISHENGLISH
Fresh drawer
- This drawer has a lower temperature to store and preserve fish, meat, and other perishable food.
It will normally be about 1 °C lower than in the rest of the refrigerator compartment.
| Temperature | Food type | Recommended storage time |
| 2.3, or 4°C | Fish or meat ≈ 2 days | |
| 5 or 6°C | Fruit | < 2 weeks |
| 7 or 8°C | Vegetables | < 5 days |
Please note
The temperature oscillation to maintain the selected temperature may cause this drawer to occasionally reach a temperature below 0 degrees.
Crisper drawer and humidity control
This drawer is ideal to store fruits and vegetables, as you can control the moisture to preserve them.
- You can turn the knob on the Crisper drawer lid to adjust the drawer's humidity. Turning the knoa to the left will maintain a higher humidity that will allow you to store fresh vegetables and fruits for a long time, while turning the knob to the right will set a lower humidity. Fig. 28
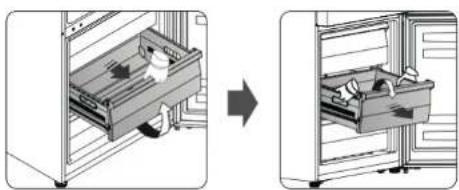
Freezer compartment drawer
- Use this drawer to store food that you want to freeze, such as meat, fish, ice cream, etc.
- To remove the freezer compartment drawer, tilt the front of the drawer up and pull forward, then tilt the drawer down and pull it forward with both hands. Fig. 29
To replace the freezer compartment drawer, tilt the drawer down, place the drawer bearings behind the rail bearings, then tilt up the front of the drawer and push it in. Fig. 30
Fig. 30
-
Drawer bearings
-
Rail bearings
Door handle (by model)
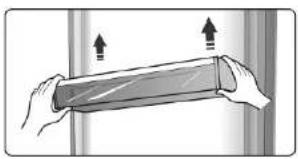
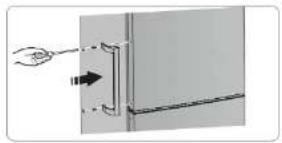
For transportation convenience, the door handle comes separately in a plastic bag. The handle is installed as follows.
- Remove the hole covers on the door's left side.
- Align the handle's screw gaps with the door's. Fig. 31
- Secure the handle with the special screws provided in the plastic bag, then replace the covers by covering the screws.
| Order Compartment type | Target storage temperature (°C) | Suitable food |
| 1 Refrigerator + 2 → + 8 Eggs, cooked food, packed food, fruits and vegetables, dairy products, cakes, drinks, and other food unsuitable for freezing. | ||
| 2 (***)* Freezer ≦ -18 Suitable for fresh frozen food, like seafood (fish, shrimp, shellfish), freshwater products, and meat (recommended for 3 months, the longer it is stored, the worse the flavour and nutrients will be). | ||
| 3 ***-Freezer ≦ -18 Not suitable for fresh frozen food, like seafood (fish, shrimp, shellfish), freshwater products, and meat (recommended for 3 months, the longer it is stored, the worse the flavour and nutrients will be). | ||
| 4 ***-Freezer ≦ -12 Not suitable for fresh frozen food, like seafood (fish, shrimp, shellfish), freshwater products, and meat (recommended for 2 months, the longer it is stored, the worse the flavour and nutrients will be). | ||
| 5 *-Freezer ≦ -6 Seafood (fish, shrimp, shellfish), freshwater products and meat (recommended for 1 month. The longer it is stored, the worse the flavour and nutrients will be). | ||
| 6 0 stars | -6 ~ 0 | Fresh pork, beef, fish, chicken, some packed processed foods, etc. (recommended to be consumed that same day, preferably no more than 3 days).Partially encapsulated processed food (non-frozen food) |
| 7 Fresh | -2 → + 3 | Fresh/frozen pork, beef, chicken, some freshwater products, etc. (7 days below 0°C, recommended to be preserved at a temperature above 0°C to be consumed that same day, preferably no more than 2 days).Seafood (less than 0°C for 15 days, not recommended to be preserved at a temperature above 0°C). |
ENGLISHENGLISH
| 8 | Fresh food | 0 - +4 | Fresh pork, beef, fish, chicken, cooked food, etc. (recommended to be consumed that same day, preferably no more than 3 days). |
| 9 | Wine + 5 - +20 | Red wine, white wine, sparkling wine, etc. |
Please note
Preserve different food according to the ideal compartment or temperature of the food.
6. SUGGESTIONS AND USEFUL TIPS
Tips on energy saving
- Try to avoid keeping the door open for a long period of time to save energy.
- Keep the refrigerator away from heat sources (direct sunlight, electric ovens or cookers, etc.).
- Do not set the temperature colder than necessary.
- Do not store hot food or steaming liquid in the refrigerator.
- Place the refrigerator in a well-ventilated and free-from-moisture room.
- If the refrigerator has the correct combination of drawers and shelves, do not modify it, as it has been designed to offer the most efficient energy setting.
Tips for cooling fresh food
- Do not place hot food directly in the refrigerator, as the interior temperature will increase, straining the compressor and spending more energy.
- Cover or wrap food, especially if it has a strong smell.
- Place food correctly so air can flow freely around it.
Refrigeration tips
- Wrap and place the meat on the glass shelf on top of the Crisper drawer. Always respect storage time and consume it according to the recommended expiration date.
Cooked food, cool dishes, etc. must always be covered and can be placed on any shelf.
- Fruits and vegetables must be preserved in the crisper drawer.
- Butter and cheese must be wrapped in airtight plastic or plastic film.
- Milk bottles must have a cap and must be preserved in the door shelves.
Freezing tips
- When turning the refrigerator on for the first time or if you use it after a long period of time, leave the refrigerator to work for at least 2 hours with the highest settings before storing any food.
- Prepare food in small portions so they are frozen evenly and quickly. This way, you will also be able to defrost just the necessary amount
- Wrap the food in aluminium foil or cling film so that the food remains airtight.
- Do not allow defrosted fresh food to come in contact with already frozen food to avoid the temperature of the latter to increase.
If food is consumed immediately after removing it from the freezer compartment, it may cause ice burns to the skin. - It is recommended to label and place a date in each frozen food to keep track of the storage time.
Tips for preserving frozen food
- Check that the food is suitable for freezing.
Once defrosted, food will deteriorate quickly and should not be frozen again. Do not exceed the storage time indicated in food packages.
Turning off the refrigerator
If it were necessary to turn off the refrigerator for a long period of time, you should follow these steps to prevent fungus or mould from farming.
- Remove all the food.
- Unplug the device from the mains supply.
- Clean and dry the interior completely.
- Make sure all doors are slightly open to allow air flow.
7. CLEANING AND MAINTENANCE
For hygienic reasons, the refrigerator should be cleaned regularly at least every two months.
Warning
The refrigerator cannot be connected to the mains during cleaning, as there is a risk of electric shock. Before cleaning it, turn off the refrigerator and unplug it from the mains.
Exterior cleaning
- To keep your refrigerator in good condition, you should clean it regularly.
- Clean the control panel with a soft and clean cloth.
- Spray water on a cleaning cloth instead of spraying it directly on the refrigerator's surface. This will help distribute moisture evenly over the surface.
Clean the doors and surfaces of the refrigerator with a soft detergent and then dry them with a soft cloth. Fig. 32
Warning
Do not use sharp objects, as they could scratch the surface.
- Do not use thinner, car detergent, chlorine-containing detergents, ethereal oil, abrasive
ENGLISHENGLISH
cleaners, or organic solvents such as benzene for cleaning. They could damage the surface of the refrigerator and cause a fire.
Interior cleaning
- You must clean the interior of the refrigerator periodically.
- Clean the interior of the refrigerator with a weak solution of baking soda and then rinse it with warm water using a wrung-out cloth or sponge. Dry it completely before replacing the shelves and the drawers. Dry all the surfaces and the detachable parts thoroughly before placing them back in place. Fig. 33
Defrost
Even if the refrigerator has an automatic defrost function, there could be a layer of frost in the interior of the freezer compartment if the door has been frequently opened or if it remained open for a long period of time. If the frost is too thick, follow these steps:
- Remove the food and the drawers, unplug the refrigerator from the mains, and leave the doors open. Ventilate the room well to speed up the defrosting process.
- After it has been completely defrosted, clean the freezer compartment following the process described.
Warning
Do not use sharp objects to remove frost. You should only plug and turn on the refrigerator when the interior is completely dry.
Cleaning the door gasket
Try to keep the doors' gasket clean. Sticky food and drinks can cause the gaskets to stick to the structure of the refrigerator and break when the door is opened. Wash the gasket with a soft detergent and warm water. Rinse it and dry it thoroughly after cleaning it.
Warning
You must only turn the refrigerator on after the door gaskets are completely dry.
Substitution of the LED light
Warning:
The LED light can only be substituted by authorised personnel. If the LED light is damaged, contact the official Customer Service of Cecotec for assistance.
To replace the LED light, follow these steps:
- Unplug the refrigerator.
- Remove the light cover by pressing it upwards and outwards.
- Hold the LED light cover with a hand and pull with the other while you press the connector.
- Substitute the LED light and place it correctly in place.
8. TROUBLESHOOTING
If you experience any problem with the refrigerator or think it does not work properly, you can carry out a few simple checks before calling the official Cecotec Customer Service.
Warning
Do not try to repair the refrigerator on your own. If the problem persists after the checks explained below, contact a qualified electrician, authorised personnel, or the store where you purchased the product.
| Problem Possible cause and solution | |
| The refrigerator does not work properly Check | if the electrical cord is plugged in correctly to the mains supply. |
| Check the fuse or the power supply circuit and replace them if necessary. | |
| The room temperature is out of the range for which the refrigerator was manufactured. Place the refrigerator in a room where the temperature is within the allowed range. | |
| It is normal for the freezer compartment not to operate during the automatic defrost cycle, or for a short time after the refrigerator is switched on to protect the compressor. | |
| Smells inside the compartments You may need | to clean the interior. |
| Some food, containers, or packaging may release smells. | |
| The refrigerator makes some noise The noises | described next are common:- Compressor operation noise.- Air flow noise of the small fan motor in the freezer compartment or other compartments.- Dripping sound similar to boiling water.- Knocking sound during automatic defrosting.- Clicking sound before the compressor starts. |
| Other unusual noises may be caused by the situations described next and you may need to check them and take action:- The refrigerator is not levelled.- The rear part of the refrigerator is in contact with the wall.- The bottles or containers hit each other. |
ENGLISHENGLISH
| The motor does not work continuously | It is usual to hear the motor noise frequently. It will work more intensely in the following situations:- The temperature setting is colder than necessary.- You have recently stored a great amount of hot food inside the refrigerator.- The room temperature is too high.- The doors have been opened for a long period of time or they are frequently open. |
| There is a layer of frost | Check the air outlets are not blocked by food and make sure the food is placed inside the refrigerator so as to allow enough ventilation. Make sure the door is properly closed. To know how to remove frost, read the 'Cleaning and maintenance' section. |
| The interior temperature is too high | You may have left the doors open for too long or opened them too often, an obstacle may have kept them open, or the refrigerator may have too little space on the sides, back, and top. |
| The interior temperature is too low | Increase the temperature following the 'Control panel' section. |
| The doors cannot be easily open | Check if the refrigerator is tilted back 10-15 mm to allow the doors to close on their own or if there is something inside which prevents the doors from closing. |
7. TECHNICAL SPECIFICATIONS
You can access the product database where the information for this model is stored by scanning the QR code (and the energy label as well).
| Reference | 02391 |
| Model | Bolero CoolMarket Combi 495 Inox |
| QR code |
| Voltage 220-240 V - | |
| Rated frequency 50 Hz | |
| Rated current 1,5 A | |
| Climate class SN, N, ST, T ( ^a ) | |
| Refrigerant R600a 60(g) | |
| Insulating foam Cyclopentane |
This product features a light source with an energy efficiency grade G.
(*) Refrigerating appliance intended for use at room temperatures between 10°C and 43°C.
Technical specifications may change without prior notification to improve product quality.
Made in China | Designed in Spain
8. DISPOSAL OF OLD ELECTRICAL AND ELECTRONIC APPLIANCES

This symbol indicates that, according to the applicable regulations, the product and/or battery must be disposed of separately from household waste. When this product reaches the end of its shelf life, you should dispose of the batteries/accumulators and take them to a collection point designated by the local authorities.
Consumers must contact their local authorities or retailer for information
concerning the correct disposal of old appliances and/or their batteries.
Compliance with the above guidelines will help protecting the environment.
9. TECHNICAL SUPPORT AND WARRANTY
Cecotec shall be liable to the end user or consumer for any lack of conformity that exists at the time of delivery of the product under the terms, conditions, and deadlines established by the applicable regulations.
It is recommended that repairs be carried out by qualified personnel.
If at any moment you detect any problem with your product or have any doubt, do not hesitate to contact Cecotec official Technical Support Service at +34 963 210 728.
10. COPYRIGHT
The intellectual property rights over the texts in this manual belong to CECOTEC INNOVACIONES, S.L. All rights reserved. The contents of this publication may not, in whole or in part, be reproduced, stored in a retrieval system, transmitted, or distributed by any means (electronic, mechanical, photocopying, recording or similar) without the prior authorization of CECOTEC INNOVACIONES, S.L.
FRANÇAISFRANÇAIS
1. PIÈCES ET COMPOSANTS
Img.1
-
Lade rollers
-
Rail rollers
8. PROBLEEMOPLOSSING
Fig./Img./Abb./Afb./Rys./Obr.2
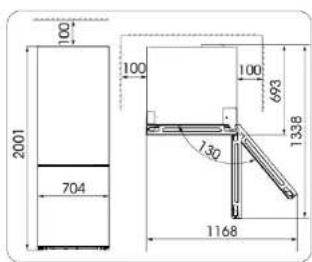
Fig./Img./Abb./Afb./Rys./Obr.3

natural_image
Simple line drawing of a hand holding a tool with a curved base and vertical line (no text or symbols)Fig./Img./Abb./Afb./Rys./Ocr.4
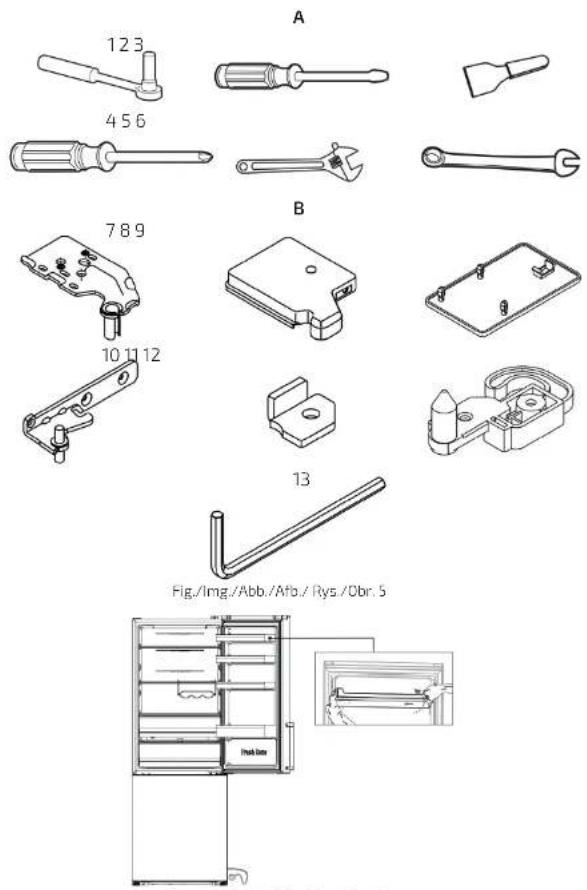
Fig./Img./Abb./Afb./Rys./Obr.6
flowchart
graph TD
    A["① Image/Abb./Afb./Rys./Obr. 7"] --> B["②"]
    B --> C["③"]
    C --> D["④"]
    D --> E["⑤"]
    E --> F["⑥"]
    F --> G["⑦"]
    G --> H["⑧"]
    H --> I["⑨"]
    I --> J["⑩"]
    J --> K["⑪"]
    K --> L["⑫"]
    L --> M["⑬"]
    M --> N["⑭"]
    N --> O["⑮"]
Fig./Img./Abb./Afb./Rys./Obr.9
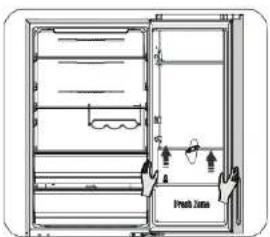
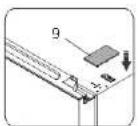
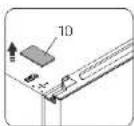
Fig./Img./Abb./Afb./Rys./Obr.10 Fig./Img./Abb./Afb./Rys./Obr.11
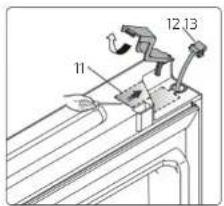
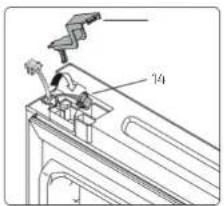
Fig./Img./Abb./Afb./Rys./Obr.12
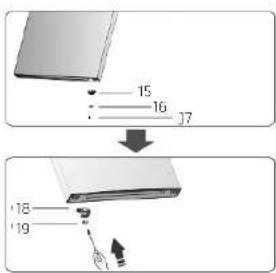
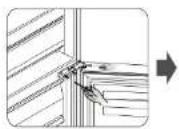
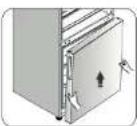
Fig./Img./Abb./Afb./Rys./Obr.13 Fig./Img./Abb./Afb./Rys./Obr.14
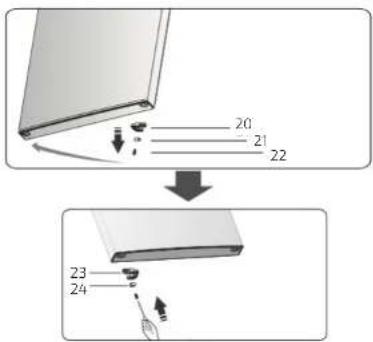
Fig./Img./Abb./Afb./Rys./Obr.15
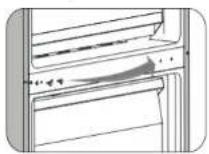
Fig./Img./Abb./Afb./Rys./Obr.16
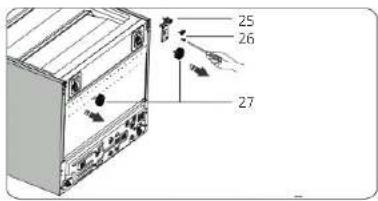
Fig./Img./Abb./Afb./Rys./Obr.17
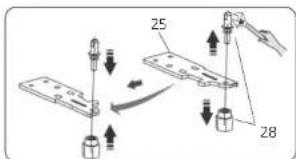
Fig./Img./Abb./Afb./Rys./Obr.18
natural_image
Illustration of a computer tower with a hand emitting a device to the left (no text or symbols visible)Fig./Img./Abb./Afb./Rys./Obr.19
natural_image
Diagram showing a door panel being adjusted to form a wall-mounted bracket (no text or symbols present)Fig./Img./Abb./Afb./Rys./Obr.20
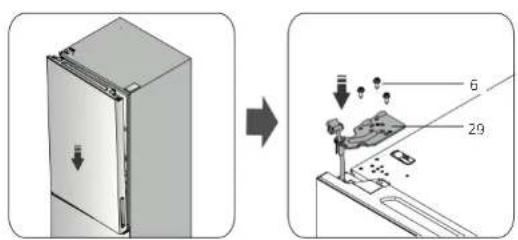
Fig./Img./Abo./Afb./Rys./Obr.21

Fig./Img./Abb./Afb./Rys./Obr.22
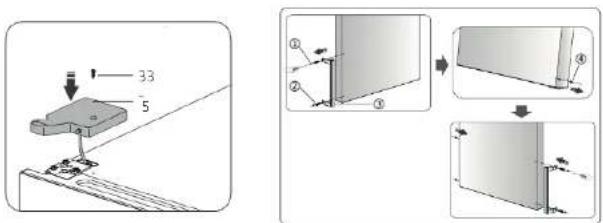
Fig./Img./Abb./Afb./Rys./Obr. 23 Fig./Img./Abb./Afb./Rys./Obr. 24
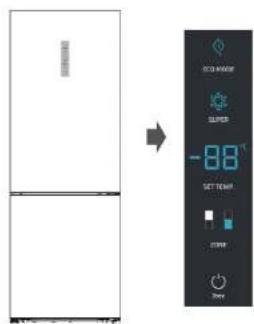
Fig./Img./Abb./Afb./Rys./Obr.25
natural_image
Illustration of two hands holding a rectangular object with upward arrows indicating motion or force (no text or symbols)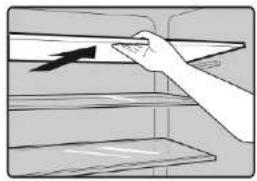
natural_image
Illustration of a hand holding a shelf with an arrow pointing to the top section (no text or symbols present)Fig./Img./Abb./Afb./Rys./Obr. 26 Fig./Img./Abb./Afb./Rys./Obr. 27
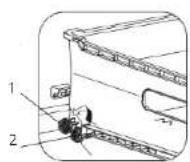
Fig./Img./Abb./Afb./Rys./Obr.30
natural_image
Diagram showing a hand pulling a component into a rectangular block with an arrow indicating direction (no text or symbols)Fig./Img./Abb./Afb./Rys./Obr.31
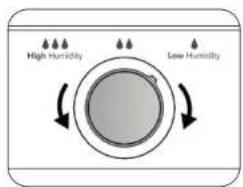
Fig./Img./Abb./Afb./Rys./Obr.28
natural_image
Diagram showing a refrigerator interior with a handbag and a side view of the refrigerator (no text or symbols present)Fig./Img./Abb./Afo./Rys./Obr.29
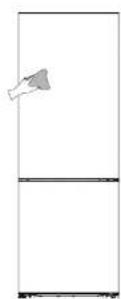
Fig./Img./Abb./Afb./Rys./Obr. 32 Fig./Img./Abb./Afb./Rys./Obr. 33
www.cecotec.es
Quart de Poblet, Valencia (Spain)
EA01220516
- INHALT
- Refrigerant
- INSTRUCTIONS DE SÉCURITÉ
- BEFORE USE
- Box contents:
- INSTALLATION
- Warning
- Refrigerator ventilation
- Please note
- ENGLISHENGLISH
- Refrigerator stabilisation
- Changing the opening direction of the door
- Warning:
- Fig. 18
- Fig. 21
- Fig. 22
- Fig. 23
- Fig. 24
- CONTROL PANEL
- Temperature control
- Refrigerator compartment
- Freezer compartment
- Super Freeze
- Energy saving
- Power button
- Alarm
- OPERATION
- Door shelves
- Refrigerator compartment shelves
- Flexible wine shelf (optional accessory)
- Fresh drawer
- Crisper drawer and humidity control
- Freezer compartment drawer
- Fig. 30
- Door handle (by model)
- SUGGESTIONS AND USEFUL TIPS
- Tips on energy saving
- Tips for cooling fresh food
- Refrigeration tips
- Freezing tips
- Tips for preserving frozen food
- Turning off the refrigerator
- CLEANING AND MAINTENANCE
- Exterior cleaning
- Interior cleaning
- Defrost
- Cleaning the door gasket
- Substitution of the LED light
- TROUBLESHOOTING
- TECHNICAL SPECIFICATIONS
- DISPOSAL OF OLD ELECTRICAL AND ELECTRONIC APPLIANCES
- TECHNICAL SUPPORT AND WARRANTY
- COPYRIGHT
- FRANÇAISFRANÇAIS
- PIÈCES ET COMPOSANTS
- Img.1
- PROBLEEMOPLOSSING
Brand : CECOTEC
Model : Bolero CoolMarket Combi 495 inox
Category : Fridge