
HighLight 91 X - Basket FABER - Free user manual and instructions
Find the device manual for free HighLight 91 X FABER in PDF.

| Product Type | Range Hood |
| Brand | Faber |
| Model | HighLight 91 X |
| Width | 90 cm |
| Minimum Safety Distance | 650 mm |
| Power Supply | 220-240 V ~ 50 Hz |
| Number of Speeds | 3 speeds + Intensive (6 min) |
| Lighting | LED, with brightness variation |
| Remote Control | Yes, wireless (LR03-AAA batteries, not included) |
| Delay Function | Delayed automatic shutdown of 30 minutes |
| Grease Filters | Dishwasher safe, clean every 2 months |
| Activated Carbon Filter | Replacement after 200 hours of operation (alarm) |
| Electrical Class | Class I (grounding required) |
| Use | Domestic use only |
Frequently Asked Questions - HighLight 91 X FABER
User questions about HighLight 91 X FABER
0 question about this device. Answer the ones you know or ask your own.
Ask a new question about this device
Download the instructions for your Basket in PDF format for free! Find your manual HighLight 91 X - FABER and take your electronic device back in hand. On this page are published all the documents necessary for the use of your device. HighLight 91 X by FABER.
USER MANUAL HighLight 91 X FABER
Recommendations and suggestions
- The Instructions for Use apply to several versions of this appliance. Accordingly, you may find descriptions of indivie features that do not apply to your specific appliance.
- The manufacturer will not be held liable for any damages resulting from incorrect or improper installation.
- The minimum safety distance between the cooker top and the extractor hood is 650~mm (some models can be installed at a lower height, please refer to the paragraphs on working dimensions and installation).
- Check that the mains voltage corresponds to that indicated on the rating plate fixed to inside of the hood.
- For Class I appliances, check that the domestic power supply guarantees adequate earthing. Connect the extractor to the exhaust flue through a minimum diameter 120 mm. The route of the flue as short as possible.
- Do not connect the extractor hood to exhaust ducts carrying combustion fumes (boilers, fireplaces, etc.).
- If the extractor is used in conjunction with non-electrical appliances (e.g. gas burning appliances), a sufficient degree of aeration must be guaranteed in the room in order to prevent the backflow of exhaust gas. The
kitchen must have an opening communicating directly with the open air in order to guarantee the entry of clean air. When the cooker hood is used in conjunction with appliances supplied with energy other than electric, the negative pressure in the room must not exceed 0,04 mbar to prevent fumes being drawn back into the room by the cooker hood.
- In the event of damage to the power cable, it must be replaced by the manufacturer or by the technical service department, in order to prevent any risks.
- If the instructions for installation for the gas hob specify a greater distance specified above, has to be taken into account. Regulations concerning the discharge of air have to be fulfilled.
- Use only screws and small parts in support of the hood. Warning: Failure to install the screws or fixing device cordance with these instructions may result in electrical hazards.
- Connect the hood to the mains through a two-pole switch having a contact gap of at least 3mm .
Use
- The extractor hood has been designed exclusively for domestic use to eliminate kitchen smells.
- Never use the hood for purposes other than for which it has been designed.
- Never leave high naked flames under the hood when it is in
operation.
- Adjust the flame intensity direct it onto the bottom of the pan only, making sure that it does not engulf the sides.
- Deep fat fryers must be continuously monitored during use: overheated oil can burst into flames.
- Do not flambé under the range hood; risk of fire.
- This appliance can be used by children aged from 8 years and above and persons with reduced physical, sensory or mental capabilities or lack of experience and knowledge if they have been given supervision or instruction concerning use of the appliance in a safe way and understand the hazards involved. Children shall not play with the appliance. Cleaning and user maintenance shall not be made by children without supervision.
- "CAUTION: Accessible parts may become hot when used with cooking appliances."
Maintenance
The symbol on the product or on its packaging indicates that this product may not be treated as household waste. Instead it shall be handed over to the applicable collection point for the recycling of electrical and electronic equipment. By ensuring this product is disposed of correctly, you will help prevent potential negative consequences for the environ
ment and human health, which tooled otherwise be caused by inappropriate waste handling of this product. For more detailed information about recycling of this product, please contact your local city office, your household waste disposal service or the shop where you purchased the product.
- Switch off or unplug the appliance from the mains supply before carrying out any maintenance work.
-
Clean and/or replace the Filters after the specified time period (Fire hazard).
-
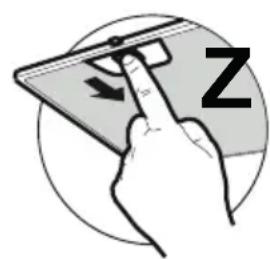
The Grease filters must be cleaned every 2 months of operation, or more frequently for particularly heavy usage, and can be washed in a dishwasher (Z).
- Clean the hood using a damp cloth and a neutral liquid detergent.
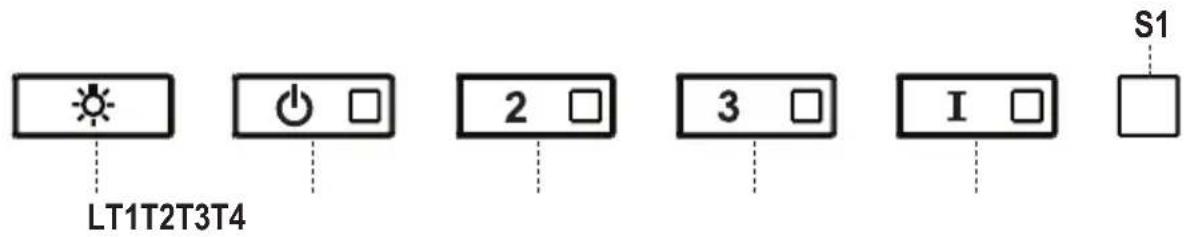
| Button | Function Led | |
| L Turns the lights ON/OFF at maximum strength. - | ||
| T1 Turns the motor on/off at speed one. - | ||
| Delay Function:Press and hold the button for approx. 3 seconds to Activate/Deactivate the Delay function (automatic switching off of the Motor, the Fans and the Lighting with a 30' delay).Cannot be enabled when Intensive or 24H are on. | Flashing | |
| T2 Turns the Motor on at speed two. - | ||
| Press and hold the button for approximately 5 seconds, with all the loads turned off (Motor and Lights), to turn the Activated Charcoal Filter alarm on. The relevant LED flashes twice to confirm. To turn the alarm off, press the button again and hold for at least 5 seconds. The relevant LED flashes once. | Flashing | |
| T3 Turns the Motor on at speed three. - | ||
| Press and hold the button for approximately 3 seconds, with all the loads turned off (Motor and Lights), to reset the Filter saturation alarm. The LED S1 flashes three times. | Flashing | |
| T4 Turns the Motor on at INTENSIVE. This speed is timed to run for 6 minutes. At the end of this time, the system returns automatically to the speed that was set before. If it is activated with the motor turned off, the hood will switch to OFF at the end of the time. | - | |
| Press and hold for 5 seconds to enable the remote control, indicated by the LED flashing twice. Press and hold for 5 seconds to disable the remote control, indicated by the LED flashing just once. | Flashing | |
| S1 Signals the Metal Grease Filter saturation alarm, indicating that it is necessary to wash the filters. The alarm is triggered after the Hood has been in operation for 100 working hours. | Fixed | |
| Signals the Activated Charcoal Filter saturation alarm. The filter must be changed after the Hood has been working for 200 hours. | Flashing | |
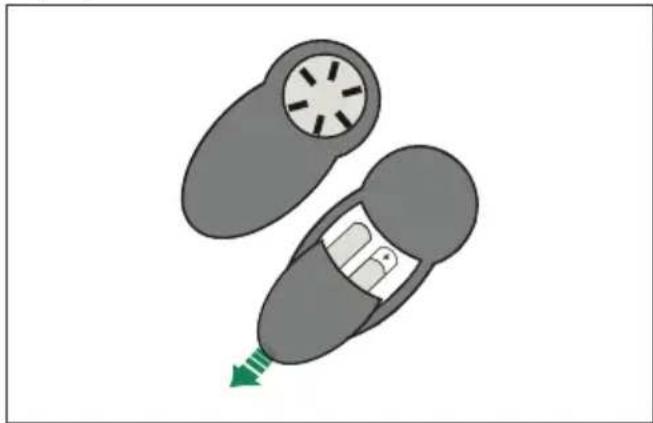
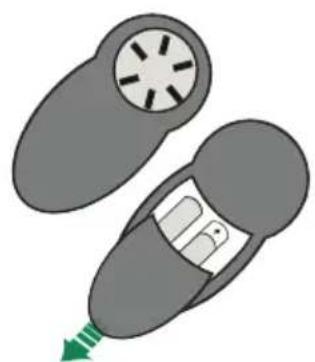
Remote control
The appliance can be controlled using a remote control powered by a 1.5 V carbon-zinc alkaline batteries of the standard LR03-AAA type (not included).
- Do not place the remote control near to heat sources.
Used batteries must be disposed of in the proper manner.
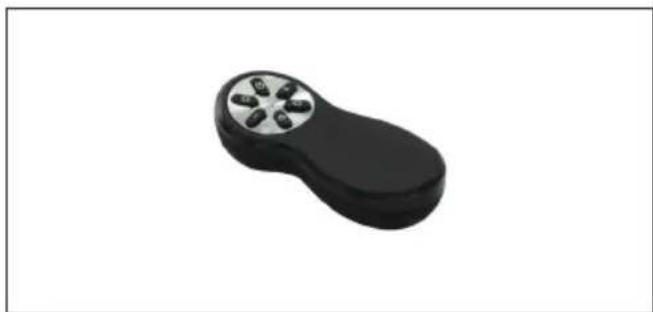
| Motor On/Off. | |
| - | Decreases the working speed each time it is pressed. |
| + | Increases the working speed each time it is pressed. |
| ① | Activates the INTENSIVE function This speed is timed to run for 6 minutes. At the end of this time, the system returns automatically to the speed that was set before. If it is activated with the motor turned off, it will switch to OFF at the end of the time. It is disabled by pressing the button again or pressing the "Motor OFF" button. |
| ◎ | - Press this button briefly to activate total shutdown of the hood (lights + motor) after 30 minutes. - Press and hold this button for a few seconds to deactivate Delay mode, or turn the motor off. The relevant LED flashes every 0.5 seconds |
| Lights On / Off |
Lighting
- For replacement contact technical support ("To purchase contact technical support").
BbITJXKIMOYTCINbHOHaRpeBaTbCBA BpEMpa60tbIra3OBbIX np6OpOB.
3KcπIpyaTaçn
- BcacbBaIOUaBbITJka npedHa3NaueHa TOnbKO dIpynmeHnB 6bIty dIy ydaJeHn I33anaxOB OT rTOBKn.
HnKOrda He nOJIb3yIITecb BbITJX-KoB INHbIX ZeJIaX,OTJIuHbTex,ДЯ KOTOpbIX OHa np3HaueHa.
HnkOrda He OCTaBnTe BbICOKoe PnAmr NOD BbITXKoH, Hax UeicB pa6ote. - PeruInpuyIte cnny nIaMeHn TaKIM o6pa30M, yTO6bI OHO OCTaBaJIOcB IOD IHNOM EMKOCTN IJI RAOTOBKN I He BblpBlAIOCb 3a eRO npedeJIbl.
- Приновке BO Фрптурнице посторно следи Te 3a ee paбтой: сильно НарpeTOe MacNo M BOCПЯмEHNTbCry.
He roTOBbTe 6JIIOda QIaM6e NOB BbITJXKOJ: ONaCHOCTb BO3Hn BEHn IOnKapa.
-Прибором могуТ NOЛьзOBaTbO Дети CTаршe 8 Лет И ОгразнчehнblIMN ПСИХИЧЕСКIMN, ФИЗИЧЕСКIMN И СЕHCOPHBIM СпособноCTЯМ, a Тадже He IMe- Юше ДОCTaTOUHOrO OпытА и 3Ha- Ни, HO TOЛьКО ПОД ПИСМOTPOM OTВETCTBEHHbIX JINц I N Pprn y
BHN, YTO OHN OByeHbI 6e3OpaCHOn 3KcNpyaTauIN npnbopa N 3HaOT O CBraHHbIX C eRO HnPaBnIbHbIM NCNoJIb3OBaHHeM ONaCHOCTX. CJeIHTe, YTObI DeTN He IrgaIIc Pnp6opom. Ounchky n y npnbopom DoJxeh ObecneuBaTb NOlb3OBaTeJIb, TaKne DeiCTB MoYr BBINOJIHrTb N DeTn,
yXoKyyxHn
CIMBOJ Ha n3dJIIN Hn yNAKOBKe yKa3bIBAeT, YTO np6Op X HeTb3a Bbl6paCbIbAtb, KaK O6bIy- eHHBn 6bITOBoMycop. Pnp6op, IOnJIeXaUm yHNUTOXeHNIO, He- oBXODIMO cdaTb BCNEuaJIbHbI INcNoJIb3OBAHnA 3JIeKTPnueCKNX N 3JIeKTPoHHbIX KOMNOHEHTOB. IOnJIb3OBAteJIb, npabNtBuHO cdaIO- Unn np6Op Ha nepepa6OTky, NO-MORAET PpeDTBpATNTb NOTEHUN-AlbHbIE HeratNBHbIE NocJeDCTBnA Dn OkpykaHOSe CpeDbI N Df JxEIDOPOBBy JIODei, BO3HnKAHOUne B CJIyuae HeNPaBVnIbHOrO erO yHNUTOXeHNIA. 3a 60one nOdp6HO-Ho-HnOPOMaUeN O BTOpUHOM NCNoJIb3OBAHn Pnp6opa O6pa
IaTeB B TOpOcKo COBeT, IuEcHyo Cnyk6y Np Nepepa6OTKe OTXODOB INN B MaRa3IN, IDe npIn 6op 6bln PnpO6peTeH.
-Перед Вынон HeHem Лобов onepaци ПО OчNTke N yXOD) BbIKIIOHTe ИЛN OTCoEINHITe CLOpH6Op OT 3JIeKTPnueCKOJ CETN.
OuHuaTe Hn/Hn 3aMeHnTe FInbTpbl NO nCTeHuN yKa3aHNO-TO nepNoDa BpeMeHn (OnaChocTb BO3HNKHOBeHn NaKapa). -XInpOBbIe FInbTpblHeo6xOdIMo XOD GAnuTaB pa3 B 2 Meca pa60-Tbl INn YaSe B Cnyae Oy IHTeHCINBHO TcNOJb3OBaHn HOpnp6op; XInpOBbIe FInbTpbl
MOXHO MbITb B NOCyIDOMOeHOn MaUNHe (Z).

OuHuaTe BbITJkKBy BJaXHOI TpIKNo, CMOeHHoB HHeITpaJIb-HOM JNdkOM MOUcEM BeIecTBe.

| КоньkaФункция Иndикатор | ||
| L BклочаET/БыклочаET Мaksимально яркове освецени. - | ||
| T1 BклочаET И БыклочаET Двигаелов на первой скорости. - | ||
| Функция за对接ки (Delay):При Нажати Кноки В тучения поимерно 3 секунд ВыклочаET/БыклочаETФункцию Delay(авторческоь Выклочаен� Двигаелов, вентлиотра и освец за对接ки 30 минут).Функция He может 썼ытб Выноча на ри Выноченho INHTEHСИВНОДSCOKОSTINипфункции 24ч. | Miraetabarийнь abarийнь двогаян Ту Сышka COOTBETCTBYUSSERO Иndикатopa. Чтосы сегу OTКLOЧИТь,[euple pa3 Нажmente Кноку В тучения 5 секунд,пoka He BCNsIXHET ODNH p3 COOTBE TCTBYUSSIOI INDInKATOP. | |
| T2 BклочаET Двигаелов на Второ SCOKОСТи. - | ||
| При Нажати Кноки В тучения поимерно 5 секунд, когда BCE Harpy3knOTКLOЧЕны (Двигаелов + освецени), пухODITВ DeievCTBNEСгнал Фпльстов на АктувированHom угл, на чTO уka3ыВаET dBOVINHа Спьшka COOTBETCTBYUSSERO Иndикатopa. Чтосы сегу OTКLOЧИТь,[euple pa3 Нажmente Кноку В тучения 5 секунд,пoka He BCNsIXHET ODNH p3 COOTBE TCTBYUSSIOI INDInKATOP. | Miraetabarийнь Ту Сышka COOTBETCTBYUSSERO Иndикатopa. Чтосы сегу OTКLOCHENь (Двигаелов + освецени), вентлиотся сбpos abarийного СпьшILA NaCByIIeHЯня Фпльстов и пtrn pa3a МогаET INDInKATOP S1. | |
| T3 | ВыночаET Двигаелов на Trетьш SCOKОСТи. - | |
| Нжатием Кноки В тучения поимерно 3 секунд, когда Выноча за对接ки OTКLOЧЕны (Двигаелов + освецени), вентлиотся сбpos abarийного СпьшILA NaCByIIeHЯня Фпьстов и Trpn pa3a МогаET INDInKATOP S1. | - | |
| T4 | ВыночаET Двигаелов на ИНTEHCIBHON SKOKОСТи.Takая SCOKОСТь орагшина таймером на 6 минут. ПО Истechени STORВамен CBNTMATEMA ABTOMATUCHEСКВ BOЗВРАСАЕТСЯ на HabстpoEHNYCOskОСТь. ECSNI Функция ИнTEHCIBHON SCOKОСТи AKTUВИРУЕТСЯ пri вbl-КлочenvHom Двигаелов, ТО NO ISTECHEN NJIESTN MInHyT OSHA BOZВРАСАЕТСЯ В COSTОПЕ ВыIKЛ (OFF). | -Ту Сышka ATOTG OpaHEE Miraet |
| Нжатием Кноки В тучения 5 секунд, пухODITВ DeievCTBNEпуныт ДУ, очem CBNTMATEMA ABTOMATUCHEСКВ BOЗВРАСАЕТСЯ на HabстpoEHNYCOskОСТь. ECSNI Функция ИнTEHCIBHON SCOKОСТи AKTUВИРУЕТСЯ пri вbl-КлочenvHom Двигаелов, ТО NO ISTECHEN MInHyT OSHA BOZВРАСАЕТСЯ В COSTОПЕ ВыIKЛ (OFF). | ||
| S1 O6 | ОзнааET abarийнь сизиелов на Habал Habал Habал Habал Habал Habал Habал Habал Habал Habал Habал Habал Habал Habал Habал Habал Habал Habал Habал Habал Habал Habал Habал Habал Habал Habал Habал Habал Habал Habал Habал Habал Habал Habал Habал Habал Habал Habал Habал Habал Habал Habал Habал Habalam Habalam Habalam Habalam Habalam Habalam Habalam Habalam Habalam Habalam Habalam Habalam Habalam Habalam Habalam Habalam Habalam Habalam Habalam Habalam Habalam Habalam Habalam Habalam Habalam Habalam Habalam Habalam Habalam Habalam Habalam Habalam Habalam Habalam Habalam Habalam Habalam Habalam Habalam Habalam Habalam Habalam Habalam Habalam Habalam Habalam Habalam Habalam Habalam Habalam Habalem Habalam Habalam Habalam Habalam Habalam Habalam Habalam Habalam Habalam Habalam Habalam Habalam Habalam Habalam Habalam Habalam Habalam Habalam Habalam Habalam Habalam Habalam Habalam Habalam Habalam Habalam Habalam Habalam Habalam Habalam Habalam Habalam Habalam Habalam Habalam Habalam Habalam Habalam Habalam Habalam Habalam Habalam Habalam Habalam Habalam Habalam Habalam Habalam Habalam Hablem Habalam Habalam Habalam Habalam Habalam Habalam Habalam Habalam Habalam Habalam Habalam Habalam Habalam Habalam Habalam Habalam Habalam Habalam Habalam Habalam Habalam Habalam Habalam Habalam Habalam Habalam Habalam Habalam Habalam Habalam Habalam Habalam Habalam Habalam Habalam Habalam Habalam Habalam Habalam Habalam Habalam Habalam Habalam Habalam Habalam Habalam Habalam Habalam Habalam HabAMAN HOM углеса CBNTMILSOI KINPOPSФуньстов и Н�бхдIMOCьпxFИпьпь.Сигнал ВыночаET сбоста CBNTMILSOI KINPOPSФуньстов и Н�бхдIMOCьпxFИпьпь.Сигнал ВыночаET сбоста CBNTMILSOI KINPOPSФуньстов и Н�бхдIMOCьпxFИпьпь.Сигнал ВыночаET сбrostа CBNTMILSOI KINPOPSФуньстов и Н�бхдIMOCьпxFИпьпь.Сигнал ВыночаET сбrostа CBNTMILSOI KINPOPSФуньстов и Н�бхдIMOCьпxFИпьпь.Сигнал ВыночаET сбrostа CBNTMILSONKOSKIFФуньстов и Н�бхдIMOCьпxFИпьпь.Сигнал ВыночаET сбrostа CBNTMILSONKOSKIFФуньстов и Н�бхдIMOCьпxFИпьпь.Сигнал ВыночаET сбrostа CBNTMILSONKOSKIFФуньстов and New York City Department of Health and Medical Services, New York City Department of Health and Medical Services, New York City Department of Health and Medical Services, New York City Department of Health and Medical Services, New York City Department of Health and Medical Services, New York City Department of Health and Medical Services, New York City Department of Health and Medical Services, New York City Department of Health and Medical Services, New York City Department of Health and Medical Services, New York City Department of Health and Medical Services, New York City Department of Health and Medical Services. | Борот постоянь СВETOM СВETOM СВETOM СВETOM СВETOM СВETOM СВETOM СВETOM СВETOM СВETOM СВETOM СВETOM СВETOM СВETOM СВETOM СВETOM СВETOM СВETOM СВETOM СВETOM СВETUM СВETUM СВETUM СВETUM СВETUM СВETUM СВETUM СВETUM СВETUM СВETUM СВETUM СВETUM СВETUM СВETUM СВETUM СВETUM СВETUM СВETUM СВETUM СВETUM СВETOM СВETUM СВETUM СВETUM СВETUM СВETUM СВETUM СВETUM СВETUM СВETUM СВETUM СВETUM СВETUM СВETUM СВETUM СВETUM СВETUM СВETUM СВETUM СВETOM СВETOM СВETOM СВETOM СВETOM СВETOM СВETOM СВETOM СВETOM СВETOM СВETOM СВETOM СВETOM СВETOM СВETOM СВETOM СВETOM СВETOM СВETOM СВETMO СВETOM СВETOM СВETOM СВETOM СВETOM СВETOM СВETOM СВETOM СВETOM СВETOM СВETOM СВETOM СВETOM СВETOM СВETOM СВETOM СВETOM СВETOM СВETOM СВETM СВETOM СВETOM СВETOM СВETOM СВETOM СВETOM СВETOM СВETOM СВETOM СВETOM СВETOM СВETOM СВETOM СВETOM СВETOM СВETOM СВETOM СВETOM СВETOM СВETМ СВETM СВETM СВETM СВETM СВETM СВETM СВETM СВETM СВETM СВETM СВETM СВETM СВETM СВETM СВETM СВETM СВETM СВETM СВETM СВETM СВETМ СВETM СВETM СВETM СВETM СВETM СВETM СВETM СВETM СВETM СВETM СВETM СВETM СВETM СВETM СВETM СВETM СВETM СВETM СВETМ СВETМ СВETM СВETM СВETM СВETM СВETM СВETM СВETM СВETM СВETM СВETM СВETM СВETM СВETM СВETM СВETM СВETM СВETM СВETM СВET明 СВETM СВETM СВETM СВETM СВETM СВETM СВETM СВETM СВETM СВETM СВETM СВETM СВETM СВETM СВETM СВETM СВETM СВETM СВETM СВET明 СВET明 СВET明 СВET明 СВET明 СВET明 СВET明 СВET明 СВET明 СВET明 СВET明 СВET明 СВET明 СВET明 СВET明 СВET明 СВET明 СВET明 СВET明 СВET明 СВETM СВET明 СВET明 СВET明 СВET明 СВET明 СВET明 СВET明 СВET明 СВET明 СВET明 СВET明 СВET明 СВET明 СВET明 СВET明 СВET明 СВET明 СВET明 СВETM СВETM СВETM СВETM СВETM СВETM СВETM СВETM СВETM СВETM СВETM СВETM СВETM СВETM СВETM СВETM СВETM СВETM СВET明 СВETМ СВET明 СВET明 СВET明 СВET明 СВET明 СВET明 СВET明 СВET明 СВET明 СВET明 СВET明 СВET明 СВET明 СВET明 СВET明 СВET明 СВET明 СВET明 СВET明 СВETm СВET明 СВET明 СВET明 СВET明 СВET明 СВET明 СВET明 СВET明 СВET明 СВET明 СВET明 СВET明 СВET明 СВET明 СВET明 СВET明 СВET明 СВET明 СВET明 СВET马 СВET明 СВET明 СВET明 СВET明 СВET明 СВET明 СВET明 СВET明 СВET明 СВET明 СВET明 СВET明 СВET明 СВET明 СВET明 СВET明 СВET明 СВET明 СВET明 СВET СВET明 СВET明 СВET明 СВET明 СВET明 СВET明 СВET明 СВET明 СВET明 СВET明 СВET明 СВET明 СВET明 СВET明 СВET明 СВET明 СВET明 СВET明 СВET明 СВET 易 СВET明 СВET明 СВET明 СВET明 СВET明 СВET明 СВET明 СВET明 СВET明 СВET明 СВET明 СВET明 СВET明 СВET明 СВET明 СВET明 СВET明 СВET明 СВET明 СВET明白 СВET明 СВET明 СВET明 СВET明 СВET明 СВET明 СВET明 СВET明 СВET明 СВET明 СВET明 СВET明 СВET明 СВET明 СВET明 СВET明 СВET明 СВET明 СВET明 СВET清 СВET明 СВET明 СВET明 СВET明 СВET明 СВET明 СВET明 СВET明 СВET明 СВET明 СВET明 СВET明 СВET明 СВET明 СВET明 СВET明 СВET明 СВET明 СВET明 СВET明清 СВET明 СВET明 СВET明 СВET明 СВET明 СВET明 СВET明 СВET明 СВET明 СВET明 СВET明 СВET明 СВET明 СВET明 СВET明 СВET明 СВET明 СВET明 СВET明 СВET不明 СВET明 СВET明 СВET明 СВET明 СВET明 СВET明 СВET明 СВET明 СВET明 СВET明 СВET明 СВET明 СВET明 СВET明 СВET明 СВET明 СВET明 СВET明 СВET明 СВET明细 СВET明 СВET明 СВET明 СВET明 СВET明 СВET明 СВET明 СВET明 СВET明 СВET明 СВET明 СВET明 СВET明 СВET明 СВET明 СВET明 СВET明 СВET明 СВET明 СВET明确 СВET明 СВET明 СВET明 СВET明 СВET明 СВET明 СВET明 СВET明 СВET明 СВET明 СВET明 СВET明 СВET明 СВET明 СВET明 СВET明 СВET明 СВET明 СВET明 СВET明显 СВET明 СВET明 СВET明 СВET明 СВET明 СВET明 СВET明 СВET明 СВET明 СВET明 СВET明 СВET明 СВET明 СВET明 СВET明 СВET明 СВET明 СВET明 СВET明 СВET明显的 COSTM COSTM COSTM COSTM COSTM COSTM COSTM COSTM COSTM COSTM COSTM COSTM COSTM COSTM COSTM COSTM COSTM COSTM COSTM COSTM COSTM COSTM COSTM COSTM COSTM COST明 COST明 COST明 COST明 COST明 COST明 COST明 COST明 COST明 COST明 COST明 COST明 COST明 COST明 COST明 COST明 COST明 COST明 COST明 COST明 COST明 COST明 COST明 COST明 COST明 COSTM COST明 COST明 COST明 COST明 COST明 COST明 COST明 COST明 COST明 COST明 COST明 COST明 COST明 COST明 COST明 COST明 COST明 COST明 COST明 COST明 COST明 COST明 COST明 COSTm COST明 COST明 COST明 COST明 COST明 COST明 COST明 COST明 COST明 COST明 COST明 COST明 COST明 COST明 COST明 COST明 COST明 COST明 COST明 COST明 COST明 COST明 COST明 COST明 COSTm COSTm COSTm COSTm COSTm COSTm COSTm COSTm COSTm COSTm COSTm COSTm COSTm COSTm COSTm COSTm COSTm COSTm COSTm COSTm COSTm COSTm COSTm COSTm COSTm COST明 COST明 COST明 COST明 COST明 COST明 COST明 COST明 COST明 COST明 COST明 COST明 COST明 COST明 COST明 COST明 COST明 COST明 COST明 COST明 COST明 COST明 COST明 COSTm COSTM COSTm COSTm COSTm COSTm COSTm COSTm COSTm COSTm COSTm COSTm COSTm COSTm COSTm COSTm COSTm COSTm COSTm COSTm COSTm COSTm COSTm COSTm COSTm COSTm COSTм COSTm COSTm COSTm COSTm COSTm COSTm COSTm COSTm COSTm COSTm COSTm COSTm COSTm COSTm COSTm COSTm COSTm COSTm COSTm COSTm COSTm COSTm COSTm COSTm COST m COSTm COSTm COSTm COSTm COSTm COSTm COSTm COSTm COSTm COSTm COSTm COSTm COSTm COSTm COSTm COSTm COSTm COSTm COSTm COSTm COSTm COSTm COSTm COSTm COSTM COSTm COSTm COSTm COSTm COSTm COSTm COSTm COSTm COSTm COSTm COSTm COSTm COSTm COSTm COSTm COSTm COSTm COSTm COSTm COSTm COSTm COSTm COSTм COSTm COSTм COSTm COSTm COSTm COSTm COSTm COSTm COSTm COSTm COSTm COSTm COSTm COSTm COSTm COSTm COSTm COSTm COSTm COSTm COSTm COSTm COSTm COSTm COSTм COSTm COST明 COST明 COST明 COST明 COST明 COST明 COST明 COST明 COST明 COST明 COST明 COST明 COST明 COST明 COST明 COST明 COST明 COST明 COST明 COST明 COST明 COST明 COST明 COST马 COST马 COST马 COST马 COST马 COST马 COST马 COST马 COST马 COST马 COST马 COST马 COST马 COST马 COST马 COST马 COST马 COST马 COST马 COST马 COST马 COST马 COST马 COST马 COST马 COSTm COSTm COSTm COSTm COSTm COSTm COSTm COSTm COSTm COSTm COSTm COSTm COSTm COSTm COSTm COSTm COSTm COSTm COSTm COSTm COSTm COSTm COSTm COSTm COST马 COST马 COST马 COST马 COST马 COST马 COST马 COST马 COST马 COST马 COST马 COST马 COST马 COST马 COST马 COST马 COST马 COST马 COST马 COST马 COST马 COST马 COST马 COST马 COST明 COST明 COST明 COST明 COST明 COST明 COST明 COST明 COST明 COST明 COST明 COST明 COST明 COST明 COST明 COST明 COST明 COST明 COST明 COST明 COST明 COST明 COST明 COST明 COST马 COST明 COST明 COST明 COST明 COST明 COST明 COST明 COST明 COST明 COST明 COST明 COST明 COST明 COST明 COST明 COST明 COST明 COST明 COST明 COST明 COST明 COST明 COST明 COSTm COST马 COST马 COST马 COST马 COST马 COST马 COST马 COST马 COST马 COST马 COST马 COST马 COST马 COST马 COST马 COST马 COST马 COST马 COST马 COST马 COST马 COST马 COST马 COST明 COST马 COST马 COST马 COST马 COST马 COST马 COST马 COST马 COST马 COST马 COST马 COST马 COST马 COST马 COST马 COST马 COST马 COST马 COST马 COST马 COST马 COST马 COST马 COST明 COSTm COST明 COST明 COST明 COST明 COST明 COST明 COST明 COST明 COST明 COST明 COST明 COST明 COST明 COST明 COST明 COST明 COST明 COST明 COST明 COST明 COST明 COST明 COSTm COST明 COSTm COST明 COST明 COST明 COST明 COST明 COST明 COST明 COST明 COST明 COST明 COST明 COST明 COST明 COST明 COST明 COST明 COST明 COST明 COST明 COST明 COST明 COST明 COST马 COST马 COST明 COST明 COST明 COST明 COST明 COST明 COST明 COST明 COST明 COST明 COST明 COST明 COST明 COST明 COST明 COST明 COST明 COST明 COST明 COST明 COST明 COST明 COSTm COST明 COST马 COST马 COST马 COST马 COST马 COST马 COST马 COST马 COST马 COST马 COST马 COST马 COST马 COST马 COST马 COST马 COST马 COST马 COST马 COST马 COST马 COST马 COST马 COSTm COST明 COST明 COST明 COST明 COST明 COST明 COST明 COST明 COST明 COST明 COST明 COST明 COST明 COST明 COST明 COST明 COST明 COST明 COST明 COST明 COST明 COST明 COST明 COST同 |
Пульт достанцнон Horo ynpablenia
ДанныМпиборOMMOЖHOуравлЯТБпьтOM ДИСТАнцИОНHOrOуравЛЕнЯHAшЕLOЧьIX БаТаpeйКax CУROLьНБIM эЛемERTOM СТандapTHOrOТиаLR03-AAA(HeВКПЮчЕН ВКOMПЛЕKT NOCTaВКИ).
He octabTb nyIbT B6n3n OT nCTOCHKOB Tena.
He BbIbpaCbIBaTb 6aTapeKn BMeCTe 06bIuHbIM Mycopom, CKNaIbIBaTb IX CneuaJIbHbIe c6OpHbIe EMKOCTN.
1,5 B

Bkn/Bbikn DvraTeJia.

Chnkaet ckopoctb pa6oTbI npn KaKdOM Haxkatu.

NobbIaetCKopocb pa60Tb npn KaJdOM HaxkATNI.

BknHouaet yHKuHIO HHTEHCNBHOCKOPOCTN.
Takay CKOpocb OrpaHnueHa TaMepom Ha 6 MNHyT. NcTeueHn 3TOBpeme HN CNCTeMa aBTOMaTHueCKn BO3BpaIa-etCra Ha HAcTpoEHHyO paHee CKOpocb.
EcInn FyHKUIN HHTeHCHBHO CKOPoCTu aKTHBnpyETCn Pn BbIKJIOueHHOM DBNaTeJIe,TO NO NCTeueHN NIECTN MInHyT OHa BO3BpaAaETCn B COCTOHNHe BblKI (OFF). FyHKUIN OTKnIOuaETCn HaxKaTNem 3Toi Je KhoNk INI IN KhoNkoB BblKI (OFF) DBNaTeJIa.

-Прн КраТКOM Hжатин KНОКИ BKЛIOчaETс peKIM ПОЛHOrO OTKПчЕньВБITЯKKI (OCBeUeHHe+ DBNaratel)Чepe3 30 MmHT.
- Pn Haxatnn KONKn B TeueHne HeCKOJIbKnX ckyND OTKIOUaETcpeKIM 3aIepKk (Delay) mmoKHO BblIOuHTb DBIrataTb. COOTBETCTByoUm nHdkaTop Mraet KaKdble 0,5 ceKyHdbI.

BKn/BbIKNOCBeueHn.
OcBeueHne
ДяЗаменс CBeToIOnOda obpaaTeCb B o6cnyKnaUoUu ΚeHTp («Дя npnoobpeTeHЯ obpaaaiTecb B O6cnyKnaUoUu ΚeHTp»).
Icke Kocblnbl/Akbpatbnbl,
KapbIKTaHDbIpy KypaJIbI
- Aybictbyy ywiH, TexnkaIbIK Konday Kepcety opTaIbIFbIMeH xa6apnaCbIHb3 («Catbin any ywiH, TexnkaIbIK KbI3MeT Kepcety opTaIbIFbIMeH xa6apnaCbIHb3»).
Cobetn TpNKOBN
- YnataCTBOTo3a ynoTpe6a ce OHeCyBaHaHeKoJkyMoJeIHO OBoj ypei. CoOBeTHo Ha Toa, BHeMOKeTeHaHajTeOpNCHa HnHBnDaJIHN KapaKTePncTNKn KOH He Ce OHeCyBaat Ha BaIHOTypei.
-ПронЗВОДИТЕЛOTнemaДа6идe OДГ罗БОЕн3aOШТETУВаьаKOн HаCTаHaJIeΚakOpe3yЛТaTHa HeправилhaHInHecoOДВeTHa MOHTaKa.
MHHMaJIHOTo 6e36eJHOIpaCTOJaHHeMeIyI IIOUaTaI 3aIrotBeIbeI H aCINHpOpOT eI 650mm (HeKOnMOJeJIIMoXaTJaCEIHCTaJIpaATnHaIIOMaJaBHCnHa,BeMOJIIME,IIOrJIeJHETeI rI JeIOBHTe 3aPa6OTHNIMeH3HHMOHTaKa). - ПюверетаДалиВОЛТаЖаТаHaCTpyjataOД罗ВаРаHaOHaaKOjaeHaBeTeHaHaПLOчКаТaCoCпeцнKaци,ПprИьрСЕнHaBHaTpeHHaTaCTpaHaHaacnHaTopOT.
3aIypeiIOJKlaIaI,I,IpoBepeTe IaJIH IOMaIHHOTo HAIOjyBaIbe coIeJIeKTPnHaCTpyjaIrapaHTnpa COoDBetHO 3a3emjyBaIbe. IIOBp3eTe roI acINHpAToPOT co OIBOJHOUpeBOIIpekyIeBkaKOJa HMaMIMMaJIeH DIJaMeTApOd 120mm.Tpacata Ha UpeBOTO Mopa Da6NdeIITTO NOKpaTka.
HeIOBp3yBajTe roacnnpaTopoT coOdBODHnKaHaJIHnHn3KOnCe CnpOBeDyBaat3aIaNHBnGammaCBN (6oJlepn,OrHnHTa,HTH.).
-Дokолку acnnapot ceKopncTn 3aeHNO co ypeJkoj
Hepa6OTnHaJeIekTpHuaCTpyja (HaIIpHMepe, ypeHa rac), MopaDaCeO6e36eHNIOBOJIe HCTeIeH HaBentnlaIaJa BO IIPOCTOpHjata 3a Da Ce cnpeu BpaKaIbe Ha3aHa HA N3dYBHTe IracOBn. KyjHATA Mopa Da HMaOTBOP KoJ e INPeKTHO IOBP3aH CO HaIBoPeUHHOT BO3dYx 3a Da Ce O6e36eHN BJe3 Ha YNCT Bo3dYx. Kora acnnpaTOPO Tce KOPHCTN 3aeEHO Co aNapATn KOHHe pa60TaHa eJIeKTPuHa CTpyja, HeRaTHBHNOT pINTCOK Bo IIPOCTOpHjata He Cmee Da6HNePiOrOleM oD 0,04 mbar, Co ZeJI DaCe cnpeu BpaKaIbe Ha N3dYBHTe racOBn Ha3aI BO IIPOCTOpHjata Od CTpaHa Ha acnnpaTOPOT.
Bo cIyuajHa oIITeTyBaHe Ha Ka6eIoT 3a Ctpyja,Toj Mopa Da 6nJe 3aMeHeo I Ipn3BOAnTeIoT HJN O,I TEXHNuKnot cepBnC,3a Da Ce CInpeaT KaKBn 6HIO pN3nI.
Ako yIaTCTBaTa 3a MoHTaKaHa IIIOUaTa 3a IOTBeHbE HaI rac HabeYBaATeKaeI eI IOTppe6HOIIOROIeMoIpactOjaHne OHaBeHeHToIIOrpe,TOa Tpe6a Da Ce 3eMe IpeBnI. PeryIaTHBtE 3a HcNpyTaHbe BO3dUxTpe6a DaCeIOHTyBaAT.
Kopnctete cmoI IpafoBN H MaJI N DeIOBn 3aI IOTIIopaHa aCnnpaTopoT. IpeDy npdeYBaHe: AkoI IpafoBNTe HJN ypeDoT 3aI fHKcnpaHBe He rMoHTnpaTe BC COJIaCHOCt CO OBHe yIaTCTBa, MoKe DaIoJe ONaChOCTn
NOBp3aHn CO ctpyjata.
- Поврзete ro acnnapotopT Deca He cMeaT da cn nIrpaat co ctpya npeky dBOPOJIeHCO anapatOT. YnCTeHbeto n npeKInHyBauch KoJ hMa KOHTaKTeIprjxUbaHbeto He cMeaT da ja3 od HajMaIky 3 mm. npaBat deca 6e3 NaI3Op.
Ynotpe6a
- Acnnapotop e dH3ajHnpa ncknyuHTeJHo 3a DOMaSH ynoTpe6a 3a eJIMnHnpaHe Mnpn36nte od KyjHaTa.
He Kopnctete ro acnpaTopoT 3a dpyn HameH, OCBeh 3a 3a KOn e Dn3ajHnpaH.
Hnkoraush He naletene octabajte OTBOPEN ORAH acnnpaTopoT DoeKa nCTno pa60tn. - Ппсncocobete ГиnteH3nteTOT HaПлamehOT 3a Да ГинcoHTeДиpeKTHO KOHДHOTO Ha TaBaTa N ПpoBepTe ДaIN NCTNOT NOДи3JIeRyBa Od CTpaHNTe TaBaTa.
-Фрnte3nte 3a Пржеьe Длабoka Machotиа Tpe6 NOctojaHO DA 6nIaT NOI NaI3Op 3a BpeMe Ha KOpNCTeHBe INperpeahOTO MacNo MoKe JleCHO Da Ce 3aIaII.
HeФлamбира te xpaHa acnnpaTOpOT;noCTOn onaCHOcT od noXap.
Oboj anapat MoKe Da KOpncTaT Deca NocTapn O, RoDHH IIua CO Hama 3NCHK, cETINH IN MeHTaHn CNOcOBHOCTN IN CO HeIOBOJHO NCKyCTBO I 3HaehBe, aKO Ce NOd HaID3Op IN aKO IM CE yNaTCTBa 3a yNOTpe6ata anapaTOT Ha 6e36eDen Ha
"BHIMAHNE: OoctaHnTe DeIOBm MOxat Da Ce BKeHT H KOra ce KopncTaT Co ypei a RotBeHe".
OДржуBa№
Cm60JOT Ha npOn3BOJOT nIN OHOBOTO NaKyBaHbe NOKaKyBa DeKa npOn3BOJOT He CMee
Hda ce TpeTnpa KaKo OTnad OdoДдOMaKInHCTBa.Toj Tpe6a T da ce npedae BO COODBeTeH CObIpeH pYHKT 3a peuNKIpaHe
Ha eIeKtpnHa n eIeKtpoHcKa onpema. Co npaBnHOpacxOyBaHbe Ha OBOJ npOn3BOD, Bce NOMarate da ce cnpeya
HATOTeHcunjaJIHnTe HeTaTINBHN PocJeIuCn Bp3 XNBOTHaTa BocpeiHa N OBeKOBOTO a 3dpabje, KOn 6n MoKeIe Da HactaHaT KaKO pe3yJITaT Ha TOHeCOoDBeTHOTO pAcxOdyBaHbe Ha OBOj Ipon3BOD KaKO OTnAd. . IOBeKe DeTaJIu INHΦOpMaUIn
OДВО BpCKa CO peuKnIpaHbeto Ha OBOj PON3BOD, Be MOJN KONTAKTIpajTe ja BaShaTa TOKaJIHa rpaIcKa Bnact, BaShaTa 8y6a 3a pacxOyBaHbe HeHnA DomaShen OTnaIиI npoDaBVHnCata Od KaDe WTO CTe ro KynIe PON3BODOT.
- Празда ro odpxyBaTe ypeDoT,ДвВьЧeTe rO nIи N3BaIeTeHakabelOT 3a HanojyBaHbe.ИСчпстete n/иn 3aMeHete rN
ФИЛТРИТЕ ПОСLE ONPREДЕЛЕНNotВременcknotперноД(ОпасноCTOД NOЖAP).
-Фиntpnte Mopa da ce chcTaT Ha cekon 2 Mececa nIIN NOeCTO npi 3roJeMeHa ynoTppe6a MOxat da ce MnjaT BO MaunHa 3a MneHbe caIOBn (Z).

- AcnnpaTopoT YnCTeTe ro BnaJHa KpNa N HeyTpapanen TeueH DeTeprEHT.
CO

| Конч. | Функциja Led | |
| L Г. | ВКЛУЧУBA/ИСКЛУЧУBA|CBETПАТа|Нa|МakсmaJIнa| jaunna- | |
| T1 Г. | ВКЛУЧУBA/ИСКЛУCHYBA|MOTOPOT|BO|6p3nHa|ец. - | |
| Функциja 3a odnojkeha pa6ota:Припсншетe| ro|и 3aДржete| ro| кОЛчeto| okoly| 3i | cekyndi| 3a| da| ja| ВКЛУЧTE/нckЛУЧTE|Функциja|a|3a|OДIOJKeHа|pa6ota|(авTomатско|нckЛУЧВаьe|Ha|MOTOPOT|ВentilatopHTe|n| OCBETLYBaBJeTO|co|ЗадунБa|о| 30i | cekyndi).He| moKE| da| ce| ВКЛУCH|KORA| e| ВКЛУЧЕHO| ИNTEH3NBUHOM|n| 24u. | Терлесы | |
| T2 Г. | ВКЛУЧУBA|MOTOPOT|BO|6p3nHa|два. - | |
| Припсншетe|ro|и 3aДржete|ro|КOLIчeto|okoly|5i|cekyndi|,co|cHTe|ypeDi|нckЛУчEH(МOTOP|и CBETIIa),3a| da| ro| ВКЛУЧte| aIapmOT|3a|фИтЕрOT|co|akTINBEH| jaIeH.CoOДВETNOT|LEDI| trpenka|ДвалATN|3a| da|notbpydi.3a| da| ro|нckЛУчte| aIapmOT|Припсншетe|ro| IOBTOPOT|КOLIчeto| n|Заджete|ro| 6apem|5i|cekyndi. |CoOДВETHOT|LEDI| CBETINO| trpenka|EDnAù. | Терлесы | |
| T3 Г. | ВКЛУЧУBA|MOTOPOT|BO|6p3nHa|trn. - | |
| Припсншетe|ro|и 3aДржete|ro|КOLIчeto|okoly| 3i | cekyndi| co|сHTe|уpeDi|нckЛУчEH(MOTOP|и CBETIIa),3a| da| HaIapbHTe|peCetHpaIbe|Ha|aIapmOT|3a|ЗаITehocT|Ha|фИтЕрOT|LEDI| S1| trpenka|Трпати. | Терлесы | |
| T4 Г. | ВКЛУCHYBA|MOTOPOT|BO|MHTEH3NBUHAI|брзиHA|OBaa|6p3nHa|e|ПОCTaВ�нa|da|pa6OTn|6IMHyTHn|Ha|КраJO|OD|ОВJO|пepнod,СИСТЕМOT| abTOMATСКИ| Ke| ce|ВрATN| BO|6p3nHATA|shTo|6nla|прETXODH|ПОCTaВ�нa|A KolICellakTINBpAlCo|HSCKlUeH|MOTOp,|acTINPAPOT|Ke|cell|NCKJIYUH|ПОСТЕКOT|HAL|ОВJO|пepнod. | - |
| Припсншетe|n|3aДржete|okoJy|5i|cekyndi|3a|da|ro|ВКЛУчte|ДalevHsCknOT|урарВauch. |Bo| toj|сlyujaj,|LEDI| trpenka|ДвалATN.Припсншетe|n|3aДржete|okoJy|5i|cekyndi|3a|da|ro|нckЛчeH|ДalevHsCknOT|урарВauch. |Bo| toj|сlyujaj,|LEDI| trpenka|само|ednau. | Терлесы | |
| S1 Г. | OЗнachуВaJaIapMOT|3a|3aСаNTeHOCT|Ha|MetaJIHOT|ФИЛтEp|3a|MaHOTnH,|koj|ПOKЖуВa|deKalle|HeONTXODH|ФИЛТРe|da|cell3MnjaT. |AларMOT|cell|ВКЛУчВa|OTKAKO| acПИРAPOT|6nla|Bo|ФИКциJa|100|pa6OTn|Uaca. | ФИКснOi |
| СИннIH3Hpa|akTINBIPaHn|aIapm|3a|ФИЛтEp|co|akTINBeH|jarJIeH. |ФИЛтЕрOT|Mopa| da| ce|Замен|OTKAKO| acПИРAPOT|pa6OTEI|200|чaca. | Терлесы |
Далецнскупаввац.
AnapaTOT MOKe Da ce KOHTpOInpa Co NOMoH Na DaJIeUHHcN yIpaBvBauch Koj pa6OtN co 1,5 V jaJIepoJHO-UNHKOBn aIKaJHn 6aTe cTaHdapDeH Bn LR03-AAA (He ce BkIyueHn BO pOn3BODoT).
He octabajTe ro daJeHHcknOT ynpaByBaU BO 6IIN3InHa Ha TOnIIHCKn I3BOpN.
- Notpoшени 武者Mopa da pacxodyBaat Ha cooDbeteH haunH.


U,


