R1 Mk2 - Radio Ruark Audio - Free user manual and instructions
Find the device manual for free R1 Mk2 Ruark Audio in PDF.
| Product type | DAB/DAB+/FM radio with RDS |
| Brand | Ruark Audio |
| Model | R1 Mk2 |
| Dimensions (W x H x D) | 175 x 130 x 135 mm |
| Weight | 1.5 kg |
| Power supply | 90-240 V AC 50-60 Hz, output 14 V DC 1.5 A |
| Output power | 9 W |
| Speaker | 3.5" (8.9 cm) in bass reflex enclosure |
| Antenna | Telescopic removable with F-type connector |
| Display | High-contrast backlit LCD, automatic brightness adjustment, large format time display |
| Radio modes | DAB, DAB+, FM with RDS |
| Presets | 5 DAB stations + 5 FM stations |
| Alarms | 2 independent alarms, daily/once/weekly/weekend repeat |
| Sleep timer | 15, 30, 45, 60, 90 minutes |
| Equalizer | Presets Normal, customisable My EQ (Bass, Treble, Loudness) |
| Auxiliary input | 3.5 mm stereo jack |
| Headphone output | 3.5 mm stereo jack |
| Line output | 3.5 mm stereo jack |
| Ambient light sensor | Yes, automatically adjusts screen brightness |
| Warranty | 2 years, subject to proper use and maintenance |
| Care and cleaning | Soft non-linting cloth slightly damp. Do not use sprays or abrasive products. |
| Safety | Do not expose to water, naked flames, extreme temperatures. High volume may damage hearing. Maintain ventilation of at least 10 cm. |
| Repairability / spare parts | Repair reserved to manufacturer or retailer. Optional BackPack battery available. Programming port for updates. |
Frequently Asked Questions - R1 Mk2 Ruark Audio
User questions about R1 Mk2 Ruark Audio
0 question about this device. Answer the ones you know or ask your own.
Ask a new question about this device
Download the instructions for your Radio in PDF format for free! Find your manual R1 Mk2 - Ruark Audio and take your electronic device back in hand. On this page are published all the documents necessary for the use of your device. R1 Mk2 by Ruark Audio.
USER MANUAL R1 Mk2 Ruark Audio
Important: Please read this manual carefully before operating your R1 and retain for future reference.
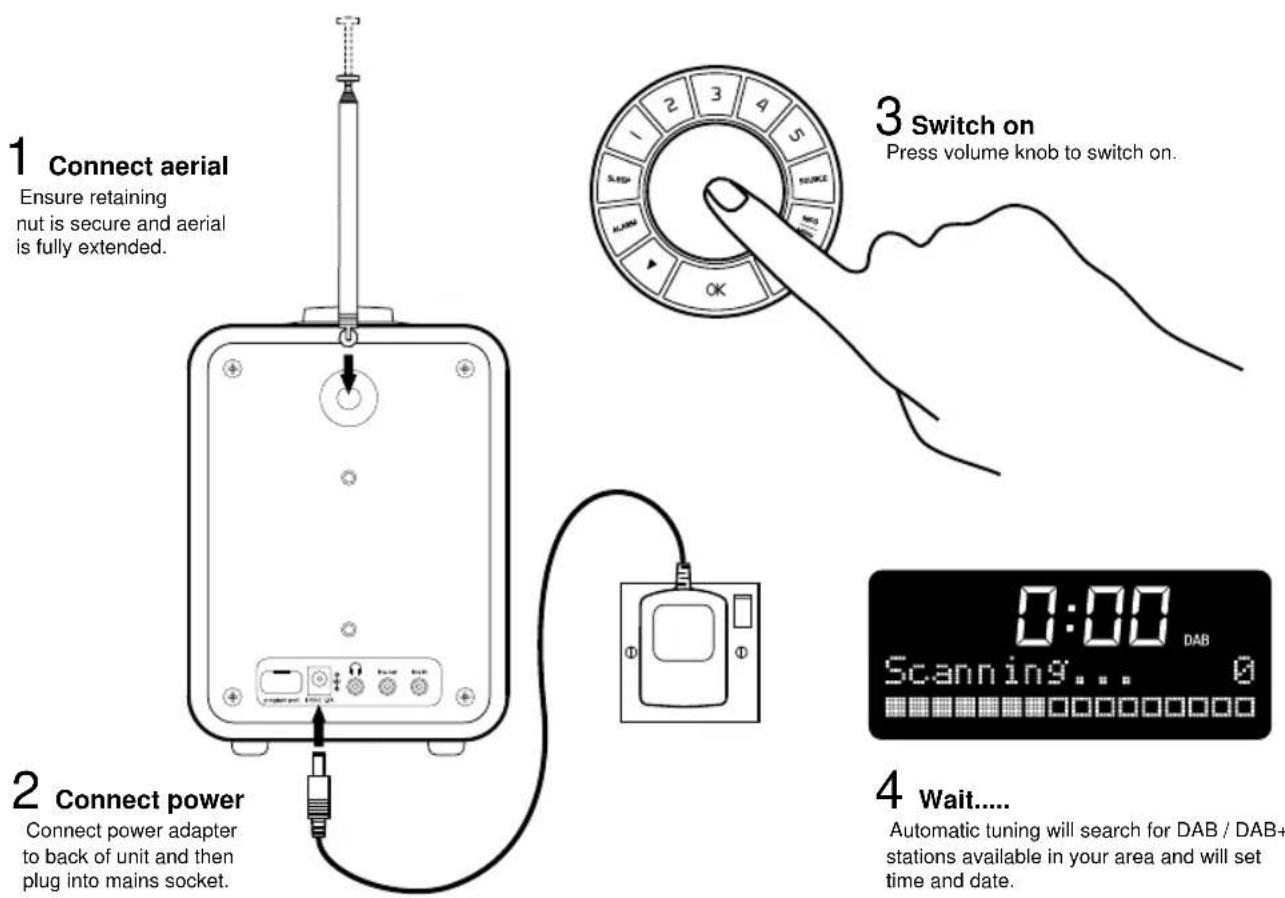
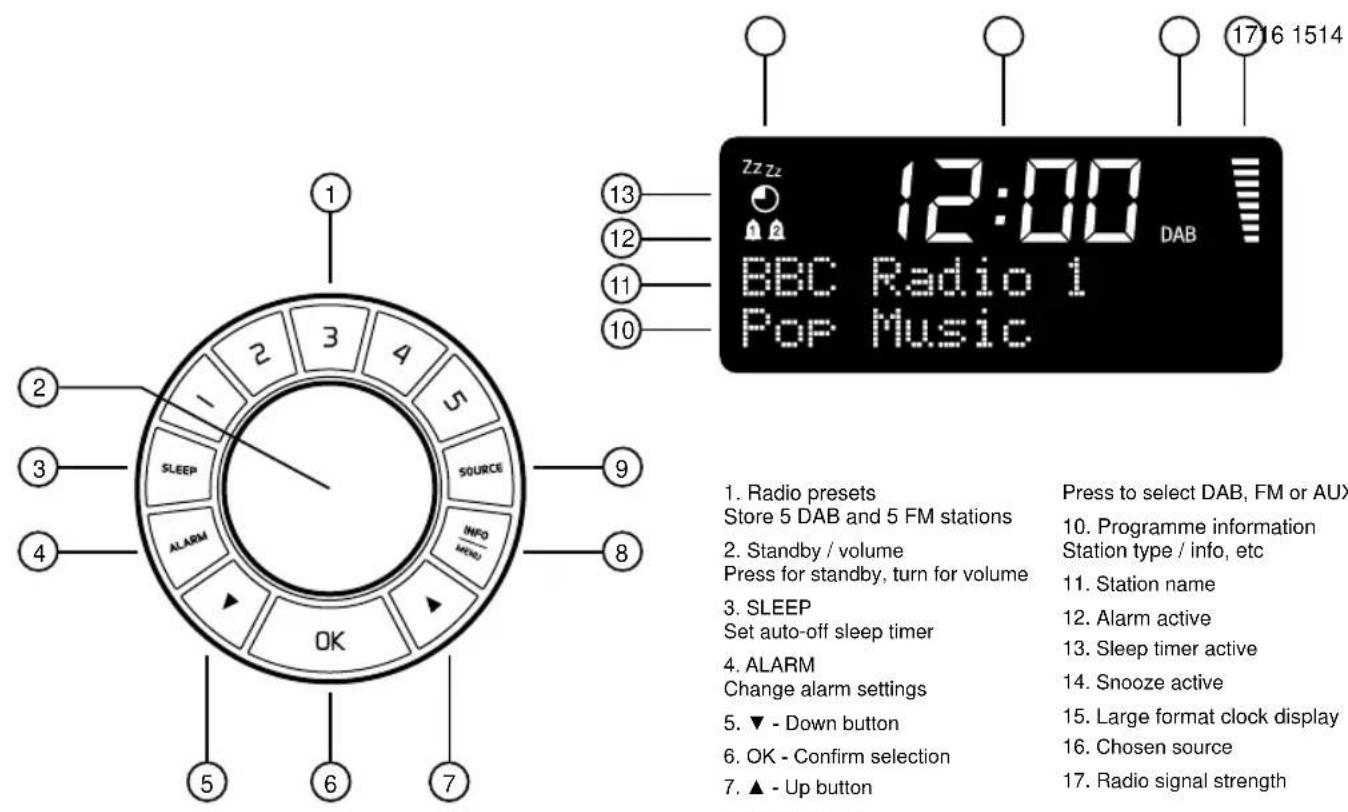
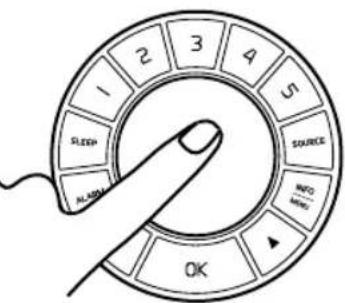
Getting to know your R1
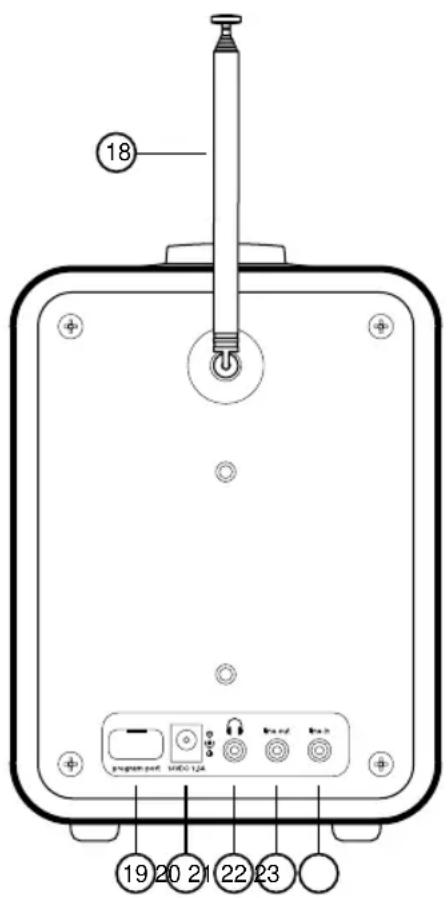
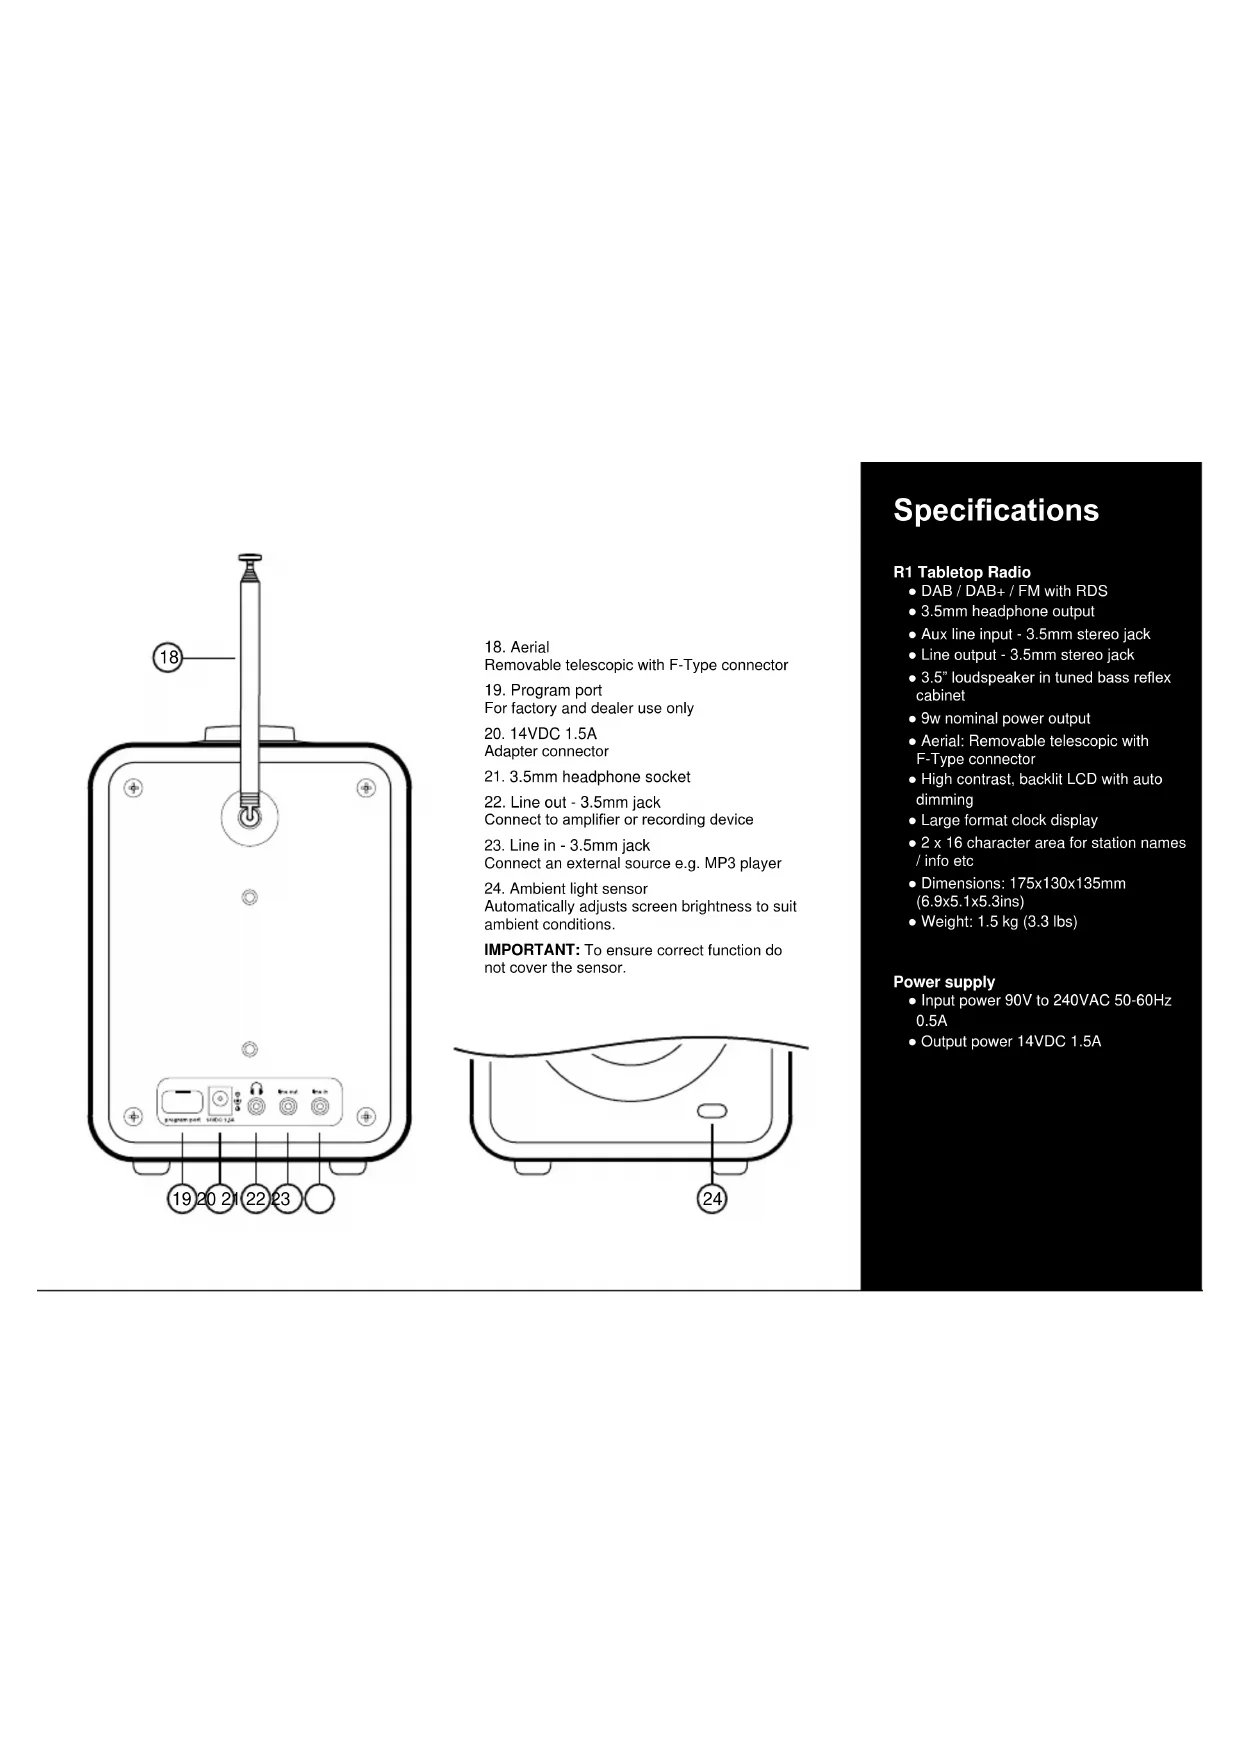
- Aerial
Removable telescopic with F-Type connector
- Program port
For factory and dealer use only
20.14VDC 1.5A
Adapter connector
-
3.5mm headphone socket
-
Line out - 3.5mm jack
Connect to amplifier or recording device
- Line in - 3.5mm jack
Connect an external source e.g. MP3 player
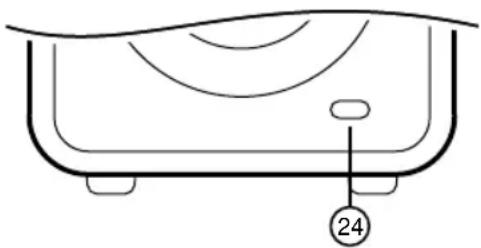
- Ambient light sensor
Automatically adjusts screen brightness to suit ambient conditions.
IMPORTANT: To ensure correct function do
not cover the sensor.
Specifications
R1 Tabletop Radio
DAB/DAB+/FM with RDS
3.5mm headphone output
- Aux line input - 3.5mm stereo jack
Line output - 3.5mm stereo jack
- 3.5" loudspeaker in tuned bass reflex cabinet
- 9w nominal power output
Aerial: Removable telescopic with F-Type connector
High contrast, backlit LCD with auto dimming
Large format clock display
- 2 x 16 character area for station names / info etc
Dimensions: 175x130x135mm
(6.9x5.1x5.3ins)
Weight: 1.5kg (3.3 lbs)
Power supply
- Input power 90V to 240VAC 50-60Hz
0.5A
Output power 14VDC 1.5A
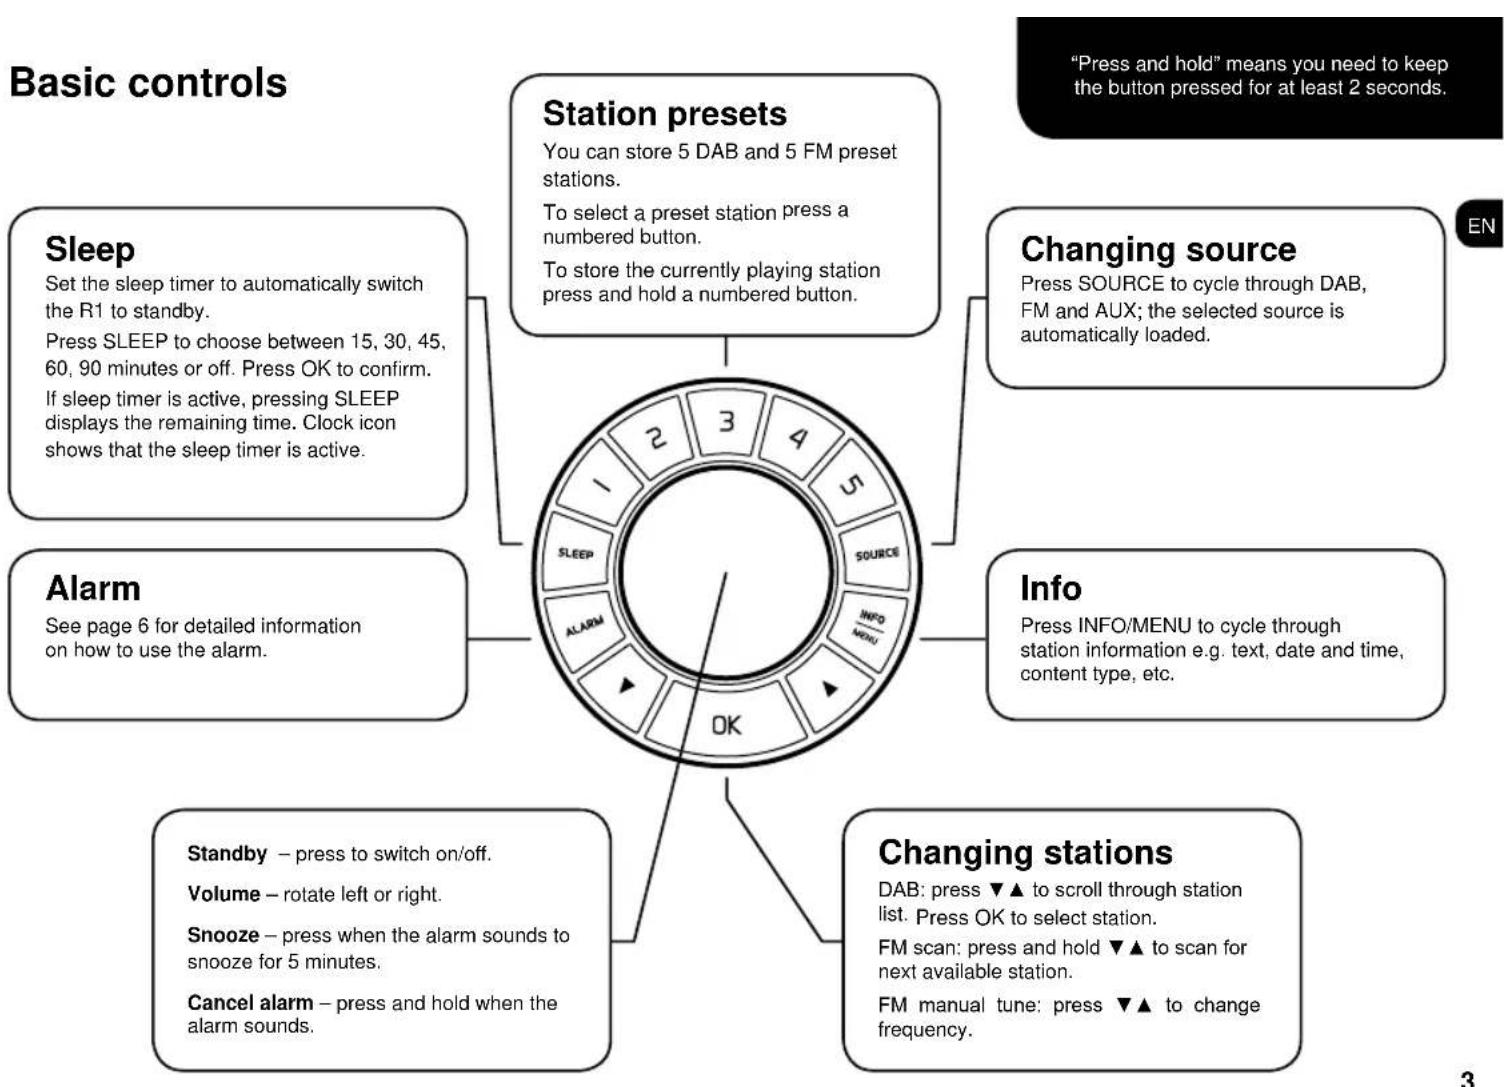
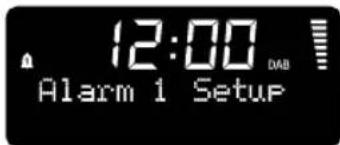
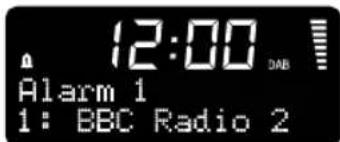
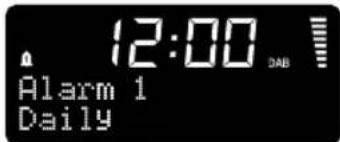
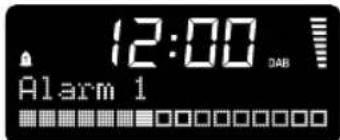
Alarm
The R1 has two separate alarm settings enabling you to, for example, have one alarm for weekdays and one for weekends.
Setting the alarm
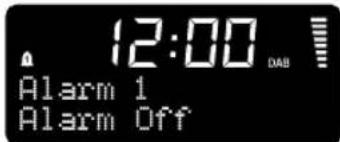
- Press ALARM to choose between 'Alarm setup 1' or 'Alarm setup 2'. Press OK to confirm.
- Press to turn alarm ON/OFF. Press OK to confirm.
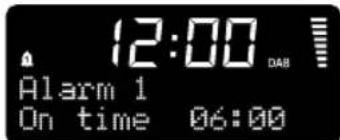
- Press to set hour. Press OK to confirm. Press to set minutes. Press OK to confirm.
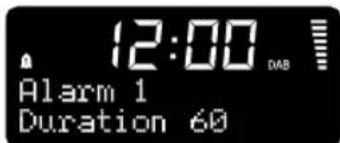
- Press to set alarm duration to 15, 30, 45, 60 or 90 minutes. Press OK to confirm.
- Press to cycle through 'DAB', 'FM' or 'Buzzer'. Press OK to confirm.
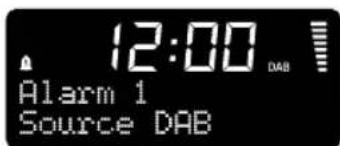
- Press OK to wake to last listened station or and then OK to choose a preset station. Note: This does not apply if 'Buzzer' is selected.
- Press to set repeat pattern to 'Daily', 'Once', 'Weekends' or 'Weekdays'. Press OK to confirm.
- Press to set alarm volume. Press OK to confirm and save the chosen alarm. Bell icons show which alarms are active.
Snoopze
When the alarm sounds, tap the volume knob to snooze an alarm for 5 minutes. Press again to add another 5 minutes.
Cancel alarm
When the alarm sounds, press and hold the volume knob.
Advanced DAB settings
These settings are only available when source is set to DAB.
Did you know you can press INFO/MENU at any time to return to previous step?
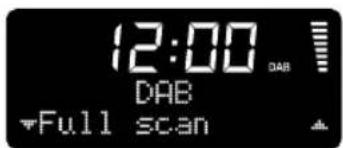
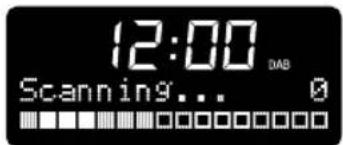
Full scan
Updates the list of available DAB stations.
- Press and hold INFO/MENU until 'Full scan' appears. Press OK to confirm.
- The R1 will commence a scan of all available DAB stations.
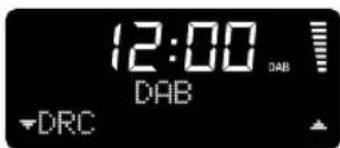
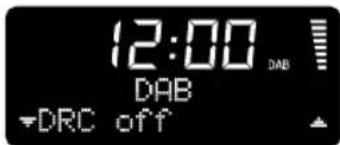
DRC (Dynamic Range Control) Some Talk and Classical music stations transmit a DRC signal which can make quiet passages easier to hear in noisy environments. If DRC is not transmitted, this function will have no effect.
- Press and hold INFO/MENU. Press to select 'DRC'. Press OK to confirm.
- Use to cycle through 'DRC high', 'DRC low' and 'DRC off'. Press OK to confirm.
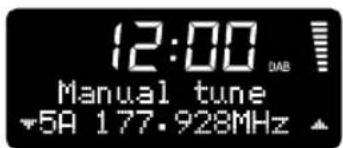
Manual tune
Manually change the frequency. 1. Press and hold INFO/MENU
1. Press and hold INFO/MENU. Press to select 'Manual tune'. Press OK to confirm.
2.Use to change the frequency. Press OK to confirm.

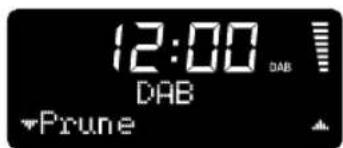
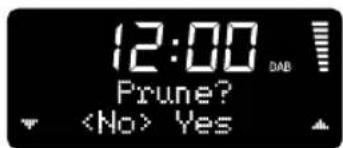
Prune
Removes unused or unavailable stations from list.
- Press and hold INFO/MENU. Press to select 'Prune'. Press OK to confirm.
2.Use to select Yes'or No'. Press OK to confirm.
Advanced FM settings
These settings are only available when source is set to FM.
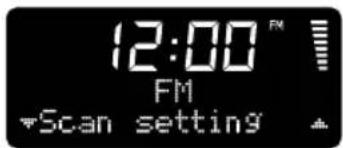
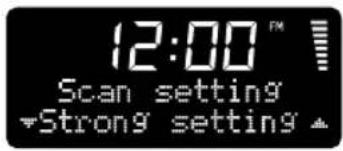
Scan setting
Change how the FM scan finds stations.
-
Press and hold INFO/MENU until 'Scan setting' appears. Press OK to confirm.
-
Use to cycle between 'Strong stations only' and 'All stations'. Press OK to confirm.
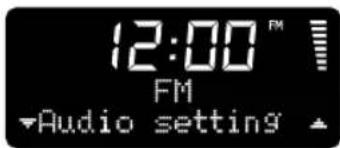
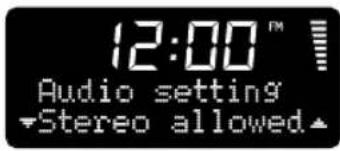
Audio setting
Change between stereo or mono settings. (Forced mono will help to reduce background noise on weak FM stations).
-
Press and hold INFO/MENU. Press to select 'Audio setting'. Press OK to confirm.
-
Use to cycle between 'Stereo allowed' and 'Forced mono'. Press OK to confirm.
System settings
To change system settings press and hold INFO/MENU.
Use to select 'System' and press OK to confirm.
Did you know that when in a menu, the current setting is highlighted by 喜 ?
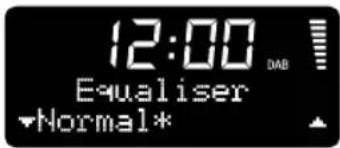
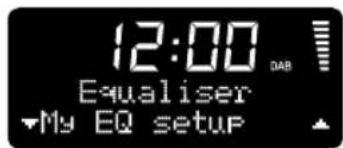
Equaliser
Selects or customises the tone settings.
- 'Equaliser' is the first option that comes up in the system settings menu. Press OK to confirm.
- Use to cycle through 'Normal', 'My EQ' and 'My EQ setup'. Press OK to confirm.
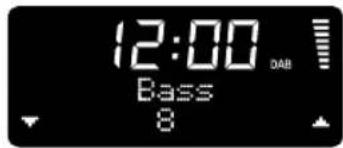
Customise 'My EQ'
- In 'Equaliser' menu, use to select 'My EQ setup'. Press OK to confirm.
- Use to cycle through 'Bass', 'Treble' and 'Loudness' settings. Press OK to confirm.
3.Use to change value. Press OK to confirm.
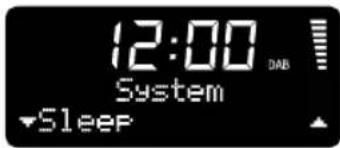
Sleep
This function is also directly available through the sleep button as shown on page 3.
- In 'System' menu, use to select 'Sleep'. Press OK to confirm.
2.Use to cycle 15,30,45,60 and 90 minute sleep timer. Press OK to confirm.
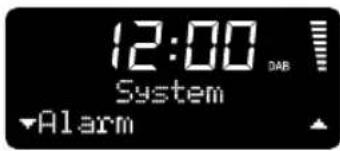
Alarm
See page 6 for detailed information on how to set the alarm.
System settings
To change system settings press and hold INFO/MENU.
Use to select 'System' and press OK to confirm.
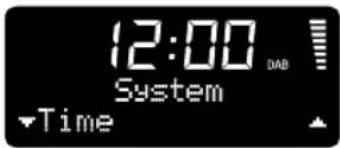
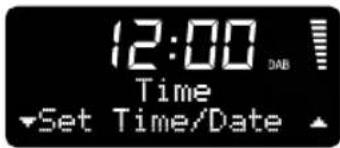
Time
Adjust how the time and date are displayed.
In 'System' menu, use to select 'Time'. Press OK to confirm.
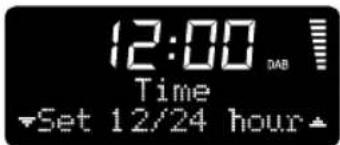
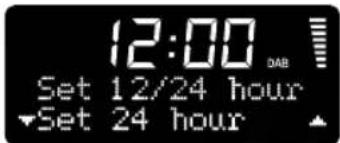
Set 12/24 hour
- In 'Time' menu, use to select 'Set 12/24 hour'. Press OK to confirm.
- Use to select 'Set 12 hour' or 'Set 24 hour' clock format. Press OK to confirm.
Auto update time
Adjust how time and date is automatically updated.
1. In 'Time' menu, use to select 'Auto update'. Press OK to confirm.
2.Use to select 'All', DAB, FM or Off.Press OK to confirm.


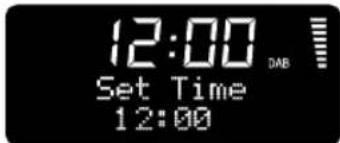
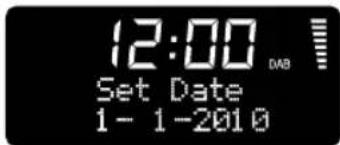
Set time/date
PLEASE NOTE: Manual time & date settings are overwritten if 'Auto update' is on with DAB and RDS signals.
- In 'Time' menu, use to cycle to 'Set Time/Date'. Press OK to confirm.
- Use and OK to set hour then minutes. Press OK to confirm.
- Use and OK to set day, month then year. Press OK to confirm.
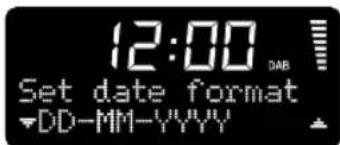
Set date format
Adjust the on screen date format.
- In 'Time' menu, use to select 'Set date format'. Press OK to confirm.
2.Use to choose
DD-MM-YYYY' or MM-DD-YYYY'. Press OK to confirm.
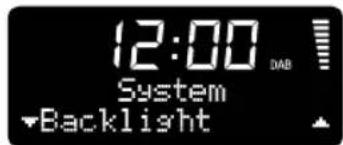
System settings
To change system settings press and hold INFO/MENU. Use to select 'System' and press OK to confirm.

Backlight
The backlight automatically adjusts to suit ambient light but you can also set it to 'time-out' and switch off. We recommend this setting is activated when R1 is used with its optional battery pack (BackPack) to give best battery life.
- In 'System' menu, use to select 'Backlight'. Press OK to confirm.
- Use to cycle through options. Press OK to confirm.

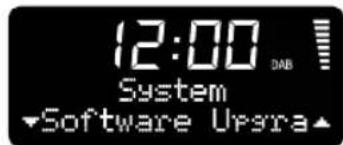
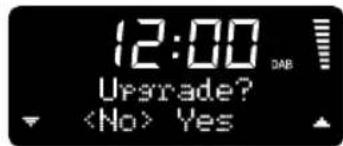
Software upgrade
This facility is for factory and dealer use only. Its primary function is to allow customisation for applications such as Hotel use etc.
- In 'System' menu, use to select 'Software upgrade'. Press OK to confirm.
2.Use to select Yes'or No'. Press OK to confirm.
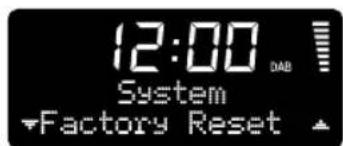
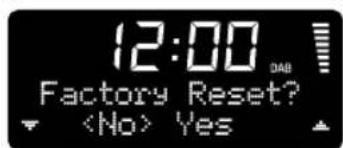
Factory reset
Reset to default factory settings.
1. In 'System' menu, use to select 'Factory reset'. Press OK to confirm.
2.Use to select Yes'or No'. Press OK to confirm.
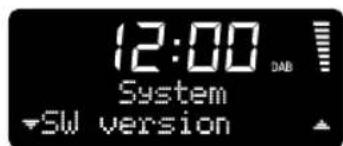
Software version
Use this function to view the Model Software version.
In 'System' menu, use to select 'Software version'. Press OK to confirm.
Guarantee information
We guarantee this product to be free from defects for a period of two years from date of purchase, providing due care and attention has been paid. Product failure through accidental damage (however caused), excessive wear and tear, negligence or unauthorised modification will void your guarantee.
Should you experience a problem please contact us either by sending an email to info@ruark.co.uk or calling us directly on 01702 601410 where we will advise the course of action. If your product needs to be returned it should be packaged in its original packing along with proof of purchase. If it is not possible to return the product by hand, then it should be sent carriage prepaid by a reputable parcel carrier. If the original packing is not available, replacement packing can be purchased from us.
Guarantee for overseas sales
The distributor in the country of purchase guarantees products purchased outside the UK. For details, please contact your local Ruark distributor or outlet.
THIS GUARANTEE IN NO WAY VARIOUS OR REMOVS THE PURCHASER'S STATUTORY RIGHTS. E&OE
Cautions
- Listening through headphones or earphones at high volume can cause hearing loss.
- The unit should not be exposed to dripping or splashing and no objects containing liquids, such as vases, should be placed on the unit.
- Ensure that the power adapter, mains plug or mains connector into the unit is readily accessible in case disconnection from the mains is required.
- The normal function of this product may be affected by strong Electromagnetic Interference. If you experience problems, simply reset the product to resume normal operation. If, after resetting, the product still fails to operate correctly, try using it in a different location.
- Keep the unit away from naked flames such as lighted candles and heat sources such as radiators.
- The unit should be positioned at least 10cm away from adjacent objects to ensure adequate ventilation.
General care
- Clean with a soft, lint-free duster or slightly dampened cloth. Do not use wax sprays or other substances as these may damage the surface finish or impair performance.
- Do not expose your unit to direct sunlight, high humidity, dust, excessive vibration or extreme temperatures, all of which can affect the finish, performance and reliability of the unit.
- The recommended operating temperature range is 5^ to 40^ .
- Natural wood finish cabinets will vary and lighten or darken with age, particularly when exposed to sunlight.

ruarkaudio
59 Tailors Court - Temple Farm Industrial Estate - Southend on Sea - Essex - SS2 5TH - UK +44 (0) 1702 601 410 info@ruark.co.uk www.ruarkaudio.com

User guide
EN
59 Tailors Court - Temple Farm Industrial Estate - Southend on Sea - Essex - SS2 5TH - UK
+44 (0) 1702 601 410 info@ruark.co.uk www.ruarkaudio.com

User guide
EN
59 Tailors Court - Temple Farm Industrial Estate - Southend on Sea - Essex - SS2 5TH - UK
+44 (0) 1702 601 410 info@ruark.co.uk www.ruarkaudio.com
20130329.1

| User guide | EN |
| Guide de l'utilisateur | FR |
| Bedienungsanleitung | DE |
| Manuale utente | IT |
| Manual de instrucciones | ES |
| Brukerveiledning | NO |
| Gebruikershandleiding | NL |
ruarkaudio
Hurtigstartveiledning
59 Tailors Court - Temple Farm Industrial Estate - Southend on Sea - Essex - SS2 5TH - UK
+44 (0) 1702 601 410 info@ruark.co.uk www.ruarkaudio.com