P31052 - Saucepan TEFAL - Free user manual and instructions
Find the device manual for free P31052 TEFAL in PDF.
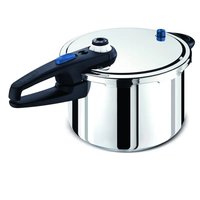
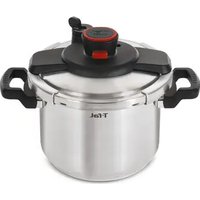
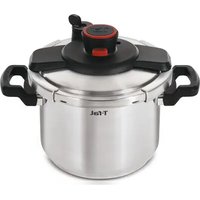
| Product Type | Pressure Cooker (pressure pot) |
| Brand | Tefal |
| Model | P31052 |
| Capacity | 20.8 liters (22 pints) |
| Material of the pot and lid | Aluminum |
| Diameter of the pot | 31 cm |
| Diameter of the base | 19 cm (approx.) |
| Maximum pressure | 103 kPa (15 lb/in²) |
| Compatible heat sources | Gas, electric, induction |
| Weight (approx.) | ~6 kg |
| Functions | Pressure cooking, canning, sterilization |
| Safety | Secure closure, safety valve, sealing gasket, pressure indicator |
| Operating valve | 3 positions (1, 2, 3) for different food types |
| Pressure gauge | Yes, with pressure zones corresponding to positions |
| Maintenance | Hand wash, do not put in dishwasher |
| Lid gasket | Replaceable (ref. US-7114001204), change once a year |
| Warranty | 2 years against manufacturing defects |
| Repairability | T-FAL authorized service center |
Frequently Asked Questions - P31052 TEFAL
User questions about P31052 TEFAL
0 question about this device. Answer the ones you know or ask your own.
Ask a new question about this device
Download the instructions for your Saucepan in PDF format for free! Find your manual P31052 - TEFAL and take your electronic device back in hand. On this page are published all the documents necessary for the use of your device. P31052 by TEFAL.
USER MANUAL P31052 TEFAL
natural_image
Black and white photo of a transparent cylindrical container with two pressure gauges on top (no text or symbols visible)User's Manual Guide de l'utilisateur Guía del usuario
Para modelo : P31052
www.t-falusa.com
www.t-fal.ca
www.t-fal.com.mx
text_image
A G D B E N F(a) H I* F(b) J O K*depending on model - *selon le modèle - *según modelo
natural_image
Illustration of a cooking pot with two hands and a rotating arrow indicating rotation (no text or symbols)Fig 1
natural_image
Illustration of a pot with two frogs and a lid, showing a curved arrow indicating rotation (no text or symbols)Fig 2
natural_image
Simple line drawing of two jars inside a container, enclosed in a circular frame (no text or symbols)Fig 3a*

natural_image
Simple line drawing of a storage cabinet with four jars, enclosed in a circular frame (no text or symbols)Fig 3b*
text_image
2/3 1/3Fig 4
natural_image
Diagram showing hands operating a mechanical component with directional arrows indicating rotation (no text or symbols)Fig 5
natural_image
Mechanical component diagram showing a circular dial with numbered ports and an arrow indicating rotational direction (no text or symbols)Fig 6
natural_image
Circular diagram showing a mechanical component with numbered slots and an arrow indicating rotational motion (no text or symbols)Fig 7
natural_image
Illustration of hands adjusting a device component (no text or symbols visible)Fig 8 Fig 9
natural_image
Illustration of a hand using a tool to adjust or install a small component, with no visible text or symbols.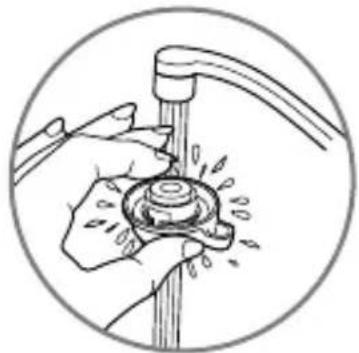
natural_image
Illustration of hands using a faucet to adjust a water tap (no text or symbols)Fig 10
natural_image
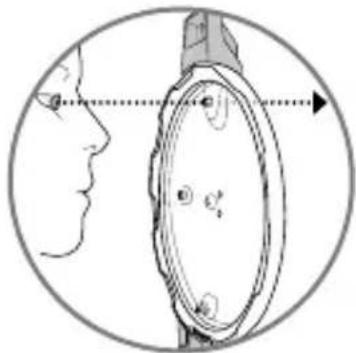
Diagram of a human face with a magnifying glass highlighting the eye area, showing eye alignment and measurement lines (no text or symbols)Fig 11
natural_image
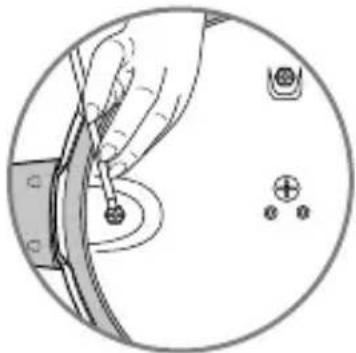
Illustration of a hand holding a small object with a circular component, no text or symbols presentFig 11bis
natural_image
Diagram of a mechanical device with a lever and base, enclosed in a circular frame (no text or symbols)Fig 12
natural_image
Illustration of a cooking pot with steam rising from a bowl, enclosed in a circular frame (no text or symbols)Fig 13
natural_image
Illustration of a robotic arm with four articulated arms and a circular frame (no text or symbols)Fig 14
*depending on model - *selon le modèle - *según modelo
IMPORTANT SAFEGUARDS
When using pressure cookers, basic safety precautions should always be followed:
- Read all instructions.
- Do not touch hot surfaces. Use handles or knobs.
- Close supervision is necessary when the pressure cooker is used near children.
- Do not place the pressure cooker in a heated oven.
- Extreme caution must be used when moving a pressure cooker containing hot liquids.
- Only use the pressure cooker for the intended use.
- This appliance cooks under pressure. Improper use may result in a scalding injury. Make certain unit is properly closed before operating. See “Operating Instructions”.
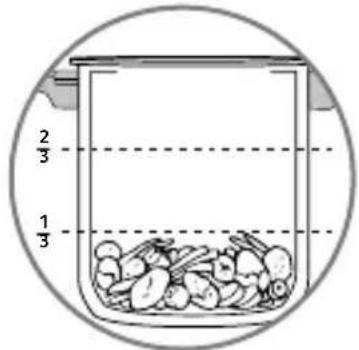
- Do not fill the unit over 2/3 full. When cooking foods that expand during cooking such as rice or dried vegetables, do not fill the unit over 1/3 full. Overfilling may cause a risk of clogging the vent pipe and developing excess pressure. See “Food Preparation Instructions”.
- Be aware that certain foods, such as applesauce, cranberries, pearl barley, oatmeal or other cereals, split peas, noodles, macaroni, rhubarb, or spaghetti can foam, froth, and sputter, and clog the pressure release device (steam vent). These foods should not be cooked in a pressure cooker.
- Always check the pressure release devices for clogging before use.
- Do not open the pressure cooker until the unit has cooled and all internal pressure has been released. If the handles are difficult to push apart, this indicates that the cooker is still pressurized – do not force it open. Any pressure in the cooker can be hazardous. See “Operating Instructions”.
- Do not use this pressure cooker for pressure frying with oil.
- When the normal operating pressure is reached, turn the heat down so that all the liquid, which creates the steam, does not evaporate.
- Always pour a minimum amount of at least 2 L (64 oz) of liquid in the unit. See «Operating Instructions.
- For food that expands during cooking, such as rice, dried vegetables or fruit compotes, never fill your pressure cooker over one third. For some soups, like pumpkin or courgette, leave your pressure cooker to cool down for a few minutes, then cool it down entirely by placing it in a bowl of cold water.
- Always be aware that certain foods, such as cranberries, spelt, millet, currants, etc., can create moss and squirt, clogging the pressure-relief device (vent). These foods should not be cooked in a pressure cooker.
- Never make a recipe with animal milk in your pressure cooker.
- Do not use rock salt in your pressure cooker, but rather add table salt when the cooking is nearly finished.
- When cooking large pieces of meat and food with a surface skin layer
(whole sausages, tongue, poultry, etc.) : we recommend that you prick the skin using a knife or fork before cooking. During cooking, boiling liquid could become trapped under the skin and create spatters.
- Alcohol vapors are flammable. Bring to a boil for about 2 minutes before placing the lid. Watch your appliance when preparing alcoholbased recipes.
- Never use aluminium foil unsecured on a container in your pressure cooker. Always secure with string. Never use cling film in your pressure cooker.
- Do not leave your pressure cooker unsupervised when heating oil or fats. Continuing to heat a smoking oil will degrade it and may increase the temperature of the oil enough for flames to appear.
- Regularly check that the handles of the pressure cooker are fitted correctly. Tighten them if necessary
- If during use you notice that any part of your pressure cooker is broken or cracked, do not attempt to open it under any circumstances; turn off the heat and leave on the hob to cool down completely before moving it or opening the lid. Do not use it again and take it to a T-FAL Approved Service Center for repair.
SAVE THESE INSTRUCTIONS.
Descriptive diagram
A - Operating valve
B - Steam release outlet
C - Pressure indicator
D - Safety valve (under the lid central knob)
E - Short lid handle
F(a) - Lid position indicator
F(b) - Lid position indicator located on the handles of the pot
G - Pressure gauge
H - Lid gasket
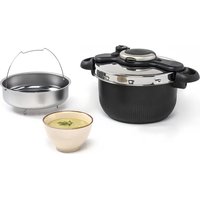
I - Canning rack
J - Short pot handle
K - Pot
L - Operating valve position marker
M - Lid central knob
N - Stop
O - Maximum levels (max 1/3 - max 2/3)
Compulsory checks before each use
Checking the operating valve
text_image
Medical procedure diagram showing step-by-step instructions for using a device to adjust the head and neck area.- Check that the draining hole of the operating valve is not obstructed.
Checking the safety valve

flowchart
graph LR
    A["Initial procedure: hand holding screw"] --> B["Inserted view: screw being inserted"]
    B --> C["Final step: hand holding screw with screw and arrow indicating direction"]

- Check that the bearing of the safety valve can move (use a batonet).
Characteristics
Base diameter of the pressure cooker according to model number Basic specifications:
| Capacity ∅ Pot ∅ Base Model | Material of pot and lid | |||
| 20,8L/22Qt 31 | cm 19 cm | P31052 | Aluminium | |
Upper operating pressure: 103 kPa/15 psi.
Compatible heat sources
GAS SEALED

ELECTRIC COIL

PLATE ELECTRIC

CERAMIC HALOGEN

INDUCTION

- On a gas hob, the flame must never exceed the diameter of the pressure cooker base.
• Make sure your pressure cooker is centered on the heat source.
- Do not use pressure canner and cooker on other electrical hobs.
- Do not use pressure canner and cooker on any outdoor heat source such as a gas burner for a turkey fryer. This type of burner will soften the canner causing the bottom to warp. It may also result in property damage and/or personal injury. In addition, the food may not be safely processed.
| Accessory Reference | number | |
| Lid gasket 22 Qt | US-7114001204 | |
- To replace other parts or have repairs performed, please call on your local T-FAL Approved Service Center.
Operating Instructions
This appliance cooks under pressure. Improper use may result in scalding injury. Make certain unit is properly closed before operating. Always pour a minimum amount of liquid of at least 2 L (64 oz) in the unit.
Opening
Do not open the pressure cooker until the unit has cooled and all internal pressure has been released. If the handles are difficult to push apart, this indicates that the cooker is still pressurized – do not force it open. Any pressure in the cooker can be hazardous.
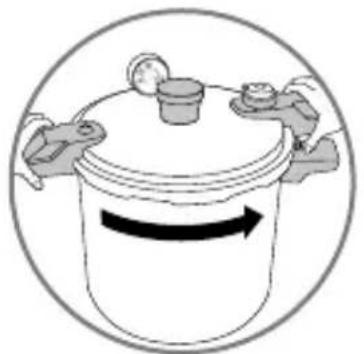
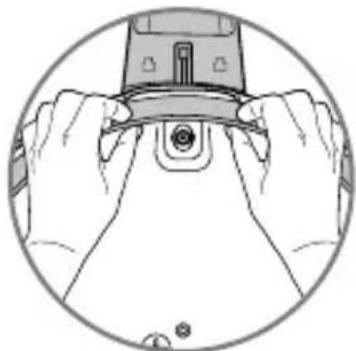
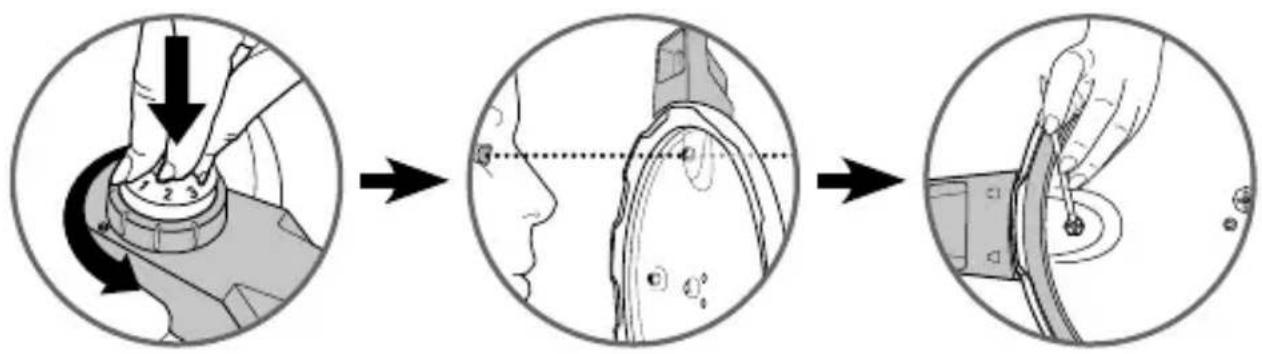
- Hold the lid handles (E) and turn until the device opens - Fig. 1. Then remove the lid.
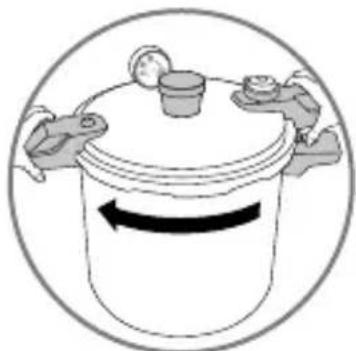
Closing
- Place the lid flat on the pot and align the lid position indicators (F(a) and F(b)).
- Turn the lid until it is closed. - Fig. 2.
Minimum filling
- Always put at least 64 oz (2 L) of liquid in the pressure cooker when in use.
Maximum filling
- Never fill the pressure cooker over 2/3 of the pot height - Fig. 4.
For certain foods
- For foods that expand when cooked (such as rice, dried vegetables and compotes), do not fill your pressure cooker over 1/3 full - Fig. 4.
Pressure gauge
- The pressure cooker is equipped with a pressure gauge to provide additional information regarding sterilisation applications.
Food Preparation Instructions
Do not fill the unit over 2/3 full. When cooking foods that expand during cooking such as rice or dried vegetables, do not fill the unit over 1/3 full. Over filling may cause a risk of clogging the steam release outlet and developing excess pressure.
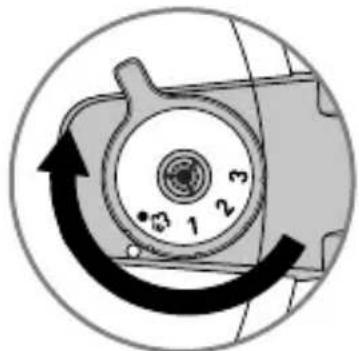
Using the operating valve (A)
- Place the operating valve (A) symbol 1, 2 or 3 facing the operating valve position marker (L) - Fig 6.
Adjusting the Valve for Your Cooking Operations
Position  | Delicate foods, vegetables and some sterilisations |
Position  | Meats, starchy foods and some sterilisations |
Position  | Frozen foods and some sterilisations |
To release the steam
- Position the symbol on the valve (A) opposite the marker (L).
To remove the operating valve
- Release the pressure and leave the appliance to cool before removing the valve (A).
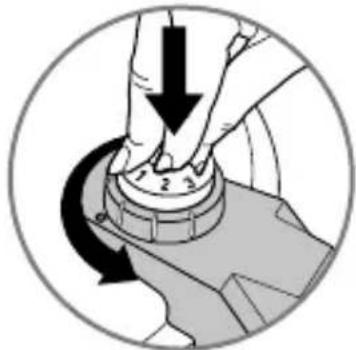
- Press down on the central section and turn the valve to line up the ● position with the marker (L) - Fig 5
- Remove the valve.
To replace the operating valve
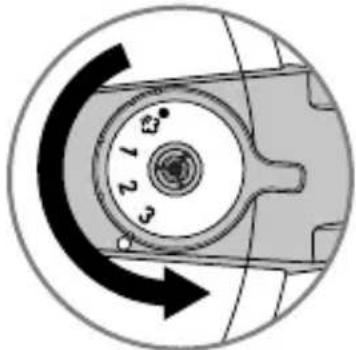
- Fit the operating valve, lining up the ● with the marker (L).
- Press down on the central section and then turn to the required position - Fig 7.
To make blackening of aluminium disappear from already used products : repeat «first use» instructions with baking soda.
- Fill the pot with 1/2 water. Add 4 tablespoons of baking soda.
- Put the operating valve(A) in place on the steam release outlet (B) - Fig. 5.
- Position the symbol 1 on the valve (A) opposite the marker (L) - Fig 7.
- Close the pressure cooker.
- Place the pressure cooker on a heat source set to maximum power.
- When steam begins to exit the valveFig 12, turn down the heat source and set a timer to 20 min.
• After 20 min., turn off your heat source.
To release the steam
- Position the symbol on the valve (A) opposite the marker (L).
- Empty then clean the pressure cooker using soapy water.
To replace the operating valve
- Fit the operating valve, lining up the ● with the marker (L).
- Press down on the central section and then turn to the required position.
Cooking
Before cooking
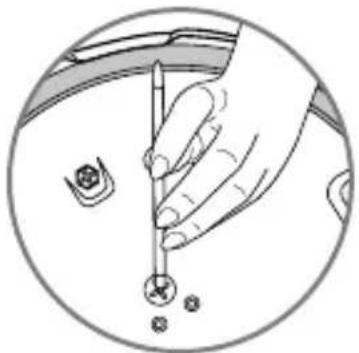
- Before each use, remove the operating valve (A) (see section «Using the operating valve») - Fig. 5. Check these by holding them up to the light, making sure the steam release outlet is not clogged - Fig. 11. If necessary, clean with a tooth pick - Fig. 11bis.
- Make sure the safety valve (D) is clean. Check that the safety valve (D) is mobile. - Fig. 9: see section «Care and cleaning».
- Put the operating valve back in place - Fig. 5.
- Position the symbol 1, 2 or 3 of the valve (A) opposite the marker (L).
- Always make sure the pressure cooker is tightly sealed before placing it on a heat source.
-
Place the pressure cooker on a heat source set to maximum heat.
-
When the operating valve (A) releases steam in a continuous manner, giving off a regular sound (PSSSCHT), lower the heat - Fig. 12, adjust the output of your heat source so that the needle of the pressure gauge remains in the green zone that corresponds to the valve position: 1, 2 or 3.
- Set a timer to the cooking time listed in the recipe.
- Once the cooking time is over, turn off the heat.
End of cooking
To release the steam:
- Once the heat source has been switched off gradually, turn the operating valve (A) to position ⚙️. Make sure that the cooker is positioned so that the steam is directed away from you. When the pressure indicator (C) drops: your pressure cooker is no longer under pressure.
- Open the pressure cooker.
If you notice any food or liquid starting to spray out from the valve when you are releasing steam: set the selector to the cooking initial position, wait a minute and then gradually turn the operating valve again, making sure that nothing else spurts out.
Warning: Never use force when removing the lid. Wait for the pressure indicator to drop down completely and remove the operating valve.
Canning
WARNING: Read the instructions on pressure cooking before using your pressure cooker/canner for canning. General information on pressure canning.
The US Department of Agriculture recommends pressure canning as the only safe way to can meats, fish, poultry and vegetables.
Fruits and tomatoes may be canned using the boiling water bath method in a conventional cooking pot, but pressure canning saves time and energy.
Use conventional cooking pots for canning marinades and fruits.
Sometimes, it is better to can foods separately (meat and vegetables, for example) and then reheat them together later.
HOW TO PRESSURE CAN USING GLASS JARS:
WARNING: Only use standard jars intended for home canning. The name of the manufacturer of these jars is embedded in the glass.
Never use jars that contained store-bought products.
Warning: Never pressure sterilize foods containing sugar, sugar syrup or other sweetening liquid.
- Make sure the jars and lids do not have any cracks, chips or sharp edges. Dispose of any damaged jars and lids.
- Wash the jars and lids in warm soapy water. Rinse thoroughly.
- Let the jars stand under hot water before filling them. There is no need to sterilize the jars before pressure canning. Place the metal lids in hot or boiling water according to the manufacturer's instructions.
- Select fresh, firm ingredients (not overripe). Sort according to size and ripeness.
- Wash and prepare ingredients.
- Put the ingredients into the jars. Most ingredients can be put into the jars while raw. Press down raw ingredients, because these tend to shrink when cooked. Ingredients can be pre-cooked or partially pre-cooked before being canned. Warm ingredients should not be pressed down after being filled into jars.
- Finish filling the jars by adding juice or water, leaving appropriate head space of 1/4-inch to 1 1/2-inches, as indicated in the recipe or canning instructions.
- Remove air bubbles by sliding a spatula along the inside of the jars.
- Clean the rims of the jars and attach the lids according to the manufacturer's instructions.
- For hot foods, you can bring the water to 180 degrees F. ahead of time, but be careful not to bring the water to a boil. Add 1 tbsp. of vinegar or cream of tartar to prevent the water from staining the interior of the pressure canner.
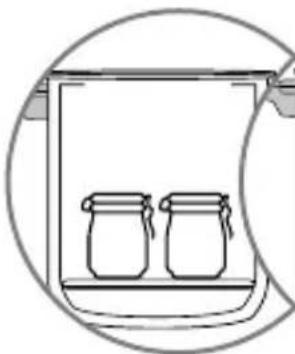
- Place the jars on the canning rack in the pressure canner. It does not matter if the jars touch each other - Fig. 3a*.
Always place jars on canning rack; never place jars directly on the bottom of pressure canner or on other jars.
Note: the 22Qt-litre pressure canner comes with two canning racks and allows one rack to be placed above the other, making it possible to process 2 rows of 250 ml (= 8oz) and 500 ml (= 16 oz) jars. Place one rack at the bottom of the pressure canner and the other on the first row of jars - Fig. 3b
-
Close the pressure canner. When properly closed, the lid and pot handles are aligned.
-
Position the symbol of the valve (A) opposite the marker (L) - Fig 7. Place the pressure cooker on high heat until steam begins to exit the steam release outlet. Continue letting pressure cooker release steam for 10 minutes.
-
After 10 minutes, position the recommended symbol 1, 2 or 3 of the valve (A) opposite the marker (L).
-
When the operating valve releases steam in a continuous manner, giving off a regulator sound (PSSSCHT), lower the heat – Fig.12, adjust the output of your heat source so that the needle of the pressure gauge remains in the zone that corresponds to the valve position: 1, 2 or 3.
WARNING: Cooking times must be strictly adhered to and the pressure caner should not be placed in a draft while cooking. Canning can take from 45 to 90 minutes in a large pressure caner filled to full capacity.
- The sterilisation time begins once the operating valve starts to release some steam.
- Once the sterilisation time has elapsed, turn off the heat source and allow the pressure cooker to cool down.
WARNING: Do not rapidly cool the pressure cooker/canner by submerging it in water or letting it stand under a tap of running water. Never remove the operating valve to reduce pressure.
- Once the pressure has dropped completely, position the symbol of the valve (A) opposite the marker (L) - Fig 7. Remove the lid carefully.
WARNING: Steam may cause scalding and the operating valve may be very hot. Protect your hands with oven mitts.
NB : You may hear a whistling noise when moving the operating valve. If no steam exits the pressure cooker, this is caused by air re-entering the device.
19. Remove the jars with a jar tong. Place them on a hot plate/trivet or several folded dish towels.
WARNING: Never place the hot jars on a cold or wet surface, this could cause them to break.
- Seal the jars if they do not seal automatically. Even if no liquid has escaped during the canning process, seal the jar as it is. Do not add liquid, as this would mean having to restart the canning process from the beginning. Fruits and vegetables that are not completely covered by the liquid may turn brown, but they will be properly preserved.
- Let the jars cool. Keep the jars upright and away from any drafts.
- After 12 hours, remove the screw-on metal rings from the jars.
If a ring is difficult to remove, cover it with a hot, damp towel for 1 minute to make the metal expand. After 1 minute, the ring should come off easily. If the ring still does not come off easily, leave it in place.
WARNING: Never remove rings with force. You risk breaking the gasket.
- Make sure the jars do not have any leaks and that the seals are air-tight. If the lid is made of metal, make sure it is air-tight by tapping it lightly with a spoon. If this makes a clear sound, the jar is well sealed. If the lid domes towards the inside and does not budge when it is tapped, this also indicates that it the gasket is air-tight.
WARNING: If a jar is not sealed or has a leak, use its contents immediately or restart the canning process within 24 hours.
- Wipe the jars with a damp cloth and then dry them. Attach labels displaying the date and contents. Keep the jars in a cold, dry place.
WARNING: The jars should not be exposed to freezing conditions, as this may cause the liquid to expand and break the glass.
Troubleshooting
PROBLEM: liquid spills out of the jars. Causes and solutions:
- The jars are overfilled.
When the contents and liquid are brought to a boil, they expand. If there is no more space, the liquid spills out of the jar. Leave a space of 1/2 to 1 1/2-inches (1.25 to 2.5 cm).
- There are air bubbles trapped in the jar.
When the contents are brought to a boil, the air bubbles force the liquid to spill out of the jar.
Before closing the jar, release the trapped air by sliding a plastic spatula along the inside of the jar.
- The pressure level fluctuates during the canning process.
If the cooking temperature is not constant, sudden pressure changes can occur, causing the liquid to spill out. Once the operating valve has begun to release steam, make sure the heat source fluctuates, slowly going up and down. Avoid pressure changes caused by the heat source.
- The pressure drops rapidly after the canning process.
If the pressure is reduced too quickly, for example by placing the pressure cooker under cold running water or frequently moving the operating valve, the internal pressure may fall too quickly in both the pressure cooker and the jars, making the liquid spill out.
Let the pressure cooker cool at room temperature. After 40 to 45 minutes, check if the pressure has dropped by moving the operating valve.
PROBLEM: the jars break. Causes and solutions:
- Supermarket jars having contained store-bought contents were used instead of specialty canning jars.
Only use jars specifically intended for home canning.
- Damaged jars were used.
Used jars may have invisible cracks. The jars may also have been damaged during transport. Each jar must be carefully inspected before being used.
- The jars were placed directly on the bottom of the pressure canner and not on the caning rack.
Always use the canning rack.
- The hot jars were placed on a wet or cold surface, or they were exposed to drafts of air.
Place the jars on a dry, heat-proof surface at room temperature or on a dry, folded kitchen towels. Avoid air drafts.
| Capacity of the canner | Quantity of water in the canner | Capacity of the canner (jars) | |||
| 8 oz250 ml | 16 oz500 ml | 16 oz(500ml) wide mouth | 32 oz1L | ||
| 22qt20.8L37 pints | 3 1/2 pints2L | 24* 18* | 16* 7 | ||
- The jars were damaged by using a knife to get rid of air bubbles.
Always use a plastic or rubber spatula to get rid of air bubbles.
Pressure canning meat and fish
*If the jars are double-stacked using a second canning rack.
Amount of salt needed for canning vegetables and meats
| Size of jar Salt | |
| 8 oz (250 ml) 1/4 tsp. | |
| 16 oz (500 ml) 1/2 tsp. | |
| 32 oz (1L) 1tsp. |
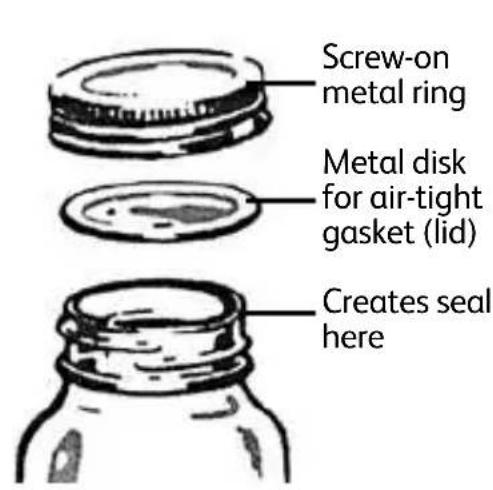
How to close the jars
text_image
Screw-on metal ring Metal disk for air-tight gasket (lid) Creates seal hereCarefully follow the instructions given by the lid manufacturer.
Use a metal ring with an air-tight coating and a screw on metal ring that fits standard canning jars.
- Fill the jar. Wipe down the rim.
- Place the metal disks in hot or boiling water according to the manufacturer's instructions.
-
Place the disk on the jar, making sure that it is placed directly on the glass and creating an air-tight gasket.
-
Screw on the ring using only the strength of your hands. Do not use any tools to screw the ring closed. If the ring is screwed too tightly, this may cause the disk to warp.
-
When canned properly, this jar will seal itself automatically. Do not retighten the ring once the jar is removed from the pressure canner as they eventually will be removed when storing the canned food.
Warning: know how to detect spoiled foods
A leaky jar or a damaged lid are signs that the jar's contents may have spoiled. Check if the contents have an odd colour or give off a strange smell.
Never taste food you think is spoiled. Dispose of immediately. Certain foods may contain botulinum toxin (causing botulism) even if their smell and taste appear normal. For this reason, boil non-acidic vegetables and meats for 10 minutes before eating. Other canned foods should also be boiled before being eaten.
Care and Cleaning
Cleaning the pressure cooker
The stains and scratches which may appear after long use do not affect the operation of the pressure cooker.
To ensure the correct operation of your pressure cooker, follow these cleaning and maintenance recommendations after each use:
- Clean the pressure cooker after each use with warm, soapy water.
- Never use bleach or products containing chlorine.
- Do not overheat your pot when empty.
How to clean the inside of the pot:
• Use a sponge and dish soap.
How to clean the outside of the pot:
- Use a sponge and dish soap.
To remove dark spots from the aluminum, repeat the procedure for «First use» and add 2 tablespoons of baking soda.
To keep your pressure cooker in good condition longer, do not overheat it when it is empty.
You must have your pressure cooker checked in a T-FAL approved service center after 10 years of use.
Do not put your pressure cooker in the dishwasher.
Never use a sharp or pointed object to carry out this operation.
How to clean the lid:
- Wash the lid under running, lukewarm water using a sponge and dish soap, then rinse thoroughly.
How to clean the lid gasket:
- After each use, clean the gasket (H) and the part of the cover in which it fits.
- Wash the gasket under running, lukewarm water using a sponge and dish soap, then rinse thoroughly.
- To put the gasket back in place, see illustration - Fig. 8.
How to clean the operating valve (A):
- Remove the operating valve (A): see section «Use of operating valve».
- Clean the operating valve(A) under running water - Fig. 10.
How to clean the steam release outlet (B):
- Remove the valve (A) - Fig. 5.
- Hold the lid against the light to make sure the steam release outlet is not clogged. If needed, clean it with a tooth pick - Fig. 11-11bis.
How to clean the safety valve (D):
- Clean the part of the safety valve located on the underside of the lid by passing it under running water.
- Also check that the safety valve works properly by using a cotton swab (for example), to press down hard on the centre of the pipe, a part that should move - Fig. 9.
- Make sure the valve functions properly by pressing lightly on the end that should lift easily.
Cleaning the pressure gauge:
- Never remove the pressure gauge.
- Use a dry, clean cloth.
- Do not use any solvents.
- Never put the pressure gauge under water or in the dishwasher.
How to replace the gasket:
- Change the gasket on your pressure cooker once a year or if it shows any signs of splitting or damage.
- Always use an original T-FAL gasket suitable to your model.
How to store your pressure cooker:
- Turn the lid upside down and place on the pot.
Safety Features
Your pressure cooker is fitted with several safety features:
- Safe closure feature:
- If the device has not been properly closed, the pressure indicator (C) cannot rise and therefore pressure cannot build in the device.
- Safe opening feature:
- During operation, the pressure indicator (C) rises completely, locking the handles and preventing the pressure cooker from being opened. This locking system is deactivated when the pressure indicator drops, i.e. when the pressure cooker is no longer under pressure.
- Never touch the pressure indicator (C) while the pressure cooker is in use or while you want to open the lid.
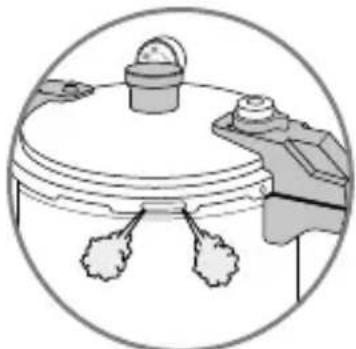
- Two overpressure safety features:
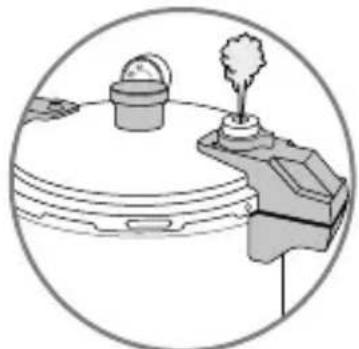
- First feature: the safety valve (D) releases pressure and steam exits horizontally towards the outer lid - Fig 13.
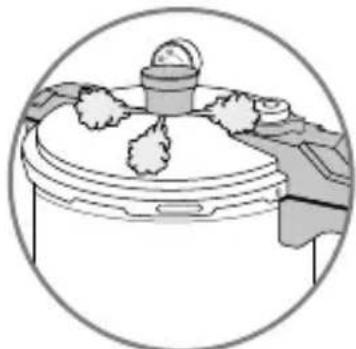
- Second feature: the gasket (H) allows steam to escape all around the pot - Fig 14.
If one of the overpressure safety features is triggered:
- Turn off the heat source;
- Let the pressure cooker cool down;
- Open it;
- Check and clean the operating valve(A), the steam release outlet (B), the safety valve (D) and the gasket (H).
Recommendations for Use
1 - Steam is very hot when it leaves the operating valve.
2 - Once the pressure indicator has risen, you can no longer open the pressure cooker.
3 - As with any cooking utensil, close supervision must be ensured, especially when using the pressure cooker near children.
4 - Watch out for the jet of steam.
5 - To move the pressure cooker, use the two pot handles.
6 - Never leave food in your pressure cooker.
7 - Never use bleach or products containing chlorine, as these may alter the quality of the aluminum.
8 - Do not put any part of your pressure cooker in the dishwasher. Do not leave the lid soaking in water.
9 - Change the gasket every year.
10 - You must only clean your pressure cooker when it is cold and empty.
11 - You must have your pressure cooker checked in a T-FAL approved service center after 10 years of use.
Warranty
- This T-FAL product is warranted against defects in workmanship and material for a period of TWO YEARS from the date that the product is originally purchased. This warranty is not applicable to replacement parts or damage to the product resulting from misuse, accidents or alterations to the product. T-FAL SHALL NOT BE LIABLE FOR INCIDENTAL OR CONSEQUENTIAL DAMAGES, HOWEVER CAUSED. Some states do not allow the inclusion or limitation of incidental or consequential damages, so the above exclusion may not apply to you. If service becomes necessary within the warranty period, please contact us Monday – Friday, 8am to 5pm EST at 1-800-527-7727.
www.t-fal.com
T-FAL - Customer Service
Groupe SEB Canada - Customer Service
2121 Eden Road, Millville 345 Passmore Ave. - Toronto ON - CANADA
NJ 08332 - 1-800-527-7727 M1V3N8 - 1800.418.3325
Monday-friday 8.30 am - 5.30 pm
Protect the environment!

① Your appliance contains a lot of materials which can be recovered or recycled.
Leave it at a local waste collection point.
T-FAL and Your Frequently Asked Questions
| Problems Suggestion | |
| The pressure cooker has been heated under pressure without liquid inside: | Have your pressure cooker checked by an approved service center. |
| The pressure indicator does not rise and no steam is released through the valve during cooking: | This is normal during the first few minutes. However, if this persists, check that:- the heat source is sufficiently strong. If not, increase it.- the quantity of liquid in the pot is sufficient.- the pressure cooker is properly closed.- the gasket and edge of the pot are not damaged. |
| The pressure indicator has risen and no steam is released through the valve during cooking: | This is normal during the first few minutes.However, if this persists, check that :- Turn off the heat, let the pressure cooker cool at room temperature until the pressure indicator drops down.- Never touch the pressure indicator.- Check and clean the operating valve(A), the steam release outlet (B), the safety valve (D) and the gasket (H). |
| If steam leaks from around the lid, check: | The lid is properly closed.The lid gasket is properly affixed.The gasket is in good condition, replace it if necessary.The lid, gasket, gasket housing on the lid, safety valve and operating valve are all clean.The edge of the pot is not damaged. |
| Food has been burned in the pressure cooker: | Let the pot soak before cleaning.Never use bleach or products containing chlorine. |
| You cannot open the lid: | Turn off the heat, let the pressure cooker cool at room temperature until the pressure indicator drops down.Never touch the pressure indicator. |
| If the food is not cooked or is burned, check: | The cooking time.The power of the heat source.If the operating valve is properly attached.The quantity of liquid. |
COOKING RECIPES
MEAT & POULTRY
SWEET AND SOUR CHICKEN
Serves: 10-12
Setting : 2
Pressure Cooking Time: 10 min
INGREDIENTS
3 tablespoons of vegetable oil, 2 large onions, 2 large green peppers, cored, seeded and diced, 2 large red peppers, cored, seeded and diced, 5 pounds boneless chicken thighs, trimmed and cut into 2" pieces, 5 tablespoons soy sauce, 3 cups of sweet & sour sauce or duck sauce, 3 tablespoons apple-cider vinegar, 6 tablespoons water, 3 teaspoons garlic powder, 4 scallions, white & green parts sliced thin.
DIRECTIONS
Heat oil in pressure cooker over medium high heat. Add onions and peppers. Cook 2 minutes. Add chicken and soy sauce. Cook for 3 minutes. Add sweet and sour sauce, vinegar, water and garlic powder and stir well.
Cover and bring to pressure. Lower heat to stabilize pressure and cook for 10 minutes.
Release pressure and open and remove lid.
Transfer to serving dish and garnish with scallions. Serve with brown or white rice.
COQ AU VIN
Serves: 8
Setting : 2
Pressure Cooking Time: 12 min
INGREDIENTS
4 tablespoons olive oil, 8 ounces bacon, chopped, 6 pounds chicken, cut into serving-size pieces, seasoned with salt & pepper, 2 medium onions, chopped, 4 garlic cloves, chopped, 4 tablespoons all-purpose flour, 4 tablespoons brandy, 4 cups red wine, 1 cup chicken broth, 1 teaspoon dried thyme, 2 bay leaves, 1 pound button mushrooms, cut into quarters, salt and black pepper, to taste.

DIRECTIONS
Heat the olive oil in the cooker over medium-high heat. Add and cook the bacon 2 minutes. Remove and set aside.
Brown the chicken in batches. Add the onion and garlic; cook 2 minutes. Sprinkle the flour over the chicken; while stirring, pour in the brandy. Cook 1 minute.
Add the wine, broth, thyme and bay leaf. Stir well and season with salt and pepper, to taste. Add the bacon and mushrooms. Cook 2 minutes without lid.
Close the pressure cooker. As soon as steam starts to release, lower the heat; cook 12 minutes.
Release pressure. Open the cooker. Remove bay leaf. Season with salt and pepper, to taste. Garnish with parsley.
ROAST PORK WITH FENNEL
Serves: 12
Setting : 2
Pressure Cooking Time: 40 minutes
INGREDIENTS
6 pound boneless pork loin roast, seasoned with salt and pepper, 4 tablespoons olive oil, 4 garlic cloves, chopped, 2 medium onions, chopped, 2 large fennel bulbs, coarsely chopped, including feathery fonds, 2 teaspoons dried thyme, 2 bay leaves, 3 cups chicken broth, Salt and black pepper, to taste.
DIRECTIONS
Heat the olive oil in the pressure cooker over medium-high heat. Add the roast and brown on all sides. Add the garlic, onion, fennel, thyme, bay leaf, broth and salt and pepper, to taste.
Close the pressure cooker. As soon as steam starts to release, lower the heat; cook 40 minutes.
Release pressure. Open the cooker. Remove bay leaf. Place meat on cutting board. Reduce the cooking liquid by half, over high heat. Strain the gravy, forcing the solids through a mesh colander. Slice meat and serve with the gravy.
PULLED PORK
Serves: 12-18
Setting : 2
Pressure Cooking Time: 45 min
INGREDIENTS
4 tablespoons olive oil, 2 large onions, cut in half and then in 14 slices, 4 garlic cloves, diced, 12 cup packed brown sugar, 14 cup chili powder, 4 tsp. ground cumin, salt and pepper to taste, 1 (6-pound) boneless pork roast cut into large cubes, 1/2 cups cider vinegar, plus extra as needed, 1 cup chicken broth, 1 cup ketchup, 12-18 hamburger buns or Portuguese rolls.
DIRECTIONS
Heat the oil in the pressure canner over medium heat. Add the onion and garlic; cook for 3 minutes.
Add all other ingredients, except rolls, stir until combined and cook for 45 minutes. Remove pork and place on a platter and cover with foil for about 15-20 minutes before shredding with two forks.
Add some of the gravy so the pork does not get dry. Serve on buns.
SAUERBRATEN
Serves: 10-12
Setting : 2
Pressure Cooking Time: 1 hour
INGREDIENTS
2 cups water, 1 cup red wine vinegar, 12 cup brown sugar, packed, 2 teaspoons ground cloves, 4 teaspoons of salt, 6-8 lbs of chuck or rump roast, salt & pepper to taste, 6 tablespoons vegetable oil, 5 large carrots, coarsely chopped, 5 ribs celery, coarsely chopped, 3 large onions, coarsely chopped, 3 cloves garlic, peeled and crushed, 2 bay leaves, 2 cups finely crushed gingersnap cookies.
DIRECTIONS
Combine water, vinegar, red wine vinegar, sugar, ground cloves and salt. Set aside. Salt and pepper the meat to taste.
Heat the oil in the pressure cooker over medium heat. Brown meat on all sides. Add the carrots, celery, onions, garlic, bay leaves. Pour the mixture that was set aside over the meat. Stir to combine. Cover and bring to pressure. Lower heat to stabilize pressure and cook for 1 hour. Let sit for 15 minutes and then release pressure. Open and remove lid. Discard bay leaves.
Remove the meat to a serving platter and cover with foil. Pour gravy into a food processor until smooth. Add crushed gingersnaps. Taste and add salt and pepper if needed. Slice the meat across the grain and serve with gravy on the side. To complete meal serve with egg noodles or mashed potatoes.
POT ROAST
Serves: 8 - 10
Setting : 2
Pressure Cooking Time: 1 hour
INGREDIENTS
5 pounds chuck roast, Salt and pepper, 3 tablespoons olive oil, 1 cup onion, thinly sliced, 10 carrots, peeled and cut in half, 8 stalks of celery, trimmed and cut in half, 4 cups beef broth, 4 tablespoon A1 sauce, 4 tablespoons Worcestershire, 16 red bliss or Yukon gold potatoes, 3 bay leaves, salt and pepper.
DIRECTIONS
Season the roast heavily with salt and pepper. Heat the oil in the pressure cooker over medium high heat. Sear the chuck roast on all sides.
Add all ingredients into the cooker; close and lock. Bring to pressure and cook for 1 hour at high pressure.
Release pressure using natural release method. Serve with vegetables and gravy.
MEAT SAUCE
Serves: 12-18
Setting : 2
Pressure Cooking Time: 30 min
INGREDIENTS
4 tablespoons olive oil, 2 small onions, chopped fine, 4 garlic cloves, minced, 3 pounds lean ground beef, 12 cup flat-leaf parsley, minced, 4 (28-ounce), 2 teaspoons sugar, cans tomato puree, 12 cup grated parmesan or romano cheese, salt and black pepper, to taste.
DIRECTIONS
Heat the olive oil in the pressure cooker over medium-high heat. Add the onion and garlic; cook until soft. Add the ground beef and cook until no longer pink, breaking up large chunks with a spoon. Add the parsley, tomato puree, sugar, salt and pepper, to taste. Stir to combine.
Close the pressure cooker. As soon as steam starts to release, lower the heat; cook 30 minutes.
Release pressure. Open the cooker. Season with salt and pepper, to taste. Serve over cooked pasta with grated cheese.
SIDES
EN
MASHED POTATOES
Serves: 8-10
Setting : 2
Pressure Cooking Time: 7 min
INGREDIENTS
5 lbs of baking potatoes, peeled and cut into chunks, 9 cups of water, 12 oz of butter, 3/4 - 1 cup of milk.
DIRECTIONS
Add water and potatoes to pot. Close lid. When steam starts cook for 7 minutes, release pressure.
Drain potatoes and add to bowl. Add butter, milk, salt and pepper and mash.
CUBAN-STYLE BLACK BEANS
Serves: 10-12
Setting : 2
Pressure Cooking Time: 15 min
INGREDIENTS
32 oz. (2 bags) of dried black beans rinsed and soaked overnight, 8 tablespoons oil, 2 medium onions chopped, 3 medium green peppers, chopped, 8 garlic cloves, minced, 1 ½ tablespoons oregano, 4 packets of latino seasoning, 3 tsp ground cumin, 8 cups water, 2 tablespoons apple cider vinegar, 1 tablespoon salt, ½ cup cilantro, chopped for garnish, sour cream, and cooked rice for serving.
DIRECTIONS
Heat the oil in the pressure cooker over medium heat. Add the onion and garlic; cook for 3 minutes.
Add remaining ingredients except cilantro. Close lid, when steam releases lower heat and cook for 15 minutes.
Remove from heat, release pressure and remove cover. Mash some of the beans to thicken the cooking liquid. While it sits the liquid will absorb.
Add cilantro, sour cream and rice and some salt if needed. Serve over rice and garnish with sour cream.
SOUPS & STEWS
POTATO AND LEEK SOUP
Serves: 10-12
Setting : 2
Pressure Cooking Time: 5 min
INGREDIENTS
2 tablespoons olive oil, 4 strips bacon, cut up in chunks, 8 leeks, white portion only, sliced and washed well, 2 yellow onions, peeled and chopped, 8 yukon gold potatoes, peeled and chopped, 8 cups chicken or vegetable broth, 2 cups half and half, 2 tablespoons fresh parsley, finely chopped, salt and pepper.
DIRECTIONS
Heat oil in pot over medium heat. Add the bacon and cook until crisp. Add the leeks and onion, and stir for 4 minutes.
Add the potatoes and chicken broth; close and lock. Bring to pressure on high heat, reduce to medium. Cook for 5 minutes at high pressure.
Release pressure using the natural release method.
Uncover; puree the soup with a hand blender until smooth. Place back into the cooker. Add the cream and parsley and then season with salt and pepper. Serve hot or cold.
CLASSIC FRENCH ONION SOUP
Serves: 12-16
Setting : 2
Pressure Cooking Time: 7 min
INGREDIENTS
4 tablespoons olive oil, 12 cups thinly sliced sweet onions, 8 garlic cloves, sliced thin, 2 teaspoons dried thyme, 1 1/3 cups dry sherry or white vermouth, 12 cups beef broth, 24 slices french bread, toasted, salt and black pepper, to taste, 2 cups gruyere cheese, grated.
DIRECTIONS
Heat olive oil in pressure cooker pot over medium heat. Add the onions and garlic; cook until soft. Add the thyme, sherry and 2 cups of the broth. Cook for 2 minutes without lid.
Close the pressure cooker. As soon as steam starts to release, lower the heat; cook 7 minutes.
Release pressure. Open the cooker. Preheat the broiler to high. Add the remaining broth and bring to a simmer. Season with salt and pepper, to taste. Ladle the soup into large soup bowls. Place two pieces of bread on top of each plate. Sprinkle with cheese. Place bowls on a large baking pan, put in oven and broil until the cheese melts, approximately 3 minutes.

BEEF CHILI
Serves: 6
Setting : 2
Pressure Cooking Time: 15 min
INGREDIENTS
6 tablespoons olive oil, 4 medium onions chopped, 12 cloves garlic minced (approximately 4 tablespoons), 6 pounds ground beef, 4 tablepoons ground cumin, 12 cups chili powder, or to taste, 3 teaspoons oregano, 12 teaspoon cayenne powder, 3 bay leafs, salt to taste, 2 (28 ounce) cans crushed or diced tomatoes, 1 (28 ounce) can tomato puree, 2 (15 ounce) cans red kidney beans (drained and rinsed), 2 (15 ounce) cans cannelli beans (drained and rinsed).
DIRECTIONS
Heat olive oil in pressure cooker pot over medium heat. Add the onion and garlic, and cook until the onion is wilted.
Add half of the beef and cook until it is browned then remove and cook the other half. Add all the beef back to the pot. Mix in the cumin, chili powder, oregano, cayenne pepper and bay leaves.
Stir in the crushed tomato and puree. Close and lock. Bring to pressure and cook for 15 minutes at high pressure.
Release pressure, remove the lid and add the beans.
Cook uncovered for 5 minutes. Serve.
CIOPPINO SEAFOOD STEW
Serves: 8
Setting : 2
Pressure Cooking Time: 6 min
INGREDIENTS
6 tablespoons olive oil, 2 medium onions, chopped, 1 large fennel bulb, finely chopped, 8 garlic cloves, chopped, 6 bay leaves, 2 teaspoons dried oregano, 1 teaspoon crushed red pepper flakes, 3 cups dry white wine, 2 (28-ounce) cans diced tomatoes with juice, 2 (8-ounce) bottles clam juice, 2 pounds skinless
haddock or cod fillets, cut into 1" pieces, 2 pounds mussels, scrubbed and de-bearded, 2 pounds large uncooked shrimp, peeled, shredded basil leaves and minced parsley, for serving.
DIRECTIONS
Heat oil in pressure cooker over medium heat. Add onion, fennel, garlic, bay leaves, oregano, and red pepper flakes.
Season with salt and black pepper and sauté until soft. Add white wine and reduce by half. Add seafood.
Close the pressure cooker. As soon as steam starts to release, lower the heat and cook 6 minutes.
Remove from heat, release pressure and remove cover. Taste and adjust for salt and black pepper.
Serve in soup bowls. Garnish with basil and parsley. Serve with crusty bread.
CHUNKY CHICKEN NOODLE SOUP
Preparation time : 10 minutes
Pressure Cooking Time: 19 minutes under pressure
Setting : 2
Yield : 8 servings
INGREDIENTS
4 split chicken breasts with bone and skin, about 3 pounds, 16 cups (4 quarts) water, 4 large leeks (or 2 large onions), washed well to remove dirt and grit, white and light green parts only, sliced thin, 6 carrots, peeled and cut into 14 -inch rounds, 6 celery stalks, cut into 14 -inch slices, 4 cups broad egg noodles, cooked al dente, 2 tablespoons chopped fresh parsley or dill, salt and black pepper, to taste.
DIRECTIONS
1 Place the chicken, water, and salt in pressure cooker. Cover and bring to pressure. Lower heat to stabilize pressure and cook 15 minutes. Use cold water release method to release pressure. Open and remove lid. Remove chicken with a slotted spoon. Skin and debone. Cut into bite-sized chunks.
2 Pour the broth through a fine-mesh strainer. Rinse out pressure cooker. Pour broth back into pot. Add leeks, carrots, and celery. Cover and bring to pressure. Lower heat to stabilize pressure and cook 4 minutes. Use cold water release method to release pressure. Open and remove lid. Taste and season with salt and black pepper. Add the cooked chicken, noodles, and parsley or dill.
Tip : to save time and keep the dishwashing chore to a minimum, cook the noodles right in the hot soup. Add about 2 cups of uncooked noodles to the soup and simmer until al dente.
Vary it : for chicken rice soup, substitute the egg noodles with 3 cups of cooked rice.
MINESTRONE SOUP
Preparation time : 25 minutes
Pressure Cooking Time: 10 minutes under pressure
Setting : 2
Yield : 12-16 servings
INGREDIENTS
5 tablespoons olive oil, 2 medium onions, chopped, 6 cloves garlic, minced, 2 tablespoons dried Italian seasoning, 2 (15-ounce) cans basil, oregano, and garlic-flavored diced tomatoes, 2 cups diced carrots, 2 cups diced celery, 2 cups diced zucchini, 2 cups peeled and diced potatoes, 2 cups string beans, cut into 12 -inch pieces, 4 cups shredded cabbage, 2 tablespoons salt, 1 teaspoon black pepper, 16 cups water, 2 (15-ounce) cans red kidney beans, drained and rinsed under cold water, 3 cups ditalini (small, tube-shaped pasta), cooked al dente, 2/3 cup freshly grated Parmesan or Pecorino Romano cheese.
DIRECTIONS
1 Heat the olive oil in the pressure cooker over medium-high heat. Add the onion, garlic, and Italian seasoning, and cook until soft, 7 to 8 minutes. Add the tomatoes, carrots, celery, zucchini, and potatoes and cook 5 minutes. Add the string beans, cabbage, salt, pepper, and water. Stir well. Cover and bring to pressure. Lower heat to stabilize pressure and cook 10 minutes. Use cold water release method to release pressure. Open and remove lid.
2 Add the kidney beans, pasta, and grated cheese. Taste and adjust for salt and black pepper.
Safe Home Food Canning Practices
The high percentage of water in fresh food makes it very perishable. Proper home canning allows you to prepare and safely store food in canning jars.
Proper canning practices include: carefully selecting and washing fresh food, preparing them according to the recipe; packing then in a hot liquid; adding acids (lemon juice or vinegar) to some foods like tomatoes and fruit; using jars and self-sealing lids manufactured specifically for home canning; and then processing the jars in a boiling-water or a pressure canner for the correct period of time. By doing so, you will remove oxygen; destroy enzymes; prevent the growth of undesirable bacteria, yeasts, and molds; and help form a high vacuum in jars. Good vacuums form tight seals which keep liquid in and air and microorganisms out.
Raw-packed and Hot-packed Food Canning
Foods that are prepared for canning are usually packed in canning jars using one of two methods (unless both methods are specified in the recipe or canning instructions). These methods are called: the raw-pack method and the hot-pack method. The differences are as follows:
Raw-pack Method: foods, like fruits and vegetables, are prepared and then packed raw (uncooked) into the clean jars. The jars are then filled with a boiling liquid before sealing and processing.
Hot-pack Method: foods are prepared and then either blanched or cooked according to the recipe. They are then packed hot into the clean jars. The jars are then filled with boiling liquid before sealing and processing.
Selecting the Correct Processing Time for Jar Size, Packing Method and Altitude
According to USDA «Complete Guide to Home Canning» Agriculture Information Bulletin No. 539, (Revised 2015), when canning in boiling water, more processing time is needed for most raw-packed foods and for quart jars than is needed for hot-packed foods and pint jars.
To destroy microorganisms in acid foods processed in a boiling-water canner, you must:
- Process jars for the correct number of minutes in boiling water.
- Cool the jars at room temperature.
The food may spoil if you fail to add process time for lower boiling-water temperatures at altitudes above 1,000 feet, process for fewer minutes than specified, or cool jars in cold water.
To destroy microorganisms in low-acid foods processed with a pressure canner, you must:
- Process the jars using the correct time and pressure specified for your altitude.
- Allow canner to cool at room temperature until it is completely depressurized.
The food may spoil if you fail to select the proper process times for specific
altitudes, fail to exhaust pressure canners properly and or process at lower pressure than specified.
Note: Since water boils at lower temperatures as altitude increases, you may also need to adjust the processing time when preparing certain foods. This is indicated for you in the Guide for Canning Food and the recipes found in this booklet.
Canning Methods
There are two distinct methods of home canning. They are the boiling-water method (also referred to as hot water canning) and pressure canning method. These two methods are described as follows:
Boiling-Water Method
This method is used to can foods that have a high level of acidity, like pickles, salsa, relishes, etc. and or fruits packed with high levels of sugar like jams and jellies.
Note that this is the only method that will allow you to sterilize fruit in syrup.
Canning jars are sterilized in boiling water and are filled, while they are still hot, with hot food and or hot liquid. They are then processed in a large canning pot, standing upright, covered with at least 1-inch of water above the lid top. The pot is covered during the canning process.
In accordance with USDA «Complete Guide to Home Canning,» Agriculture Information Bulletin No. 539, (Revised 2015), the following are the basic guidelines to canning using the boiling water method:
- Before you start preparing your food, place canner rack in the bottom of a canner. Fill the canner half full with clean warm water for a canner load of pint jars. For other sizes and numbers of jars, you will need to adjust the amount of water so it will be 1 to 2 inches over the top of the filled jars.
- Center the canner over the burner and preheat the water to 140 degrees F. for raw-packed foods and to 180 degrees F. for hot-packed foods. You can begin preparing food for your jars while this water is preheating.
- Load filled jars, fitted with lids and ring bands, into the canner one at a time, using a jar lifter. When moving jars with a jar lifter, make sure the jar lifter is securely positioned below the neck of the jar (below the ring band of the lid). Keep the jar upright at all times. Tilting the jar could cause food to spill into the sealing area of the lid.
If you have a shaped wire rack that has handles to hold it on the canner sides, above the water in the canner, you can load jars onto the rack in the raised position and then use the handles to lower the rack with jars into the water.
- Add more boiling water, if needed, so the water level is at least one inch
above the jar tops. Pour the water around the jars and not directly onto them. For process times over 30 minutes, the water level should be 2 inches above the jars.
-
Turn the heat setting to its highest position. Set a timer (after the water is boiling) for the total minutes required for processing the food.
-
Place the lid on the T-Fal canner pot and lock in place. Since you are not canning with pressure, position the symbol on the valve (A) opposite the marker (L).
-
Keep the canner covered for the process time. The heat setting may be lowered as long as a gentle but complete boil is maintained for the entire process time.
-
Add more boiling water during the process, if needed, to keep the water level above the jar tops. Pour the water around the jars and not directly onto them.
-
If the water stops boiling at any time during the process, turn the heat on its highest setting, bring the water back to a vigorous boil, and begin the timing of the process over, from the beginning (using the total original process time).
-
When the jars have been processed in boiling water for the recommended time, turn off the heat and remove the canner lid. Wait 5 minutes before removing jars to allow the canner contents to settle.
-
Using a jar lifter, remove the jars one at a time, being careful not to tilt the jars. Carefully place them directly onto a towel or cake cooling rack, leaving at least one inch of space between the jars during cooling. Avoid placing the jars on a cold surface or in a cold draft.
-
Let the jars sit undisturbed while they cool, from 12 to 24 hours. Do not tighten ring bands on the lids or push down on the center of the flat metal lid until the jar is completely cooled.
-
Remove ring bands from sealed jars. Put any unsealed jars in the refrigerator and use first.
| Measures of Water and Sugar | |||||
| Syrup Type | 9 Pint Jars 7 Q | Quart Jars Suggested | Fruits | ||
| Water | Sugar | Water | Sugar | ||
| Light | 5-3/4 cups | 1-1/2 cups | 9 cups | 2-1/4 cups | Very sweet fruit |
| Medium | 5-1/4 cups | 2-1/4 cups | 8-1/4 cups | 3-3/4 cups | Sweet apples, sweet cherries, berries, grapes |
| Heavy | 5 cups | 3-1/4 cups | 7-3/4 cups | 5-1/4 cups | Tart apples, apricots, sour cherries, nectarines, peaches, pears, plums |
Pressure Canning Method
This is the only recommended method for canning meat, poultry, seafood, an fruits and vegetableless packed in water or juice. This method may also be used for canning fruit, as well.
In accordance with USDA «Complete Guide to Home Canning» Agriculture Information Bulletin No. 539, (Revised 2015), the following are the adapted basic guidelines to using your pressure canner:
- Make sure the pressure canner is working properly before preparing food. Clean lid gaskets and other parts according to the manufacturer's directions; make sure all vent pipes are clear and contain no trapped material or mineral deposits. Center the canner over the burner. The burner and range must be level. Your pressure canner can be damaged if the burner puts out too much heat. In general, do not use on an outdoor LP gas burner or gas range burner over 12,000 BTU's. Check your manufacturer's directions for more information about appropriate burners.
Put the rack and hot water into the canner. If the amount of water is not specified with a given food, use enough water so it is 2 to 3 inches high in the canner. Longer processes required more water. For hot packed foods, you can bring the water to 180 degrees F. ahead of time, but be careful not to boil the water or heat it long enough for the depth to decrease. For raw packed foods, the water should only be brought to 140 degrees F.
-
Place filled jars, fitted with lids and ring bands, on the jar rack in the canner, using a jar lifter. When moving jars with a jar lifter, make sure the jar lifter is securely positioned below the neck of the jar (below the ring band of the lid). Keep the jar upright at all times. Tilting the jar could cause food to spill into the sealing area of the lid.
-
Properly close the pressure cooker lid. Set the temperature to its highest setting. Refer to the start of this user's guide for information and instructions on pressurisation and maintaining the pressure in your T-Fal pressure cooker.
IMPORTANT: If the pressure drops below the recommended zone indicated on the pressure gauge, bring the pressure back up in the pressure cooker and restart the operation from the start (i.e. the full length of the original operation). This is important to ensure food safety.
- When the timed process is completed, turn off the heat, remove the canner from the heat (electric burner) if possible, and let the canner
cool down naturally. (Lift the canner to move it; do not slide the canner. It is also okay to leave the canner in place after you have turned off the burner. It is better to do so than to let jars inside the canner tilt or tip over if the canner is too heavy to move easily.)
While the canner is cooling, it is also de-pressurizing. Do not force cool the canner. Forced cooling may result in food spoilage. Cooling the canner with cold running water or opening the vent pipe before the canner is fully depressurized are types of forced cooling. They will also cause loss of liquid from jars and seal failures. Forced cooling may also warp the canner lid.
-
After the canner is completely depressurized, follow step 18, page 8, in the owner's manual. Unfasten the lid and remove it carefully. Lift the lid with the underside away from you so that the steam coming out of the canner does not burn your face.
-
Using a jar lifter, remove the jars one at a time, being careful not to tilt the jars. Carefully place them directly onto a towel or cake cooling rack, leaving at least one inch of space between the jars during cooling. Avoid placing the jars on a cold surface or in a cold draft.
-
Let the jars sit undisturbed while they cool, from 12 to 24 hours. Do not tighten ring bands on the lids or push down on the center of the flat metal lid until the jar is completely cooled.
-
Remove ring bands from sealed jars. Ring bands can be washed and dried and put away for using another time. Put any unsealed jars in the refrigerator and use first.
-
Wash jars and lids to remove all residues.
-
Label jars and store in a cool, dry place out of direct light.
-
Dry the canner, lid and gasket. Follow maintenance and storage instructions that come from your canner manufacturer.
Safe Practices for Storing and Using Home Canned Food
In accordance with USDA «Complete Guide to Home Canning» Agriculture Information Bulletin No. 539, (Revised 2015), the following are the basic guidelines for: testing jar seals; storing home canned food; and identifying and handling spoiled food.
Storage
After cooling jars for 12 to 24 hours, remove the ring bands and test seals with one of the following options:
Option 1: Press the middle of the lid with a finger or thumb. If the lid springs up when you release your finger, the lid is unsealed.
Option 2: Tap the lid with the bottom of a teaspoon. If it makes a dull sound, the lid is not sealed. If food is in contact with the underside of the lid, it will also cause a dull sound. If the jar is sealed correctly, it will make a ringing, high-pitched sound.
Option 3: Hold the jar at eye level and look across the lid. The lid should be concave (curved down slightly in the center). If center of the lid is either flat or bulging, it may not be sealed.
Reprocessing Unsealed Jars
If a lid fails to seal on a jar, remove the lid and check the jar-sealing surface for tiny nicks. If necessary, change the jar, add a new, properly prepared lid, and reprocess within 24 hours using the same processing time. Headspace in unsealed jars may be adjusted to 1½ inches and jars could be frozen instead of reprocessed. Foods in single unsealed jars could be stored in the refrigerator and consumed within several days.
Storing Canned Foods
If lids are tightly vacuum sealed on cooled jars, remove screw bands, wash the lid and jar to remove food residue; then rinse and dry jars. Label and date the jars and store them in a clean, cool, dark, dry place. For best quality, store between 50 and 70 °F. Can no more food than you will use within a year.
Do not store jars above 95° F or near hot pipes, a range, a furnace, in an uninsulated attic, or in direct sunlight. Under these conditions, food will lose quality in a few weeks or months and may spoil. Dampness may corrode metal lids, break seals, and allow recontamination and spoilage.
Accidental freezing of canned foods will not cause spoilage unless jars become unsealed and re-contaminated. However, freezing and thawing may soften food. If jars must be stored where they may freeze, wrap them in newspapers, place them in heavy cartons, and cover with more newspapers and blankets.
Identifying and Handling Spoiled Canned Food
Do not taste food from a jar with an unsealed lid or food that shows signs of spoilage. You can more easily detect some types of spoilage in jars stored without screw bands. Growth of spoilage bacteria and yeast produces gas which pressurizes the food, swells lids, and breaks jar seals. As each stored jar is selected for use, examine its lid for tightness and vacuum. Lids with concave centers have good seals.
Next, while holding the jar upright at eye level, rotate the jar and examine its outside surface for streaks of dried food originating at the top of the jar. Look at the contents for rising air bubbles and unnatural color.
While opening the jar, smell for unnatural odors and look for spurting liquid and cotton-like mold growth (white, blue, black, or green) on the top food surface and underside of lid.
Spoiled low-acid foods, including tomatoes, may exhibit different kinds of spoilage evidence or very little evidence. Therefore, all suspect containers of spoiled low-acid foods, including tomatoes, should be treated as having produced botulinum toxin and handled carefully in one of two ways:
- If the swollen metal cans or suspect glass jars are still sealed, place them in a heavy garbage bag. Close and place the bag in a regular trash container or dispose in a nearby landfill.
- If the suspect cans or glass jars are unsealed, open, or leaking, they should be detoxified before disposal.
Guide for Canning Food
The following guide provides step-by-step directions and information on how to can commonly prepared vegetables, fruits, meat and poultry.
- Be sure to always the consult the user's guide regarding the proper and safe use of this appliance.
- Each food and recipe specifies the canning method to be used (boiling-water or pressure can), as well as indicates any differences in processing times, as well as pressure canner settings.
Asparagus: Spears or Pieces
Quantity: You will need approximately 24½ pounds per canner load of 7 quarts; an average of 16 pounds is needed per canner load of 9 pints.
Method: Pressure Can
Procedure: Select tender, tight-tipped spears, 4 to 6 inches long. Wash asparagus. Break off tough stems and peel off any tough skin. Wash again.
Cut into 1-inch pieces or can whole. Choose either hot or raw pack method:
Hot pack method: Lay asparagus flat in a large pot and cover with boiling water. Boil 2 to 3 minutes. Loosely fill jars with hot asparagus, leaving 1-inch headspace. If desired, add 1 teaspoon of canning salt per quart, to the jar. When all jars are filled, add the reserved, hot cooking liquid, leaving a 1-inch headspace. Remove any bubbles. Wipe rims; center lids and screw on the jar bands. Place the jars in the canner and process following the recommendations below.
Raw pack method: Bring a large pot of water to a boil. Fill jars with raw asparagus, packing as tightly as possible without crushing, leaving 1-inch headspace. If desired, add 1 teaspoon of canning salt per quart, to the jar. When all jars are filled, add boiling water, leaving a 1-inch headspace. Remove any bubbles. Wipe rims; center lids and screw on the jar bands. Place the jars in the canner and process following the recommendations below.
Recommended Process Time
Canner Pressure (PSI) Setting at Altitudes of
| Style of Pack | Jar Size | Process Time | 0-4000 feet (10PSI) | 4000-8000 feet (15PSI) |
| Hot & Raw Pints | 30 minutes Setting 2 Setting | 3 | ||
| Quart | 40 minutes Setting 2 Setting | 3 | ||
Beans: Green, Wax, Snap and Italian
Quantity: A bushel of beans weighs approximately 30 pounds and yields 12 to 20 quarts, an average of 2 pounds per quart or 1 pound per pint.
Method: Pressure Can
Procedure: Select firm, blemish-free beans. Wash beans and trim the ends. Leave whole or cut into 1-inch pieces. Choose either hot or raw pack method:
Hot pack method: Place prepared beans in a large pot. Cover with boiling water; boil 5 minutes. Fill prepared jars loosely with blanched beans, leaving 1-inch of headspace. If desired, add 1 teaspoon of canning salt per quart, to the jar. When all jars are filled, add the reserved, hot cooking liquid, leaving a 1-inch headspace. Remove any bubbles. Wipe rims; center lids and screw on the jar bands. Place the jars in the canner and process following the recommendations below.
Raw pack method: Bring a large pot of water to a boil. Fill prepared jars tightly with raw beans, leaving 1-inch of headspace. If desired, add 1 teaspoon of canning salt per quart, to the jar. When all jars are filled, add boiling water, leaving a 1-inch headspace. Remove any bubbles. Wipe rims; center lids and screw on the jar bands. Place the jars in the canner and process following the recommendations below.
Recommended Process Time
Canner Pressure (PSI) Setting at Altitudes of
| Style of Pack | Jar Size | Process Time | 0-4000 feet (10PSI) | 4000-8000 feet (15PSI) |
| Hot & Raw Pints | 20 minutes Setting 2 Setting | 3 | ||
| Quart | 25 minutes Setting 2 Setting | 3 | ||
Beets: Whole, Cubed or Sliced
Quantity: You will need approximately 21 pounds of beets (without tops) per canner load of 7 quarts; an average of 13-1/2 pounds is needed per canner load of 9 pints. A bushel (without tops) weighs 52 pounds and yields 15 to 20 quarts, an average of 3 pounds per quart.
Method: Pressure Can
Procedure: Select beets that are no larger than 1 to 2 inches in diameter for whole packs. Larger beets need to be cut. Trim off beet tops, leaving an inch of stem and roots to reduce bleeding of color. Scrub and rinse well. Beets should only be canned using the hot pack method:
Hot pack method: Place beets in a large pot and cover with boiling water. Boil until skins slip off easily, about 15 to 25 minutes depending on size. Remove skins, and trim off stems and roots. The beets should remain warm or hot going into the jars. Leave baby beets whole. Cut medium or large beets into 1/2-inch cubes or slices. Halve or quarter very large slices. If desired, add 1 teaspoon of canning salt per quart, to the jar. When all jars are filled, add boiling water, leaving a 1-inch headspace. Remove any bubbles. Wipe rims; center lids and screw on the jar bands. Place the jars in the canner and process following the recommendations below.
Recommended Process Time
Canner Pressure (PSI) Setting at Altitudes of
| Style of Pack | Jar Size | Process Time | 0-4000 feet (10PSI) | 4000-8000 feet (15PSI) |
| Hot only Pints | 30 minutes Setting 2 Setting | 3 | ||
| Quart | 35 minutes Setting 2 Setting | 3 | ||
Carrots: Sliced or Diced
Quantity: You will need approximately 17-1/2 pounds (without tops) per canner load of 7 quarts; an average of 11 pounds is needed per canner load of 9 pints. A bushel (without tops) weighs 50 pounds and yields 17 to 25 quarts; an average of 2-1/2 pounds per quart.
Method: Pressure Can
Procedure: Select small carrots, preferably 1 to 1-1/4 inches in diameter. Discard any foliage. Wash, trim, peel, and rewash carrots. Slice or dice, as desired. Choose either hot or raw pack method:
Hot pack method: Place prepared carrots in a large pot. Cover with boiling water; bring to boil. Lower heat and simmer 5 minutes. Fill prepared jars loosely with blanched carrots, leaving 1-inch of headspace. If desired, add 1 teaspoon of canning salt per quart, to the jar. When all jars are filled, add the reserved, hot cooking liquid, leaving a 1-inch headspace. Remove any bubbles. Wipe rims; center lids and screw on the jar bands. Place the jars in the canner and process following the recommendations below.
Raw pack method: Bring a large pot of water to a boil. Fill prepared jars tightly with raw carrots, leaving 1-inch of headspace. If desired, add 1 teaspoon of canning salt per quart, to the jar. When all jars are filled, add boiling water, leaving a 1-inch headspace. Remove any bubbles. Wipe rims; center lids and screw on the jar bands. Place the jars in the canner and process following the recommendations below.
Recommended Process Time
Canner Pressure (PSI) Setting at Altitudes of
| Style of Pack | Jar Size | Process Time | 0-4000 feet (10PSI) | 4000-8000 feet (15PSI) |
| Hot & Raw Pints | 25 minutes Setting 2 Setting | 3 | ||
| Quart | 30 minutes Setting 2 Setting | 3 | ||
Corn: Whole Kernel
Quantity: You will need 31½ pounds (in husk) of sweet corn per canner load of 7 quarts; an average of 20 pounds is needed per canner load of 9 pints. A bushel weighs 35 pounds and yields 6 to 11 quarts, an average of 4½ pounds per quart.
Method: Pressure Can
Procedure: Select fresh ears of sweet corn containing slightly immature kernels. Some varieties of sweet corn or too immature kernels may cause browning. Can a small amount, check color and flavor before canning large quantities.
Husk corn, remove silk, and wash. Blanch 3 minutes in a large pot of boiling water. Cut corn from cob at about three-fourths the depth of kernel. Do not scrape cob. Choose either hot or raw pack method:
Hot pack method: For each four cups of kernels, add 1 cup of hot water to an appropriately sized pot. Bring to a boil; lower heat and simmer 5 minutes. Add 1 teaspoon of salt per quart to the jar, if desired. Fill prepared jars with corn and cooking liquid, leaving 1-inch headspace. Remove any bubbles. Wipe rims; center lids and screw on the jar bands. Place the jars in the canner and process following the recommendations below.
Raw pack method: Bring a large pot of water to a boil. Fill prepared jars with raw kernels, leaving 1-inch headspace. If desired, add 1 teaspoon of canning salt per quart, to the jar. When all jars are filled, add boiling water, leaving a 1-inch headspace. Remove any bubbles. Wipe rims; center lids and screw on the jar bands. Place the jars in the canner and process following the recommendations below.
Recommended Process Time
Canner Pressure (PSI) Setting at Altitudes of
| Style of Pack | Jar Size | Process Time | 0-4000 feet (10PSI) | 4000-8000 feet (15PSI) |
| Hot & Raw Pints | 55 minutes Setting 2 Setting | 3 | ||
| Quart | 85 minutes Setting 2 Setting | 3 | ||
Lima Beans
Quantity: A bushel of lima beans weighs approximately 32 pounds and yields about 9 to 10 quarts, an average of 4 pounds per quart. An average of 18 pounds is needed per canner load of 9 pints.
Method: Pressure Can
Procedure: Select beans that have well-filled pods with green beans. Shell beans and wash thoroughly. Choose either hot or raw pack method:
Hot pack method: Place beans in a large pot. Cover with boiling water; bring to boil. Lower heat and simmer 5 minutes. Fill prepared jars loosely with blanched beans; do not pack down. If desired, add 1 teaspoon of canning salt per quart, to the jar. When all jars are filled, add the reserved, hot cooking liquid, leaving 1-inch of headspace for pints and 1 ¼-inches for quarts. Remove any bubbles. Wipe rims; center lids and screw on the jar bands. Place the jars in the canner and process following the recommendations below.
Raw pack method: Bring a large pot of water to a boil. Fill prepared jars loosely with beans; do not pack down. If desired, add 1 teaspoon of canning salt per quart, to the jar. When all jars are filled, add boiling water, leaving 1-inch of headspace for pints and 1 ¼-inches for quarts. Remove any bubbles. Wipe rims; center lids and screw on the jar bands. Place the jars in the canner and process following the recommendations below.
Recommended Process Time
Canner Pressure (PSI) Setting at Altitudes of
| Style of Pack | Jar Size | Process Time | 0-4000 feet (10PSI) | 4000-8000 feet (15PSI) |
| Hot & Raw Pints | 40 minutes Setting 2 Setting | 3 | ||
| Quart | 50 minutes Setting 2 Setting | 3 | ||
Mixed Summer Vegetables
Quantity: Makes 7 quarts; you will need:
- 6 cups sliced carrots
- 6 cups cut, whole kernel sweet corn
- 6 cups cut green beans
- 6 cups shelled lima beans
- 4 cups whole or crushed tomatoes
- 4 cups diced zucchini
Method: Pressure Can
Procedure: Mixed vegetables should only be canned using the hot pack method:
Hot pack method: Except for zucchini, wash and prepare vegetables as detailed in this manual for the other vegetables. Wash, trim, and slice or cube zucchini; combine zucchini with all vegetables in a large saucepan, add enough water to cover pieces. Boil 5 minutes.
Fill jars with vegetables and cooking liquid, leaving 1-inch headspace. Add 1 teaspoon salt per quart to the jars, if desired. Remove any bubbles. Wipe rims; center lids and screw on the jar bands. Place the jars in the canner and process following the recommendations below.
Note: You can substitute yellow summer squash for the zucchini.
Recommended Process Time
Canner Pressure (PSI) Setting at Altitudes of
| Style of Pack | Jar Size | Process Time | 0-4000 feet (10PSI) | 4000-8000 feet (15PSI) |
| Hot only Pints | 75 minutes Setting 2 Setting | 3 | ||
| Quarts | 90 minutes Setting 2 Setting | 3 | ||
Peas, Green or English, Shelled
Quantity: A bushel of peas weighs approximately 30 pounds and yields 5 to 10 quarts, an average of 4.5 pounds a quart. An average of 20 pounds is needed for 9 pints.
Method: Pressure Can
Procedure: Select filled pods containing young, tender, and sweet peas. Shell peas and wash thoroughly. Choose either hot or raw pack method:
Hot pack method: Place peas in a large pot. Cover with boiling water; bring to boil and cook 2 minutes. Fill prepared jars with blanched peas. If desired, add 1 teaspoon of canning salt per quart, to the jar. When all jars are filled, add the reserved, hot cooking liquid, leaving 1-inch of headspace for pints and 1 ¼-inches for quarts. Remove any bubbles. Wipe rims; center lids and screw on the jar bands. Place the jars in the canner and process following the recommendations below.
Raw pack method: Bring a large pot of water to a boil. Fill prepared jars with raw peas. If desired, add 1 teaspoon of canning salt per quart, to the jar. When all jars are filled, add boiling water, leaving 1-inch of headspace. Remove any bubbles. Wipe rims; center lids and screw on the jar bands. Place the jars in the canner and process following the recommendations below.
EN
Recommended Process Time
Canner Pressure (PSI) Setting at Altitudes of
| Style of Pack | Jar Size | Process Time | 0-4000 feet (10PSI) | 4000-8000 feet (15PSI) |
| Hot & Raw Pints | 40 minutes Setting 2 Setting | 3 | ||
| Quarts | 40 minutes Setting 2 Setting | 3 | ||
Potatoes, White, Cubed or Whole
Quantity: Approximately 20 pounds of potatoes are needed to make 7 quarts; an average of 13 pounds is needed per canner load of 9 pints. A bag weighs 50 pounds and yields 18 to 22 quarts, an average of 2 12 to 3 pounds per quart.
Method: Pressure Can
Procedure: Select best quality small to medium-size mature potatoes. Choose potatoes 1 to 2 inches in diameter if packing whole. Potatoes should only be canned using the hot pack method:
Hot pack method: Wash and peel potatoes. Place in ascorbic acid solution to prevent darkening (refer to information provided on page 40 and 41 in section on Selecting, Preparing and Canning Fruit). If desired, cut potatoes into 1/2-inch cubes. Cook 2 minutes in boiling water and drain. For whole potatoes, boil 10 minutes and drain. Add 1 teaspoon of salt per quart to the jar, if desired. Fill jars with hot prepared potatoes, leaving no more than 1-inch headspace. Cover hot potatoes with fresh boiling water (do not use the cooking water as it contains too much starch), leaving 1-inch headspace and covering all the potatoes. Remove any bubbles. Wipe rims; center lids and screw on the jar bands. Place the jars in the canner and process following the recommendations below.
Recommended Process Time
Canner Pressure (PSI) Setting at Altitudes of
| Style of Pack | Jar Size | Process Time | 0-4000 feet (10PSI) | 4000-8000 feet (15PSI) |
| Hot only Pints | 35 minutes Setting 2 Setting | 3 | ||
| Quarts | 40 minutes Setting 2 Setting | 3 | ||
Tomatoes
To prevent botulism poisoning and other bacterial concerns due to a combination of acid and heat, tomatoes must always be acidified when canning. Always add two tablespoons of bottled lemon juice (do not use freshly squeezed) or 1/2 teaspoon of citric acid per quart of tomatoes. For pints, use one tablespoon bottled lemon juice or 1/4 teaspoon citric acid. Acid can be added directly to the jars before filling with product.
Quantity: Approximately 21 pounds of tomatoes are needed for a canner load of 7 quarts; an average of 13 pounds is needed for a canner load of 9 pints. A bushel weighs 53 pounds and yields 15 to 21 quarts, an average of 3 pounds per quart.
Canning Whole or Halved Tomatoes (packed raw without added liquid)
Method: Pressure Can
Procedure: Select very ripe, blemish free tomatoes. Wash and then dip in boiling water for 30 to 60 seconds or until skins split; plunge in cold water. Slip off skins and remove cores. Leave whole or halve.
Raw pack method: Fill jars with raw, peeled tomatoes. Press tomatoes in the jars until spaces between them fill with juice, leaving 1/2-inch headspace.
Add two tablespoons of bottled lemon juice or 1/2 teaspoon of citric acid per quart of tomatoes. For pints, add one tablespoon bottled lemon juice or 1/4 teaspoon citric acid. Add 1 teaspoon of salt per quart or 12 teaspoon per pint, if desired. Remove any bubbles. Wipe rims; center lids and screw on the jar bands. Place the jars in the canner. Cover, vent and process following the recommendations below.
Recommended Process Time
Canner Pressure (PSI) Setting at Altitudes of
| Style of Pack | Jar Size | Process Time | 0-4000 feet (10PSI) | 4000-8000 feet (15PSI) |
| Raw | Pints or Quarts | 25 minutes Setting 2 Setting | 3 | |
Whole or Halved Tomatoes Packed in Water
Method: Pressure Can
Procedure for hot or raw tomatoes filled with water in jars: Select very ripe, blemish free tomatoes. Wash and then dip in boiling water for 30 to 60 seconds or until skins split; plunge in cold water. Slip off skins and remove cores. Leave whole or halve. Choose either hot or raw pack method:
Hot pack: Put prepared tomatoes in a large saucepan and add enough water to completely cover them. Boil tomatoes gently for 5 minutes. Fill hot jars with hot tomatoes leaving 12 -inch headspace. Add cooking liquid to the jars to cover the tomatoes, leaving 12 -inch headspace.
Add two tablespoons of bottled lemon juice or 1/2 teaspoon of citric acid per quart of tomatoes. For pints, add one tablespoon bottled lemon juice or 1/4 teaspoon citric acid. Add 1 teaspoon of salt per quart or 12 teaspoon per pint, if desired. Remove any bubbles. Wipe rims; center lids and screw on the jar bands. Place the jars in the canner. Cover, vent and process following the recommendations below.
Raw pack: Bring a large pot of water to a boil. Fill jars with prepared raw tomatoes, leaving 12 -inch headspace. Cover tomatoes in the jars with boiling water, leaving 12 -inch headspace.
Add two tablespoons of bottled lemon juice or 1/2 teaspoon of citric acid per quart of tomatoes. For pints, add one tablespoon bottled lemon juice or 1/4 teaspoon citric acid. Add 1 teaspoon of salt per quart or 12 teaspoon per pint, if desired. Remove any bubbles. Wipe rims; center lids and screw on the jar bands. Place the jars in the canner and process following the recommendations below.
Recommended Process Time
Canner Pressure (PSI) Setting at Altitudes of
| Style of Pack | Jar Size | Process Time | 0-4000 feet (10PSI) | 4000-8000 feet (15PSI) |
| Hot & Raw | Pints or Quarts | 10 minutes Setting 2 Setting | 3 | |
Selecting, Preparing and Canning Meat and Poultry
Beef, Lamb, Pork, Veal, Venison
Choose high quality refrigerated meat. Remove excess fat. Cut meat into strips, cubes or chunks. Soak strong-flavored game for 1 hour in brine containing 1 tablespoon of salt per quart of water. Rinse. Remove large bones. For best results, only use the hot pack method.
Method: Pressure Can
Procedure: Boil, steam or bake meat until about two-thirds done. Add 1 teaspoon salt per quart to the jar, if desired. Fill jars with pieces and hot broth, leaving 1-1/4 inch headspace. Remove any bubbles. Wipe rims; center lids and screw on the jar bands. Place the jars in the canner and process following the recommendations below.
Recommended Process Time
Canner Pressure (PSI) Setting at Altitudes of
| Style of Pack | Jar Size | Process Time | 0-4000 feet (10PSI) | 4000-8000 feet (15PSI) |
| Hot only Pints | 75 minutes Setting 2 Setting | 3 | ||
| Quart | 90 minutes Setting 2 Setting | 3 | ||
Chicken
Choose fresh, large, dressed chickens. If fresh killed, dress and refrigerate 6 to 12 hours before canning. Remove excess fat. Cut the chicken into suitable sizes for canning. Can with or without bones. For best results, only use the hot pack method.
Method: Pressure Can
Procedure: Boil, steam or bake meat until about two-thirds done. Add 1 teaspoon salt per quart to the jar, if desired. Fill jars with pieces and hot broth, leaving 1-1/4 inch headspace. Remove any bubbles. Wipe rims; center lids and screw on the jar bands. Place the jars in the canner and process following the recommendations below.
Recommended Process Time
Without bones:
Canner Pressure (PSI) Setting at Altitudes of
| Style of Pack | Jar Size | Process Time | 0-4000 feet (10PSI) | 4000-8000 feet (15PSI) |
| Hot only Pints | 75 minutes Setting 2 Setting | 3 | ||
| Quart | 90 minutes Setting 2 Setting | 3 | ||
With bones:
Canner Pressure (PSI) Setting at Altitudes of
| Style of Pack | Jar Size | Process Time | 0-4000 feet (10PSI) | 4000-8000 feet (15PSI) |
| Hot only Pints | 65 minutes Setting 2 Setting | 3 | ||
| Quart | 75 minutes Setting 2 Setting | 3 | ||
IMPORTANTES MESURES DE SÉCURITÉ
text_image
Diagram illustrating three-step mechanical assembly steps: press, side view, and end view of a device with a knob.flowchart
graph LR
    A["Hand Tool Application"] --> B["Tool Position"]
    B --> C["Assembly"]
    C --> D["Final Assembly"]
METS D'ACCOMPAGNEMENT
PURÉE DE POMMES DE TERRE
Portions : 8-10
Réglage : 2
text_image
Diagram illustrating three-step automotive assembly process: wheel press, nose cone tip, and tire marking.flowchart
graph LR
    A["Hand Tool Application"] --> B["Tool Position"]
    B --> C["Assembly"]
    C --> D["Final Assembly"]
2121 Eden Road, Millville 345 Passmore Ave. - Toronto ON - CANADÁ
NJ 08332 - 1-800-527-7727 M1V3N8 - 1800.418.3325
De lunes a viernes, de 8.30 a 17.30 h
Groupe SEB México, S.A. de C.V.
Calle Goldsmith 38-401 Piso 4