
Universal Base - Baby products Mountain Buggy - Free user manual and instructions
Find the device manual for free Universal Base Mountain Buggy in PDF.

| Product type | Car seat group 0+ (newborn to 13 kg) |
| Usage | Rear-facing only |
| Safety standards | Compliant with ECE R44/04 standard |
| Maximum child weight | 13 kg |
| Maximum child height | 74 cm (head less than 2 cm from top of shell) |
| Installation in vehicle | 3-point seat belt, semi-universal |
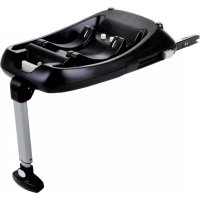
| Main components | Shell, 5-point harness, canopy, removable base, load leg |
| Adjustments | Harness height, crotch strap position, shell recline via load leg |
| Care and cleaning | Clean the cover with a damp cloth and mild detergent; do not use abrasive products |
| Out-of-vehicle use | Baby carrier or bassinet (on flat surface, handle in stationary position) |
| Warranty | Register at www.philandteds.com/register |
| Customer service | www.philandteds.com or www.mountainbuggy.com |
| Spare parts | Contact the manufacturer or authorized dealer |
| Reparability | Do not modify or disassemble the seat; contact customer service if damaged |
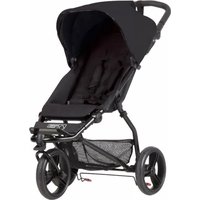
| Brand | Mountain Buggy |
| Model | Universal Base |
Frequently Asked Questions - Universal Base Mountain Buggy
User questions about Universal Base Mountain Buggy
0 question about this device. Answer the ones you know or ask your own.
Ask a new question about this device
Download the instructions for your Baby products in PDF format for free! Find your manual Universal Base - Mountain Buggy and take your electronic device back in hand. On this page are published all the documents necessary for the use of your device. Universal Base by Mountain Buggy.
USER MANUAL Universal Base Mountain Buggy
KEEP FOR FUTURE REFERENCE
phil&teds®
alpha™

protect™
Capsule Base
Group 0+
Suitable for birth to 13kg child
The Capsule Base complies with requirements applicable in market of sale
For rights & remedies, refer www.philandteds.com/warranty
Please register your purchase through our online warranty registration by visiting: www.philandteds.com/register
philandteds.com
mountainbuggy.com
Congratulations on choosing your new car seat capsule base!

Product Care

Safety Warnings

Features

Instructions

Product care
GENERAL INSTRUCTIONS
Group 0+
Suitable for birth to 13kg child.
THIS DOCUMENT CONTAINS IMPORTANT INFORMATION AND MUST BE KEPT WITH THE SEAT FOR FUTURE REFERENCE.
This product should be used rearward facing until the child is too large for the seat or exceeds 13kgs.
This product should never be used forward facing.
CLEANING & CARING
Check your car seat for cuts & bruises. If your product is damaged in any way, or you're not sure how to use it, please consult our web support from where you can access a local customer care team.
Caring for your car seat
Unlike children, your car seat likes to stay clean.
Cleaning the fabric cover:
- Read the label on the removable cover for washing instructions.
• Hand wash in warm water only
• DO NOT tumble dry.
• The fabric cover can be easily removed for washing. - Remove the harness by gently feeding it through from the front to the back of the seat.
- Next remove the crotch strap, including buckle, by rotating it a quarter turn and feeding it out through the seat shell. The cover should now be free of obstruction.
-
Remove the cover and hand wash it at 30^ C; dry flat-away from direct heat.
-
To replace the cover follow the instructions above in reverse.
Cleaning the harness, chest pads and seat:
- Sponge clean only. Use hand soap and warm water.
• DO NOT use solvents, harsh detergents or washing up liquids as these may weaken the harness and seat.
• Use only mild detegents.
• DO NOT lubricate or oil any part of the seat.
• DO NOT wring.
• Dry thoroughly before storage. - Store in a well ventilated space, away from direct sunlight which could damage or fade your product.
- Store in a safe place when it is not being used. Avoid placing heavy objects on top of it.
- DO NOT allow to come into contact with corrosive substances e.g. battery acid.
The correct use and maintenance of your carseat will ensure it gives long and trouble free use. When somebody else is using your car seat, ensure that they also know how to use it and especially the correct way to adjust it. The safety of your child is your responsibility.
IMPORTANT
Please read thoroughly before commencing installation as an incorrect installation could be dangerous.
- Only suitable for use in vehicles fitted with a three-point seat belt approved under UN/ECE 16 or equivalent standard.
- The category of this child restraint system is "SEMI-UNIVERSAL" and it is suitable for installation in the vehicles and in the seat positions indicated in the vehicle list on philandteds.com or mountainbuggy.com.
- If in doubt, consult the manufacturer, retailer or certified installer.

Safety Warnings
WARNINGS
- PLEASE READ ALL INSTRUCTIONS IN THIS MANUAL AND IN THE VEHICLE OWNER'S MANUAL RELATED TO CHILD SAFETY SEATS CAREFULLY AND UNDERSTAND THEM. INSTALL AND USE THE CHILD SAFETY SEAT AS DESCRIBED IN THE INSTRUCTION MANUAL. FAILURE TO DO THIS COULD RESULT IN SERIOUS INJURY OR DEATH OF YOUR CHILD. THE INSTRUCTIONS SHOULD BE RETAINED WITH THE CHILD RESTRAINT FOR THE FUTURE USE.
-
BECAUSE OF POTENTIAL MEDICAL ISSUES INHERENT IN LOW BIRTH WEIGHT AND PREMATURE INFANTS, ALWAYS HAVE A TRAINED PROFESSIONAL DOCTOR, OR HOSPITAL STAFF MEMBER ASSESS THE SUITABILITY OF THE CHILD RESTRAINT PRIOR TO LEAVING THE HOSPITAL OR USING THE CHILD RESTRAINT.
-
Do not remove any labels on the child safety seat. Important information is contained on the labels.
- Do not use a child safety seat with damaged or missing parts.
- Do not use damaged or frayed harness straps or vehicle belt.
- Do not modify or attempt to modify the child safety seat in any way.
- Do not take apart or attempt to take apart this child safety seat except as instructed in this manual.
- Do not use a child safety seat that has been in a crash. A crash can cause damage to the child safety seat that you cannot see.
- Do not replace the child seat cover or harness with any other than the ones we recommend as these parts are integral to the child safety seat's performance.
• Make sure that the child safety seat does
not become trapped by folding or moveable passenger seat or in the door of your car.
- Do not use on the vehicle seats that face the sides or rear of the vehicle. Use the child safety seat only on the vehicle seats that face forward. According to accident statistics, children are safer when properly restrained in the rear seating positions than in the front seating positions.
- Do not use in any configuration not shown in the instructions.
- Never use this child safety seat with 2 point vehicle belts.
- Do not use belt routing methods not shown in these instructions.
- Do not allow children to play with or adjust the child safety seat.
- Always check the tightness of the restraint and the harness before each use.
• Do not use a second-hand child seat or child
seat whose history you do not know.
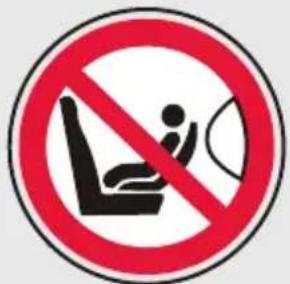
- Do not use this child safety seat in a passenger seat with an active airbag unless the vehicle manufacturer confirms that it is safe.
- This child restraint should be securely belted in the vehicle even when not in use. In a crash or sudden stop, an unsecured child safety seat may injure other occupants.
- Make sure to properly secure any loose objects, such as luggage or books, in your car as they may cause injuries in the event of an accident.
- Never leave your child unattended in a car even for a short time.
- Never take your child out of the child safety seat when the vehicle is moving.
- Never use this child safety seat without the car seat cover.
- Hot! Cover the child safety seat when left in direct sunlight. Parts of a child safety seat

Safety Warnings
may become too hot for the child's skin.
Always check surfaces before placing a child in the child seat.
- Do not use any load bearing contact points other than those described in the instructions and marked in the child restraint.
- The rigid items and plastic parts of a child restraint must be so located and installed that they are not liable, during everyday use of the vehicle to become trapped by a movable seat or in a door of the vehicle.
- We recommended that any straps holding the restraint to the vehicle should be tight, that any straps restraining the child should be adjusted to the child's body, and that straps should not be twisted.
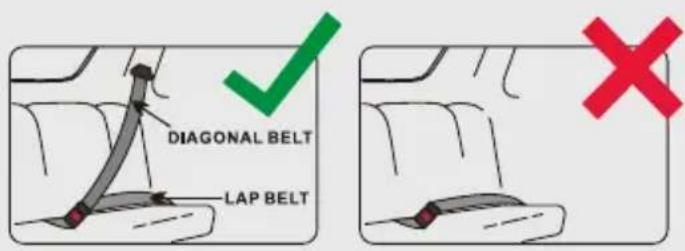
- Important. Please ensure that any lap strap is worn low down, so that the pelvis is firmly engaged.
• Never use this child restraint with any other
base except ones that the manufacturer permits.
• Always make sure all vehicle belts and harness straps are not twisted before each use.
- Never leave the child in the child seat when the harness straps are loose or undone.
- Do not leave your child in this child restraint for an extended period of time.
• Always install the child safety seat in a rear-facing position.
• Never install the child safety seat forward facing.
- Do not use alternative routings not shown in these instructions.
• Make sure all folding passenger seats are property latched.
- All occupants of the vehicle should be correctly restrained. Unrestrained passengers may be thrown into other passengers and cause serious injury or death in a crash.
• Always make sure the handle is properly
locked in the upright carrying position before carrying a child in the child seat.
- Never place the car seat or infant carrier near the edge of an elevated surface or on a soft item such as a seat cushion or mattress. The car seat or infant carrier could fall off these surfaces and cause serious injury or death.
- Never use the child safety seat with a shopping cart.
- Only suitable for use in the listed vehicles fitted with 3 point safety belts, approved to ECE Regulation No. 16 or other equivalent standards.
- Make sure the adult safety-belt buckle does not contact or interfere with the main load bearing contact points on the car seat.
- Contact the child restraint manufacturer or your retailer if in doubt about these points.

Safety Warnings
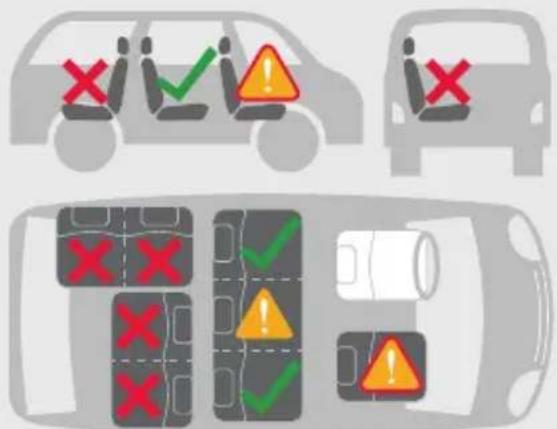
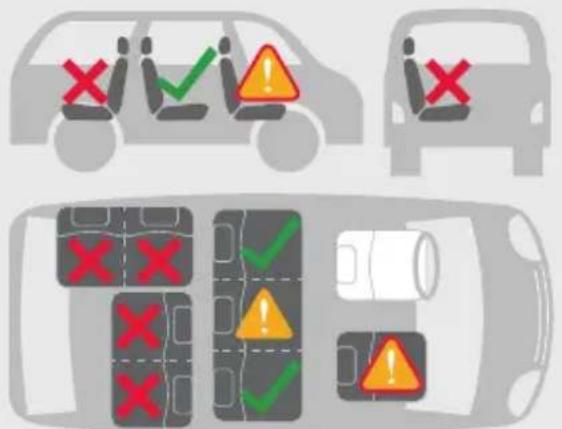
Do not use on a passenger seat with a front airbag.

| √ | On outer rear seat | YES |
| On centre rear seat with 3-point belt | YES | |
| × | On a rearward-facing seat | NO |
| × | On seats facing sidewards | NO |
| × | On rear seat with lapbelt only | NO |
| Front seat with airbag off | YES |
CHECKLIST BEFORE USE
Inspect
• Child restraint free of damage
Verify Child within Size Range
• Weight between 0-13kg
- Height 74cm or less (top of head 2cm or more below top of shell)
Install Child Restraint Rearward-facing in Safe
Location in Vehicle
• Vehicle seats that face front of vehicle only
• Handle locked in specified position
• Child facing rear of vehicle
• Position with NO active airbag
• 3 point (shoulder/lap) belt used
- Seat belt not twisted
- Belt path followed
• Tight against vehicle seat
Secure Child Properly in Child Restraint
• Correct shoulder strap height
- Harness not twisted
- Harness low across hips
• Harness secure and tight

Features
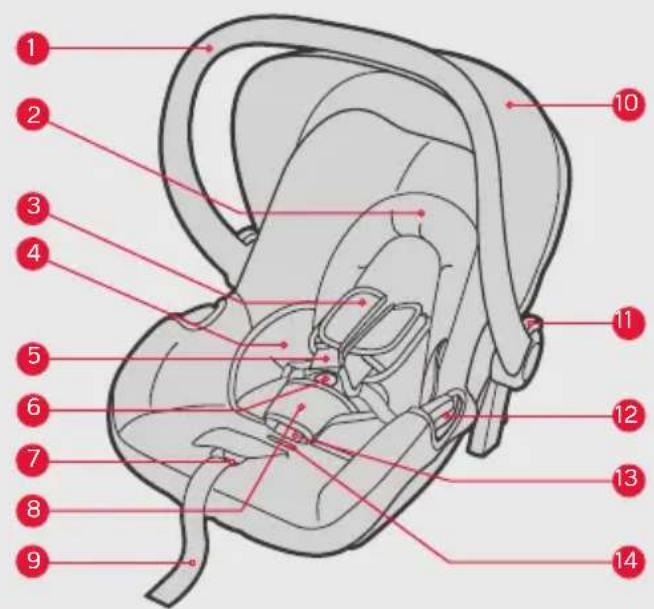
01 Handle
02 Head Support
03 Shoulder Pads
04 Infant Pads
05 Harness
06 Buckle
07 Adjuster Button
08 Crotch Pad
09 Adjuster Strap
10 Canopy
11 Handle Release Button
12 Lap Belt Guide
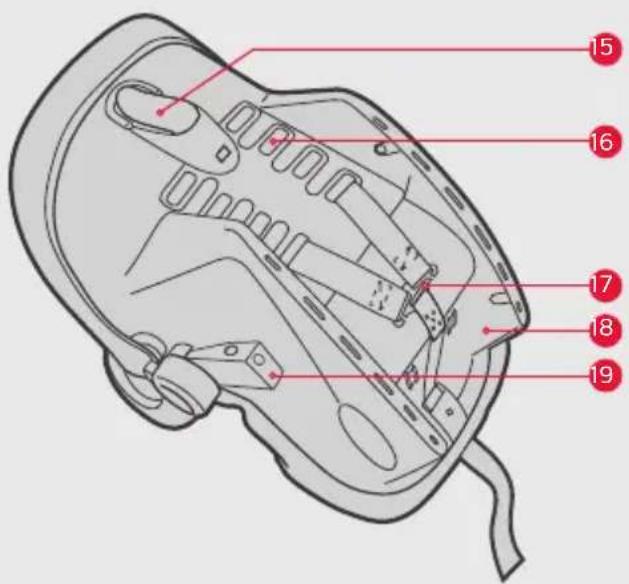
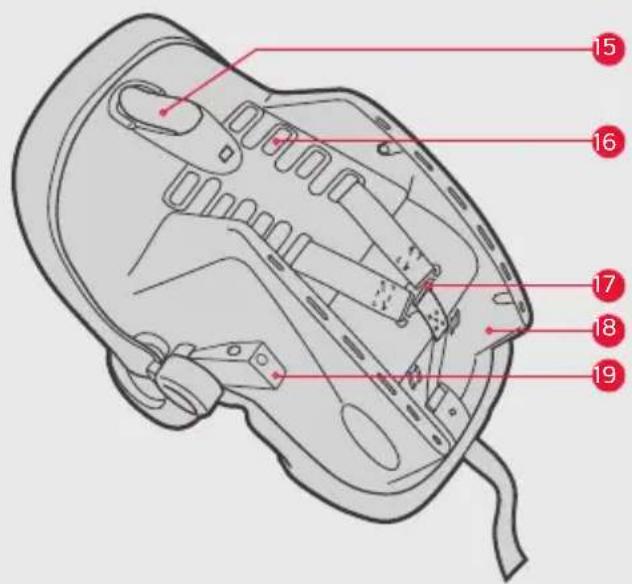
17 Splitter Plate
18 Shell
19 Adapter* (only for some models)
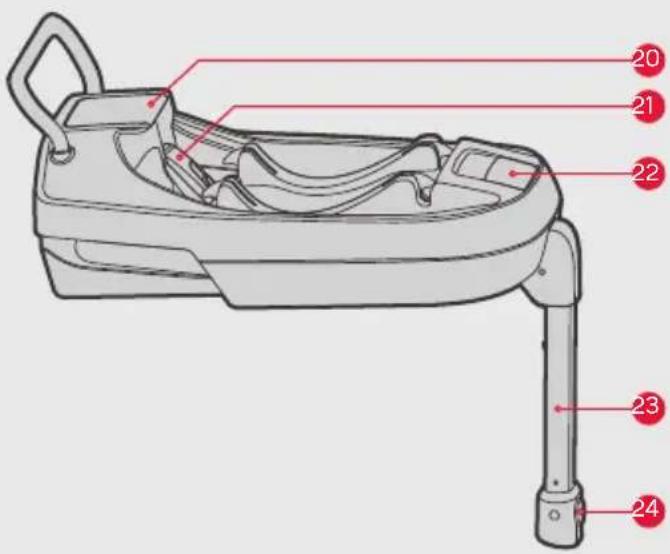
20 Storage for the Manual
21 Lock Off
22 Release Button
23 Support Leg
24 Support Leg Adjustment Button
13 Crotch Belt
14 Crotch Strap Slot
15 Shoulder Belt Guide
16 Harness Slot

Instructions

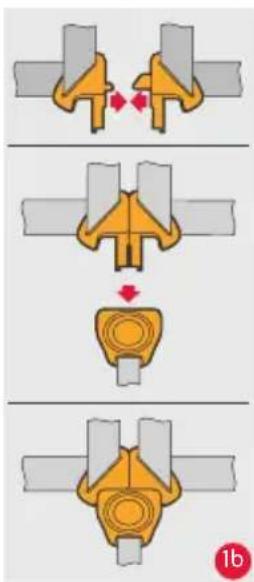
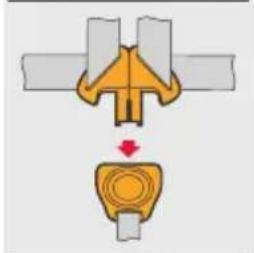
HARNESS POSITIONING
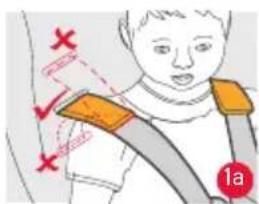
1a Position the height of harness according to the child's height. The harness straps should be level with the child's shoulders. Do not use the child restraint with the harness if the child's shoulder are above the heightest slots in the backrest or if the child's weight exceeds 13kg.
1b Put the two buckle clips together, then lock into the female buckle. (1b)
Tighten the straps until they are in contact with your child's body.
CAUTION!
The hip belt must lie as low as possible over your child's hips.

natural_image
Illustration of a hand adjusting a car seatbelt with red arrows indicating motion (no text or symbols)
natural_image
Mechanical diagram showing a belt drive mechanism with red motion lines (no text or symbols)ADJUSTING THE HANDLE
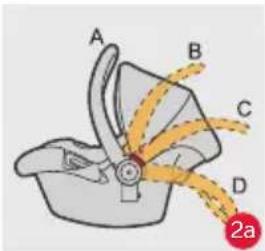
2a There are 4 positions: In vehicle position (A), Carry position (A), Middle position (B,C), and Stationary position(D)
2b To adjust, squeeze handle release buttons on both sides, then rotate the handle, The handle will lock into position.
2c You should hear a click when the handle button is engaged and handle is locked into the upright carrying position.
WARNING:
Always make sure the handle is securely locked in the upright carrying position before carrying.

Instructions
natural_image
Illustration of hands adjusting a yellow belt or belt buckle (no text or symbols visible)
natural_image
Illustration of a hand using orange pliers to adjust or install a component, with no visible text or symbols.
natural_image
Illustration of a hand holding a yellow tool with red components, no text or symbols presentADJUSTING THE HARNESS
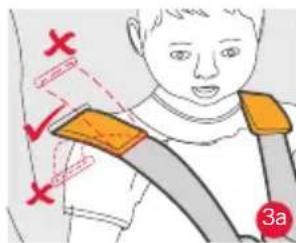
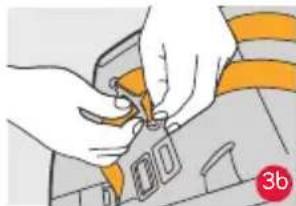
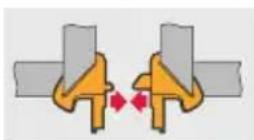
3a Adjust the shoulder straps height so they are level with, or just below child shoulders.
3b To adjust the height of shoulder straps, you need to take out the straps from the splitter plate located in the rear of the seat.
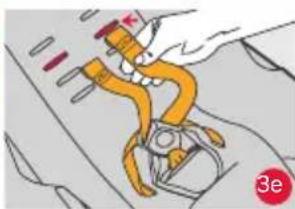
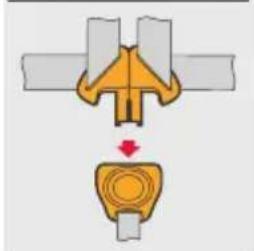
3d Pull both straps through the shell and seat cover.
3e Thread the harness straps through the proper harness slot. Make sure that both straps are even and not twisted. From the rear of the seat, secure the harness strap onto the splitter plate (reverse the 3b). Pull to make sure the harness straps are firmly secured onto the splitter plate. Remember, shoulder straps should be level with, or just below the child's shoulders (3a).
natural_image
Diagram of a garment collar with buttons and a red square mark, no text or symbols present
natural_image
Illustration of a hand adjusting a car seatbelt with a red arrow indicating the angle (no text or symbols present)ADJUSTING THE CROTCH STRAP POSITION
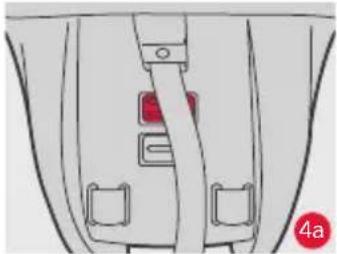
The crotch strap adjusts to 2 positions to fit the child's size. Only move crotch strap position to outer position when the child weighs more than 7kg. Typically this is when the harness is in middle slots.
4a To move the crotch strap, locate the metal plate attached to the crotch strap under the child restraint (4a). Rotate the metal plate and push it through the shell and seat cover. Loosen harness adjuster strap if it is in the way.
4b Locate the appropriate crotch strap slot and insert the metal plate and crotch strap through the seat cover and shell (4b). Pull on harness buckle to make sure crotch strap is securely installed.

Instructions

natural_image
Illustration of a baby wearing an orange safety harness inside a car seat (no text or symbols)SECURING THE CHILD IN CHILD RESTRAINT
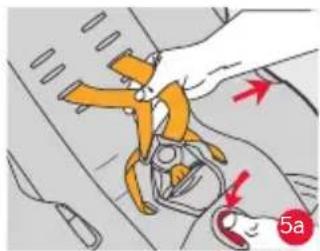
5a Press the adjuster button on the front center of the seat, and pull on both shoulder straps to loosen the harness.
5b Press the red button on the buckle to release the shoulder straps and move them to the side.
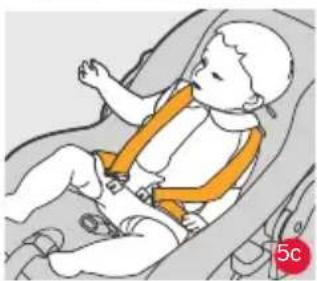
5c Place child's bottom on the seat and the child's back flat against the back of the child restraint. This will increase the child's comfort and allow the harness to properly secure the child. Slide shoulder straps over the child's shoulders (5c). Make sure the harness is at or below the top of the child's shoulders.
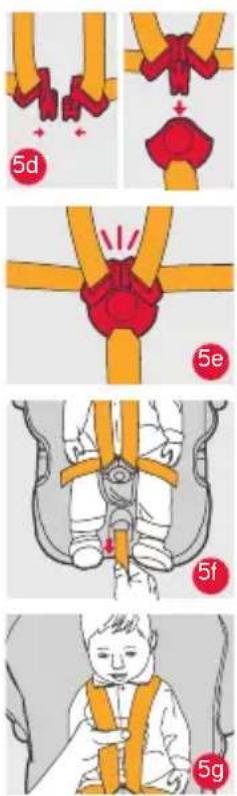
5d Align the top and bottom buckle clips to form one clip.
5e Insert into the buckle until you hear a "click". Make sure the shoulder straps are not twisted. Adjust the shoulder pads over the centre of the child's shoulders.
5f Pull the harness adjustment strap until shoulder straps are tight against the child.
5g For proper tightness, one finger should fit between the harness straps and the child's shoulders.
To remove the child, loosen shoulder straps and release buckle.
Discontinue use when child's weight > 13kg, height >74cm or head is less than 2cm above the top of the shell.

Instructions
APPROVED USES OUTSIDE OF THE VEHICLE
- ALWAYS secure the child with the harness when placing the child in the child restraint.
- ALWAYS make sure the handle is securely locked before using. For use as an infant carrier, place handle in carrying station (A in 2a). For rocking, place the child restraint on level ground, make sure handle is in carrier positions (A in 2a) and lock gently.
- For feeding and resting, place seat on secure and level surface away from the edge of elevated surfaces, and put handle in the stationary position (D in 2a).
natural_image
Illustration of a car seat with a curved seat and seatbelt, no text or symbols present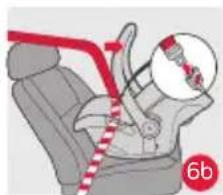
natural_image
Diagram of a car interior showing a red car seatbelt and a hand holding the steering wheel, with no text or symbols present.
natural_image
Illustration of a car seatbelt with red band and arrow indicating motion (no text or symbols)
natural_image
Illustration of a stylized object with a red arrow and circular label '6d' (no text or symbols on the object itself)INSTALLATION IN THE VEHICLE WITHOUT BASE
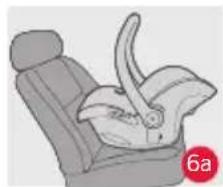
6a Place the child restraint rear-facing on the vehicle seat and make sure the handle is in specified position. The child will face the rear of the vehicle.
6b Route the vehicle lap belt through both lap belt guides and buckle the seat belt.
6c Route the vehicle shoulder belt around the back of the child restraint and through the shoulder belt guide.
6d If vehicle shoulder belt is too short, please move vehicle seat belt height adjustment to the lowest possible height. If the vehicle belt is still too short, try another seating position.

Instructions
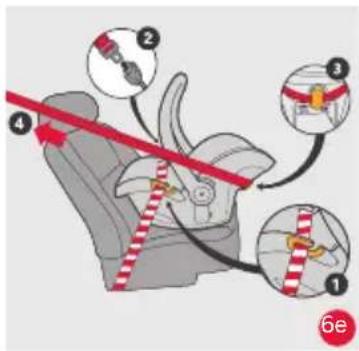
6e Adjust the child restraint to the proper recline to ensure maximum protection for the child. A tightly rolled towel under the front edge of the child restraint can be used to achieve the correct recline.
WARNING:
Do not route the vehicle belt using any other path when using the child seat. For assistance contact our Customer Service team.
Do not use 2 point vehicle belt to install this child seat.
Only install the child restraint rear-facing on forward-facing vehicle seats.
Make sure the child is properly secured in the child restraint, and the child restraint is tightly installed in the vehicle.
natural_image
Side view of a car seat with a strap and seatbelt, no text or symbols visible
natural_image
Illustration of a car seat with a red belt and seatbelt, no text or symbols present
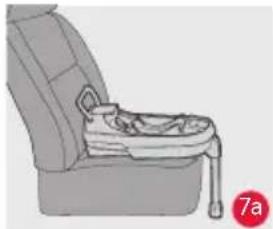
INSTALLATION IN THE VEHICLE WITH BASE
7a Place the base onto the vehicle seat.
Pull out the support leg under the base, put the base flatly on the vehicle seat. Push the base to the back of vehicle seat with anti-rebound bar against the back of vehicle seat.
7b Pull vehicle belt through slot on either side of base.
7c Unlock the lock-off on base, put vehicle belt through lock-off and belt slot on the other side, then lock the lock-off. When you hear a "click", that means the lock-off is well locked.
Smooth out and fasten vehicle belt.
Adjust the length of support leg, make sure support leg touching vehicle floor firmly.

Instructions
natural_image
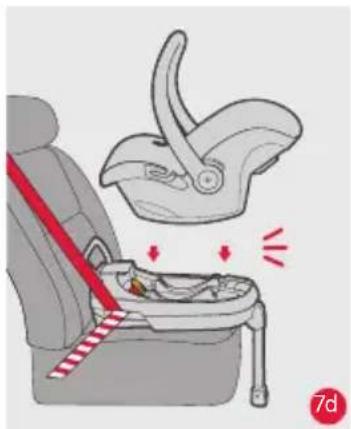
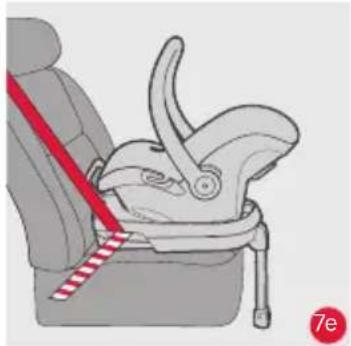
Illustration of a car seat with a red safety belt and warning symbols (no text or labels)7d Put carrier rear facing on the base, and press the carrier downward. When hearing a "click", it shows carrier is correctly installed to the base.
7e Try to pull out the carrier to double check carrier is firmly locked to the base.
natural_image
Illustration of a car seat with a red belt and seatbelt, no text or symbols present
REMOVING THE CHILD SAFETY SEAT
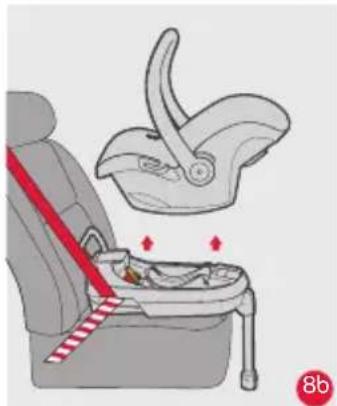
8a Pull up the red release handle in front of the base, unlock the carrier from base, at the same time lift up the carrier vertically, then the carrier can be taken out.
8b Attention:
When taking the carrier out of the base, please check and confirm the handle is on vertical position to avoid risk of baby falling from the carrier.
natural_image
Illustration of a car seat with a red belt and a seatbelt device, no text or symbols present
Instructions

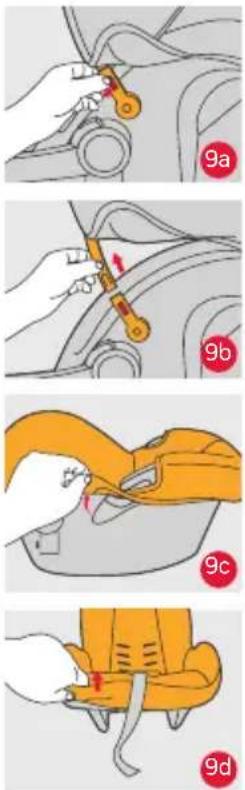
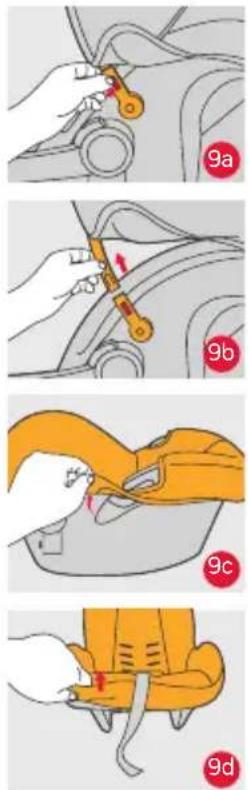
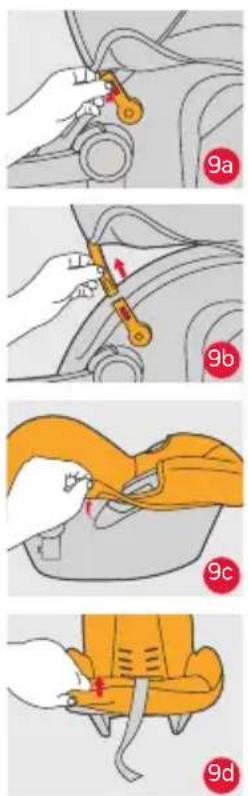
REMOVING THE CANOPY AND COVER
9a / 9b On the side of canopy, pull the tab and detach the canopy frame.
9c / 9d Pull out the cover from shell front.

natural_image
Vertical gray gradient bar with no text or symbols
natural_image
Solid gray vertical bar with no text or symbols
bar
| Category | Value | |---|---| | Category 1 | 100 | | Category 2 | 50 | | Category 3 | 25 | | Category 4 | 15 | | Category 5 | 10 |Français
natural_image
Diagram showing a mechanical assembly with two components, one highlighted in yellow and the other in gold, with no visible text or symbols.
natural_image
Pure mechanical component diagram without any text, numbers, or symbolsPOSITIONNEMENT DU HARNAIS
natural_image
Illustration of a hand adjusting a car seatbelt with red arrows indicating motion (no text or symbols)
natural_image
Mechanical diagram showing a belt drive mechanism with red motion lines (no text or symbols)RÈGLAGE DE LA POIGNÉE

natural_image
Illustration of hands adjusting a yellow belt or belt buckle (no text or symbols visible)
natural_image
Illustration of a hand using orange pliers to adjust or install a component, with no visible text or symbols.

natural_image
Illustration of a hand holding a yellow tool with red components, no text or symbols presentRÈGLAGE DU HARNAIS
natural_image
Diagram of a garment collar with buttons and a red square mark, no text or symbols present
AJUSTEMENT DE LA POSITION DE LA SANGLE D'ENTREJAMBE


natural_image
Illustration of a baby wearing an orange safety harness inside a car seat (no text or symbols)PLACER L'ENFANT DANS LE SIÈGE AUTO
natural_image
Illustration of a car seat with a curved arm and seatbelt, no text or symbols present
natural_image
Diagram of a car seatbelt with red belt and white headband, no text or symbols present
natural_image
Car seat diagram showing seatbelt and seatbelt with red belt and dotted line indicating direction (no text or symbols)
natural_image
Illustration of a car front bumper with a red diagonal stripe and orange belt, no text or symbols present.INSTALLATION DANS LE VÉHICULE SANS BASE
natural_image
Side view of a car seat with a strap and seatbelt, no text or symbols visible
natural_image
Illustration of a car seat with a red belt and seatbelt, no text or symbols present
INSTALLATION DANS LE VÉHICULE AVEC BASE
natural_image
Illustration of a car seat with a red safety belt and warning symbols (no text or labels)natural_image
Illustration of a car seatbelt with a red diagonal band indicating safety belt (no text or symbols)
RETRAIT DU SIÈGE DE SÉCURITÉ ENFANT
natural_image
Illustration of a car seat with a red belt and a seatbelt device, no text or symbols present
Notice
ENLEVER LA CAPOTE ET LA HOUSSE
natural_image
Solid gray vertical bar with no text or symbols
natural_image
Solid gray vertical bar with no text or symbols
bar
| Category | Value | |---|---| | Category 1 | 100 | | Category 2 | 50 | | Category 3 | 25 | | Category 4 | 15 | | Category 5 | 10 |Deutsch

natural_image
Illustration of a hand adjusting a small object with red arrows indicating motion (no text or symbols)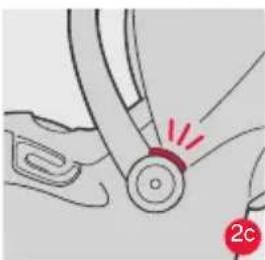
natural_image
Diagram of a mechanical component with red laser lines and a numbered label '2c' (no text or symbols on the diagram itself)
natural_image
Illustration of hands adjusting a yellow belt or belt buckle (no text or symbols visible)
natural_image
Illustration of a hand using orange pliers to adjust or install a component, with no visible text or symbols.

natural_image
Illustration of a hand holding a yellow tool with red components, no text or symbols presentnatural_image
Diagram of a garment collar with buttons and a red square mark, no text or symbols present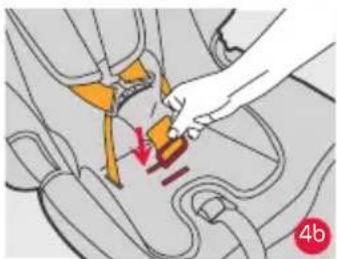
natural_image
Illustration of a hand adjusting a car seatbelt with a red arrow indicating the angle (no text or symbols present)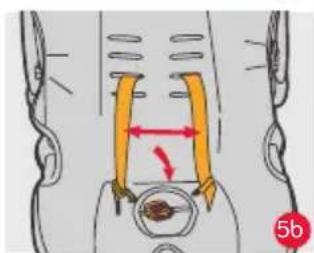

natural_image
Illustration of a baby wearing an orange safety harness inside a car seat (no text or symbols)KIND IM KINDERSITZ SICHERN
natural_image
Illustration of a car seat with a curved seat and seatbelt, no text or symbols present
natural_image
Diagram of a car interior showing a red car seatbelt and a hand holding the wheel, with no visible text or symbols.
natural_image
Illustration of a car seatbelt with red band and arrow indicating motion (no text or symbols)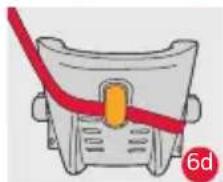
natural_image
Illustration of a car front bumper with a red diagonal stripe and orange button, no text or symbols present.natural_image
Side view of a car seat with a strap and seatbelt, no text or symbols visible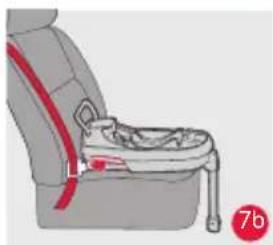
natural_image
Illustration of a car seat with a red belt and seatbelt, no text or symbols present
ANBRINGUNG IM FAHRZEUG MIT BASIS
natural_image
Illustration of a car seat with a red safety belt and warning symbols (no text or labels)natural_image
Illustration of a car seat with a red belt and seatbelt, no text or symbols present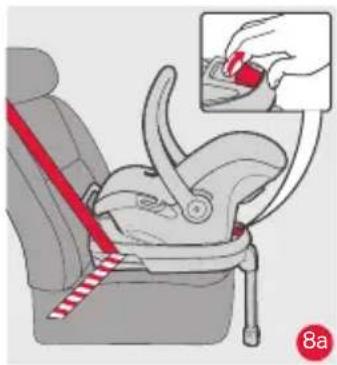
natural_image
Illustration of a car seat with a red belt and a seatbelt device, no text or symbols present
Gebrauchsanweisung
ENTFERNEN DES SONNENDACHS UND BEZUGS
natural_image
Vertical gray gradient bar with no text or symbols
natural_image
Solid gray vertical bar with no text or symbols
bar
| Category | Value | |---|---| | Category 1 | 100 | | Category 2 | 50 | | Category 3 | 25 | | Category 4 | 15 | | Category 5 | 10 |Español


01 Manilla
natural_image
Illustration of a hand adjusting a car seatbelt with red arrows indicating motion (no text or symbols)
natural_image
Mechanical diagram showing a belt drive mechanism with red motion lines (no text or symbols)AJUSTE DE LA MANILLA

natural_image
Illustration of hands adjusting a yellow belt or belt buckle (no text or symbols visible)
natural_image
Illustration of a hand using orange pliers to adjust or install a component, with no visible text or symbols.

natural_image
Illustration of a hand holding a yellow tool with red components, no text or symbols presentAJUSTE DEL ARNÉS
natural_image
Diagram of a garment collar with buttons and a red square mark, no text or symbols present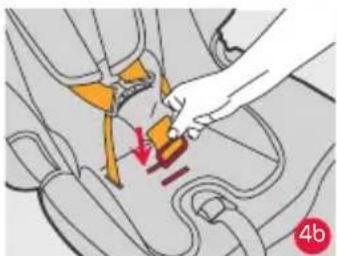


natural_image
Illustration of a baby wearing an orange safety harness inside a car seat (no text or symbols)natural_image
Illustration of a car seat with a curved seat and seatbelt, no text or symbols present
natural_image
Diagram of a car interior showing a red car seatbelt and a hand holding the wheel, with no visible text or symbols.
natural_image
Illustration of a car seatbelt with red band and arrow indicating motion (no text or symbols)
natural_image
Illustration of a stylized object with a red arrow and circular label '6d' (no text or symbols on the object itself)natural_image
Side view of a car seat with a strap and seatbelt, no text or symbols visible
natural_image
Illustration of a car seat with a red belt and seatbelt, no text or symbols present
natural_image
Illustration of a car seat with a red safety belt and warning symbols (no text or labels)natural_image
Illustration of a car seat with a red belt and seatbelt, no text or symbols present
natural_image
Illustration of a car seat with a red belt and seatbelt, showing no text or symbols
Instrucciones

natural_image
Vertical gray gradient bar with no text or symbols
natural_image
Solid gray vertical bar with no text or symbols
bar
| Category | Value | |---|---| | Category 1 | 100 | | Category 2 | 50 | | Category 3 | 25 | | Category 4 | 15 | | Category 5 | 10 |Nederlands


01 Draagbeugel
02 Hoofdsteun
03 Gordelbeschermers
04 Zitverkleiner
05 Gordel
06 Gesp
07 Verstelknop


natural_image
Diagram showing a mechanical assembly with two components, one highlighted in yellow and the other in gold, with no visible text or symbols.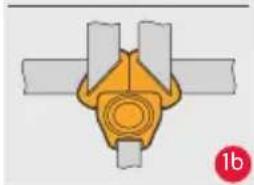
natural_image
Pure mechanical component diagram without any text, numbers, or symbolsDE GORDEL VASTMAKEN
natural_image
Illustration of a hand adjusting a small object with red arrows indicating motion (no text or symbols)
natural_image
Mechanical diagram showing a belt drive mechanism with red motion lines (no text or symbols)DE DRAAGBEUGEL AANPASSEN

natural_image
Illustration of hands adjusting a yellow belt or belt buckle (no text or symbols visible)
natural_image
Illustration of a hand using orange pliers to adjust or install a component, with no visible text or symbols.

natural_image
Illustration of a hand holding a yellow tool with red components, no text or symbols presentDE GORDEL AANPASSEN
natural_image
Diagram of a garment collar with buttons and a red square mark, no text or symbols present


natural_image
Illustration of a baby wearing an orange safety harness inside a car seat (no text or symbols)HET KIND STEVIG IN HET KINDERBEVEILIG INGSSYSTEEM VASTMAKEN
natural_image
Illustration of a car seat with a curved seat and handle, no text or symbols present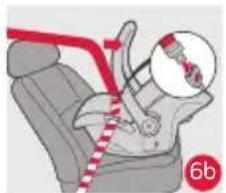
natural_image
Illustration of a car interior with a red car seat, showing a person seated and a magnified inset of the seat (no text or symbols)
natural_image
Illustration of a car seatbelt with red band and arrow, no text or symbols present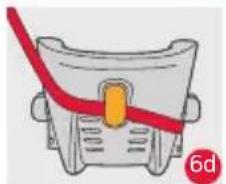
natural_image
Illustration of a car head with a red trend line and orange button, no text or symbols presentINSTALLATIE IN VOERTUIG ZONDER BASIS
natural_image
Side view of a car seat with a strap and seatbelt, no text or symbols visible
natural_image
Illustration of a car seat with a red belt and seatbelt, no text or symbols present
INSTALLATIE IN VOERTUIG MET BASIS
natural_image
Illustration of a car seat with a red safety belt and warning symbols (no text or labels)natural_image
Illustration of a car seat with a red belt and seatbelt, no text or symbols present
HET KINDERVEILIGHEIDSZITJE VERWIJDEREN
natural_image
Illustration of a car seat with a red belt and a seatbelt device, no text or symbols present
Handleiding
DE ZONNEKAP EN BEKLEDING VERWIJDEREN
natural_image
Vertical gray gradient bar with no text or symbols
natural_image
Solid gray vertical bar with no text or symbols
bar
| Category | Value | |---|---| | Category 1 | 100 | | Category 2 | 50 | | Category 3 | 25 | | Category 4 | 15 | | Category 5 | 10 |Dansk

01 Håndtag
02 Hovedstøtte
03 Skulderpuder
04 Spædbarnspuder
05 Sele
06 Spænde
07 Justeringsknap
08 Skridtpude
09 Justeringsstrop
10 Baldakin

natural_image
Diagram showing two mechanical components with a red arrow indicating motion or force direction (no text or symbols)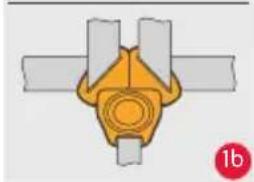
natural_image
Pure mechanical component diagram without any text, numbers, or symbolsPLACERING AF SELEN
natural_image
Illustration of a hand adjusting a car seatbelt with red arrows indicating motion (no text or symbols)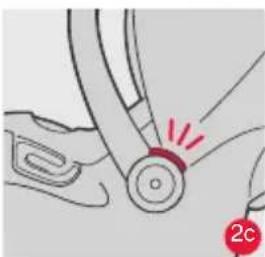
natural_image
Mechanical diagram showing a belt drive mechanism with red motion lines (no text or symbols)JUSTERING AF HÅNDTAGET
2a Der er 4 positioner: I bilposition (A), Bæreposition (A), Mellemposition (B, C) og Stationær position (D)

natural_image
Illustration of hands adjusting a yellow belt or belt buckle (no text or symbols visible)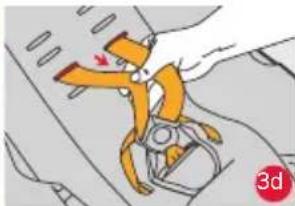
natural_image
Illustration of a hand using orange pliers to adjust or install a component, with no visible text or symbols.

natural_image
Illustration of a hand holding a yellow tool with red components, no text or symbols presentJUSTERING AF SELEN
natural_image
Diagram of a garment collar with buttons and a red square mark, no text or symbols present
natural_image
Illustration of a hand adjusting a car seatbelt with a red arrow indicating the angle (no text or symbols present)JUSTERING AF SKRIDTSTROPPENS POSITION


natural_image
Illustration of a baby wearing an orange safety harness inside a car seat (no text or symbols)FASTG∅RELSE AF BARNET I BARNEFASTHOLDELSESANORDNINGEN
natural_image
Illustration of a car seat with a curved seat and seatbelt, no text or symbols present
natural_image
Diagram of a car interior showing a red car seatbelt and a hand holding the wheel, with no visible text or symbols.
natural_image
Illustration of a car seatbelt with red band and arrow indicating motion (no text or symbols)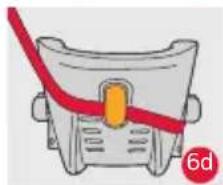
natural_image
Illustration of a stylized object with a red arrow and circular label '6d' (no text or symbols on the object itself)MONTERING I BILEN UDEN BASE
natural_image
Side view of a car seat with a strap and seatbelt, no text or symbols visible
natural_image
Illustration of a car seat with a red belt and seatbelt, no text or symbols present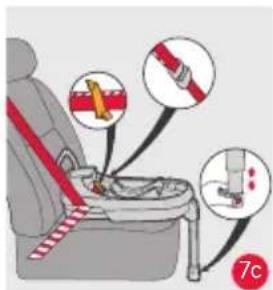
MONTERING I BILEN MED BASE
natural_image
Illustration of a car seat with a red safety belt and warning symbols (no text or labels)natural_image
Illustration of a car seat with a red belt and seatbelt, no text or symbols present
FJERNELSE AF AUTOSTOLEN
natural_image
Illustration of a car seat with a red belt and a seatbelt device, no text or symbols present
Vejledning

FJERNELSE AF BALDAKINEN OG BETRÆKKET
© Phil and Teds Most Excellent Buggy Company Ltd 2012.
We (Phil and Teds Most Excellent Buggy Company Ltd) own the intellectual property rights in our brands, designs and inventions featured in this publication. These include, without limitation, the phil&teds, adapt&survive!, &, INLINE trade marks and INLINE DOUBLE BUGGY shape. We actively pursue people who infringe our intellectual property.
©Phil & Teds Most Excellent Buggy Company Ltd 2012.
© Phil and Teds Most Excellent Buggy Company Ltd 2012.
© Phil and Teds Most Excellent Buggy Company Ltd 2012.
© Phil and Teds Most Excellent Buggy Company Ltd 2012.
© Phil and Teds Most Excellent Buggy Company Ltd 2012.
Mountain Buggy Spain
Mountain Buggy France
Designed in New Zealand. Made in China
Designed in New Zealand. Made in China


- Capsule Base
- Congratulations on choosing your new car seat capsule base!
- GENERAL INSTRUCTIONS
- Group 0+
- Suitable for birth to 13kg child.
- THIS DOCUMENT CONTAINS IMPORTANT INFORMATION AND MUST BE KEPT WITH THE SEAT FOR FUTURE REFERENCE.
- CLEANING & CARING
- Caring for your car seat
- IMPORTANT
- WARNINGS
- Safety Warnings
- CHECKLIST BEFORE USE
- Inspect
- Verify Child within Size Range
- Install Child Restraint Rearward-facing in Safe
- Location in Vehicle
- Secure Child Properly in Child Restraint
- HARNESS POSITIONING
- CAUTION!
- ADJUSTING THE HANDLE
- WARNING:
- ADJUSTING THE HARNESS
- ADJUSTING THE CROTCH STRAP POSITION
- SECURING THE CHILD IN CHILD RESTRAINT
- APPROVED USES OUTSIDE OF THE VEHICLE
- INSTALLATION IN THE VEHICLE WITHOUT BASE
- INSTALLATION IN THE VEHICLE WITH BASE
- REMOVING THE CHILD SAFETY SEAT
- 8b Attention:
- REMOVING THE CANOPY AND COVER
- POSITIONNEMENT DU HARNAIS
- RÈGLAGE DE LA POIGNÉE
- RÈGLAGE DU HARNAIS
- AJUSTEMENT DE LA POSITION DE LA SANGLE D'ENTREJAMBE
- PLACER L'ENFANT DANS LE SIÈGE AUTO
- INSTALLATION DANS LE VÉHICULE SANS BASE
- INSTALLATION DANS LE VÉHICULE AVEC BASE
- RETRAIT DU SIÈGE DE SÉCURITÉ ENFANT
- ENLEVER LA CAPOTE ET LA HOUSSE
- KIND IM KINDERSITZ SICHERN
- ANBRINGUNG IM FAHRZEUG MIT BASIS
- ENTFERNEN DES SONNENDACHS UND BEZUGS
- AJUSTE DE LA MANILLA
- AJUSTE DEL ARNÉS
- DE GORDEL VASTMAKEN
- DE DRAAGBEUGEL AANPASSEN
- DE GORDEL AANPASSEN
- HET KIND STEVIG IN HET KINDERBEVEILIG INGSSYSTEEM VASTMAKEN
- INSTALLATIE IN VOERTUIG ZONDER BASIS
- INSTALLATIE IN VOERTUIG MET BASIS
- HET KINDERVEILIGHEIDSZITJE VERWIJDEREN
- DE ZONNEKAP EN BEKLEDING VERWIJDEREN
- PLACERING AF SELEN
- JUSTERING AF HÅNDTAGET
- JUSTERING AF SELEN
- JUSTERING AF SKRIDTSTROPPENS POSITION
- FASTG∅RELSE AF BARNET I BARNEFASTHOLDELSESANORDNINGEN
- MONTERING I BILEN UDEN BASE
- MONTERING I BILEN MED BASE
- FJERNELSE AF AUTOSTOLEN
- FJERNELSE AF BALDAKINEN OG BETRÆKKET
Brand : Mountain Buggy
Model : Universal Base
Category : Baby products