
Isofix Base - Baby products Mountain Buggy - Free user manual and instructions
Find the device manual for free Isofix Base Mountain Buggy in PDF.

| Brand | Mountain Buggy |
| Model | Isofix Base |
| Product type | ISOFIX base for child car seat |
| Category | Baby products |
| Dimensions (approx.) | 45 x 35 x 20 cm |
| Weight (approx.) | 5 kg |
| Material | Reinforced plastic, metal |
| Approval | R44.04, class E semi-universal |
| Usage group | Group 0+ (newborns up to 13 kg) |
| Recommended orientation | Rearward facing |
| Fixation type | ISOFIX + support leg |
| Number of ISOFIX positions | 8 adjustable positions |
| Connection indicators | Yes (red/green) |
| Foot pressure indicators | Yes (red/green) |
| Maintenance | Clean with warm water, dry completely, store away from sunlight |
| Safety | Do not use on seat with frontal airbag |
| Spare parts | ISOFIX plastic guides included |
| Repairability | Contact customer service in case of damage |
| Warranty | Online registration required |
| Manufacturer | Phil & Teds (Mountain Buggy) |
Frequently Asked Questions - Isofix Base Mountain Buggy
User questions about Isofix Base Mountain Buggy
0 question about this device. Answer the ones you know or ask your own.
Ask a new question about this device
Download the instructions for your Baby products in PDF format for free! Find your manual Isofix Base - Mountain Buggy and take your electronic device back in hand. On this page are published all the documents necessary for the use of your device. Isofix Base by Mountain Buggy.
USER MANUAL Isofix Base Mountain Buggy
KEEP FOR FUTURE REFERENCE
phil&teds®
alpha™

protect™
ISOFIX CLASS E
The ISOFIX CLASS E complies with requirements applicable in market of sale. For rights & remedies, and important online product registration please visit:
www.philandteds.com/register
www.mountainbuggy.com/register
philandteds.com
mountainbuggy.com
Congratulations on choosing your new car seat isofix base!

Product Care

Safety Warnings

Features

Instructions

Product care
Products care

GENERAL INSTRUCTIONS
Group 0+
Suitable for birth to 13kg.
ISOFIX CLASS E
THIS DOCUMENT CONTAINS IMPORTANT INFORMATION AND MUST BE KEPT WITH THE SEAT FOR FUTURE REFERENCE.
This product should be used rearward facing until the child is too large for the seat or exceeds 13kg.
This product should never be used forward facing
CLEANING & CARING
Check your ISOFIX Base for cuts & bruises. If your product is damaged in any way, or you're not sure how to use it, please consult our web support from where you can access a local customer care team.
Caring for your ISOFIX Base
Unlike children, your ISOFIX Base likes to stay clean. Cleaning:
- Wipe down with warm water.
• Dry thoroughly before storage. - Store in a well ventilated space, away from direct sunlight which could damage or fade your product
- Store in a sale place when it is not being used. Avoid placing heavy objects on top of it.
- DO NOT allow to come into contact with corrosive substances e.g. battery acid.
The correct use and maintenance of your ISOFIX Base will ensure it gives long and trouble free use. When somebody else is using your ISOFIX Base, ensure that they also know how to use it and especially the correct way to adjust it. The safety of your child is your responsibility.
IMPORTANT
Please read thoroughly before commencing installation as an incorrect installation could be dangerous.
- This is a "Semi-Universal" ISOFIX BASE CHILD RESTRAINT SYSTEM, it is approved to ECE regulation 44.04. Please note that the ISOFIX base is not suitable for all types of cars and is designed as "Semi-universal" and therefore suitable for installation on the seats of certain cars as stated on the car fitting list.
- If in doubt, consult either phil&lod or the retailer. Extreme Hazard
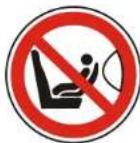
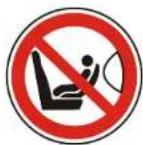
- Do not use in passenger seats equipped with airbags

Safety Warnings
Safety Warnings

WARNINGS
- PLEASE READ THOROUGHLY BEFORE COMMENCING INSTALLATION AS INCORRECT INSTALLATION COULD BE DANGEROUS.
- THIS ISOFIX BASE SHOULD NOT UNDER ANY CIRCUMSTANCES BE USED ON A PASSENGER SEAT EQUIPPED WITH AN AIRBAG
- The Isofix base is only suitable for installation on the seats of certain cars – refer to the car's fitting list.
• Never buy or use a second hand ISOFIX base. - Never use an ISOFIX base that has been in an accident or become badly worn – replace the base. After an accident, the base may not appear damaged but it may not be able to protect your child in the event of another accident. Periodically inspect the base for wear and signs of damage.
-
Always secure the isofix base to the vehicle's isofix points.
-
All occupants in the vehicle must be correctly restrained.
- Do not place any objects in the foot well in front of the Isofix base.
- Do not make any unauthorised modifications or alterations to the Iselix base.
- Do not allow children to play with the isofix base.
- Do not place the Isofix base on a table or work top.
• Make sure the Isofix base does not become trapped in the door of the vehicle or by a folding seat.
• Make sure folding seats are securely latched. - Do not fit the Isofix base on a side or rear facing vehicle seat.
- A car's interior can become very hot if the vehicle is left parked in direct sunlight. It is recommended that the base and car seat is covered with a towel etc when not in use. This prevents the base and car seat
from becoming hot and burning the child.
- When not in use, store the Iselix base in a safe dry place.
- Do not place the front support leg on a floor storage compartment lid. The front support leg MUST make full and firm contact with the vehicle floor.
- Make sure that the support leg does not raise the base from the surface of the vehicle seat.

Features
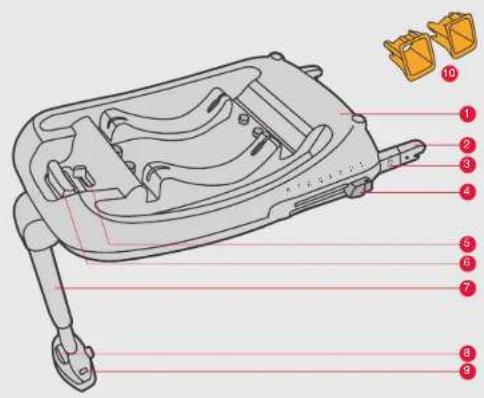
Features

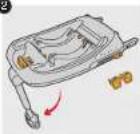
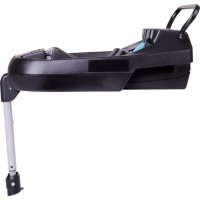
01 Base
02 ISOFIX connector arms
03 ISOFIX connection indicator
04 ISOFIX adjustment button
05 Shell second lock release button/Indicator
06 Shell release handle/indicator
07 Support leg
08 Support log adjuster
09 Support leg pressure indicators
10 Plastic ISOFIX guides

Instructions

Installing the ISOFIX Base
WARNING: To install the ISOFIX CHILD RESTRAINT SYSTEM read the instruction manual carefully as the safety of your child is at stake. It is important that you take the time to read these instructions carefully.
Check that the ISOFIX CHILD RESTRAINT SYSTEM has been installed correctly.
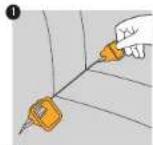
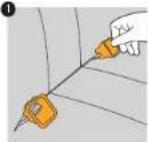
1 Insert the two plastic ISOFIX guides and hook them onto the vehicle ISOFIX points.
The plastic guides can help identify the vehicle ISOFIX points and make installation easier. They can also help with the protection of your vehicle seat.
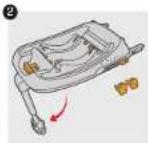
2 Pull out the support leg from the attachment.
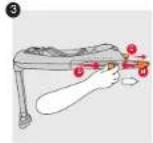
3 Pinch the Adjustment Buttons(a) on each side of the ISOFIX base and slide out the arms(b&c). ISOFIX has B positions, which adjust the length.

4 Connect the ISOFIX arms onto the vehicle ISOFIX points.
Note: see picture 4, need to push the ISOFIX adjuster button on both two sides. In order to make assembly panel, we suggest to adjust the ISOFIX to the longest position.
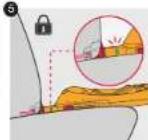
5 Push the Adjust buttons toward the vehicle's anchors until both connectors are locked and the indicators show green on both sides.
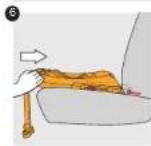
6 Push the base towards the seat back, making sure the base is installed firmly against the seat back.
Note: the adjust buttons on both two sides must in the same location

Instructions

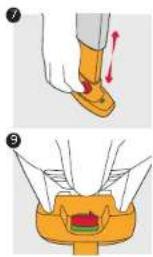
7 Push the support leg adjuster and adjust the support leg so that it makes full and firm contact with the vehicle floor. The two pressure monitors at the base of the support leg must turn from red to green confirming firm contact. Check that the front support leg clicks into position and is correctly adjusted.
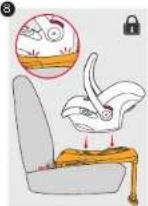
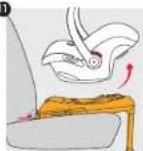
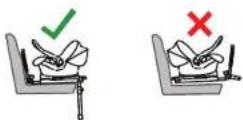
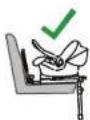
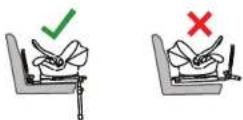
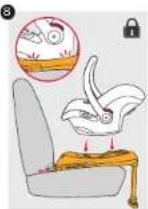
8. Lower the car seat on to the ISOFIX Base and make sure that all 4 connection bars engage firmly and click into position on the base connection points. Make sure the car seat handle is in the upright position and that it "clicks" into place.
9 Lift the car seat to make sure that all four connections have engaged correctly and the three connection indicators have changed from red to green(parts list no.5/8/9)
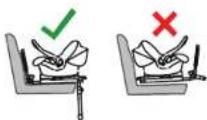
Do not place the front support leg on a floor storage compartment. I.e. The front support leg MUST make full and firm contact with the vehicle floor.
Make sure that the support leg does not raise the base from the surface of the vehicle seat
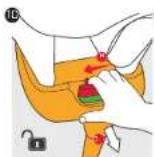

Detaching the Car Seat from the ISOFIX Base
10 Push the shell release button to the left, at the same time pull the shell release button handle indicator, then you can move out the shell.
11 Carefully lift the car seat from the ISOFIX Base.
Removing the ISOFIX Base from the vehicle
12 Push the ISOFIX adjustment button, and the ISOFIX connector arms will pop-up automatically, then the base of ISOFIX can move out from the seat of car.
Pushing the support leg adjustment button to adjust the front support leg to the required length. Reattach to the holder position under the base. Carefully remove the base from your vehicle.

Instructions Instructions
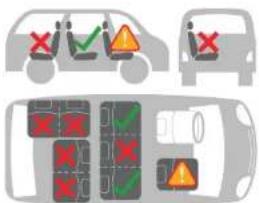


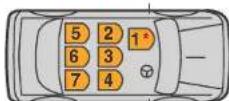
| √ | On outer rear seat | YES |
| ✕ | On centre rear seat | NO |
| ✕ | On a rearward-facing seat | NO |
| ✕ | On seats facing sidewards | NO |
| ✕ | On rear seat with lapbelt only | NO |
| ✕ | Front seat with airbag off | YES |
Do not use on a passenger seat with a front airbag.
ISOFIX Base Vehicle Application List
Semi-Universal approved to ECE-R14.04 for use in the vehicles listed in the vehicle application list.
INFORMATION
- Do not place the front support leg on a floor storage compartment lid, the floor storage compartment lid support leg must make full and firm contact with the vehicle chassis.
- Please consult with the vehicle manufacturer regarding access to ISOFIX points.
- Because of the vehicle seat position card must be taken to correctly attach the child restraint system to the ISOFIX points.
• Vehicle seat (mid row) must be adjusted forward. - Adjust the vehicle seat so that the base front support leg does not make contact with the floor storage compartment.
\*DO NOT USE ON A PASSENGER SEAT WITH A FRONT AIRBAG
- Vehicle seat has to be fully adjusted to the rear most position.
- Ensure the resting angle is appropriate for the child.
- Although the car filling list advises to which vehicles the ISOfix base will attach, not all models and makes will be suitable. Therefore, there will be exceptions to the rule and we advise that one should lose the car seat and base in the car to ensure a suitable fit.


Konmarkon


Funktioner

01 Base
02 ISOFIX-forbinderarme
03 ISOFIX-forbindelsesindikator
04 ISOFIX-justeringsknap
05 Skallens anden
läsefrigivelsesknap-indikator
06 Skallens udløserhåndtag/-indikator
07 Støtteben
08 Støttebensjustering
09 Slottebenets trykindikalorer
10 ISOFIX-plaststyr

www.philandlods.com/register www.mountainbuggy.com/register
philandteds.com
mountainbuggy.com
DETTE DOKUMENTET INNEHOLDER VIKTIG INFORMASJON, OG MÅ OPPBEVARES SAMMEN MED SETET FOR FREMTIDIG REFERANSE.
01 Base
02 ISOFIX forbindelsesarmer
03 ISOFIX forbindelsesindikator
04 ISOFIX justeringsknapp
05 Andre skallås utloserknapp/indikator
06 Skallutloser grep/indikator
07 Stotteben
08 Støttebenregulator
09 Stotteben trykkindikator
10 ISOFIX plastskinne

Notice Notice
①
2
| ✓ | På ytre baksete JA | |
| ✕ | På midtre baksete NEI | |
| ✕ | På bakovervendt sete NB | |
| ✕ | På seter venut szelengs | NB |
| ✕ | På baksete med bare holtebelle | NB |
| ✕ | Försete med kollisjonspute deakdivert | JA |
©Phi and Tods Most Excellent Buggy Company Ltd 2012.
We (Phil and Teds Most Excellent Buggy Company Ltd) own the intellectual property rights in our brands, designs and inventions featured in this publication. These include, without limitation, the philgrads, adapt&survival, & INLINE trade marks and INLINE DOUBLE BUGGY shape. We actively pursue people who infringe our intellectual property.
©Phil & Tede Most Excellent Buggy Company Ltd 2012.
© Phi and Teds Most Excellent Buggy Company Ltd 2012.
© Phi and Teds Most Excellent Buggy Company Ltd 2012.
© Phi and Teds Most Excellent Buggy Company Ltd 2012.
© Phi and Tods Most Excellent Buggy Company Ltd 2012.
© Phil and Tods Most Excellent Buggy Company Ltd 2012.
©Phil and Teds Most Excellent Buggy Company Ltd 2012.
Vi (Phil and Teds Most Excellent, Buggy Company Ltd) erer de intellektuelle retiughtelene til varemenkene, designene og oppinnelsene du der I denne publikasjonen. Dette ambitter, utan aagrenning, varemarkene philjteds, adaptjsurvival, §, INLINE, og INLINE DOUBLE BUGGY- formen. Vi oppaker aktivt personer som byrter våra Intellaktuelle diendomantitghater.
AUS/NZL
Mountain Buggy Australasia
102-112 Daniell Street
Newtown, Wellington 6021
New Zealand
+6443800833
EUR
Mountain Buggy Spain
Mountain Buggy France
Designed in New Zealand. Made in China
Designed in New Zealand. Made in China


- Congratulations on choosing your new car seat isofix base!
- GENERAL INSTRUCTIONS
- Group 0+
- Suitable for birth to 13kg.
- ISOFIX CLASS E
- THIS DOCUMENT CONTAINS IMPORTANT INFORMATION AND MUST BE KEPT WITH THE SEAT FOR FUTURE REFERENCE.
- CLEANING & CARING
- Caring for your ISOFIX Base
- IMPORTANT
- WARNINGS
- Installing the ISOFIX Base
- Detaching the Car Seat from the ISOFIX Base
- Removing the ISOFIX Base from the vehicle
- ISOFIX Base Vehicle Application List
- INFORMATION
- \*DO NOT USE ON A PASSENGER SEAT WITH A FRONT AIRBAG
- DETTE DOKUMENTET INNEHOLDER VIKTIG INFORMASJON, OG MÅ OPPBEVARES SAMMEN MED SETET FOR FREMTIDIG REFERANSE.
- AUS/NZL
- EUR
Brand : Mountain Buggy
Model : Isofix Base
Category : Baby products