BS2000HD - Video camera VOLTCRAFT - Free user manual and instructions
Find the device manual for free BS2000HD VOLTCRAFT in PDF.
| Product type | Inspection videoscope (display/control unit) |
| Brand | Voltcraft |
| Model | BS2000HD |
| Category | Inspection video camera |
| Dimensions (W × H × D) | 260 × 160 × 70 mm |
| Weight | 1.32 kg |
| Power supply | Mains adapter: input 120-240 V AC, output 15 V DC / 2.4 A; built-in Li-Po battery 10.8 V / 3450 mAh (37.26 Wh) |
| Battery life | Up to 6 hours |
| Display resolution | 1024 × 600 pixels |
| Photo/video resolution | 1280 × 720 pixels HD |
| Digital zoom | Up to 3x |
| Storage | microSD card, class 10, up to 32 GB, FAT32 format |
| Protection rating | IP54 (limited protection against dust and water splashes) |
| Main functions | HD image capture and video recording, screen rotation in 90° increments, 3x digital zoom, length measurement, HDMI output for external monitor, PC connection via USB, text editing via PS/2 keyboard, built-in file browser, date/time setting |
| Maintenance and cleaning | Use a dry, lint-free cloth; for hard-to-reach areas, use the supplied cleaning sticks. Do not use aggressive cleaning agents or alcohol. |
| Safety | Do not immerse; use only in fresh water with neutral pH; use only in de-energized systems; do not modify the product; charge battery unsupervised; disconnect the adapter during thunderstorms |
| Spare parts and repairability | Built-in battery not user-replaceable. In case of malfunction, contact technical support. No spare parts provided. |
| General information | Complies with national and European requirements; instruction manual available for download at www.conrad.com; warranty void if instructions are not followed |
Frequently Asked Questions - BS2000HD VOLTCRAFT
User questions about BS2000HD VOLTCRAFT
0 question about this device. Answer the ones you know or ask your own.
Ask a new question about this device
Download the instructions for your Video camera in PDF format for free! Find your manual BS2000HD - VOLTCRAFT and take your electronic device back in hand. On this page are published all the documents necessary for the use of your device. BS2000HD by VOLTCRAFT.
USER MANUAL BS2000HD VOLTCRAFT
GB Operating Instructions
BS-2000HD Inspection Videoscope Control Unit/Display
Item No. 2250943 Page 16 - 29
F Mode d'emploi
text_image
Technical diagram of a digital camera with numbered parts for identification and assembly reference.natural_image
Diagram of a mechanical or electrical component with no visible text, numbers, or symbolsFormatieren
natural_image
Abstract black geometric shape resembling a stylized letter or symbol (no text or symbols present)
text_image
A- Introduction....17
- Explanation of symbols....17
- Up-to-date operating instructions....17
- Intended use....18
- Delivery content....18
- Safety instructions ....19
a) General information....19
b) Power adaptor 19
c) LiPo battery 20
d) Product....20
e) Connected devices....20
- Operating elements ......21
a) Front/back....21
b) Side 22
- Ingress protection 22
- Getting started 22
a) Charging the battery....22
b) Get storage ready....23
c) Set date and time 23
d) Connection 23
- Navigating menus....24
- Settings menu options....24
- Operation....26
a) Power ON/OFF....26
b) Rotate screen 26
c) Capture image/video 26
d) File browser/playback image and video 26
e) Transfer image/video to computer....26
f) Reset button 27
- Troubleshooting 27
- Care and cleaning....28
- Disposal....28
- Technical data....29
a) Videoscope display/control unit....29
b) Power adaptor 29
1. Introduction
Dear customer,
Thank you for purchasing this product.
This product complies with the statutory national and European requirements.
To maintain this status and to ensure safe operation, you as the user must observe these operating instructions!

These operating instructions are part of this product. They contain important notes on commissioning and handling. Also consider this if you pass on the product to any third party. Therefore, retain these operating instructions for reference!
If there are any technical questions, please contact: www.conrad.com/contact
2. Explanation of symbols

The symbol with the lightning in the triangle is used if there is a risk to your health, e.g. due to an electric shock.

The symbol with the exclamation mark in the triangle is used to indicate important information in these operating instructions. Always read this information carefully.

The arrow symbol indicates special information and advice on operation.
3. Up-to-date operating instructions
Download the latest operating instructions at www.conrad.com/downloads or scan the QR code shown. Follow the instructions on the website.

4. Intended use
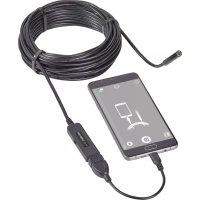
The product is a videoscope display/control unit for use with an insertion cable and camera head. Applications include insertion into drainage pipes, ventilation conduits, plumbing, and other non-destructive inspection.
The product has an IP54 ingress protection rating. It provides limited protection against dust and low powered water spray from all directions. Do not submerge. See “8. Ingress protection” on page 22 for further details.

Important
- Only use this product and any connected peripherals in voltage free systems.
- Only use in fresh water.
- Do not use on humans or animals.
For safety and approval purposes, you must not rebuild and/or modify this product. If you use the product for purposes other than those described above, the product may be damaged. In addition, improper use can result in short circuits, fires, electric shocks or other hazards. Read the instructions carefully and store them in a safe place. Make this product available to third parties only together with its operating instructions.
All company names and product names are trademarks of their respective owners. All rights reserved.
HDMI is a registered trademark of HDMI Licensing L.L.C.
5. Delivery content
• Videoscope display/control unit
- Cable: mini HDMI to VGA
• Cable: Mini USB to USB-A
• 32 GB MicroSD card
- Cleaning kit (3x cleaning rods, 1x microfiber cloth)
- Carrying case
- Power adaptor
- Operating instructions

Read the operating instructions carefully and especially observe the safety information. If you do not follow the safety instructions and information on proper handling in this manual, we assume no liability for any resulting personal injury or damage to property. Such cases will invalidate the warranty/guarantee.
a) General information
- The device is not a toy. Keep it out of the reach of children and pets.
- Do not leave packaging material lying around carelessly. This may become dangerous playing material for children.
- Protect the appliance from extreme temperatures, direct sunlight, strong jolts, flammable gases, steam and solvents.
- Do not place the product under any mechanical stress.
-
If it is no longer possible to operate the product safely, take it out of operation and protect it from any accidental use. Safe operation can no longer be guaranteed if the product:
-
is visibly damaged,
- is no longer working properly,
- has been stored for extended periods in poor ambient conditions or
-
has been subjected to any serious transport-related stresses.
-
Please handle the product carefully. Jolts, impacts or a fall even from a low height can damage the product.
- Consult an expert when in doubt about the operation, safety or connection of the appliance.
- Maintenance, modifications and repairs must only be completed by a technician or an authorised repair centre.
- If you have questions which remain unanswered by these operating instructions, contact our technical support service or other technical personnel.
b) Power adaptor
- The mains outlet must be located near to the device and be easily accessible.
- As power supply, only use the supplied mains adaptor.
- Only connect the power adaptor to a normal mains socket connected to the public supply. Before plugging in the power adaptor, check whether the voltage stated on the power adaptor complies with the voltage of your electricity supplier.
- Never connect or disconnect power adaptors if your hands are wet.
- Never unplug the power adaptor from the mains socket by pulling on the cable; always use the grips on the plug.
- When setting up the product, make sure that the cable is not pinched, kinked or damaged by sharp edges.
- Always lay the cables so that nobody can trip over or become entangled in them. This poses a risk of injury.
- For safety reasons, disconnect the power adaptor from the mains socket during storms.
c) LiPo battery
- The rechargeable battery is permanently built into the product and cannot be replaced.
- Never damage the rechargeable battery. Damaging the casing of the rechargeable battery might cause an explosion or a fire! Unlike conventional batteries/rechargeable batteries (e.g. AA or AAA type), the casing of the LiPo rechargeable battery does not consist of a thin sheet but rather a sensitive plastic film only.
- Never short-circuit the contacts of the rechargeable battery. Do not throw the battery or the product into fire. There is a danger of fire and explosion!
- Charge the rechargeable battery regularly, even if you do are not using the product. Due to the rechargeable battery technology being used, you do not need to discharge the rechargeable battery first.
- Never charge the rechargeable battery of the product unattended.
- When charging, place the product on a surface that is not heat-sensitive. It is normal that a certain amount of heat is generated during charging.
d) Product
- This product and any connected peripherals are only suited for inspection in voltage-free systems. Make sure all system components are voltage-free before inspection.
- Only hold the controller and connected peripherals when used in voltage-free liquids.
- Avoid heavy mechanical loads and/or vibrations.
-
Only for use in fresh water with a neutral pH value. Do not expose to:
-
Acidic, alkaline, or caustic solutions.
- Oil or petrol
- Salt water
e) Connected devices
- Also observe the safety and operating instructions of any other devices which are connected to the product.
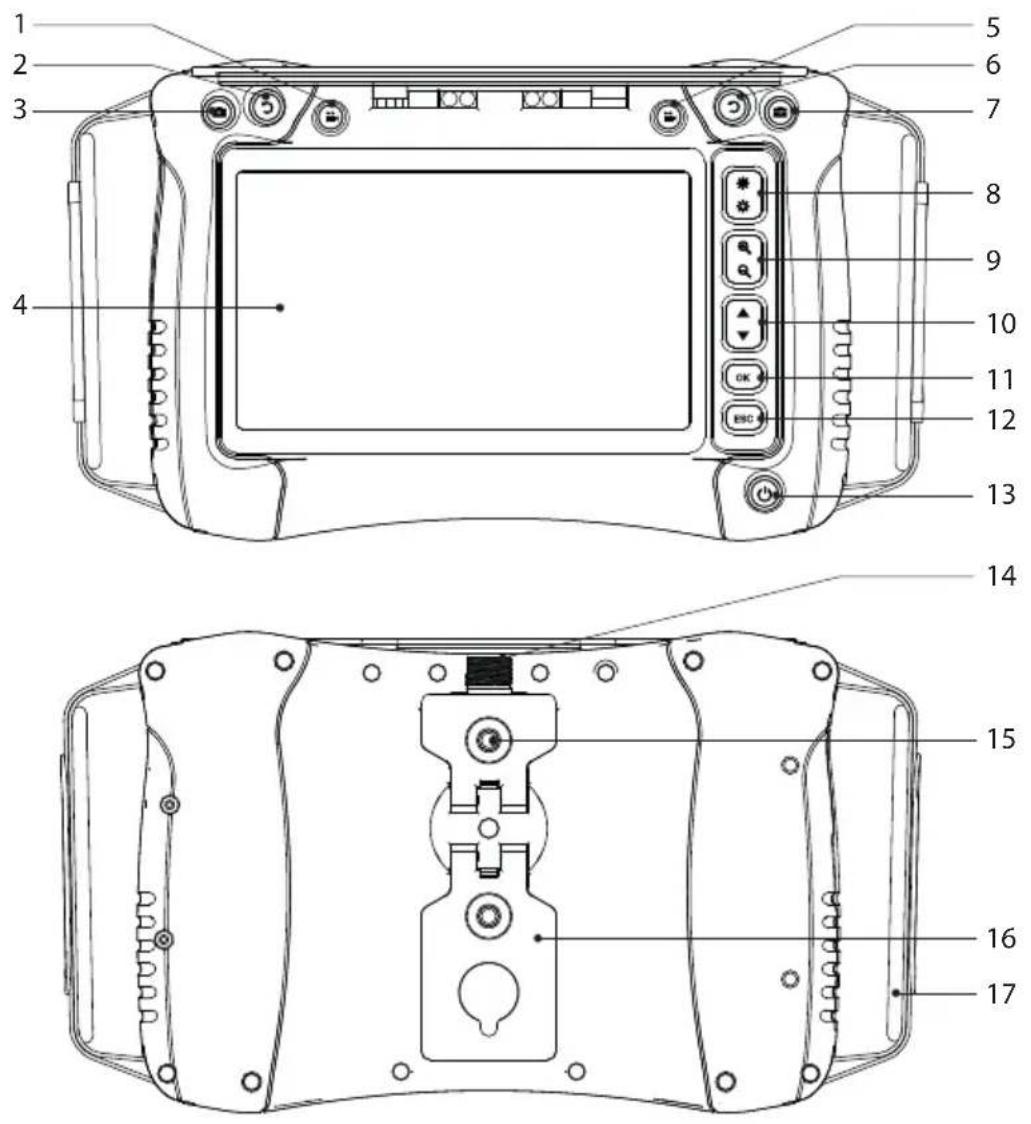
7. Operating elements
a) Front/back
text_image
Technical diagram of a camera with numbered parts for identification and assembly reference.1 Video record button
2 Screen rotate button
3 -to snapshot button
4 Screen
5 Video record button
6 Screen rotate button
7 to snapshot button
8 LED brightness up/down
9 Zoom +/-
10 Navigation ▲ /▼
11 OK/enter button
12 ESC/back button
13 Power button
14 Insertion cable socket
15 Mounting thread
16 Fold-out stand
17 Hand strap
b) Side
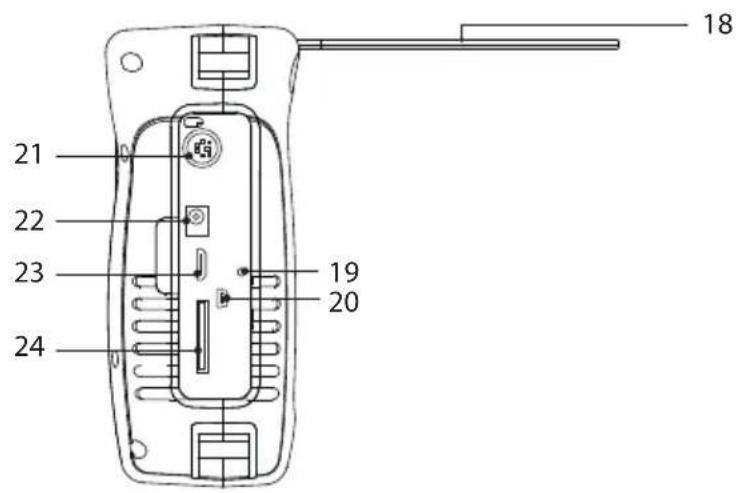
text_image
18 21 22 23 19 20 2418 Sunshade
19 Reset buttonhole
20 Mini USB port
21 PS/2 port (keyboard input)
22 Power input socket
23 Mini HDMI video output
24 MicroSD card slot
8. Ingress protection
The product has an IP54 ingress protection rating. It provides limited protection against dust and water splashing from all directions. Do not submerge!

Note
- For the ingress protection rating to be effective the rubber compartment cover should be properly sealed.
• The insertion cable connector is IP54 rated. - Only expose to fresh water with a neutral pH value
9. Getting started
a) Charging the battery
- Connect one end of the included power adaptor to the power input socket on the product and the other end to a mains power supply.
• The battery status is shown on the display:
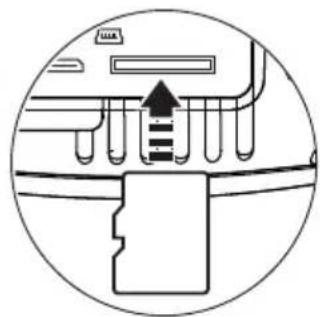
b) Get storage ready
The compatible microSD card format is FAT32. If a card is not formatted correctly a message will appear on the display.
Insert microSD
Insert the microSD card into the slot, it will "click" into place.
Formatting
⚠ Warning: all data will be lost after formatting!
- The product will automatically detect if an inserted card is not formatted correctly.
- Follow the onscreen instructions to complete the formatting process.
c) Set date and time
Saved photos and videos will contain date and time information.
- Press and hold the power button ⏻ switch the power ON.
- Press OK to enter the settings menu.
- Press ▲ /▼ to scroll to the "Date Time Setup" icon. Press OK to select it.
- Update the date and time.
- Press and hold the power button ⏻ switch the power OFF.
d) Connection
⚠️ Make sure the insertion cable socket is clean before connecting to the adaptor cable.
This product should be used together with compatible components.
For example: videoscope control unit/display adaptor cable insertion cable camera head.
→ Refer to the information included with each component for further details.
natural_image
Diagram of a mechanical or electrical component with no visible text, numbers, or symbols10. Navigating menus
| Button Description | |
 | Adjust value: +/- |
 | Selection: ▲ /▼ |
 | Enter settings menu/confirm a selection |
 | Cancel selection/return to previous screen. |
11. Settings menu options
| Item Description | |
 | “PC Connect”The unit can function as external storage. Manage files using your computer operating system.⚠ The product may no longer recognize files if the filename/extension has been changed.1. Connect one end of the included cable to the Mini USB to USB-A port and the other end to an available port on your computer.2. Navigate to “PC Connect” in the settings menu then press OK.3. The product will appear as an external storage device on your computer. |
 | “Edit Text”1. Connect a keyboard to the PS/2 port.2. Navigate to “Edit Text” in the settings menu then press OK.3. Use the keyboard to type a message. |
| Item Description | |
 | “Length Measure”Navigate to “Length Measure” in the settings menu then press OK.The measured length will be shown on the display.The length automatically increases as the camera moves into the area for inspection.The length can be manually reset to zero at any time.The length automatically resets to zero when the product is restarted. |
 | “Auto Power Off”Navigate to “Auto Power Off” in the settings menu then press OK. |
 | “Display”Navigate to “Display” in the settings menu then press OK.Adjust various display settings such as brightness, contrast, and sharpness. |
 | “Language”Navigate to “Language” in the settings menu then press OK.Select an interface language. |
 | “Date Time Setup”Navigate to “Date Time Setup” in the settings menu then press OK. |
 | “Video Output”View the camera image on an external display:1. Connect the included cable to the Mini HDMI video output and a suitable display.2. Navigate to “Video Output” in the settings menu then press OK. |
12. Operation
a) Power ON/OFF
Press and hold the power button ⬆ to switch the power ON/OFF.
b) Rotate screen
- You can rotate the live image shown on the LCD to make it easier to see.
- While viewing the live image, press to rotate the image anti-clockwise in 90^ increments.

text_image
A
natural_image
Abstract black geometric shape resembling a stylized letter or symbol (no text or symbols present)
text_image
Ac) Capture image/video
While viewing a live image, press:
• to take a photo
• to record a video
d) File browser/playback image and video
You can access the onboard file browser from the main screen.
- Press ▲ /▼ to enter the "PLAYBACK" menu. A list of files will show.
-
Press ▲ /▼ to select a file then press OK to view it
-
Press OK to delete the file.
- Press ▲ /▼ to select another image.
- Press ESC to return to the previous menu.
e) Transfer image/video to computer
Transfer via USB cable
See "11. Settings menu options" on page 24 for further information.
Direct access from microSD card
- Remove the microSD card and insert it into a card reader.
- Connect the card reader to your computer.
f) Reset button
- If the product is not functioning correctly, you may need to perform a reset.
- With the power switched on, press the RESET button.
- Press and hold the power button to switch the power back on.
13. Troubleshooting
| Problem Cause Solution |
No image shown
| After power on Low battery Charge | the battery | |
| After power on only words show No | camera detected Check all components are properly connected. | |
| After connected to an external monitor and the cable was disconnected. | In “Video Output” mode. | Press the ESC button 3x to exit “Video Output” mode. |
Cannot access microSD card
| In “PC Connect” mode and the USB cable was disconnected | In “PC Connect” mode Exit “PC Connect” mode. | |
| Cannot access card | Card was inserted and removed multiple times or the card was removed too quickly. | Insert the card again and wait a few moments for the insert/remove status to refresh. |
| Cannot access card | Card was removed during a recording or image capture and the card was damaged. | Check the card on your computer. If the problem persists, try reformatting or replacing it.All card data will be lost after formatting! |
Miscellaneous
| Cannot capture photos or record video | Storage device error | Check the microSD card:is correctly insertedread/write card lock is not onis correctly formatted. See “b) Get storage ready” on page 23 for further information. |
| Problem Cause Solution | ||
| Moving the camera head quickly causes the image to trail | Video recording is in progress. | Recording uses extra system resources. Stop recording or move the camera head slower. |
| “Edit text” → “Display” → “ON” but no message is shown on the screen. | Messages can only show in live mode | Message will be visible in captured photos, recorded videos and during recording. |
| Recorded images have severe lagging. | MicroSD card not formatted correctly | Format the card. See “b) Get storage ready” on page 23” for further information. |
| Image freezes | Processor locks due to abnormal operation. | Press the reset button. See “f) Reset button” on page 27 for further information. |
| Zoom adjustments are not shown in captured photos or recorded images. | Photos and video can only save 1x zoom | Use third party software to enhance the image. |
| Cannot charge battery Defective battery | Contact our technical support service or other technical personnel. |
14. Care and cleaning

Do not use any aggressive cleaning agents, rubbing alcohol or other chemical solutions as they can cause damage to the housing and malfunctioning.
- Disconnect the product from any peripherals and/or mains before each cleaning.
- Clean the product with a dry, fibre-free cloth. Moisten the cloth if needed.
- Use the included cleaning rods to clean difficult to reach places.
15. Disposal

Electronic devices are recyclable waste and must not be disposed of in the household waste. At the end of its service life, dispose of the product in accordance with applicable regulatory guidelines.
thus fulfill your statutory obligations and contribute to the protection of the environment.
16. Technical data
a) Videoscope display/control unit
Input voltage/current....15 V/DC 2.4 A
Battery....Lipo 10.8 V 3450 mAh (37.26 Wh)
Operating time....max. 6 hrs
USB....USB2.0 (data transmission)
Digital zoom....max. 3x
Supported MicroSD ....Class 10 max. 32 GB
SD card format ......FAT32
Languages......German, English, French, Spanish
Ingress protection....IP54
Photo/video resolution....1280 x 720 pixels HD
Display resolution 1024 x 600
Supported OS....Windows 7 ^® (and above), MacOS X 10.8 (and above), Linux 2.6.32 (and above)
Operating conditions....0 to 40 °C, ≤95 % RH (non-condensing)
Storage conditions....-20 to +60 °C, ≤95 % RH (non-condensing)
Dimensions (W x H x D) 260 x 160 x 70 mm
Weight 1.32 kg
b) Power adaptor
Input....120 - 240 V/AC 50/60 Hz 0.6 A
Output....15 V/DC 2.4 A
Protection class....II
Table des matières
Page
France (email): technique@conrad-france.fr
Suisse: www.conrad.ch ____
2. Explication des symboles

text_image
Technical diagram of a camera module with numbered parts for identification and assembly reference.natural_image
Diagram of a mechanical or electrical component with no visible text, numbers, or symbolsFormatage
natural_image
Abstract black geometric shape resembling a stylized letter or symbol (no text or symbols present)
text_image
Atext_image
Technical diagram of a camera with numbered parts for identification and assembly reference.natural_image
Diagram of a mechanical or electrical component with no visible text, numbers, or symbolsCopyright 2021 by Conrad Electronic SE.
This is a publication by Conrad Electronic SE, Klaus-Conrad-Str. 1, D-92240 Hirschau (www.conrad.com).
All rights including translation reserved. Reproduction by any method, e.g. photocopy, microfilming, or the capture in electronic data processing systems require the prior written approval by the editor. Reprinting, also in part, is prohibited. This publication represents the technical status at the time of printing.
Copyright 2021 by Conrad Electronic SE.
Copyright 2021 by Conrad Electronic SE.
Copyright 2021 by Conrad Electronic SE.