BS350XIPSD - Video camera VOLTCRAFT - Free user manual and instructions
Find the device manual for free BS350XIPSD VOLTCRAFT in PDF.
| Product type | Endoscopic video camera |
| Brand | Voltcraft |
| Model | BS350XIPSD |
| Dimensions (L x W x H) | 236 x 84 x 47 mm |
| Weight | 365 g (without batteries or accessories) |
| Power supply | 4 AA batteries (6 V DC) |
| Power consumption | max. 350 mA |
| Display | TFT 2.7 inches (6.86 cm), max resolution 960 x 240 pixels |
| Camera | CMOS VGA 1/6" sensor, max resolution 640 x 480 pixels |
| Gooseneck | Length 90 cm ± 2 cm, head diameter 8 mm |
| Lighting | 4 white LEDs, 6 levels, max brightness 1000 lux at 20 mm |
| Digital zoom | 4x |
| Protection | IP64 (splash and dust protected) |
| Storage | microSDHC card up to 32 GB |
| Photo formats | JPG max. 640x480 pixels |
| Video formats | AVI max. 640x480 pixels |
| Frame rate | 20, 25, 30 FPS |
| Connectivity | Mini USB 1.1 |
| Included tips | Magnetic, mirror, hook |
| Package contents | Endoscope, 3 tips, mini USB cable, carrying case, instruction manual |
| Operating conditions | Temperature 0°C to +45°C, relative humidity 15% to 85% |
| Storage conditions | Temperature -10°C to +50°C, relative humidity 15% to 85% |
| Windows compatibility | XP SP1 (32-bit), Vista, 7, 8.1, 10 (32 and 64-bit) |
| Additional functions | 180° screen rotation, date/time display |
Frequently Asked Questions - BS350XIPSD VOLTCRAFT
User questions about BS350XIPSD VOLTCRAFT
0 question about this device. Answer the ones you know or ask your own.
Ask a new question about this device
Download the instructions for your Video camera in PDF format for free! Find your manual BS350XIPSD - VOLTCRAFT and take your electronic device back in hand. On this page are published all the documents necessary for the use of your device. BS350XIPSD by VOLTCRAFT.
USER MANUAL BS350XIPSD VOLTCRAFT
www.business.conrad.at
text_image
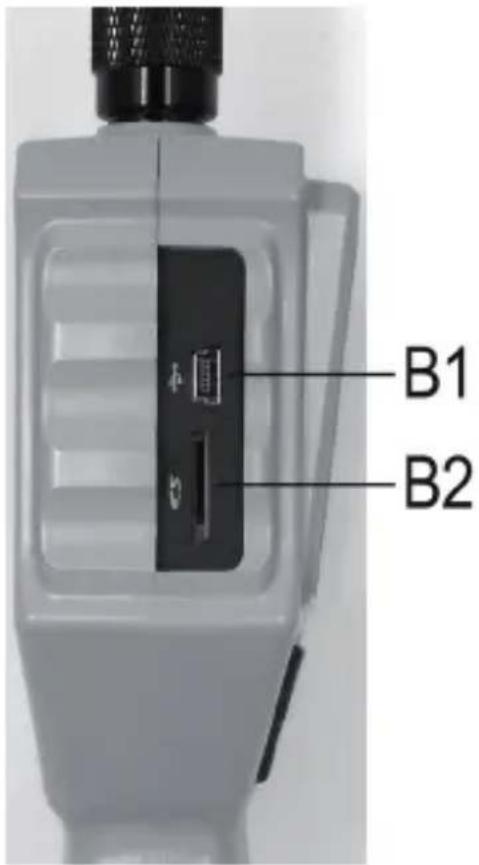
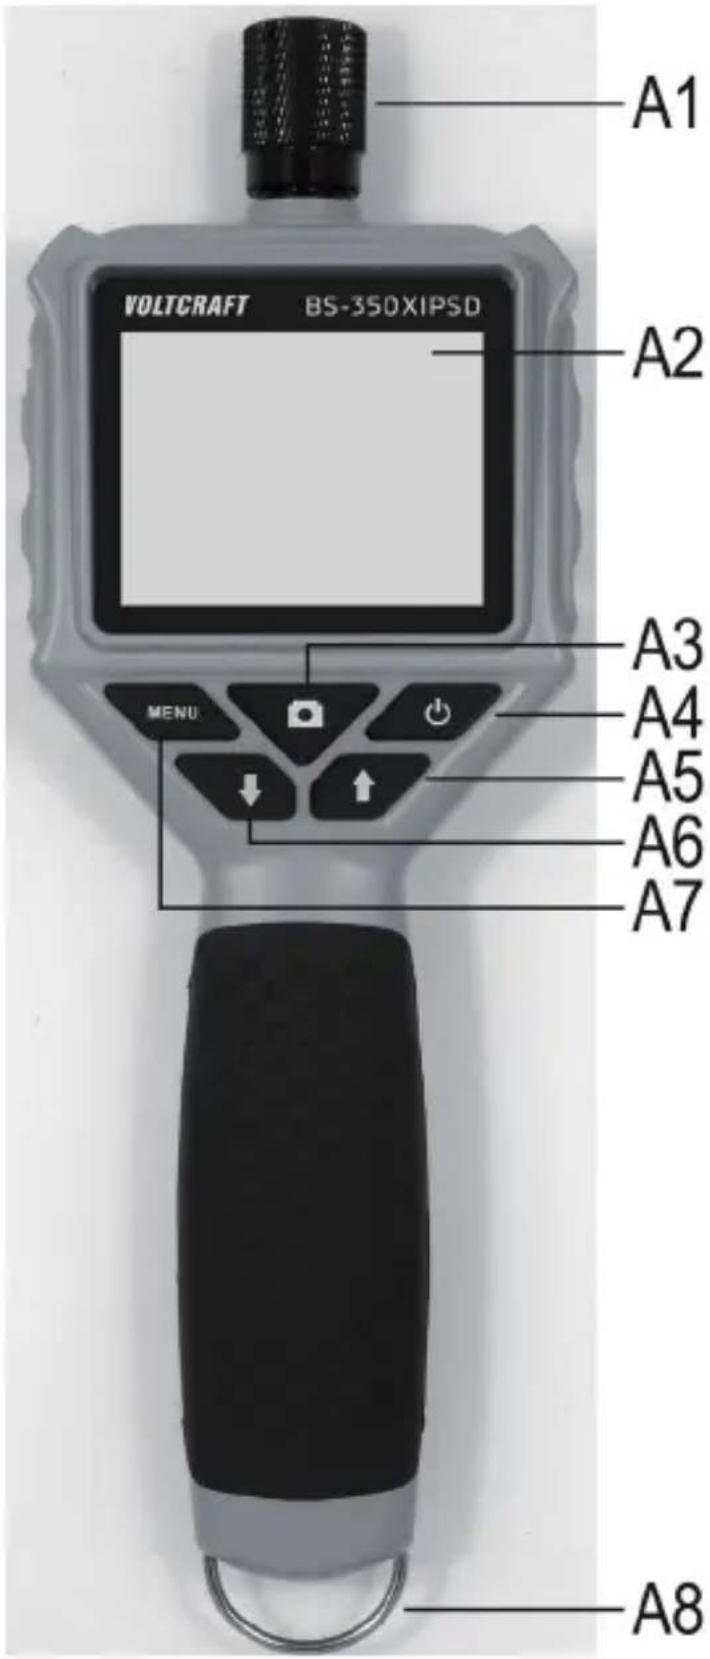
VOLTCAFT BS-350XIPSD A1 A2 A3 A4 A5 A6 A7 MENU A8B1 Mini-USB1.1-Anschluss
B2 Micro-SDHC-Kartenslot
text_image
B1 B2natural_image
Top-down view of a gray electronic device casing with mounting holes and a small component, no visible text or symbols.text_image
VOLTCRAFT BS-350XIPSD MENU
natural_image
Close-up of a black mechanical component with a downward arrow indicating compression or disassembly (no visible text or symbols)natural_image
Close-up of a black mechanical component with a white arrow pointing to a feature (no visible text or symbols)natural_image
Three-panel image showing mechanical components: a clamp-like ring, a ring with curved ends, and a handheld tool with a pointed tip (no text or symbols visible)Framerate 20, 25, 30 FPS
- Introduction......27
- Symbol explanation, labels....28
- Intended use....28
- Scope of delivery....29
- Safety information 29
a) General information....30
b) Batteries and rechargeable batteries 31
- Operating elements 32
- Display....34
- Commissioning....35
a) Inserting and replacing the batteries 35
b) Insertion of the memory card 36
c) Connection of the endoscope camera ....37
d) Switching the device on and off 38
e) Setting the camera lighting....38
- Configuration 39
a) Setting the language 39
b) Setting of date and time 39
c) Setting frame rate....40
d) Formatting the memory card 40
- Operation....41
a) Recording photos 41
b) Recording videos 41
c) Displaying photographs and videos 41
d) Deleting photographs and videos....42
e) Digital zoom 43
f) Turning the display....43
-
PC Connection 44
-
Attachments 45
- Troubleshooting....46
- Maintenance and care....47
- Disposal....47
a) General information....47
b) Batteries and rechargeable batteries 48
- Technical data 48
1. INTRODUCTION
Dear Customer,
Thank you for making the excellent decision to purchase a Voltcraft® product.
Voltcraft® - This name stands for above-average quality products in the areas of measuring, charging and grid technology, characterised by technical competence, extraordinary performance and permanent innovation.
Whether you are an ambitious hobby electronics or a professional user - a product of the Voltcraft® brand family will provide you with the best solution for even the most sophisticated of tasks. Special features: We offer the sophisticated technology and reliable quality of our Voltcraft® products at a near-unbeatable price/performance ratio. We lay the groundwork for long, good and successful cooperation.
Enjoy your new Voltcraft® product!
All company names and product names are trademarks of their respective owners. All rights reserved.
If there are any technical questions, please contact:
International: www.conrad.com/contact
United Kingdom: www.conrad-electronic.co.uk/contact
Latest Operating Instructions
The latest edition of these operating instructions is available for download from our website at all times.
2. SYMBOL EXPLANATION, LABELS

This symbol is used when your health is at risk, e.g. from an electric shock.

The exclamation mark in a triangle indicates important notes in these operating instructions that must be observed strictly.

The “arrow” symbol indicates that special advice and notes on operation are provided.
3. INTENDED USE
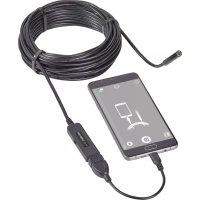
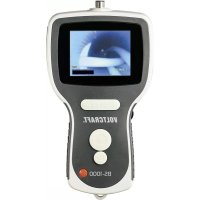
The endoscope is a visual aid for optical troubleshooting and inspection at powered-down systems and facilities.
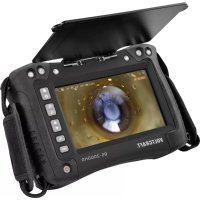
The camera picture is displayed on the installed TFT screen. Recorded pictures or videos can be transmitted via the memory card or USB.
The lighting at the tip of the endoscope camera can be adjusted in 6 steps.
The product corresponds to protection type IP54 and is thus protected against splashing water from any side. It is also dust-tight.
The voltage is supplied via 4 AA batteries.
Operation in explosive atmospheres or use with persons and animals is not permissible.
Any other use than described above may damage the product and poses additional dangers.
Read these operating instructions completely and attentively; they contain a lot of important information on configuration. Always observe the safety information!
This product complies with the statutory national and European requirements.
4. SCOPE OF DELIVERY
- Endoscope
- Magnetic attachment
- Mirror attachment
- Hook attachment
- Mini-USB cable
- Case
- Operating instructions
5. SAFETY INFORMATION
The guarantee/warranty will expire if damage is incurred resulting from non-compliance with the operating instructions! We do not assume any liability for consequential damage! We do not assume any liability for property damage or personal injury caused by improper use or non-compliance with the safety instructions! In such cases the guarantee/warranty will expire!
Dear Customer,
The following safety information is intended not only for the protection of your health but also for the protection of the product.
Therefore, read this chapter very carefully before taking the product into operation!
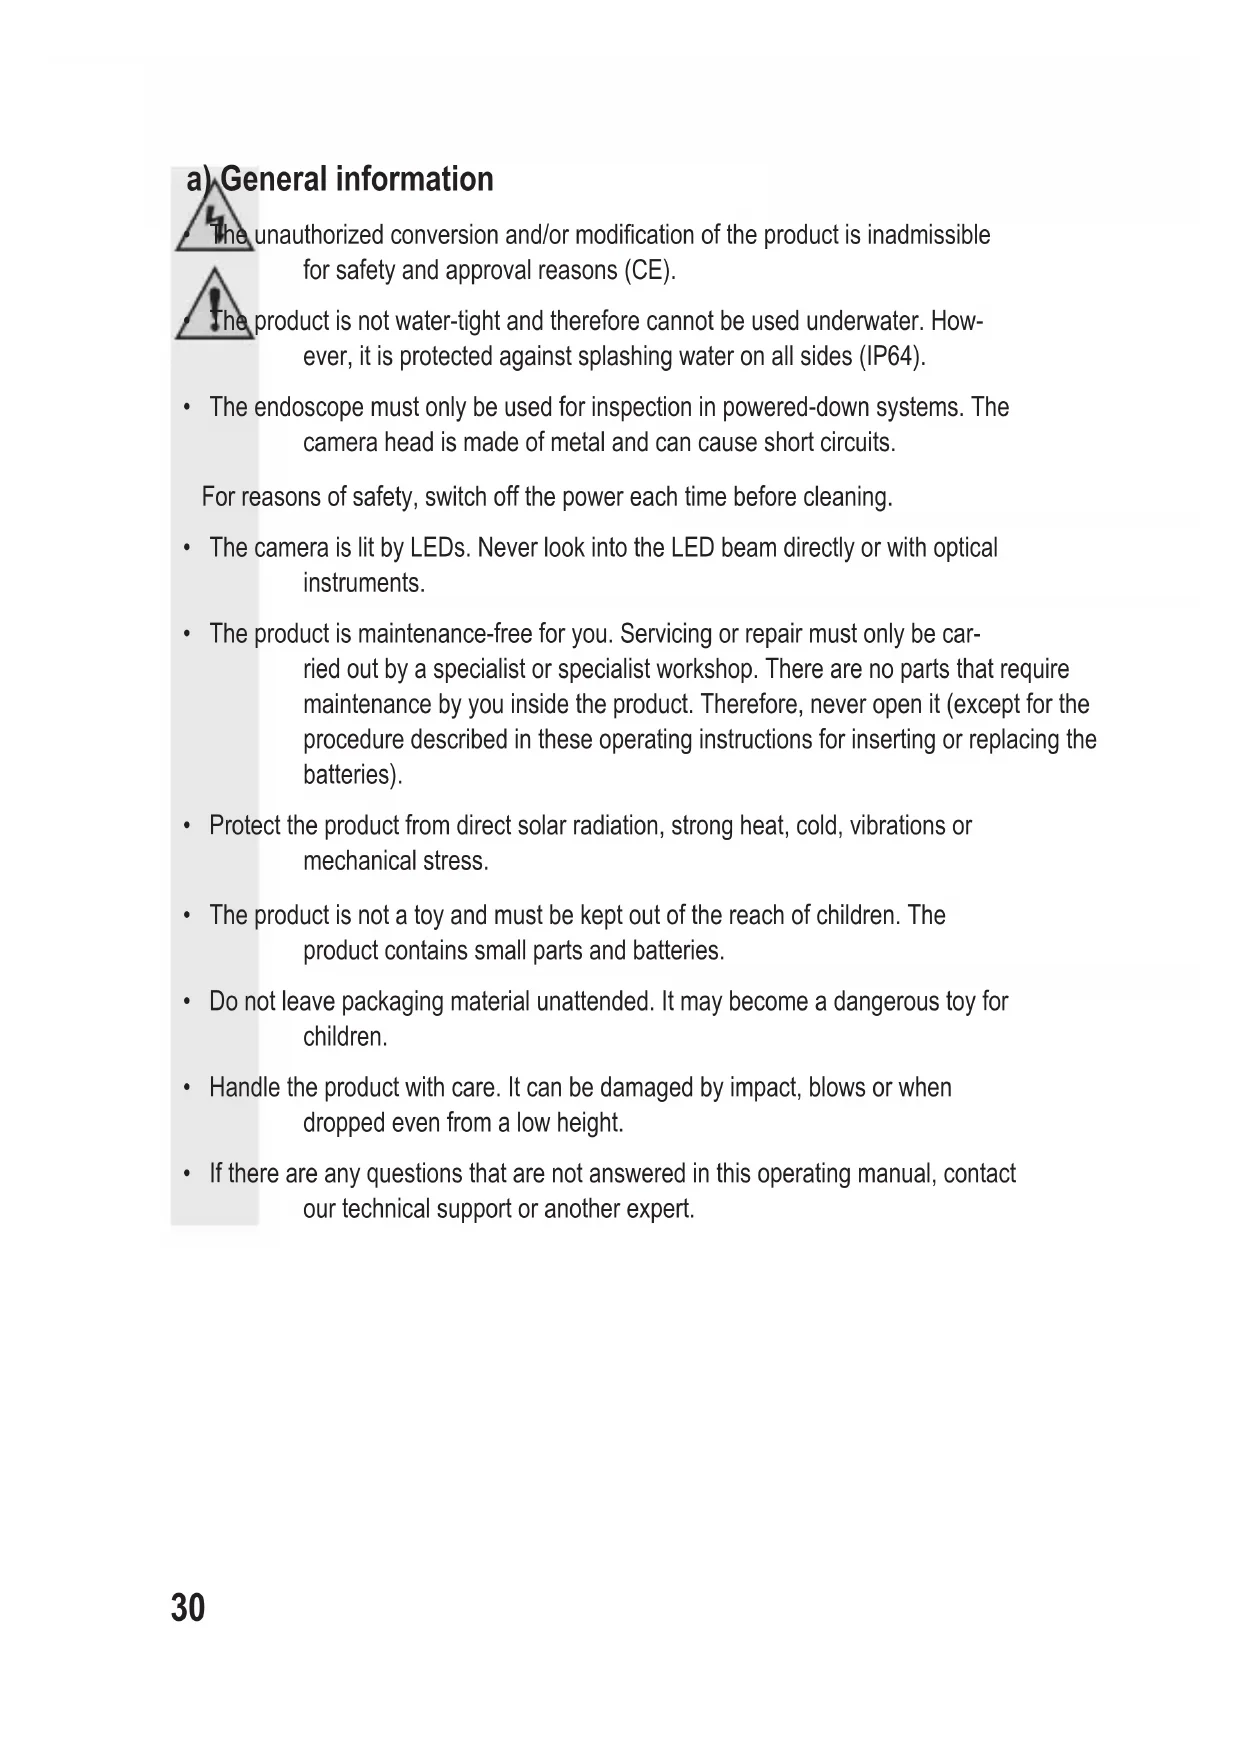
a) General information

unauthorized conversion and/or modification of the product is inadmissible for safety and approval reasons (CE).

product is not water-tight and therefore cannot be used underwater. However, it is protected against splashing water on all sides (IP64).
- The endoscope must only be used for inspection in powered-down systems. The camera head is made of metal and can cause short circuits.
For reasons of safety, switch off the power each time before cleaning.
- The camera is lit by LEDs. Never look into the LED beam directly or with optical instruments.
- The product is maintenance-free for you. Servicing or repair must only be carried out by a specialist or specialist workshop. There are no parts that require maintenance by you inside the product. Therefore, never open it (except for the procedure described in these operating instructions for inserting or replacing the batteries).
- Protect the product from direct solar radiation, strong heat, cold, vibrations or mechanical stress.
- The product is not a toy and must be kept out of the reach of children. The product contains small parts and batteries.
- Do not leave packaging material unattended. It may become a dangerous toy for children.
- Handle the product with care. It can be damaged by impact, blows or when dropped even from a low height.
- If there are any questions that are not answered in this operating manual, contact our technical support or another expert.
b) Batteries and rechargeable batteries

batteries/rechargeable batteries out of the reach of children.

not leave any batteries/rechargeable batteries lying around openly. There is a risk of batteries being swallowed by children or pets. If swallowed, consult a doctor immediately. Danger to life!
- Leaking or damaged batteries/rechargeable batteries can cause chemical burns to skin at contact; therefore, use suitable protective gloves.
- Ensure that the polarity is correct when inserting the batteries/rechargeable batteries (observe plus/+ and minus/-).
- Batteries/rechargeable batteries must not be short-circuited, disassembled or thrown into fire. There is a danger of explosion!
- Never recharge normal (non-rechargeable) batteries. There is a danger of explosion!
- Replace an empty battery/rechargeable battery by a new one or remove the used-up battery/rechargeable battery as soon as possible. A flat battery/rechargeable battery may leak and damage the device!
- If not used for a longer period (e.g. in case of storage), remove the inserted batteries/rechargeable batteries. There is a danger of old batteries/rechargeable batteries leaking, which causes damage to the product. Loss of guarantee/warranty!
• Always replace the entire set of batteries, only use batteries of the same type and by the same manufacturer with the same charge status (do not mix charged with partially charged or empty batteries).
- Never mix batteries and rechargeable batteries. Use either batteries or rechargeable batteries.
- For proper disposal of batteries/rechargeable batteries, please read the chapter Disposal.
6. OPERATING ELEMENTS
A1 Connection for the camera attachment
A2 Display
A3 Recording button; to record a photograph or start a video recording; to confirm a menu item or selection
A4 On/off button
A5 Button up; to navigate up in the menu or the selection; if the button is pushed for more than 1.5 seconds, the entire display will turn by 180^
A6 Button down; to navigate down in the menu or the selection; if the button is pushed for more than 1.5 seconds, the zoom factor will be increased by 1 (2x, 3x, 4x)
A7 Button "MENU" to open the menu and go a step back in the menu
A8 Attachment bracket, e.g. to secure the product
text_image
VOLTCRAFT BS-350XIPSD A1 A2 A3 A4 A5 A6 A7 MENU A8B1 Mini-USB1.1 connection
B2 Micro-SDHC card slot
text_image
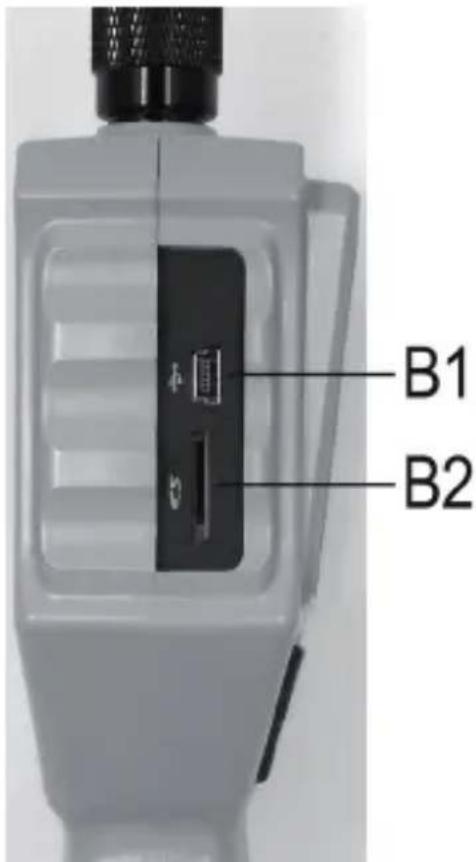
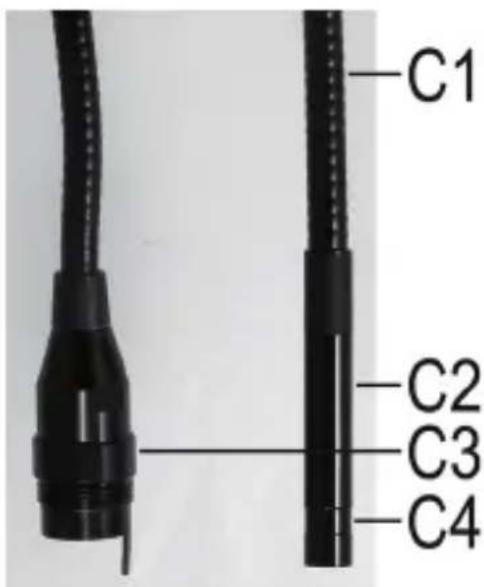
B1 B2C1 Flexible swan neck
C2 Camera head
C3 Connection plug
C4 Guide for the additional attachments
text_image
C1 C2 C3 C47. DISPLAY
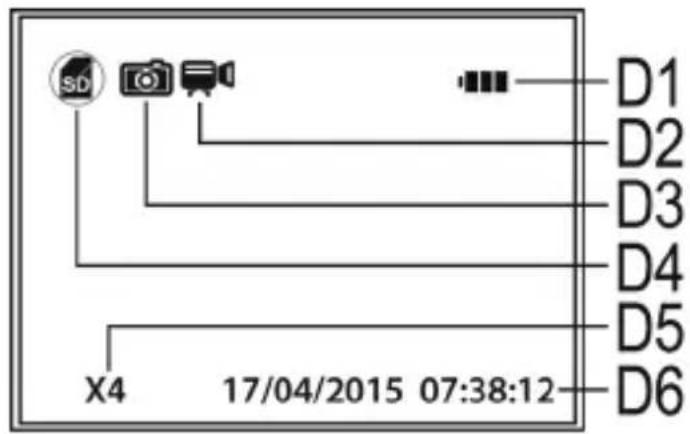
D1 Display for the remaining capacity of the batteries
D2 Display for video mode
D3 Display for photo mode
D4 Display if the micro SD card is not inserted
D5 Display of the currently set zoom factor (max. 4-fold)
D6 Display of the current date and time
text_image
SD D1 D2 D3 D4 D5 X4 17/04/2015 07:38:12 D6→ When displaying the current operating mode (photo or video), only one of the two icons (D2 or D3) will be displayed in the position of the camera.
a) Inserting and replacing the batteries
Before you can use the product, you need to insert the batteries. 4 AA batteries are needed for operation.
This description also applies if you have to replace the batteries later.
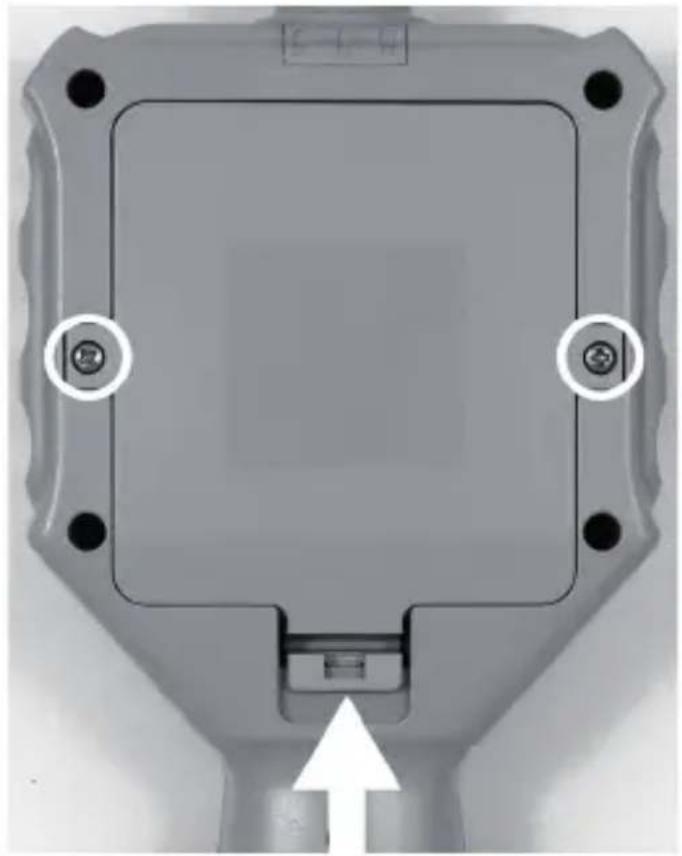
- First, open the battery lid of the endoscope. It is located at the rear of the main unit.
Open the two screws of the battery compartment lid with a Phillips screw-driver (see the two white circles in the image) until they spin. They cannot be removed entirely.
Now push the lever (white arrow in the image) in the direction of the arrow.
At the same time, lift the battery compartment lid and take it off of the battery compartment.
natural_image
Top-down view of a gray electronic device casing with mounting holes and a white arrow pointing to a component (no text or symbols visible)- If you want to replace the batteries, remove the old batteries first.
- Then insert 4 new AA batteries into the battery compartment.
Please observe correct polarity (plus/+ and minus/-. How to insert the batteries is marked in the battery compartment by illustrations.
- Last, close the battery compartment again.
For this, hook the lid at the top in the housing with both guides and fold it shut until the lever latches at the bottom.
- Screw on the two Phillips-head screws hand-tightly again.
- This completes insertion or replacement of the batteries.
b) Insertion of the memory card
You can record pictures and videos with the BS-350XIPSD. They are saved on the micro SD card (not enclosed). Micro-SDHC memory cards up to 32 GB are supported.
Now insert the memory card into the endoscope.
Switch off the device before starting.
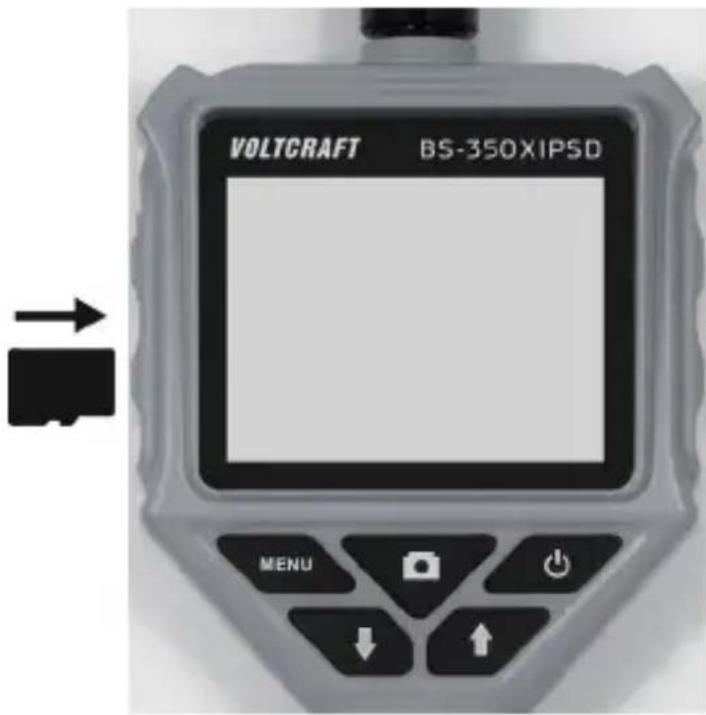
- Pull out the rubber cover on the right side of the device carefully and fold it to the side.
- Push the card into the memory card slot B2 until it latches.
The contacts must point down and to the right (see figure).
• Finally, push the rubber cover back into the endoscope.

To remove the memory card again, switch off the endoscope first. Push the card to unlatch it and then pull it from the slot.
text_image
VOLTCRAFT BS-350XIPSD MENUc) Connection of the endoscope camera
Now connect the enclosed endoscope camera to the BS-350XIPSD.
- If you have switched on the device, switch it off again at first (see chapter 8 d).
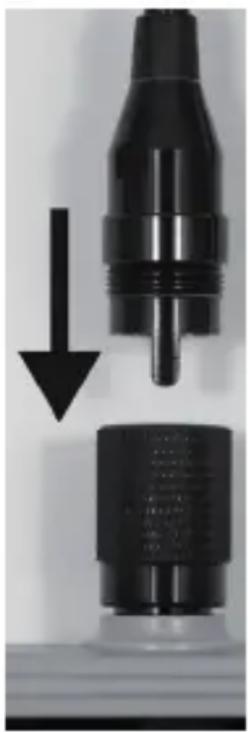
- Push the plug of the camera C3 into the connection A1 of the endoscope (see arrow).
The proper orientation can be told by the guide pin in the plug. When the endoscope is display-up, the pin must also still point up.
When pushing on, ensure that you do not bend or break off any pins.
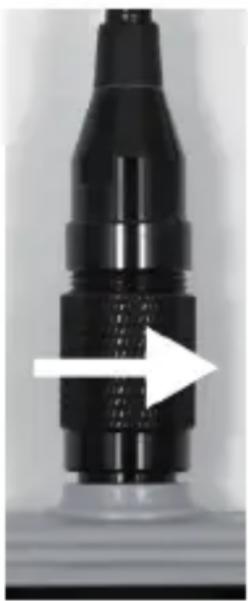
natural_image
Close-up of a black mechanical component with a downward arrow indicating compression or disassembly (no visible text or symbols)- Turn the closure of the camera plug counter-clockwise (see arrow) until it is tightened hand-tight.
The camera plug must no longer move then.
natural_image
Close-up of a black mechanical component with a white arrow pointing to a specific feature (no text or symbols visible)→ To remove the camera again, switch off the BS-350XIPSD first and screw open the metal closure again (turn -clockwise). Then remove the camera.
d) Switching the device on and off
- To switch on the endoscope basic device, briefly push the on/off button (A4).
About one second later, the device will start and first show a white and then a blue screen.

When starting is completed, the device is in preview mode. This means that the current camera picture, the set date and the time (D6), as well as the recording mode for photographs (D3) are shown.
At the upper right of the display, you will also see the display for the battery charge(D1). If the charge level is too low, change the 4 AA batteries (see chapter 8 a)) before you continue.
If the symbol for the SD card (D4) is displayed, you either have not inserted a card yet or the card has not been recognised properly.
- To switch off the endoscope again, briefly push the on/off button (A4) again. Once the display goes out, the device is off.
e) Setting the camera lighting
To be able to use the endoscope in absolutely dark areas as well, the BS-350XIPSD has an integrated dial for the LED lighting installed in the camera head. You can set the brightness in 6 levels.
- When the endoscope is switched on, push the button A5 (arrow up) to change the brightness.
- To reduce brightness, push the button A6 (arrow down).
- Set the lighting so that the picture displayed is recognisable well.

In narrow tubes or similar, it may be of advantage to reduce lighting slightly to prevent reflections and too bright pictures.
The following configuration items can be found in the setting menu.
- To enter the settings menu, push the button "MENU" (A7) with the device switched on.
- You can leave the menu by pushing the button again or selecting the respective menu item.
- Navigate through the menu items with the two arrows A5 (up) and A6 (down).
- The desired menu item is selected with the recording button (A9).
- If no input is made for a few seconds, the menu is closed again automatically.
a) Setting the language
- Open the menu (A7) and navigate (A5/A6) to the menu item "Settings" and open it (A3).
- Now navigate to the menu item "Language" and push button A3.
If you have already switched on the device and changed the language then, the two menu items are named accordingly differently.
- Select your desired language (A5/A6) and confirm with the button A3.
- Push the "MENU" (A7) button to leave the settings.
b) Setting of date and time
We recommend setting the date and time before your record pictures or videos. The date and time are displayed in all photographs and videos.
- Navigate (A5/A6) to the item "Setting" in the menu and open it (A3).
- Then open (A3) the menu item "Time/Date".
- You are immediately asked to set the date.
Set the correct day with the two arrows (A5/A6) and confirm with A3. The flashing cursor switches to the next input.
Proceed accordingly to set the current month and year.
- After you have set the year and pushed the button A3, the display will switch to setting the time.
Proceed precisely as when setting the date. When confirming the set seconds with the A3 button, the menu item for setting the date and time will be closed automatically. The set values are then saved automatically.
c) Setting frame rate
To set the frame rate for the video recording, proceed as follows:
- Navigate (A5/A6) to the item "Frame Rate" in the setting menu and open it (A3).
- Use the two arrows (A5/A6) to select the desired frame rate (FPS) and confirm with A3.
- The following frame rates are available: 20, 25, 30 FPS
d) Formatting the memory card
To format the inserted memory card and to delete all images and videos recorded from the memory card, proceed as follows:
- Navigate (A5/A6) to the item "Format" in the setting menu and open it (A3).
- Use one of the two arrows (A5/A6) to select the "Yes" and confirm with A3.
- The format is shown in the display and then confirmed.
a) Recording photos
- To record an individual picture with the camera, simply push the button A3 in preview mode. Keep the connected camera as calm as possible to receive a good recording.
The symbol in the display for photo mode (D3) flashes thrice while the photo is taken.
- All recorded pictures are saved in JPG format, in the sub-folder "PIC001". The numbers of the folder may also change. The recording folder is in the folder "Photo" on the memory card. The file name is produced from the current date and time.
b) Recording videos
To record videos, you first need to switch the endoscope to video mode.
Once you switch off the BS-350XIPSD, it will automatically be reset to photo mode. This means that if you want to record a video after switching on, you have to switch mode first.
- Navigate (A5/A6) to the item "DVR" in the menu and confirm it with the button A3. The menu is automatically closed and the display shows the symbol for video mode (D2).
- Push the button A3 to start the recording. During the recording, the video symbol (D2) will flash and the recording time will be displayed at the lower left of the display.
- Push the button A3 again to terminate the recording. - All recorded videos are saved in AVI format, in the sub-folder "vid00001". The numbers of the folder may also change. The recording folder is in the folder "DCIM" on the memory card.
c) Displaying photographs and videos
- To get to the display mode for photographs and videos, open the menu (A7) and navigate (A5/A6) to the item "Playback". Confirm with the A3 button.
- Use one of the two arrows (A5/A6) to select playback of videos or photographs. Confirm with the A3 button.
The first photograph is displayed or the first video played in each case.
Whether it is a photograph or a video can be seen additionally by the displayed icon for the mode (D2 or D3).
The lower right of the display shows the number of the currently displayed photograph or video and the total number of photographs or videos. If, e.g., 002/008 is displayed, this means that the 2nd photograph or video of 8 total is currently shown.
Additionally, you can see the date and time of when the photograph or video has been recorded.
When playing back videos, the runtime is additionally displayed at the lower left of the display.
- To switch on to the next photograph or video, push the arrow down (A6). To switch on to the previous picture or video, push the arrow up (A5).
d) Deleting photographs and videos
- If you want to delete a specific photograph or video, push the button A3 for approx. 2 seconds while displaying the respective photograph or video.
- When the display has changed, confirm with the button A3 to delete the previously displayed photograph or video.
In the next display, switch the white bar (A5 or A6) to Yes and again confirm with A3.
→ If you want to delete all photographs or videos, select the lower item "Delete All" in the first display.
This always deletes all photographs and videos. This depends on the playback mode in which you are.
e) Digital zoom
In preview mode, you can digitally enlarge the pictures.
- Keep the arrow down (A6) pushed.
- The zoom factor is gone through in the following steps:
2-fold, 3-fold, 4-fold, off
- The current zoom factor is always displayed at the lower left of the display (D5) (X2, X3, X4). If nothing is displayed here, digital amplification is deactivated.
- If you record a picture or video now, this will be done with the set zoom factor.
f) Turning the display
You can turn the displayed picture by 180^ in preview mode.
- Keep the arrow up (A5) pushed until the display is turned by 180^ .
- If you keep the button A5 pushed again, the original picture will be displayed again.
11. PC CONNECTION
To transfer the recorded pictures and videos to a computer, you can connect your endoscope to your PC directly via USB.
Of course, there is the alternative option of removing the Micro SD memory card from the device to transfer the pictures and videos from the card reader to your computer.
Proceed as follows:
- Connect the USB cable to the mini-USB-socket B1 of the endoscope.
- Connect the other end of the USB cable to a free USB port of your PC.
The endoscope starts automatically and switches to USB mode.
- Once it has been recognised by the PC, it acts as a card reader and the memory card is recognised on your computer as a removable data carrier.
- You can now copy files from the SD card onto the PC.
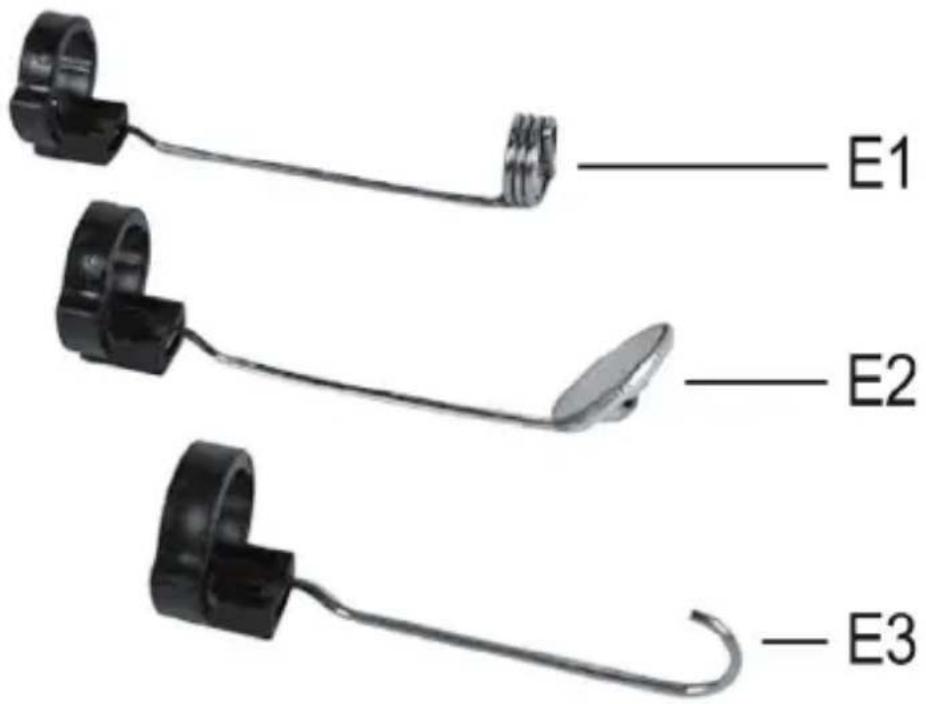
12. ATTACHMENTS
The scope of delivery contains three different attachments.
text_image
E1 E2 E3E1 Magnetic attachment
E2 Mirror attachment
E3 Hook attachment
Proceed as follows to install an attachment on the camera head:
- Place the open plastic ring in the guide C4 at the camera head.
Then close the closure. It must latch properly.
If the attachment is properly installed, you can turn it but not push it back or forwards.
- To remove the attachment again, just open the closure.
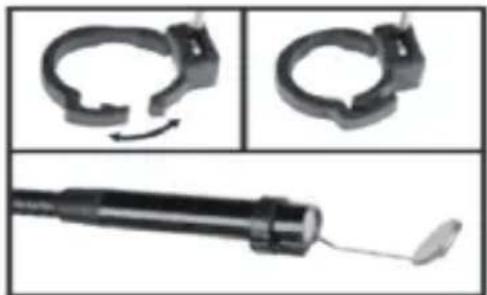
natural_image
Three-panel image showing mechanical components: a clamp-like ring, a ring with curved ends, and a handheld device with a tip (no visible text or symbols)13. TROUBLESHOOTING
In purchasing the endoscope, you have acquired a product designed to the state of the art and operationally reliable. Nevertheless, problems or errors may occur. Therefore, we would like to describe to you how to remove possible interferences.
The endoscope does not work; nothing is shown on the display:
- The batteries may be empty. Open the battery compartment lid as described in chapter 8 a). Check the batteries and replace them if necessary.
The preview mode is not displayed after activation. You can only see a black screen:
- Check that your endoscope camera is properly connected to the endoscope basic device.
- Switch off the endoscope, wait for a few seconds and then switch it on again.
No photographs or videos can be recorded:
- Check if the Micro SD card is properly inserted.
- The Micro SD card may be full. Check this by either connecting the endoscope to a computer by USB or check the memory card in your card reader. Delete some recordings if necessary.
- The partition of the Micro SD card may be damaged. Use your computer or the respective menu function to format the card (chapter 9 d).
- The Micro SD card may be defective. Check the endoscope with another Micro SD card.
14. MAINTENANCE AND CARE
The product is maintenance-free for you. Never take it apart or open it (except for the procedure as described in these operating instructions for inserting or replacing the batteries). Repair or maintenance work must be carried out by a specialist.
A dry, soft and clean cloth is sufficient for cleaning the outside. If the product is more strongly contaminated, moisten the cloth with a little luke-warm water.
Use a small brush or a cotton swab to clean the camera lens.

Do not put too much pressure on the display; this can cause scratch marks or failures of the display.
Never use any aggressive cleaning agents or chemical solutions. They may damage the surface of the casing (discolourations).
15. DISPOSAL
a) General information

The product does not belong in the household waste!
of the product according to the applicable statutory provisions at the end of its service life.
Remove any inserted batteries and dispose of it separately from the product.
b) Batteries and rechargeable batteries
You as the end user are required to return all used batteries/rechargeable batteries by law (Battery Ordinance). Disposing of them in household waste is prohibited!

Batteries/rechargeable batteries that contain hazardous substances are labelled with the adjacent icon to indicate that disposal in domestic waste is forbidden. The descriptions for the respective heavy metals are: Cd=cadmium, Hg=mercury, Pb=lead (the names are indicated on the battery/rechargeable battery e.g. below the rubbish bin symbol shown on the left).
You can return used batteries/rechargeable batteries free of charge at the official collection points of your community, in our stores, or wherever batteries are sold!
You thus fulfil your statutory obligations and contribute to the protection of the environment.
16. TECHNICAL DATA
Operating voltage 6 V/DC
Power consumption ......Max. 350 mA
Voltage supply ....4 AA batteries (not included)
Display 6.86 cm (2.7") TFT-monitor; max. 960 x 240 pixels
Protection degree ......IP64 (protection from splashing water on all sides, dust-tight)
Connections ...... Connection for endoscope camera 4-pin; Mini-USB1.1-connection; Micro-SDHC-memory card reader
Supported memory card ......Micro-SDHC; max. 32 GB
Picture format ......JPG; max. 640 x 480 pixels
Video format ......AVI max. 640 x 480 pixels
Frame rate 20, 25, 30 FPS
Supported operating systems ..... Windows® XP SP 1 and up (only 32 Bit); Windows Vista™, Windows® 7, Windows® 8.1, Windows® 10, (32 and 64 Bit)
Sensor 1/6" VGA CMOS
Resolution ......max. 640 x 480 pixels (VGA)
Camera lighting ....4 white LEDs
Brightness .... max. 1000 Lux (± 150 Lux), at a distance of 20 mm; adjustable in 6 levels
Focussing ....30 mm to endless
Camera angle 54° diagonal
Dimensions (endoscope) ......236 x 84 x 47 mm (H x W x D)
Dimensions (case) 75 x 322 x 196 mm (H x W x D)
Length of swan neck ....90 cm ±2 cm
Length of the camera head .....5.2 cm
Diameter of the camera head .....8.0 mm
Bending radius ....> 50 mm (swan neck)
Weight 365 g (endoscope incl. camera attachment, without batteries and accessories)
Operating conditions ......temperature 0 °C to +45 °C, humidity 15% to 85% relative
Storage conditions ...... temperature -10 °C to +50 °C, humidity 15% to 85% relative

Small deviations in dimensions and weight are due to production technical reasons.
Page
France (email): technique@conrad-france.fr
text_image
VOLTCAFT BS-350XIPSD A1 A2 A3 A4 A5 A6 A7 MENU A8natural_image
Top-down view of a gray electronic device casing with mounting holes and a small component, no visible text or symbols.text_image
VOLTCRAFT BS-350XIPSD MENUnatural_image
Close-up of a black mechanical component with a downward arrow indicating compression or disassembly (no visible text or symbols)natural_image
Close-up of a black mechanical component with a white arrow pointing to a specific feature (no text or symbols visible)natural_image
Three-panel image showing mechanical components: a loop clamp, a ring clamp, and a handheld tool with a tip (no text or symbols visible)2. VERKLARING VAN SYMBOLEN, OPSCHRIFTEN

text_image
VOLTCRAFT BS-350XIPSD A1 A2 A3 A4 A5 A6 A7 MENU A8natural_image
Top-down view of a gray electronic device casing with mounting holes and a small component, no visible text or symbols.text_image
VOLTCRAFT BS-350XIPSD MENUnatural_image
Close-up of a black mechanical component with a downward arrow indicating compression or disassembly (no visible text or symbols)natural_image
Close-up of a black mechanical component with a white arrow pointing to its side (no visible text or symbols)natural_image
Three-panel image showing mechanical components: a loop clamp, a ring clamp, and a needle-like tool with tip (no text or symbols visible)13. VERHELPEN VAN STORINGEN
Framerate 20, 25, 30 FPS
Diameter camerakop 8,0 mm
Buigradius ....>50 mm (zwanenhals)
Gewicht .... 365 g (endoscoop incl. camera-opzetstuk, zonder batterijen en accessoires)
© Copyright 2015 by Conrad Electronic SE.
GB Legal Notice
This is a publication by Conrad Electronic SE, Klaus-Conrad-Str. 1, D-92240 Hirschau (www.conrad.com).
All rights including translation reserved. Reproduction by any method, e.g. photocopy, microfilming, or the capture in electronic data processing systems require the prior written approval by the editor. Reprinting, also in part, is prohibited. This publication represents the technical status at the time of printing.
© Copyright 2015 by Conrad Electronic SE.
© Copyright 2015 by Conrad Electronic SE.
NL Colofon
© Copyright 2015 by Conrad Electronic SE. V1_1015_02/VTP