
MultiSync 20WGX² Pro - Monitor NEC - Free user manual and instructions
Find the device manual for free MultiSync 20WGX² Pro NEC in PDF.
| Brand | NEC |
| Model | MultiSync 20WGX² Pro |
| Product Type | Color LCD Monitor |
| Screen Size | 20 inches (diagonal) |
| Native Resolution | 1680 x 1050 |
| Power Supply | 220-240 V AC, 50/60 Hz (Europe) |
| Power Consumption | Not specified; energy-saving standby (ENERGY STAR compliant) |
| Video Inputs | Analog (Mini D-SUB 15-pin) and digital (DVI-D) |
| USB Hub | Yes (1 type B input, 1 type A output) |
| Ergonomic Functions | Tilt (-5° to +30°), swivel, VESA mount |
| OSM (On-Screen Manager) | Yes: brightness, contrast, color, position, etc. |
| Preset Image Modes | DV Mode (Film, Games, Photo), sRGB, Native |
| Screen Cleaning | Soft dry or slightly damp cloth; avoid abrasive products |
| Cabinet Cleaning | Soft cloth with mild detergent; do not use benzene or alcohol |
| Safety | Do not open the cabinet; unplug before cleaning; use cord suitable for voltage |
| Spare Parts / Repairability | No user-serviceable parts; refer to a professional |
| Weight | Not specified in the manual |
| Dimensions (W x H x D) | Not specified in the manual |
Frequently Asked Questions - MultiSync 20WGX² Pro NEC
User questions about MultiSync 20WGX² Pro NEC
0 question about this device. Answer the ones you know or ask your own.
Ask a new question about this device
Download the instructions for your Monitor in PDF format for free! Find your manual MultiSync 20WGX² Pro - NEC and take your electronic device back in hand. On this page are published all the documents necessary for the use of your device. MultiSync 20WGX² Pro by NEC.
USER MANUAL MultiSync 20WGX² Pro NEC
Canadian Department of Communications Compliance Statement
DOC: This Class B digital apparatus meets all requirements of the Canadian Interference-Caising Equipment Regulations.
C-UL: Bears the C-UL Mark and is in compliance with Canadian Safety Regulations according to CAN/CSA C22.2 No. 60950-1.
FCC Information
- Use the attached specified cables with the MultiSync 20WGX ^2 Pro (L205GJ) colour monitor so as not to interfere with radio and television reception.
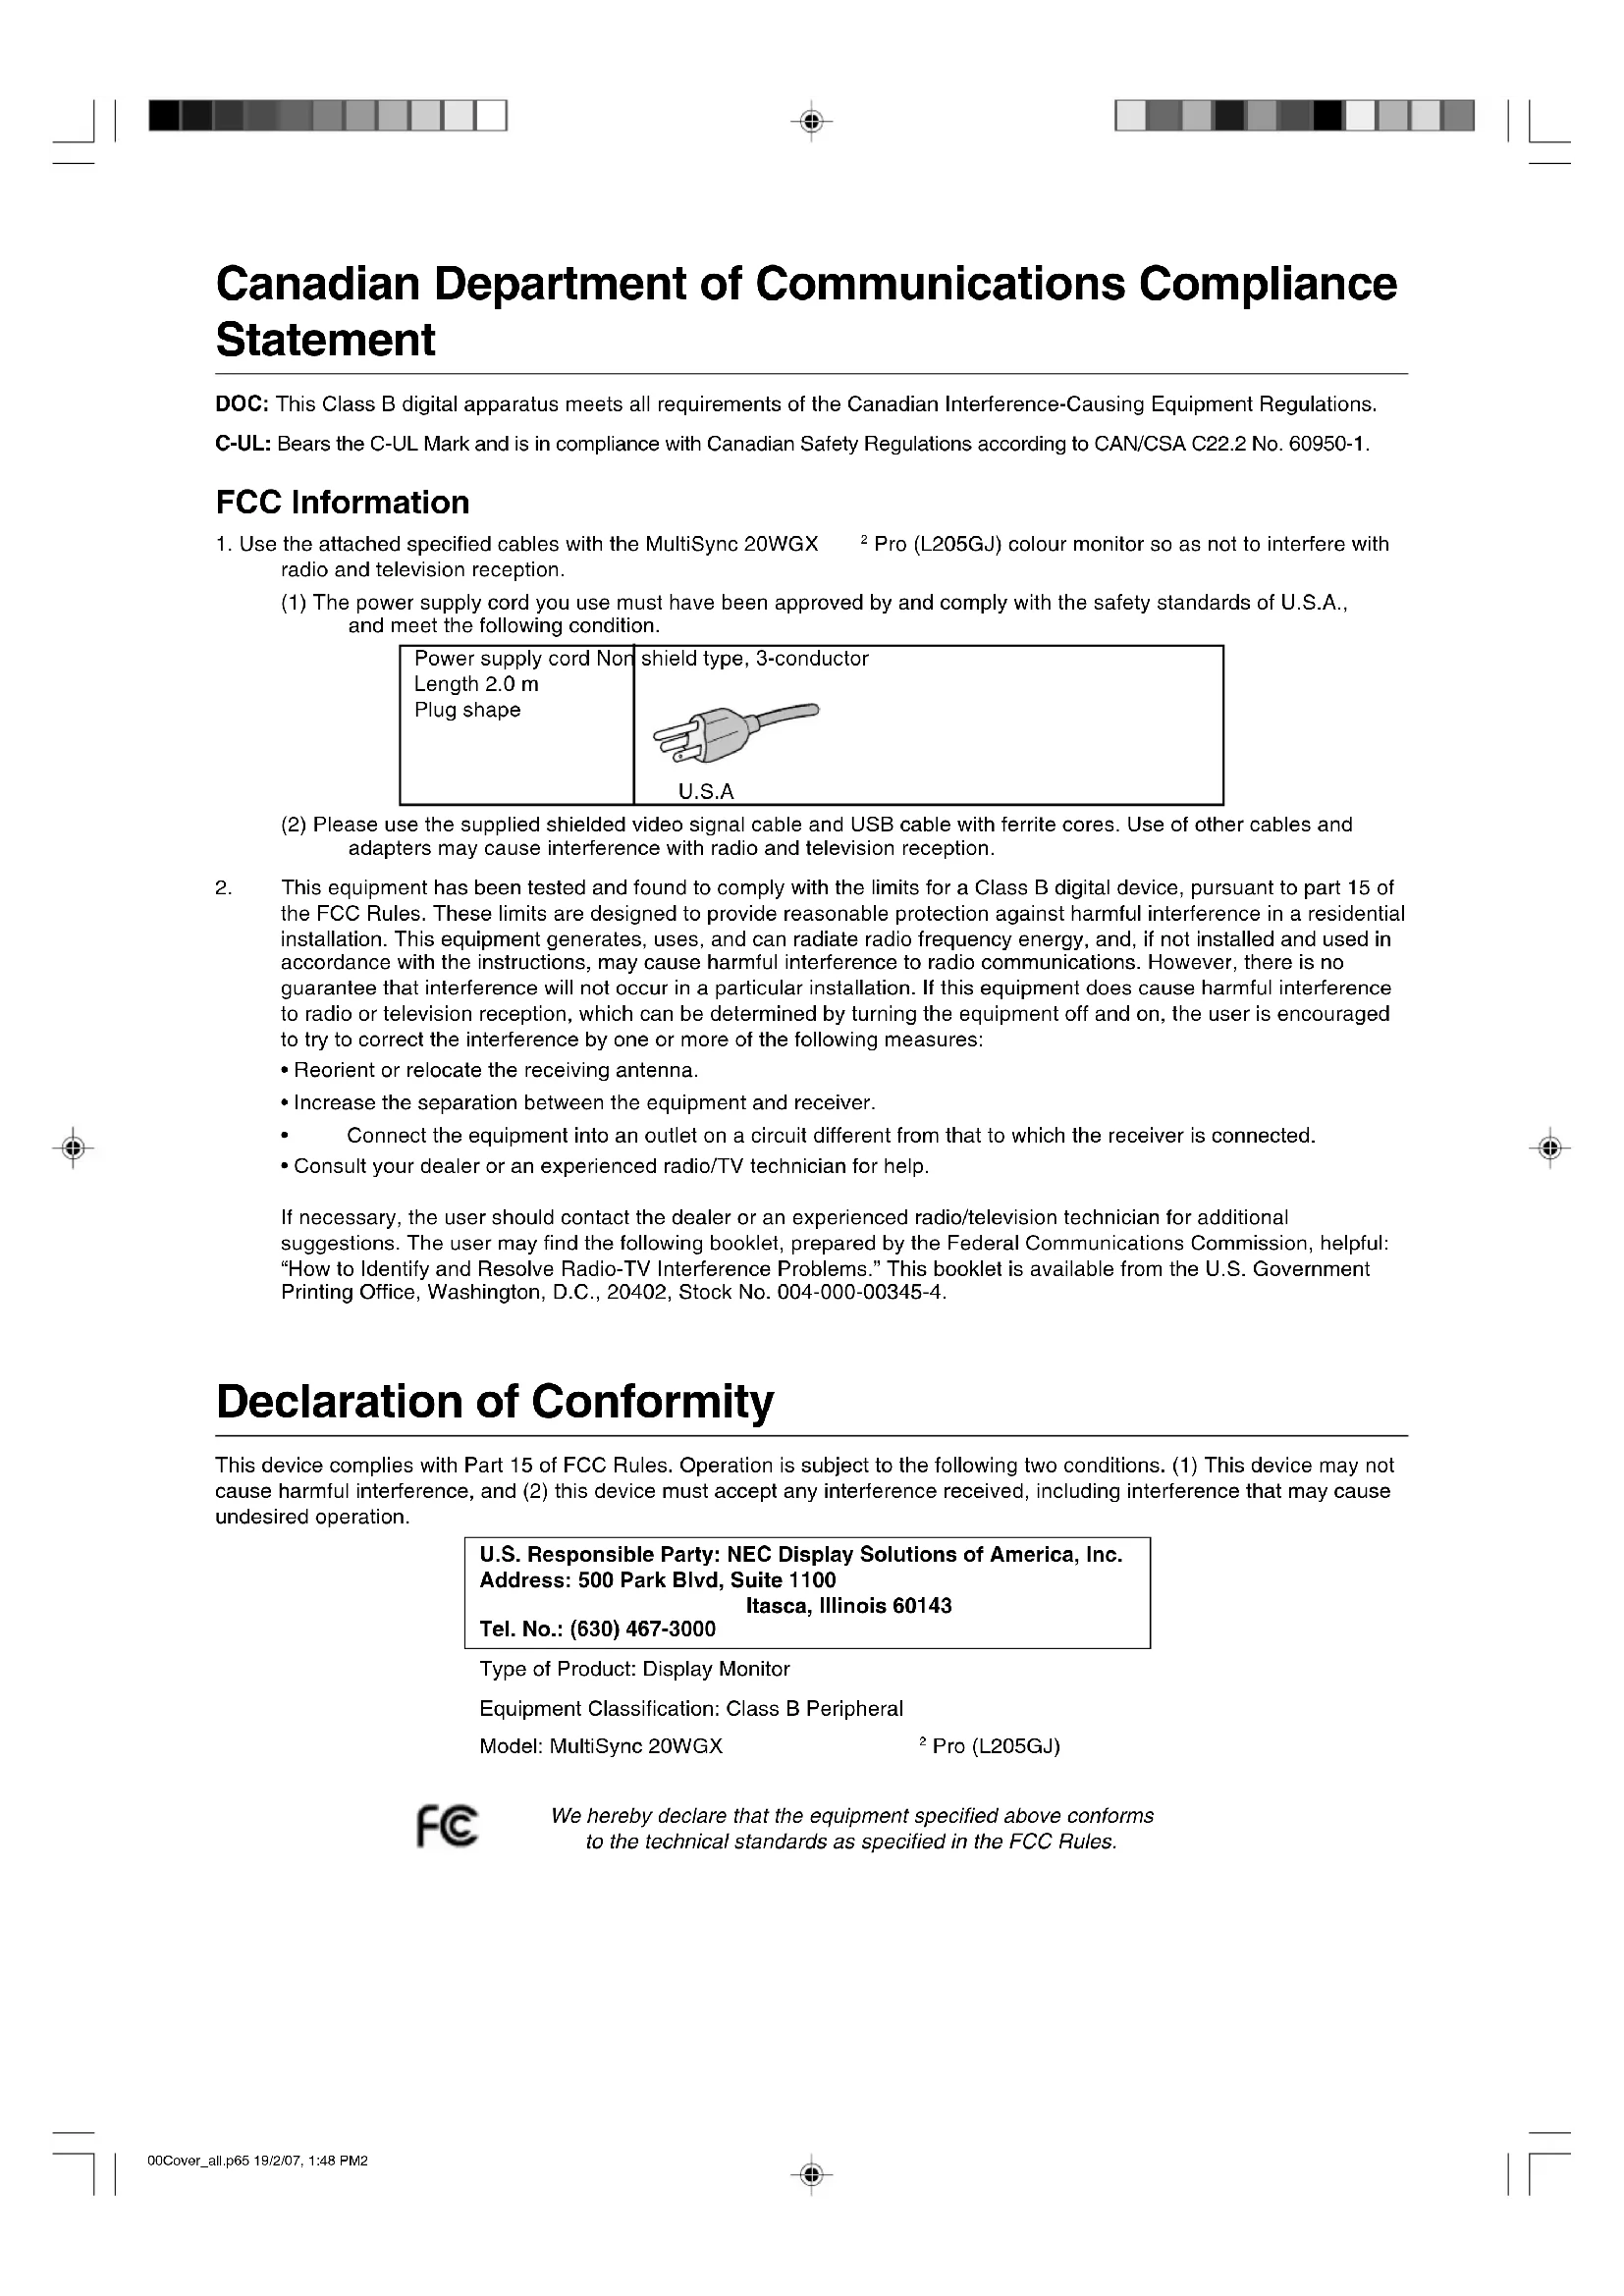
(1) The power supply cord you use must have been approved by and comply with the safety standards of U.S.A., and meet the following condition.
(2) Please use the supplied shielded video signal cable and USB cable with ferrite cores. Use of other cables and adapters may cause interference with radio and television reception.
-
This equipment has been tested and found to comply with the limits for a Class B digital device, pursuant to part 15 of the FCC Rules. These limits are designed to provide reasonable protection against harmful interference in a residential installation. This equipment generates, uses, and can radiate radio frequency energy, and, if not installed and used in accordance with the instructions, may cause harmful interference to radio communications. However, there is no guarantee that interference will not occur in a particular installation. If this equipment does cause harmful interference to radio or television reception, which can be determined by turning the equipment off and on, the user is encouraged to try to correct the interference by one or more of the following measures:
-
Reorient or relocate the receiving antenna.
- Increase the separation between the equipment and receiver.
- Connect the equipment into an outlet on a circuit different from that to which the receiver is connected.
- Consult your dealer or an experienced radio/TV technician for help.
If necessary, the user should contact the dealer or an experienced radio/television technician for additional suggestions. The user may find the following booklet, prepared by the Federal Communications Commission, helpful: "How to Identify and Resolve Radio-TV Interference Problems." This booklet is available from the U.S. Government Printing Office, Washington, D.C., 20402, Stock No. 004-000-00345-4.
Declaration of Conformity
This device complies with Part 15 of FCC Rules. Operation is subject to the following two conditions. (1) This device may not cause harmful interference, and (2) this device must accept any interference received, including interference that may cause undesired operation.
U.S. Responsible Party: NEC Display Solutions of America, Inc.
Address: 500 Park Blvd, Suite 1100
Itasca, Illinois 60143
Tel. No.: (630) 467-3000
Type of Product: Display Monitor
Equipment Classification: Class B Peripheral
Model: MultiSync 20WGX
2 Pro (L205GJ)

We hereby declare that the equipment specified above conforms to the technical standards as specified in the FCC Rules.

TcODevelopment
Congratulations!
The display you have just purchased carries the TCO'03 Displays label. This means that your display is designed, manufactured and tested according to some of the strictest quality and environmental requirements in the world. This makes for a high performance product, designed with the user in focus that also minimizes the impact on our natural environment.
Some of the features of the TCO'03 Display requirements:
Ergonomics
- Good visual ergonomics and image quality in order to improve the working environment for the user and to reduce sight and strain problems. Important parameters are luminance, contrast, resolution, reflectance, colour rendition and image stability.
Energy
- Energy-saving mode after a certain time - beneficial both for the user and the environment
- Electrical safety
Emissions
- Electromagnetic fields
- Noise emissions
Ecology
- The product must be prepared for recycling and the manufacturer must have a certified environmental management system such as EMAS or ISO 14 001.
-
Restrictions on:
-
chlorinated and brominated flame retardants and polymers
- heavy metals such as cadmium, mercury and lead.
The requirements included in this label have been developed by TCO Development in cooperation with scientists, experts, users as well as manufacturers all over the world. Since the end of the 1980s TCO has been involved in influencing the development of IT equipment in a more user-friendly direction. Our labelling system started with displays in 1992 and is now requested by users and IT-manufacturers all over the world.
For more information, please visit
www.tcodevelopment.com
TCO Development
TODevelopment
Tc0'06
MEDIA DISPLAYS
www.tcodevelopment.com
Congratulations!
The product you have just purchased carries the TCO'06 Media Displays label. This means that your display is designed and manufactured according to some of the strictest performance and environmental criteria in the world. The manufacturer of this display has selected it to be certified to TCO'06 Media Displays as a sign of usability, high performance and reduced impact on the natural environment.
Products certified to TCO '06 Media Displays are specifically designed for high quality reproduction of moving images. Features such as luminance, colour rendition and response time are important when watching TV or working with media, graphics, web design and other applications that demand outstanding moving images.*
Other features of TCO'06 Media Displays:
Ergonomics
- Good visual ergonomics and image quality in order to reduce vision and strain problems.
Criteria for luminance, contrast, resolution, reflectance, colour rendition and response time.
Energy
- Energy saving mode - beneficial both for the user and the environment
- Electrical safety
Emissions
- Low electromagnetic fields surrounding the display
Ecology
- Product is designed for recycling. Manufacturer must have a certified environmental management system such as EMAS or ISO 14 001
-
Restrictions on:
-
Chlorinated and brominated flame retardants and polymers
- Hazardous heavy metals such as cadmium, mercury, hexavalent chromium and lead.
All TCO labelled products are verified and certified by TCO Development, an independent third party labelling organization. For over 20 years, TCO Development has been at the forefront of moving the design of IT equipment in a more user-friendly direction. Our criteria are developed in collaboration with an international group of researchers, experts, users and manufacturers. Since the program's inception, TCO labelled products have grown in popularity and are now requested by users and IT-manufacturers all over the world.
Full specifications and lists of certified products can be found on our homepage www.tcodevelopment.com
- For a display used primarily for conventional work tasks such as word processing, we recommend a display certified to our office display series TCO'03 Displays or later version.
Manufacturer's Recycling and Energy Information
NEC DISPLAY SOLUTIONS is strongly committed to environmental protection and sees recycling as one of the company's top priorities in trying to minimize the burden placed on the environment. We are engaged in developing environmentally-friendly products, and always strive to help define and comply with the latest independent standards from agencies such as ISO (International Organisation for Standardization) and TCO (Swedish Trades Union).
Disposing of your old NEC product
The aim of recycling is to gain an environmental benefit by means of re-use, upgrading, reconditioning or reclamation of material. Dedicated recycling sites ensure that environmentally harmful components are properly handled and securely disposed. To ensure the best recycling of our products, NEC DISPLAY SOLUTIONS offers a variety of recycling procedures and gives advice on how to handle the product in an environmentally sensitive way, once it has reached the end of its life.
All required information concerning the disposal of the product and country-specific information on recycling facilities can be found on our following websites:
http://www.nec-display-solutions.com/greenccompany/ (in Europe),
http://www.nec-display.com (in Japan) or
http://www.necdisplay.com (in USA).
Energy Saving
This monitor features an advanced energy saving capability. When a VESA Display Power Management Signalling (DPMS) Standard signal is sent to the monitor, the Energy Saving mode is activated. The monitor enters a single Energy Saving mode.
| Mode Power co | consumption LED colour | |
| Normal Operation Approx. 92W Blue | ||
| Energy Saving Mode Less than 2W Amber | ||
| Off Mode Less than 1W Unlit | ||
WEEE Mark (European Directive 2002/96/EC)
Within the European Union
EU-wide legislation, as implemented in each Member State, requires that waste electrical and electronic products carrying the mark (left) must be disposed of separately from normal household waste. This includes monitors and electrical accessories, such as signal cables or power cords. When you need to dispose of your NEC display products, please follow the guidance of your local authority, or ask the shop where you purchased the product, or if applicable, follow any agreements made between yourself and NEC.
The mark on electrical and electronic products only applies to the current European Union Member States.
Outside the European Union
If you wish to dispose of used electrical and electronic products outside the European Union, please contact your local authority so as to comply with the correct disposal method.
Chinese RoHS-information relevant for Chinese market
Warning, Caution. English-1
Declaration English-1
Contents English-2
Quick Start English-3
Controls English-7
Recommended use English-10
Varovani, Upozorneni. Cesky-1
Prohlasei Cesky-1
Obsah Cesky-2
Rychly start Cesky-3
Ovladaci prvky Cesky-7
Provozni pouyny Cesky-10
Warning, Vorsicht . . . . . . . . . . . . . . . . . . . . . . . . . . . . . . . . . . . . . . . . . . . . . . . . . . . . . . . . . .
Erklärung . . . . . . . . . . . . . . . . . . . . . . . . . . . . . . . . . . . . . . . . . . . . . . . . . . . . . . . . .
Inhalt der Verpackung . . . . . . . . . . . . . . . . . . . . . . . . . . . . . . . . . . . . . . . . . . . . . . . . . . . . . . . . . . . . . . . . . . . . . . . . . ..
KpaTkoe pykoOboCTBO no
Haayy pa60tbl Pyckn-3
OprahbI ynpaBHeHn.. Pycckn-7
Pekomehdaun no 3Kcnnyataun.. Pycckn-10
Dikkat, Uyari. Turkce-1
Bildirim .. Turkce-1
Icindekiler Turkce-2
Hizli Baslama .. Turkce-3
Kontroller .. Turkce-7
TO PREVENT FIRE OR SHOCK HAZARDS, DO NOT EXPOSE THIS UNIT TO RAIN OR MOISTURE. ALSO, DO NOT USE THIS UNIT'S POLARIZED PLUG WITH AN EXTENSION CORD RECEPTACLE OR OTHER OUTLETS UNLESS THE PRONGS CAN BE FULLLY INSERTED.
REFRAIN FROM OPENING THE CABINET AS THERE ARE HIGH VOLTAGE COMPONENTS INSIDE. REFER SERVICING TO QUALIFIED SERVICE PERSONNEL.

CAUTION:
CAUTION

TO REDUCE THE RISK OF ELECTRIC SHOCK, MAKE SURE POWER CORD IS UNPLUGGED FROM WALL SOCKET. TO FULLY DISENGAGE THE POWER TO THE UNIT, PLEASE DISCONNECT THE POWER CORD FROM THE AC OUTLET.DO NOT REMOVE COVER (OR BACK).NO USER SERVICEABLE PARTS INSIDE.REFER SERVICING TO QUALIFIED SERVICE PERSONNEL.


This symbol warns user that uninsulated voltage within the unit may have sufficient magnitude to cause electric shock. Therefore, it is dangerous to make any kind of contact with any part inside this unit.
This symbol alerts the user that important literature concerning the operation and maintenance of this unit has been included. Therefore, it should be read carefully in order to avoid any problems.
Caution:
When operating the MultiSync 20WGX Pro with a 220-240V AC power source in Europe, use the power cord provided with the monitor.
In the UK, a BS approved power cord with a moulded plug has a Black (five Amps) fuse installed for use with this equipment. If a power cord is not supplied with this equipment please contact your supplier.
When operating the MultiSync 20WGX² Pro with a 220-240V AC power source in Australia, use the power cord provided with the monitor. If a power cord is not supplied with this equipment please contact your supplier.
For all other cases, use a power cord that matches the AC voltage of the power outlet and has been approved by and complies with the safety standard of your particular country.
Declaration
Declaration of the Manufacturer
We hereby certify that the colour monitor
MultiSync 20WGX² Pro (L205GJ) is in
compliance with
Council Directive 73/23/EEC:
EN 60950-1
Council Directive 89/336/EEC:
-EN55022
- EN 61000-3-2
-EN61000-3-3
-EN55024
and marked with

NEC Display Solutions, Ltd.
4-13-23, Shibaura,
Minato-Ku
Tokyo 108-0023, Japan
ISO 13406-2

Windows is a registered trademark of Microsoft Corporation. NEC is a registered trademark of NEC Corporation. ENERGY STAR is a U.S. registered trademark.
OmniColor is a registered trademark of NEC Display Solutions Europe GmbH in the countries of EU and Switzerland.
ErgoDesign is a registered trademark of NEC Display Solutions, Ltd. in Austria, Benelux, Denmark, France, Germany, Italy, Norway, Spain, Sweden, U.K.
NaViSet is a trademark of NEC Display Solutions Europe GmbH in the countries of EU and Switzerland.
MultiSync is a registered trademark of NEC Display Solutions, Ltd. in the countries of U.K., Italy, Austria, Netherlands, Switzerland,
Sweden, Spain, Denmark, Germany, Norway and Finland.
All other brands and product names are trademarks or registered trademarks of their respective owners.
As an ENERGY STAR® Partner, NEC Display Solutions of America, Inc. has determined that this product meets the ENERGY STAR guidelines
for energy efficiency. The ENERGY STAR emblem does not represent EPA endorsement of any product or service.
Contents
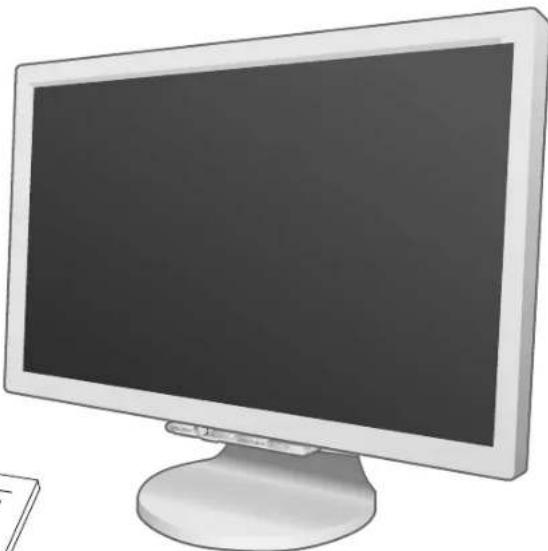
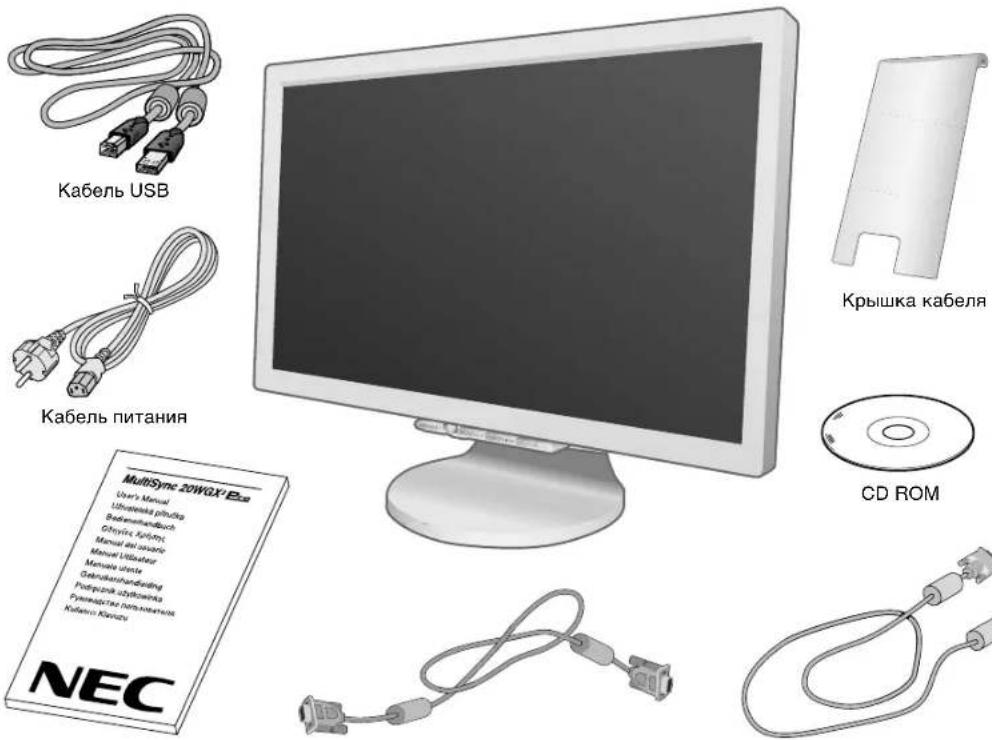
Your new NEC MultiSync LCD monitor box* should contain the following:
MultiSync 20WGX Pro monitor with tilt/swivel adjust stand
Power Cord
- V ideo Signal Cable (15-pin mini D-SUB male to 15-pin mini D-SUB male)
V ideo Signal Cable (DVI-D to DVI-D)
USB Cable
- User's Manual
Cable Cover
- CD ROM (includes complete User's Manual in PDF format).
To see the User's Manual, Acrobat Reader 4.0 must be installed on your PC.
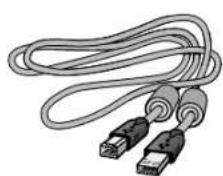
USB Cable
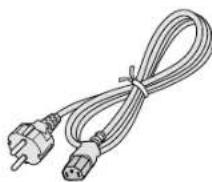
Power Cord
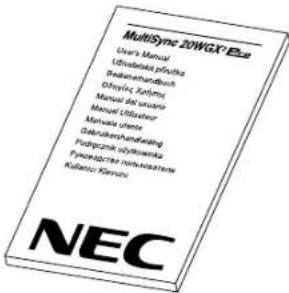
User's Manual 15-pin mini D-SUB male to
15-pin mini D-SUB male

Cable Cover
CD-ROM
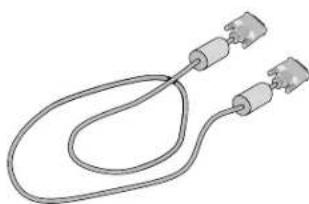
DVI-D to DVI-D
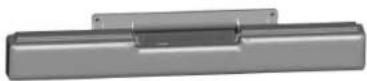
NOTE: This monitor can be equipped
with optional loudspeakers:
"MultiSync Sound bar". Please ask your dealer or check our website
http://www.nec-display-solutions.com
- Remember to save your original box and packing material to transport or ship the monitor.
Quick Start
To attach the MultiSync LCD monitor to your system, follow these instructions:
- Turn off the power to your computer.
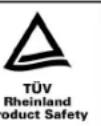
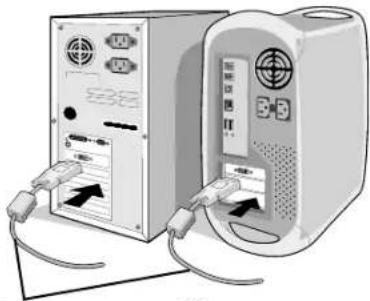
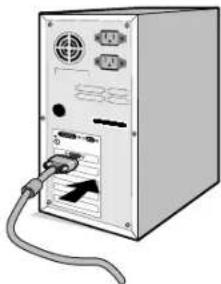
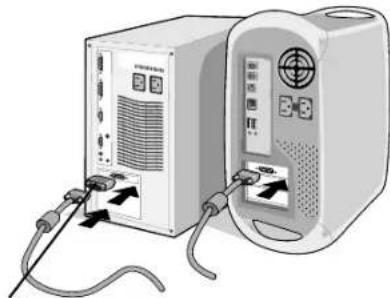
- For the PC or MAC with DVI digital output: Connect the DVI signal cable to the connector of the display card in your system (Figure A.1). Tighten all screws.
For the PC with Analog output: Connect the 15-pin mini D-SUB signal cable to the connector of the display card in your system (Figure A.2). Tighten all screws.
For the MAC: Connect the Macintosh cable adapter to the computer, then attach the 15-pin mini D-SUB signal cable to the Macintosh cable adapter (Figure B.1). Tighten all screws.
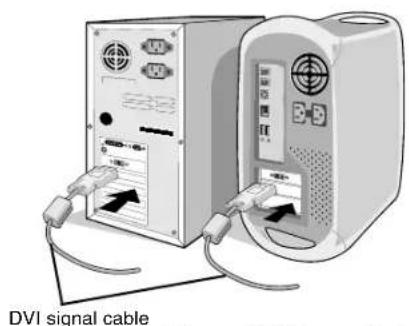
Figure A.1 Figure B.1
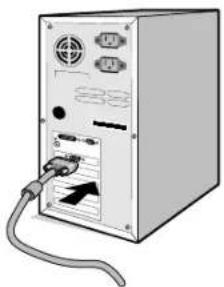
Figure A.2
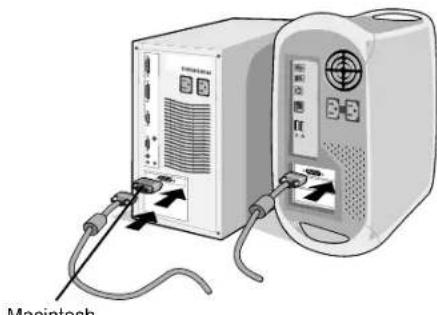
Cable Adapter (not included)
NOTE: Some Macintosh systems do not require a Macintosh cable adapter.
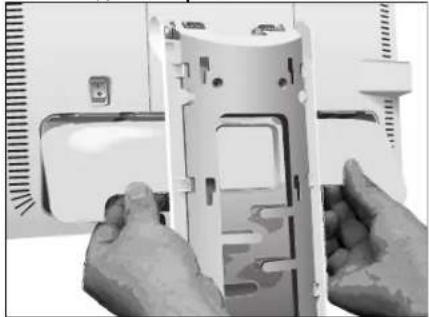
- Remove the connector cover (Figure C.1).
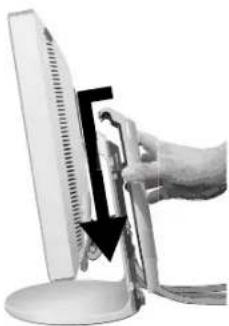
- Place hands on each side of the monitor to tilt the LCD panel 30 degrees angles (Figure C.2).
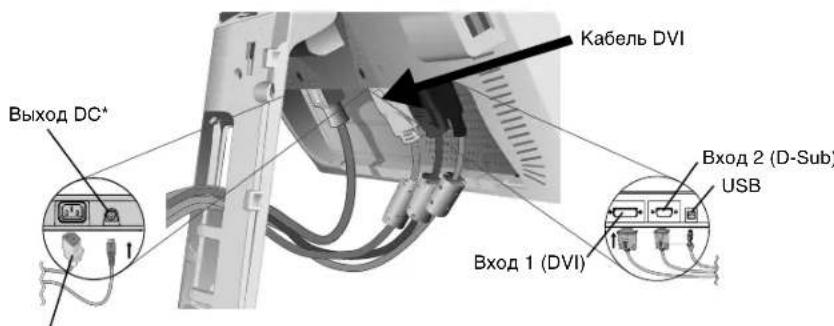
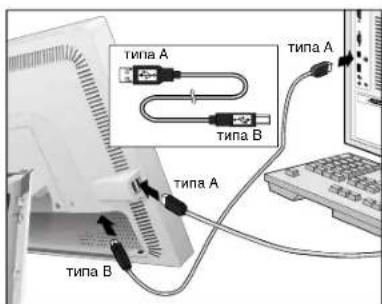
- Connect all cables to the appropriate connectors (Figure C.3). Using the USB cable, connect the B type connector to the USB upstream port on the right side of the monitor and the A type connector to the downstream port on the computer (Figure C.3a). If you can use the cord from the USB device, use one of the downstream ports on the side of the monitor.

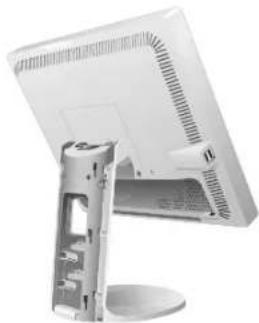
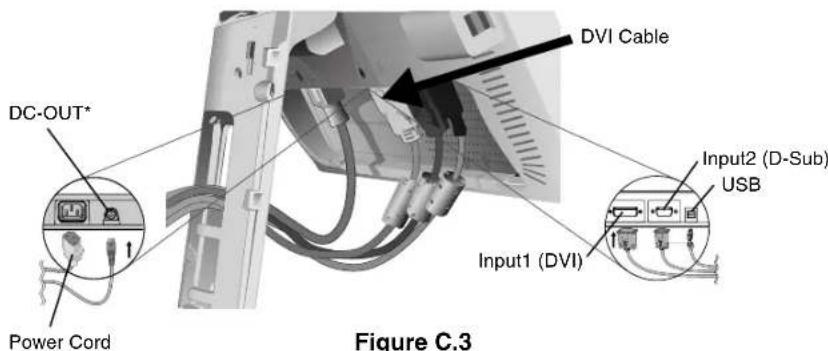
Figure C.1 Figure C.2
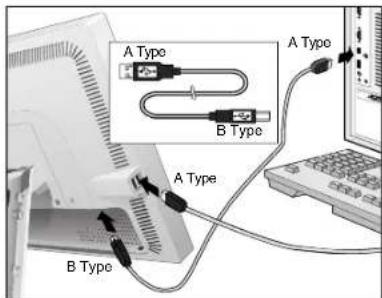
Figure C.3a
- NEC optional product attachment.
Do not use this connector unless specified.
English-3
- Place the connector cover onto the back cabinet (Figure C.4).
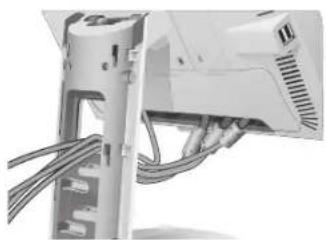
- Place all cables into the hooks (Figure C.5).
- Place hands on each side if the monitor to tilt the LCD panel back 5^ (Figure C.6).
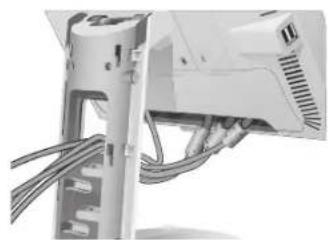
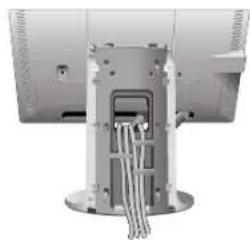
Figure C.4 Figure C.5
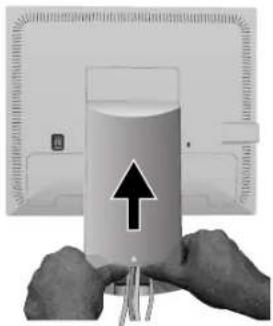
- Place the cable cover onto the stand (Figure C.6). To remove the cable cover, push the notch at the bottom of the cover up (towards the top of the monitor) in order to unhook the cover from the stand (Figure C.7).
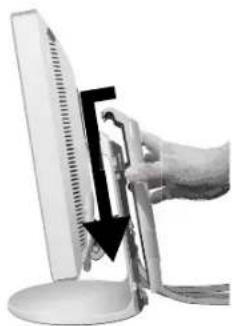
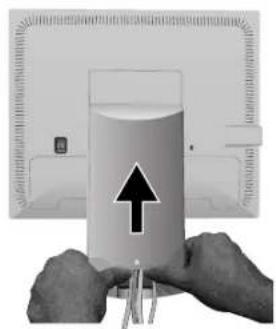
Figure C.6 Figure C.7
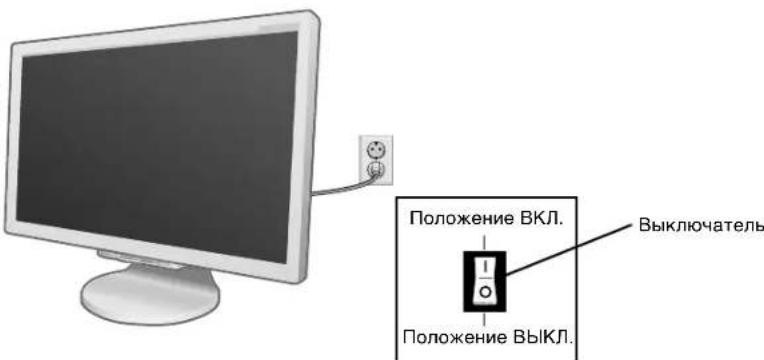
- Connect the power cord to the power outlet (Figure D.1).
NOTE: Please refer to Caution section of this manual for proper selection of AC power cord.
- The vacation switch on the back side of the monitor must be turned on (Figure D.1). Turn on the monitor with the front power button and the computer.
NOTE: The vacation switch is a true on/off switch. If this switch is on the OFF position, the monitor cannot be turned on using the front button. DO NOT switch on/off repeatedly.
-
No-Touch Auto Adjust automatically adjusts the monitor to optimal settings upon initial setup for most timings. For further adjustments, use the following OSM controls:
-
Auto Adjust Contrast (Analog input only)
- Auto Adjust (Analog input only)
Refer to the Controls section of this User's Manual for a full description of these OSM controls.
NOTE: If you have any problems, please refer to the Troubleshooting section of this User's Manual.
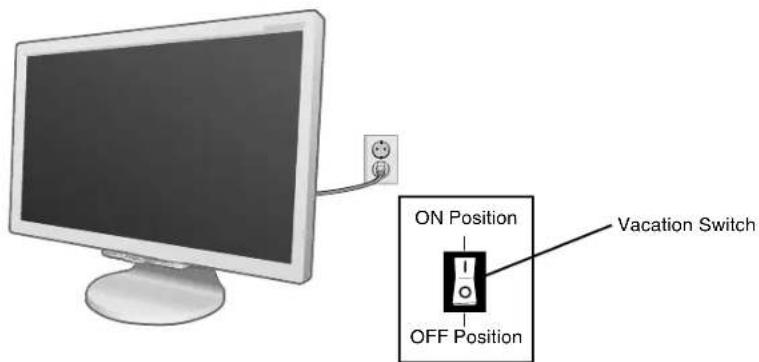
Figure D.1
English-4
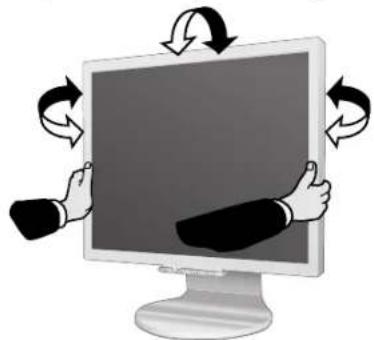
Tilt and Swivel
Grasp both sides of the monitor screen with your hands and adjust the tilt and swivel as desired (Figure TS.1).
NOTE: Handle with care when tilting and swivelling the monitor screen.

Figure TS.1
Remove Monitor Stand for Mounting
To prepare the monitor for alternate mounting purposes:
- Place hands on each side of the monitor to tilt the LCD panel 5 degrees angles. Remove the cable cover (Figure M.1).
Remove the connector cover (Figure M.2). - Disconnect all cables.
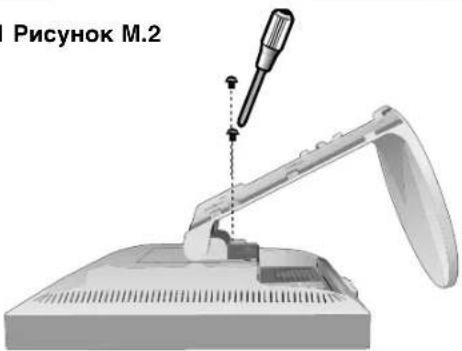
- Place monitor face down on a non-abrasive surface (Figure M.3).
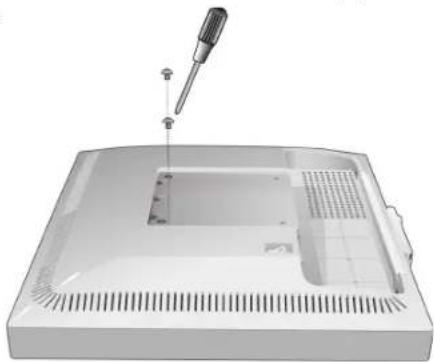
- Remove the 2 screws connecting the stand to the monitor (Figure M.3).
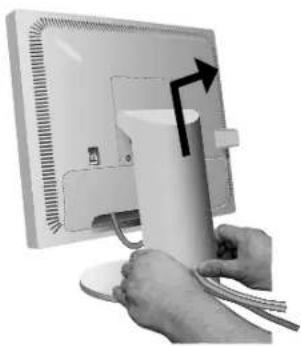
Figure M.1
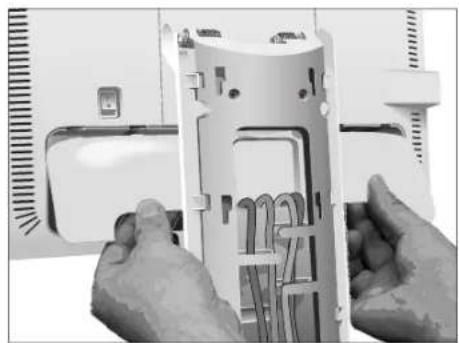
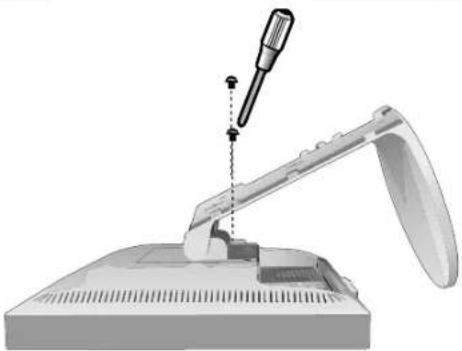
Figure M.2
Figure M.3
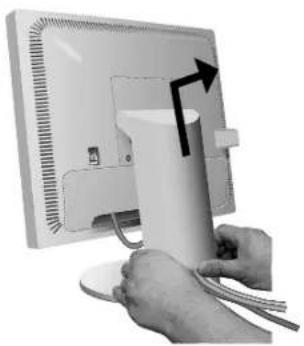
- Lift up the stand to unlatch the upper hooks and remove the stand (Figure M.4).
- Remove the 2 screws on the top of the monitor (Figure M.5). The monitor is now ready for mounting in an alternate manner.
- Connect the cables and place the connector cover on the back of the monitor.
- Reverse this process to re-attach stand.
NOTE: Use only VESA-compatible alternative mounting method. Handle with care when removing stand.
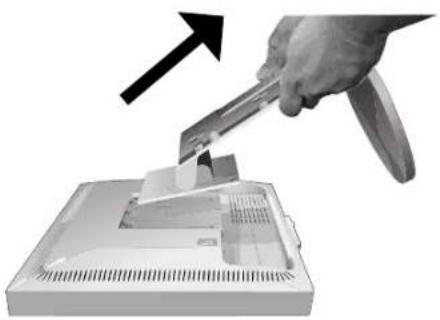

Figure M.4 Figure M.5
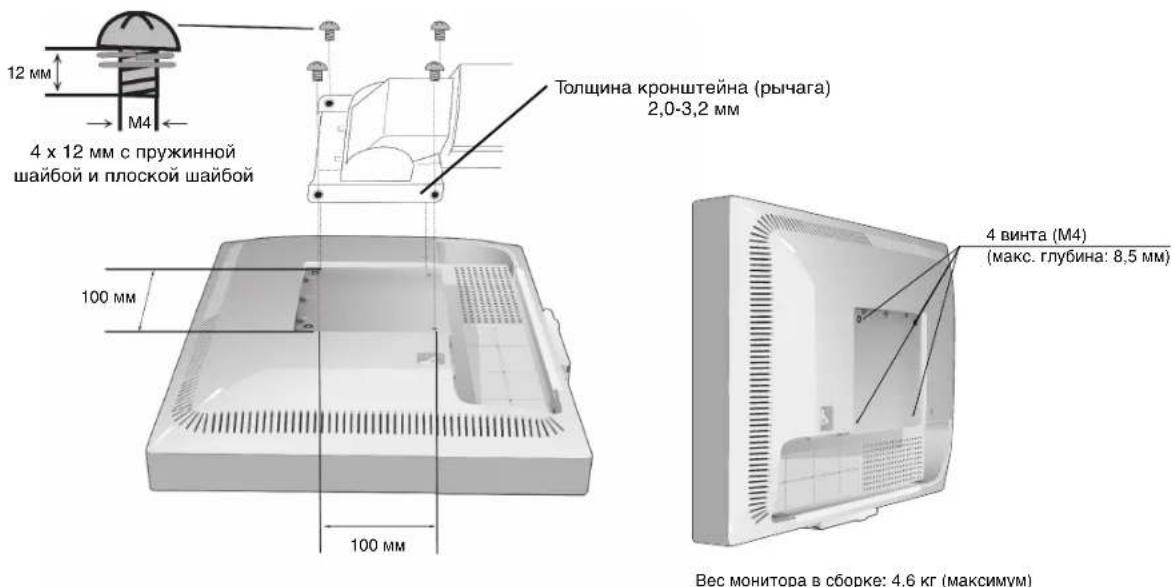
Flexible Arm Installation
This LCD monitor is designed for use with a flexible arm. To mount the monitor to a flexible arm:
- Follow the instructions on how Remove Monitor Stand for Mounting to remove the stand.
- Use the 4 screws to attach the arm to the monitor (Figure F.1).
NOTE: The LCD monitor should only be used with an approved arm (e.g. GS mark). To meet the safety requirements, the monitor must be mounted to an arm, which guarantees the necessary stability under consideration of the weight of the monitor.
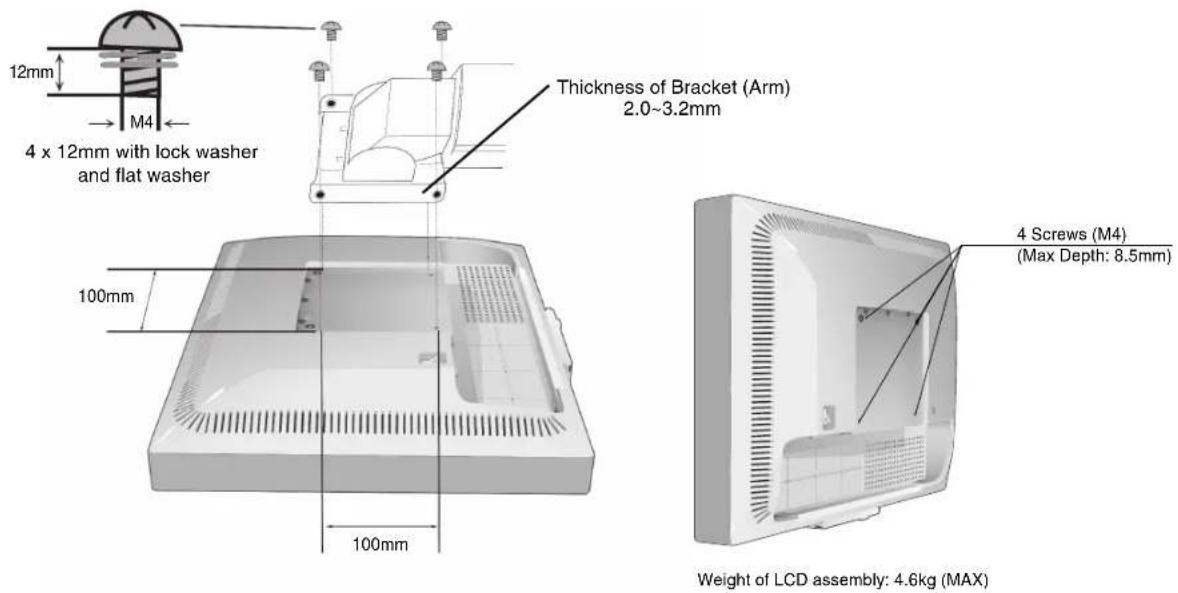
Figure F.1
Controls
OSM (On-Screen Manager) control buttons on the front of the monitor function as follows:
Toaccess OSM menu, press any of the control buttons (MENU/EXIT, Left, Right, Down, Up).
To change signal input, press the SELECT button.
Tochange DV MODE, press the RESET/DV MODE button.
NOTE: OSM must be closed in order to change signal input.

Button
Menu
MENU/EXIT
Open OSM main menu.
Exits the OSM controls.
Exits to the OSM main menu.
4-Direction-Key


RightLeft
Down
Left/Right
Moves the highlighted area left/right to select control menus.
Moves the bar left/right to increase or decrease the adjustment.
Direct adjust of brightness if HOT KEY is set to ON.
Enters the OSM menu if HOT KEY is set to OFF.
Down/Up
Moves the highlighted area down/up to select one of the controls.
Direct adjust of contrast if HOT KEY is set to ON.
Enters the OSM menu if HOT KEY is set to OFF.
SELECT/
Enter the OSM sub menu. Active the selected function.
1<-2RESET
Change the Input source.
RESET/DV MODE Resets the highlighted control menu to the factory setting. Switches the DV Mode.
NOTE: When RESET is pressed in the main and sub-menu, a warning window will appear allowing you to cancel the RESET function by pressing the MENU/EXIT button.

Brightness/Contrast Controls
BRIGHTNESS
Adjusts the overall image and background screen brightness.
CONTRAST
Adjusts the image brightness in relation to the background.
AUTO CONTRAST (Analog input only)
Adjusts the image displayed to optimal settings.
ADVANCED DV MODE
Activates the Advanced Dynamic Video Mode.
DV MODE
Dynamic Visual Mode allows you to select setting for Movie, Photo and etc.

Auto Adjust (Analog input only)
Automatically adjusts the Image Position, H. Size and Fine settings.

Image Controls (Analog input only)
LEFT / RIGHT
Controls Horizontal Image Position within the display area of the LCD.
DOWN / UP
Controls Vertical Image Position within the display area of the LCD.
H.SIZE
Adjusts the horizontal size by increasing or decreasing this setting.
FINE
Improves focus, clarity and image stability by increasing or decreasing this setting.

Colour Control System
Colour Control System: Six colour presets select the desired colour setting (sRGB and NATIVE colour presets are standard and cannot be changed).
R,G,B: Increases or decreases Red, Green or Blue colour depending upon which is selected. The change in colour will appear on screen and the direction (increase or decrease) will be shown by the bars.
NATIVE: Original colour presented by the LCD panel that is unadjustable.
sRGB: sRGB mode dramatically improves the colour fidelity in the desktop environment by a single standard RGB colour space. With this colour supported environment, the operator could easily and confidently communicate colour without further colour management overhead in the most common situations.
NOTE: When MOVIE, GAMING, or PHOTO is selected as the DV MODE, NATIVE is selected automatically as the six colour preset and cannot be changed.

Tools
SHARPNESS: Adjust the image to get distinct or as soft a picture as is preferred.
EXPANSION: Selects the zoom mode.
FULL: The image is expanded to 1680 × 1050 , regardless of the resolution.
ASPECT: The image is expanded without changing the aspect ratio.
OFF: The image is not expanded.
NOTE: EXPANSION is available only resolution under 1280 x 1024.
OFF TIMER: Monitor will automatically power-down when the end user has selected a predetermined amount of time.
LED BRIGHTNESS: You can adjust the Blue LED brightness.
HOT KEY: You can adjust the brightness and contrast directly. When this function is set to ON, you can adjust the brightness with left or right control and contrast with up or down control while the OSM menu is off.
INPUT RESOLUTION (Analog Input Only): Selects of resolution's priority of input signal to one pair of the following: 1360 x 768, 1680 x 1050 or 1280 x 768, 1400 x 1050.
1360 × 768, 1680 × 1050 : Determines the resolution to 1360 × 768 and 1680 × 1050 .
1280 × 768, 1400 × 1050 : Determines the resolution to 1280 × 768 and 1400 × 1050 .
DDC/CI: This function allows the DDC/CI function ON or OFF.
FACTORY PRESET: Selecting Factory Preset allows you to reset all OSM control settings back to the factory settings. The RESET button will need to be held down for several seconds to take effect. Individual settings can be reset by highlighting the control to be reset and pressing the RESET button.

Menu Tools
LANGUAGE: OSM control menus are available in eight languages.
OSM LEFT/RIGHT: You can choose where you would like the OSM control image to appear horizontally on your screen.
OSM DOWN/UP: You can choose where you would like the OSM control image to appear vertically on your screen.
OSM Turn Off: The OSM control menu will stay on as long as it is in use. In the OSM Turn Off submenu, you can select how long the monitor waits after the last touch of a button to shut off the OSM control menu.
OSM Lock Out: This control completely locks out access to all OSM control functions without Brightness and Contrast. When attempting to activate OSM controls while in the Lock Out mode, a screen will appear indicating the OSM controls are locked out. To activate the OSM Lock Out function, press SELECT, then right control button and hold down simultaneously. To deactivate the OSM Lock Out, press SELECT, then left control button and hold down simultaneously while in the OSM menu.
RESOLUTION NOTIFIER: This optimal resolution is 1680 × 1050 . If ON is selected, a message will appear on the screen after 30 seconds, notifying you that the resolution is not at 1680 × 1050 .
English-8

Information
The Information menu indicates the current input, display resolution, horizontal and vertical frequency, and polarity settings of the monitor. The model and serial numbers of your monitor are also indicated.
OSM Warning
OSM Warning menus disappear with Exit button.
NO SIGNAL: This function gives a warning when there is no Horizontal or Vertical Sync. After power is turned on or when there is a change of input signal, the No Signal window will appear.
RESOLUTION NOTIFIER: This function gives a warning of use with optimized resolution. After power is turned on or when there is a change of input signal or the video signal doesn't have proper resolution, the Resolution Notifier window will open. This function can be disabled in the Menu Tools.
OUT OF RANGE: When input signal is non-supported timing or the video signal doesn't have proper timing, the Out of Range menu will appear.
Recommended use
Safety Precautions and Maintenance

FOR OPTIMUM PERFORMANCE, PLEASE NOTE THE FOLLOWING WHEN SETTING UP AND USING THE MULTISYNC LCD COLOUR MONITOR:

DO NOT OPEN THE MONITOR. There are no user serviceable parts inside and opening or removing covers may expose you to dangerous shock hazards or other risks. Refer all servicing to qualified service personnel.
- Do not spill any liquids into the cabinet or use your monitor near water.
- Do not insert objects of any kind into the cabinet slots, as they may touch dangerous voltage points, which can be harmful or fatal or may cause electric shock, fire or equipment failure.
- Do not place any heavy objects on the power cord. Damage to the cord may cause shock or fire.
- Do not place this product on a sloping or unstable cart, stand or table, as the monitor may fall, causing serious damage to the monitor.
- Do not place any objects onto the monitor and do not use the monitor outdoors.
- The inside of the fluorescent tube located within the LCD monitor contains mercury. Please follow the bylaws or rules of your municipality to dispose of the tube properly.
- Do not bend power cord.
- Do not use monitor in high temperatured, humid, dusty, or oily areas.
- Do not cover vent on monitor.
Immediately unplug your monitor from the wall outlet and refer servicing to qualified service personnel under the following conditions:
- When the power supply cord or plug is damaged.
- If liquid has been spilled, or objects have fallen into the monitor.
- If the monitor has been exposed to rain or water.
- If the monitor has been dropped or the cabinet damaged.
- If the monitor does not operate normally by following operating instructions.
If glass is broken, handle with care.
If monitor or glass is broken, do not come in contact with the liquid crystal and handle with care.

- Allow adequate ventilation around the monitor so that heat can properly dissipate. Do not block ventilated openings or place the monitor near a radiator or other heat sources. Do not put anything on top of monitor.
- The power cable connector is the primary means of detaching the system from the power supply. The monitor should be installed close to a power outlet which is easily accessible.
-
Handle with care when transporting. Save packaging for transporting.
-
Image Persistence: Please be aware that LCD Technology may experience a phenomenon known as Image Persistence. Image Persistence occurs when a residual or "ghost" image of a previous image remains visible on the screen. Unlike CRT monitors, LCD monitors' image persistence is not permanent, but constant images being displayed for a long period of time should be avoided. To alleviate image persistence, turn off the monitor for as long as the previous image was displayed. For example, if an image was on the monitor for one hour and a residual image remains, the monitor should be turned off for one hour to erase the image.
NOTE: As with all personal display devices, NEC DISPLAY SOLUTIONS recommends displaying moving images and using a moving screen saver at regular intervals whenever the screen is idle or turning off the monitor when not in use.

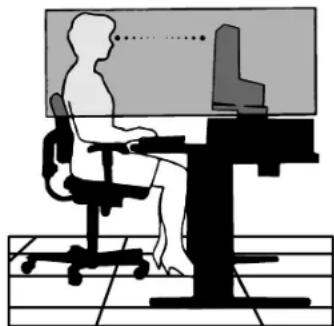
CORRECT PLACEMENT AND ADJUSTMENT OF THE MONITOR CAN REDUCE EYE, SHOULDER AND NECK FATIGUE. CHECK THE FOLLOWING WHEN YOU POSITION THE MONITOR:

- For optimum performance, allow 20 minutes for warm-up.
- Adjust the monitor height so that the top of the screen is at or slightly below eye level. Your eyes should look slightly downward when viewing the middle of the screen.
- Position your monitor no closer than 40~cm and no further away than 70~cm from your eyes. The optimal distance is 50~cm .
- Rest your eyes periodically by focusing on an object at least 20 feet away. Blink often.
- Position the monitor at a 90^ angle to windows and other light sources to minimize glare and reflections. Adjust the monitor tilt so that ceiling lights do not reflect on your screen.
- If reflected light makes it hard for you to see your screen, use an anti-glare filter.
- Adjust the monitor's brightness and contrast controls to enhance readability.
- Use a document holder placed close to the screen.
- Position whatever you are looking at most of the time (the screen or reference material) directly in front of you to minimize turning your head while you are typing.
- Avoid displaying fixed patterns on the monitor for long periods of time to avoid image persistence (after-image effects).
Get regular eye checkups.
Ergonomics
Torelize the maximum ergonomics benefits, we recommend the following:
- Use the preset Size and Position controls with standard signals.
- Use the preset Colour Setting.
- Use non-interlaced signals with a vertical refresh rate between 60-75 Hz.
- Do not use primary colour blue on a dark background, as it is difficult to see and may produce eye fatigue to insufficient contrast.
Cleaning the LCD Panel
Recommended cleaning of the LCD:
- T o remove dust and dirt from the surface of the LCD panel, wipe gently with a soft cloth.
- Do not rub the LCD panel with rough material.
- Do not press on the surface of the LCD panel.
To avoid scratches
- Do not touch LCD panel with hard objects.
- Use only a soft cloth for cleaning the surface of the LCD panel.
To avoid stains
Clean fingerprints, water drips, chemical spills and etc. from the LCD panel immediately or discoloration and spot will occur.
If the LCD panel is rubbed with too much force, cracking may occur, which will lead to abnormalities in the display.
To avoid breakage or screen trouble
- Do not push hard on the LCD panel surface.
- Do not set heavy objects on the LCD panel surface.
- Do not leave the LCD panel under constant pressure.
Cleaning the Cabinet
- Unplug the power supply.
- Use a soft cloth.
-ampen the cloth with a mild detergent mixed with water, wipe the cabinet and dry with a soft cloth.
NOTE: Many plastics are used on the cabinet surface. DO NOT clean with benzene, alkaline detergent, alcoholic system detergent, glass cleaner, wax, polish cleaner, soap powder or insecticide. Do not touch the cabinet with rubber or vinyl for a prolonged period. These types of fluids and fabrics can cause the paint to deteriorate, crack or peel.


VAROVÁNÍ

CHRANTE ZARIZENI PRD DESTEM A VLHKEM. ZABRANITE TAK NEBEZPECI POZARU NEBO URAZU ELEKTRICKYM PRODEM. POLARIZOVANOU ZASTCKU JEDNOTKY NEPOUZIVEJTE VE SPOJENI SE ZASUVKOU PRODLUZOVACI SNURY NEBO JINYMI ZASUVKAMI, POKUD KOLIKY NELZE ZCELA ZASUNOUT.
UVNTR ZARIZENI SE NACHAZI VYSOKONAPETOV KOMPONENTY, PROTO SKRIN NEOTEVIREJTE. SERVIS SVERTE KVALIFIKOVANE OSOBE.

UPOZORNENI

UPOZORNENI: PRO SNIZENI RIZIKA URAZU ELEKTRICKYM PROUDEM ZKONTROLUJTE, ZDA JE NAPAJECI SNURA ODPOJENA ZE ZASUVKY. PRO UPLNE ODPOJENI ZDROJE NAPAJENI OD JEDNOTKY ODPOJTE NAPAJECI SNURU Z ELEKTRICKE ZASUVKY (NEOSTRANUITE KRYT). UVNITR SE NENACHAZEJI DILY, DO KTERYCH UZIVATEL MUZE ZASAHOVAT. SERVIS SVERTE KVALIFIKOVANE OSOBE.

NEC Display Solutions, Ltd. 4-13-23, Shibaura,
Minato-Ku
Tokyo 108-0023, Japan

TUV Rheinland Product Safety
ISO 13406-2

NEC Display Solutions, Ltd.
4-13-23, Shibaura,
Minato-Ku
Tokyo 108-0023, Japan

Rheinland Product Safe
ISO 13406-2

Odyia Tou Eupwaikou Suouaiou 89/336/EOK:
-EN55022
-EN61000-3-2
-EN61000-3-3
-EN55024
NEC Display Solutions, Ltd.
4-13-23, Shibaura,
Minato-Ku
Tokyo 108-0023, Iantovia

H. SIZE (OPIZONTIO MEGEOOS)
Mnopeite va puθμioεTe to oipογοντι μèyεθoc auéavovotac n μεiδovovtac tvuţn autnc tcns pθuiαns.
FINE (MIKPOPYOMIzH)
Mnopeite va Tnv EOTiaon, Tnv Eukpiveia kai Tn OtaepoTnta Tnc Eikovac auXavovTac n eivovotac Tnv Tmu autnc Tnc puOuionc.

KaBapipoos Tns Obovnc LCD
PnpoTeivOeVocKaaipiaoCtnc oovc LCD:
Tia va aqapoeote nokovn ka n npwmu ano nvy eniipaveia nts oovnc LCD, okauniote ana lae eva maakouqa.
Mny tpiBTe TnV oOvN LCD e Oknpa UlaKa.
Mny nizcE T N V enipdvaeia Tc oovn LCD.
Tia va anopuyeteypatouoviec
MnvyicTe nV oOvN LCD kAnpa uAka.
XpnoiopoouoTe movo eva maakoo upaogya ia tov kaqapioo tns oovn LCD.
Directiva 89/336/CEE:
-EN55022
-EN61000-3-2
- EN 61000-3-3
-EN55024
y lve la marca

NEC Display Solutions, Ltd.
4-13-23, Shibaura,
Minato-Ku
Tokyo 108-0023, Japon
ISO 13406-2

NEC Display Solutions, Ltd.
4-13-23, Shibaura, Minato-Ku
Tokyo 108-0023, Japan

ISO 13406-2

Figure A.1 Figure B.1

Figure A.2
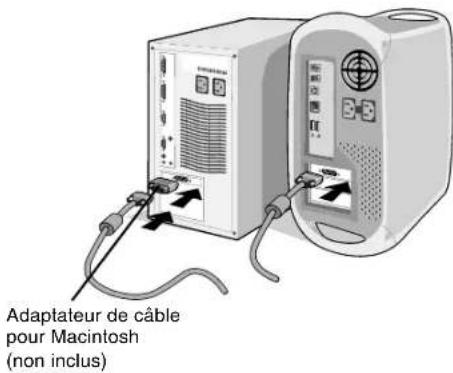
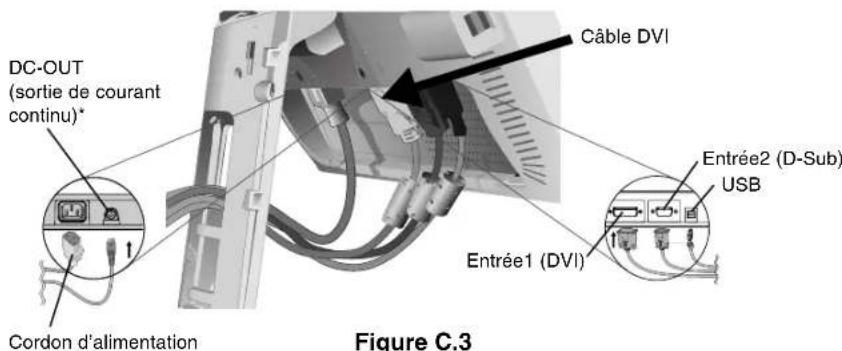
Figure C.1 Figure C.2
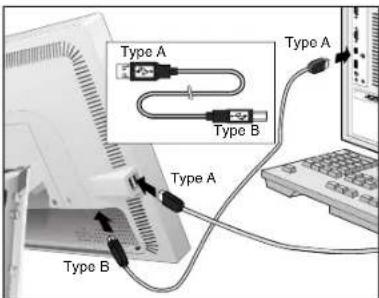
Figure C.3a
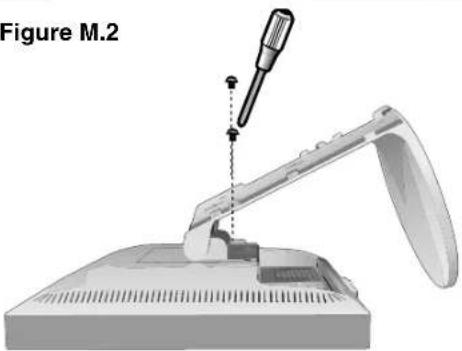
Figure M.1 Figure M.2
Figure M.3
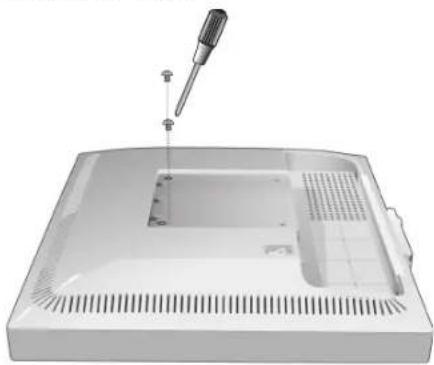
Figure M.4 Figure M.5
Installation du bras flexible
NEC Display Solutions, Ltd.
4-13-23, Shibaura,
Minato-Ku
overeenstemming is met
NEC Display Solutions, Ltd.
4-13-23, Shibaura,
Minato-Ku
Tokyo 108-0023, Japan

ISO 13406-2

Brightness/Contrast Controls (Helderheid/contrast)
BRIGHTNESS (Helderheid)
NEC Display Solutions, Ltd.
4-13-23, Shibaura,
Minato-Ku
Tokyo 108-0023, Japonia

ISO 13406-2

DOWN/UP (POZYCJA PIONOWA)
NEC Display Solutions, Ltd.
4-13-23, Shibaura,
Minato-Ku
Tokyo 108-0023, Japan

BZ02

Windows - 3TO 3apeHCTpnpoBAHHb TOBapHBn 3hak Microsoft Corporation. NEC - 3apeHCTpnpoBAHHb TOBapHBn 3hak NEC Corporation. ENEGY STAR - 3TO 3apeHCTpnpoBAHHb B CUSA TOBAPHBn 3hak.
OmniColor ABnreTc 3apeHrcTpnpoBaHHbIM ToaBpHbIM 3HaKOM NEC Display Solutions Europe GmbB ctpaHax EC n UBeuapnn.
ErgoDesign 3apeHCTaepnOBAHHbIM TOBapHbIM 3hakOM NEC Display Solutions, Ltd. B AbcTpM, ctpaHax BeHNIIOKc, DaHm, PhaHm, FepMaHm, HTaHm, HopBerHm, UcaHm, WeeHm, BeNko6pTaHm.
NaViSet ABnEeTcT Toprobim 3hakom NEC Display Solutions Europe GmbH B cTpaHax EC n WBeuapm.
MultiSync ABnTc3 aperntpobHbIM ToBapbIM 3hakOM KopnpaUN NEC Display Solutions, Ltd. B EInko6puTahm, Vtaun, AbcTnn, HndepnaHdx, Wbeuapun, Wbeuun, NcaHm, DaHm, TepMaHm, HopBerHn N PnHnAHN.
Bce octaIbHbIe MapKn HaaBaHnIPOyKTOB RABJHOCTc TOBaPbIMN 3HaKaAMn IIN 3apeRtnpoBaHbIMN TOBAPbIMN 3HaKaAMN COOTBeTCTBYUHX BnaJeBueB. ByDyuN npTHePOM nporpAmMbI ENERGY STAR, NEC Display Solutions of America, Inc., TTo 3TOT npOyKT COOTBeTCTByeI dpeKTHBam nporpAmMbI ENERGY STAR B OTHoWeHm 3ΦΦeKTHBOCTn INIOJIb3OBaHUN 3HEpTN. 3M6JIema ENERGY STAR HE O3HaAet Odo6peHne EPA KAKORo-JIn60 npOyKTA nIN yCJYn.
Pycckn-1
Copepkmoe
B yanaKoOuHn Kopo6ke* HOBOr MoHITopa NEC MultiSync LCD dOnJxHO 6bIb cneDuOoe:
- MoHITop MultiSync 20Gx² Pro c noDCTaBKOДЯpeRyIINPOBKn HAKIOHa I NOBOPoTa
Ka6eJIb nHTaHnR
Ka6eIbBnDeocnHana(15-7TbipbKObMmH-pa3bEmD-SUB-15-7TbipbKObMmH-pa3bEmD-SUB)
Ka6eBbBnDeocnHaJa (DVI-D K DVI-D)
Ka6eJb USB
-PykoBOJCTBO NOIb3OBaTeNa
KpbIwkaKa6eHa
CD ROM (coepkaunn noHoe pykoBOcTBo noIb3ObaTeJn B opMaTe PDF). Ipa npoCMOTpa pykoBOcTbna noIb3ObaTeJn Heo6xoJnMo, YTo6bHa PIK 6bJa ycTaHOBJeHa nporpamma Acrobat Reader 4.0.
PykoobocBo nIb3oBateHa 15-ItbipkOBbMmH-pa3bEmD-SUB -15-ItbipkOBbMmH-pa3bEmD-SUB
KpaTkoe pykoBODCTBO NO haay pa60TbI
YTO6bI NOJKNIOHTb KK-MOHITop MultiSync K cnCTeme, BblNOJIHnTe cneJeouune DeiCTBna:
1.OTKnIOHTe NHTaHHe KOMNbIOTepa.
2.ДЯ KMNbIOTepa PC nH Macintosh c uHpOBbIM BbxOdom DVI: NOKIOHTe Ka6Bb BNDeocnHaJa DV I K pa3bemy nAaTb BNDeoAaNTepa B KOMNbIOTpe (PcyHok A.1). 3aTHNtE BCE BNHTbl.
DЯ KOMNbIOTepa PC c aHaNoRObbIM BbxOdom: NOKIOHTe 15-WtbpKOBbM MNH-pa3bEm Ka6eBA BNDeocnHaJa D-SUB K pa3bemy nAaTb BNDeoAaNTepa B KOMNbIOTpe (PcyHok A.2). 3aTHNtE BCE BNHTbl.
DЯ KOMNbIOTepa Macintosh: NOKIOHTe Ka6eBc aAdanTepom dH Macintosh k p3bemy Ha KOMNbIOTepe, 3aTEM NOcOeHNHe Ka6eBb BNDeocnHaJa C 15-WtbpKOBbM MNH-pa3bEmOM D-SUB K Ka6eHo c aAdanTepom dH Macintosh (PcyHok B.1). 3aTHNtE BCE BNHTbl.
KaebbBndeocnHaDvI
PucyHok A.1 PucyHok B.1
PncyHok A.2
AanTepKa6eNa
dna Macintosh
(He BXOJNT B KOMNNEKT)
PIMMEAHNE. Hekotobix KOMbIepeoB Macintosh Ka6ebc aadantepom He Tpebyetca.
- CHIMITE Kpbiikky OTCeKa pa3beMOB (PncyHok C.1).
4.Bo3bMnTe MOHITOp C DByX CTOpOH u yCTaHOBIne XK-naHeN B nNoOKeHne C yTlOM HaKnloHa 30 rpaDycOB (PncyHOK C.2). - Пдкючite BCE ka6eHn K COOTBcTByUOuM pa3bEmAM (PucyHOK C.3). C nomoubko Ka6eIa USB noKIOHHTpe pa3bEM TnA B K BXoHOMy npTy USB c npBaOoi CTopoHb MOHITopa, a pa3bem TnA A - K BbIXoHOMy npTy KOMNbIoTepa (PucyHOK C.3a). Ecnn npImeHReTc Ka6eIb OT yCTpOiCTBa USB, nCnoNb3yIte OINH N3 BbIXoHbIX NOPTOB Ha 60KOBo NaHEn MoHITopa.

PncyHOK C.1 PncyHOK C.2
KaBeJIb NITAHIN
PncyHcK C.3a
PucyHok C.3
PIO kIIOHHe IONIHHTbHbX yCTPOcTB NEC. He nObn3ynte 3OT pa3bem 6e3 COOTBETCTBYIOx yKa3AHn.
Pycckn-3
- YcTaHOBnTe KpbIuKy OTeKa pa3bEmoB Ha 3aDnIO UacTb Kopnyca (PncyHOK C.4).
- NomeCTIte BCE Ka6eBn B Ka6eBhBie KaHaBb (PncyHok C.5).
8.Bo3bMnTe MOHHTOp C DByx CTOpOH N OBePnTe KK-naHeNb Ha3aB N NoOKeHne C yrIOM HAKNoHa 5 rpaIycOB (PcyHOK C.6).

PucyHOK C.4 PucyHOK C.5
- YcTaHOBnTe KpbIbKy Ka6eBbHorO OTceKa Ha NoCTaBky (PcyHOK C.6). YTObbl CHrTb KpbIbKy Ka6eBbHOrO OTceKa, HAdaBnTe Ha BbEMKy BHN3y KpbIbKn (No HAnpaBHeNtIO BBepx), YTObbl OTCoEINHnTB KpbIbKy OT noCTaBKn (PcyHOK C.7).
PucyHOK C.6 PucyHOK C.7
10.Подклioчnte Ka6eь nIraHnK po3eTke 3neKtpoIraHn (PncyHok D.1).
PIMMEAHNE. TTo6bl npabnBHO noo6paTb Ka6elb nTuHnepMeHHoro ToKa, cm. pa3den BHMaHne daHHoro pykoBoDCTBa.
- BbIKIOHateBc o6paTHO CTOpHO MOHTOPa DOJKeH 6bITb BKIOUeH (PcyHOK D.1). BKIOUHTe MOHTOP c NOMOIOH KhoNn nIiTaHn Ha nepeDHe naHeH n KOMNbIoTeP.
PIMMEAHNE. BbIKIOaTeB bKIOaET NOTAHNE. EcN 3TOB bIKIOaTeB hAXOHTCB NONOKEHIN BblI., TO MOHITOP HeB3A BKIOaHTB C NOMOUB KHOKN Ha nepeDne NaHNI. HE CJIEDYET qacto nepeKIOaTb 3TOT BbIKIOaTeB.
12.Функцибесконтakthon Habtpoikn No-Touch Auto Adjust abTomatueckn yctaHabnBaet ONtmaNbHbIe napameTpby npi nepBOHaaybHOH HactpoKe MOHTopa, BKJIQUy a60nbHnCTBO napameTpOB cHxpoH3aUN.ДЯ daNBHeuXHactpoEK nCNoB3yIte CneDyUOuNE napameTpbl 3KpaHnO MeHIO:
- Auto Adjust Contrast (ABTomatuecka Hactpoika KOHTpacta) (Tolbko analorobbi BXOD)
- Auto Adjust (Агтонастора) (Толбко саналоговы BXOD)
IOnHoe OINcAHne 3Tnx npaMeTpOB 3KpaHHOro MeHO CM. B pa3dene OpraHbI ynpabJeHn DaHHoro PykoBocTaBa nOlb30BaTeHa.
PIMMEUHNE. B cnuyae kaknx-n6o Henoiaok o6paatae b K pa3dny Yctpaehne HncnpaBHOte TaHHoro PykoOIOCTBa nonb30BaTeHa.
PucyHok D.1
Pycckn-4
HaKIoH n BpaSeHne
YcTaHOBtHe Oe6xOuMbI HAcJIoN 3KpaHa MOHITOpa, npUepKINBaER oR pyKaMn C 06eX CTOpOH (PncyHOK TS.1).
PIMMEUAHNE. Co6HIOaIe OCToPOXHOcTb npn HAcNOHe IN BpaueHIN 3KpHa.
PucyHok TS.1
OTcoeDInHeHne NODCTaBKn MOHTopa nepeyctaHOBKOJ
YTO6bI NOIROTOBHT MOHITOP K yCTaHOBKe B DpyROM NIOJOXeHN:
- Bo3bMITE MOHITOP C DByx CTOpOH u yCTaHOBtE KK-naHb B nONoXeHne C yrIOM HAKNoHa 5 rpaDycoB. CHIMTE KpbIuKy Ka6eIbHorO OTcKa (PncyHok M.1).
CHIMMTE KpbIky OTeKa pa3bEmOB (PcyHok M.2). - OToeHNHTe Bce Ka6eN.
- ПОДЖИТЕ монитор крахов Винз на поевхонь, кOTOPАг He noцapanaeТ кран (Pсунок М.3).
- OTBepHnTe 2 BepxHnx BNHTa, c NMOOuIbIO KOTOpbIX MOHITOP KpeINrTcK NOCTabKe (PucyHok M.3).

PncyHOK M.1 PncyHOK M.2
PucyHok M.3
Pycckn-5
- NODHMNTe NOCTaBky, YTO6bI OHa BblnA IN3 BEPHNX Na3OB, IN CHMNTe ee (PncyHOK M.4).
- OTBepHnTe 2 BnHTa B BepxHei Yactn MOHITopa (PncyHok M.5) Tenepb MOHITOP rTOB K yCTaHOBKe B dpyrom noIOXeHN.
7NoKJIIOHnTe Ka6eI N yCTaHOBnTe KpbIuKy OTEcKa pa3bEmOB Ha 3aAnIO nHeJb MoHITopa.
8. Yto6bI cHOba ycTaHOBnTb NOCTaBky, NOBtOpNTe BcH npOeDpy B o6paTHOM npAJaKe.
PIMMEAHNE. Ipynne nCIOB3yEmble NOCTABKn IIN KPOHHTeHNb DOXHBc COOTBeTCTBOBaTb CTaHdapTy VESA. Co6NdoaTe OCTOPOXHOCTb npn CHrTN NODCTABKn.

PncyHok M.4 PncyHok M.5
YcTaHOBka Ha NOdBnKhbI KPOHtTeH
JaHHbIKK-MOHHTOPMOXeT6bIbYCTAHOBENHaNoDBNXHbIKPOHHTeH.HTo6blcTAHOBHTbMOHHTOpHaKPOHHTeH:
- YTO6bI CHaTb NOCTABKy, BbINONHInTe DeiCTBnA, ONuCAHHbE B pa3dene "OTcoeHNHeHne NODCTaBKn MOHTopa nepeD yCTaHOBkoN".
- PpKpeHnTe KPOHtEHH KMOHtOpC NOMOuBIO 4 BHTOB (PucyHOK F1).
IPNMEUHNE. K-MOHITOP cIeMyET IcONb3OBaTb TOnbKO C npEHa3HaueHHbIM dINr Hrero KPOHHTeHOM (HaHPmep, cTAnapTa GS).B eJnx CO6JIoDEHn IpaBn 6eOanacHOCTn MOHTOP cIeMyET yCTaHABNbBaTb Ha KPOHHTeHe, o6ecneuBAIOeM Heo6xOdmyO yCTOuBOCTb C yETOM BECA MOHTOpa.
Pucyok F.1
OprahbI ynpaBJeHnA
KhoNkynpaBJIeHn3KpaHHoro MeHIO Ha nepeDHe NaneHmOHTopa BbINOJHrOT cIeDyUoUne fYHKcM:
YTo6bBouTnB3KpaHHeMeHO,HaXMTeIIO6yIO N3 KhoNOK ynpaBHeHn(MENU/EXIT,BneBO,BnpaBO,BBePx,Bn3). YTo6bBn3MeHnTB TIN BxOJHO CnHaHa,HaXMTe KhONky SELECT (BblOP). IINr Bb6opa DV MODE (PEXIM DV) HaXMTe KhoNky“RESET/DV MODE”(CEPOC/PEXIM DV).
PIMMEUAHNE. UTo6bI n3MeHnT b TIN BxOdHOro CnHaHa, Heo6xoDIMO 3aKpbItb 3KpaHHoe MeHIO.
SELECT/1--2 RESET/DV MODE
Khonka
MEUN/EXIT (MEHIO/BbIXO)
Yetbipexno3nUHna HABIRaUHOHa KaONKa
MehIO
BoiDteB rnaHoe 3KpaHoe MeHIO. BixoN u3 MeHIO HactpoiKn npametpoB. BixoN B rnaHoe 3KpaHoe MeHIO.
Bnpabo

BJeBoBepx
Bn3
BneBo/BnpaBO
IpeMeueHHe BbIeHnO bIaCTn BBeBO/BnpaO dIy BbIopa OndHO n3 npaMeTPOB MeHIO. IpeMeueHHe NIOcBt HNdkaTopa BBeBO/BnpaO dIy yBeJIuHEnr IIN yMeHbUeHn 3HaueHn HAcTPOKn. HAcTPOka JPKoCTn HApamYIO, ecNI FyHKUNA "TOPRAJ KJIABUNA" BKIOueHa (BKl.). BxOD B3KpaHHOe MeHIO, ecNI FyHKUNA "TOPRAJ KJIABUNA" BblKIOueHa (BblKI.).
Bm3/BBepx
IpeMeueHHe BbIeHNo 6bIacTn Bn3/BBepx dnn BbIbopa Ondoro n3 napaMeTpOB. HAcToPka KOHTpaCTa HanpMyIO, eCNI FyHKUIN "TOPAAR KJIABUNUA" BKIOueHa (BKJ). BxOd B3kpanHoE MeHO, eCNI FyHKUIN "TOPAAR KJIABUNUA" BblKIOueHa (BblKl.).
SELECT/
1<>2RESET
BxO B NOMeHIO 3KpaHHoro MeHIO. BKIOueHne BbIbpaHHo fYHKcIMN.
ImMeHHe NCTOCHNA BxoDHO CnHaJa.
RESET/DV MODE
Bo3BpaT BbIeHnHO npaMeTp a K 3NaueHIO, ycTaHOBneHHOMy Ha 3aBOJe. IpeKJIoueHne B peKIM DV.
IPIMUEAHNE. Ipn HaxaTIN KhoNk REsT (C5POC) B rnaBHom MeHIO INI NODMeHIO NOBnEeTc npedynpeXdaOooce coo6ueHne, KOtOpoe n03BOJareT OTMeHnTB fynKcHIO c6poca HaxaTHe MKNKn MENU/EXIT (MEHIO/BblxOД).

HactpoikKa npKoctn/KOHtpacta
APKOCTb
HactpoikKa o6eJ npKocTn n3o6paXeHnI n foHa 3kpaHa.
KOHTPACT
HactpoikKa npKocn n306paXeHHIO OTHOWeHHIO KfoHy.
ABTOKOHTPACT (ToIbko aHaIorOboBn BXoD)
ABTomatuecka HactponKa ONTImaIbHbIX npaMeTpOB n3O6paXeHn.
PACU. PEX. DV MODE
PacunpeHHbI pexKIM dHaMnHoro n3o6paKeHra.
PEKIM DV
Pekm DnKyuOeroc n3o6paXeHn (DV) no3BOnaTe BbIbnpaTb HacTpOKn dI npocMOTpa foTOpTaΦn, BnEo n T.

ABTOHAcTpoKa (ToIbKO aHaJIOrObBi BXoD)
AToMaTuYeCKaHacTpoKa npaMeTpOBn3o6paXeHHa:NoLoXeHHa,pa3Mepa no rOpu3OHTaUN uTeKocTN.
Pycckn-7

IapameTpbl noJoxeHn H3o6paXeHn (Tolbko aHaIorOBbB BXOD) BJIeBO/BnPABO
PerynpyetcnooxeHne n3o6paXeHnHa 3KpAe KK-MOHHTopa no ropn3OHTaI.
BHN3/BBEPX
PerynpyetcnoIooKeHne I3o6paKeHnHa 3KpaHe KK-MoHntOpa no BepTnKaJI.
IIO TOPN3OHTAJIN
YMeHbSeHHnEM nIyBEnuHeHem 3HaueHnR 3TOro napaMeTp apeynpyeTc pa3Mep n3o6paKeHn no roPn3OHTan.
TOUHO
YBeHHeHem HnI yMeHbSeHem 3Haehn 3TOro npaMetpa perynpyetc fokycnpobka, YETKocb n yctOuHBOCTb N306paxeHn.

CnCTembl perylnpOBKn CBeTa
CnCTemblpernylnpOBNuBETa:C nOMoUbIO uectn 3aDaHHbIX HabOpOB napameTpOB MOKHO Bb6paTb NOxOyHIO HAcTPOky UBeTOBOrO 6aHaHCA (3aDaHHbIe naINTpby UBeToB sRBG INCXODHbI ABJIOTc CTAHApTHbIMN He MOYr 6bIT bMHeHbI).
R,G,B:YBeJIyHeHne IIN yMeHbWeHne 1eTeOBbIX COCTABNIOUXX (Kpachoro,3eNEHO rN CnHrO), npn BbIbope COOTBETCTBYUoEro UeBaTBA. BHOCIMbIE N3MeHEnH OTO6paKaIOTC HENOCpeDCTBeHHo Ha 3KpaHe, a HAnpaBLeHne (B CTOPOHy YBeJIyHeHn IIN yMeHbWeHn) NOKa3aHO C NOMOuBIO NOLOcb INHdkaTopa.
NCXOHNHbI: NcXoHbI cBeTOB0 6aJAnaC, npdctabHeHHbHa KK-naHnK, KOtOpb HEnb3peynpoBaTb.
sRGB: Pexim sRGB KapinHaBno ynyuAet ToHocTb nepeaun CBeta Ha pa6oem CTone, 6nraodapnCnObn30BaHIO eINHoro cTaHApTHoro UBETOBOR npoctpaHCTBa RGB. C nOMouho 3Toi cpdeI noDnepKKnUBeta onepato MPKeJ NERKO uYbepeHNO 3aDaBaTB CBETOBOI 6aAnaHC, He TpaTAnonHHTeNbix ycNIM Ha daJIbHeMuyo HAcTPOky CBeta, B O6bUHbIX yCNoBnx 3KcnnyatauM.
PIMMEUHNE. PnBbIope npaMeTPOB "BNIEO, "ITPA nIN "FOTO" INPEKIMA DV npaMeTp cBeTOBOI npoctpaHCTBa "NCXODHBI" BbIbpaETcABTOMaTHeCKN H He MoKet 6bIb N3MeHeH.

HctpymeHtbl
PE3KOCtB: N03BOJnE HAcTpOHTb N3o6paXeHHe - cIeNaTb erO 60nee pe3KIM nI IN crJaXeHHbIM.
PACUINPEHNE: Bb6oppeXmua yBeJIuueHnI3O6paKeHnA.
I0H.: I3o6paJxHe HeBnHbAeTcdo pa3mepa 1680 x 1050 He3aBnMo OT pa3peuHn.
4To6bln36exatb noBHeHn nATEH
- HeMeIeHHO ydaJIaIte c KK-naHeI KaJIb BObl, XmMHeCKNX BeIecTB n T.I., KOToPbIE MOrYT NOBNeYb 3a co60n BO3HNIKHOBEHne PAnTeH n OBeCuBeYBaHne.
He Tpnte KK-naHEnb CnIuKOM CnIbHO, TaK KaK 3To MoKET npUBeCTN K NOABJIeHNIO TpeunH N IOBpeXKeHInO 3KpaHa.
Yro6bI n36eKaTb TpeuH n NOBpeKdEHH 3kpaHa
- Henb3a daBntb cNtukom cnJbHO ha nobepxhoctb XXNaHeHn.
- Henb3r CTaBt b TKeIbe npedMeTb Ha nobepxHocTb KK-naHeHn.
- HeIb3a IONYcKaTb IINTeJIbHOrO HaxoXJdeHnR JK-nAneHnI nO harpy3koJ.
Kopnya
- OTKJIHOHTe MOHHTOP OT NCTOCHNA nITaHRA.
-ДячсTKKoprnyca nCNoB3yTe MArKyIO TkaHb. - CMOHTe TkaHb CnaBbIM BODHbIM pAcTBOpOM MOIOJero cpeICTBa, IpoTpITe KOpNyc, 3aTeM npn NOMOUI MRAKoi TKAHN BblPTe erO Hacyxo.
IINPIMEAHHE. INH3ROBHeHH NOBepxHOCTn KOpNyCa HcNoJIb3yOTcPa3NmUHbIE BnDbI INaCTMaCC. HEJIb3I NCNOJ3OBaTb DnHcTKn KOpNyCa 6eHN3H, 7eNoUHbIE n CnIrpTOCoDEpXaUHe MIOUHne cpeCTBa, ONUCTHTEN DnH CTekOJI, BOCK, NOnIpON, CTnpAJIbHbIE NPOoWKn INHCEKTHuDbl. HeJIb3r DOnyCKaTb DInTeJIbHO rCpNIKOCHOBeHH pe3HOBbIX INBnBnHObIX NOBepxHOCTe C KOpNcOM. IpeueNCJIeHHBe JIKIDKOCTH mATEpNAJIbMOrY T Bbl3BaTb NOBpeXdHe, OTcLnBaHne INI paCTpeCKNBaHne Kpackn.


DIKKAT

YANGIN VE SOK TEHLIKELERINI ONLEMEK I CIN CIHAZ YAGMUR YA DA NEME MARUZ KALMAMALIDIR. AYRICA BU CIHAZIN POLARIZE FI SI NI UCLAR TAM OTURMADI G SURECE BIR UZATMA KABLOSU YA DA BA SKA PRIZLERDE KULLANMAYIN.
ICERISINDE YUKSEK VOLTAJI BILESENLER BULUNDUGU IcIN KASAYI AÇMAKTAN KACININ SERVIS IcIN YETKILI SERVIS PERSONELINE BASVURUN.

UYARI

UYARI: ELEKTRIK SOKU RISKINI AZALTMAK IÇIN, GÜç KABLOSUNUN PRIZDEN ÇEKİLDIGINDEN EMIN OLUN. BIRIME GIDEN GUCUN TAMAMEN KESİLDIGINDEN EMIN OLMAK IÇIN, LUTFEN GÜç KABLOSUNU AC PRIZİNDEN ÇEKİN. KAPAGI (VEYA ARKASINI) AÇMAYIN. IÇ KISIMDA KULLANICININ ILGILENEBILECEGE HERHANGI BIR PARÇA BULUNMAMAKTADIR. SERVIS IÇIN YETKI LI SERVIS PERSONELINE BASVURUN.

NEC Display Solutions, Ltd.
4-13-23. Shibaura.
Minato-Ku
Tokyo 108-0023, Japonya

Windows, Microsoft Corporation'in kayitll ticari markasdir. NEC, NEC Corporation'in kayitll ticari markasdir. ENERGY STAR A.B.D kayitll ticari markadir.


- Canadian Department of Communications Compliance Statement
- FCC Information
- Declaration of Conformity
- TcODevelopment
- Congratulations!
- Ergonomics
- Energy
- Emissions
- Ecology
- TCO Development
- Manufacturer's Recycling and Energy Information
- Disposing of your old NEC product
- Energy Saving
- WEEE Mark (European Directive 2002/96/EC)
- Within the European Union
- Outside the European Union
- Chinese RoHS-information relevant for Chinese market
- CAUTION
- Caution:
- Declaration
- Declaration of the Manufacturer
- Contents
- Quick Start
- English-3
- Tilt and Swivel
- Remove Monitor Stand for Mounting
- Flexible Arm Installation
- Controls
- OSM (On-Screen Manager) control buttons on the front of the monitor function as follows:
- Button
- Menu
- MENU/EXIT
- 4-Direction-Key
- Left/Right
- Down/Up
- SELECT/
- 1<-2RESET
- Brightness/Contrast Controls
- BRIGHTNESS
- CONTRAST
- AUTO CONTRAST (Analog input only)
- ADVANCED DV MODE
- DV MODE
- Auto Adjust (Analog input only)
- Image Controls (Analog input only)
- Colour Control System
- Tools
- Menu Tools
- English-8
- Information
- OSM Warning
- Recommended use
- FOR OPTIMUM PERFORMANCE, PLEASE NOTE THE FOLLOWING WHEN SETTING UP AND USING THE MULTISYNC LCD COLOUR MONITOR:
- CORRECT PLACEMENT AND ADJUSTMENT OF THE MONITOR CAN REDUCE EYE, SHOULDER AND NECK FATIGUE. CHECK THE FOLLOWING WHEN YOU POSITION THE MONITOR:
- Cleaning the LCD Panel
- To avoid scratches
- To avoid stains
- To avoid breakage or screen trouble
- Cleaning the Cabinet
- VAROVÁNÍ
- UPOZORNENI
- SIZE (OPIZONTIO MEGEOOS)
- FINE (MIKPOPYOMIzH)
- KaBapipoos Tns Obovnc LCD
- Tia va anopuyeteypatouoviec
- Installation du bras flexible
- Brightness/Contrast Controls (Helderheid/contrast)
- BRIGHTNESS (Helderheid)
- DOWN/UP (POZYCJA PIONOWA)
- Pycckn-1
- Copepkmoe
- KpaTkoe pykoBODCTBO NO haay pa60TbI
- HaKIoH n BpaSeHne
- OTcoeDInHeHne NODCTaBKn MOHTopa nepeyctaHOBKOJ
- YcTaHOBka Ha NOdBnKhbI KPOHtTeH
- OprahbI ynpaBJeHnA
- KhoNkynpaBJIeHn3KpaHHoro MeHIO Ha nepeDHe NaneHmOHTopa BbINOJHrOT cIeDyUoUne fYHKcM:
- SELECT/1--2 RESET/DV MODE
- Khonka
- MEUN/EXIT (MEHIO/BbIXO)
- Yetbipexno3nUHna HABIRaUHOHa KaONKa
- MehIO
- Bnpabo
- Bn3
- BneBo/BnpaBO
- Bm3/BBepx
- 1<>2RESET
- RESET/DV MODE
- HactpoikKa npKoctn/KOHtpacta
- APKOCTb
- KOHTPACT
- ABTOKOHTPACT (ToIbko aHaIorOboBn BXoD)
- PACU. PEX. DV MODE
- PEKIM DV
- ABTOHAcTpoKa (ToIbKO aHaJIOrObBi BXoD)
- IapameTpbl noJoxeHn H3o6paXeHn (Tolbko aHaIorOBbB BXOD) BJIeBO/BnPABO
- BHN3/BBEPX
- IIO TOPN3OHTAJIN
- TOUHO
- CnCTembl perylnpOBKn CBeTa
- HctpymeHtbl
- 4To6bln36exatb noBHeHn nATEH
- Yro6bI n36eKaTb TpeuH n NOBpeKdEHH 3kpaHa
- Kopnya
- DIKKAT
- UYARI
Brand : NEC
Model : MultiSync 20WGX² Pro
Category : Monitor