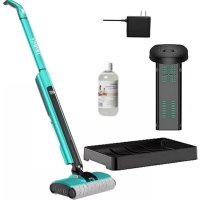
SF8 - Vacuum Cleaner JIMMY - Free user manual and instructions
Find the device manual for free SF8 JIMMY in PDF.



| Product type | Wet-dry stick vacuum |
| Brand | JIMMY |
| Model | SF8 |
| Rated voltage | 14.4 V |
| Rated input power | 60 W |
| Power supply | Rechargeable Li-ion battery 2500 mAh |
| Charging time | 5 to 5.5 hours |
| Brush motor power | 25 W |
| Water pump power | 5 W |
| Power adapter | Input 100-240 V~ 50/60 Hz, output 17.4 V 600 mA |
| Compatible floor types | Hard floors, tiles, parquet |
| Main functions | Wet and dry cleaning, water spraying, brush self-cleaning |
| Routine maintenance | Empty and clean the wastewater tank after each use, clean the roller brush, self-cleaning mode |
| Safety | Do not use on flammable or explosive liquids, unplug before maintenance, do not immerse |
| Available spare parts | Roller brush, clean water tank, wastewater tank, adapter |
| Warranty | 1 year from date of purchase |
| Manufacturer | Kingclean Electric Co., Ltd, China |
| Included accessories | Adapter, floor brush, small brush, detergent, fixed base |
Frequently Asked Questions - SF8 JIMMY
User questions about SF8 JIMMY
0 question about this device. Answer the ones you know or ask your own.
Ask a new question about this device
Download the instructions for your Vacuum Cleaner in PDF format for free! Find your manual SF8 - JIMMY and take your electronic device back in hand. On this page are published all the documents necessary for the use of your device. SF8 by JIMMY.
USER MANUAL SF8 JIMMY
Products Installation
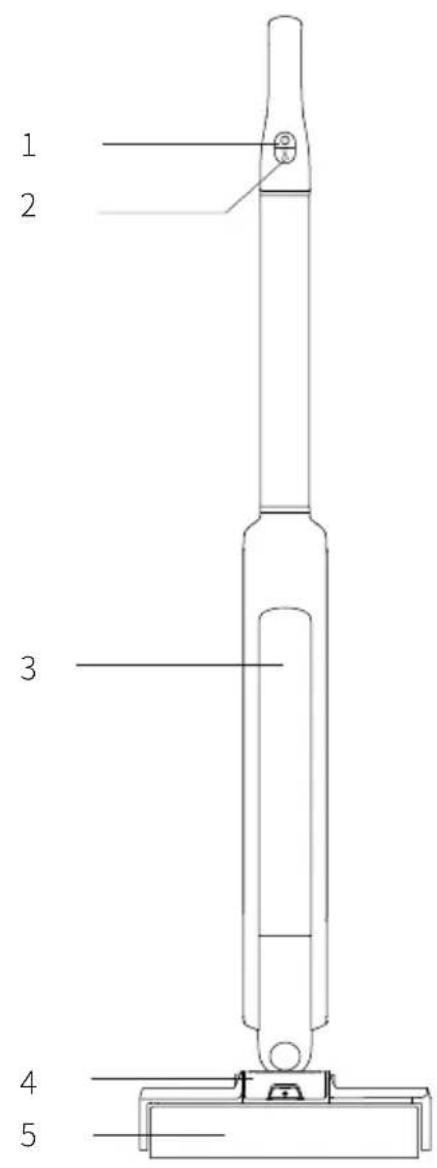
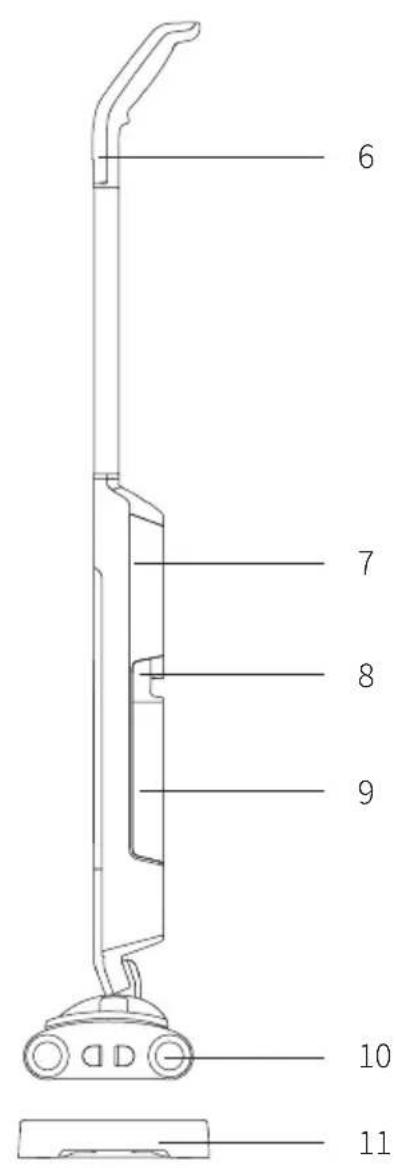
Parts Name

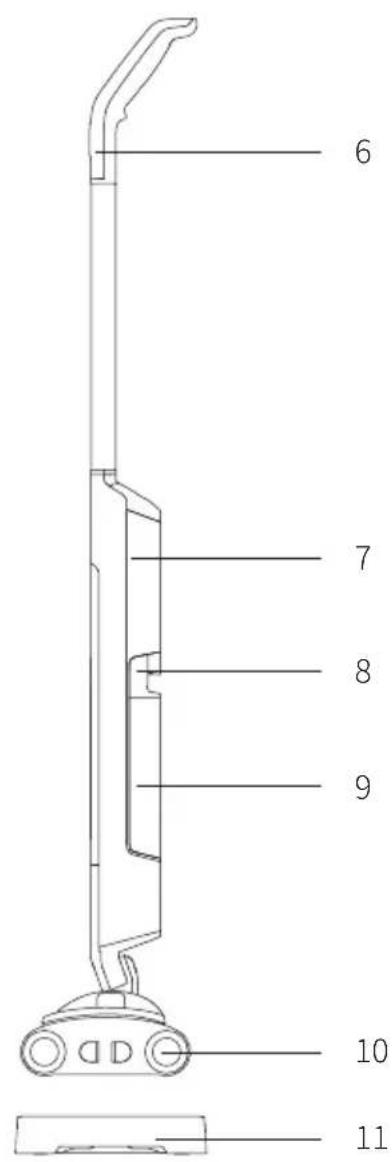
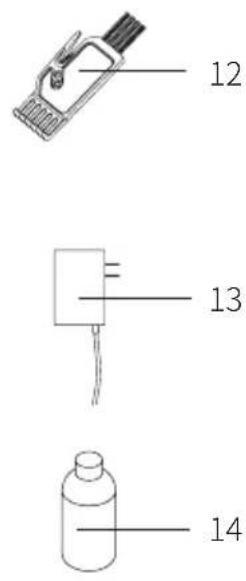
- On/off button 4. Floorhead upper cover latch
- Battery pack 10. Floorhead
- Adaptor
2. Water spray button 5. Brushroll 8. Clean water tank release button 11. Stand base 14. Floor Cleaning shampoo
- LED screen 6. Handle
- Clean water tank
- Mini-brush
Packing List
| Name | Mainbody assembly | Handle assembly | Adaptor Stand base | Mini-brush | Floor Cleaning shampoo | Instruction Manual | |
| Quantity 1 | 1 1 1 1 1 | ||||||
Machine assembly
Handle and mainbody assembly
- Take the parts of machine out of the box
- Align the metal of handle with the connecting rod on the mainbody. Insert the handle vertically into the mainbody until a "click" sound is heard. (Figure 1)
Attention:
- Pay attention to the assembly direction of the handle. Do not insert it in the opposite direction to avoid damage.
- Insert the handle vertically into the main body until a "click" sound is heard, to avoid poor contact and a loose handle.
Adaptor assembly
Take the adaptor out of the box. Insert the connector into the socket at the back of the body. After the power plug is connected into the A/C power socket, the machine starts to charge. (Figure 2)
Attention: Please charge within the distance of the power cord. To avoid poor contact of the power cord at the limit distance, which may lead to the machine being unable to charge.
Use of product
1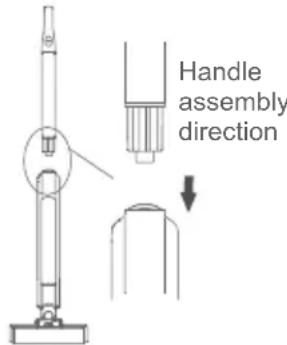
2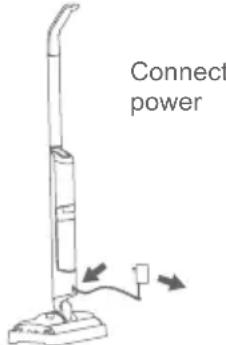
3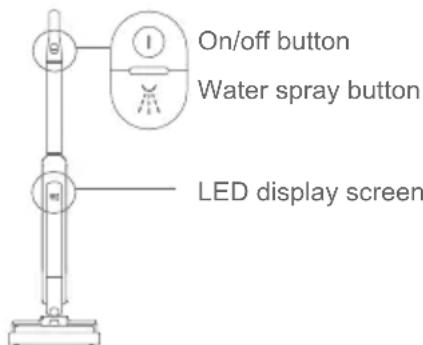
4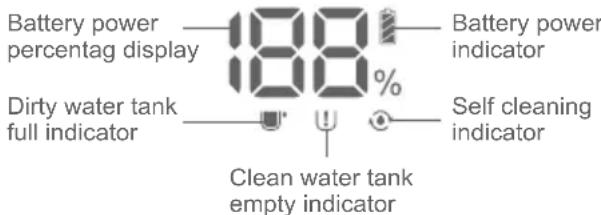
Charging and charging LED display of floor cleaner
- When the LED display shows battery power less than 20%, the battery indicator turns from white to red. This reminds the user to turn off the machine and charge it.
- When charging, the display shows the percentage of battery power and the battery indicator turns red. When the LED display shows 100% power and the battery indicator turns from red to white, it indicates that charging is completed. This reminds the user to unplug the power. (Figure 3, Figure 4)
- The machine charging time is around 4.5 hours to 5.5 hours. After charging, please unplug the charger plug from the power socket and stop charging.
Attention:
- When using the product for the first time, the battery power is insufficient and the use time is short. It can be used normally after being fully charged.
- For the first three uses of the product, it is recommended to charge for about 12 hours each time. After complete charging and discharging, the product can be charged normally.
Use and Maintenance
Use of floor cleaner
- Take the floor cleaner off the stand base and press the on/off button. The LED screen shows the percentage of battery power. The machine starts to work and the brushroll rotates. Press the on/off button again, the machine stops working and the screen turns off.
- Press and hold the water spray button, the machine starts to spray water. Release the water spray button and the machine stops spraying water.
- When in use, press and hold the water spray button, the buzzer sounds "didi". The screen shows clean water empty. It indicates the clean water tank is empty to remind the user to add clean water.
- When in use, the buzzer sounds "didi". The screen shows dirty water full and the machine automatically turns off. It indicates the dirty water tank is full and needs to be emptied, or the dirty water tank wall is too dirty and needs to be cleaned in time.
Disassemble and assemble the clean water tank
Disassemble: Press up the clean water tank button to take out the clean water tank.
Assemble: Put the clean water tank cap into the round groove of the machine, and then press from top inward firmly. Assemble the clean water tank into the main body until a "click" sound is heard. (Figure 5)
Fill up the clean water tank
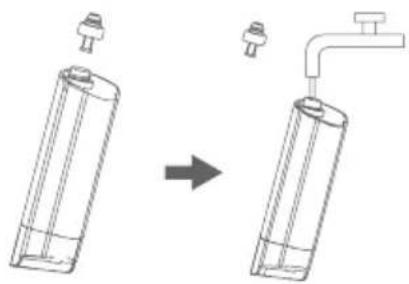
Turn the clean water tank cap anti-clockwise to open and fill in clean water (self-addition cleaning shampoo, the ratio of solution to clean water is 1:50). Fill up clean water and turn the clean water tank upside down and assemble it into the main body. (Figure 6)
Attention:
1. User add clean water do not exceed the Max line to avoid dirty water tank overflow. 2. When in use, press and hold the water spray button, the buzzer sounds "didi". The screen shows clean water empty. It indicates the clean water tank is empty to remind the user to add clean water.
5 6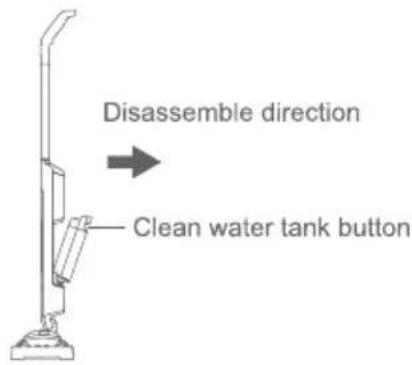
Turn the cap anti-clockwise to open. Fill in clean water.
Disassemble and assemble dirty water tank.
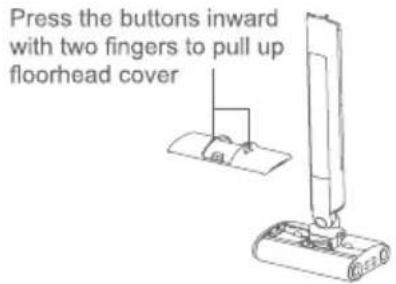
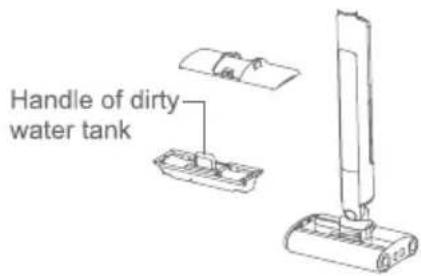
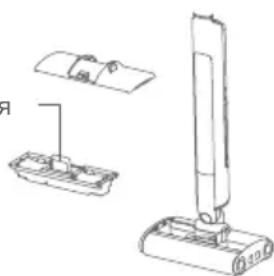
Disassemble: Press the two upper lid latch buttons inward with two fingers to pull up floorhead cover. Lift up the handle of dirty water tank and take it out for cleaning.
Assemble: After cleaning, put dirty water tank into the floorhead slot and put floorhead cover on. Press both sides of brushroll cover at the same time. The button pops up to lock upper cover until a "click" sound is heard. (Figure 7)
Clean dirty water tank.
Take off upper cover and dirty water tank to clean floorhead base by brush. Lift up the dirty water tank and turn flip handle out to empty the dirty water. After clean up the dirty water tank and put it back into machine. If there are debris or particles between dirty water tank and floorhead, clean the floorhead to take off the dirty water tank. (Figure 8)
Attention:
- It is recommended to clean the dirty water tank before every use.
- If the buzzer sounds "didi" alarm when using, the screen shows dirty water full. Please check whether the dirty water tank is full. And then pour out dirty water and clean dirty water tank for use.
- It is normal to find water on the floorhead base after taking off dirty water tank. Please put it in a ventilated place and blow dry.
Disassemble and assemble brushroll.
- Disassemble: Press the latch button of right cover inward and pull out the right cover. Then hold the head of brushroll and pull brushroll out. 2. Assemble: Overlap the brushroll into floorhead motor and push inward until it can't move. Then press right cover until a "click" sound is heard. (Figure 9)
Attention:
- When assembling brushroll, push it to the root. And then put the right cover. If the brushroll is not in place, there will be abnormal noises when turn on machine. Please switch off the machine immediately and reassemble the brushroll.
7-1
7-2
7-3
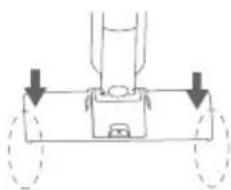
Press both sides of the floorhead cover at the same time and the button pops up to lock tightly.
8
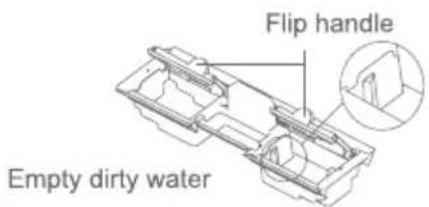
9-1
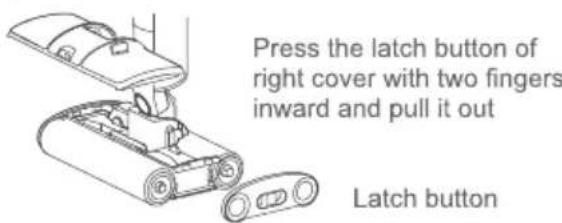
9-2
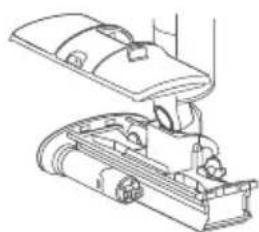
Take off the brushroll cover.
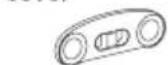
Pull out the brushroll.
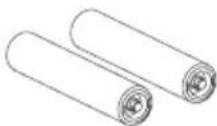
- When the brushroll is rotating, if there is a big foreign object blockage or excessive fiber entanglement, or if a child accidentally puts a hand into the brushroll, the floorhead will stop working to protect personal safety and avoid floorhead motor damage. (Please clean up the brushroll in time when there is a big foreign object blockage or excessive fiber entanglement.)
Use of the machine stand base
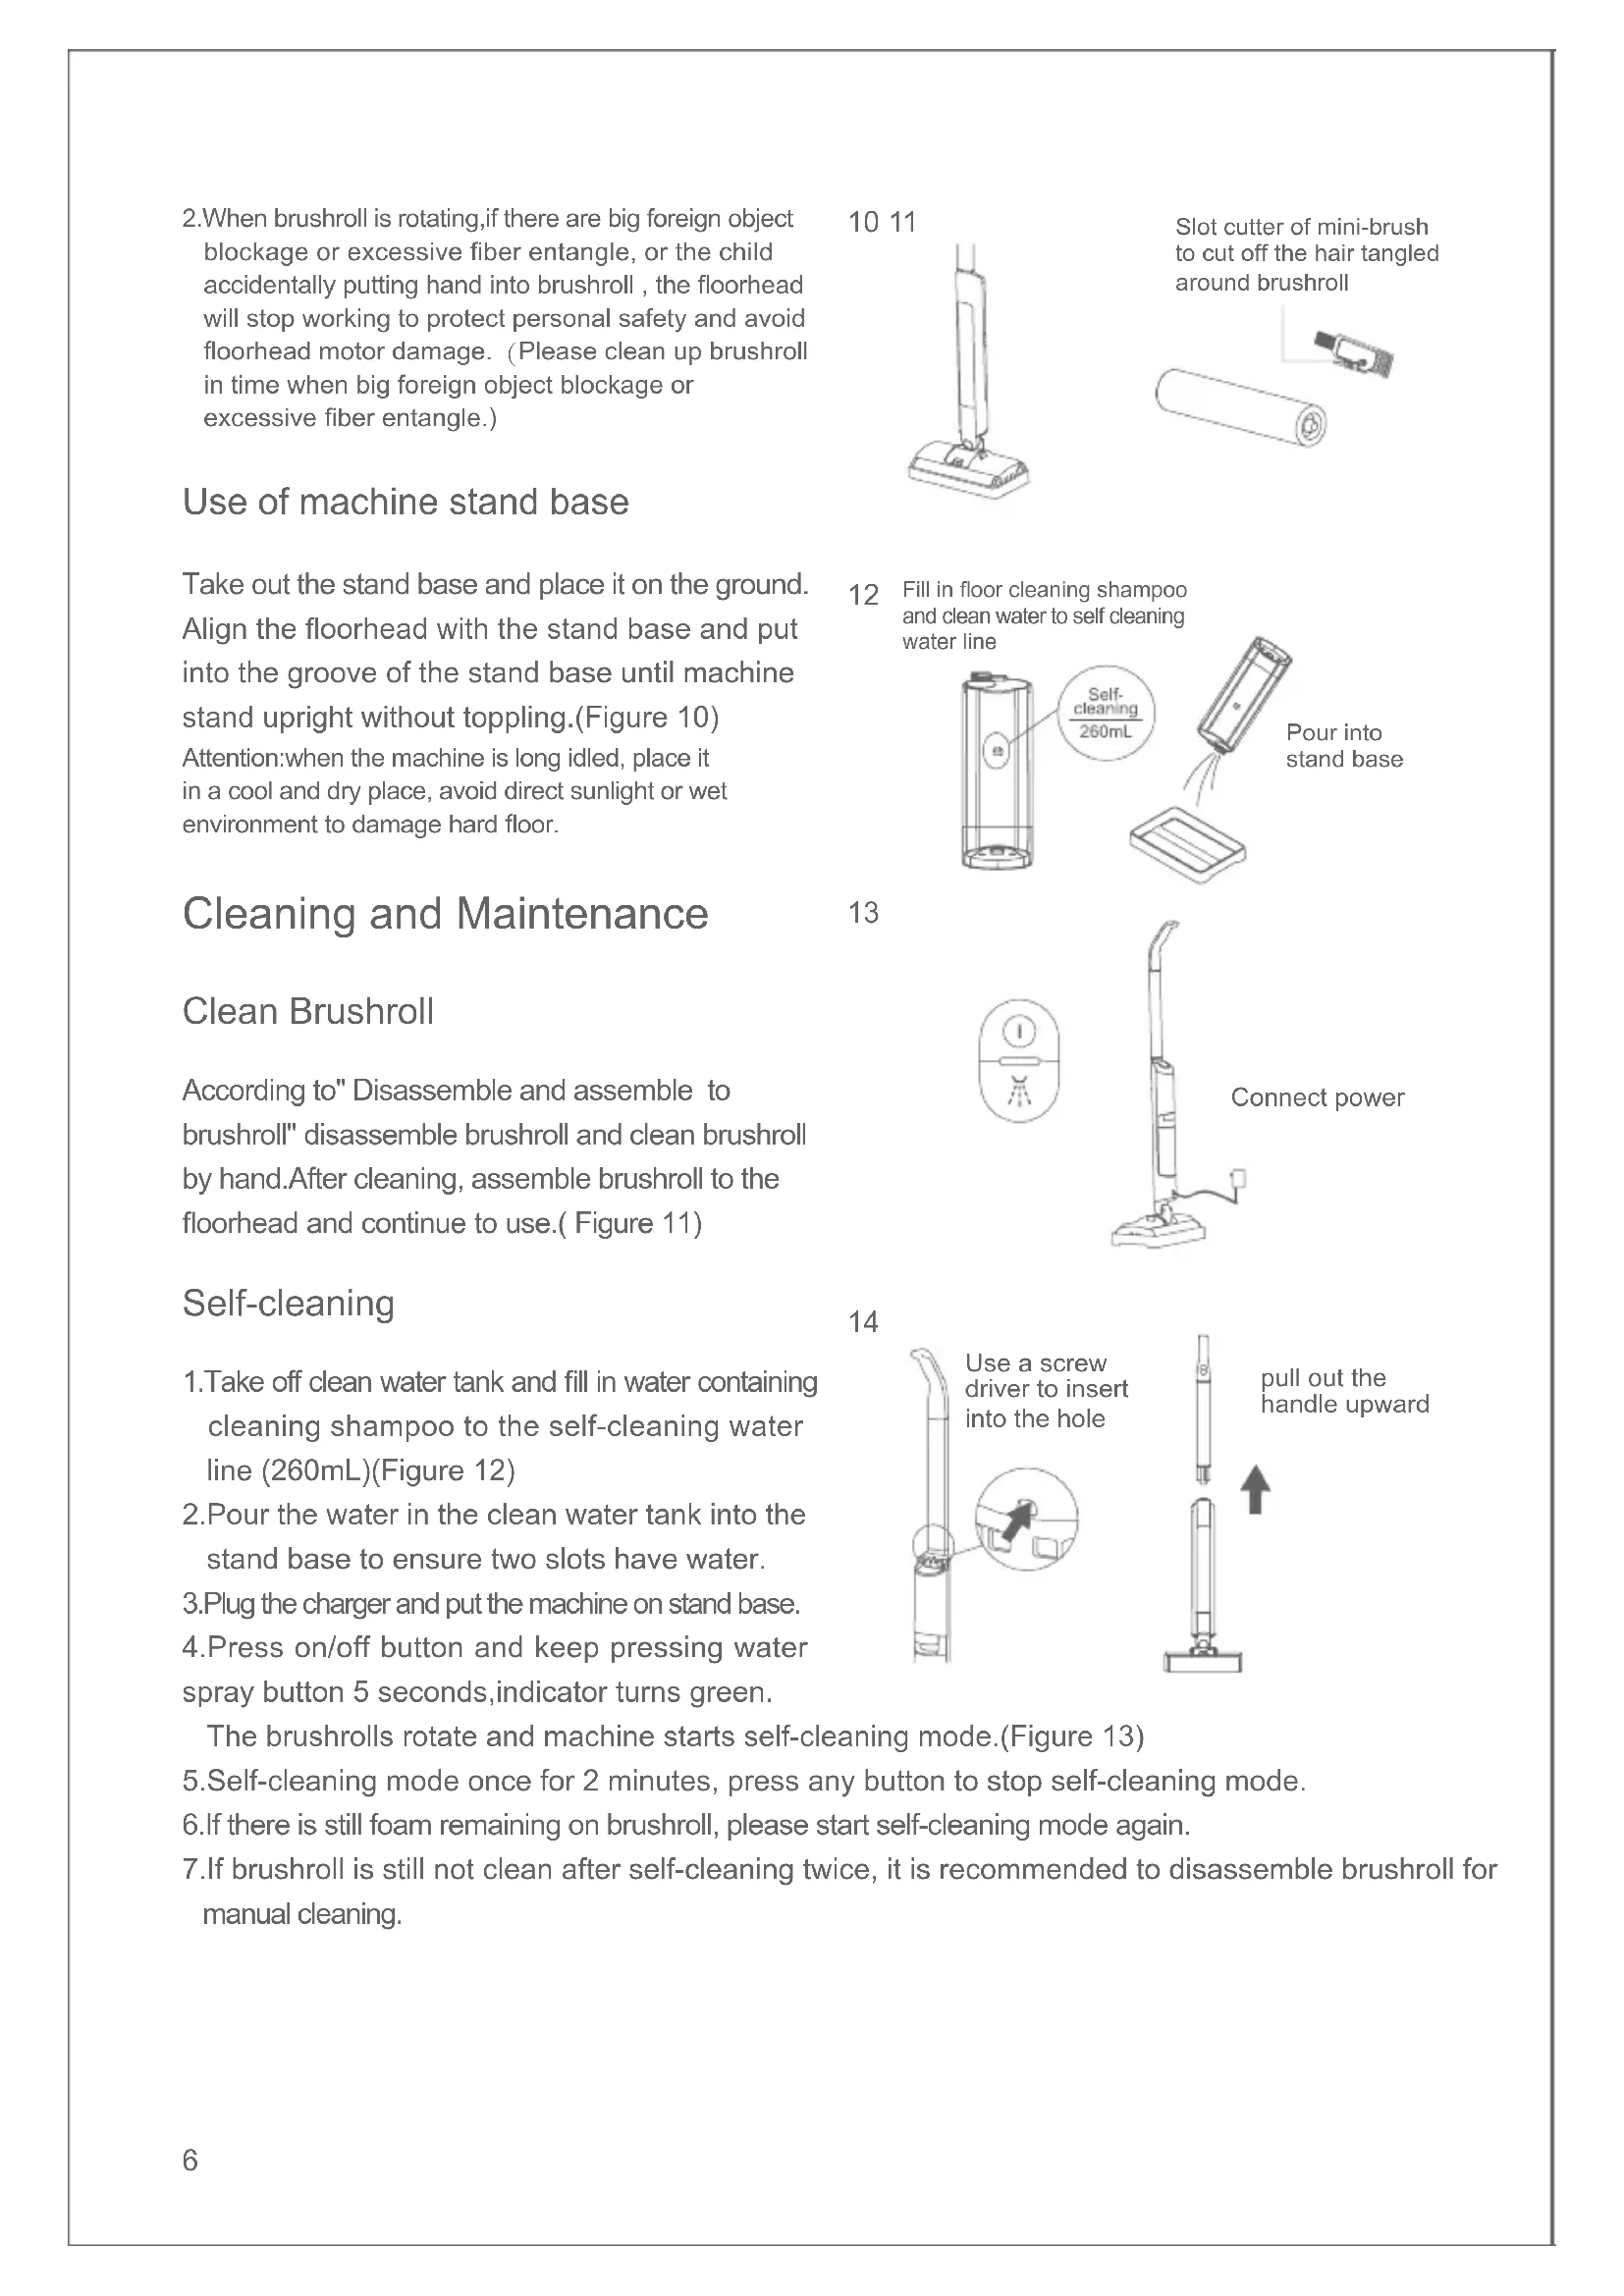
Take out the stand base and place it on the ground. Align the floorhead with the stand base and put it into the groove of the stand base until the machine stands upright without toppling. (Figure 10) Attention: when the machine is idle for a long time, place it in a cool and dry place, avoid direct sunlight or wet environment to prevent damage to hard floors.
Cleaning and Maintenance
Clean the brushroll
According to "Disassemble and assemble the brushroll", disassemble the brushroll and clean it by hand. After cleaning, assemble the brushroll to the floorhead and continue to use. (Figure 11)
Self-cleaning
- Remove the clean water tank and fill it with water containing cleaning shampoo up to the self-cleaning water line (260 mL) (Figure 12).
- Pour the water from the clean water tank into the stand base to ensure both slots have water. 3. Plug in the charger and place the machine on the stand base.
- Press the on/off button and keep pressing the water spray button for 5 seconds; the indicator turns green.
The brushrolls rotate and the machine starts self-cleaning mode (Figure 13).
- Self-cleaning mode runs for 2 minutes; press any button to stop it. 6. If there is still foam remaining on the brushroll, start self-cleaning mode again. 7. If the brushroll is still not clean after self-cleaning twice, it is recommended to disassemble the brushroll for manual cleaning.
10 11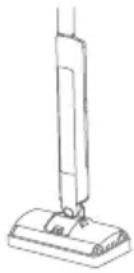
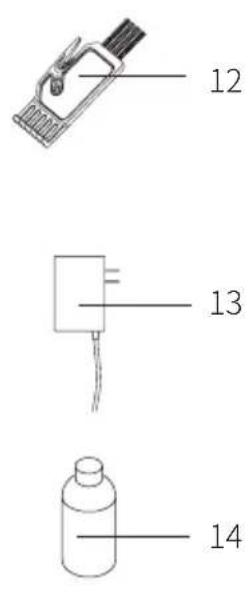
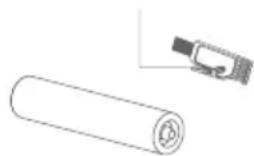
Slot cutter of mini-brush to cut off the hair tangled around the brushroll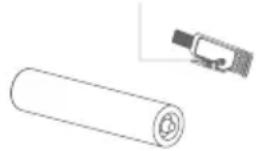
12 Fill in floor cleaning shampoo and clean water to the self-cleaning water line 13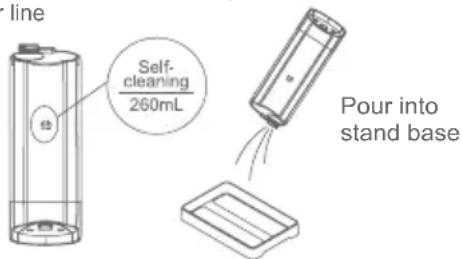
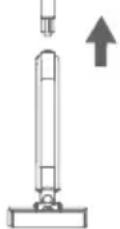
Pull out the handle upward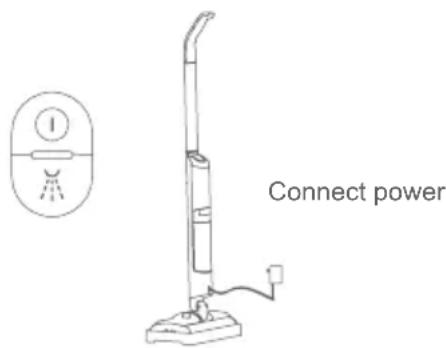
14
Use a screwdriver to insert into the hole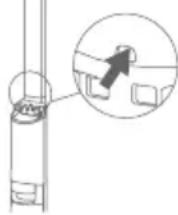
Important Safety Instructions
- Read all instructions and warnings before using this appliance. Failure to follow the warnings and instructions may result in electric shock, fire, or serious injury.
- Please read this instruction manual carefully before use, and properly save and store it for future use.
This product is designed for home use. Do not use it for industrial or outdoor purposes.
Warning
1. Before using the product, check whether the local voltage matches the voltage marked on the power adaptor. 2. Inspect the product before use; stop using it if the product or adaptor is damaged. 3. Use only as described in this manual. 4. This appliance cannot be used by children or persons with reduced physical, sensory, or mental capabilities, or lack of experience and knowledge, unless they have been given supervision or instruction concerning use of the appliance in a safe way and understand the hazards involved. 5. Do not use this product as a toy. Keep this product away from the reach of children. Take care of children and make sure they do not regard this product as a toy. 6. Do not touch the plug with wet hands. 7. Do not use, disassemble, or replace any component if there is damage to the power cord, plug, battery, or conductive parts. Disassembly or replacement of components by yourself may cause electric shock or fire. JIMMY will not take responsibility. Once damaged, the product must be repaired or replaced by JIMMY, JIMMY's distributor, or a qualified person designated by JIMMY to avoid injury. 8. Recharge only with the adaptor specified by JIMMY. 9. Only use the battery pack specified by JIMMY. Use of any other battery pack may cause explosion, injury, and/or product damage. 10. If the product does not operate in accordance with the instructions, is seriously impacted, falls from a height, is damaged, or falls into water, do not use it and contact JIMMY or JIMMY's distributor. 11. Only use JIMMY-specified replacement parts or attachments. JIMMY will not take responsibility. 12. Do not use, disassemble, or replace any component if there is damage to the power cord or plug. Once damaged, the product must be repaired or replaced by JIMMY, JIMMY's distributor, or a qualified person designated by JIMMY to avoid injury. 13. Do not drag the cord or carry the product by the cord, or use the cord as a handle. 14. Do not pull or press the cable. Keep the cable away from heated surfaces. Do not place the cable in a closed door or pull it through a sharp edge or corner. Keep the cable away from walking areas. Do not operate the product across the cable. 15. Do not use the product to pick up flammable or explosive liquids such as gasoline, or use it in areas where such liquids or vapors may exist. 16. Do not use the product to pick up burning or smoking objects, such as cigarette butts, matches, or hot ashes. 17. Do not use the product to pick up sharp objects like broken glass. 18. Do not use cleaning solutions containing vinegar or acid solutions; they will damage the parts and affect the use effect. 19. Please unplug the charger when the product is idle for a long time or before repairing. 20. Do not wash the product or the whole machine directly under a faucet; otherwise, it may cause a short circuit and product damage.
Troubleshooting
Please check the following points before contacting after-sales service.
| Problem Possible cause Solution | ||
| Brushroll does not work Battery has no power Charge the machine | ||
| Brushroll does not work | Brushroll is pressed by heavy objects or tangled with excessive hair. | Remove heavy objects and clean brushroll |
| Brushroll does not work Motor failure Replace motor | ||
| No water spray out Clean water tank empty | Refill clean water tank | |
| No water spray out Object blockage | Clean the dirty nozzle, clean the dirty water tank | |
| Full indicator lights up Dirty water tank full or too dirty | Empty the dirty water and clean dirty water tank | |
| Empty indicator lights up Clean water tank empty Fill clean water tank | ||
| Display battery power light turns red Lower battery power Charge the machine | ||
Attention: If the above troubleshooting guide fails to provide a solution, please contact after-sales service or your local distributor for support.
Product Specification
Technical Specification
| Model No SF8 | |
| Rated Voltage | 14.4V= |
| Rated Power | 60W |
| Adaptor Input Voltage | 100-240V~ 50-60Hz |
| Adaptor Output Voltage | 17.4V= 600mA |
| Rated Power of Electric Floor Head | 25W |
| Rated Power of Water spray pump | 5W |
| Battery pack capacity | 2500mAh |
| Charging time | 5±0.5H |
Circuit Diagram
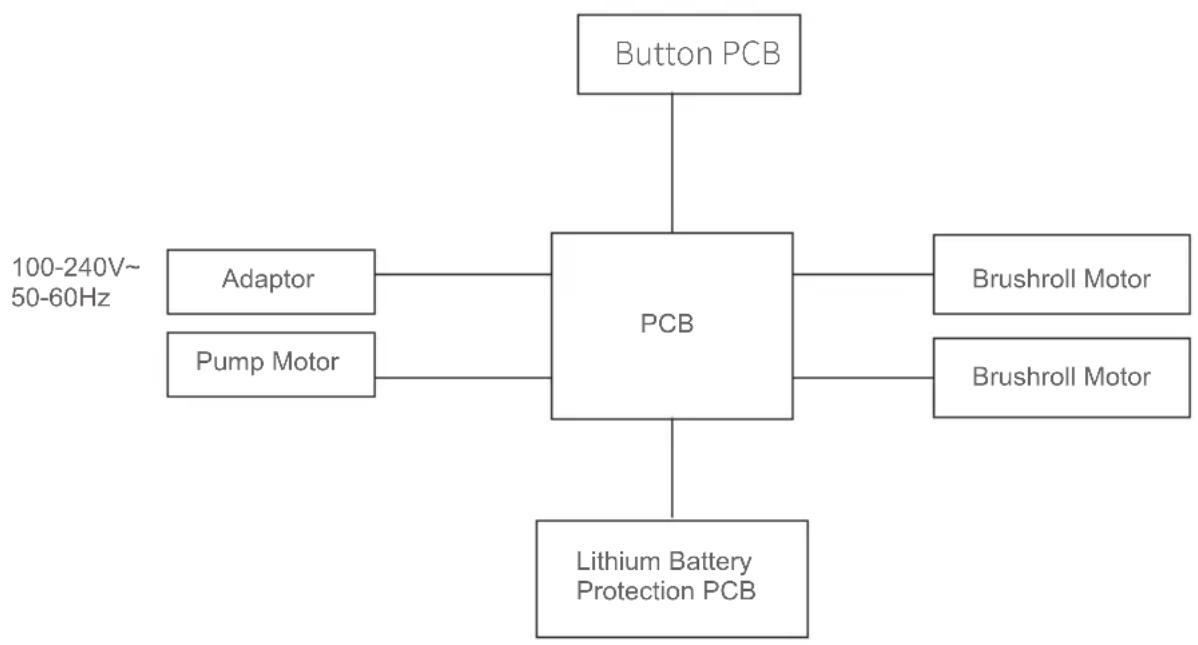
Manufacturer Information
| Manufacturer Kingclean Electric Co., Ltd | |
| Address | No.1 Xiangyang road, Suzhou New District,Jiangsu province, 215009, China |
C E E A C
The machine, accessories, and packaging should be sorted for environmentally friendly recycling.
Do not dispose of the machine with household waste!
Only for EC countries:
According to European Directive 2012/19/EU, machines that are no longer usable, and according to European Directive 2006/66/EC, defective or used battery packs/batteries, must be collected separately and disposed of in an environmentally correct manner.
Battery packs/batteries:
Integrated batteries may only be removed for disposal by qualified personnel. Opening the housing shell can damage or destroy the machine.
Do not dispose of battery packs/batteries in household waste, fire, or water. Battery packs/batteries should, if possible, be discharged, collected, recycled, or disposed of in an environmentally friendly manner.
Subject to change without notice.
Warranty Information
This product enjoys two year warranty from the date of purchase.
Excluded from the guarantee is normal wear, commercial use, alterations to the appliance as purchased, cleaning activities, consequences of improper use or damage by the purchaser or a third person, damage that can be attributed to external circumstances or caused by the batteries.
Unpacking
Parts Name
The machine, accessories and packaging should be sorted for environmental-friendly recycling.
Only for EU countries:
Handle and Mainbody Assembly
Disassemble and assemble brushroll
Installation of the main body
Installation of the handle and main body
- Remove the machine parts from the packaging.
- Insert the rod on the body into the metal socket of the handle until the plastic button pops out of the handle joint, and you will hear a "click". (Fig.1)
Note:
Pull out against the arrow to add clean water
7-1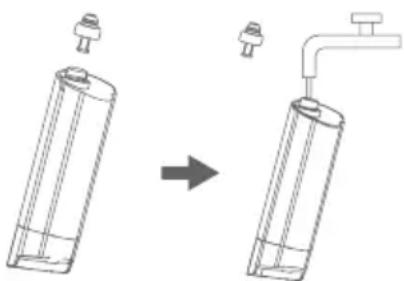
Press the button with both hands and lift the lid of the floor brush.
7-2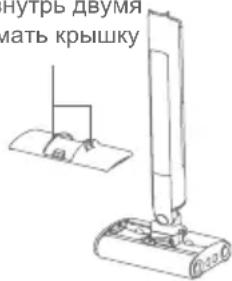
Dirty water tank
7-3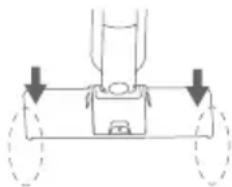
Only when the button is pressed and both sides of the floor brush lid are lifted simultaneously can it be locked.
If the dirty water tank is difficult to remove, it means there are debris or particles between the dirty water tank and the floor brush base. In this case, it is recommended to clean the floor brush base and the dirty water tank. (Fig. 8) Note:
- 1. It is recommended to clean the dirty water tank after each use; 2. If you hear a "tick-tock" sound during use, and the screen displays full water level, check if the dirty water tank is full. Then drain the dirty water and clean the side wall of the tank before next use.
- If water is found on the floor brush base after draining the dirty water tank, it is normal, and it can be dried in a ventilated place.
Disassembly and assembly of the roller brush
- Disassembly of the roller brush: Press the lock button on the right lid with both hands, then lift the right lid upward to remove it, then pull out the roller brush, holding its head.
- Assembly of the roller brush: Insert the roller brush onto the motor of the floor brush, and push the roller brush inward until it cannot be pushed further. Then press the right lid, and it will be set in the correct position, as you hear a "click" (Fig. 9). Note: 1. When assembling the roller brush, you need to insert the roller brush to the end, and then install the right lid components. If the assembly is unsuccessful, abnormal noises will occur when starting the machine. In this case, please stop working immediately and reassemble. 2. During the operation of the roller brush, if it is wound with too many foreign objects or too much fiber, or if a child accidentally puts a hand into the roller brush while the machine is running, which causes abnormal stop of the roller brush, the floor brush will stop working to ensure human safety and the motor of the floor brush (when the roller brush is wound with too many foreign objects or too much fiber, it should be cleaned in time).
8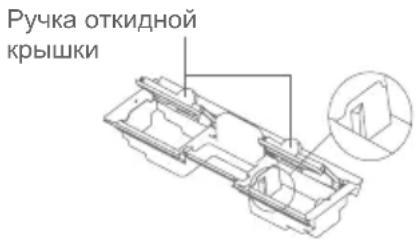
9-1 Press the lock button of the right lid with two fingers and pull out the lid. Lock button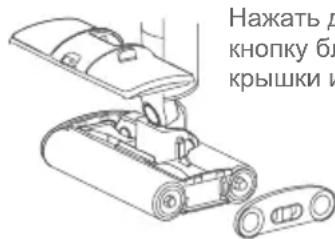
9-2 Remove the roller brush lid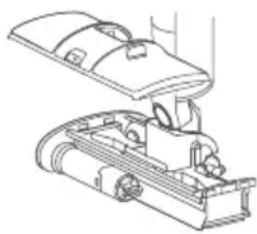
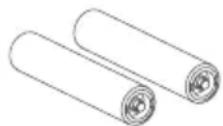
Pull out the roller brush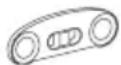
Using the base for securing the machine
After using the machine, wipe the base for securing the machine and place it on the floor, then insert the brushroll into the lower part of the base in the groove so that the machine stands vertically without tipping over. (Fig. 10)
Note: after use, the machine must be placed in its base so that the wet brushroll bristles do not come into contact with the floor for a long time and do not deteriorate.
Cleaning and maintenance
Cleaning the brushroll
According to "Disassemble and assemble brushroll" to disassemble brushroll and clean brushroll by hand. After cleaning, assemble brushroll to the floorhead and continue to use.(Figure 11)
After cleaning the brushroll according to the section "Disassembly and assembly of the brushroll", you can clean it manually, and then install the brushroll into the floorhead according to the section "Disassembly and assembly of the brushroll" for further use. (Fig. 11)
12 Fill the water tank with household cleaning liquid up to the self-cleaning level.
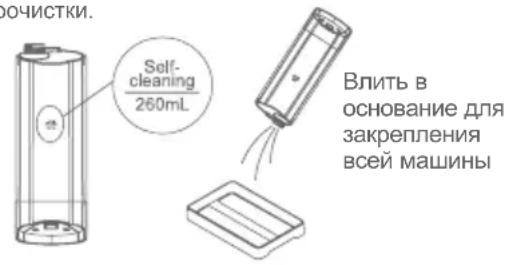
13
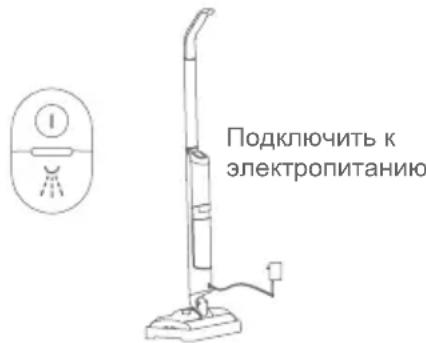
Self-cleaning
- Remove the water tank, pour out the water, and fill it with water containing household cleaning liquid up to the self-cleaning level (self-cleaning level - 260 mL) (Fig. 12);
- Pour the water from the water tank into the base for securing the machine so that there is water in the two grooves of the base;
- Place the entire machine on the base and connect it to the power supply; 4. Press and hold the spray button for 5 seconds, during which the green indicator lights up, the brushroll starts and switches to self-cleaning mode; (Fig. 13)
- Self-cleaning mode runs for 2 minutes each time, you can turn off self-cleaning mode by pressing any button;
- If the self-cleaning cycle is not clean, you can run the self-cleaning cycle again;
- If after the second gas self-cleaning the elements are still not clean, it is recommended to remove them for manual cleaning.
Storage of the washing machine
After using this product, please place it on its base and secure the entire machine to avoid damage and unnecessary losses due to the wet hair of the roller brush coming into contact with the floor for a long time.
It is recommended to clean the roller brush compartment before storage, and then store it in a cool place to avoid affecting the service life of the roller brush compartment because the hair of the roller brush is covered with dirt and emits an unpleasant odor.
Storage of the machine
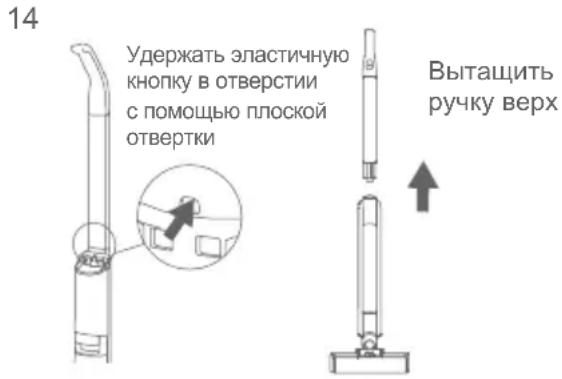
Lift the handle of the product, hold the latch button in the hole with a flat-head screwdriver, as shown in the figure, to pull out the handle, and then place it in the box. If the machine is not used for a long time, it is recommended to pack the machine according to the selected steps and store it in a cool and dry place,
Do not store it in direct sunlight or in a humid environment. (Fig. 14)
Important safety notes
- Before using this product, please read all the precautions and warnings described in this manual and on the product. When using the product, always follow the basic safety measures to reduce the risk of fire, electric shock, and injury.
- Before using this product, please read this manual and instructions carefully, then set up the machine according to the steps indicated in the manual, and keep this manual for future reference. This product is suitable for use in ordinary household conditions and is not suitable for use in industrial or commercial conditions.
Warnings!
- Before connecting this product to the power source, be sure to check the local voltage to ensure it matches the voltage indicated on the adapter.
- Before use, be sure to check the product. If the product or adapter is damaged, stop using them.
- Please use it strictly in accordance with the method described in this manual.
- This product cannot be used by persons with physical, sensory, or mental impairments, or by persons lacking the appropriate experience and knowledge. They may use it only under the supervision of a guardian, so that they can safely use this product.
- Do not use this product as a toy. Keep it out of the reach of children. Please take care of children and ensure they do not use this product as a toy. Do not touch the plug or any parts of the product with wet hands.
- If the cable, plug, battery, or current-carrying parts are damaged, do not use them, and do not disassemble or replace parts yourself. Self-disassembly or replacement of parts may lead to electric shock or fire, and the company bears no responsibility for this. In case of damage, they must be repaired or replaced by the company, an agent of the company, or a person with the appropriate qualification designated by the company, to avoid dangers. 8. For charging, only use the charging device specified by the company.
- Only use original batteries from the company: using any other battery may lead to explosion, injury to persons, or damage to the product.
- If the product does not work according to this instruction, has been subjected to a strong impact, fallen from a height, damaged, or fallen into water, please do not use it and call the company's service hotline.
- Only use spare parts and components specified by the company; otherwise, the company bears no responsibility.
- If the cable or plug is damaged, do not use them. In case the cable is damaged, it must be repaired or replaced by the company, an agent of the company, or a person with the appropriate qualification designated by the company, to avoid dangers.
- Do not pull the cable or hold it by the product's handle, and do not use it as a handle.
- Do not pull or press hard on the cable. Keep it away from heated surfaces. Do not place it in a closed door chain or pull it through sharp edges or corners. Keep the cable away from areas of movement where it is easy to trip. Do not let this product operate when the cable is under the machine.
- Do not use this machine for removing flammable or explosive liquids, such as gasoline, and do not use this machine in places where these liquids or vapors may exist.
- Do not use this machine for removing hot or burning objects, such as cigarettes, matches, or hot ashes.
- Do not use the machine for inserting sharp objects such as broken glass.
- Please do not add vinegar or acidic solution to this product, as it may damage the parts and affect the performance.
- Please unplug the device from the outlet before repair or when the product is not in use.
- Do not place the device under a tap or near water, as this may cause a short circuit, damage the product, or lead to malfunction.
Troubleshooting
Please check the following issues before contacting after-sales service:
| Heinzspapbvocnti Bozmoxhble npuynbI PeueHnia | ||
| PoliKobaye Tcka He pa60taet | AkkymyIop caIIncsI | 3apRdntb MaunHy |
| PoliKobaye Tcka He pa60taet | PoliKobaye Tcka HaxaTa TJXeJIbIMn PpeDMeTAMN IINI HaMOTaHa cIIuShKom MHOro BOLOcAmN | Y6paTb TjXeJIbIe PpeDMeTbI, YdaJIbTb BOLOcbl |
| PoliKobaye Tcka He pa60taet | ÖNeKTPOdBVIRatelb OTKa3bIBaETcI | 3amEHITb ÖNeKTPOdBVIRatelb |
| Hacoc He noaet BODy Bak dIy ChSTOn BODby NucST | CHOBA HApONHtB 6ak dIy ChSTOn BOdbl | |
| Hacoc He noaet BODy | ПocSTOPHNHe IpeDMeTbI 3abloKupOBaII | YdaJIbTb rpr3b OT pacNbIaIooJero conla, OuHCTNb 6ak dIy rpr3HOb BOdbl |
| Индikatop 3anOpHeHnY 3aIogpaETcI | Бak dIy rpr3HOb BODby 3aOpONHeH nLI OH cIIuShKom rpr3HbI | BoBpemy BvIInTb rpr3HyIO BODy n OUcSTtB 6ak dIy rpr3HOb BOdbl |
| Инд�示ахонь leхватки воры 3агораекя | He xbaetaeТВорыВ баке дя чостов воры | Воверma наолнить 6ak дя чостов воры |
| Инд�示ахонь leхватки зapаяna на экраино 3агораекя КрасhevIM | He xbaetaeМошисти | Зapаяntь |
Note: If the above troubleshooting guide does not resolve the issue, please contact after-sales service or local agents for assistance.
Product Specifications
Technical Parameters
| Mодень SF8 | |
| Hоминальhoe habржени 14.4V | == |
| Hоминальhoe BхODная моцноctь 60W | |
| ВхODhoe habржени щадпера 100-240V~ 50-60Hz | |
| ВыхODhoe habржени щадпера 17.4V -600mA | |
| Hоминальhoe моцноctь 3лесто只得 веля наюнoi шетки 25W | |
| Моцноctь насoca расьileни Воры 5W | |
| Емкость akкуMLEтopa 2500mAh | |
| Вremя зapяdkи 5±0.5H | |
Electrical Schematic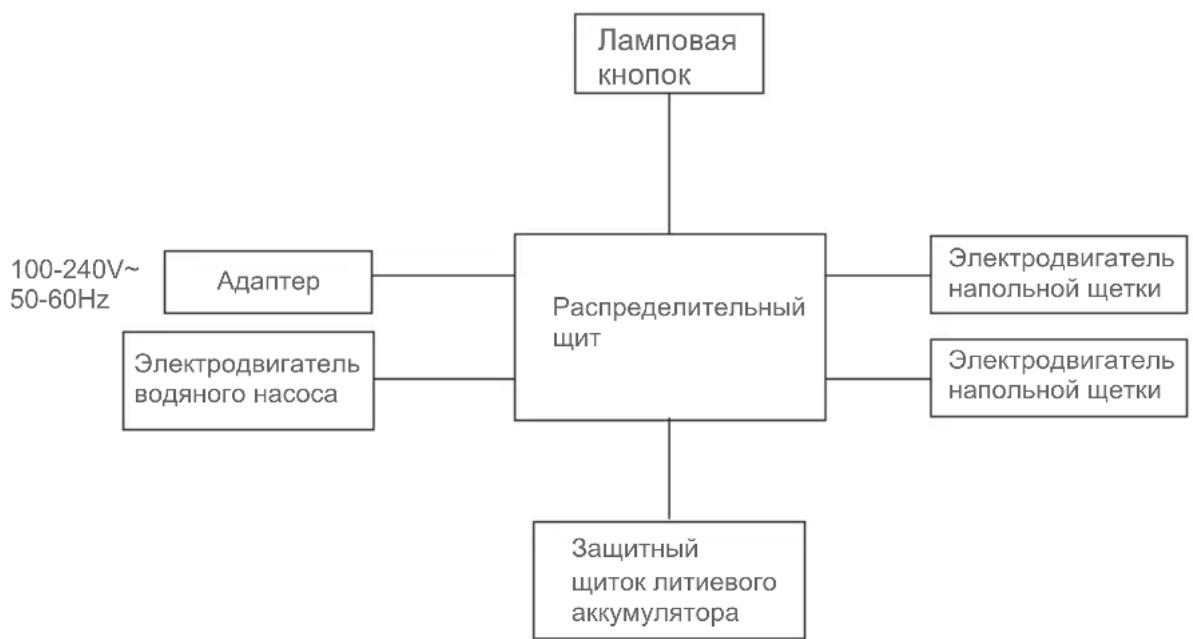
Information about the Manufacturer
Used devices should not be disposed of with household waste!
Subject to change without prior notice.
Warranty Information
This product has a one-year warranty from the date of purchase.
Warranty is not provided in case of natural wear, use of commercial cells, changes to the original state of the device, cleaning work, consequences of improper handling or damage caused by the buyer or third parties, damage caused by external factors, or due to accumulator batteries.
1K-01


- PRODUCTS INSTALLATION
- PARTS NAME
- PACKING LIST
- MACHINE ASSEMBLY
- HANDLE AND MAINBODY ASSEMBLY
- ADAPTOR ASSEMBLY
- USE OF PRODUCT
- CHARGING AND CHARGING LED DISPLAY OF FLOOR CLEANER
- ATTENTION
- USE AND MAINTENANCE
- USE OF FLOOR CLEANER
- DISASSEMBLE AND ASSEMBLE THE CLEAN WATER TANK
- FILL UP THE CLEAN WATER TANK
- DISASSEMBLE AND ASSEMBLE DIRTY WATER TANK
- CLEAN DIRTY WATER TANK
- DISASSEMBLE AND ASSEMBLE BRUSHROLL
- 7-1
- 7-2
- 7-3
- 8
- 9-1
- 9-2
- USE OF THE MACHINE STAND BASE
- CLEANING AND MAINTENANCE
- CLEAN THE BRUSHROLL
- SELF-CLEANING
- IMPORTANT SAFETY INSTRUCTIONS
- WARNING
- TROUBLESHOOTING
- PRODUCT SPECIFICATION
- CIRCUIT DIAGRAM
- MANUFACTURER INFORMATION
- C E E A C
- ONLY FOR EC COUNTRIES
- BATTERY PACKS/BATTERIES
- WARRANTY INFORMATION
- UNPACKING
- INSTALLATION OF THE MAIN BODY
- INSTALLATION OF THE HANDLE AND MAIN BODY
- DISASSEMBLY AND ASSEMBLY OF THE ROLLER BRUSH
- USING THE BASE FOR SECURING THE MACHINE
- CLEANING THE BRUSHROLL
- STORAGE OF THE WASHING MACHINE
- STORAGE OF THE MACHINE
- IMPORTANT SAFETY NOTES
- WARNINGS
- PRODUCT SPECIFICATIONS
- INFORMATION ABOUT THE MANUFACTURER
Brand : JIMMY
Model : SF8
Category : Vacuum Cleaner