
H8 Pro - Vacuum Cleaner JIMMY - Free user manual and instructions
Find the device manual for free H8 Pro JIMMY in PDF.
| Product type | Cordless stick vacuum |
| Brand | JIMMY |
| Model | H8 Pro |
| Rated voltage | 25.2 V |
| Rated power | 500 W |
| Adapter input | 100-240 V ~ 50/60 Hz 0.8 A |
| Adapter output | 30 V / 600 mA |
| Battery capacity | 3000 mAh |
| Charging time | 5 hours |
| Floor brush power | 30 W |
| Operating modes | Auto, Turbo, Max, Eco |
| Filter | Washable HEPA |
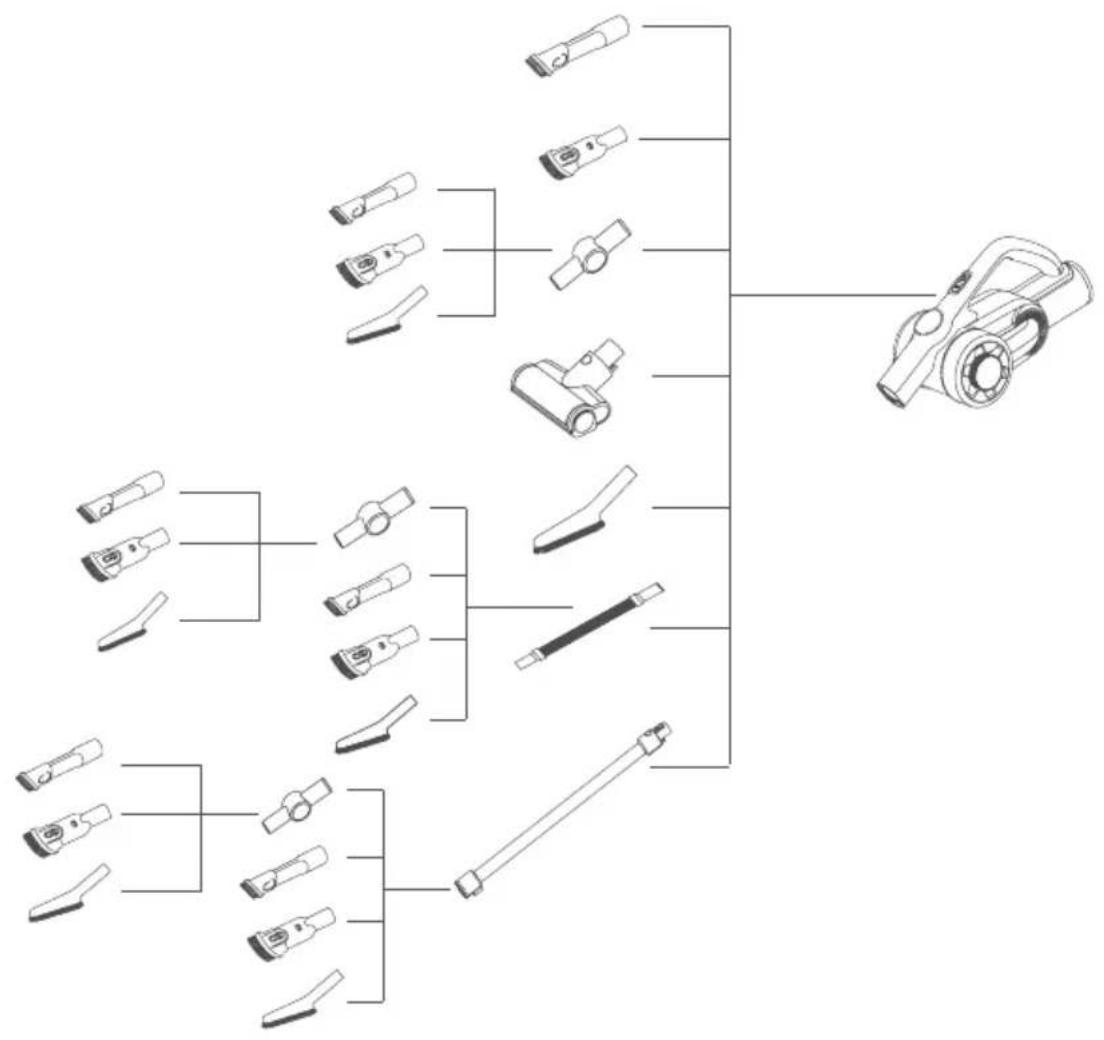
| Included accessories | Electric floor brush, electric mattress brush, 2-in-1 crevice tool, 2-in-1 upholstery tool, soft brush, extension hose, connector, charging stand |
| Runtime | Up to 45 min (Eco mode) |
| Dust bin capacity | 0.6 L |
| Weight | Approx. 2.5 kg |
| Warranty | 2 years |
| Maintenance | Regular cleaning of the filter and roller brush |
| Safety | Automatic brush stop in case of clogging or obstruction |
Frequently Asked Questions - H8 Pro JIMMY
User questions about H8 Pro JIMMY
0 question about this device. Answer the ones you know or ask your own.
Ask a new question about this device
Download the instructions for your Vacuum Cleaner in PDF format for free! Find your manual H8 Pro - JIMMY and take your electronic device back in hand. On this page are published all the documents necessary for the use of your device. H8 Pro by JIMMY.
USER MANUAL H8 Pro JIMMY
Products Installation
Unpacking
Open the package, take out the foam pad, all accessories and machine from the package, take off the plastic bag and save them for the purpose of future maintenance and repair.
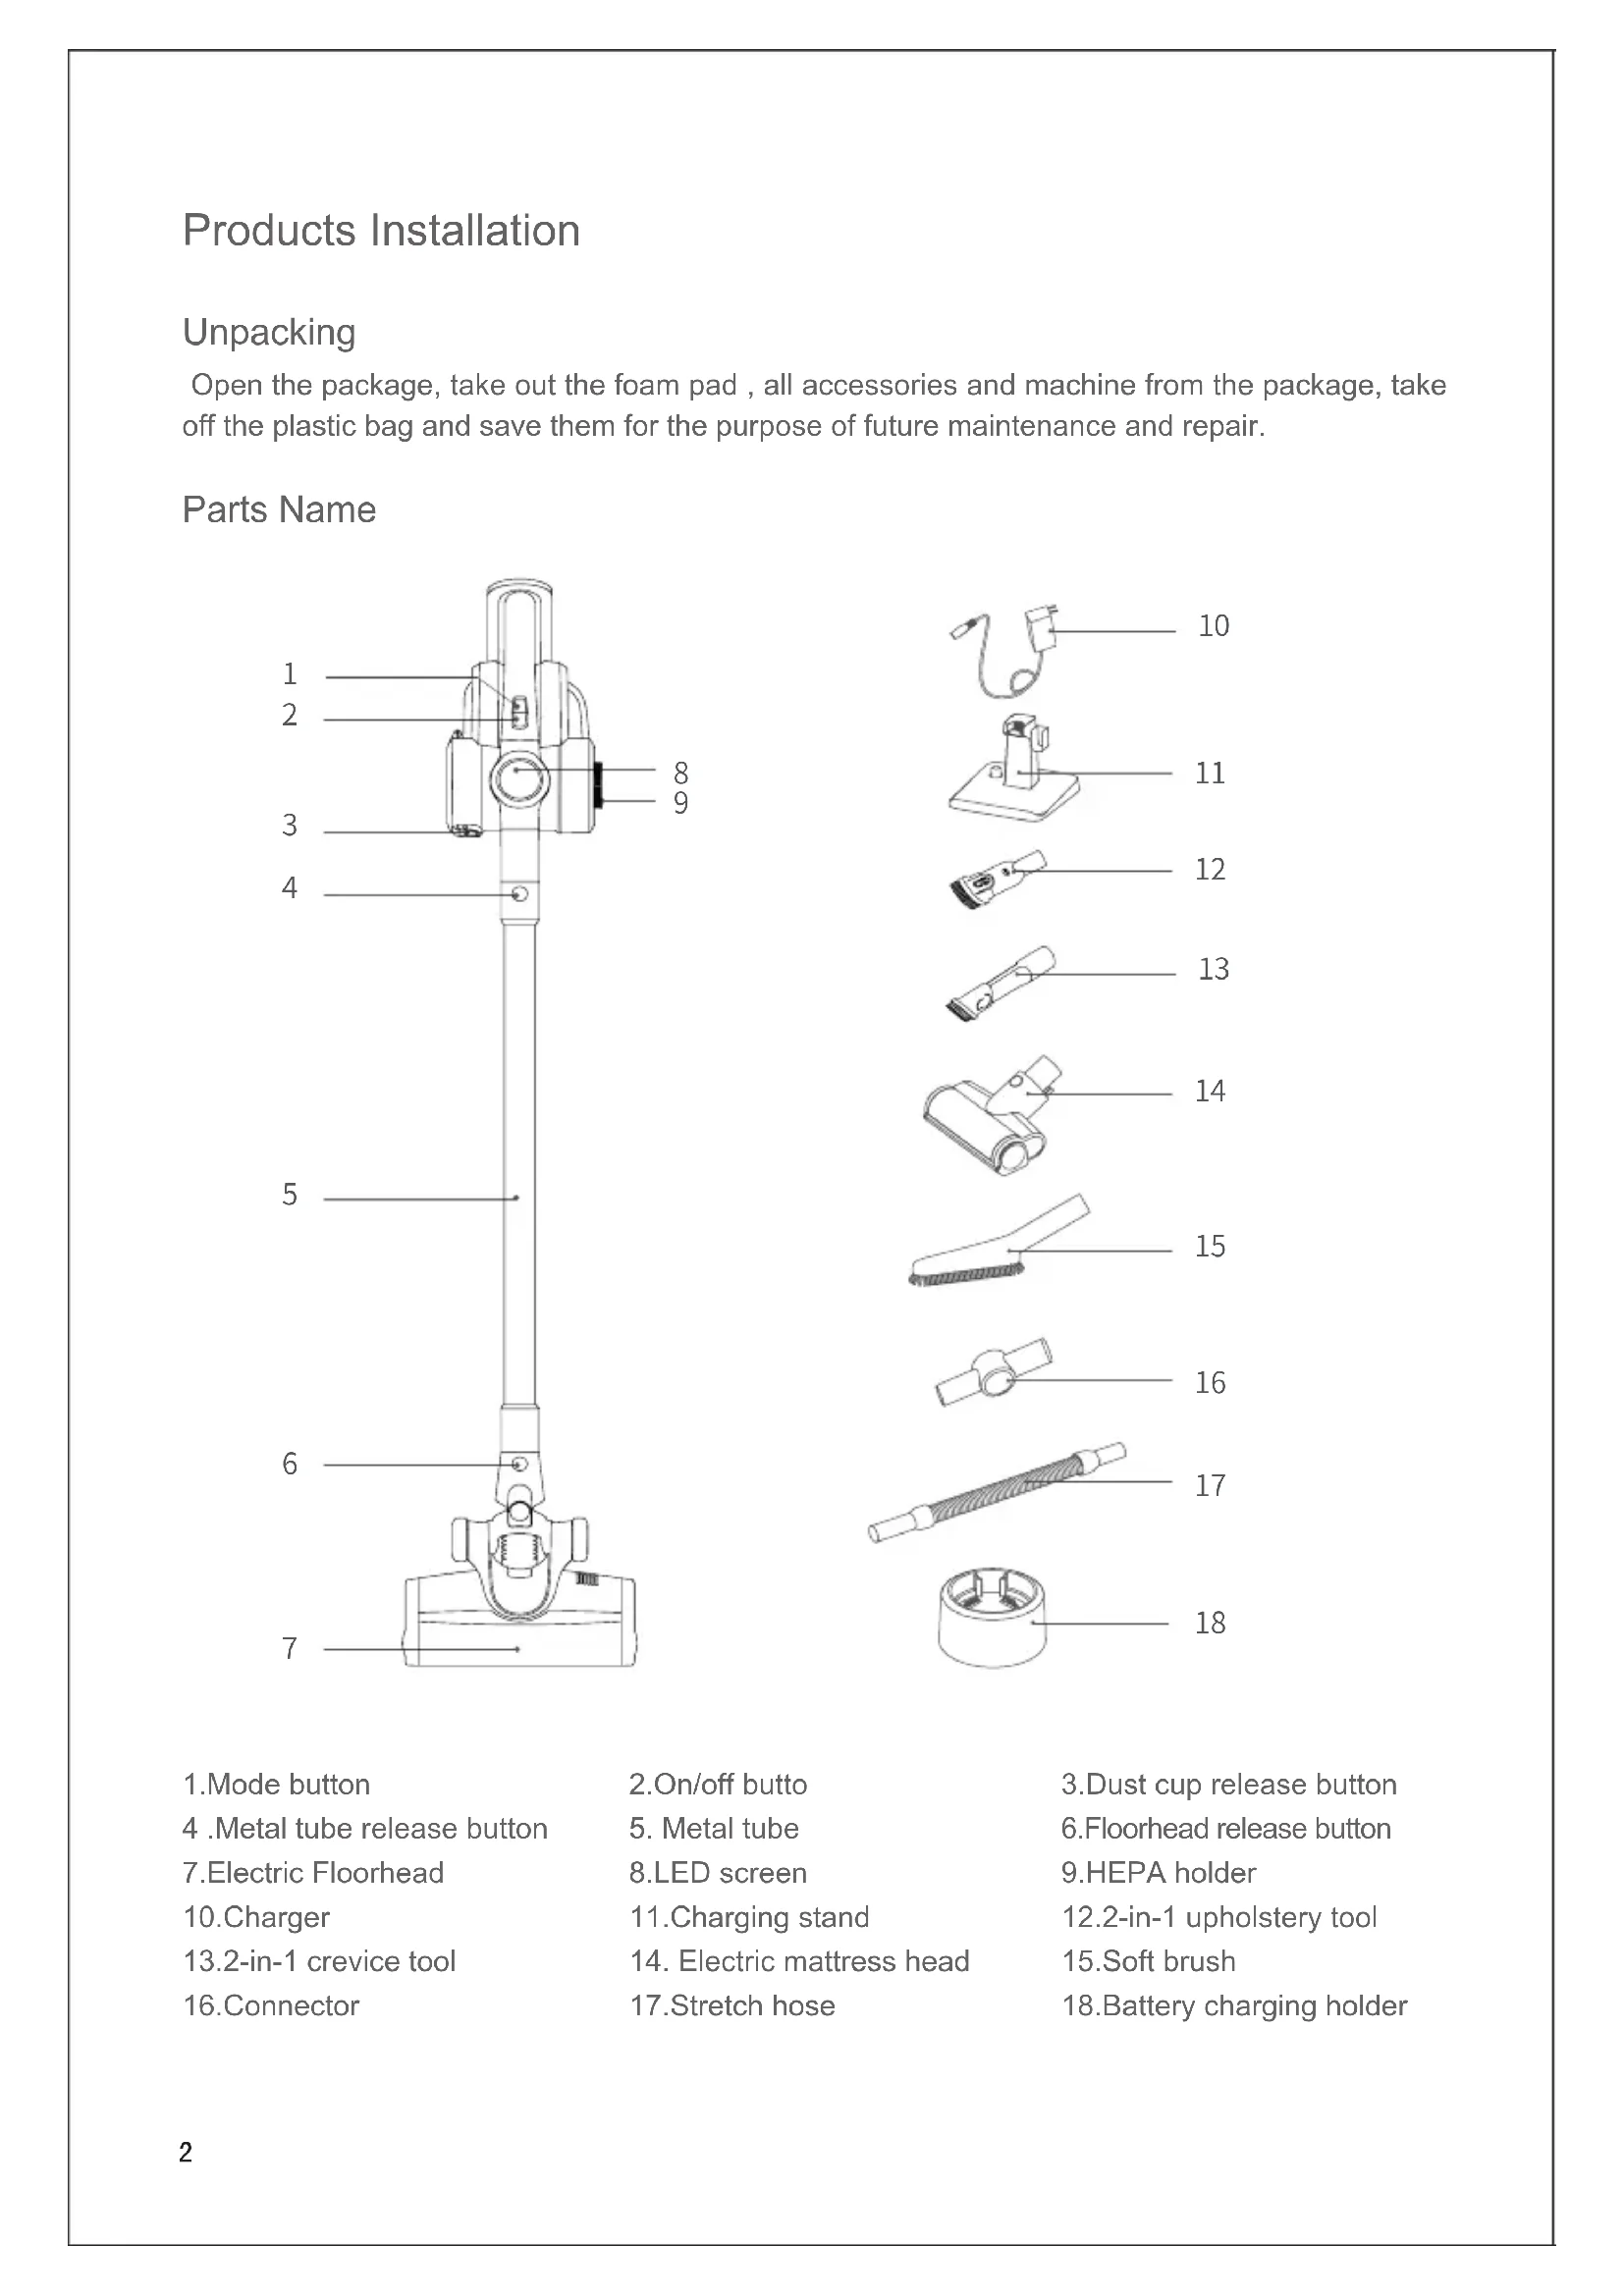
Parts Name
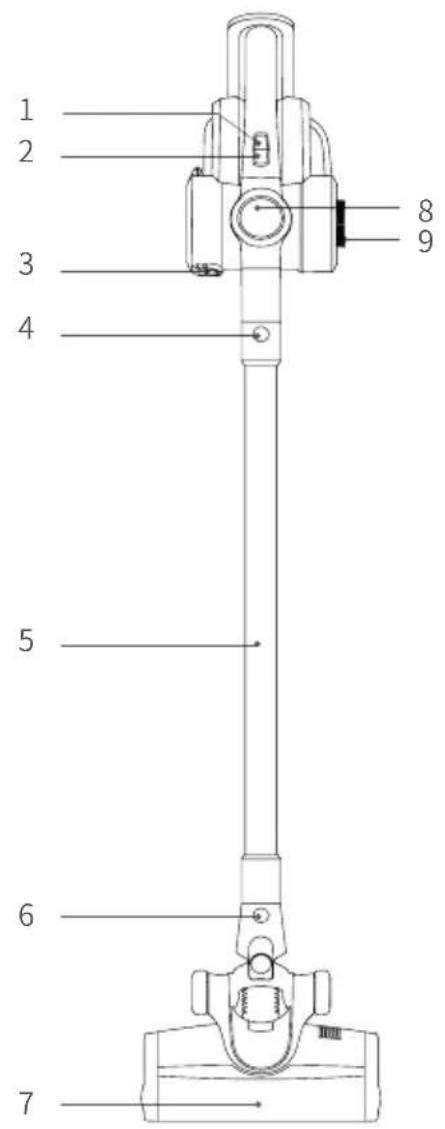
1.Mode button
4.Metal tube release button
- Electric Floorhead
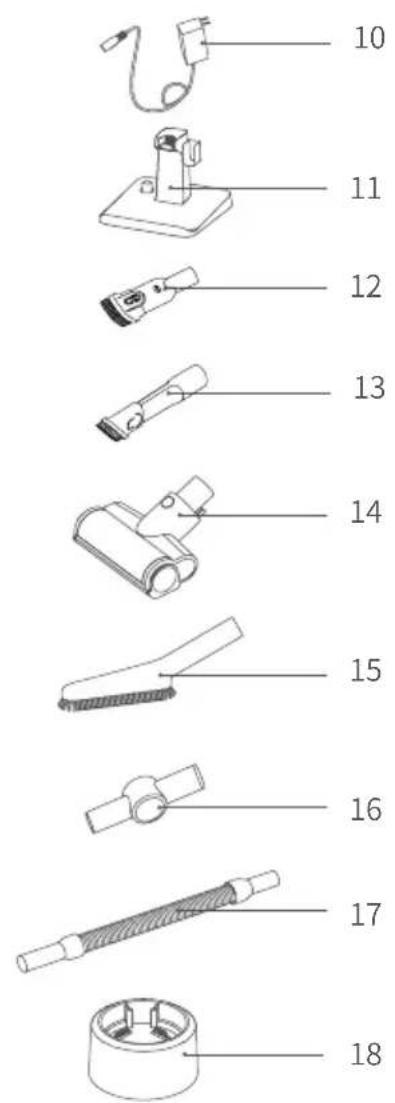
10.Charger
13.2-in-1 crevice tool
-
Connector
-
On/off butt
-
Metal tube
-
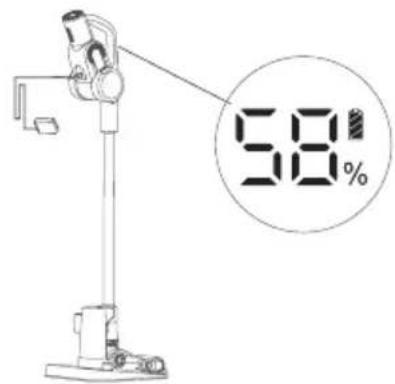
LED screen
11.Charging stand
- Electric mattress head
17.Stretch hose
3.Dust cup release button
6.Floorhead release button
9.HEPA holder
12.2-in-1 upholstery tool
- Soft brush
18.Battery charging holder
Packing List
| Part Name | Handheld Vacuum Cleaner | ElectricFloor head | Electric mattress head | 2-in-1 upholstery tool | 2-in-1 crevice tool |
| Quantity 1 | 1 1 1 | ||||
| Part Name Soft brush Charging stand Connector Stretch hose Metal tube | |||||
| Quantity 1 | 1 1 1 | ||||
| Part Name Battery charging holder Charger Battery Pack Instruction Manual | |||||
| Quantity 1 | 1 1 | ||||
Product assembly and disassembly
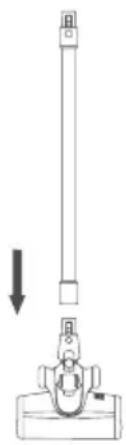
Assemble the electric floorhead and metal tube
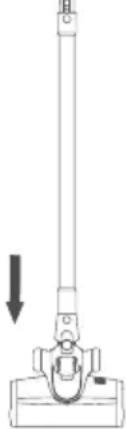
When connecting, hold the electric floorhead with your left hand in the direction shown, use right hand to insert the metal tube vertically into floorhead, align with the conductive needle, press the handle until a "click" sound is heard.(Fig 1)
Attention: Keep the handle and floor head in the same direction, conductive needle shall align with the socket.
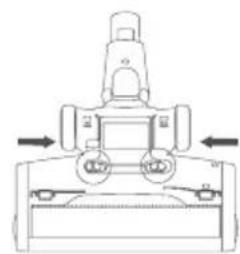
When packing, storing or cleaning, if the electric floorhead needs to be removed, press the brush release button as shown in the picture and pull the electric floorhead in the direction shown in the picture. (Fig 2)
Assemble the battery pack and handheld vacuum cleaner
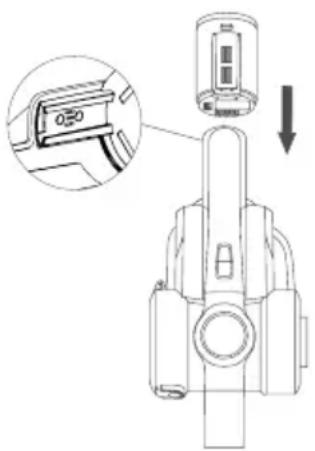
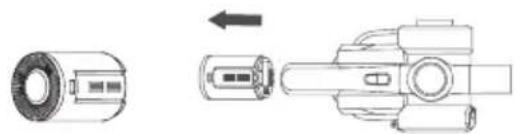
Assembly of battery pack: hold the hand held vacuum cleaner in one hand, hold the battery pack in the other hand, aim at the guiding groove on the body, slide in the battery pack according to the arrow direction shown in the picture, and then pull the battery pack after installation to make sure it does not get loose. (Fig3)
Attention: when the vacuum cleaner is long idled, please remove the battery, pack the machine and store it in a cool and dry place, avoid direct sunlight or humid environment.
1
2
3
Assemble metal tube and handheld vacuum
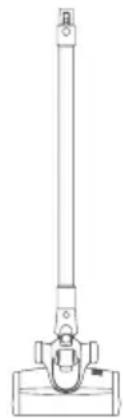
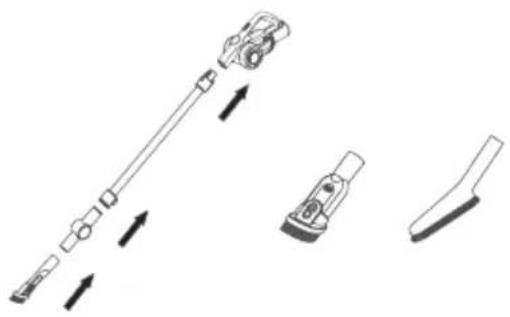
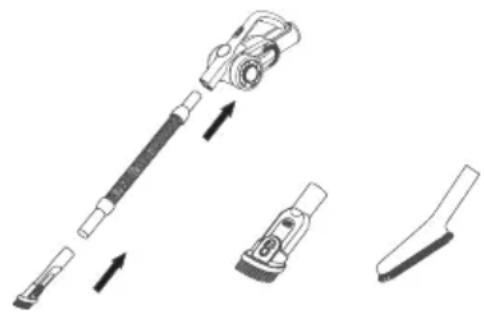
First, assemble floorhead and metal tube according to the method of assembling electric floor head and metal tube.(Fig 4)
Assemble the floorhead, metal tube and handheld vacuum cleaner
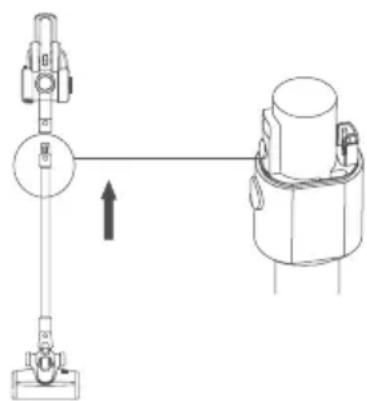
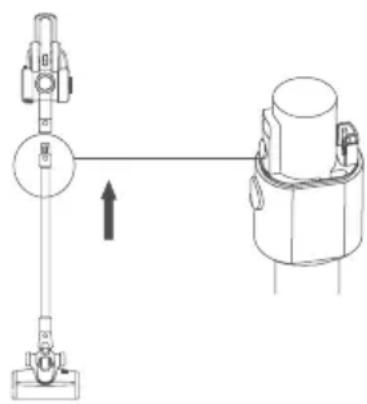
As shown by the arrow, align the conductive needle of the metal tube with the coupler of the suction nozzle, push up until a "click" sound is heard.(Fig5)
Assemble the charging stand
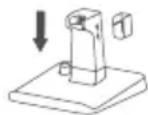
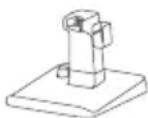
Assembly sequence: Insert stand into stand base as ①, insert charger bracket into stand as ②. After assembly the stand is like ③. Please the vacuum cleaner to bracket. (Fig 6)
Assembly of accessories
For the convenience of use, this product is specially equipped with some accessories for the handheld part of the vacuum cleaner. When you use the handheld vacuum cleaner alone, you can directly connect the accessories according to your needs or connect the accessories through the stretch hose.
Assemble accessories to handheld vacuum cleaner
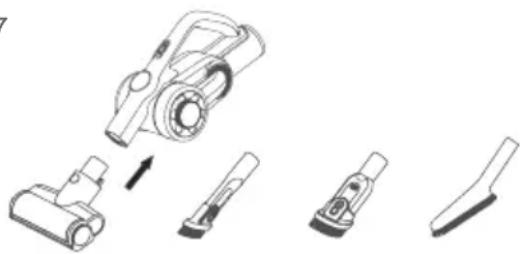
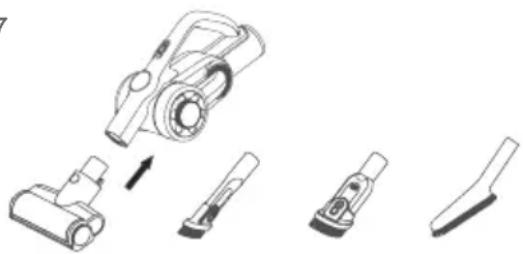
Align electric mattress head connector with handheld vacuum, insert to the end as the picture.(Fig 7)
Attn:The handheld vacuum can be connected with 2-in-1 upholstery, 2-in-1 crevice tool and soft brush as electric mattress head.
Assemble accessories to handheld vacuum cleaner
Align the vacuum cleaner with stretch hose, insert until it is fully tightened. Connect stretch hose with 2-in-1 upholstery tool: insert the 2-in-1 upholstery tool into the stretch hose until it is fully tightened.(Fig 8)
4
5
6

①
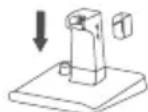
②
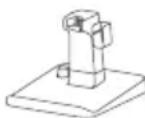
(3)
7
8

Attn: 2-in-1 crevice tool and soft brush can be connected to stretch hose as 2-in-1 upholstery tool.
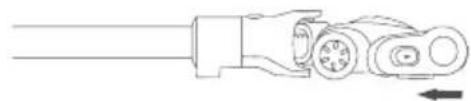
Connect handheld vacuum cleaner with accessories through connector
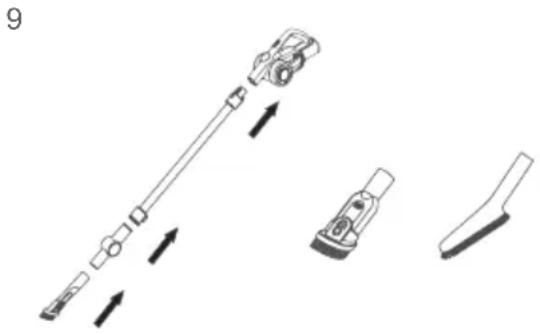
After connecting handheld vacuum cleaner to metal tube, the metal tube can connect with 2-in-1 crevice tool through connector. Insert one end of the connector into metal tube until it is fully tightened, and then insert 2-in-1 crevice tool into another end of the connector.(Fig 9)
9
Attn:
1.The 2-in 1 upholstery tool and dusting brush can be connected to connector as 2-in-1 crevice tool.
2. Connector can be directly connected to handheld vacuum cleaner.
Accessories Connection List
Use of the product
Attn:
- When use the product for first time, battery power is not full. Need to charge the vacuum before using. 2. When battery capacity is lower than 20% , the machine will automatically change to Eco mode, and cannot run in max mode.
Charging
When the vacuum cleaner power is insufficient, charge the vacuum cleaner in time; When the voltage is too low, to protect the battery, vacuum cleaner will be automatic power-off, at this time the vacuum cleaner need to be charged. When charging, assemble battery pack to machine, plug the charger connector into the A/C power socket and another end to vacuum cleaner to start charging. When the handheld vacuum cleaner LED display shows an increase in power, it indicates that the vacuum cleaner is charging. When charging is completed, LED display show 100% power.(Fig 10)
Attn:
- After charging, please pull the charger plug off power socket and stop charging.
- If power cord is damaged, to avoid danger, it must be replaced by a professional people of the manufacturer, repairing agent or similar department.
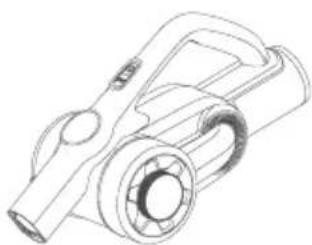
Use of Handheld Vacuum Cleaner
Take the vacuum cleaner off the holder, press the on/off button on the handle to start or stop of the vacuum cleaner. When machine is turned on, it works in Auto mode, press the power button to switch to Turbo mode, press again to switch to Max mode and again to switch to Eco mode. The vacuum cleaner working mode switches in the sequence of Auto, Turbo, Max, Eco mode through pressing mode button.(Fig 11)
Vacuum cleaner working mode:
Auto Mode: Adjusts power automatically according to different floor type, suitable for all types of floor. Turbo Mode: Suitable for short hair carpet Max: Mode: Suitable for long hair carpet Eco Mode: Suitable for hard floor like wooden floor, tile etc.
10
11
12
13
14
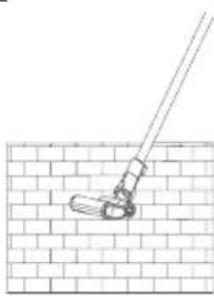
Use of Electric Floor Head
Electric floorhead can be used to clean short hair carpet, hardfloor, or tile.(Fig 12 13)
Attn:
During the operation of the electric floorhead, if there is a large volume of foreign matter inhaled or too much fiber wound, or even a child in the play of the machine mistakenly put his hand into the nozzle, resulting in the brushroll abnormal stop, the electric floorhead will stop working, in order to protect personal safety and brush motor.
Use of accessories
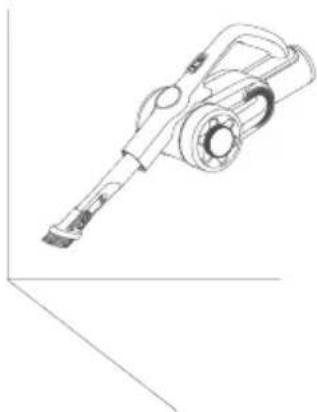
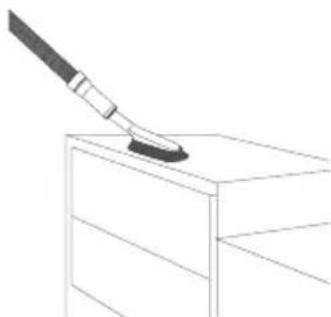
2-in-1 crevice tool: suitable for cleaning crevice, door or window corners and other narrow gaps.(Fig 14)
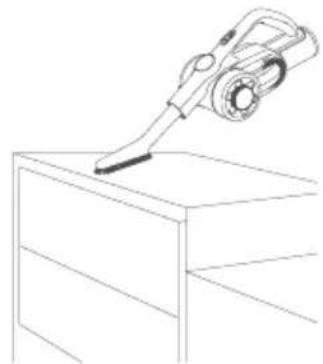
2-in-1 upholstery tool: suitable for cleaning closet, windowsill, sofa and table surface.(Fig 15)
Soft brush: suitable for cleaning easy to scratch furniture like bookshelf, handicraft etc.(Fig 16)
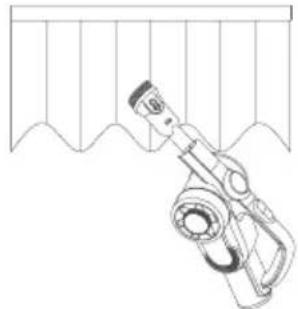
Stretch hose: the stretch hose is suitable for cleaning hard to reach areas.(Fig 17)
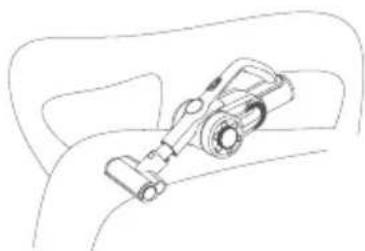
Electric mattress head: Suitable for sofa and mattress. The brushroll beats and then cleans the dust mite and allergen from deep sofa or bed.(Fig 18)
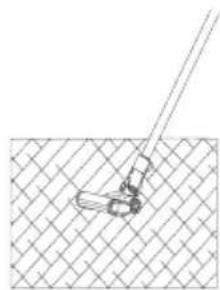
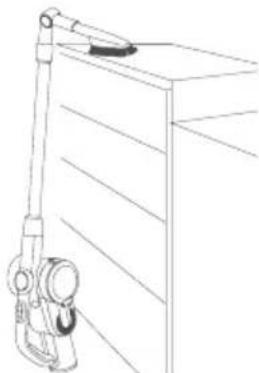
Connector: Can be connected to other tools and bend todifferent angle to clean dust on top of high cabinets or dust on the roof. (Fig 19)
Cleaning and Maintenance
Clean dust cup and filter
- Press dust cup cover release button to open dust cup cover.
2.Dump the dust to trash can from dust cup bottom.(Fig 20)
15
16
17
18
19
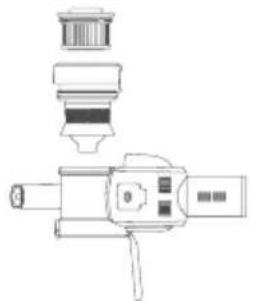
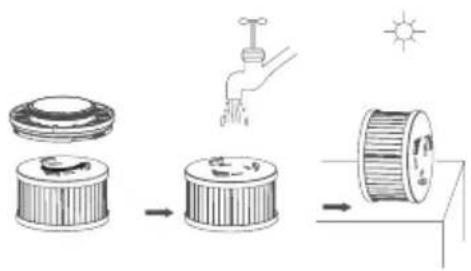
- Rotate HEPA holder to lift HEPA from vacuum cleaner. Cyclone can also be removed from vacuum cleaner for cleaning in the same way.(Fig 21)
- Rotate HEPA holder to take off HEPA for cleaning. HEPA needs completely dry before reuse.
5.After clean and dry the HEPA (Replace HEPA if necessary).(Fig 22)
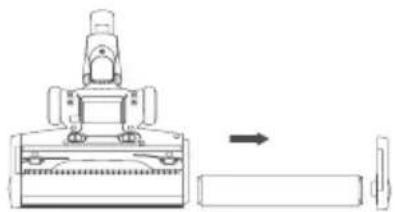
Clean brushroll
Move the brushroll release button along the arrow direction to remove side cover. (Fig 23)
Remove one end of the brushroll and take it out from nozzle for cleaning. After cleaning or replacing brushroll, assemble it back in opposite sequence of disassembly.
Clean floorhead air path
- Push the two buttons to remove floorhead air path cover.(Fig 25).
- Hold floorhead air path with finger and pull it out to clean.
- After cleaning, assemble in opposite sequence of disassembly.
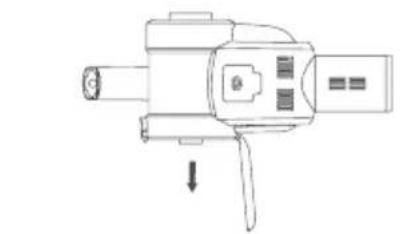
When the vacuum is long idled, need to remove the battery. Press the battery release button, remove the battery pack in the arrow direction and place the battery in a plastic bag, then store it in a cool and dry place, do not put in direct sunlight or humid environment. (Fig 26)
20
21
22
23
24
25
26
Safety Notes
This vacuum cleaner is designed for home use. Do not use it for commercial or other purposes.
Please read this instruction manual carefully before use, properly save and store it for future use.
Do not put the vacuum close to re or other high temperature facility.
Do not use or store the machine under extreme bad conditions, for example, extreme temperature. It is recommended to use it indoors between the temperature of 5^ to 40^ . Store the machine in dry place and avoid direct sunlight.
Fully charge the battery before rst use or after long storage.
Before using the vacuum, make sure brushroll is assembled, otherwise, it may lead to motor fan blockage, causing motor burn out.
Please do not use the vacuum to pick up detergent, oil, glass slag, needle, cigarette ash, wet dust, water, matches, etc.
Please do not use the vacuum to pick up tiny particles such as cement, gypsum powder, wall powder, or large objects such as paper balls, otherwise it will cause malfunctions such as blockage and motor burnout.
Avoid blockage to air inlet or brushroll, it may cause motor failure.
Do not pour or splash water or other liquids into the machine to avoid short circuit to burn out the machine.
If the brushroll is not working, please check whether the brushroll is entangled with hair or other long ber, clean it in time.
When storing the machine for a long time, ensure that the battery is fully charged before storage and charge the machine at least every three months.
Unplug the charger to clean or repair the machine. Hold the charger when plugging or unplugging it, and do not pull the charging cord.
Use a dry cloth to clean the machine. Liquids like gasoline, alcohol, lacquer thinner will cause crack or colour fading and cannot be used.
If the machine is not working after fully charged, it must be checked and repaired in our designated office, please do not dismantle the machine on your own.
When discard the machine, please press the button to release the battery pack, take out the battery pack, make sure the machine is disconnected with power and handled properly. Do not throw into fire, water or soil.
If the battery liquid leakage touches your skin or clothes, wash it with water, if there is any discomfort, please go to hospital immediately.
Do not use non-original battery pack, avoiding machine damage and safety problems.
Avoid to use the vacuum cleaner to pick up easily blockable things such as: plastic bags, candy paper, big scrap of paper, which might affect the function, even cause failure of working. Please clean the foreign matter on the floor head in time, then it will work normally. The discarded battery pack shall be recycled safely, do not throw away casually.
Trouble Shooting
Please check the following issues before sending to designated repair offices.
Trouble Possible Causes Solutions
Motor does not work Battery has no power Charge the vacuum cleaner
Motor does not work
Metal tube, floorhead, battery pack and vacuum cleaner is not assembled correctly
Check the accessories are assembled correctly to the vacuum cleaner
Suction drops Dust cup full Clean dust cup
Suction drops Filter blocked Clean or replace filter
Suction drops Floorhead air path blocked Clean floorhead air path
Short working time after charging
Machine not fully charged
Follow instruction manual to fully charge the battery
Short working time after charging
Battery old aging
New batteries can be bought from local distributor
Attention:If any other failures occurred, which need professional tools, in order to avoid danger, the machine must be repaired or replaced by manufacturer, other maintenance offices or professionals from similar offices.
Product Specification
Technical Parameter
Model No. H8 Pro
Rated Voltage 25.2V

Rated Power 500W
Adaptor Input Voltage 100-240V
50 - 60Hz0.8A
Adaptor Output Voltage 30V
600mA

Model No of Electric Floor Head
T-EB112
Rated Power of Electric Floor Head
30W
Battery pack capacity 3000mAh
Charging time 5h
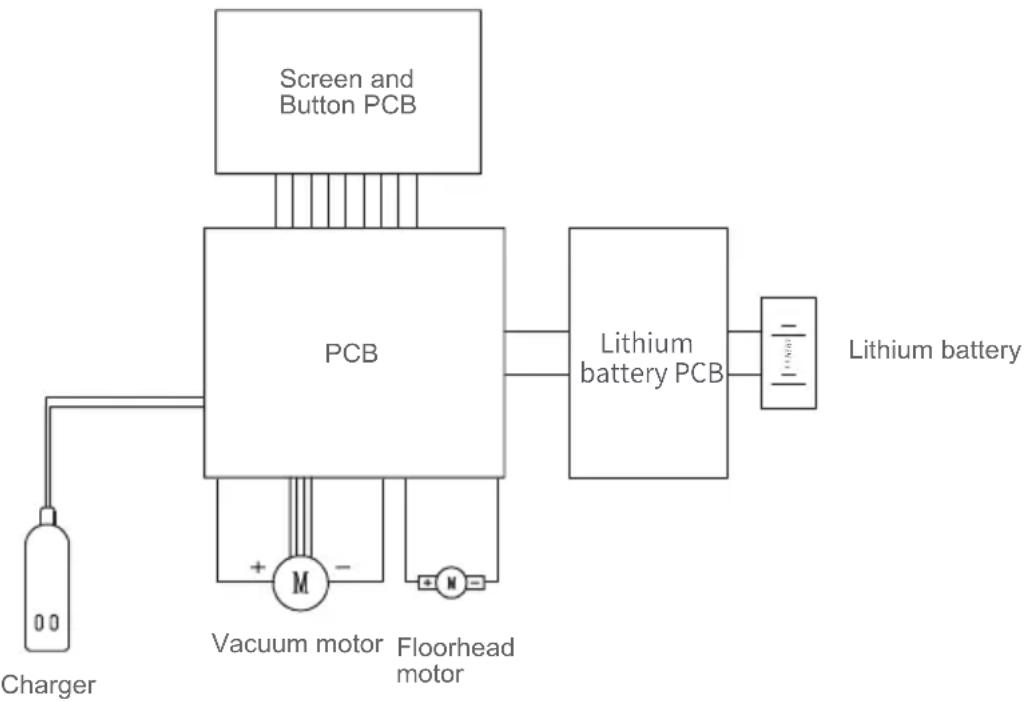
Circuit Diagram
Manufacturer Information
| Manufacturer Kingclean Electric Co., Ltd | |
| Address | No.1 Xiangyang Road, Suzhou New District, Jiangsu Province 215009, China |

Disposal
The machine, accessories and packaging should be sorted for environmental-friendly recycling.

Do not dispose of the machine into household waste!
Only for EC countries:
According to the European Guideline 2012/19/EU, machine that are no longer usable, and according to the European Guideline 2006/66/EC, defective or used battery packs/batteries, must be collected separately and disposed of in an environmentally correct manner.
Battery packs/batteries:
Integrated batteries may only be removed for disposal by qualified personnel. Opening the housing shell can damage or destroy the machine.
Do not dispose of battery packs/batteries into household waste, fire or water. Battery packs/batteries should, if possible, be discharged, collected, recycled or disposed of in an environmental-friendly manner.
Subject to change without notice.
Warranty Information
This product enjoys two year warranty from the date of purchase.
Excluded from the guarantee is normal wear, commercial use, alterations to the appliance as purchased, cleaning activities, consequences of improper use or damage by the purchaser or a third person, damage that can be attributed to external circumstances or caused by the batteries.
Please do not use the vacuum to pick up detergent, oil, glass slag, needle, cigarette ash, wet dust, water, matches, etc.
| Hersteller Kingclean Electric Co., Ltd | |
| Adresse | No.1 Xiangyang Road, Suzhou New District, Jiangsu Province 215009, China |
CE
Entsorgung
Batteries / batteries
11.Support de charge
Batteries / batteries
14.3nEeKtpnueckaJtKa dny ydaenHnIbIeBbIX Kneu
17.3naCTnHbI nnHHbI ⅢnHaHr
3.KhoIka pa3bIopKIOBm IbIeO5OpHnKa
6.Khonka pa36nokipobkH HanoIbHOH 5eTkn
9.Pyka pfunbtpa HEPA
12.BcacbBaHOuee conIO DBA B ODHOMDINIBaHa
15.MraKaJzTeKa
18.OchOBaHne IepKataTeIyI3apAdkn aKKymyIyTopa
YnakoBOUHbI JNCT
MOnTax aKKymyIaTOPHO bTapeN npUHOrO nblncocca
MoHTaK aKKymIyIopHO 6aTapei: ctaBnH3npuYte pyHoi nbIeCOC OHO HpyoN n depXHite aKKymIyIopHyIO 6bAtpaeO dpyroH pyKO,HaueINBUnCb Ha na3 HAnpaBIAUeH Na Kopnyce MaunHbI, BtANKBaIte pyHoi nbIeCOC B HAnpaBHeHn Po CTpeJIke, yka3AHHom Ha pncyKe. Iocne MoHTaKa CINbHO NOTAHTE HIXHIO KpbIuKy aKKymIyIaTOPa BHN3, UTObl y6eINTbcra, aKKymIyIaTOP He OTcoeINHTcR, pni 3OM cbOpKa aKKymIyIaTOPHO 6bTapeN 3abepSeHa. (Pnc.3)
PpimueaHHe: KOrda NbIeCoc He nCNoJIb3yETcB TeYeHne DInTeJbHoro BpeMeHN, pa3bnpaIte aKkymIaTOpHyIO 6aTaPeIO, ypaKyIte MaunHy u XpaHnte eE B npoxJaHOM I cyXOM MeCTe, He XpaHnte PoI npraMbIM COJHeuHbIMn IyuAmn IN Bo BLnaxHoI cpeJe.
MOnTaX MeTaNnuecko Tpy6kn n ceNoi MaunHbI
CnaaIa cMOHTnpyIte 3JIeKTPnueckyIO HanoJbHyIO UTeKyu I MetaJIuNueCKyIO Tpy6Ky corNacho cnocOby MOHTaJa 3JIeKTPnueckoH aNoJbHOJ UTeTKN I MetaJIuNueCKoT py6Kn. (Pnc.4)
MoHTaX HanoJbHOJ UeTKn-MetaJIInuecko Tpy6Kn n pyuHoro Nblncocca
Kak noka3aHO cTpeIkoH na pncyHke, BbipOBnIte rHe3do puHoro nbinecoca n 3neKTponpoBODHyIO nIpy MeTaNIIuecko Tpy6Kn, NOTOM CINbHO TOkaiTe Bn3, noka He ycbluHnte «UeNqok》. (Pnc.5)
MOnTakdepKaTeJia
CnocobMOHTaKa: ChaJana BCTaBbTe DePkaTeNb B OCHOBaHne DePkaTeJIa, KaK NOKa3aHO Ha PNCyHKe ① , NOTOM yCTaHOBIne DePkaTeNb aAnTepa B BBiUeYka3aHHbI DEPkaTeNb, KaK NOKa3aHO Ha PNCyHKe ② , YCTaHOBJIeHHbI DEPkaTeNb NOKa3aH Ha PNCyHKe ③ , B KOHcE KOHcOB NOCTaBBTe UeNyo MaunHy Ha yCTaHOBJIeHHbI DePkaTeNb (Pnc.6)
4
5
6

①
②
(3)
7
8
PoiocoeHHeHne akceccyapOB
Дя удобста И спОьзовиня HabToцая Прodyкua Спсuaлбо OсhaшеHa HeKOTOpbIMn akceccyapam ДЯ рунЧаCTи nbIeCoca. Korda Вы Incnoь3yeTe рунН Пынecoc OTdeЛьHo, Bbl MOжete NOДcoeДИHITь Akceccyapbl HApPMyU ИПС CпOMOью элactУHOrO ShJaHra NO Mpe Heo6xOДmOCTn.
IodcoeHHeHne pyHOro nbJIecOca KaKceccyapam
HaueiTe kpyIbI nopT aadTepa 3neKtpnuecko 9eTKn dJa ydaJeHna bJIeBbIX KJIeSei Ha BCaCbBaIOoee COIIPO pyHoro Nblncocca, NOTOM BCTaBbTe eRO B NOIOXHe OCTaHOBKn B HapabLeHH, NOKa3aHHOM Ha pscyHke. (Pnc.7)
He cTaBbTe nbIeoc6bln3ko K orHIO nn Dpyromy BbICOKoTeMpeaTyphOMy MeCTy.
He nCnoB3yIte H He xpaHnte MaunHy B 3KCTpeMaJIbHbIX He6JarOpnpyTHbIX ycIOBnIx, TaKnx KaK 3KCTpeMaJIbHbIe TemnepaTpybl. He nCnoB3yIte B cpeaX, rJe TemnepaTpya HnKe 5^ nnB bIwe 40^ . XpaHnte B cyxOM npoxnaHOM MeTe. 3anpeuaetcA dNITeJIbHoe Bo3deiCTBne COJHeuHbIX nyuei.
3apndte akkymyIaTOp nbIeococa noJIHocTbIO nepei nCNoJb3OBAHNem HOBOro akkymyIaTopa nn npn nepBOM nCNoJb3OBAHNn akkymyIaTopa nocJe dNITeJbHoro xpaHeHHa.
ОьратиЕ ВИMuHHe Na yCTaHOBJIeHne BaIHKOBoi ΜeTKI ДЯ ΜeTKI ДЯ чИСТКI NOla NepeД ИСПОЛБ3OBaHnEM nbIeNecOca.В npOTINBHom cIyuae 3TO MOKET pINBecTи K CTOrHKe NOd TOKOM IN CxUraHIO DBuRatela.
He nCnoJb3yIte nbIeNoc dJa BCacbIBaHnra MOUx cpeCTB, KepocHa, CTekJHHoro IJnaka, INI, CaXn, BJIaxHOI PbIN, CTOHyBIX BOd, CnueK n DpyrIX npedMeTOB.
He nCnoB3yIte nbIeoc 6nBcAcbHnMeIbuaWx qactu, TaKx KaK cemeHT, rncobbl npo0ok, cTeHOBoI npo0ok, nn KpyHbIe ppeMToI, TaKe KaK irpyka, bymaxhbl uapNK. B npOTNBOM cnUyae 3TO MOKeT npVBecTI K 3acopeHHIO nbIeocOa I CkNraHHIO dBVaTeJIa.
При И спослбзовани nbilecoca obpatite Bниманe Ha To,чTo He 3acopntb BCacbIbaUоцee OTBepctne n 3amopo3nTB BaIINKOByU uetky.В npotINBHom cnyuae Dnuratelb moKet pa6OtaTb HnnpabNtBHO.
He KnaIte KOHeuHocTn BO BCacbIBaIOUe OEtBepCTne UeTKn IJIy NcCTKn NOJa npNcNoJIb3OBAHm nblIEcoCA, B IpOTUBHom Cnyae 3TO MOKeT pnpBeCTn K TpaBMe.
He neiTe n He 6pbI3raIte BDOy IIN dpyrHe JnKIOCTN B MaUNHy, YTObI N36eKaTb KOpOTKO0 3aMbIKAHnB MaUNHe n CxNIGAHn.
EcIn BaNkoBaj 1eTka He nobopauHbAetcB BO BpeM IcNoIb3OBAHn, NoXaIyICTa, npOBepbTe, He o6MoTaHa JIn BaNkoBaj 1eTka BOLOcam NIN dpyrIMN dINHHbIMN BOJOKHAMN, IN BOBpeM OUnCTITE IX.
При Дпintьном xpaHeHn yctpoiCtBa, noXaIyIcTa, y6eIntEcB, YTO aKKymJrTOp nONHOCTbIO 3apJxKeH. A TAKKe y6eIntEcB, YTO aKKymJrTOp 3apJxKeTcN i pa3pJxKeTcN He pexe Ondoro pa3aВТрИ Mecaцa.
Korda Baw nbilecoc noHoctbu 3apxkeH,doJxeh 6bItb ouHueH nn OTpeMOHTnpOBaH, noXaIyICTa, BOBpem OTKIOUHTe BNky 3apdHoro ycTpoIcTBa. DePKeITe BNky 3apdHoro yCTpoIcTBa npi noDKIOUeHn nn OTKIOUeHn cTeBOrO shypa n He TAnHe 3a 3apdHbI ceTeBoI shyp.
IcnoJb3yIte cyxuTo TkaHb npu YnCTke nbilecoca. He IcnoJb3yIte 6eH3nH, cnpt, 6aHaHObyIO 3ccEHnIO n T.d. TaK KaK 3TO MoKET npNBecTn K pactpeCKNBAHNIO nIN BblCBeTaHIO Kopnyca.
Korda uejra MaunHa noHocTbIO 3apXeHa, Ho He MoKe Ta6oTaB, ee Heo6xOJMo npOBepntb I OTpeMOHTnpOBaTb B Ha3NaueHHOM nyHKTe o6cIyJxBAHn. He pa3bpaTe MaunHy co6CTBeHHO.
B yctapeon Mycopno MaunHe coepKNT 6aTapei. OHH dOJIxHbI 6bITb yTNIN3npoBaHbI 6e3OnacHO. He BbIbpaCbIbAitne ux.
Ecni ceTeBOI uHyp IOBpeXJeH, OH DoJIkeH 6bITb 3aMeHeH I OTpeMOHTnpOBaH KBaJIINpUPOBaHHbIM CneuiaNCTOM B n3rOToBnTeNe, erO OTdEne O6cnyKbAHnI aHaIOnuHOM OTdEne, YTObI n36eKaTb ONaCHOCTN.
YcTpaHHeN HeNCnPaBHOCTeI
PpOBepbTe cIeDyUoUne BOpocbl nepei cdauee npOdyKcHn Ha peMOHT.
TapaHTnHe npedocTabIeTcB Cnyuae eCTcTBehHOro n3HOca, nCNoJIb3OBaHnB KOMMepuecknx ceIax, n3MeHnN nepBOHaayalbHOrO coCTOraHnnp6opapabot no OunchTe, npn NocJIeCTBnX HeHaJNeKxAeero o6paUeHn nn NobpeKdEHN NOKyNaTeJIem INn TpeTbIMN JInCaMn, NOBpeKdEHN, Bbl3BaHHOM BHeUHmN ObCTOaTeJIbCTBaMn, INn IN3-3a aKKymIyTophIx 6batapei.

1K-01


- Products Installation
- Unpacking
- Parts Name
- Product assembly and disassembly
- Assemble the battery pack and handheld vacuum cleaner
- Assemble metal tube and handheld vacuum
- Assemble the floorhead, metal tube and handheld vacuum cleaner
- Assemble the charging stand
- Assembly of accessories
- Assemble accessories to handheld vacuum cleaner
- Connect handheld vacuum cleaner with accessories through connector
- Attn:
- Accessories Connection List
- Use of the product
- Charging
- Use of Handheld Vacuum Cleaner
- Use of Electric Floor Head
- Use of accessories
- Cleaning and Maintenance
- Clean brushroll
- Clean floorhead air path
- Safety Notes
- Trouble Shooting
- Product Specification
- Technical Parameter
- Circuit Diagram
- Manufacturer Information
- Disposal
- Only for EC countries:
- Battery packs/batteries:
- Warranty Information
- CE
- Entsorgung
- Batteries / batteries
- YnakoBOUHbI JNCT
- MOnTax aKKymyIaTOPHO bTapeN npUHOrO nblncocca
- MOnTaX MeTaNnuecko Tpy6kn n ceNoi MaunHbI
- MoHTaX HanoJbHOJ UeTKn-MetaJIInuecko Tpy6Kn n pyuHoro Nblncocca
- MOnTakdepKaTeJia
- PoiocoeHHeHne akceccyapOB
- IodcoeHHeHne pyHOro nbJIecOca KaKceccyapam
- YcTpaHHeN HeNCnPaBHOCTeI
Brand : JIMMY
Model : H8 Pro
Category : Vacuum Cleaner