RB38A7B5C12 - Freezer SAMSUNG - Free user manual and instructions
Find the device manual for free RB38A7B5C12 SAMSUNG in PDF.

User questions about RB38A7B5C12 SAMSUNG
0 question about this device. Answer the ones you know or ask your own.
Ask a new question about this device
Download the instructions for your Freezer in PDF format for free! Find your manual RB38A7B5C12 - SAMSUNG and take your electronic device back in hand. On this page are published all the documents necessary for the use of your device. RB38A7B5C12 by SAMSUNG.
USER MANUAL RB38A7B5C12 SAMSUNG
User servicing manual
- You can check where to buy replacement parts at http://samsung.com
-
Visit the part purchase site and enter the model code of your product to check the parts available for purchase. The model code is labelled on the outer side of your product.
-
You can check the model code and version on the barcode label at the bottom left of the product.
-
For replacement parts, make sure the part name matches that of the illustration in this manual.
- User-serviceable parts are limited to handles (some models only), gaskets, drawers, and hinges.
NOTE
Following the repair by a non-authorised service provider, self-repair or non-professional repair of the product, Samsung is not liable for any damage to the product, any injury or any other product safety issue caused by any attempt to repair the product which does not carefully follow these repair and maintenance instructions. Any damage to the product caused by an attempt to repair the product by any person other than a Samsung certified service provider will not be covered by the warranty.
CAUTION
- The part name listed on the site may differ from that in this manual. Please make sure you choose the right part name.
- Replacing hinges requires extreme caution because it involves detaching the door.
- Be sure to wear safety gloves while making repairs.
English
The actual image and provided parts of the refrigerator may differ, depending on the model and the country.
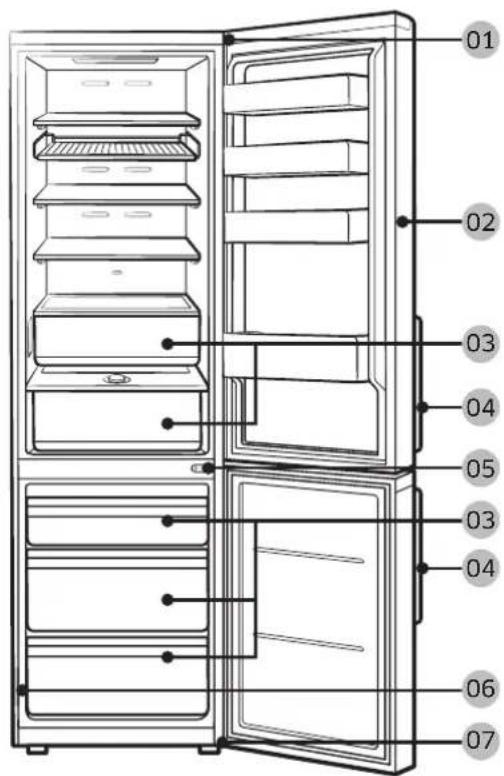
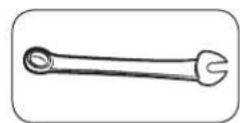
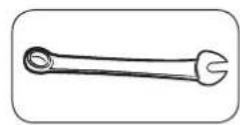
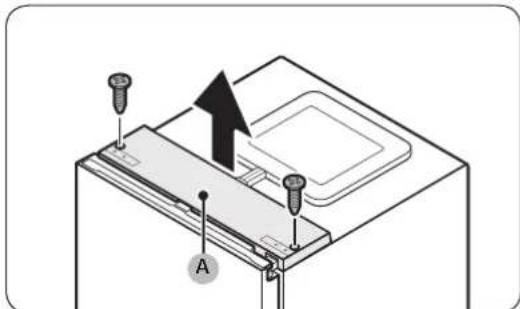
01 Top hinge 02 Gasket
03Drawer 04 Handles (Applicable models only)
05 Middle hinge 06 Barcode label
07 Bottom hinge
English
Handle replacement
Model name looks like this: RB386, RB382, RL386, RB3L*2, RB366, RB362, RL36*6, RL362, RB346, RB34*2, RL346, RL342***
What replaces the asterisks may differ depending on the model.
Asterisk(s) in the model code indicate a variant model and may replace (0-9) or (A-Z) in the model code.
CAUTION
- When replacing the door handle, take care not to scratch the front of the door.
- Firmly press the handles at the supports. Make sure there is no gap between the supports and the door.
- Tightly fasten the screws when attaching the handle.
- Check that the handle is firmly attached before using the product.
Tools required (not provided)

Phillips screwdriver Flat-head screwdriver
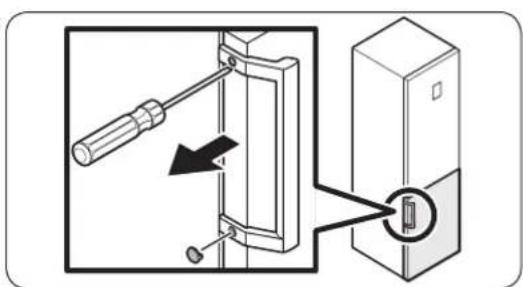
To detach the handles
NOTE
This procedure applies to both the fridge and freezer compartment.
-
Use a flat-head screwdriver to remove the screw covers.
-
After detaching the handle, attach the screw covers back on the screw holes.
-
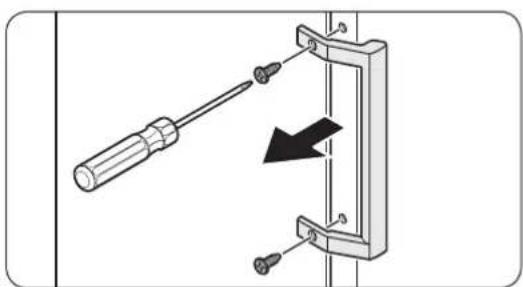
Use a Phillips screwdriver to remove the screws and detach the handle.
NOTE
Use these screws to fasten the handle on the opposite side.
- Assemble the new handle in the reverse order of disassembly.
English
Gasket replacement
CAUTION
Make sure you firmly attach the gasket. Otherwise, cold air from the refrigerator may leak.
To remove the gasket
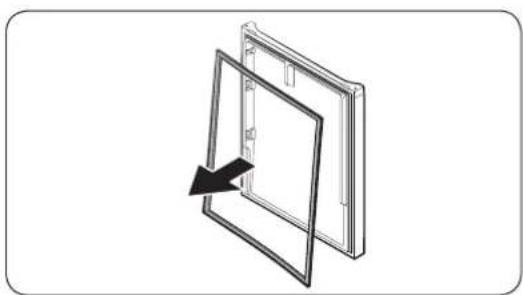
Open the door and remove the gasket from the door.
To replace the gasket
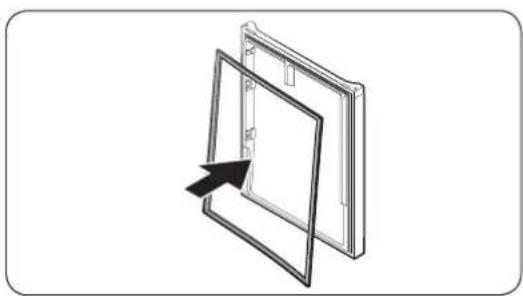
Attach a new gasket to the refrigerator door. Make sure there is no gap between the new gasket and the door.
Drawer replacement
CAUTION
Check that the drawer is inserted properly into the rail during assembly.
To remove the drawer
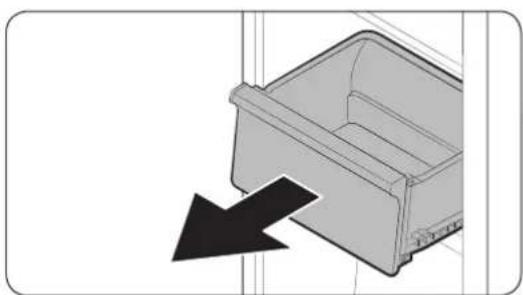
Gently lift up the front of the drawer and slide it out.
To reattach the drawers
Reattaching the drawers follows the reverse order of their respective removal steps.
English
Hinge replacement
To replace the hinges, you must remove the doors first.

CAUTION
- When removing the doors, take extreme caution because the doors are heavy.
- Before replacing the hinges, put a soft pad such as cardboard on the floor to prevent scratches on the door when you place the doors down.
- As the hinges must be handled carefully and replaced by two or more persons, we recommend you to call for professional technical service.
If you remove the hinge without holding the door, the door may fall and cause injury. - Ensure that the shaft is firmly tightened on the hinge.
- Check that the hinge is firmly attached to the cabinet.
- Make sure the wire connectors are connected properly.
- Be careful not to damage the wires when fastening the top cover.

WARNING
- Tilting/laying the refrigerator requires a minimum of 2 people.
- Disconnect the power cord before reversing the doors.
Tools required (not provided)
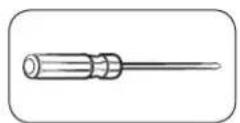
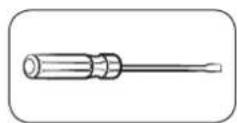
Phillips screwdriver Flat-head screwdriver 11 mm spanner
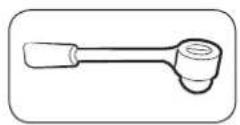
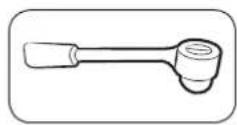
10 mm socket wrench 8 mm socket wrench 10 mm spanner
English
Reversing the door

NOTE
For the models with handles, reverse the handles first. (For detailed information, see the "Handle replacement (For models with bar handles)" section.)
-
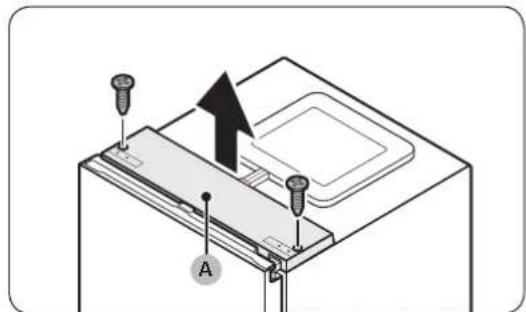
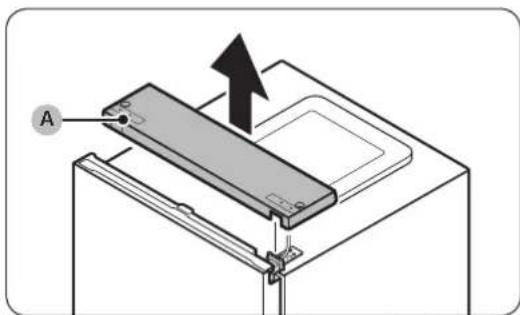
With the fridge door closed, use a Phillips screwdriver to remove the screws fastening the top cover (A).
-
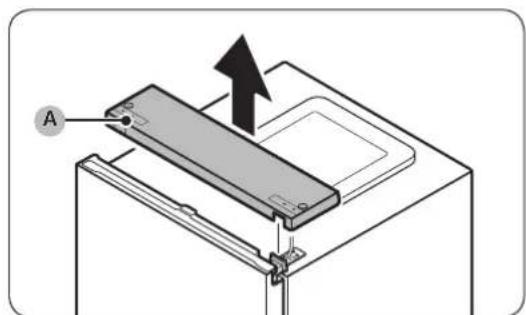
Gently lift the top cover (A) and place it on top of the refrigerator.
-
Be careful when you lift the top cover (A). There is a wire connected underneath it.
-
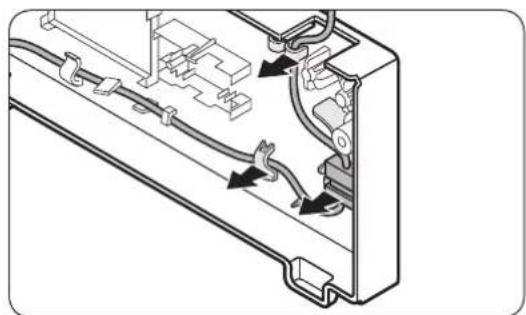
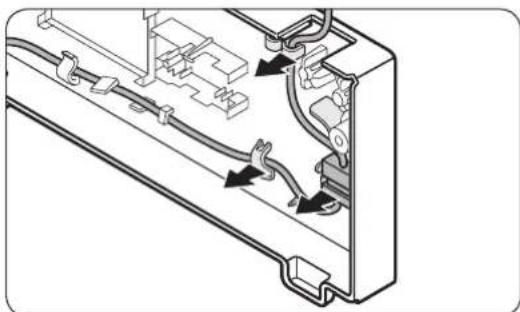
Remove the wire and the wire connector placed on the holder underneath the top cover.
-
This step may not apply to some models.

CAUTION
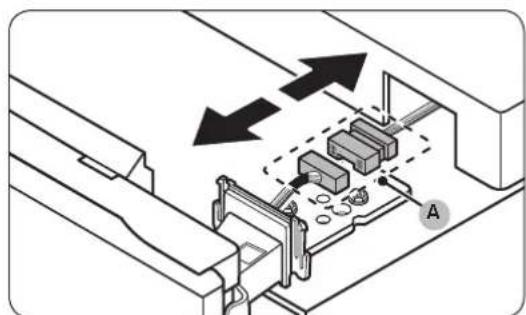
Do not pull the connectors too hard.
-
Disconnect the wire connector (A).
-
This step may not apply to some models.
English

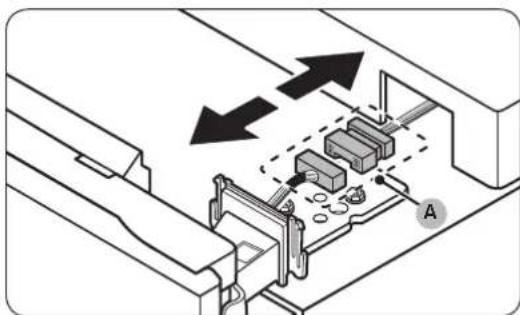
- Use a socket wrench (8 mm) to remove the screws fastening the top hinge (A).
CAUTION
To prevent the fridge door from falling, make sure to hold it tight while removing the screws.
- Open the fridge door, and then lift the door to remove it from the middle hinge. Keep the door in a safe place.
CAUTION
The door is heavy. To prevent damage or injury, use caution while removing the door.
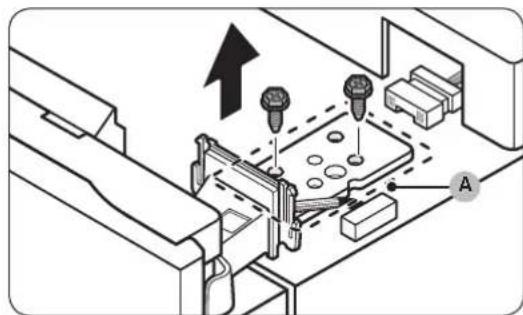
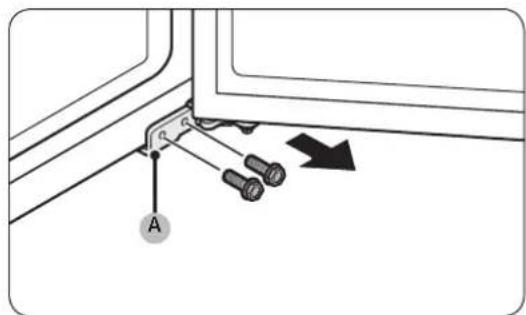
- Open the freezer door, and then use a socket wrench (8 mm) to remove the screws fastening the bottom hinge (A).
English
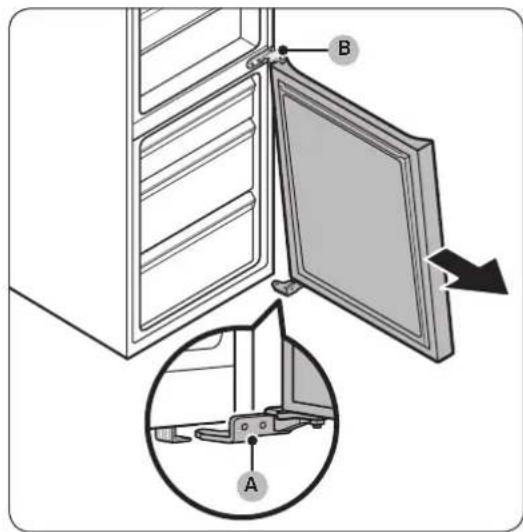
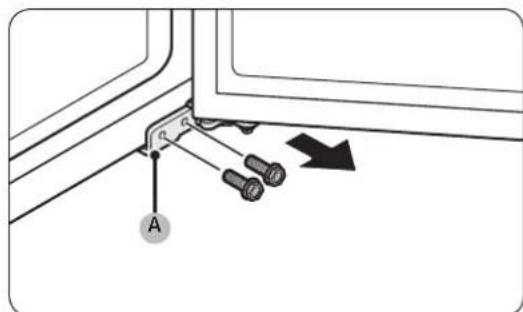
- With the freezer door sitting on the bottom hinge (A), slowly pull the bottom hinge (A) to remove it from the holder on the bottom of the refrigerator. Once the bottom hinge (A) is removed from the holder, remove it from the freezer door, and then pull the freezer door down to remove it from the middle hinge (B).
CAUTION
To prevent the freezer door from falling, make sure to hold the freezer door tight until it is safely removed from the middle hinge (B).
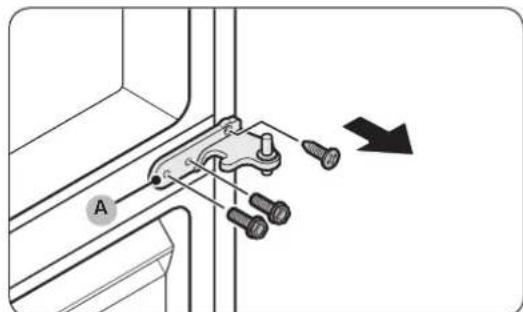
- Use a Phillips screwdriver and socket wrench (10mm) to remove the screws fastening the middle hinge (A).
- Reassemble in the opposite order of disassembly after replacing the top, middle, and/or bottom hinge.
CAUTION
Make sure the wire connectors are connected properly.
- Be careful not to damage the wires when fastening the top cover
English
Guide de réparation
Undga at treek for hardt i stikket.
10-MM Tpb6eH KIIIOU 8-MM Tpb6eH KIIIOU 10-MM raeuH KIIIOU
BbIraPcKu
06pbuaneHaBpaTaTa

BEJIEXKA
Pn moe nte c dpbknn Ha-Haeped Tpr6ba da oobpheTe dpbknte. (3a noippo6Ha HOpmaun BnKte pa3en, CmHa ha dpbknte (3a moeenn c dpbknn c noct)
-
Pn 3aTbopeHa BpTa Ha XlaDINHnKa C NOMOuTa Ha Kpbcta OTBePTKa CBaIe TE BuHTOBeTe, C KOINTe e 3aTeHAT ROpHnKa nak(A).
-
BHIMATEJHO NOBdHHeTe rOpHnA Kanak (A) n ro noctabete Bbpxy xnaDnHnka.
БьдeTe BHHMaTeHn npn NOBdIraHTo Ha rOpHnKa nakA(A).Poi Hero e pa3noJoxKe npoBOdHnK.
3.ИЗваде Te npOBODикa И KOHeKToPа НпpoBODnka, NOCTaBeH BbPxI DpbKkata NOD rOpHnKa nak.
Bb3MOxHo e Ta3n CTbNka da He ce OTHacr 3a HAKO MOdJI.N.

BHIMAHVIE
He bpaai Te KOeKTopi Te pkeaeno CnHNo.
- N3KJIIOUeTe KOHEKTopa Ha npoBoHnKa (A).
-Вьзможно e Ta3n CTbПka Ja He ce OTHaCЯ HЯКО MOnJI.
BbIraPcKu


5.CnOMOHTaHaTnyxKIOU(8MM)npemaxHeteBHTOBETe, c KONTO e 3aterHata ropHaTa naHTA(A).
BHIMAHHE
3a Da He Doynchete NaDaHe Ha BpaTata Ha XnaHnHa, norgnkeTe Ce Ta Jbpxnte 3pabo,doKATO N3BaXdaTe BNHTOBete.
- OTbOpTe BpaTata Ha xHaDnHnKa n CneT TOBa naBnHHe, 3a a n3BaNte OTo WapHnpa Ha XHaDnHnKa. 3ana3e BpaTata Ha cnrypHo MAnTo.
BHIMAHHE
BpataeTeKka.3aJaHeOnyCheteNobpeaHapaHbAhe, BHmBaIte,doKaTOCBaJIrE Bpata.
- OTbopete BpaTata Ha φpnsεpa n C NOMOHTa Ha rIyX KIOU (8 MM) npemaxHete BnHTOBeTe, c KONTo e 3aTeHata DOnHaTa naHTa (A).
BbIraPcKu


8.ДOKATO BPAATA NaФPn3epa e 3aKauyeHa cAmO Ha DOJHATA naHTA(A),6abHO n3dbpnaTe DOJHATA naHTA(A),3a Da ro OCBO6OJNTe OT dpbXkata OTdOly Ha XnaIINHnka.Cnei KaTO DOJHATA naHTA(A) ce OCBO6OJNOT dpbXkata, INBaJeTe r OT BpATA NaΦPn3epa n CneI TOB a Nb3HeTe BpATA NaΦPn3epa HADONY, 3a Da n OCBO6OJNTe OT CpeHATA naHTA (B).
BHIMAHHE
3a da He donyucheTe nadahe Ha BpataHa φpns3epa, norpnkete ce da dbpxnte 3npabO BpataHa φpns3epa,dokaTo oCBO6oNDte p6eONaceHnHnOT cpeNaHTa (B).
- C nOMOHTa Ha KpbCTata OTBepTKa HnIyXKnIOU (10 MM) 3BaTe BnHTOBete, C KOINTe 3aTeHATA CpeHaTa NaHTa (A).
- Crno6eTe OTHOBO B o6paHnpeHa pa3rno6BaHHeTo, cneI KaTO NOCTaBtE rOpHaTa, CpeHbTa N/INN DOJIHaTa NaHTA.
BHIMAHHE
PpOBepeTe daJI KOneKToPe Ha npoBoHnUHTe ca BKNIOueHN, KaKTo TpR6Ba.
BHNMaBaIe da He NoBpeJte IpoBoDNHnUITE,doKaTO 3aTaraTe rOpHnKanak
BbIrapcn