
BTSenrex - Audio accessory HAMA - Free user manual and instructions
Find the device manual for free BTSenrex HAMA in PDF.

User questions about BTSenrex HAMA
0 question about this device. Answer the ones you know or ask your own.
Ask a new question about this device
Download the instructions for your Audio accessory in PDF format for free! Find your manual BTSenrex - HAMA and take your electronic device back in hand. On this page are published all the documents necessary for the use of your device. BTSenrex by HAMA.
USER MANUAL BTSenrex HAMA
ThankyouforchoosingaHamaproduct.
Takeyourtimeandreadthefollowinginstructionsandinformationcompletely.Pleasekeepthese instructionsinasafeplaceforfuturereference.Ifyousellthedevice,pleasepasstheseoperating instructionsontothenewowner.
1. Controlsanddisplays
1.TX/RXswitch
-
Multi-functionbutton(MFB)
-
StatusLED
-
Audioinput(3.5mm)
-
Micro-USB connection
2. Explanationofwarningsymbolsandnotes
Warning

This symbol is used to indicate safety instructions or to draw your attention to specific hazards and risks.
Note

This symbol is used to indicate additional information or important notes.
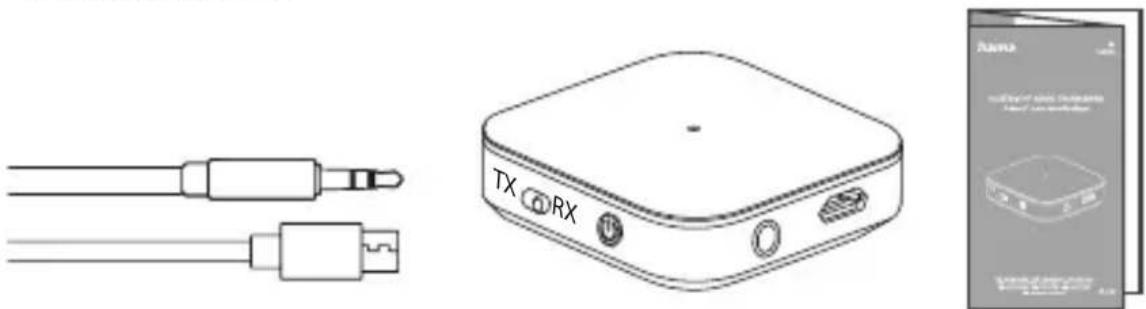
3.Packagecontents
- 1x"BT-Senrex"Bluetoothaudiotransmitter/receiver
• 1xmicro-USBchargingcable - 1x3.5mmAUXcable
- 1xoperatinginstructions
4. Safetyinstructions
• The product is intended for private, non-commercial use only.
- Protect the product from dirt, moisture and overheating and use it indry environments only.
- Donotusetheproductintheimmediatevicinityofheaters,otherheatsourcesorindirect sunlight.
- Whiledrivingacarorusingsportsequipment, donotallowyourselftobedistractedbyyour productandkeepaneyoneonthetrafficsituationandyoursurroundings.
- Donotdroptheproductanddonotexposeittoanymajorshocks.
- Donotoperatetheproductoutsidethepowerlimitsgiveninthespecifications.
- Donotopenthedeviceorcontinuetooperateitifitbecomesdamaged.
- The battery is permanently installed and cannot be removed; dispose of the product as a whole in accordance with the statutory regulations.
- Disposeofpackagingmaterialimmediatelyinaccordancewiththelocallyapplicableregulations.
- Donotmodifythedeviceinanyway.Doingsovoidsthewarranty.
- Usetheproductonlyfortheintendedpurpose.
- Onlyusethearticleundermoderateclimaticconditions.
- Donotusetheproductinareasinwhichelectronicproductsarenotpermitted.
- Do not attempt to service or repair the product yourself. Leave any and all service work to qualified experts.
- Donotincineratethebatteryortheproduct.
- Donottamperwithordamage/heat/disassemblethebatteries/rechargeablebatteries.
• Take care that component such as airbags, safety areas, controls, instruments, etc. and visibility are not blocked or restricted. - Ensure that the product is securely mounted before every journey.
Warning-rechargeablebattery

- OnlyusesuitablechargingdevicesorUSBportstochargetheproduct.
- DonotusedefectivechargersorUSBportsanddonotattempttorepairthem.
- Donotoverchargetheproductorallowthebatterytocompletelydischarge.
- Avoidstoring, charging and using inextremetemperatures and atextremely low atmospheric pressures (such as high altitudes).
- Whenstoredoveralongperiodoftime, batteriesshouldbechargedregularly(atleasteverythreemonths).
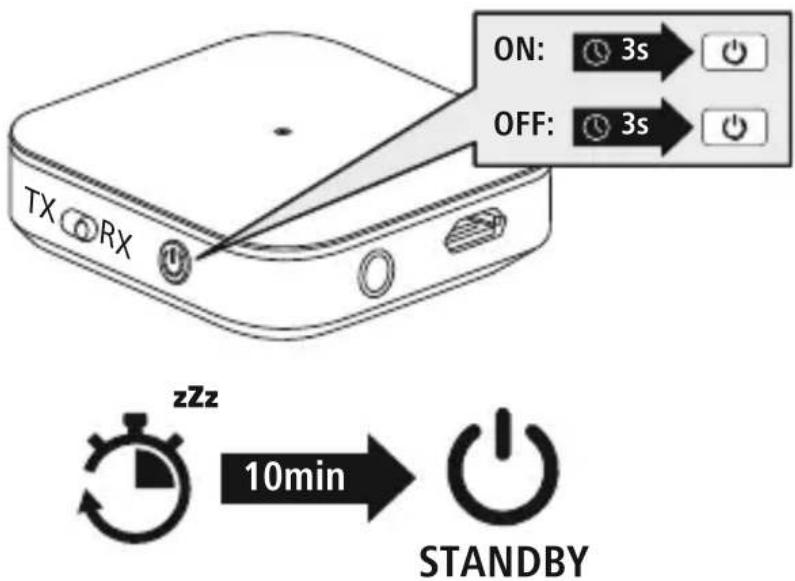
5.Switchingon/off

PresstheMFBbutton(2)foraround3secondsuntiltheLED(3)lightsupblue.

Toswitchoff, presstheMFBbutton(2)foraround3secondsuntiltheLED(3)flashesred twiceandthengoesout.
text_image
ON: 3s OFF: 3s TX RX zZz 10min STANDBYNote-Automaticproductswitch-off

The product is equipped with an automatic switch-off mechanism. If there is no connection to your device within 10 minutes, it switches itself off automatically.
6.Charging
Fullychargetheproductoncebeforeusingitforthefirsttime.
1
Connectingtheproduct
ConnecttheUSBchargingcableincludedtothechargingsocket(5).Connectthefreeplug onthemicro-USBchargingcabletoasuitableUSBcharger.Todothis,consulttheoperating instructionsfortheUSBchargeryouareusing.
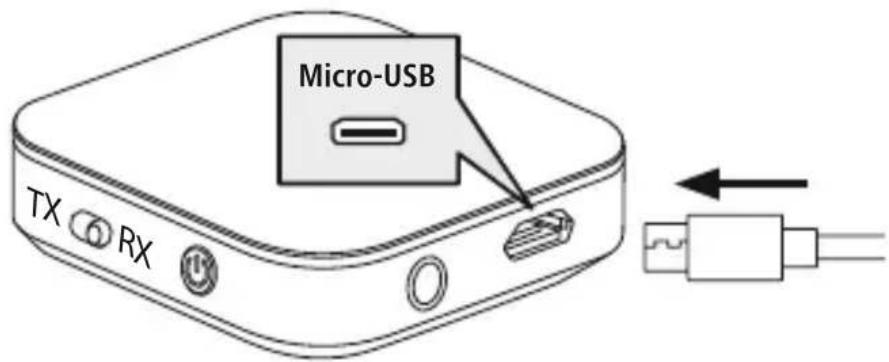
text_image
Micro-USB TX RX2
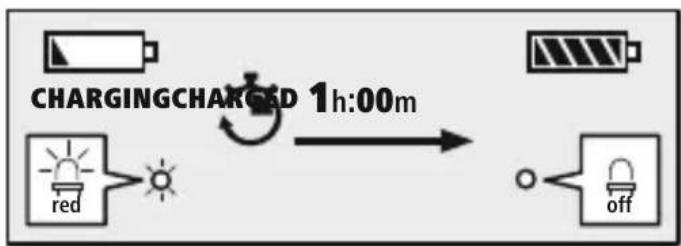
Chargingprocess
TheLED(3)lightsupsolidredduringthechargingprocess.Oncethechargingprocessis complete,theLED(3)goesout.

flowchart
graph LR
    A["Charging Battery"] --> B{Charging Charge}
    B --> C["Red Light"]
    B --> D["Off"]
    C --> E["Light Bulb"]
    D --> F["Off Bulb"]
    G["1h:00m"] --> H["Charge Cycle"]
Itcantakeupto1hourforthebatterytobefullycharged.
3
Batterycapacity
When battery levels are low, the LED(3) start to flash red.
7. Bluetooth ^ pairing

Note-pairing
- Ensure that the Bluetooth®-enabled device is switched on and that the Bluetooth® function is activated.
- Pleaserefertotheoperatinginstructionsofyourdeviceformoreinformation.
- Whentheproductisswitchedonforthefirsttime, pairingbeginsautomatically.
- Theproductandthedeviceshouldnotbemorethan1metreapart.Theshorterthedistance,the better.
- SwitchtheproductonusingtheMFBbutton(2).
- ThisproducthasanintegratedBluetooth ^ functionthatallowsstreaming(e.g.froma
- smartphone)totheproduct. The product also has a further function that ten ablestransmission to Bluetooth® devices(suchasBluetooth® headphones/speakers).
7.1RXreceivemode
YoucanpairyourdeviceswiththeproductusingBluetooth® anduseitasaplaybackdevice.Youcan control playbackdirectlyontheterminaldevice.Whenusedasareceiver,upto8transmitterscanbe stored,theaudiosignalfromwhichcaneachbereceivedbyaBluetooth® device.
1 Connectiontothedevice
Toconnecttoyourdevice, connectitusingthe3.5mmAUXcableandtheaudioinput(4)on theproduct.

RX
SelectRXmodebypushingtheswitch(1)totheright.


PresstheMFBbutton(2)twice.
- IftheLED(3)isflashingalternatelyredandblue: theproductissearchingforaBluetooth ^ connection.
- IftheLED(3)lightsupblue: theproductisalreadypairedwithaBluetooth ^ device.
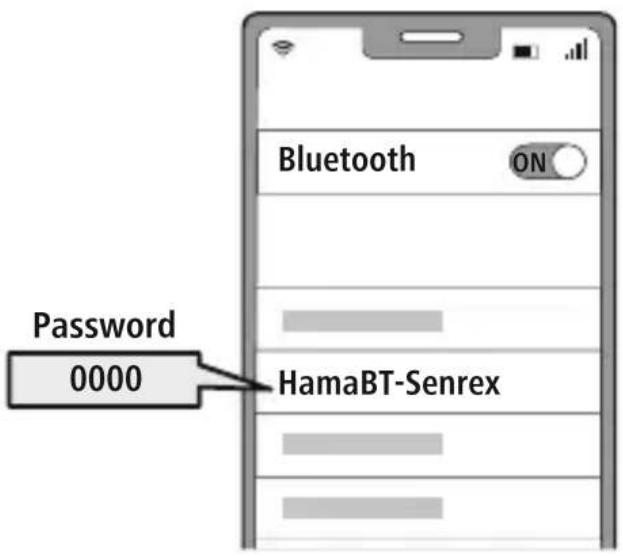
2 Searchusingyourdevicefortheproduct(onlyrequiredonthefirstconnection)
OpentheBluetooth® settingsonyourdeviceandwaituntilthelistoffoundBluetooth devicesshowsHamaBT-Senrex.
Select Hama BT-Senrex and wait until product is listed as connected in your device's Bluetooth® settings.
Note-Bluetooth ^® password

SomedevicesrequireapasswordinordertoconnecttoanotherBluetooth ^® device.
- Enterthepassword0000toconnecttheheadphonesifyourdevicepromptsyouto enterone.
text_image
Password 0000 HamaBT-Senrex3
Multi-pointtechnology
ThisproductcanconnecttotwoBluetooth ^ -enabledaudiodevicessimultaneously (multi-point).TheproductautomaticallynamesthetwodevicesAandBandestablishesa connection.

natural_image
Two smartphones with wireless signal icons around each, no text or symbols present- Firstconnectthefirstdevicetoyourproduct.
- PutyourproductinBluetooth® pairingmodebypassingthe MFBbutton(2)twice.
- ThenconnecttheBluetooth ^ functionontheseconddevice.
- Thenconnecttheseconddevicetoyourproduct.
7.2TXtransmittermode
YoucanconnectthisproducttootherBluetooth ^ devicesviaBluetooth ^ andtransferaudiocontent tothem. Thismeansthatmanyspeakersandheadphonescanbeusedincombinationwiththis product.Whenusedasatransmitter,upto4receiverscanbestoredandtheaudiosignalcanbesent simultaneouslyto2Bluetooth ^ devices.
1
Connectiontothedevice
Toconnecttoyourchosendevice,connectitusingthe3.5mmAUXcableandtheaudioinput (4)ontheproduct.SwitchontheBluetooth® deviceyouwanttoconnecttotheproduct. Pleaserefertotheoperatinginstructionsofyourdeviceformoreinformation.Connectionnow takesplaceautomatically.
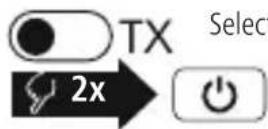
SelectTXmodebypushingtheswitch(1)tothelift.
PresstheMFBbutton(2)twice.
- IftheLED(3)flashesblue: theproductissearchingforaBluetooth ^ connection.
- IftheLED(3)lightsupblue: theproductisalreadypairedwithaBluetooth ^ device.
Note

- Ifnecessary, you may need to carry out a setting on the device in order to allow automatic connection to the repaired product.
2 Multi-pointtechnology
ThisproductcanconnecttotwoBluetooth ^ -enabledaudiodevicessimultaneously (multi-point).

natural_image
Two black headphones with sound waves, no text or symbols present- Firstconnectthefirstdevicetoyourproduct.
- PutyourproductinBluetooth® pairingmodebypassing theMFBbutton(2)twice.
- Putyoursecondaudiodeviceinpairingmodeandfollow thedevice'soperatinginstructions.
- Connectionnowtakesplaceautomatically.
7.3 Deleting thepairinglist
Switch the product off in its current mode. After around 3 seconds, mov the switch (1) to the other mode and switch the product back on. This will delete all paired devices from the list.
8.Technicaldata
| Bluetooth® version5.0 | |
| Max.transmitteroperatingtime13h | |
| Max.receiveroperatingtime12h | |
| Chargingtime1h | |
| ProfileA2DP,AVRCP | |
| Currentconsumption5V | == 240mA |
| BatterytypeLi-polymer/3.7 | V |
| Min.capacity240mAh | |
| Weight20 | g |
| Size | 44x44x13mm |
9. Care and maintenance
Onlycleanthisproductusingalint-free,slightlydampclothanddonotuseanyharshcleaners.
10.Warrantydisclaimer
HamaGmbH&CoKGassumesnoliabilityandprovidesnowarrantyfordamageresultingfrom improperinstallation/mounting,improperuseoftheproductorfromfailuretoobservetheoperating instructionsand/orsafetynotes.
11. Service and support
PleasecontactHamaProductConsultingifyouhaveanyquestionsaboutthisproduct.
Hotline:+499091502-0(German/English)
Furthersupportinformationcanbefoundhere:www.hama.com
12. Declaration of conformity

HamaGmbH&CoKGherebydeclaresthattheradioequipmenttype[00184154]isin
compliancewithDirective2014/53/EU.ThefulltextoftheEUdeclarationofconformityis
availableatthefollowingInternetaddress:
www.hama.com->00184154->Downloads.
Frequencyband(s)2402–2480MHz
Maximumradio-frequencypowertransmitted3.94mWE.I.R.P.
text_image
ON: 3s OFF: 3s TX RX zzz 10min STANDBYnatural_image
Two smartphones with wireless signal icons around a central black dot (no text or symbols)natural_image
Two headphones with sound waves, no text or symbols presenttext_image
ON: 3 s OFF: 3 s TX RX zzz 10min STANDBYnatural_image
Two smartphones with sound waves between them, no text or symbols presentnatural_image
Two headphones with sound waves, no text or symbols presenttext_image
ON: 3s OFF: 3s TX RX zzz 10min STANDBYnatural_image
Two smartphones with wireless signal icons around each, no text or symbols presentnatural_image
Two headphones with sound waves, no text or symbols presentnatural_image
Pure electrical circuit lines without any symbols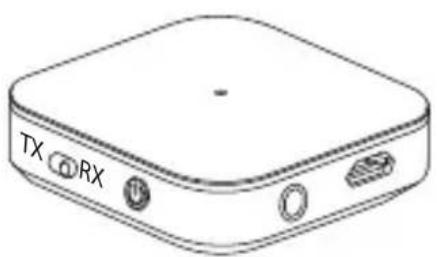
natural_image
Line drawing of a rectangular electronic device with labeled ports (TX, RX) and buttons, no text or symbols beyond labels
text_image
Ranma SALADYAN SALADYAN SALADYAN SALADYAN SALADYAN SALADYAN SALADYAN SALADYAN SALADYAN SALADYAN SALADYAN SALADYAN SALADYAN SALADYAN SALADYAN SALADYAN SALADYAN SALADI SALADI SALADI SALADI SALADI SALADI SALADI SALADI SALADI SALADI SALADI SALADI SALADI SALADI SALADI SALADI SALADI SALADI SALADI SALADI SALADI SALADI SALADI SALADI SALADI SALADYAN SALADYAN SALADYAN SALADYAN SALADYAN SALADYAN SALADYAN SALADYAN SALADYAN SALADYAN SALADYAN SALADYAN SALADYAN SALADYAN SALADYAN SALADYAN SALADRAN SALADRAN SALADRAN SALADRAN SALADRAN SALADRAN SALADRAN SALADRAN SALADRANtext_image
ON: 3s OFF: 3s TX RX zzz 10min STANDBYtext_image
micro-USB TX RX2
Laadproces
Deled(3)brandttijdenshetopladencontinurood.Alshetopladenisvoltooid,gaatdeled (3)uit.
flowchart
graph LR
    A["Charging Battery"] --> B{Charging Charge}
    B --> C["Red Light"]
    B --> D["Off"]
    C --> E["Light Bulb"]
    D --> F["Off Bulb"]
    G["1h:00m"] --> H["Charge to Red"]
natural_image
Two smartphones with wireless signal icons around each, no text or symbols presentnatural_image
Two black headphones with sound waves, no text or symbols presentnatural_image
Technical line drawing of a TX/RX audio device with two cables and a separate card cover (no text or symbols on components)text_image
ON: 3 s OFF: 3 s TX RX zzz 10min STANDBYnatural_image
Two smartphones with wireless signal icons around each, no text or symbols presentnatural_image
Two black headphones with sound waves, no text or symbols presentnatural_image
Technical line drawing of a TX/RX audio device with two cables and a separate card cover (no text or symbols on components)Avertizare—Acumulator

text_image
ON: 3s OFF: 3s TX RX zzz 10min STANDBYIndicatie—Oprireaautomataaprodusului

natural_image
Two smartphones with wireless signal icons around a central black dot (no text or symbols)natural_image
Two black headphones with sound waves, no text or symbols presentnatural_image
Technical line drawing of a TX/RX audio device with two cables and a separate card cover (no text or symbols on components)text_image
ON: 3s OFF: 3s TX RX zZz 10min STANDBYnatural_image
Two smartphones with wireless signal icons around a central black dot (no text or symbols)natural_image
Two black headphones with sound waves, no text or symbols presentnatural_image
Technical line drawing of a TX/RX audio device with two cables and a separate card cover (no text or symbols on components)text_image
ON: 3s OFF: 3s TX RX zzz 10min STANDBYflowchart
graph LR
    A["NABÍJASANABÍT"] -->|1h:00m| B["Red & Off"]
    B --> C["Off"]
natural_image
Two smartphones with wireless signal icons around each, no text or symbols presentnatural_image
Two black headphones with sound waves, no text or symbols present• Najprvspojteprvékoncovézariadeniesvýrobkom.
• VýrobokprepnitedorežimupripojeniaBluetooth ^® tak, žedvakrátstlačítetlačidloMFB(2).
- Nastavtedruhékoncovéaudiozariadenienapárovanie arešpektujtepritomnávodnapoužitiekoncového zariadenia.
• Terazsapripojenieuskutočníautomaticky.
natural_image
Pure electrical circuit lines without any symbols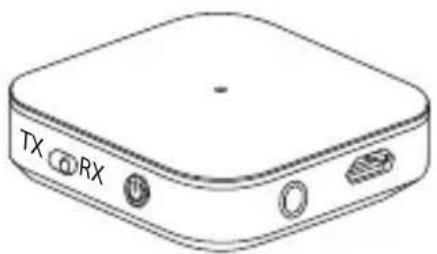
natural_image
Line drawing of a rectangular electronic device with labeled ports (TX, RX) and buttons, no text or symbols beyond labels
text_image
Ranma SALADYAN SALADYAN SALADYAN SALADYAN SALADYAN SALADYAN SALADYAN SALADYAN SALADYAN SALADYAN SALADYAN SALADYAN SALADYAN SALADYAN SALADYAN SALADYAN SALADYAN SALADI SALADI SALADI SALADI SALADI SALADI SALADI SALADI SALADI SALADI SALADI SALADI SALADI SALADI SALADI SALADI SALADI SALADI SALADI SALADI SALADI SALADI SALADI SALADI SALADI SALADYAN SALADYAN SALADYAN SALADYAN SALADYAN SALADYAN SALADYAN SALADYAN SALADYAN SALADYAN SALADYAN SALADYAN SALADYAN SALADYAN SALADYAN SALADYAN SALADRAN SALADRAN SALADRAN SALADRAN SALADRAN SALADRAN SALADRAN SALADRAN SALADRANtext_image
ON: 3s OFF: 3s TX RX zZz 10min STANDBYtext_image
micro-USB TX RX2
Процессзарядки
flowchart
graph LR
    A["Charging Battery"] --> B{Charging Charge}
    B --> C["Red Light"]
    B --> D["Off"]
    C --> E["Light Bulb"]
    D --> F["Off"]
    G["1h:00m"] --> H["Charge Cycle"]
natural_image
Two smartphones with wireless signal icons around a central black dot (no text or symbols)natural_image
Two headphones with sound waves, no text or symbols presentAll listed brands are trademark sof the corresponding companies. Errors and omission excepted, and subject to technical changes. Our general terms of delivery and payment are applied.