MS200LED - Detector VOLTCRAFT - Free user manual and instructions
Find the device manual for free MS200LED VOLTCRAFT in PDF.
User questions about MS200LED VOLTCRAFT
0 question about this device. Answer the ones you know or ask your own.
Ask a new question about this device
Download the instructions for your Detector in PDF format for free! Find your manual MS200LED - VOLTCRAFT and take your electronic device back in hand. On this page are published all the documents necessary for the use of your device. MS200LED by VOLTCRAFT.
USER MANUAL MS200LED VOLTCRAFT
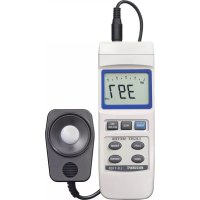
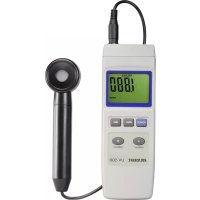
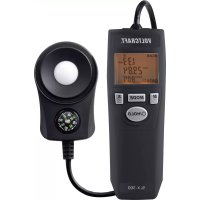
The luxmeter is a digital measurement device to measure the illuminance level.
A graded filter can be selected for various light sources, in order to measure the actual strength of light. Measurements are made via a photo-element with a filter, that separates the visible light spectrum in order to be measured.
It is operated with batteries.
Always observe the safety instructions and all other information included in these operating instructions.
This product complies with the applicable national and European requirements. All names of companies and products are the trademarks of the respective owners. All rights reserved.
Package Contents
Luxmeter
- 3 batteries of type AAA/Micro
- Operating instructions
Up-to-date operating instructions
Download the latest operating instructions via the link www.conrad.com/downloads or scan the QR code. Follow the instructions on the website.
Explanation of Symbols

An exclamation mark in a triangle indicates important instructions in this operating manual which absolutely have to be observed.

The arrow symbol indicates that special tips and notes on operation are provided here.
Safety Instructions

Please read all instructions before using this device, they include important information on its correct operation. The warranty will be void in the event of damage caused by failure to observe these safety instructions! We do not assume any liability for any resulting damage!
We do not assume any liability for material and personal damage caused by improper use or non-compliance with the safety instructions! In such cases, the warranty will be null and void.
- The unauthorised conversion and/or modification of the product is not permitted for safety and approval reasons. Never dismantle the product, except for inserting/ replacing the batteries as described in this operating manual.
The product is not a toy and should be kept out of the reach of children. - The product must not be exposed to extreme temperatures, strong vibrations or heavy mechanical stress.
Handle the product with care; it can be damaged by impacts, blows, or accidental falls, even from a low height.
If you see any damage, do not use the product anymore but take it to a specialised workshop or dispose of it in an environmentally friendly manner.
- In commercial institutions, the accident prevention regulations of the Employer's Liability Insurance Association for Electrical Systems and Operating Facilities are to be observed.
In schools, educational centres, hobby and self-help workshops, the operation of the product is to be supervised by trained employees. - Do not leave packaging material carelessly lying around. It may become a dangerous plaything for children!
- If you are not sure about the correct operation or if questions arise which are not covered by the operating instructions, please do not hesitate to contact our technical support or another specialist.
Notes on batteries and rechargeable batteries
- Batteries/rechargeable batteries must be kept out of the reach of children.
- Check that the polarity is correct when inserting the batteries/rechargeable batteries (pay attention to plus and minus).
- Do not leave batteries/rechargeable batteries lying around; there is a risk that they could be swallowed by children or pets. If they are swallowed, consult a doctor immediately.
Leaking or damaged normal/rechargeable batteries in contact with the skin can cause acid burns; therefore, use suitable safety gloves. - Liquids leaking from batteries/rechargeable batteries are very chemically aggressive. Objects or surfaces coming into contact with these liquids might be considerably damaged. Thus, store batteries/rechargeable batteries in a suitable location.
- Ensure that the batteries/rechargeable batteries are never short-circuited, taken apart or thrown into a fire. There is a risk of explosion!
- Do not recharge normal, non-rechargeable batteries. There is a risk of explosion! Charge only rechargeable batteries that are intended for this purpose; use a suitable battery charger.
- If the product is not to be used for a while (e.g. storage), remove the batteries/rechargeable batteries. Old batteries/rechargeable batteries can leak and cause damages on the product; loss of guarantee/warranty!
- Always exchange the whole set of batteries/rechargeable batteries, only use batteries/rechargeable batteries of the same type, by the same manufacturer and in the same charging state (do not mix charged batteries with half-charged or flat batteries/rechargeable batteries).
- Never mix normal batteries with rechargeable batteries. Use either batteries or rechargeable batteries.
- For the environmentally friendly disposal of batteries and rechargeable batteries, please read the chapter "Disposal".

Operation with accumulators is also possible. However, the operating time and the display contrast are reduced by the lower voltage (battery = 1.5 V, rechargeable battery = 1.2 V).
Therefore, we recommend operating the device with high-quality alkaline batteries to ensure long and reliable operation.
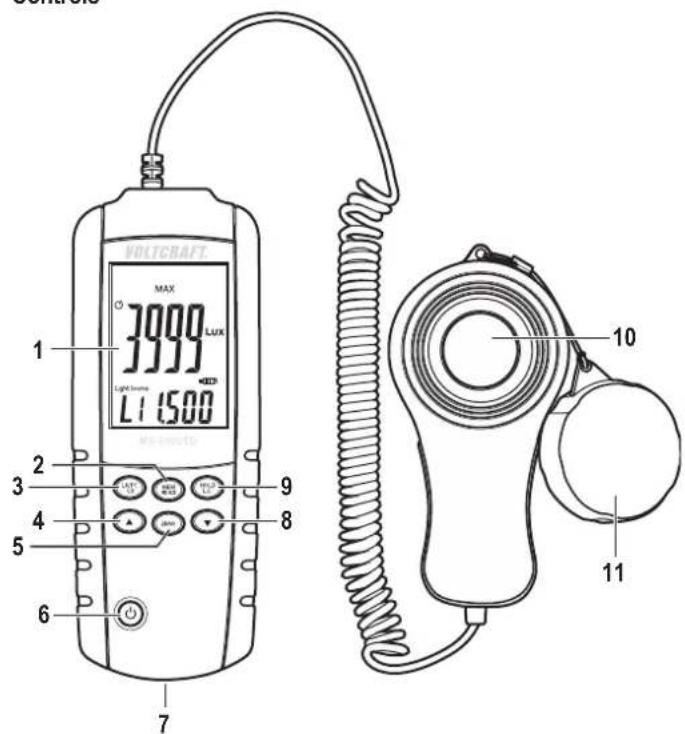
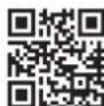
Controls
1 LCD display
2 "MEM READ" button
3 "LX/FC/CD" button
4“▲”button
5“ZERO”button
6 " button to switch on/off the luxmeter
7 Battery compartment (on the bottom)
8 "▼" button
9 "HOLD L.S." button
10 Sensor
11 Protective cap
Inserting/replacing the batteries
- Open the battery compartment on the bottom of the device, by unscrewing the fastening screw on the battery compartment cover and then removing the cover.
- Insert three AAA/Micro batteries into the battery compartment paying attention to the correct polarity (observe positive/+ and negative/-).
- Put back the battery cover and tighten it again.
- The battery must be replaced if the display contrast fades or the device cannot be switched on any longer. Additionally, a battery symbol indicates the state of the batteries or rechargeable batteries in form of a bar graph.
Operation
a) Switching on/off
- Shortly press the "O button (6) to switch the luxmeter on or off.
- If no button is pressed, the luxmeter switches off automatically after 3 - 5 minutes to save power.
The automatic switch-off function can be deactivated. Switch on the luxmeter by pressing the "C button (6) briefly.
Then, press and hold the button (6) for 1 second and the symbol "as disappeared. If you wish to reactivate the switch-off function, hold the button (6) again for 1 second and the symbol appears on the display again.

Be sure to always put the protective cap (11) on to the sensor (10) when no measurements are performed.
b) Measuring the illuminance level (Lux/Fc)
- Switch the luxmeter on.
- Remove the protective cap (11) from the sensor (10).
- Hold the sensor housing with the sensor in a way that the light to be measured falls on the sensor as vertically as possible.
- Press the "LX/FC/CD" button (3) shortly in order to switch between the measurement unit "Lux" and "Fc" ("Lux" = illuminance level lx, "Fc" = "footcandle"), depending on which unit you need (the unit "Fc" is commonly used in the USA).
The measured value shown on the display changes according to the incidence of light on the sensor.
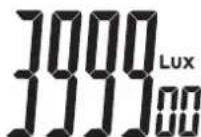
If the values are in increased, the value-display will be extended to the fifth and sixth digit (see the example in the picture on the right, the value = 399900 Lux).
In this the single and ten digit are presented with smaller numbers, by increased measured values the larger number is the important one and the numbers in the one or ten digit place represent the tolerance/deviation.
When pressing the "LX/FC/CD" button (3) for more than 1 second you get to the measurement mode for the luminous intensity (unit "cd", Candela), see next section c).
Press the "HOLD L.S." button (9) shortly to "freeze" the displayed measured value (data hold function). "HOLD" will be shown in the upper right corner of the display.
Press the "HOLD L.S." button (9) again to exit the mode.
- When the measurement process is completed, put the protective cap (11) on to the sensor (10) auf and switch off the luxmeter.
c) Measuring the lumionous intensity (cd)
- Switch the luxmeter on.
- Remove the protective cap (11) from the sensor (10).
- Press and hold the key "LX/FC/CD" button (3) for 1 second. The measurement display disappears, the upper right corner of the display will show "CD" and the unit "m" (meter) respectively "ft" (feet = 30,48 cm) will flash in the lower right corner of the display.
- Select the desired unit using the "▲" (4) or the "▼" (8) button.
- Briefly press the "LX/FC/CD" button (3). Now, the distance value (the distance between the centre of the light source and the sensor) will flash on the display.
The pre-set distance value is "1 m" resp. "3,28 ft".
- Set the distance using the "▲" (4) or the "▼" (8) button. For quick adjustment, hold the corresponding button for a little longer. The adjustable range for the distance value is between 0.01 and 30.47 m resp. 0.01 and 99.99 ft.
- Briefly press the "LX/FC/CD" button (3).
The measured value is shown on the display.
The luminous intensity can be calculated as follows:
Luminous intensity (cd) = illuminance level (lux) x distance
d) Data hold function
During the measurement process, the measured value shown on the display changes according to the incidence of light on the sensor (10).
In order to better read the measured value (or to be able to save it), you have the possibility to activate the data hold function. To do so, briefly press the "HOLD L.S." button (9) during the measurement. The measured value displayed "freezes" and will not change any more so that it is easier to read or save it.
"HOLD" will be shown in the upper right corner of the display.
Press the "HOLD L.S." button (9) again to exit the mode. The "HOLD" symbol disappears.
e) Calibrating function
- Switch the luxmeter on.
- Put the protective cap (11) on to the sensor (10).
- Briefly press the "ZERO" button (5).
- "AdJ" will be shown on the display for a few seconds. The luxmeter will be calibrated and the display will be reset to 0.00.
If "CAP" appears on the display, the protective cap is not mounted completely or correctly and the sensor measures too much light. If so, execute the calibration process in a slightly darker environment.
If "CAP" does not disappear from the display, briefly switch off the luxmeter and switch it on again.
f) Displaying maximum, average and minimum value
This is only possible during the measurement process of the illuminance level (Lux/Fc), but not during the measurement of the luminous intensity (cd).
- Press the "▲" button repeatedly during the measurement in order to switch between the following operation modes (the respective operation mode will be displayed above the measured value):
"MAX" The luxmeter will only show the highest measured value.
"AVG The luxmeter will continuously calculate and display the average value.
"MIN The luxmeter will only show the lowest measured value.
- To exit the current operation mode, hold down the "▲" button (4) for about one second. The operation mode ("MAX", "AVG" or "MIN") will no longer be shown on the display.
g) Selecting/changing/saving correction parameters
Light sources have different colour spectra. In order to be able to compare the measured light intensity, different sensors would be required.
With the luxmeter MS-200 this is not necessary since the light intensity can automatically be corrected and displayed using an adjustable correction factor (9 different memories available).
Examples using the correction factor:
| Light source Correction factor | |
| Incandescent bulbs/daylight 1.000 | |
| Daylight white LEDs 0.990 | |
| Red LEDs | 0.516 |
| Amber yellow LEDs | 0.815 |
| Green LEDs | 1.216 |
| Blue LEDs | 1.475 |
| Purple LEDs | 1.148 |
| Neon tubes white | 0.870 |
| Neon tubes blue | 1.286 |
| Neon tubes green | 1.167 |
| Neon tubes red | 0.671 |
The measured value displayed when the correction factor is set to "1.000" refers to a standard incandescent bulb with a colour temperature of 2856 K (Illuminant A).
More information on this can be found in the corresponding technical literature or on the Internet.
The luxmeter has 9 memories (L1...L9) for correction parameters ("Light Source" is shown in the bottom line of the display incl. the currently active correction parameter).
If necessary, the measured value shown on the display can be corrected automatically.
Example:
Measured value: 2000 lux, correction factor 1.200
The display shows: 2400 lux (2000 x 1.200 = 2400)
Always ensure that the correct correction parameter is selected during the measurement process as otherwise the displayed value may be wrong.
If you don't want the value to be corrected, select correction parameter *1.000 (set the correction parameter ^ 一 1 . 0 0 0 ^ 一 in one of the 9 memories and select the respective memory for the display of the uncorrected measured value).
Selecting the memory for the correction parameter
This is only possible during the measurement process of the illuminance level (Lux/ Fc), but not during the measurement of the luminous intensity (cd).
In this case, select the measuring mode for the illuminance level first and then select a memory for the correction factor. Then, proceed to the measurement of the luminous intensity. The previously set correction factor will also be used during the measurement process of the luminous intensity.
- Press and hold the "HOLD L.S." button (9) for 1 second and the numbers (1...9) on the bottom of the display will flash.
- Select the desired memory using the "▲" (4) or the "▼" (8) button.
- Press and hold the "HOLD L.S." button (9) again for one second and the display will stop flashing and the memory has been selected successfully.
Changing/saving correction parameters
- Press and hold the "HOLD L.S." button (9) for 1 second and the numbers (1...9) on the bottom of the display will flash.
- Select the desired memory using the "▲" (4) or the "▼" (8) button.
- Briefly press the "HOLD L.S." (9) button and the correction parameter display flashes.
- Set the correction parameter using the "▲" (4) or the "▼" (8) button. For a quick adjustment, hold the corresponding button for a longer period of time.
- Press and hold the "HOLD L.S." button (9) for one second and the correction value will be saved and the display stops flashing.
h) Saving/displaying/deleting measured values
Saving the measured value
The luxmeter has over 99 memories (01...99) for the measured values of the illuminance level (lux/fc). When saving, not only the measured value but also the unit set during saving (lux or fc) will be stored in the memory.
Measured values of the luminous intensity can not be saved.
To save a measured value, briefly press the "MEM READ" (2) button. The upper left corner of the display will briefly show "M" and the storage number (e.g. "No. 01").
Displaying the measured value
In order to display one of the 99 stored measured values, proceed as follows:
- Press and hold the "MEM READ" button (2) for 1 second and the upper left corner of the display will show "R" and the last saved measured value (and the storage number) will be shown.
- Select the desired memory using the "▲" (4) or the "▼" (8) button. For quick adjustment, hold the corresponding button for a little longer.
- To exit the die saved measured value mode press and hold the "MEM READ" button (2) again for 1 second. "R" and the storage number will disappear from the display.
Deleting Measured Values
Deleting a single memory is not possible. you can only delete all memories at one time.
- Shortly press the "按钮 (6) to switch the luxmeter off.
- Press and hold the " button (6) and the "MEM READ" button (2) at the same time. "CLR" appears on the display.
When "CLR" disappears from the display, all stored measured values have been deleted. Now release both buttons.
Cleaning
Clean the product carefully, e.g. with a soft, clean cloth. Do not press too hard on the display; this can lead not only to scratches but also to the destruction of the display.
Dust can be easily removed with a soft, clean brush and a vacuum cleaner.
Never use aggressive cleaning agents or any chemicals at all for cleaning; these can lead not only to discolouration, but can also damage the product.
Disposal
a) General

Electronic devices are recyclable material and do not belong with household waste. dispose of the device, when it is no longer of use, according to current statutory requirements.
b) Normal and rechargeable batteries
As the end user, you are required by law (Battery Regulation) to return used batteries and rechargeable batteries. Do not dispose of used batteries in the household waste!

Batteries/rechargeable batteries containing hazardous substances are labelled with these symbols to indicate that the disposal of them in the household waste is forbidden.
You can return used (rechargeable) batteries free of charge at the official collection points in your municipality, our stores, or where ever (rechargeable) batteries are sold!
You thereby fulfil your statutory obligations and contribute to the protection of the environment.
Technical data
Power supply. 3 batteries of type AAA/Micro
Sensor............ photo diode with filter
Measurement/indicating range ....0....400000 lux / 0....40000 fc (if the measurement range is exceeded, "OL" will be displayed)
Accuracy. ±3% with standard light bulbs with a colour temperature of 2856K or with corrected white led spectrum ±6% with other visible light
Deviation of the entry angle. 30^ .. ± 2% 60^ .. ± 6% 80^ .. ± 25
The optimal case is when the light to be measured falls on the sensor vertically. Sampling rate 2,5/s
Operating conditions.Temperature +5^ to +40^ Humidity 0% to 80% relative air humidity, non-condensing
Cable length approx. 1.5 m
Dimensions. 160 x 58 x 27 mm (L x W x H)
Weight 280 g (without battery)
Mode d'emploi
Luxmètre « MS200 »
N^ de commande 1088913
80^:± 25%
d) Data-hold-function
80^:± 25%