SLX300 - Detector VOLTCRAFT - Free user manual and instructions
Find the device manual for free SLX300 VOLTCRAFT in PDF.
| Brand | Voltcraft |
| Model | SLX300 |
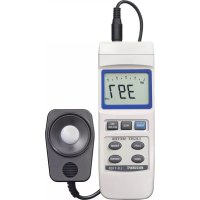
| Product Type | Solar radiation detector |
| Measurement range | 0 - 2000 W/m² (0 - 634 BTU/ft²·h) |
| Accuracy | ±10 W/m² or ±5% (whichever is greater) |
| Resolution | 0.01 W/m² (0 - 99.99 W/m²), 0.1 W/m² (100 - 999.9 W/m²), 1 W/m² (1000 - 2000 W/m²) |
| Spectral range | 400 - 1100 nm |
| Tilt angle | 0° to 90° |
| Angular accuracy | Cosine correction < 7% (angle < 60°); ±1.2° (≤60°) |
| Measurement units | W/m² and BTU/(ft²·h) switchable |
| Operating modes | SCAN, ZERO, UNIT, MEM, TIME, Transmission |
| Memory | 20 memory locations for measured values |
| Special functions | Automatic measurement (AUTO REC), value hold (HOLD), backlight, built-in compass |
| Power supply | 9 V battery (included) |
| Battery life | Approx. 30 hours (continuous use) |
| Auto power off | After 10 minutes of inactivity (deactivatable) |
| Dimensions (sensor) | 83 x 54 x 26 mm |
| Weight | 202 g (without battery) |
| Sensor cable length | 175 cm |
| Operating conditions | 0 to +50 °C, < 80% RH (non-condensing) |
| Storage conditions | -10 to +60 °C, < 85% RH |
| Maintenance | Clean sensor with compressed air and cotton swab; housing with damp cloth and soapy water |
| Safety | Follow instructions in the manual; do not expose to moisture; replace battery observing polarity |
| Package contents | Measuring instrument with sensor, 9V battery, pouch, instruction manual |
Frequently Asked Questions - SLX300 VOLTCRAFT
User questions about SLX300 VOLTCRAFT
0 question about this device. Answer the ones you know or ask your own.
Ask a new question about this device
Download the instructions for your Detector in PDF format for free! Find your manual SLX300 - VOLTCRAFT and take your electronic device back in hand. On this page are published all the documents necessary for the use of your device. SLX300 by VOLTCRAFT.
USER MANUAL SLX300 VOLTCRAFT
GB Operating Instructions
SLX-300 SOLAR ENERGY METER
Item No. 1970436 Page 15 - 27
F Notice d'emploi
INSTRUMENT DE MESURE DE L'ENERGIE SOLAIRE SLX-300
MEETAPPARAAT SLX-300
Bestelnr. 1970436 Pagina 41 - 53
CE
Seite
text_image
J I H G F E D C B A 2 1 SCAN AUTO REC ZERO MIN UNIT 8.0.0.0 MEM MAX 8.0.0.0 TIME HOLD TRANSMISSION ANGLE 8.0.0.0 DATA 88 % M MODE S /HOLD K L M N O P Q R S T 3 4natural_image
Technical line drawing of a vertical mechanical device with internal components (no text or symbols)
natural_image
Technical line drawing of a mobile phone case with handle and keypad (no text or symbols)- Introduction......16
- Explanation of symbols....16
- Intended use....17
- Package contents 17
- Features and functions....17
- Safety information....18
a) General information....18
b) Connected devices....18
c) Battery information 18
- Product overview 19
a) Meter 19
b) Photoelectric sensor....20
- Operation....20
a) Inserting/changing the battery 20
- Taking measurements....21
a) Switching on/off 21
b) Enabling/disabling the automatic power off function 21
c) Selecting the operating mode....21
d) Setting the sensor to zero (calibration)....21
e) Sensor's angle of inclination during measurements....22
f) Measuring irradiance - SCAN mode....23
g) Changing/selecting the measuring unit 24
h) Recalling stored readings....24
i) Time mode (TIME)....25
j) Transmission mode: Measuring the energy throughput of glass windows 25
k) Readings outside of the measuring range....25
1) Compass and tripod 26
- Care and cleaning....26
a) Cleaning the sensor....26
b) Cleaning the housing....26
- Disposal....26
a) Product 26
b) Battery information 26
- Technical data....27
1. Introduction
Dear customer,
Thank you for purchasing this product.
This product complies with statutory, national and European regulations.
To ensure that the product remains in this state and to guarantee safe operation, always follow the instructions in this manual.

These operating instructions are part of this product. They contain important information on setting up and using the product. Do not give this product to a third party without the operating instructions. Keep these operating instructions in a safe place for future reference.
If there are any technical questions, please contact:
International: www.conrad.com/contact
United Kingdom: www.conrad-electronic.co.uk/contact
2. Explanation of symbols

The symbol with an exclamation mark in a triangle is used to highlight important information in these operating instructions. Always read this information carefully.

The arrow symbol indicates special information and tips on how to use the product.
3. Intended use
This product is designed to measure the intensity of solar radiation. It can record the maximum, minimum and average solar radiation reading. It can also freeze the current reading on the display. The readings can be displayed in W/m² or BTU/(ft²xh). The meter can be used to measure solar radiation (taking into account the angle of incidence), to check the energy transmittance of tinted windows, and to measure the best angle of incidence for solar panels and solar water heaters. It also provides a quick and reliable way to determine the efficiency of a PV or solar power system. Measurements at different locations can be taken to determine the best location for a new solar power system. The meter can also be used to measure the radiation intensity in laboratories or for agricultural purposes.
The product must only be used in dry areas. Contact with moisture (e.g. in a bathroom) must be avoided under all circumstances.
For safety and approval purposes, do not rebuild and/or modify this product. Using the product for purposes other than those described above may damage the product. In addition, improper use can cause hazards such as a short circuit or fire. Read the operating instructions carefully and store them in a safe place. Only make this product available to third parties together with its operating instructions.
All company and product names are trademarks of their respective owners. All rights reserved.
4. Package contents
- Meter with sensor
- 1x 9 V battery
- Carry bag
- Operating instructions
Up-to-date operating instructions
To download the latest operating instructions, visit www.conrad.com/downloads or scan the QR code on this page. Follow the instructions on the website.

5. Features and functions
• Measures irradiance accounting for the angle of incidence
- Automatically detects the measurement range at an accuracy of up to 4 digits
- Units can be set to W/m ^2 or BTU/ft ^2 x h
• 20 memory slots with automatic recording and data recall
• Automatic transmittance measurements
- Backlight and triple display

Read the operating instructions and safety information carefully. If you do not follow the safety instructions and information on proper handling in these operating instructions, we will assume no liability for any resulting personal injury or damage to property. Such cases will invalidate the warranty/guarantee.
a) General information
- The product is not a toy. Keep it out of the reach of children and pets.
- Do not leave packaging material lying around carelessly. It may become a dangerous plaything for children.
- Protect the product from extreme temperatures, direct sunlight, strong jolts, high humidity, moisture, flammable gases, vapours and solvents.
- Do not place the product under any mechanical stress.
-
If it is no longer possible to operate the product safely, stop using it and prevent unauthorised use. Safe operation can no longer be guaranteed if the product:
-
is visibly damaged,
- is no longer working properly,
- has been stored for extended periods in poor ambient conditions or
-
has been subjected to any serious transport-related stress.
-
Handle the product carefully. Jolts, impacts or a fall even from a low height may damage the product.
- Consult a technician if you are not sure how to use or connect the product, or if you have concerns about safety.
- Maintenance, modifications and repairs must only be carried out by a technician or a specialist repair centre.
- If you have any questions which are not answered in these operating instructions, contact our technical support service or other technical personnel.
b) Connected devices
- Always observe the safety instructions and operating instructions of any other devices which are connected to the product.
c) Battery information
• Always ensure that the battery is inserted in the correct polarity.
- To prevent the battery from leaking, remove it from the device if you are not going to use the product for a prolonged period. Leaking or damaged batteries may cause acid burns if they come into contact with your skin. Always use suitable protective gloves when handling damaged batteries.
- Batteries must be kept out of the reach of children. Do not leave batteries lying around, as there is a risk that children or pets may swallow them.
- Batteries must not be dismantled, short-circuited or thrown into open flames. Never recharge non-rechargeable batteries. This may cause an explosion!
7. Product overview
a) Meter

text_image
J I H G F E D C B A 2 1 SCAN AUTO REC 0 ZERO WIN UNIT 8.0.0.0 MEM MAX 8.0.0.0 TIME HOLD INTU 8.0.0.0 Transmission ANGLE 8.0.0.0 DATA 88 % K L M N O P Q R S T 3 4A Measurement number
B Energy throughput reading
C Measurement time setting
D Memory recall
E Measuring unit settings (M/F ^2 and BTU/(ft ^2 h))
F ZERO mode (calibration)
G SCAN mode
H MAX/MIN/AVG symbols
I AUTO symbol (automatic measurement)
J REC symbol (recording)
1 MODE button
2 M/DOWN button
3 S/UP button
4 ⏻/HOLD button

text_image
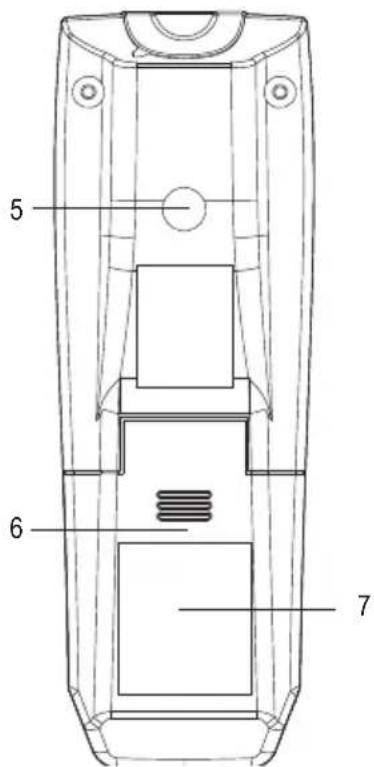
5 6 7K Automatic power-off symbol
L Battery status symbol
M Irradiance reading (first line)
N Irradiance unit
O Max/min/average readings (second line)
P HOLD symbol (freeze the current reading)
Q Measured value (third line)
R Unit for angle of inclination
S Percent symbol
T Angle of inclination icon (sensor angle)
5 Connection thread
6 Battery compartment cover
7 Non-slip coating
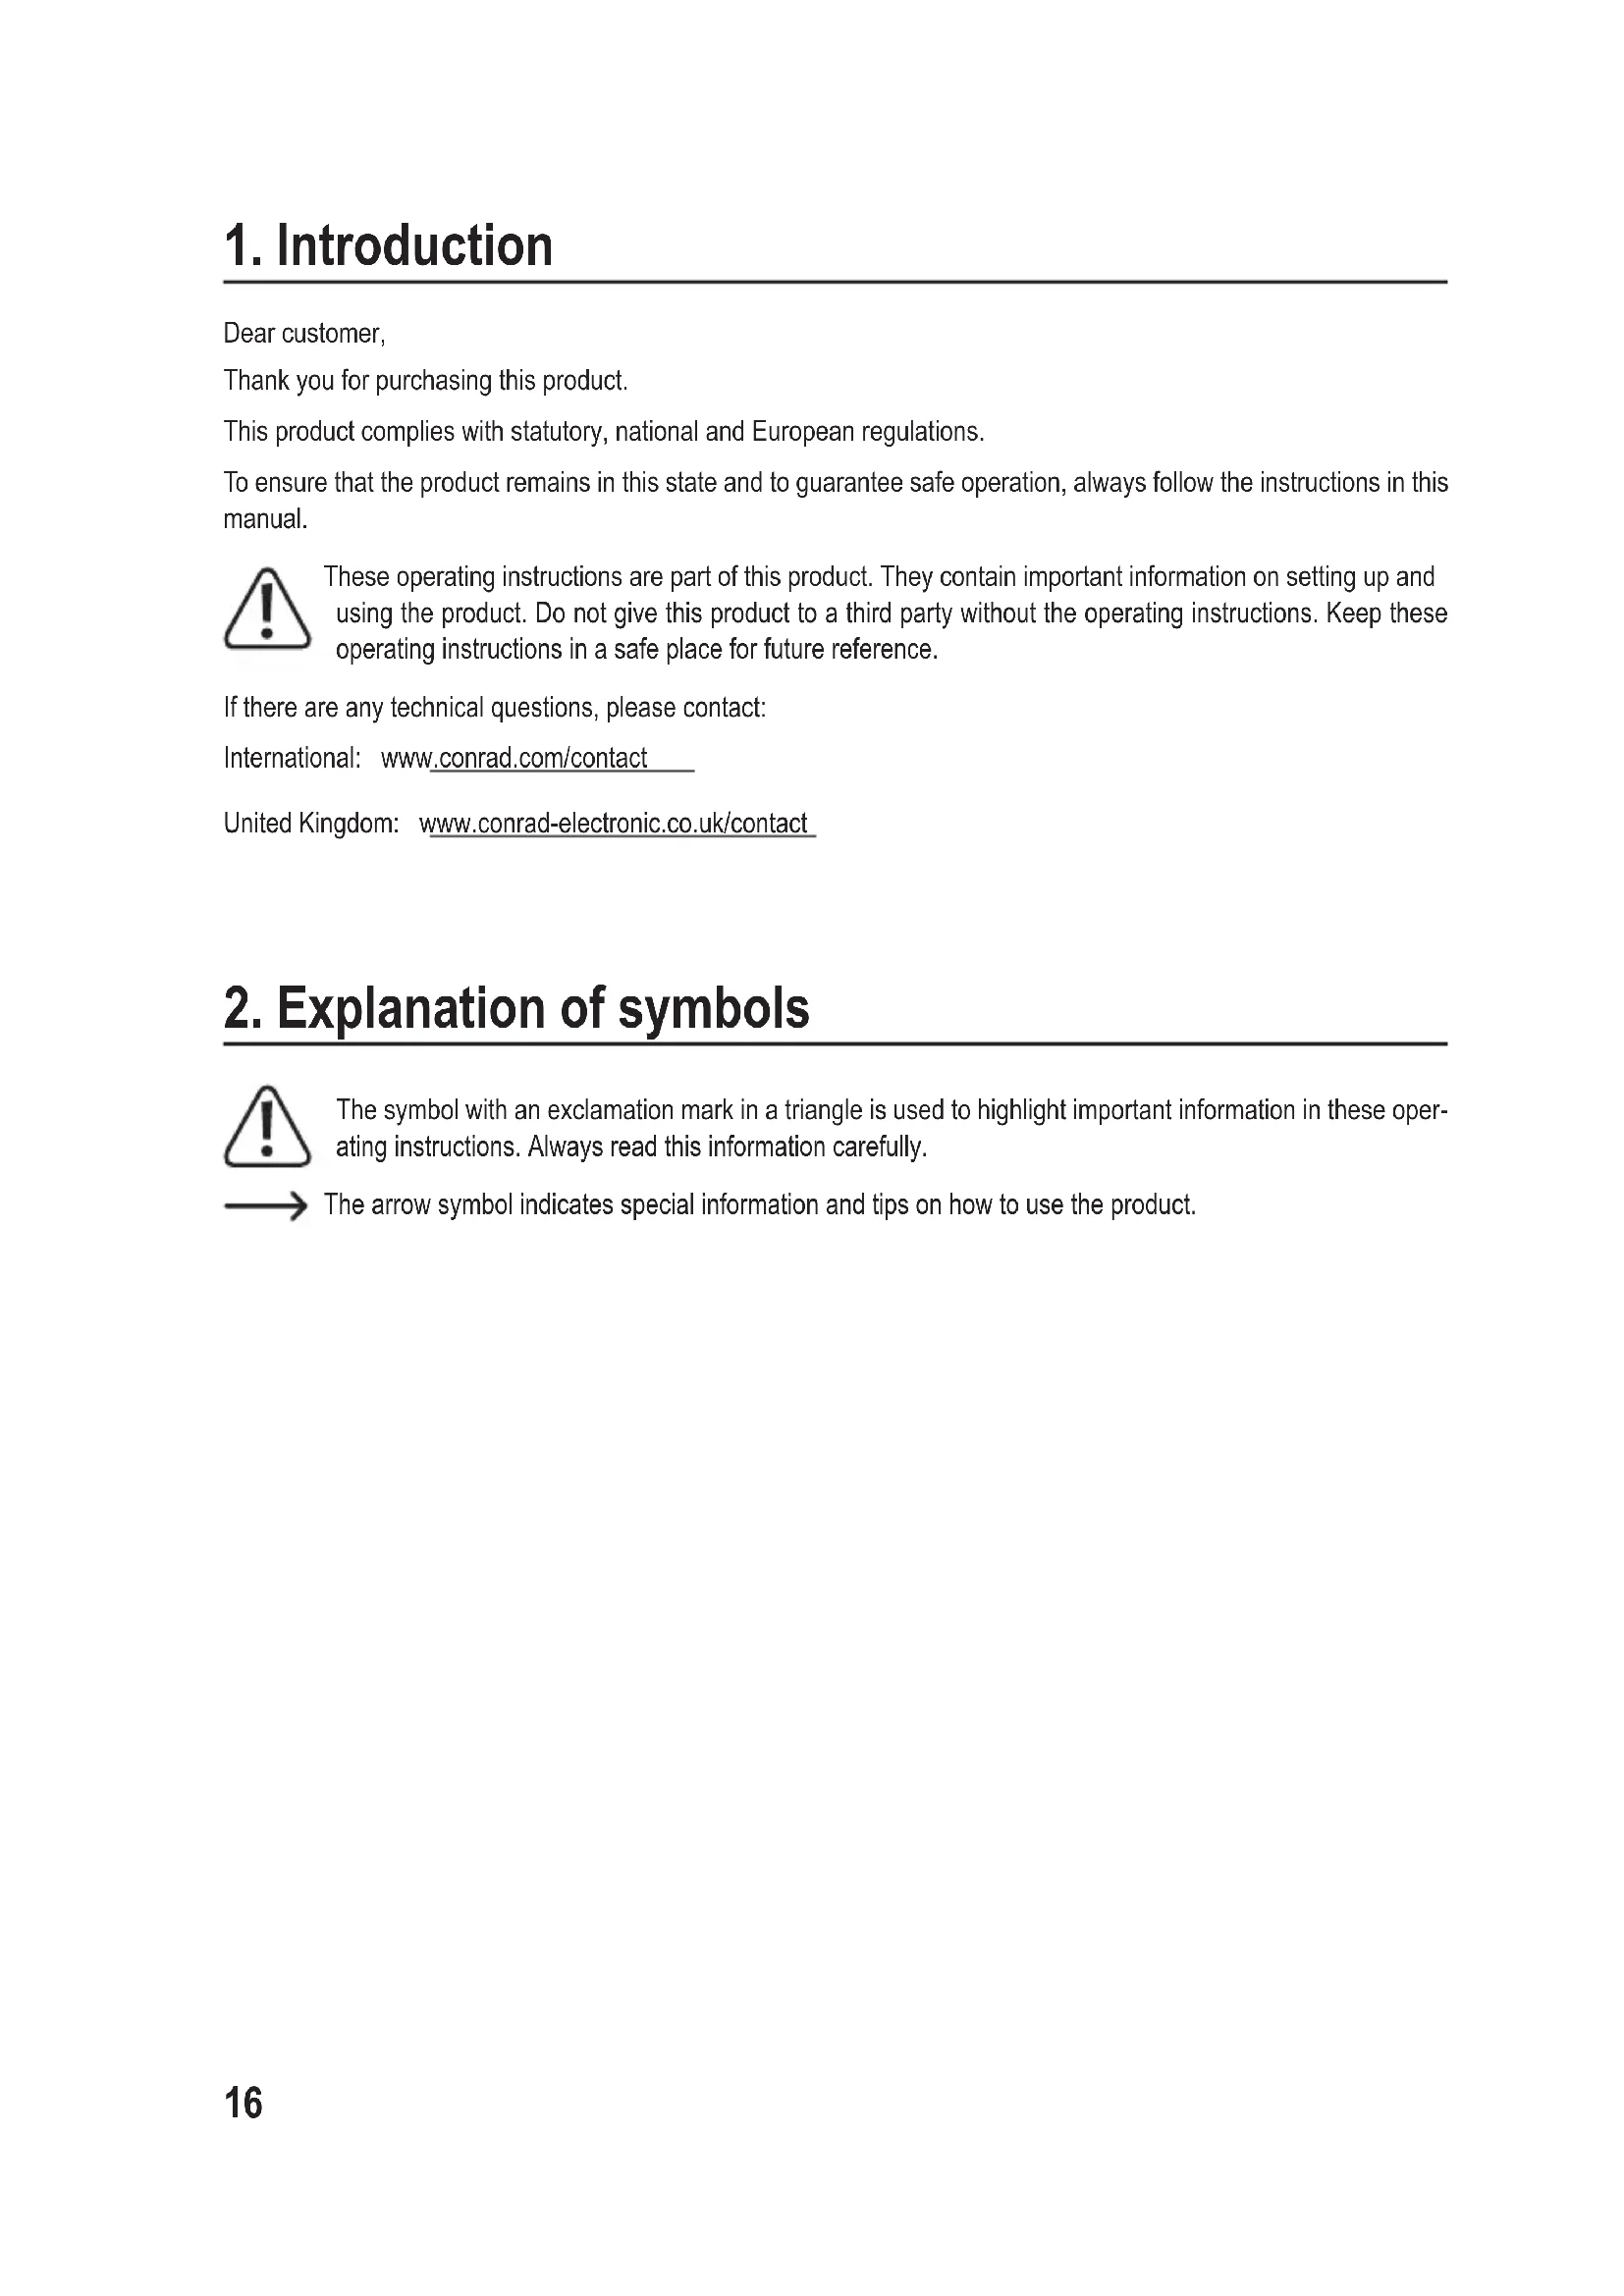
b) Photoelectric sensor
text_image
8 9 m s 108 Sensor 9 Compass 10 Sensor cover
8. Operation
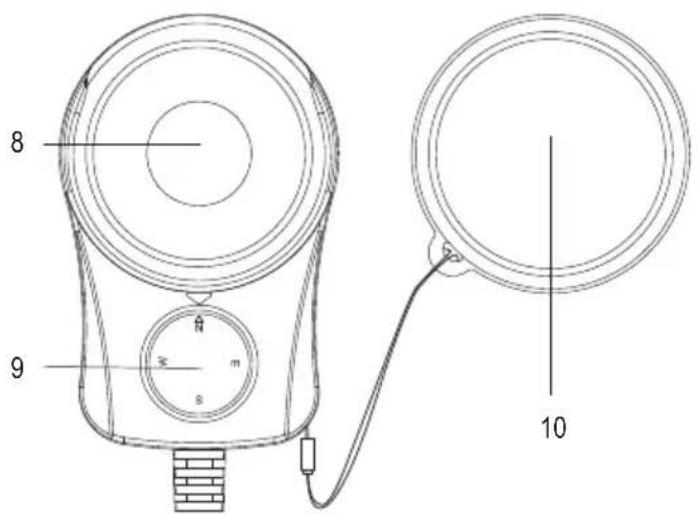
a) Inserting/changing the battery
- Insert the battery before using the device for the first time. Follow the steps below to insert the battery:
natural_image
Technical line drawing of a mobile phone casing with internal components (no text or symbols)- Open the battery compartment cover (6) on the back of the measuring device by sliding it downwards.
- Fold the battery compartment cover upwards.
- Connect the battery connector to the battery. Always observe the correct polarity (positive/+ and negative/-).
- Insert the 9 V block battery provided into the battery compartment. Stow the battery connector cables in the battery compartment.
- Fold the battery compartment cover downwards and slide it back into place.
→ Replace the battery when the battery status symbol (L) indicates a low battery ().
• To replace the battery, remove the old battery from the battery connector and follow the steps above.
9. Taking measurements
a) Switching on/off
- Hold down the /HOLD button (4) for 2 seconds to switch on the meter.
- If the meter display does not turn on, check the battery in the battery compartment on the rear of the device.
- Hold down the /HOLD button (4) for 2 seconds to switch off the meter after use.
b) Enabling/disabling the automatic power off function
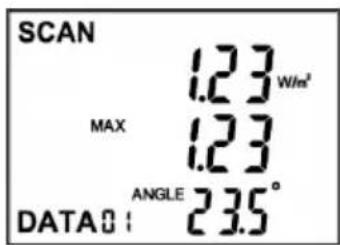
The meter features a power off function that automatically switches the meter off after 10 minutes of inactivity.
text_image
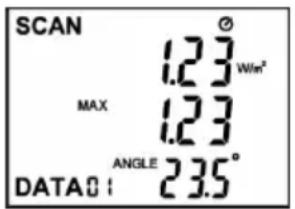
SCAN MAX 1.23 W/m² 1.23 DATA0: ANGLE 23.5°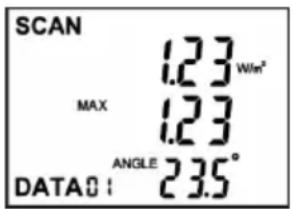
text_image
SCAN MAX 1.23 W/m² 1.23 DATA0: ANGLE 23.5°- Hold down the ⏻ /HOLD (4) and S/UP (3) buttons to disable the automatic power off function. The clock symbol (K) in the upper-right corner of the LCD display will disappear.
- Hold down the ⏻ /HOLD and S/UP buttons to enable the automatic power off function. The clock symbol will appear on the LCD display.
c) Selecting the operating mode

- Press the MODE button (1) to move through the available operating modes in a cycle. There are six available modes: SCAN>ZERO>UNIT>MEM
d) Setting the sensor to zero (calibration)
You can calibrate the sensor / set a specific gradient before taking an irradiance measurement. You can switch between the two calibration modes.
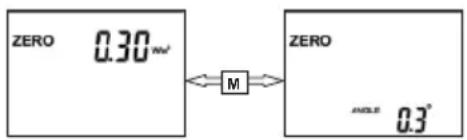
text_image
ZERO 0.30 mm M ZERO 0.3°- Press the MODE button (1) to switch to ZERO mode (calibration mode).
- Press the M/DOWN button (2) to switch between the two parameters in ZERO mode.
Setting the irradiance reading to zero
- Go the photoelectric power display (the W/m² or BTU/ft²xh units will appear on the LCD display).
- Attach the sensor cover (10). Press the S/UP button (3) to set the photoelectric power display to zero before taking a measurement.
- Hold down the S/UP button (3) for 2 seconds to reset the photoelectric power display.
Setting the angular position of the sensor to zero
Use a reference surface as the zero position from which the angle should be measured. Place the sensor on this surface. The current angle of inclination will be displayed.
- Switch to the angular position display as described above.
- Press the S/UP button (3) to set the angle of inclination display to zero. The angle displayed on the meter will be measured from the selected reference surface.
- Press and hold the S/UP button for 2 seconds to reset the angular position to the original setting.
→ You can check and correct the sensor calibration settings. If necessary, use a spirit level to determine the horizontal reference surface.
- Place the sensor (8) on the horizontal, level surface. If an angle of "0°" is displayed, this indicates that the angle calibration settings are correct. If this is not the case, press the S/UP button (3) to reset the angle of inclination to zero. The angle measurement settings are now calibrated.
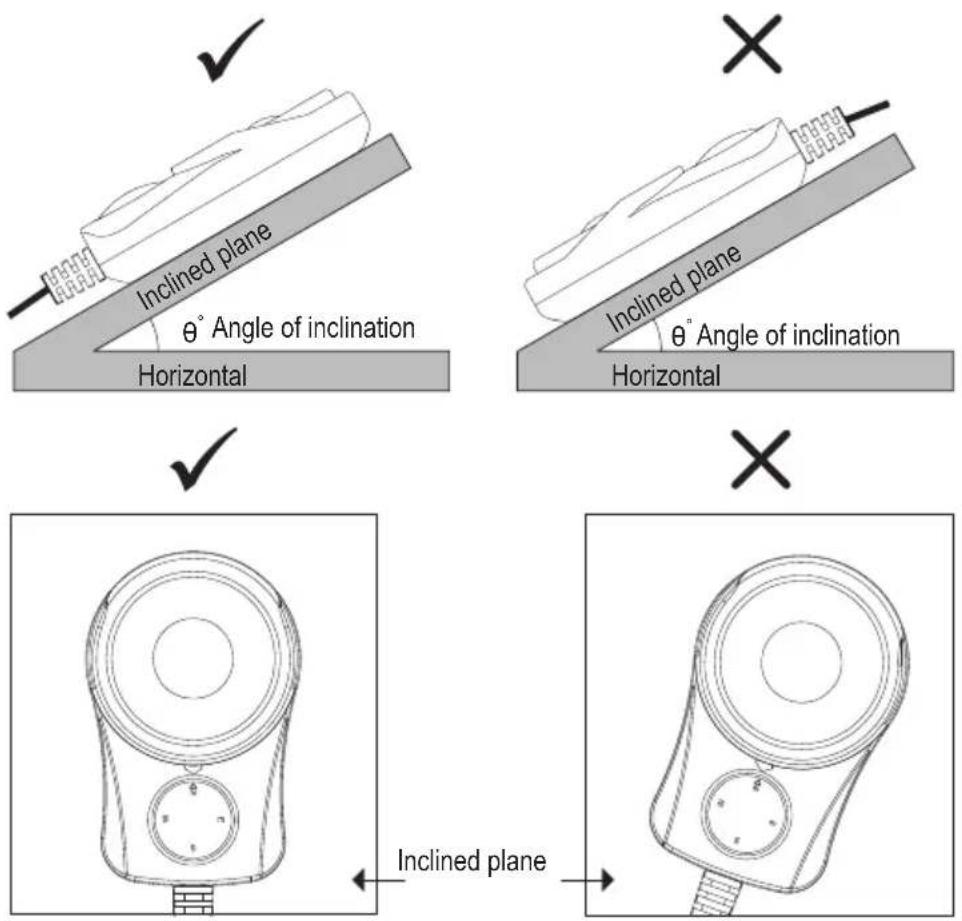
e) Sensor's angle of inclination during measurements
Before taking an irradiance reading, position the sensor as shown in the diagram to achieve optimal accuracy during measurements.
text_image
Inclined plane θ° Angle of inclination Horizontal Inclined plane θ° Angle of inclination Horizontal Inclined plane Inclined planef) Measuring irradiance - SCAN mode
Measure the irradiance after placing the sensor in the sun.
5-2 SCAN Mode
text_image
SCAN MAX 1.23 W/m² 1.23 DATA: ANGLE 23.5°• The following three readings are displayed in SCAN mode:
- The first row from the top displays the current solar radiation reading.
- The second row displays the measured maximum/minimum values, as well as the average solar radiation readings. The MAX, MIN or AVG symbol is displayed accordingly.
- The third row displays the current angle of inclination of the sensor (Q).
Displaying the maximum/minimum and average readings
- Press and hold the S/UP button (3) to toggle the readings in row 2 of the LCD display. The MAX, MIN or AVG symbols will appear on the LCD display together with the corresponding reading.
Maximum/minimum and average values of a reading
- Press and hold the S/UP (3) button to switch between the measured maximum, minimum and average values in the first row of the display.
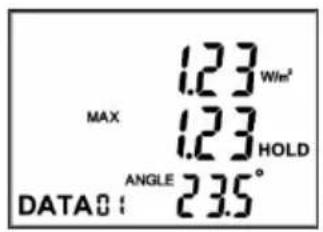
Freezing/unfreezing a measured value
text_image
MAX 1.23 W/m² 1.23 HOLD DATA8: ANGLE 23.5°- Press the /HOLD button (4) to freeze all readings on the display. The HOLD symbol (P) will be displayed, and the SCAN symbol (G) will disappear from the LCD display.
- Press the ⏻/HOLD button to unfreeze the display and revert to measurement mode. The SCAN icon will be displayed and the HOLD symbol will disappear from the LCD display.
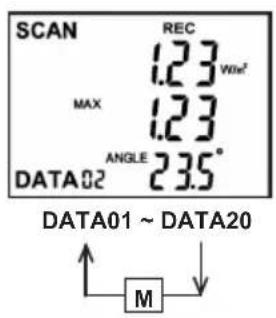
Saving readings (REC)
text_image
SCAN REC 1.23 W/m² MAX 1.23 DATA02 ANGLE 23.5° DATA01 ~ DATA20 M- Press the M/DOWN button (2) to save all current readings. The REC symbol (J) will flash once together with the corresponding number (A).
- Repeat this step for other measurements/readings. You can save up to 20 sets of readings on the 20 memory slots.
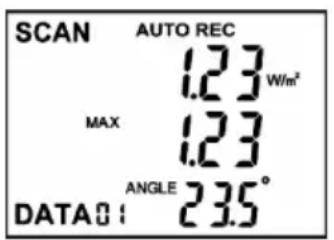
Automatically measuring and recording readings (AUTO REC)
In automatic measurement mode, the meter measures 20 sets of data and saves the readings over a preset period. If the automatic switch-off function is enabled, the meter switches off automatically after the measurements have been taken.
For more information, see section b) "Enabling/disabling the automatic power off function". The duration of the automatic measurement cycle can be preset. This duration can be configured in time mode. For more information, see section i) "Time mode (TIME)".
text_image
SCAN AUTO REC 1.23 W/m² MAX 1.23 DATA: ANGLE 23.5°- Press and hold the M/DOWN button (2) for 2 seconds to start the automatic measurement cycle. The AUTO (I) and REC (J) symbols will appear on the LCD display. The meter will then start to take measurements.
- Hold down the M/DOWN button (2) for 2 seconds to end the automatic measurement cycle. The AUTO (I) and REC (J) symbols will disappear from the LCD display.
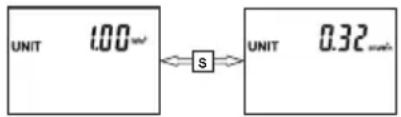
g) Changing/selecting the measuring unit
5-4 UNIT Mode
text_image
UNIT 1.00 S UNIT 0.32- Press the S/UP button (3) to change the measuring unit.
- Press the S/UP button to switch between the W/m ^2 and BTU (ft ^2 *h) units. The selected unit will be displayed (1 W/m ^2 = 0.3169984 BTU/ft ^2 xh).
h) Recalling stored readings
5-5 MEM Mode
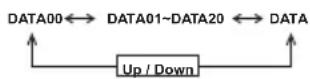
- Press the S/UP (3) or M/Down (2) button to recall the saved data sets in a cycle (there are up to 20 data sets in separate memory slots).
The saved data sets are marked with "REC" or "AUTO REC". "REC" means that the data set was manually saved. See "Saving readings (REC)" for details.
"AUTO REC" means that the data set was automatically saved. See "Automatically measuring and recording readings (AUTO REC)" for details.
Displaying the duration of the automatic measurement cycle
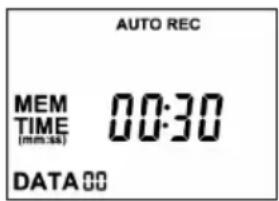
text_image
AUTO REC MEM 00:30 TIME (mm:ss) DATA 00- Press the S/UP (3) or M/DOWN (2) button until the "DATA00" memory slot is displayed. The preset duration of the previous automatic measurement cycle will be displayed.
- You now know the duration of the previous measurement cycle. See section "i) Time mode (TIME)" for details.
Deleting saved data
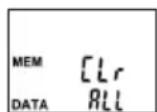
- Press the S/UP (3) or M/DOWN button (2) repeatedly until the "DATA" memory slot is displayed. "CIr ALL" will be displayed.
- Press the /HOLD button (4) twice to delete all saved data.
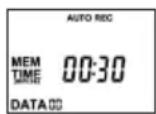
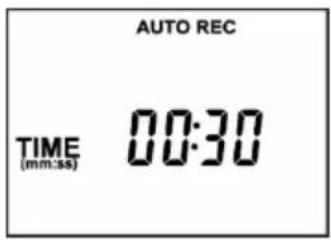
i) Time mode (TIME)
text_image
AUTO REC TIME (mm:ss) 00:30- Press the MODE button (1) to select "TIME" mode.
- Press the S/UP button (3) to set the duration of the automatic measurement cycle. The following measurement intervals are available: 30 seconds, 1, 2, 5, 10, 30 minutes.
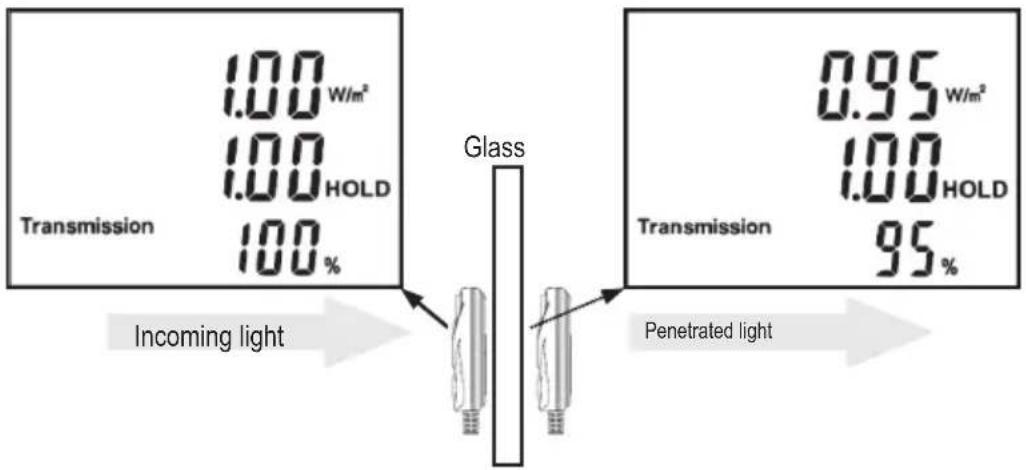
j) Transmission mode: Measuring the energy throughput of glass windows
You can use the meter to measure the energy throughput of car windows or check the efficiency of glass windows in buildings. You can also measure the intensity of a light transmitted through a pane of glass.
other
| Condition | Transmission (W/m²) | Holding (%) | | ----------------- | ------------------- | ---------- | | Incoming light | 1.00 | 100 | | Penetrated light | 0.95 | 95 |Proceed as follows:
- Turn the meter on and set the display to zero before taking a measurement. For details, see section d) "Setting the sensor to zero (calibration)".
- Use the MODE button (1) to select "Transmission" mode.
- Point the sensor at the sun with the window open. Take a reading and press the ⏻ /HOLD (4) button to freeze the reading. The direct reading (O) will appear in the first line.
- Close the window, point the device through the window at the sun and take another reading.
- Write down the reading (M) in the first line. The transmittance coefficient (Q) will be displayed in percent on the third line of the display.
- You can compare the two values manually to calculate the energy efficiency of the window.
Transmittance coefficient = transmitted radiation/incoming radiation × 100 %, (0 ≤ T ≤ 100 %)
→ Check the window at least once per year to monitor the efficiency.
k) Readings outside of the measuring range
"H I" indicates that the measured energy reading is outside the range of the meter.
I) Compass and tripod
You can screw the meter to a tripod via the connection thread (5). This is useful when taking automatic irradiance measurements over a prolonged period.
The compass (9) on the sensor allows you to determine the direction relative to the magnetic north pole.
10. Care and cleaning

Never use aggressive detergents, rubbing alcohol or other chemical solutions, as these may damage the casing or stop the product from functioning properly.
- Before cleaning the product, disconnect it from the power supply (remove the battery).
- If you do not plan to use the meter for an extended period, close the sensor cover and remove the battery from the meter.
a) Cleaning the sensor
- Use compressed air to carefully blow dust particles off the meter. Clean other dirt with a camel-hair brush.
• After you have finished cleaning, carefully rub the surface with a slightly damp cotton bud.
b) Cleaning the housing
- Use a lint-free cloth or a soft sponge soaked in soapy water to clean the housing of the product.
11. Disposal
a) Product

Electronic devices are recyclable waste and must not be placed in household waste. At the end of its service life, dispose of the product according to the relevant statutory regulations. Remove any inserted batteries and dispose of them separately from the product.
b) Battery information

You are required by law to return all used batteries (Battery Directive). They must not be placed in household waste.
Batteries containing hazardous substances are labelled with this symbol to indicate that disposal in household waste is forbidden. The abbreviations for heavy metals in batteries are: Cd = Cadmium, Hg = Mercury, Pb = Lead (indicated on the battery, e.g. below the waste bin icon on the left).
Used batteries can be returned to local collection points, our stores or battery retailers.
You thus fulfil your statutory obligations and contribute to environmental protection.
12. Technical data
Input voltage/current....9 V/DC battery, 12.6 mA
When switched off ....0 mA
Spectral range 400 - 1100 nm
Range....0 - 2000 W/m² (0\~634 BTU/ft²xh)
Accuracy....(at 23°C, 60 % relative humidity: ±10 W/m² (±3 BTU/ft²xh) or ±5 % (whichever is greater)
Resolution....0.00 - 99.99 W/m² : 0.01 W/m² 100.0 - 999.9 W/m² : 0.1 W/m² 1000 - 2000 W/m² : 1 W/m² 0.00 - 99.99 BTU/ft²xh: 0.01 BTU/ft²xh 100.0 - 634,0 BTU/ft²xh: 0.1 BTU/ft²xh
Angular accuracy....Cosine response < 7 % (angle <60°)
Tilt angle range....0 - 90°
Tilt angle accuracy....(at 23 °C, 60 % relative humidity) ± 1.2° (≤ 60°), additional temperature error of ±0.1°/°C over 23 °C
Sampling rate ....Approx. 0.4 seconds
Automatic power-off....After approx. 10 minutes
Battery life....Approx. 30 hours (continuous use)
Memory slots 20
Cable lenght (sensor) 175 cm
Operating conditions....0 to +50 °C, <80 % relative humidity (non-condensing)
Storage conditions....-10 to +60 °C, <85 % relative air humidity (non-condensing)
Dimensions (L x W x H) 29 x 49 x 140 mm (meter) 83 x 54 x 26 mm (sensor)
Weight 202 g (without battery)
Page
France (email) : technique@conrad-france.fr
text_image
J I H G F E D C B A 2 1 SCAN AUTO REC ZERO MIN UNIT 8.0.0.0 MEM MAX MIN HOLD TIME AND Transmissionangle 8.0.0.0 DATA 88 8.0.0 % M MODE S /HOLD K L M N O P Q R S T 3 4natural_image
Technical line drawing of a vertical mechanical device with internal components (no text or symbols)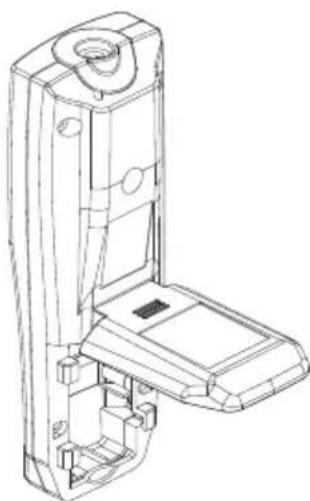
natural_image
Technical line drawing of a mobile phone case with handle and keypad (no text or symbols)text_image
AUTO REC MEM TIME 00:30 (mm:ss) DATA 00Dimensions (L x l x P).... 29 x 49 x 140 mm (instrument)
text_image
J I H G F E D C B A 2 1 SCAN AUTO REC ZERO WIN UNIT AUWI MEM MAX 8.8.00 HOLD TIME AVG Transmission/ANGLE 8.8.00 ? DATA 88 SE M MODE S /HOLD K L M N O P Q R S T 3 4A Volgnummer van de meetwaarde
B Energiegeleidingsmeting
C Meetduurinstelling
D Geheugen oproepen
E Meeteenheden instellen (W/m ^2 en BTU/(ft ^2 h))
F ZERO-modus (kalibreren)
G SCAN-modus
H MAX/MIN/AVG-symbolen
I AUTO-pictogram (automatische meting)
J REC-symbol (opname)
1 Knop MODE
2 Knop M/DOWN
3 Knop S/UP
4 Knop ⏻/HOLD
text_image
5 6 7natural_image
Technical line drawing of a mobile phone casing with internal components (no text or symbols)text_image
AUTO REC MEM TIME (mm:ss) 00:30 DATA 00This is a publication by Conrad Electronic SE, Klaus-Conrad-Str. 1, D-92240 Hirschau (www.conrad.com).
All rights including translation reserved. Reproduction by any method, e.g. photocopy, microfilming, or the capture in electronic data processing systems require the prior written approval by the editor. Reprinting, also in part, is prohibited. This publication represent the technical status at the time of printing. Copyright 2020 by Conrad Electronic SE.