VCharge 2S - Battery charger VOLTCRAFT - Free user manual and instructions
Find the device manual for free VCharge 2S VOLTCRAFT in PDF.

| Product type | Battery charger for model building |
| Brand | Voltcraft |
| Model | VCharge 2S (V-Charge 2S QUAD) |
| Number of channels | 4 independent channels |
| Compatible battery types | LiPo, LiHV, NiMH, NiCd |
| Input voltage | 100-240 VAC (50/60 Hz) or 7-17 VDC |
| Charging current per channel | 0.1 A to 1.0 A, adjustable in steps |
| Maximum charging power | 4 x 7 W (±10%) |
| Maximum output voltage | 8.7 V |
| Output connectors | SM, XH, Micro, MX, JST, mCPX |
| Display | LCD screen with charge parameters |
| LED indicators | 4 LEDs (red/green) per channel |
| Reverse polarity protection | Yes |
| Overvoltage protection | Yes (automatic shutdown) |
| Undervoltage protection | Yes (shutdown if DC input < 7 V) |
| Overcurrent protection | Yes (shutdown if current > 1.20 A) |
| Weight | 233 g |
| Power cable length | 1.1 m |
| Operating temperature | 0 °C to +40 °C |
| Operating humidity | 0 to 90% RH (non-condensing) |
| Storage conditions | -10 °C to +50 °C, 0-95% RH |
| Maintenance and cleaning | Disconnect before cleaning; use a dry, lint-free cloth; avoid harsh chemicals |
| Safety | Use only in dry indoor areas; do not cover; maintain a distance of at least 20 cm; do not leave unattended |
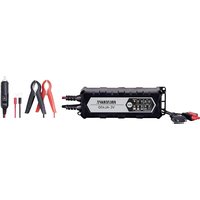
| Package contents | Charger, power cable, CD with instruction manual |
Frequently Asked Questions - VCharge 2S VOLTCRAFT
User questions about VCharge 2S VOLTCRAFT
0 question about this device. Answer the ones you know or ask your own.
Ask a new question about this device
Download the instructions for your Battery charger in PDF format for free! Find your manual VCharge 2S - VOLTCRAFT and take your electronic device back in hand. On this page are published all the documents necessary for the use of your device. VCharge 2S by VOLTCRAFT.
USER MANUAL VCharge 2S VOLTCRAFT
- Nickel-Cadmium (NiCd)
flowchart
graph LR
    A["VOLTCRAFT\nV-CHARGE 25 QUAD"] --> B["IN Voltage: 12.0V"]
    B --> C["LiPo LiPo\nLiPo LiPo"]
flowchart
graph TD
    A["LiPo LiPo\nLiPo LiPo"] --> B["4.10 4.10\n4.10 4.10"]
    C["0500 0500\n0500 0500"] --> D["0.50 0.50\n0.50 0.50"]
flowchart
graph TD
    A["FULL LiPo\nLiPo LiPo"] --> B["0150 4.10\n4.10 4.10"]
    C["0500 0510\n0510 0510"] --> D["FULL 0.50\n0.50 0.50"]
Schutzfunktionen
Akkuanschlüsse......SM, XH, Micro, MX, JST, mCPX
Copyright 2020 by Conrad Electronic SE. *2300390_v2_1220_02_DS_m_(1)_6L
GB Operating instructions
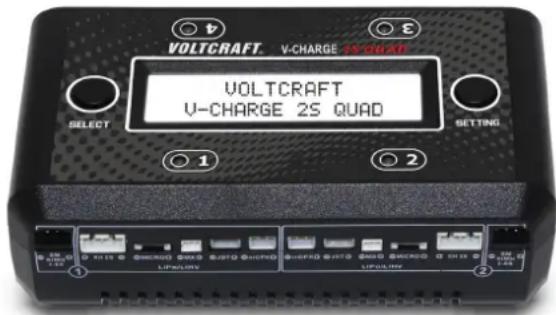
V-Charge 2S QUAD charger for model batteries
Item no. 2300390
Intended use
The V-Charge 2S QUAD charger for model batteries is designed to charge up to 4 rechargeable batteries simultaneously (4 channels, 1 battery per channel). The following battery types are supported:
• Lithium-Polymer (LiPo)
• Nickel-metal hydride (NiMH)
• Lithium-Polymer-High-Voltage (LiHV)
- Nickel-cadmium (NiCd)
The charging currents can be set between 0.1 and 1.0 A. Setting, monitoring and controlling the functions is made easier by a clear LCD display. The charger also features a range of basic safety functions such as reverse polarity protection and a function to protect the batteries against overcharging. An AC or DC voltage can be used for the voltage/power supply of the charger (see "Technical data"). The factory-provided power cable is designed for use with a mains AC voltage. The DC power supply can be provided via a laboratory power supply unit or other similar device. The charger can also be powered by a rechargeable battery during outdoor activities in dry environments. There is no short-circuit protection for the power supply at the inputs! Follow the instructions in "Initial operation, b) Connecting to the power supply". The required connection cable for the DC power connection is not included with the product.
This product is intended for indoor use only. Do not use it outdoors. Contact with moisture (e.g. in a bathroom) must be avoided under all circumstances.
For safety and approval purposes, do not rebuild and/or modify this product. Using the charger for purposes other than those described above may damage the components. In addition, improper use can cause hazards such as a short-circuit, fire or electric shock. Read the operating instructions carefully and store them in a safe place. Only make the Ladegerät available to third parties together with its operating instructions.
This product complies with statutory, national and European regulations. All company and product names contained herein are trademarks of their respective owners.
Delivery content
- Charger
• CD with operating instructions - Mains cable
- Safety information
Up-to-date operating instructions
Download the latest operating instructions at www.conrad.com/downloads or scan the QR code shown. Follow the instructions on the website. The operating instructions for this product can also be downloaded from this link.

Description of symbols

The symbol with the lightning in a triangle indicates that there is a risk to your health, e.g. due to an electric shock.

The symbol with an exclamation mark in a triangle is used to highlight important information in these operating instructions. Always read this information carefully.

The arrow symbol indicates special information and tips on how to use the product.

This product must only be used in dry, enclosed indoor areas. It must not become damp or wet, as this may cause a fatal electric shock!

This symbol reminds you to read the operating instructions included with the product.
Safety information

Read the operating instructions carefully and especially observe the safety information. If you do not follow the safety information and information on proper handling in these operating instructions, we will assume no liability for any resulting personal injury or damage to property. Such cases will invalidate the warranty/guarantee.

a) General information
• This product is not a toy. Keep it out of the reach of children and pets.
- Do not leave packaging material lying around carelessly. It may become a dangerous toy for children.
- Protect the product from extreme temperatures, direct sunlight, strong jolts, high humidity, moisture, flammable gases, vapours and solvents.
- Do not place the product under any mechanical stress.
- If it is no longer possible to operate the product safely, stop using it and prevent unauthorised use. Safe operation can no longer be guaranteed if the product:
- is visibly damaged,
- is no longer working properly,
- has been stored for extended periods in poor ambient conditions or
- has been subjected to any serious transport-related stress.
- Handle the product carefully. Jolts, impacts or a fall even from a low height may damage the product.
- Consult a technician if you are not sure how to use or connect the product, or if you have concerns about safety.
- Maintenance, modifications and repairs must be carried out by a specialist or a specialist repair centre.
- If you have questions which remain unanswered by these operating instructions, contact our technical support service or other technical personnel.
b) Connected devices
- Always observe the safety information and operating instructions of any other devices which are connected to the product.
c) Installation location
- The product may only be used in dry, enclosed spaces. The product must not become damp or wet. This may cause a fatal electric shock!
- Place the charger on a clean, level surface of a sufficient size.
- Do not place the charger on flammable materials (e.g. a carpet, car seat or tablecloth). Always use a suitable non-flammable, heatproof surface. Keep the charger away from flammable or combustible materials (e.g. curtains).
- Ensure that the cable is not pinched or damaged by sharp edges. Route the connecting cable so that nobody can trip over it.
- Do not place any containers filled with liquid on or next to the product. Liquids that come into contact with the interior components may destroy the charger and cause a fire or explosion.
- If liquid comes into contact with the charger or the interior components:
- Switch off the power supply to the mains socket to which the charger is connected. To do this, switch the corresponding circuit breakers off or unscrew the fuse. In addition, turn off the residual current device in order to disconnect all poles of the socket from the mains voltage.
- You can then unplug the charger from the mains socket.
- Discontinue use immediately and take the charger to a specialist repair shop, or dispose of it in an environmentally friendly manner.
Always use suitable protection when placing the charger on valuable furniture, otherwise the charger may cause scratches, pressure points or discolouration.
d) Operation
- Never attempt to charge unsupported battery types or non-rechargeable batteries. This may cause a fire or explosion!
- Always set the correct charging voltage. Failure to do so may cause a fire or explosion.
- Ensure there is adequate ventilation during operation. Never cover the charger. Leave sufficient distance (at least 20 cm) between the charger and other objects. The charger may cause a fire if it overheats!
- The charger may be powered via an AC or DC voltage. The device can be operated either with a 100–240 V AC voltage or with a 7–17 V DC voltage. Make sure that you use the correct input voltages. Always ensure the correct polarity.
- Never leave the product unattended during use. Although there is a wide range of comprehensive safety mechanisms on the device, it is impossible to exclude the possibility of malfunctions or problems occurring while charging.
- When connecting the battery packs, ensure that the input and output are connected with the correct polarity.
- When working with the charger, never wear metallic or strongly conductive materials such as jewellery (necklaces, bracelets, rings or similar objects). This may cause a fire or explosion in the event of a short circuit.
- Only use the product in temperate climates. It is not suitable for use in tropical climates.
- Do not use the product in the immediate vicinity of strong magnetic or electromagnetic fields, transmitter aerials or HF generators. These may affect the electronic control system.
- Do not place the product directly next to devices with strong electrical or magnetic fields (e.g. transformers, motors, cordless telephones, wireless devices and radios), as these can prevent the product from working properly.
- Never use the product immediately after it has been brought from a cold room into a warm one. This may generate condensation, which can cause the product to malfunction or damage the interior components. It may also cause a fatal electric shock! Let the product reach room temperature before using it. This may take several hours.
- If you do not plan to use the product for an extended period (e.g. storage), disconnect the product from the power supply. To do this, disconnect the power cable from the mains socket.
- Trained personnel must supervise the use of electrical appliances in schools, training facilities and DIY workshops.
- For installations in industrial facilities, follow the accident prevention regulations for electrical systems and equipment issued by the government safety organisation or the corresponding authority for your country.
e) Electrical safety
- Before connecting the product to the mains, ensure that your local mains voltage matches the specifications on the product nameplate.
- The product must only be powered with a properly fused earthed socket (230 V/AC, 50 Hz) or a suitable DC voltage source (7–17 V/DC).
- The mains socket must be located near to the device and be easily accessible.
- For safety reasons, disconnect the mains plug from the mains socket during thunderstorms.
- Never connect or disconnect power plugs when your hands are wet.
Information about charging parameters
Rechargeable batteries consists of two electrodes which are contained in an electrolyte. A rechargeable battery is therefore a chemical element. Chemical reactions take place inside this element. These reactions are reversible, which makes it possible to recharge the battery. To charge a rechargeable battery, a so-called charge voltage is required, which must exceed the cell voltage. Moreover, the energy supplied during the charging process must be higher than that which can be drawn afterwards. This ratio of the energy supplied to the energy drawn is called efficiency.
The capacity that can be drawn is heavily dependent on the discharging current and has a decisive impact on the condition of the battery. The supplied charge cannot be used as a measure, because some of it will be lost during charging (e.g. converted into heat).
The capacity data given by the manufacturer is the maximum theoretical quantity of current which can be delivered by the battery. This means that a 2000 mAh battery can theoretically deliver a current of 1000 mA (= 1 A) for two hours. The actual value depends heavily on numerous factors (e.g. condition of the battery, discharging current and temperature).
a) Selecting the charging parameters

All parameters must be set correctly before each charge. Using incorrect settings can cause a fire and injury as well as damage to property.
b) Selecting the charging current
An excessive charging current significantly reduces the lifespan of the battery, and in extreme cases may cause a fire or explosion. Selecting the appropriate charging current for a battery type is therefore very important. The charging and discharging current are determined by the C-coefficient of a battery pack. For most conventional battery packs, the C-coefficient is indicated on the nameplate.
The requisite charging current for a battery is calculated according to the following formula:
Capacity in mA x C-coefficient = charging current in mA
Example: 1000 mAh x 5C = 5000 mA
A 1000 mAh battery with a coefficient of 5C requires a charging current of approx. 5 A. If you can't determine the C-coefficient of a battery pack, always use a coefficient of 1C and calculate the charging current accordingly. This is always a safe charging current. However, bear in mind that the charging times can vary according to the actual (but not verified) battery specifications.

For batteries with only one cell, the C coefficient is 1.
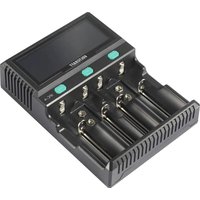
Product overview
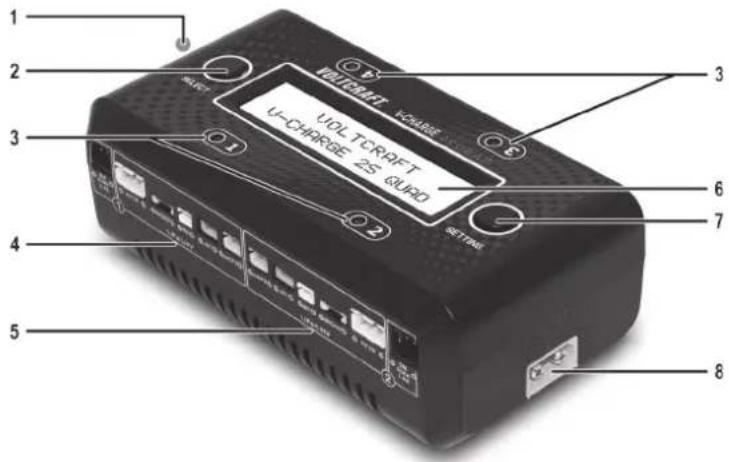
1 Mains connection (100-240 V/AC) 2 SELECT button
3 LED indicators (charging channels 1-4) 4 Charging connections (charging channel 1)
5 Charging connections (charging channel 2) 6 LCD display
7 SETTING button 8 7-17 V/DC DC voltage connection
Operation
a) Placement
- Place the charger with the plastic feet on a non-combustible, heat-resistant surface close to a standard fused mains socket, if you wish to use it with a mains voltage. To use the charger with a DC voltage, the DC source must be located nearby or moved next to the charger.
- Keep the charger away from flammable or combustible materials (e.g. curtains). Never operate the charger on car seats, carpet or other combustible materials.
b) Connecting to the power supply

Never operate the charger with a voltage that is outside the range specified in the technical data.
- Alternating current connection: Connect the mains cable to the 100–240 V/AC mains connection (1) and plug the mains plug into a standard mains socket.
- Direct current connection: Connect the 7–17 V/DC voltage connection (8) to a suitable DC voltage source (e.g. laboratory power adapter) using a suitable cable with an XT60 plug (not included) (see "Technical data"). You can use power adapters or, in dry conditions, car batteries. However, consider the charging status of your car battery when you are travelling.

We recommend a battery with 2-4S and 7–17 V/DC voltage as a DC supply.

The charger has no short-circuit protection at the input. Never connect both power supply connections simultaneously. Do not attempt to operate the charger with an AC voltage and a DC voltage (e.g. a battery) at the same time. This will cause the charger to switch off and start repeatedly. This may damage the AC power supply, or in the worst case, destroy the charger.
c) Setting the parameters
- When the charger is connected to a power supply, it briefly shows the device logo and type, followed by the value of the input voltage. The 4 LED indicators light up in red and green until the charger switches to the standby display.

flowchart
graph LR
    A["VOLTCAFT\nV-CHARGE 25 QUAD"] --> B["IN Voltage: 12.0V"]
    B --> C["LiPo LiPo\nLiPo LiPo"]
Setting the charging current
- Press the SELECT button (2) to switch to the default setting for the charging current. The factory default setting is 0.5 A.
- Press the SETTING button (7) to adjust the charging current setting between 0.1 and 1.0 A. Press and hold the SETTING button (7) to confirm the setting. "SAVE SETTING ..." will appear on the LCD display (6) to confirm that your setting has been saved. The charger will then switch back to the standby display.
Setting the battery type
• After setting the charging current, press the SELECT button (2) to switch to the settings menu for the battery type. The factory setting is LiPo.
• To set the battery type for all 4 charging channels simultaneously, proceed as follows:
- Press the SETTING button (7) to switch between the different battery types. This can be repeated as often as required.
- Press and hold the SETTING button (7) to confirm the global setting for all 4 charging channels. "SAVE SETTING ..." will appear on the LCD display (6) to confirm that your setting has been saved.
• To set the battery type for each charging channel individually, proceed as follows:
- Press the SELECT button (2) again to set the battery type for the first charging channel (charging channel 1). The setting symbol for the respective charging output will start to flash on the LCD display (6).
- Press the SETTING button (7) to change the battery type. Each additional press of this button switches between the two battery types.
- Press the SELECT button (2) again to switch to the setting for the next charging channel. The indicators for outputs 2 to 4 always flash individually to indicate that the corresponding charging output is ready to be set. Press the SETTING button (7) to set the battery type for each charging output.
- When you have finished setting the battery type, press and hold the SETTING button (7) until "SAVE SETTING ..." appears on the LCD display (6) to confirm that the settings have been saved successfully. The charger will then switch back to the standby display
d) Connecting batteries to the charger

Never attempt to connect more than one battery to a charging channel at the same time. This may damage or even destroy the charger.
- For each charging channel (1-4), only connect one battery with one type of connector to the possible battery connections. Select the appropriate connector (SM, XH, Micro, MX, JST and mCPX) for each of the four channels and connect up to a maximum of four batteries to the charger.
- Charging will start after the batteries have been connected.
e) Charging process
- During the charging process, the LED indicator (3) for the active charging channel will flash in red.
- The LCD display will show the charging parameters for all connected batteries in an alternating sequence.
- Sequence for 1S LiPo/LiHV and NiMH/NiCd batteries:
Battery type > Battery voltage > Charging current > Battery capacity
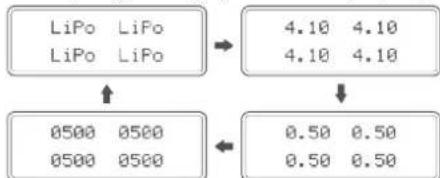
flowchart
graph TD
    A["LiPo LiPo\nLiPo LiPo"] --> B["4.10 4.10\n4.10 4.10"]
    C["0500 0500\n0500 0500"] --> D["0.50 0.50\n0.50 0.50"]
- Sequence for 2S LiPo/LiHV batteries:
Battery type > Battery voltage > Cell 1 voltage > Cell 2 voltage > Charging current > Battery capacity
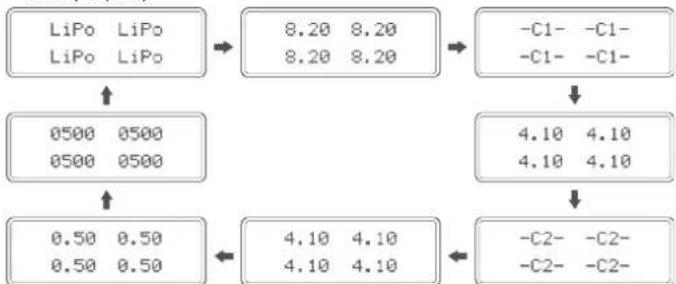
flowchart
graph TD
    A["LiPo LiPo\nLiPo LiPo"] --> B["8.20 8.20\n8.20 8.20"]
    B --> C["-C1- -C1- -C1- -C1-"]
    A --> D["0500 0500\n0500 0500"]
    D --> E["4.10 4.10\n4.10 4.10"]
    E --> F["-C2- -C2- -C2- -C2-"]
    A --> G["0.50 0.50\n0.50 0.50"]
    G --> H["4.10 4.10\n4.10 4.10"]
    H --> I["-C2- -C2- -C2- -C2-"]
- As soon as a battery is fully charged, "FULL" will be displayed for the corresponding charging channel. The corresponding LED indicator (3) will then stay constant green.
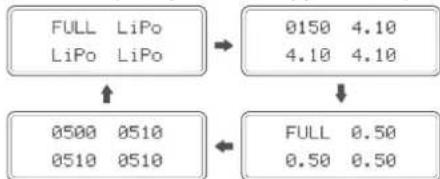
flowchart
graph TD
    A["FULL LiPo\nLiPo LiPo"] --> B["0150 4.10\n4.10 4.10"]
    C["0500 0510\n0510 0510"] --> D["FULL 0.50\n0.50 0.50"]
Safety features
a) Under/overvoltage protection
The charger stops charging when the input voltage on the DC power connection is less than 7.0 V/DC. "DC Input Low" will be displayed on the LCD display.
DC Input Low Input: 6.5V
If you are using a rechargeable battery for the power supply, remove it as soon as possible and recharge it later.
If you are using a power adapter for the power supply, check whether the setting is too low or whether there is another malfunction.
The charger also stops charging when the input voltage on the DC power connection is more than 17.0 V/DC. "DC Input High" will be displayed on the LCD display.
DC Input High Input: 17.5V
If this message appears, immediately adjust the input voltage to the correct value or disconnect the charger from the voltage source (battery). Prolonged overvoltages increase the risk of a fire or may even destroy the charger.
b) Reverse polarity protection
If you connect a battery with reversed polarity, the charger will not charge. Connect the rechargeable battery(s) with the correct polarity.
c) Cell overvoltage
As soon as the saturation voltage exceeds 100 mV, the charger automatically stops charging and displays an "OV" warning message for the corresponding channel.
-OV- LiPo LiPo LiPo
d) Overcurrent
If the charging current is above 1.20 A, the charger automatically stops charging and displays the "OC" warning message for the corresponding channel.
-OC- LiPo LiPo LiPo
Care and cleaning

Do not use any aggressive cleaning agents, rubbing alcohol or other chemical solutions, as these may damage the housing or impair the functioning of the device.
- Disconnect the product from the mains before each cleaning session. Pull the mains plug from the mains socket or disconnect the DC power supply.
- Use a dry, lint-free cloth to clean the product.
- To prevent scratch marks, do not press too hard on the surface of the enclosure or LCD display when cleaning.
Disposal

Electronic devices are recyclable waste and must not be placed in household waste. At the end of its service life, dispose of the product according to the relevant statutory regulations.
You thus fulfil your statutory obligations and contribute to environmental protection.
Technical data
Input voltage....100-240 VAC / 50/60 Hz or 7-17 VDC
Output voltage ...... Max. 8.7 V
Charging power ....4x max. 7 W ± 10%
Charging current....4x 0.1–1.0 A ± 10%
Battery connections......SM, XH, Micro, MX, JST, mCPX
Rechargeable battery types..... LiPo, LiHV, NiMH, NiCD
Operating conditions....0 to +40 °C, 0–90 % relative humidity (non-condensing)
Storage conditions....-10 to +50 °C, 0–95 % relative humidity (non-condensing)
Dimensions (L x W x H).....122 x 68 x 42 mm
Cable length 1.1 m
Weight 233 g
This is a publication by Conrad Electronic SE, Klaus-Conrad-Str. 1, D-92240 Hirschau (www.conrad.com).
All rights including translation reserved. Reproduction by any method, e.g. photocopy, microfilming or capture in electronic data processing systems, requires the prior written approval of the publisher. Reprinting, also in part, is prohibited. This publication reflects the technical status at the time of printing.
Copyright 2020 by Conrad Electronic SE. *2300390_v2_1220_02_DS_m_(1)_6L
F Mode d'emploi
- Nickel-cadmium (NiCd)
flowchart
graph LR
    A["VOLTCRAFT\nV-CHARGE 25 QUAD"] --> B["IN Voltage: 12.0V"]
    B --> C["LiPo LiPo\nLiPo LiPo"]
flowchart
graph TD
    A["LiPo LiPo\nLiPo LiPo"] --> B["4.10 4.10\n4.10 4.10"]
    C["0500 0500\n0500 0500"] --> D["0.50 0.50\n0.50 0.50"]
flowchart
graph TD
    A["FULL LiPo\nLiPo LiPo"] --> B["0150 4.10\n4.10 4.10"]
    C["0500 0510\n0510 0510"] --> D["FULL 0.50\n0.50 0.50"]
Dimensions (L x l x h)....122 x 68 x 42 mm
Copyright 2020 by Conrad Electronic SE.
*2300390_v2_1220_02_DS_m_(1)_6L
- Nikkel-cadmium (NiCd)
flowchart
graph LR
    A["VOLTCRAFT\nV-CHARGE 25 QUAD"] --> B["IN Voltage: 12.0V"]
    B --> C["LiPo LiPo\nLiPo LiPo"]
Laadstroom instellen
flowchart
graph TD
    A["LiPo LiPo\nLiPo LiPo"] --> B["4.10 4.10\n4.10 4.10"]
    C["0500 0500\n0500 0500"] --> D["0.50 0.50\n0.50 0.50"]
flowchart
graph TD
    A["FULL LiPo\nLiPo LiPo"] --> B["0150 4.10\n4.10 4.10"]
    C["0500 0510\n0510 0510"] --> D["FULL 0.50\n0.50 0.50"]
Laadvermogen....4 x max. 7 W ± 10%
Laadstroom....4 x 0,1–1,0 A ± 10%
Accu-aansluitingen ......SM, XH, Micro, MX, JST, mCPX
Oplaadbare accutypes...LiPo, LiHV, NiMH, NiCD
Copyright 2020 by Conrad Electronic SE.
*2300390_v2_1220_02_DS_m_(1)_6L
Utilizzo conforme
• LiHV (Lithium Polymer High Voltage)
- Nichel-Cadmio (NiCd)
flowchart
graph TD
    A["LiPo LiPo\nLiPo LiPo"] --> B["4.10 4.10\n4.10 4.10"]
    C["0500 0500\n0500 0500"] --> D["0.50 0.50\n0.50 0.50"]
- Sequenza per le batterie 2S LiPo/LiHV:
flowchart
graph TD
    A["FULL LiPo\nLiPo LiPo"] --> B["0150 4.10\n4.10 4.10"]
    C["0500 0510\n0510 0510"] --> D["FULL 0.50\n0.50 0.50"]
Copyright 2020 by Conrad Electronic SE. *2300390_v2_1220_02_DS_m_(1)_6L
flowchart
graph TD
    A["LiPo LiPo\nLiPo LiPo"] --> B["4.10 4.10\n4.10 4.10"]
    C["0500 0500\n0500 0500"] --> D["0.50 0.50\n0.50 0.50"]
flowchart
graph TD
    A["FULL LiPo\nLiPo LiPo"] --> B["0150 4.10\n4.10 4.10"]
    C["0500 0510\n0510 0510"] --> D["FULL 0.50\n0.50 0.50"]
Funkcje ochronne
Copyright 2020 by Conrad Electronic SE.
*2300390 v2 1220 02 DS m (1) 6L