
VC-AL100N - Battery charger VOLTCRAFT - Free user manual and instructions
Find the device manual for free VC-AL100N VOLTCRAFT in PDF.

| Product type | Intelligent charger for lead-acid batteries |
| Brand | Voltcraft |
| Model | VC-AL100N |
| Charging voltages | 6 V and 12 V |
| Charging current | 1 A |
| Compatible battery capacity | 1.2 to 24 Ah |
| Compatible battery types | Lead-acid, AGM, gel |
| Supply voltage | 100 – 240 V AC, 50/60 Hz |
| Max. power consumption | 24 W |
| Dimensions (L x W x H) | 110 x 72 x 40 mm |
| Total weight with accessories | 330 g |
| Power cable length | 1.7 m |
| Fuse | T1A |
| Operating conditions | 0 to +40 °C, 20-80 % RH non-condensing |
| Storage conditions | -30 to +70 °C, 10-85 % RH non-condensing |
| Main functions | Automatic charging, defective battery detection, reverse polarity protection, overheat and short-circuit protection, trickle charging, deep discharge battery regeneration |
| LED indicators | Charging, 6V mode, 12V mode, fault |
| Supplied accessories | Red/black terminal, eyelet connector, user manual |
| Maintenance | Clean with a dry, lint-free cloth; disconnect before cleaning |
| Safety | Protection class II, indoor use only, do not cover during operation |
| Repairability | Fuse replacement by a professional only |
Frequently Asked Questions - VC-AL100N VOLTCRAFT
User questions about VC-AL100N VOLTCRAFT
0 question about this device. Answer the ones you know or ask your own.
Ask a new question about this device
Download the instructions for your Battery charger in PDF format for free! Find your manual VC-AL100N - VOLTCRAFT and take your electronic device back in hand. On this page are published all the documents necessary for the use of your device. VC-AL100N by VOLTCRAFT.
USER MANUAL VC-AL100N VOLTCRAFT
GB Operating Instructions
VC-AL100N
Automatic charger 1 A
Item No. 2637720 Page 2 - 13
F Notice d'emploi
VC-AL100N
- Introduction......3
- Explanation of symbols....3
- Intended use....4
- Package contents 4
- Features and functions .... 5
- Safety information....5
a) General information....5
b) Connected devices....6
c) Electrical safety 6
d) Persons and product 7
e) Rechargeable batteries ....7
- Operating elements 8
a) Meaning of LED indicators 8
- Setup 9
a) Charging a battery....9
b) Charging modes and functions....10
c) Charging time 11
d) Built-in protection features....11
-
Care and cleaning....12
-
Changing the fuse....12
- Disposal....12
a) Product....12
b) (Rechargeable) batteries....13
- Technical data....13
1. Introduction
Dear customer,
Thank you for purchasing this product.
This product complies with statutory national and European regulations.
To ensure that the product remains in this state and to guarantee safe use, always follow the instructions in this manual.

These operating instructions are part of this product. They contain important information on setting up and using the product. Do not give this product to a third party without the operating instructions. Keep these operating instructions in a safe place for future reference.
If there are any technical questions, please contact:
International: www.conrad.com/contact
2. Explanation of symbols

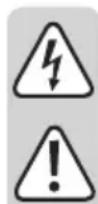
The symbol with the lightning in a triangle indicates that there is a risk to your health, e.g. due to an electric shock.

The symbol with an exclamation mark in a triangle is used to highlight important information in these operating instructions. Always read this information carefully.

The arrow symbol indicates special information and tips on how to use the product.

This symbol indicates that this product is built according to protection class II. It is equipped with reinforced or dual insulation between the mains circuit and the output voltage.

The product must only be installed and used in dry, indoor locations. It must not become damp or wet, as this may cause a fatal electric shock!

This symbol reminds you to read the operating instructions included with the product.
3. Intended use
This compact charger automatically charges lead-acid batteries with a 6 V or 12 V terminal voltage and a capacity of 1.2–24 Ah. Compatible battery types include lead-acid, lead-fleece (AGM) and gel batteries. The charger can be used to charge batteries mounted in vehicles. It automatically detects drained batteries and reactivates them by delivering an increased charging voltage. A trickle charge function keeps the battery voltage at an optimal level. The charger features an operating button. LED indicators indicate the operating status. The charger is protected against reverse polarity, overheating and short circuits. The clamps initially deliver a voltage of 0.6-0.8 V when the charger detects that a battery is connected. This prevents sparks from being produced if the clamps are touched unintentionally. The connection is indicated with colour-coded red and black clamps (red +, black -) for universal contact, or eyelets for permanent contact. The charging connections can be reversed with a reverse-polarity protected socket system. The charger must not be used to connect or charge primary batteries (e.g. zinc-carbon or alkaline batteries) or other batteries that are not specified in these instructions (e.g. NiCd, NiMH and LiPo batteries). Refer to the "Technical data" section for more information on compatible battery types.
The charger must be connected to a standard household AC voltage and must only be used in well ventilated indoor areas. The charger is powered by a 220–240 V/AC mains voltage.
This product is intended for indoor use only. Do not use it outdoors. Contact with moisture (e.g. in a bathroom) must be avoided under all circumstances.
For safety and approval purposes, do not rebuild and/or modify this product. Using the product for purposes other than those described above may damage the product. In addition, improper use can cause hazards such as a short circuit, fire or electric shock. Read the instructions carefully and store them in a safe place. Only make this product available to third parties together with its operating instructions.
All company and product names are trademarks of their respective owners. All rights reserved.
4. Package contents
- Charger
- 1x ring eyelet connection (black = negative terminal, red = positive terminal).
- 1x red and black terminal (black = negative terminal, red = positive terminal).
- Operating instructions
Up-to-date operating instructions
To download the latest operating instructions, visit www.conrad.com/downloads or scan the QR code on this page. Follow the instructions on the website.

5. Features and functions
- Charges 6 V or 12 V lead-based motorcycle batteries with a current of up to 1 A
- Automatically selects the previous charging mode when switched on
- Detects faulty batteries
- Compact and lightweight design
- Trickle charging
6. Safety information
Read the operating instructions and safety information carefully. If you do not follow the safety instructions and information on proper handling in these operating instructions, we assume no liability for any resulting personal injury or damage to property. Such cases will invalidate the warranty/guarantee.
a) General information
- The product is not a toy. Keep it out of the reach of children and pets.
- Do not leave packaging material lying around carelessly. It may become a dangerous toy for children.
- Protect the product from extreme temperatures, direct sunlight, strong jolts, high humidity, moisture, flammable gases, vapours and solvents.
- Do not place the product under any mechanical stress.
-
If it is no longer possible to operate the product safely, stop using it and prevent unauthorised use. Safe operation can no longer be guaranteed if the product:
-
is visibly damaged,
- is no longer working properly,
- has been stored for extended periods in poor ambient conditions or
-
has been subjected to any serious transport-related stress.
-
Handle the product carefully. Jolts, impacts or a fall even from a low height may damage the product.
- Consult a technician if you are not sure how to use or connect the product, or if you have concerns about safety.
- Maintenance, modifications and repairs must be done by a technician or a specialist repair centre.
- If you have any questions which are not answered in these operating instructions, contact our technical support service or other technical personnel.
b) Connected devices
• Always observe the safety instructions and operating instructions of other devices (vehicle, batteries) which are connected to the product.
c) Electrical safety
- Before connecting the product to the mains, check that your local A/C mains voltage matches the specifications on the nameplate.
- The product is constructed according to protection class II. Only connect the charger to a standard mains socket (230 V/AC, 50 Hz) connected to the public grid.
- Never pour liquids over electrical devices or place objects filled with liquid next to the device. If liquid or an object does enter the interior of the device, power down the respective socket (e.g. switch off the circuit breaker) and remove the mains plug from the mains socket. Discontinue use and take the product to a specialist repair centre.
- Never use the product immediately after it has been brought from a cold room into a warm one. The condensation that forms may destroy the product. The mains adapter may also cause a fatal electric shock! Allow the product to reach room temperature before connecting it and putting it to use. This may take several hours.
- The mains outlet must be located near to the device and be easily accessible.
- Never unplug the mains plug by pulling on the cable. Always use the grips on the plug.
- Unplug the mains plug from the mains socket if you do not plan to use the appliance for an extended period of time.
- For safety reasons, disconnect the mains plug from the mains socket during thunderstorms.
- Make sure that the mains cable is not squeezed, bent, damaged by sharp edges or subjected to mechanical stress. Avoid excessive thermal stress on the mains cable from extreme heat or cold. Do not modify the mains cable, as this may damage the components inside the cable. Damaged mains cables can cause a fatal electric shock.
- Do not touch the mains cable if there are any signs of damage. Power down the respective mains socket (e.g. via the respective circuit breaker), and then carefully unplug the mains plug from the mains socket. Never use the product if the mains cable is damaged.
- Damaged mains cables must be replaced by the manufacturer, an authorised repair centre or a qualified electrician.
- Never insert or unplug the mains plug when your hands are wet.
d) Persons and product
- Always comply with the accident prevention regulations for electrical equipment when using the product in commercial facilities.
- In schools, educational facilities, computer and DIY workshops, the product must be used under the supervision of qualified personnel.
- The device must not be used in explosion-prone areas.
- Observe the safety information in each section.
-
Observe the labels on the product.
-
Warning! Avoid explosive gases, naked flames and sparks.
- Disconnect the mains plug before connecting/disconnecting the battery.
- Read the operating instructions before charging.
-
Use only the product in well ventilated areas.
-
Do not use the charger inside vehicles.
- Never cover the charger or the connected battery!
- Do not smoke when using the charger or handling rechargeable batteries.
- Do not use the charger when the ambient temperature is higher than +40 °C.
- Do not use the charger in the vicinity of flammable substances or gases.
e) Rechargeable batteries
- Ensure that you insert the battery in the correct polarity.
- Keep batteries out of the reach of children. Do not leave batteries lying around, as they constitute a choking hazard for children and pets.
- Rechargeable batteries must not be dismantled, short-circuited or thrown into open flames. Never attempt to charge non-rechargeable batteries, as this may cause an explosion!
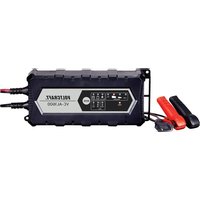
7. Operating elements
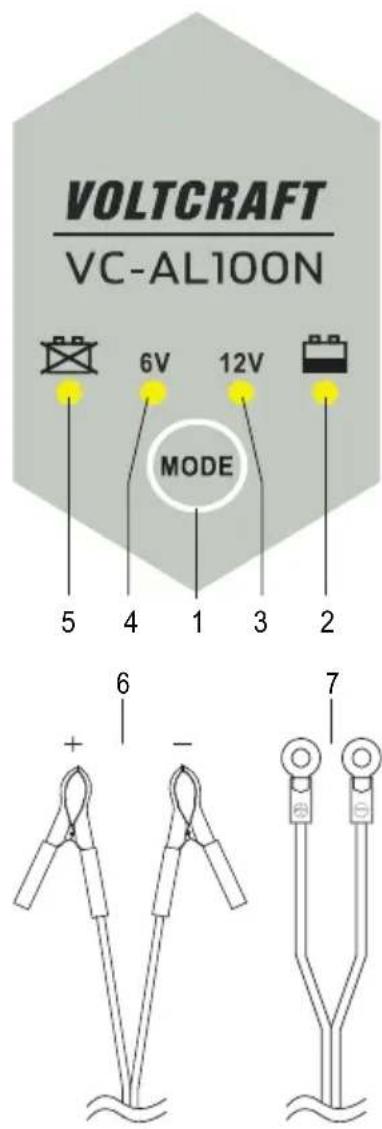
1 MODE button
2 Charging LED
3 12 V mode LED indicator
4 6 V mode LED indicator
5 Fault LED indicator
6 Red and black terminal (black = negative terminal, red = positive terminal).
7 Eyelet connector (black = negative terminal, red = positive terminal).
a) Meaning of LED indicators
LED Meaning

Charging indicator Flashes when the battery is charging and stays constant when the battery is fully charged.
6V 6 V mode is designed to charge lead-acid batteries with a voltage of up to 7.2 V and a capacity of up to 24 Ah.
12 V
12 V mode is designed to charge lead-acid batteries with a voltage of up to 14.4 V and a capacity of up to 24 Ah.

Fault indicator: This indicator tuns on if the battery is defective or connected in the wrong polarity.

The charger heats up during use. Ensure that there is sufficient ventilation. Do not cover the housing!
Never charge lead batteries in a closed container.
Ensure there is sufficient ventilation during the charging process and avoid naked flames!
Explosive gases may be generated during the charging process. Keep the charger out of the reach of children!
Before charging batteries with liquid acid, open the sealing plugs on each cell.
Leave the battery casing to ventilate for approx. 2 minutes to allow explosive gases to evaporate!
Check the liquid level and top up if necessary.
Check the liquid level on a regular basis during longer charging periods (overwintering). Wear safety goggles when inspecting the batteries!
Do not turn lead-acid batteries upside down. Avoid any contact with the battery liquid, as it may cause severe chemical burns.
Rinse the contact points (skin, clothes etc.) immediately with water to dilute the battery acid.
Contact a doctor immediately in case of contact with skin.
In case of prolonged storage, charge lead-acid batteries every 3 months to prevent them from draining.
Never short-circuit the battery contacts.
When connecting batteries, ensure that they are connected in the correct polarity and observe the charging instructions provided by the battery manufacturer.
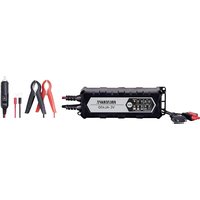
a) Charging a battery
- Ensure that your battery is compatible with the charger. It must be a 6 V / 12 V lead-acid, lead-fleece (AGM) or gel battery. Refer to the specifications in the "Technical data" section.

Do not use the charger to charge batteries with other operating voltages!
- Connect the appropriate adapter cable to the charging cable. The plugs can only be connected in the correct polarity. Check that the cables are connected properly. The locking mechanism should click into place.
- To unplug the adapter cable from the charging cable, press gently on the latch and pull the cables apart. Do not force the cables apart if the locking mechanism has not been released.
- Insert the mains plug into a mains socket (100-240 V/AC, 50/60 Hz). The charger will switch on and check each charging function. The LED indicators will turn on briefly.

The charger has an automatic memory function, i.e. it automatically selects the previous charging mode when it is connected to the mains.
- Use the MODE button (1) to select a charging mode. Press the button until the LED/LEDs indicate the desired function (6 V or 12 V mode). For details on individual charging modes, refer to the next section ("b) Charging modes and functions").

Connect the adapter cable to the battery. Never connect the cable directly to other devices!
- Connect the charger to the battery. Ensure that the battery is connected in the correct polarity. The red adapter cable must be connected to the positive terminal, and the black adapter cable must be connected to the negative terminal. Connect the cables on the red and black clamps to the battery terminals. Screw the eyelet connector to the terminal contacts (red and black terminal and eyelet connector: black = negative terminal, red = positive terminal).

For built-in batteries connected to an on-board system, connect the positive terminal and then connect the black terminal to an earth potential (chassis) that is positioned at a slight distance from the battery and the fuel pipe. Check that the clamps are connected properly.
- Disconnect all devices from the battery. If the battery is mounted inside a vehicle, switch off the ignition and other connected devices.

For more information on charging vehicle batteries, follow the instructions and safety information in the owner's manual. Modern vehicles are equipped with sensitive electronic components and sensors which may be damaged if you do not exercise caution.
- The LED (5) will turn on if the polarity is incorrect. Check the polarity and connect the terminals in the correct polarity.
- If the charging circuit is short-circuited, the defective LED indicator (5) will turn on.
- The charger can automatically detect defective batteries. If the battery is defective, the selected charging program will not be started and the defective LED indicator (a) will turn on. Ask a technician to inspect the battery, or purchase a replacement.
- Disconnect the battery and the charger from the power supply after the battery has finished charging. Disconnect the mains plug from the mains socket. Remove the black and then the red clamp from the battery.
b) Charging modes and functions
1. 6 V motorcycle mode (7.2 V ±0.25 V)
- This mode is designed for 6 V batteries with capacity of less than 24 Ah, e.g. 6 V motorcycle batteries.
- To select this mode, press the MODE button (5) until the 6 V LED indicator (4) turns on. The charging process will start automatically (1 A ±10 %). The charging LED(2) will start to flash.
- The charging indicator (2) will stay constant when the battery is fully charged (7.2 V ±0.25 V). The device will switch off automatically.
2. 12 V car mode (14.4 ±0.25 V)
- This mode is designed for 12 V batteries with capacity of less than 24 Ah, e.g. 12 V car batteries.
- To select this mode, press the MODE button (5) until the 12 V LED indicator (3) turns on. The charging process will start automatically (1 A ±10 %). The charging LED(2) will start to flash.
- The charging indicator (2) will stay constant when the battery is fully charged (14.4 V ±0.25 V). The device automatically switches to trickle charge mode.
Restore function
- This function is designed to restore overdischarged batteries. It cannot be selected manually. Restore mode starts automatically when an overdischarged battery is connected to the charger. A low charging current is used to restore the battery to a normal voltage. When the battery reaches its normal voltage, the charger continues to charge the battery using the normal charging process.
c) Charging time
• The time it takes for the battery to reach its final charging voltage depends on several parameters, such as:
- The capacity (Ah) (batteries with higher capacities take longer to charge)
- The type of battery
- The charging status (full, half-full or empty)
- The ambient temperature (ideally between 20 - 25 °C) and
- The general condition (age) of the battery.
The charging time depends on the above parameters and can be roughly estimated using the following formula: Charging time (in hours) = Battery capacity (in Ah) x 1.2 / Charging current (in A)
Example: 20 Ah lead-gel battery, empty
Approx. charging time 5 hrs = 20 Ah x 1.2 / 5 A
d) Built-in protection features
Spark-resistant short-circuit and reverse polarity protection
• These functions protect the charger from damage when the battery cables are connected in reverse polarity.
Overvoltage protection
- This function protects sensitive electronic components in the charger against damage caused by high voltages.
Charging current regulator
- This function prevents the charger from overheating and damage caused by short or excessive loads.
Automatic overtemperature protection
- The overtemperature protection feature prevents damage to the charger caused by abnormal ambient temperatures or faulty components.
The built-in overheat protection feature constantly monitors the temperature of the electronic components. If the temperature exceeds the preset limit, the current is reduced to prevent the charger from overheating. This reduces the output current until the temperature has dropped to a safe level.
9. Care and cleaning

Never use aggressive detergents, rubbing alcohol or other chemical solutions, as these may damage the casing or stop the product from functioning properly.
- Before cleaning, disconnect the product from the mains and remove any connected batteries.
- Use a dry, lint-free cloth to clean the product.
10. Changing the fuse
- If the fuse of the device has burned out (there is no voltage at the charging output when a battery is connected), send the charger to our technical support team or a qualified technician for repair/replacement fuse. Do not attempt to replace the fuse by yourself!
11. Disposal
a) Product
This symbol must appear on any electrical and electronic equipment placed on the EU market. This symbol indicates that this device should not be disposed of as unsorted municipal waste at the end of its service life.
Owners of WEEE (Waste from Electrical and Electronic Equipment) shall dispose of it separately from unsorted municipal waste. Spent batteries and accumulators, which are not enclosed by the WEEE, as well as lamps that can be removed from the WEEE in a non-destructive manner, must be removed by end users from the WEEE in a non-destructive manner before it is handed over to a collection point.
Distributors of electrical and electronic equipment are legally obliged to provide free take-back of waste. Conrad provides the following return options free of charge (more details on our website):
• in our Conrad offices
• at the Conrad collection points
- at the collection points of public waste management authorities or the collection points set up by manufacturers or distributors within the meaning of the ElektroG
End users are responsible for deleting personal data from the WEEE to be disposed of.
It should be noted that different obligations about the return or recycling of WEEE may apply in countries outside of Germany.
b) (Rechargeable) batteries
Remove batteries/rechargeable batteries, if any, and dispose of them separately from the product. According to the Battery Directive, end users are legally obliged to return all spent batteries/rechargeable batteries; they must not be disposed of in the normal household waste.
Batteries/rechargeable batteries containing hazardous substances are labelled with this symbol to indicate that disposal in household waste is forbidden. The abbreviations for heavy metals in batteries are: Cd = Cadmium, Hg = Mercury, Pb = Lead (name on (rechargeable) batteries, e.g. below the trash icon on the left).
Used (rechargeable) batteries can be returned to collection points in your municipality, our stores or wherever (rechargeable) batteries are sold. You thus fulfil your statutory obligations and contribute to environmental protection.
Batteries/rechargeable batteries that are disposed of should be protected against short circuit and their exposed terminals should be covered completely with insulating tape before disposal. Even empty batteries/rechargeable batteries can contain residual energy that may cause them to swell, burst, catch fire or explode in the event of a short circuit.
12. Technical data
Input voltage....100–240 V/AC, 50/60 Hz
Power consumption......Max. 24 W
Output voltage/current.... 12 V/DC, 1 A 6 V/DC, 1 A
Rechargeable batteries ....1.1 Ah – 24 Ah
Final charge voltage.... 7.2 V ±0.25 V (6 V mode) 14.4 V ±0.25 V (12 V mode)
Cable length 1.7 m (mains cable)
Fuse......T1A
Operating conditions....0 to +40 °C, 20–80 % relative humidity (non-condensing)
Storage conditions....-30 to +70 °C, 10–85 % relative humidity (non-condensing)
Dimensions (L x W x H)....110 x 72 x 40 mm (device)
Weight 330 g (with accessories)
Page
France (email) : technique@conrad-france.fr
This is a publication by Conrad Electronic SE, Klaus-Conrad-Str. 1, D-92240 Hirschau (www.conrad.com).
All rights including translation reserved. Reproduction by any method, e.g. photocopy, microfilming, or the capture in electronic data processing systems require the prior written approval by the editor. Reprinting, also in part, is prohibited. This publication represents the technical status at the time of printing.
Copyright 2022 by Conrad Electronic SE.
Copyright 2022 by Conrad Electronic SE.
Copyright 2022 by Conrad Electronic SE.
- Introduction
- Explanation of symbols
- Intended use
- Package contents
- Up-to-date operating instructions
- Features and functions
- Safety information
- a) General information
- b) Connected devices
- c) Electrical safety
- d) Persons and product
- e) Rechargeable batteries
- Operating elements
- a) Meaning of LED indicators
- LED Meaning
- a) Charging a battery
- b) Charging modes and functions
- 6 V motorcycle mode (7.2 V ±0.25 V)
- 12 V car mode (14.4 ±0.25 V)
- Restore function
- c) Charging time
- Example: 20 Ah lead-gel battery, empty
- d) Built-in protection features
- Spark-resistant short-circuit and reverse polarity protection
- Overvoltage protection
- Charging current regulator
- Automatic overtemperature protection
- Care and cleaning
- Changing the fuse
- Disposal
- a) Product
- b) (Rechargeable) batteries
- Technical data
- Page
Brand : VOLTCRAFT
Model : VC-AL100N
Category : Battery charger