
MMini USB - Talkie Walkie MIDLAND - Free user manual and instructions
Find the device manual for free MMini USB MIDLAND in PDF.
| Product type | Mobile CB walkie-talkie |
| Brand | Midland |
| Model | MMini USB |
| Frequency band | 26.565 - 27.99125 MHz (CB band) |
| Dimensions | 110 x 120 x 25 mm |
| Weight | 450 g |
| Supply voltage | 13.2 V (12V vehicle) |
| Current consumption | 2 A max |
| TX power | 4 W (AM/FM per standard) |
| Modulation | AM / FM |
| Number of channels | Up to 80 per standard (40 FM + 40 AM) |
| Squelch | Manual (28 levels + 0) and Digital DS (9 levels) |
| RF gain | Yes, adjustable attenuation (6 dB max) |
| SCAN function | Yes, channel scanning |
| Emergency channel | CH9 / CH19 |
| Key lock | Yes (except PTT) |
| USB charging output | Yes, for external devices |
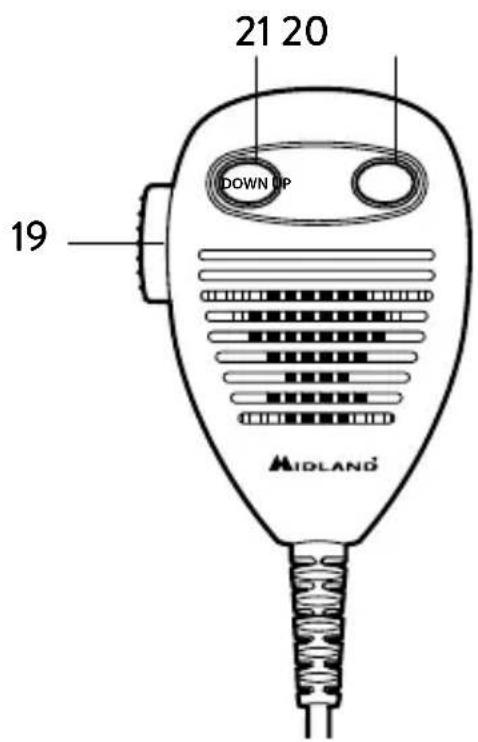
| Microphone connector | RJ45, detachable mic |
| Antenna connector | UHF, SO-239 |
| External speaker | Yes, 3.5 mm mono jack (8 Ω) |
| Display | LCD with S-Meter, TX/RX indicators, mode, etc. |
| Factory reset | Yes, by key combination |
| Maintenance and cleaning | Clean with a soft, dry cloth. Avoid moisture and abrasive products. |
| Safety instructions | Never transmit without an antenna. 12V power supply only. Secure installation in the vehicle. |
| Operating temperature | -10°C to +55°C |
Frequently Asked Questions - MMini USB MIDLAND
User questions about MMini USB MIDLAND
0 question about this device. Answer the ones you know or ask your own.
Ask a new question about this device
Download the instructions for your Talkie Walkie in PDF format for free! Find your manual MMini USB - MIDLAND and take your electronic device back in hand. On this page are published all the documents necessary for the use of your device. MMini USB by MIDLAND.
USER MANUAL MMini USB MIDLAND
Controllo guadagno RF
Descriptions and commands 3
Display 4
Back panel 4
Microphone 5
Installation 5
Power supply 5
Antenna connection 5
Operation 6
Power On/Off the radio 6
Volume control 6
Channel Selection 6
Squelch level control (28 level and off) 6
DS control (9 levels) 6
Modulation Type 7
RF Gain control 7
Emergency Channel 7
Key Lock 7
Scan function 7
Changing the CB-Standard 8
External Speaker 8
Restore factory default 8
Specifications 9
Features
Multi-standard device
- USB port to recharge your devices
- Power cord with cigarette lighter plug included
- Removable microphone with RJ45 connector and Up/Down controls
- Channel Scan
- LCD display, S-Meter
- Double squelch mode
(9 and 28 levels)
RF Gain
Emergency channel 9/19
- Socket for external loudspeaker
Dimensions: 110 × 120 × 25 ~mm
Descriptions and commands
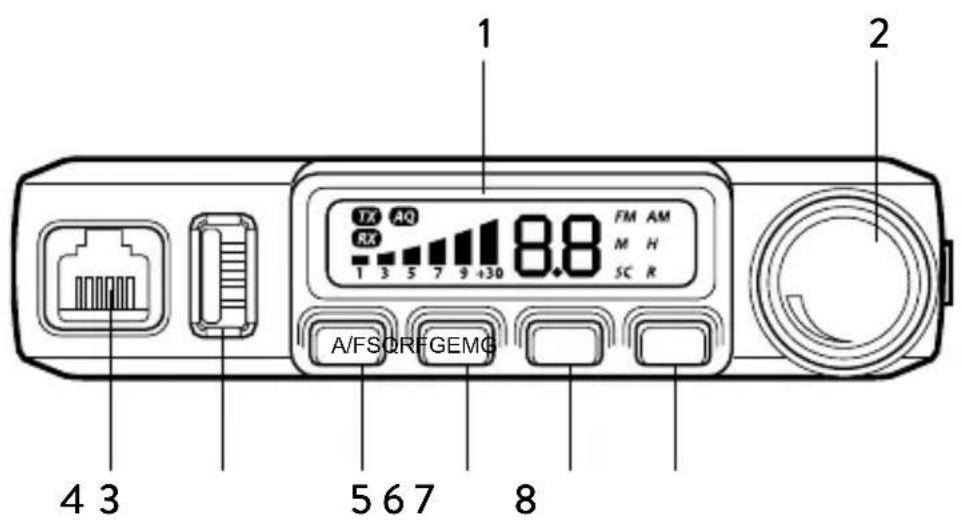
- LCD display
- Power On/Off Volume
- Microphone jack
- USB charging jack. If the device that must be recharged requires a high current, the sensitivity of the radio could decrease.
- A/F switch: Short press AM/FM selection - Long press enables SCAN function
- Squelch control SQ and DS: Short press to display and adjust the manual squelch - Long press to display and adjust the DS (digital squelch)
- RF Gain: Short press enables/disables RF GAIN and controls its level
- Emergency key Ch9/Ch19 keylock: Short press switches continually amongst ch9/ch19/channel in use
Display
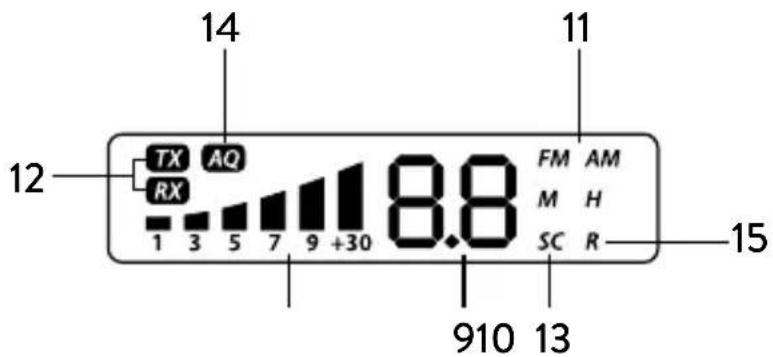
-
Selected channel
-
Received signal strength indicator and transmission power signal
- AM/FM mode
- RX/TX: reception (RX) and transmission (TX) indicator
- SC: SCAN function activated
- AQ: Digital squelch activated
- R: RFGAIN activated
Back panel
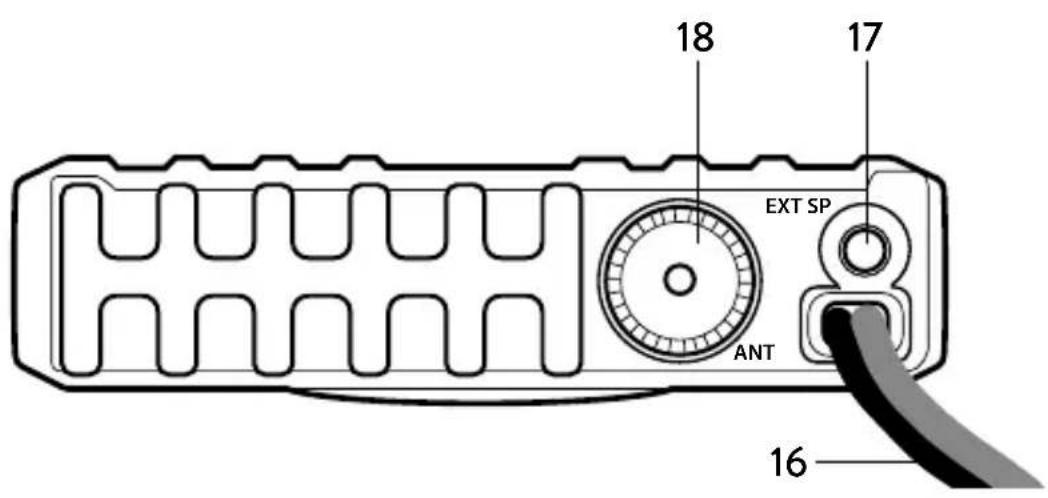
- Power supply cable
- External speacker
- Antenna connector
Microphone
- PTT key: transmission button
- UP key
- DOWN key
Installation
Select the mounting location so that road safety is not affected by the device, or additional risk of injury in an accident arises. Check that the display can be seen, and the controls can easily accessed.
Power supply
Connect the cigarette lighter power cable to the proper plug of your vehicle. Be sure your car has a power supply of 12V and not 24V.
Antenna connection
Connect the CB antenna to the ANT socket on the back of your M-MINI. The antenna must be tuned to the CB radio band. For this use a SWR meter. For a good radio range, the SWR should not exceed a value of 2. A high SWR also points to defects in antenna, cable, or a short circuit in the antenna line. Never transmit without connected antenna!
Note: The radio antenna is to be mounted from other antennas and interference sources as much as possible. CB antennas must be mounted usually in the vehicle highest part on a metal surfaces. A sufficiently large metal surface is essential for the function of the antenna. For installation on a fiberglass cabs or plastic wind deflectors, special ground less antennas can be used.
Operation
Power On/Off the radio
Turn VOL switch clockwise to power on the radio, the LCD displays the CB standard followed by the channel number.
Turn the VOL knob counterclockwise, until it clicks. The radio is powered off.
Volume control
Turn clockwise to increase volume and turn counterclockwise to decrease volume.
Channel Selection
Shortly press microphone UP or DOWN to change working channel. Hold microphone UP or DOWN to change the working channel fast.
Squelch level control (28 level and off)
Shortly press SQ, until LCD shortly displays "SQ" and then displays current level squelch;
0.F Squelch off
0.1 Lowest Squelch level
2.8 highest Squelch level
While display shows current level, press microphone UP or DOWN shortly to change SQ level; hold microphone UP or DOWN to change the SQ level fast. Hold SQ or wait for 3 seconds to store and exit.
Note: Higher SQ level require a stronger signal to open the speaker and hear the spokesman.
DS control (9 levels)
Hold SQ key, until LCD displays AQ, the DS function is turned on. The LCD will display the DS level.
A.1 lowest DS level
A.9 highest DS level
Shortly press microphone UP or DOWN to change DS level, hold microphone UP or DOWN to change the DS level fast fast. Hold SQ or wait for 3 seconds to store and exit.
Note: Higher DS level require a stronger signal to open the speaker and hear the spokesman.
Modulation Type
Shortly press A/F key to switch between AM /FM mode.
The LCD displays the selected mode.
RF Gain control
Shortly press RFG key, LCD displays R and the present RF gain level flashes.
Shortly press microphone UP or DOWN to change the level of attenuation.
Shortly press RFG key to exit RF gain level control.
When RFG function is on, your radio attenuately receives anche the low signal could be not received.
If RFG level 6 is selected it means the attenuation is 6 dB.
Emergency Channel
Shortly press EMG key to choose CH9, the channel number flashes.
Shortly press EMG key again to choose CH19, the channel number flashes.
Shortly press EMG key third time to return to last normal channel.
Key Lock
Hold EMG key for over 2 seconds to lock the keys, LCD displays "LC".
Hold EMG key for over 2 seconds again to unlock the keys, LCD displays OF.
Note: In lock mode, all keys except PTT are invalid.
Scan function
Hold A/F to start scan function, "SC" flashes in the LCD; press microphone UP or DOWN to change scan direction during scan. Press A/F or PTT key to exit scan function.
Changing the CB-Standard
Switch off the radio, press A/F and then switch on your radio. Display shows the current frequencies.
Press microphone UP or DOWN to choose wanted norms.
Power off and power on again.
Frequency band chart
| Digits displayed | Country |
| I Italy 40 | CH AM/FM 4 Watt |
| I2 Italy 34 | CH AM/FM 4 Watt |
| de Germany | 80 CH FM 4 Watt / 40 CH AM 4 Watt |
| EU Europe | 40 CH FM 4 Watt / 40 CH AM 1 Watt |
| CE CEPT | 40 CH FM 4 Watt |
| PL Poland | 40 CH AM/FM 4 Watt |
| UK England | 40 CH FM 4 Watt English frequencies + I (Italy) 40 CH FM 4 Watt CEPT frequencies |
| In International | 27 CH AM/FM 4 Watt |
Note: The frequency band allowed all over Europe is 40 CH FM 4W (CE).
External Speaker
An external speaker (8 Ohm) can be connected to the 3.5mm mono socket on the back of the radio. The built-in speaker automatically turns off when a plug is inserted into this jack.
Restore factory default
Switch off the radio, hold SQ key and then powering the radio on, until the LCD displays "RT".
All channel and function setting will resume factory default after above operation.
Specifications
Frequency band* 26.565-27.99125
Dimensions. 110× 120× 25mm^3
Weight 450 gr
Supply Voltage 13,2 V
Current Consumption 2 A max
Operating Temperature Range -20 to +50^
Antenna Socket UHF, SO-239
Frequency Error. < + / - 300Hz
TX Power. 4 Watt
Spurious Transmissions. < 4nW (-54 dBm)
Adjacent Channel Power. < 20~ W
FM Deviation 1.9 kHz
AM Modulation Index 85-90%
RX Sensitivity better than. 1 V
Image Rejection 70dB
Adjacent Channel Rejection 60dB
Audio Output 1 Watt into 8 Ohm
Frequency Response 300-3000Hz
*covering all approved EU frequency band
Specifications are subject to change without notice.
A redily accessible disconnect device shell be incorporated in the installation wiring.
The disconnect device shall disconnect both poles simultaneously.
Inhalt
Eigenschaften 2
Conector antenna UHF, SO-239
Eroare freventa < + / - 300Hz
Putere emisie 4 Watt
Transmisie eronata. < 4nW (-54 dBm)
Putere canal adjacent. < 20~ W
Deviatie FM 1,9 kHz
Index modulatie AM. 85-90%
Sensibilitate RX 1 V
Imported by: ALAN-NEVADA UK
Unit 1 Fitzherbert Spur Farlington Portsmouth Hants P061TT, United Kingdom
www.nevada.co.uk.
The use of this transceiver can be subject to national restrictions. Read the instructions carefully before installation and use.
Ennery, France - www.alan-midland.fr