
DR430 - Radio SHARP - Free user manual and instructions
Find the device manual for free DR430 SHARP in PDF.
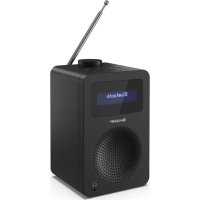


| Product type | DAB+/FM/Bluetooth digital radio |
| Brand | Sharp |
| Model | DR430 (also Tokyo DR-430) |
| Dimensions (W x H x D) | 105 x 171.5 x 110.5 mm |
| Weight | Approx. 0.56 kg |
| Power supply | Mains adapter 9 V DC, 1 A (included) or 100-240 V AC, 50/60 Hz |
| Active power consumption | Less than 3 W |
| Standby power consumption | Less than 0.5 W |
| Frequency ranges | DAB: Band III, 174 – 240 MHz; FM: 87.5 – 108 MHz |
| Bluetooth | Version? (2.4 – 2.480 GHz; pairing name "SHARP DR-430") |
| Audio output power | 5 W RMS |
| Headphone jack | Yes (3.5 mm jack) |
| Telescopic antenna | Yes, built-in |
| Operating modes | DAB+, FM, Bluetooth |
| Presets | 20 DAB + 20 FM + direct keys 1-3 |
| Alarms | 2 independent alarms (buzzer, DAB or FM) with snooze |
| Sleep timer | Yes (15, 30, 45, 60 or 90 minutes) |
| Backlit display | Yes, with time-out and brightness adjustment |
| Display languages | English, French, German, Italian, Spanish, Polish, Dutch |
| Automatic time update | Yes (via DAB/FM) |
| Manual time and date setting | Yes |
| Maintenance and cleaning | Unplug before cleaning; use a soft dry cloth; do not use chemicals |
| Safety | Double insulation (Class II); do not expose to water, heat sources or naked flames; use only supplied adapter |
| Spare parts and repairability | No user-serviceable parts; contact authorized service center for repairs |
| General information | CE and UKCA certifications; recycling per WEEE directive; software version displayable |
Frequently Asked Questions - DR430 SHARP
User questions about DR430 SHARP
0 question about this device. Answer the ones you know or ask your own.
Ask a new question about this device
Download the instructions for your Radio in PDF format for free! Find your manual DR430 - SHARP and take your electronic device back in hand. On this page are published all the documents necessary for the use of your device. DR430 by SHARP.
USER MANUAL DR430 SHARP
Product images are for illustration purposes only. Actual product may vary.
2
Important safety instructions
Please follow all safety instructions and heed all warnings. Keep this manual for future reference.

This symbol instructs the user to consult the user manual for further safety, operational and maintenance related information.

Refers to class II equipment. This symbol indicates that this product has a double insulation system and does not require a safety connection to electrical earth (ground).

Refers to alternating current (AC). This symbol indicates that the rated voltage marked with the symbol is AC voltage.

Refers to direct current (DC). This symbol indicates that the rated voltage marked with the symbol is DC voltage.

For indoor use only

Energy efficiency marking with level VI
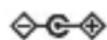
Polarity of d.c. power connector
Precautions
Child safety
- Always follow basic safety precautions when using this product, especially when children are present. Children should be supervised to ensure that they do not play with the product.
Location
- The product should be installed in a stable location and ensure the product and its parts are not overhanging.
Ventilation
- Slots and openings in the cabinet are provided for ventilation to ensure reliable operation of the product and to protect it from overheating; these openings must not be blocked or covered. Ensure a minimum distance of 5 cm around the product for sufficient ventilation. Never let
anyone push anything into holes, slots or any other openings in the product's casing as this could result in an electric shock.
Heat and operating temperature
- Do not install near any heat sources such as radiators, heat registers, stoves or other apparatus (including amplifiers) that produce heat. Avoid exposure to direct sunlight.
Naked flames
- To prevent the risk of fire, keep candles or open flames away from this product.
Water, moisture and liquid entry
- To prevent the risk of fire or electric shock, do not expose this product to rain, water or moisture. Do not place objects filled with liquids on or near this product.
Storms and lightning
- Storms are dangerous for all electric products. If the power or aerial wiring is struck by lightning the product might get damaged, even if it is turned off. You should disconnect all cables and connectors from the product before a storm.
Power cable
- Do not damage, stretch, bend or place heavy objects on the power cable.
Damage
- Please inspect the unit for damage after unpacking. If it is damaged in any way, do not operate the unit and consult your dealer.
Maintenance
- Unplug the power cable from the power source before cleaning the product. Use a soft and clean cloth to clean the outside of the unit. Never clean it with chemicals or detergent.
Service and repair
- This product does not contain any parts that are serviceable by the user. Exposing the internal parts inside the device may endanger your life. In case of a fault, contact the manufacturer or authorized service department. The manufacturer's guarantee does not extend to faults caused by repairs carried out by unauthorized third parties.
Power Adapter
- If the unit will not be used for a period of time, it is recommended to switch the unit off and remove the AC power plug from the mains outlet.
- Only use the supplied mains adaptor; failure to do this may result in a safety risk and/or damage to the unit.
Disposal of this equipment
Information for users on collection and disposal of old equipment.
This symbol on a product means that the product is covered by European Directive 2012/19/EU and must not be disposed of or dumped with your other household waste.

This symbol means that the product is designed and manufactured so that it can be recycled and reused.
- These symbols on the products, packaging and/or accompanying documents mean that used electrical and electronic products should not be mixed with general household waste. Household users should contact either the retailer where they purchased this product, or their local government office, for details of where and how they can take these items for environmentally safe recycling.
CE and UKCA statement:
- Hereby, Sharp Consumer Electronics Poland sp. z o.o. declares that this audio device is in compliance with the essential requirements and other relevant provisions of RED Directive 2014/53/EU and UK Radio Equipment Regulations 2017.
- The full CE text and UKCA declaration of conformity are available at sharpconsumer.eu, enter the download section of your model and select "CE Statements".
Controls
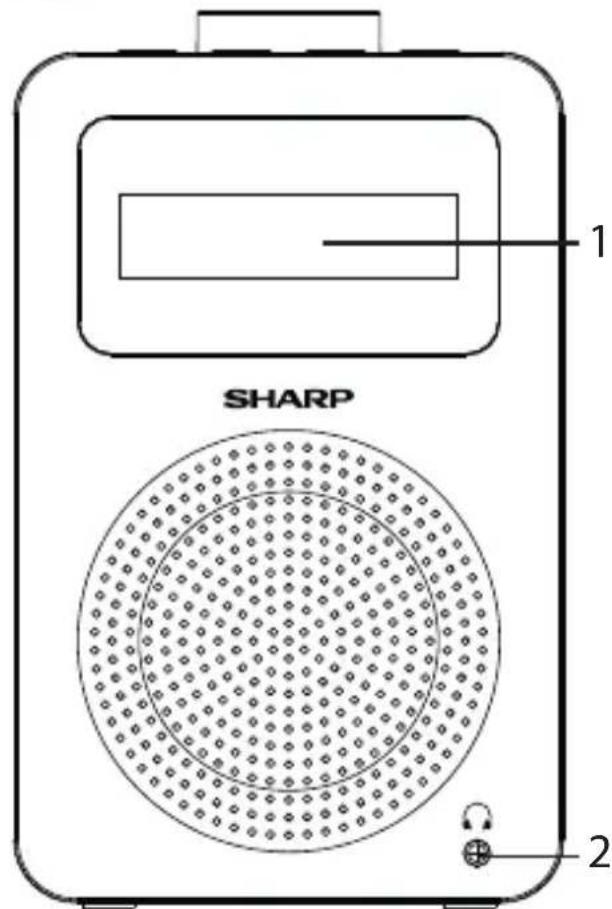
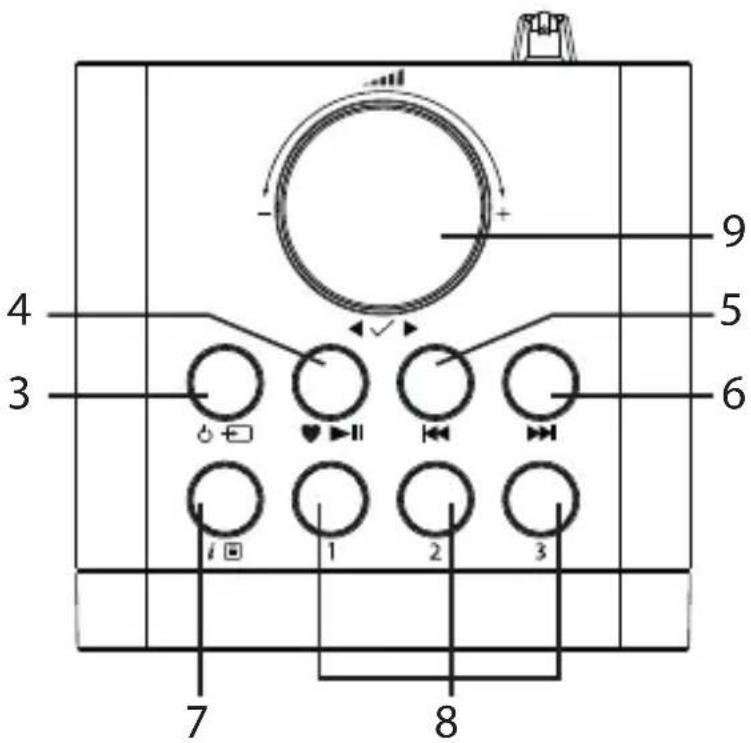
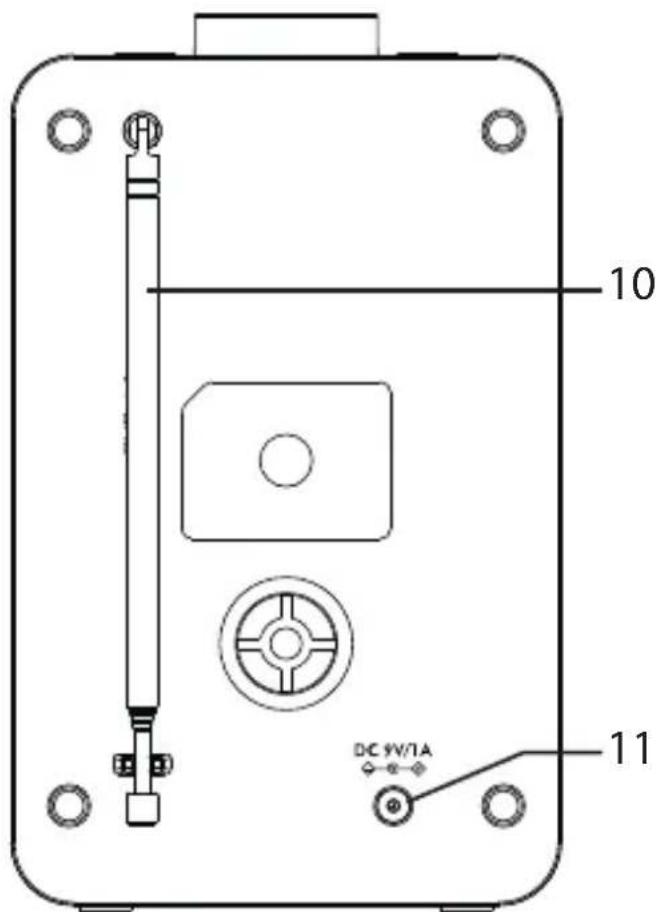
(Refer to on page 2).
- Backlit display
- Headphone socket
- Power/Mode
- Short press: Power on
- Short press: Change the mode
- Long press: Standby
- Preset (20 DAB/20 FM)/Play/Pause
- Short press: Preset recall
- Long press: Preset store
- In Bluetooth mode:
- Short press to Play/Pause
- Long press to disconnect current device and scan for new devices
5.
- Short press:
- In DAB mode: Move up the DAB station list - In FM mode: Move down the frequency band by 0.05 MHz
- In Bluetooth mode: Previous track - In menu: Scroll left.
- Long press:
- In FM mode: Scan down the frequency band
6.
- Short press:
- In DAB mode: Move down the DAB station list - In FM mode: Move up the frequency band by 0.05 MHz
- In Bluetooth mode: Next track - In menu: Scroll right.
- Long press:
- In FM mode: Scan up the frequency band
7. i Info/Menu
- Short press: Station information
- Long press: Enter the menu options
- When in standby: short press to enter the Alarm 1 and 2 On/Off settings
- Memory presets 1, 2 and 3
- Short press: Recall preset
- Long press: Store preset
- Volume control:
- Rotate: adjust the volume
- Rotate in the Menu or Presets: Scroll through
the available menu options or preset locations
- Short press: Select a displayed radio station/frequency, menu or preset option.
- When alarm is sounding in standby, short press: activates a 10-minute snooze.
- Telescopic aerial
- Power input
Box contents
1 x DR-430 Tokyo Digital Radio
Power adaptor
User documentation
Using your DAB+/FM radio
Telescopic aerial
Fully extend the telescopic aerial (preferably vertically) before you attempt to tune to a DAB / FM station. This will ensure that the maximum signal strength is available when the radio begins to scan. Extending the aerial also ensures the best possible sound quality.
Connection
Note: Your radio has been supplied with a power adaptor. Please check and ensure that you connect the correct 3 pin or 2 pin part to the power adapter that is appropriate for the country where the product will be used.
Connect the adapter lead to the power input or power socket on the back of the radio and plug the power adaptor into the wall socket and switch on. The radio will power on and display . It will then go into standby mode.
Initial set-up
Short press switch on the radio. It will begin an automatic scan for DAB stations. A progress bar will show the progress of the scan and the number of stations found. When the scan is complete, your radio will select the first available station and begin to play. By default, stations are listed numerically and then alphabetically.
Note: The DAB radio station list is stored in the memory; the next time the radio is switched on, the station search does not take place.
Short press or scroll through the available stations. To select the station displayed, short press. There will be a short delay whilst your radio tunes to your selected station.
Adjusting the volume
Turn clockwise to increase the volume, and anti-clockwise to decrease the volume.
Time and date
Time and date will be synchronised automatically to that broadcast by the DAB service in 24-hour format.
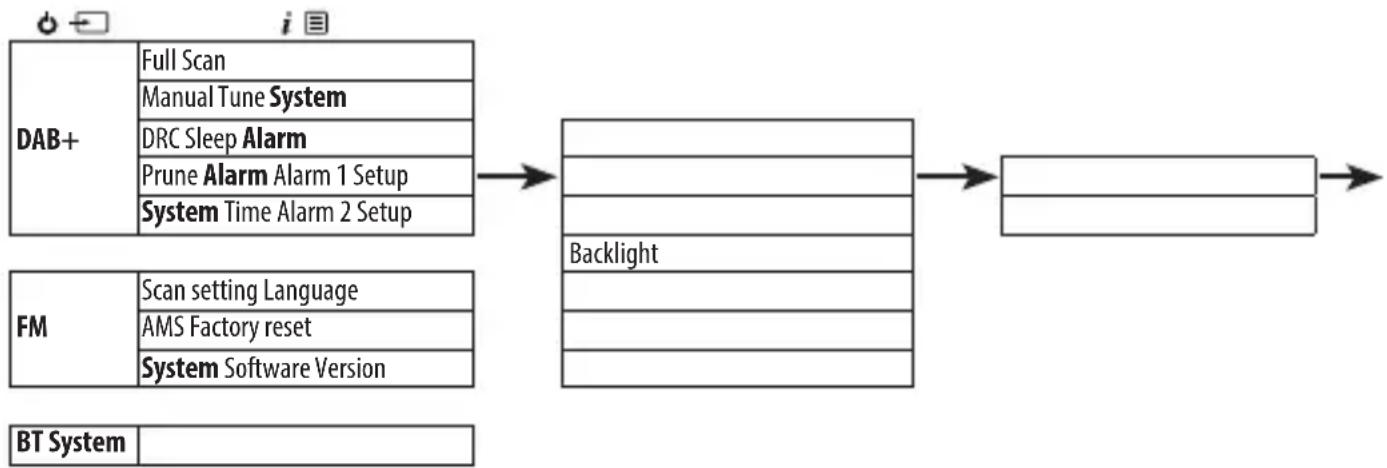
To set the time and date manually, turn on the radio. Long press i to enter the menu options. Use to select System> / / . is displayed and the hour digits will flash; use to set hours and minutes. is displayed and the day will flash; use to set day, month and year. is shown once the year is confirmed and you will return to the menu.
Use to change the clock/date format and auto update settings. Short press to exit the menu.
Change the mode
Short press to change between DAB, FM, and Bluetooth modes. The display screen will confirm the mode.
DAB radio mode
Select DAB radio mode
Short press until the screen displays “DAB +”. The first time you use the radio or if the station list is empty, your radio will automatically begin to scan for DAB radio stations. A progress bar will show the progress of the scan and the number of stations found during the scan will also be displayed. If you were listening to a DAB station when you switched the radio off, this station will automatically be selected when you switch the radio back on.
Change DAB stations
Use to roll through the available stations. Press to select when the station you want to listen to is displayed. There will be a short delay whilst your radio tunes to your selected station.
Scanning for DAB stations
With DAB radio, additional stations and services regularly become available. Carry out a manual scan periodically to make sure that you have the most up-to-date station listing stored within the memory of your radio. If you have moved your radio to a new location, for e.g. if you go abroad on holiday, then it's also a good idea to carry out a manual scan.
In DAB mode:
Long press. Use to scroll and select. The display will change. A progress bar will show the progress of the scan and the number of stations found.
Prune DAB stations
You can remove the DAB stations in the station list that cannot be received in your area. These are listed with a “<ref” prefix.
In DAB mode:
Long press i. Use to scroll and select. “Prune? Yes” is displayed. Use ◁ to scroll and select. Stations with a “< ?>” prefix will now no longer be displayed.
Storing a DAB station preset
Your radio can store up to 20 DAB radio stations as a preset for instant access to your favourite stations.
Note: Storing DAB radio station presets do not overwrite FM station presets.
Tune the radio to the DAB radio station that you wish to preset. Long press until “Preset Store <1:Empty>” is displayed. Use to move to the preset location that you would like to store the radio station to (1-20). Press ✓ to select. The display will confirm “Preset X stored”, where X is the number of the preset (1-20).
Note: If there is already an existing DAB station stored under a preset, it will be overwritten when you store the new station.
Tune to a DAB preset station
In DAB mode:
To quickly access the radio stations stored under preset locations 1, 2, or 3, short press 1, 2, or 3 as appropriate, on the front of your radio. Alternatively, short press the Preset Recall button. <Preset Recall 1:> is displayed together with the name or frequency of the station stored there, or if no previous station has been stored. Use the left arrow to move to and select the preset station that you would like to listen to (1-20).
DAB display information
When listening to a DAB station, you can change the information that will appear on the display. There are several different types of information that are sent by the broadcaster. Repeatedly short press the info button to cycle through the different information options:
- Dynamic label segment (DLS) - This is scrolling text information as supplied by the broadcaster. This could include artist names, song titles, contact details for the radio station, etc.
- Signal strength - An empty square will appear on the display to indicate the minimum signal strength for acceptable listening. The row of solid rectangles indicates the actual signal strength that you are receiving.
- Program type (PTY) - e.g. 'Rock', 'Pop', 'Talk' or 'News'
- Multiplex name - Displays the broadcasting area and collection of radio stations on this frequency e.g. BBC National DAB, Digital 1 Network
- Channel and frequency - e.g. 12B 225.648 MHz (Channel=12B, Frequency=225.648 MHz)
- Signal error - This is displayed as a number between 0-99. To satisfactorily listen to a radio station, the signal error must be below 30. Adjust the aerial or relocate your radio to improve reception.
- Signal information - The data rate at which the signal is being transmitted. Time
- Date
Dynamic range control (DRC)
DRC data is not transmitted by all broadcasters. DRC is used for controlling the difference between the loudest and quietest sounds. For example, in a noisy environment, setting the DRC to maximum makes quiet sounds comparatively louder, and loud sounds quieter.
There are 3 levels of compression:
- DRC off - no compression. This is the default setting.
- DRC low - medium compression
- DRC high - maximum compression
In DAB mode, long press i. Use o to scroll and select <DRC> and then select your preference.
Note: The current DRC setting will have an asterisk (*) in the display.
FM radio mode
To change to FM mode, short press the radio displays <FM>. If you were listening to an FM station when you switched the radio off, this station will automatically be selected when you power the radio back on.
Tune to an FM station
Long press button to scan up or down the frequency band. The radio will search for and stop at the next available station.
Short press or fine-tune each frequency in 0.05MHz steps.
Note: If the reception is poor, adjust the aerial or move the radio to another location.
Change the scan setting
In FM mode:
Long press i , will be displayed. Press
There are two different options to choose from:
- The scan will only stop when a strong signal strength is received, resulting in better audio quality. It is possible that the station you are scanning for may be missed using this option.
- The scan will stop at every station it receives, even if the signal strength is poor.
Use to choose and select from the options available.
Note: The current scan setting will have an asterisk (*) in the display.
Storing an FM station preset
Your radio can store up to 20 FM stations in its preset memories for instant access to your favourite stations.
Note: Storing FM radio station presets do not overwrite your DAB station presets.
Tune the radio to the FM radio station that you wish to preset. Long press until <Preset Store < 1 : (Empty) >> is displayed. Use to move to and select the preset location that you would like to store the radio station to (1-20). The display will confirm Preset X stored>, where X is the number of the preset (1-20).
Note: If there is already an existing FM station stored under a preset, it will be overwritten when you store the new station.
Auto memory store (AMS)
Alternatively, you can use the Auto Memory Store (AMS) feature to store your FM radio station presets. In FM mode, long press i Use to scroll to and select . Your radio will now scan the FM frequency band and the stations found will be automatically stored to the preset locations.
Note: You can manually overwrite your AMS stored presets by following the steps in 'Storing an FM station preset' above.
Tune to an FM preset station
In FM mode:
To quickly access the radio stations stored under preset locations 1, 2 or 3, short press 1, 2 or 3, as appropriate. Alternatively, short press the Preset Recall button. "Preset Recall <1:>" is displayed together with the name or frequency of the station stored there, or "(Empty)>" if no previous station has been stored. Use the left arrow to move to and select the preset station that you would like to listen to (1-20).
FM display information
When listening to an FM station you can change the information that appears on the second line of the display. Repeatedly short press the info button to cycle through the different information options:
- Radiotext (RT) - This is scrolling text information as supplied by the broadcaster. This could include artist names, song titles, contact details for the radio station, etc.
- Program Type (PTY) - e.g., 'Rock', 'Pop', 'Talk', or 'News'
- Station name or frequency - e.g., BBC R4, 93.30MHz Time
- Date
Bluetooth mode
Ensure your radio is in Bluetooth mode by short pressing the mode button until the radio displays the Bluetooth icon. Your radio will begin to search for Bluetooth devices. Ensure the Bluetooth-enabled device you are connecting to is discoverable.
Note: If necessary, refer to the instructions for your device to add or set up Bluetooth.
When found, your radio will be displayed as 'SHARP DR-430' on your device. Select this to begin pairing. Once done, the Bluetooth icon will be displayed on your radio.
Paired devices will connect to the radio when they are within range (within 10 metres in line of sight). Your device will remain paired with the radio unless you decide to disconnect it.
To disconnect from Bluetooth, long press the button for 3 seconds to unpair your current device and search for new devices.
Wirelessly stream music via Bluetooth
In Bluetooth mode, you can wirelessly stream audio through the product's speaker. Use the controls on your paired Bluetooth device as well as those on your radio. Controls available:
- Play/Pause: Short press. Previous track: Short press.
- Next track: Short press.
Volume can also be adjusted - either using your radio and/or your connected device.
Note: If the radio is inactive for 20 minutes, or no audio signal is being received, the radio will automatically go into standby.
Alarm functionality
Set an alarm
Note: Check that the radio is displaying the correct time and date before you set an alarm.
| Alarm 1 or 2 settings | |
| Time | Hour |
| Min | |
| Duration 1, 5, 15, 30, or 60 minutes | |
| Source Buzzer, DAB, or FM | |
| Frequency Daily, once, weekdays or week | ends |
| Volume level 25%-100% | |
| Alarm On or Off | |
Note: If the time is not set or has failed to update from the radio signal, will be displayed when you try to set the alarm. The radio will then prompt you to set the time. An alarm can only be set after the time has been set.
Stop, snooze or switching the alarm off
To stop the alarm, short press. "Alarm off" will be displayed. The alarm symbol will remain in the display and will sound again at the same time the next day unless it was set for "Once".
To snooze the alarm, press. will be displayed, followed by a 10-minute countdown. Once the countdown ends, the alarm will sound again. You can terminate snooze by pressing. will be displayed.
To switch off the alarm, follow the steps for 'Set an alarm' and select "Off".
Sleep timer
You can set your radio to switch to standby mode automatically using the sleep timer. You can choose from 15, 30, 45, 60, and 90 minutes. To do this, long press i. Use the left arrow to scroll and select System > Sleep. Use the left arrow to scroll and select your preference. The selected time will be displayed. In the top right of the radio display, the number of minutes until your radio will switch to standby mode will be displayed, e.g., S90.
Display backlight timeout
To adjust the display backlight timeout, long press i. Use the left arrow to scroll to and select Display > Backlight. Scroll through the available backlight timeout options.
The current setting will have an asterisk (*) in the display. Press to select.
Similarly, use the left arrow to change the settings for the backlight brightness for the display and the buttons. There are 3 options available: Low, Medium, and High.
Display language
To change the display language, long press i. Use the left arrow to scroll and select System > Language. Use the left arrow to scroll and select your preferred language. There are 7 options available: English, French, German, Italian, Spanish, Polish, and Dutch. An asterisk (*) will be displayed next to the current language setting.
Other information
Software version
To check the software version of your radio, long press i. Use the left arrow to scroll and select System > Info. The software version will be displayed.
Factory reset
You can reset your radio to restore it to the original factory settings.
Note: If you reset your radio, your stored presets will be deleted and any connected Bluetooth device will be unpaired.
Long press i. Use the left arrow to scroll and select System > Factory Reset. <Factory Reset? Yes> will be displayed. Use the left arrow to scroll and select Yes. The display will show Resetting. After a few seconds, the display will change to Welcome and will then go to standby mode.
Troubleshooting
If there is no sound or power:
- Adjust the volume.
- Check that the power cable is connected and that the radio is not in standby mode.
If the radio reception is poor:
- Make sure that you have fully extended the telescopic aerial (preferably vertically).
- Rescan for radio stations, see sections 'Scanning for DAB stations' and/or 'Tune to an FM station' as appropriate.
- Try moving your radio to another location to see if the reception improves.
- Check that you do not have other electrical equipment close to your radio. This may cause interference.
If you are unable to pair with a Bluetooth device:
- Check that you are in Bluetooth mode.
- Ensure that you are within 10 metres of the radio for Bluetooth functionality.
- Move the radio and Bluetooth device away from other Bluetooth devices/electrical equipment.
- If possible, turn off other nearby Bluetooth devices or disable their Bluetooth functionality.
If the function buttons do not respond:
- Short press
- Switch off the power supply to the unit, wait 10 seconds and reconnect power supply.
Note: All your settings, including the radio station list, connected Bluetooth devices and any presets will be deleted when a factory reset is carried out.
Technical specifications
| Input DC 9V, 1A | |
| Audio output 5 W RMS | |
| Power Consumption Active: < 3 W Standby: < 0.5 W | |
| DAB frequency range Band III, 174 MHz to 240 MHz | |
| FM frequency range 87.5 MHz to 108 MHz | |
| Bluetooth 2.4 GHz ~ 2.480 GHz | |
| Pairing name SHARP DR-430 | |
| Dimensions (W) x (H) x (D) mm 105 x 171.5 x 110.5 | |
| Weight approx. 0,56 kg | |
| Power Adapter | |
| Model name OBL-0901000R | |
| Input 100-240V~ 50/60Hz 0,5 A Max | |
| Output DC 9V, 1 A 9W | |
| Manufacturer | DongGuan Obelieve Electronic Co.,Ltd; Huazhaoxin Industrial Park B-4/F; Golden Phoenix Industrial zone; Fenggan Town, Dongguan, GuandDong Province; People's Republic of China |
Dynamic Range Control (DRC)
Alternatively, you can use the following two methods to find a suitable FM for each of these devices. Firstly, select the FM in the radio frequency band (RF) and then use the FM frequency to identify the FM frequency of the device. Secondly, select the FM frequency from the radio frequency band (RF) and then use the FM frequency to identify the FM frequency of the device. Thirdly, select the FM frequency from the radio frequency band (RF) and then use the FM frequency to identify the FM frequency of the device. Finally, select the FM frequency from the radio frequency band (RF) and then use the FM frequency to identify the FM frequency of the device.
Change DAB station
Technical specifications
Dynamic Range Control (DRC)
- Do not install the device near heat sources such as radiators, heaters, stoves, or other devices (including amplifiers) that produce heat. Do not expose the device to direct sunlight.
Open windows
To avoid the risk of fire, do not place the device near candles or other sources of open flame.
Water, moisture and liquid ingress
- To avoid the risk of fire or electric shock, do not allow dripping or splashing of water or other liquids on the device. Do not place objects filled with liquids on the device.
P03bl MOJHIN
- These devices pose a danger to all electrical appliances. A lightning strike through the antenna cable can damage the device, even if it is turned off. Before a thunderstorm, disconnect all cables and connectors from the device.
P03bl MOJHIN
Do not damage the power supply, do not stretch or bend it, and do not place heavy objects on it.
P03bl MOJHIN
Inspect the packaging to ensure it is free of damage. If it has any damage, do not start using the product; contact the seller instead.
P03bl MOJHIN
- Before proceeding with cleaning, disconnect the power supply from the energy source. To clean the external surface of the device, use a soft, slightly damp cloth. Never clean it with chemical or abrasive agents.
P03bl MOJHIN
This device does not contain components that the user can service themselves. Contact with certain parts inside the device may be dangerous to life. In the event of malfunctions, contact the manufacturer or an authorized service center. The manufacturer's warranty does not cover damage resulting from repairs carried out by unauthorized third parties.
P03bl MOJHIN
- To disconnect the device from the power supply, remove the plug from the wall socket.
- Use only with the included power supply unit, as failure to comply with this condition may lead to safety hazards and/or damage to the device.
P03bl MOJHIN
The modernization concerns the utilization of old equipment.
This symbol indicates that the product is distributed under the provisions of EU Directive 2012/19/EU, which prohibits its disposal and export together with ordinary household waste.

This symbol indicates that the design and manufacture of the product have taken into account the possibility of its reuse and recycling.
The symbols on the product, packaging, and (or) accompanying documentation indicate that used electrical and electronic products must not be disposed of together with ordinary household waste. For detailed information on the disposal and possible locations for environmentally safe recycling of the product, end users should contact either the retail outlet where they purchased the product or local authorities.
Declaration of Conformity with the requirements for CE and UKCA marking:
- Sharp Consumer Electronics Poland sp. z o.o. hereby declares that this audio device complies with the essential requirements and other relevant provisions of EU Directive 2014/53/EU and the UK Radio Equipment Regulations 2017. To view the full text of the Declaration of Conformity and to obtain the CE and UKCA marking, visit sharpconsumer.eu, open the downloads section for your model, and select the document "CE Statements".
Control elements
(see page 2).
1. Display/backlight 2. Headphone jack 3. Power supply/mode
Digital radio receiver DR-430 "Tokno" - 1 pc. Power adapter
User documentation
User
radio receiver DAB+/FM
There are 3 levels of compression:
- DRC off - no compression. This is the default setting.
- DRC low - medium level of compression.
- DRC high — maximum compression.
Time for pressing and holding the button
i. Press and hold the button
Select the item, then select the lower option.
Note. The DRC instruction text is placed on the "Star" display (*)
FM radio mode
To switch the radio receiver to FM radio mode, press the button until the display appears. If before switching off the radio receiver you were listening to an FM station, then when you turn on the radio receiver again, it will resume receiving the same station.
Tuning the receiver to an FM station
When you press and hold the button
The frequency range is scanned by increasing or decreasing the frequency, respectively. The radio receiver finds a radio station and stops at the first detected station.
With a short press of the button, the frequency of the received signal changes by 0.05 MHz.
Note. If the signal is weak, change the position of the antenna or move the radio receiver to another place.
Changing the search tuning
In FM mode:
When you press and hold the button
The display will show.
Press the button.
You can choose one of two options:
- Program Type (PTY) - for example, "Rock", "Pop", "Talk", "News".
- Station name or frequency - for example, BBC R4, 93.30MHz Time - Data
Bluetooth mode
To switch the radio to Bluetooth mode, briefly press the button. The display will show "BT". The radio will start searching for Bluetooth devices. Make sure that the device with Bluetooth interface to which you want to connect the radio can be detected.
You can learn about the Bluetooth setup procedure on this device in the corresponding instruction manual. After detection, the radio will appear on the device's screen under the name "SHARP DR-430". To start the connection setup process, select this item. After the connection is established, the radio's display will show "BT" again.
Devices within the range of the interface (10 meters in line of sight) can establish a connection with the radio.
The connection between the radio and the device is maintained until it is intentionally broken.
To disconnect from the Bluetooth device, press and hold the button for 3 seconds. As a result, the radio will disconnect from the current device and start searching for other devices.
Wireless audio streaming via Bluetooth
In Bluetooth mode, you can stream audio wirelessly through the speaker.
The device uses control means of both the Bluetooth device and the radio. Available control means:
Play/Pause: short press
- Short recording: brief compressed recording
You can also adjust the volume: either on the radio itself or on the connected device.
Note. If the receiver is not used for 20 minutes or no audio signal is received, it automatically switches to standby mode.
Alarm function
Setting the alarm
Note. Before setting the alarm, check that the time displayed on the radio is correct.
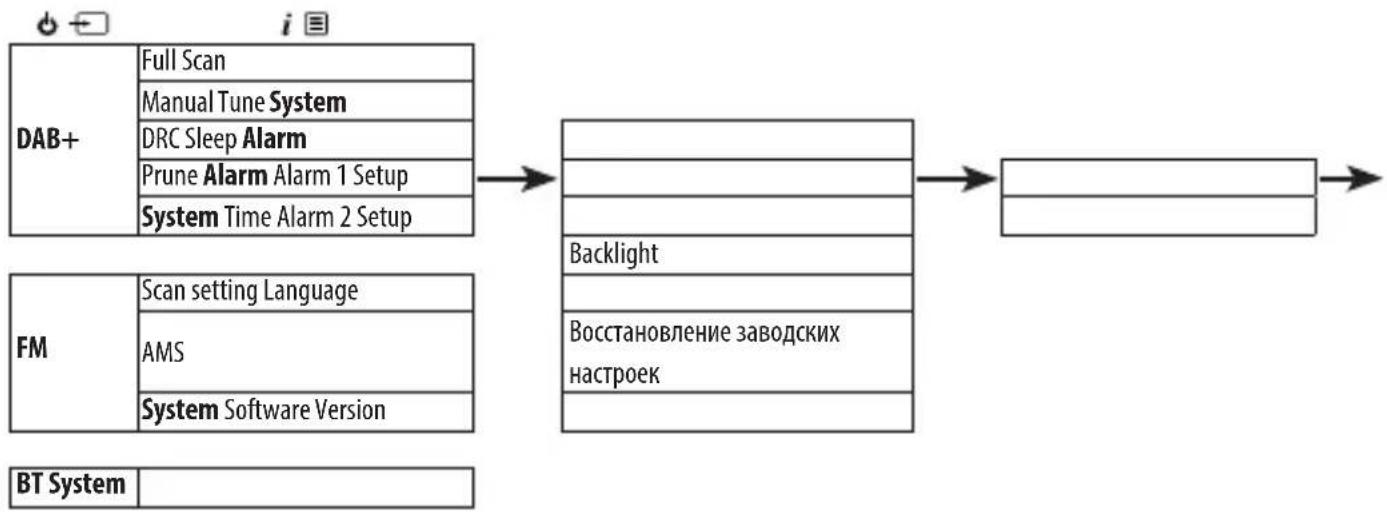
| Alarm 1 or 2 settings | |
| Time | Hour |
| Min | |
| Duration 1, 5, 15, 30 minutes | |
| Истουнок Вuzzer, DAB на FM | |
| Частora Daily, Once, Weekdays, Weekends. | |
| Volume level 25%-100% | |
| Alarm On наOff | |
Note. If the time is not set or could not be received via radio signal, then when trying to set the alarm, a message will appear on the display: . In this case, the radio will prompt you to set the time. Setting the alarm is possible only after setting the time.
Stopping, delaying the alarm signal, and turning off the alarm
To stop the alarm, briefly press the button. A message will appear on the display: .
The alarm icon will remain on the display, and if the alarm was not set to the mode, it will go off at the same time the next day.
To delay the alarm signal, press the button. The display will show the inscription and the countdown timer for the reverse countdown
with a duration of 10 minutes. After the reverse countdown ends, the alarm will sound again. To stop the reverse countdown of the delay period, press the ✓ button. A message will appear on the display: .
To turn off the alarm, follow the steps described in the "Setting the alarm" section and select the option .
Sleep timer
The sleep timer allows you to set the radio to turn off automatically. You can choose , <15>, <30>, <45>, <60> or <90> minutes. To do this, press and hold the button. Press the button, find and select the item / . Press the button, find and select the desired option. The display will show the inscription: . In the upper right corner of the radio display, the time in minutes until the radio switches to standby mode will be shown, for example: S90.
Backlight interval
To set the backlight interval
Press and hold the i button. Press the button, find and select the item / /. The possible backlight interval options will be displayed. The current setting is marked with an asterisk (*). Select it by pressing the button
√. Similarly, by pressing the <√> button, change the backlight brightness settings: n . Three options are provided: , n .
Display language
To change the display language, press and hold the i button. Press the ▷ button, find and select the System> / item. Press the ▷ button, find and select the most convenient language for you. Seven options are provided: English, French, German, Italian, Spanish, Polish, and Dutch. The current language setting is marked with an asterisk (*).
Device information
Software version
To check the software version of the radio, press and hold the i button. Press the button
, find and select the System> / item. The software version will be displayed on the screen.
Restoring factory settings
By resetting the radio, you can restore the original factory settings.
Note. When resetting the radio, saved stations are deleted from memory, and all Bluetooth devices connected to it are disconnected.
Press and hold the i button. Press the button, find and select the item
/ .On the screen
nOBnTc3a npoc: Yes>.
Haxkab KhoNky BbI6epnte OTBeT .
Ha nncnnee noaBntc coo6eHne: <Restart-
ing...>.Yepe3 HeckoBko CekyHn Ha nncnnee
NOBITcHaIINCb ,
IpaHIOpHnEMHNKpepeIDTbpexkIMOxndaHn.
Понск и устpanенье нецправност
Ecnn 3Byk OTCyTCTByet nn Cna6bl:
- OTPerynupyTe rpoMkoCTb.
- y6eNTecb TOM, yTO Ka6eJIb NITaHnA
IopKJIoueH, a paIIOIpneMHNK He HaxOHTcBpeXIMe OxuHaHn.
Pn cna6om paunocnhrane:
- Y6eIITecb B TOM, yTO TEleCKOINuYeCKa aHTeHHa NOLHOCTbIO BbITAHyTa (XeNaTeNbHO B BePTnKaJIbHOe NIOJKeHne).
- Повторе посяк радиocтанци соглachoуka3aHЯ m в pa3dene "Поиск санци DAB" n (ии) "Hac troйka ппемнika на FM-станци",В завсимости OT peжima.
- Pocmotpnte, He yuuchTcJn npneM, ecn nephectu padnoonpneMHK B dpyroe MeCTo.
- Keep the device away from the radio receiver and any other electronic devices. They may cause interference.
If you cannot establish a connection via Bluetooth:
- Check that the receiver has Bluetooth mode enabled.
- Make sure that the device is within the Bluetooth range of 10 meters.
- Move the receiver and the Bluetooth device closer to each other and away from other Bluetooth devices and electronic devices.
- If possible, turn off nearby Bluetooth devices or disable their Bluetooth function.
If the radio receiver does not respond to the function buttons:
Briefly press the button to turn off the device and then turn it on again after 10 seconds.
Note: Restoring the factory settings of the radio receiver will delete the list of radio stations and paired Bluetooth devices.
Technical specifications
The Bluetooth® word mark and logos are registered trademarks owned by Bluetooth SIG., Inc.
digitalradio DAB+ DAB FM certified

CE UK CA
Sharp Consumer Electronics Poland sp. z o.o.
Ostaszewo 57B, 87-148 Lysomice, Poland
Made in China
SAU/MAN/0176
www.sharpcounter.eu
- IMPORTANT SAFETY INSTRUCTIONS
- PLEASE FOLLOW ALL SAFETY INSTRUCTIONS AND HEED ALL WARNINGS. KEEP THIS MANUAL FOR FUTURE REFERENCE
- PRECAUTIONS
- CHILD SAFETY
- LOCATION
- VENTILATION
- HEAT AND OPERATING TEMPERATURE
- NAKED FLAMES
- WATER, MOISTURE AND LIQUID ENTRY
- STORMS AND LIGHTNING
- POWER CABLE
- DAMAGE
- MAINTENANCE
- SERVICE AND REPAIR
- POWER ADAPTER
- DISPOSAL OF THIS EQUIPMENT
- CE AND UKCA STATEMENT
- CONTROLS
- I INFO/MENU
- BOX CONTENTS
- USING YOUR DAB+/FM RADIO
- TELESCOPIC AERIAL
- CONNECTION
- INITIAL SET-UP
- ADJUSTING THE VOLUME
- TIME AND DATE
- CHANGE THE MODE
- DAB RADIO MODE
- SELECT DAB RADIO MODE
- CHANGE DAB STATIONS
- SCANNING FOR DAB STATIONS
- IN DAB MODE
- PRUNE DAB STATIONS
- STORING A DAB STATION PRESET
- TUNE TO A DAB PRESET STATION
- DAB DISPLAY INFORMATION
- DYNAMIC RANGE CONTROL (DRC)
- THERE ARE 3 LEVELS OF COMPRESSION
- FM RADIO MODE
- TUNE TO AN FM STATION
- CHANGE THE SCAN SETTING
- STORING AN FM STATION PRESET
- AUTO MEMORY STORE (AMS)
- TUNE TO AN FM PRESET STATION
- IN FM MODE
- FM DISPLAY INFORMATION
- BLUETOOTH MODE
- WIRELESSLY STREAM MUSIC VIA BLUETOOTH
- ALARM FUNCTIONALITY
- SET AN ALARM
- STOP, SNOOZE OR SWITCHING THE ALARM OFF
- SLEEP TIMER
- DISPLAY BACKLIGHT TIMEOUT
- DISPLAY LANGUAGE
- OTHER INFORMATION
- SOFTWARE VERSION
- FACTORY RESET
- TROUBLESHOOTING
- IF THERE IS NO SOUND OR POWER
- IF THE RADIO RECEPTION IS POOR
- IF YOU ARE UNABLE TO PAIR WITH A BLUETOOTH DEVICE
- IF THE FUNCTION BUTTONS DO NOT RESPOND
- CHANGE DAB STATION
- TECHNICAL SPECIFICATIONS
- OPEN WINDOWS
- WATER, MOISTURE AND LIQUID INGRESS
- P03BL MOJHIN
- DECLARATION OF CONFORMITY WITH THE REQUIREMENTS FOR CE AND UKCA MARKING
- CONTROL ELEMENTS
- USER
- RADIO RECEIVER DAB+/FM
- TUNING THE RECEIVER TO AN FM STATION
- CHANGING THE SEARCH TUNING
- WIRELESS AUDIO STREAMING VIA BLUETOOTH
- ALARM FUNCTION
- SETTING THE ALARM
- STOPPING, DELAYING THE ALARM SIGNAL, AND TURNING OFF THE ALARM
- BACKLIGHT INTERVAL
- DEVICE INFORMATION
- RESTORING FACTORY SETTINGS
- ПОНСК И УСТPANЕНЬЕ НЕЦПРАВНОСТ
- ECNN 3BYK OTCYTCTBYET NN CNA6BL
- PN CNA6OM PAUNOCNHRANE
- IF YOU CANNOT ESTABLISH A CONNECTION VIA BLUETOOTH
- IF THE RADIO RECEIVER DOES NOT RESPOND TO THE FUNCTION BUTTONS
Brand : SHARP
Model : DR430
Category : Radio