Gysdust Self Extractor - Vacuum Cleaner GYS - Free user manual and instructions
Find the device manual for free Gysdust Self Extractor GYS in PDF.
| Product type | Mobile pneumatic vacuum for explosive dusts (ATEX) |
| Brand | GYS |
| Model | Gysdust Self Extractor |
| Dimensions (L x H x D) | 350 x 800 x 400 mm |
| Weight | 21 kg |
| Power supply | Compressed air, max inlet pressure 10 bar, consumption 340 l/min |
| Maximum vacuum | 1 150 mm H2O |
| Airflow | 600 l/min |
| Dust bag capacity | 7 kg (20 L) |
| Suction hose length | 5 m |
| Suction hose diameter | 29 mm |
| Sander operating pressure | Adjustable up to 5 bar (pressure gauge) |
| ATEX classification | Group II, Category 3D, Zone 22 |
| Sound level | 70 dB(A) |
| Main functions | Suction of bodywork sanding dust (including aluminum), compatible with pneumatic tool with suction |
| Maintenance | Empty bag after each use; clean ducts every 4 hours with brush; dust with blowgun; check ground connection |
| Safety | Mandatory grounding; disconnect power before maintenance; use only approved accessories; avoid ignition sources |
| Spare parts | GYS dust bag ref. 058880 |
| Warranty | 2 years (parts and labor), excluding normal wear and misuse |
| Additional information | Compliant with European and British directives; declaration of conformity available online |
Frequently Asked Questions - Gysdust Self Extractor GYS
User questions about Gysdust Self Extractor GYS
0 question about this device. Answer the ones you know or ask your own.
Ask a new question about this device
Download the instructions for your Vacuum Cleaner in PDF format for free! Find your manual Gysdust Self Extractor - GYS and take your electronic device back in hand. On this page are published all the documents necessary for the use of your device. Gysdust Self Extractor by GYS.
USER MANUAL Gysdust Self Extractor GYS
natural_image
Technical line drawing of a portable electrical or mechanical device with wheels and control panel (no text or symbols)
| FR | 02-12 / 47-52 |
| EN | 13-18 / 47-52 |
| DE | 19-25 / 47-52 |
| ES | 26-32 / 47-52 |
| RU | 33-39 / 47-52 |
| NL | 40-46 / 47-52 |
| IT | 47-53 / 47-52 |
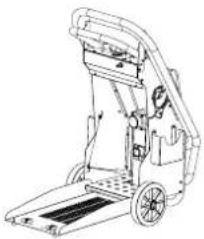
GYSDUST EXTRACTOR
MONTAGE / ASSEMBLY / MONTAJE / YCTAHOBKA / MONTAGGIO
MANUEL D'INSTALLATION / INSTALLATION MANUAL / INSTALLATIONSHANDBUCH / MANUAL DE INSTALACIÓN / РУКОВОДСТВО ПО УСТАНОВКЕ / INSTALLATIE HANDLEIDING / MANUALE D'INSTALLAZIONE
natural_image
Technical line drawing of a mechanical housing or enclosure with internal components and mounting holes (no text or symbols)
natural_image
Technical line drawing of a mechanical device with no visible text or symbols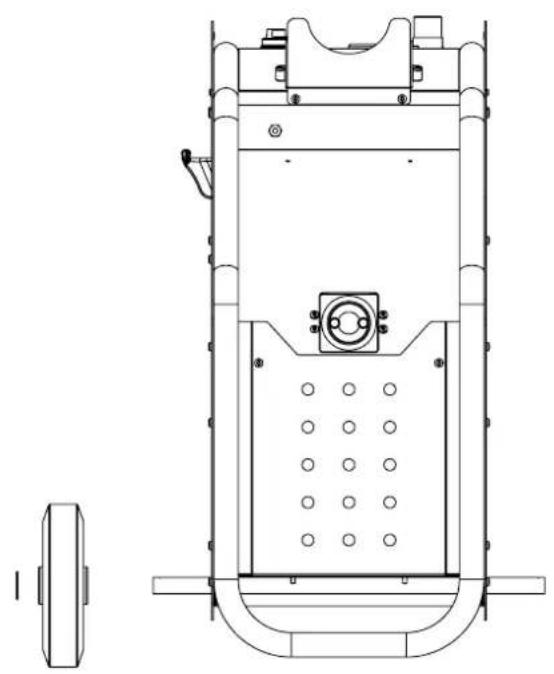
natural_image
Technical line drawing of a mechanical device with internal components and mounting features (no text or symbols)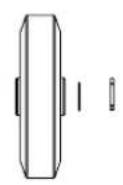
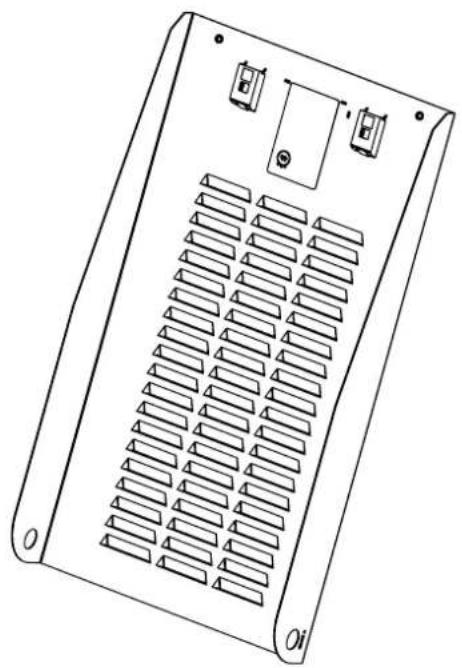
natural_image
Line drawing of a rectangular electronic device with slots and mounting points (no text or symbols)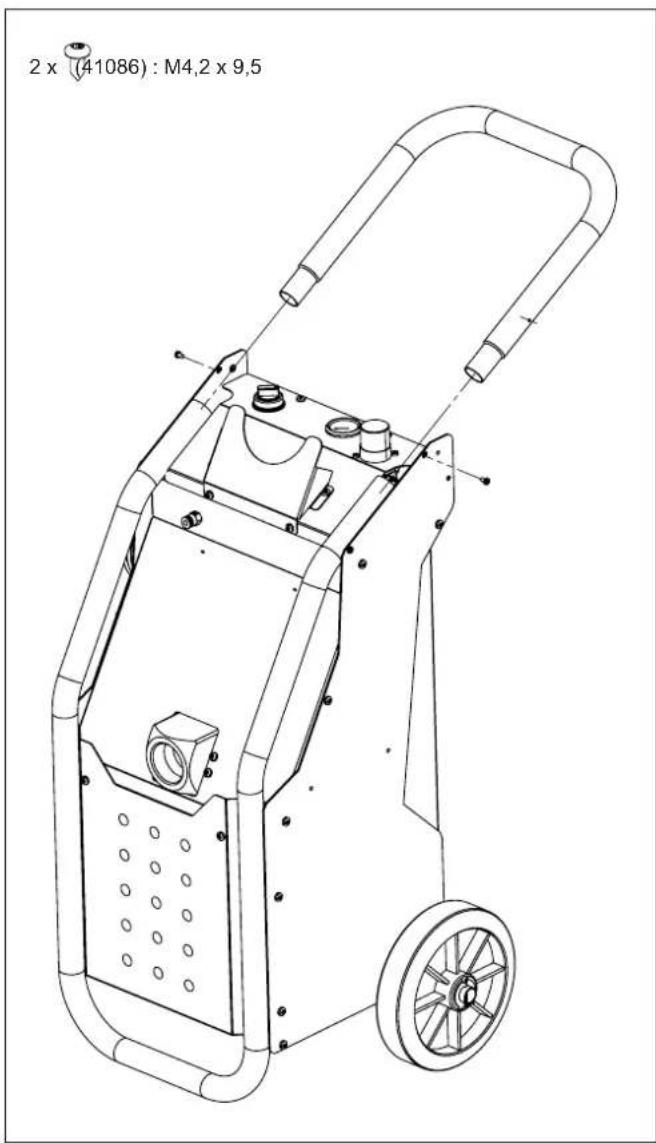
text_image
2 x (41086) : M4,2 x 9,5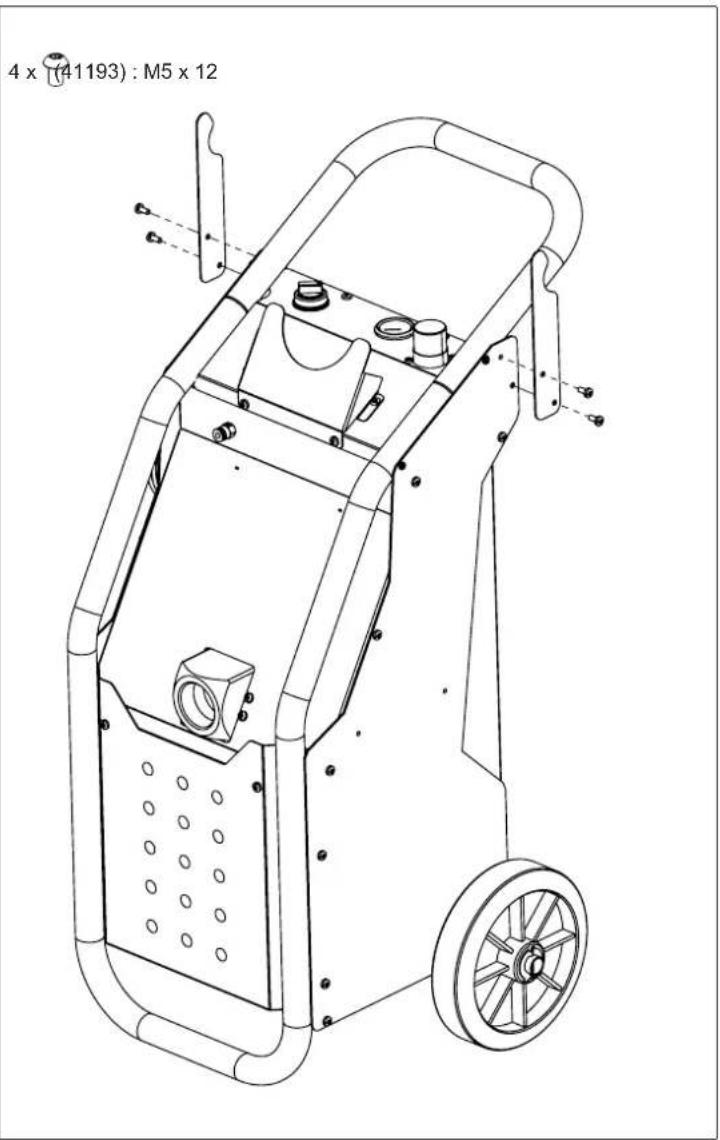
text_image
4 x (41193) : M5 x 12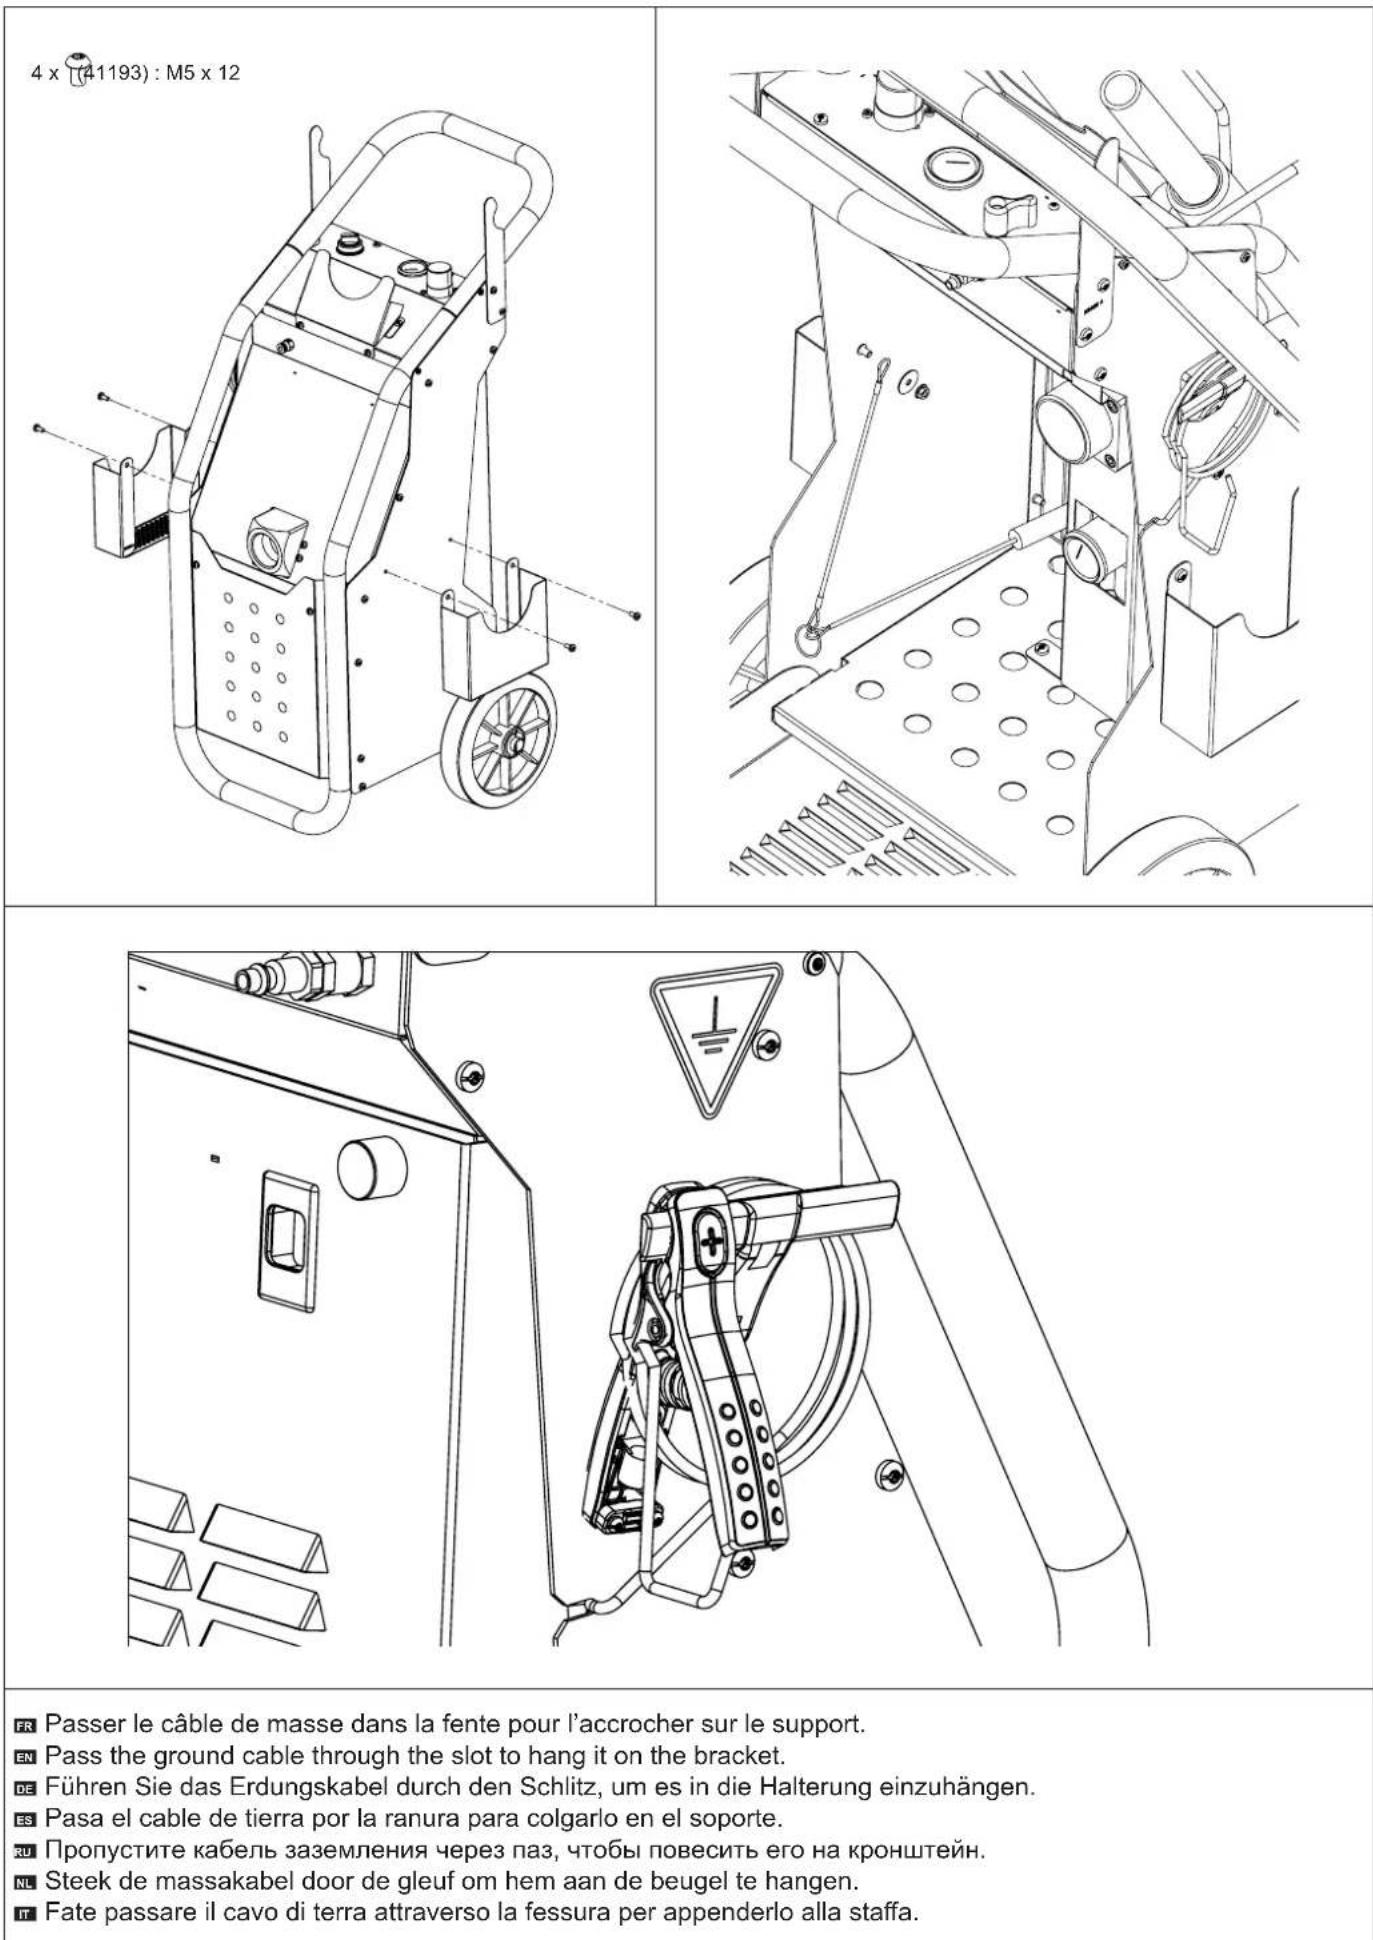
AVERTISSEMENTS - RÈGLES DE SÉCURITÉ
CONSIGNE GÉNÉRALE
natural_image
Line drawing of a mechanical lifting device with wheels and a handle (no text or symbols)natural_image
Illustration of a teal-colored portable space lift with wheels and a handle (no text or symbols)BRANCHEMENT DE L'ASPIRATEUR
text_image
Technical diagram of a mechanical device with numbered components for identificationCONDITIONS DE GARANTIE
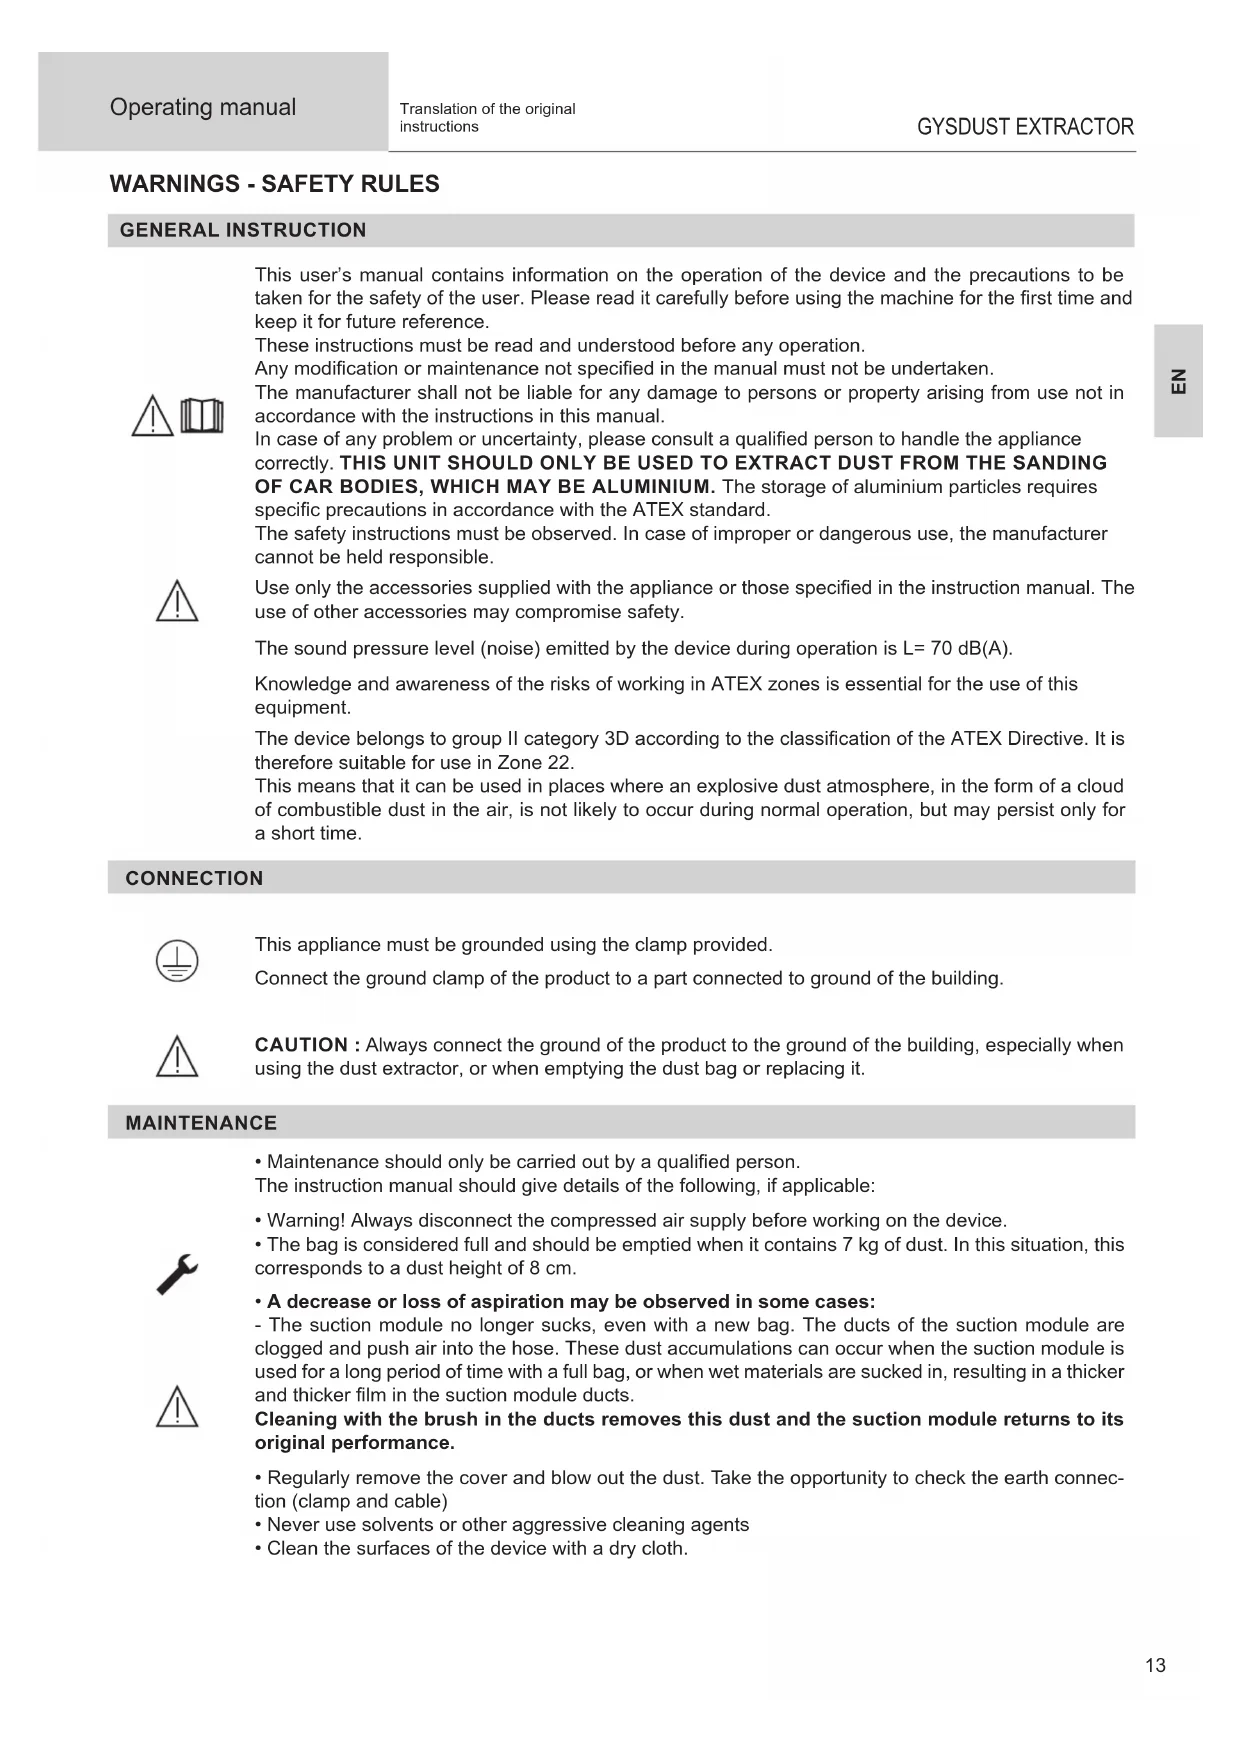
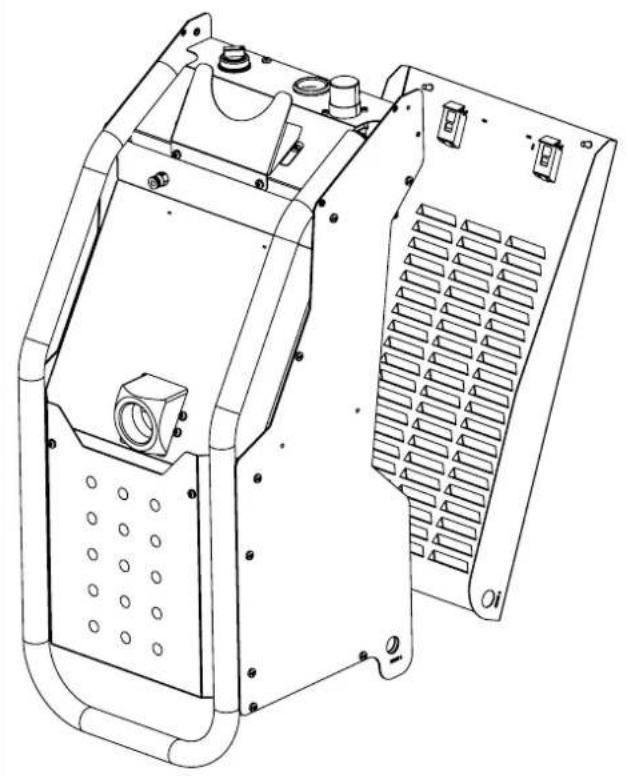
This user's manual contains information on the operation of the device and the precautions to be taken for the safety of the user. Please read it carefully before using the machine for the first time and keep it for future reference.
These instructions must be read and understood before any operation.
Any modification or maintenance not specified in the manual must not be undertaken.
The manufacturer shall not be liable for any damage to persons or property arising from use not in accordance with the instructions in this manual.
In case of any problem or uncertainty, please consult a qualified person to handle the appliance correctly. THIS UNIT SHOULD ONLY BE USED TO EXTRACT DUST FROM THE SANDING OF CAR BODIES, WHICH MAY BE ALUMINIUM. The storage of aluminium particles requires specific precautions in accordance with the ATEX standard.
The safety instructions must be observed. In case of improper or dangerous use, the manufacturer cannot be held responsible.

Use only the accessories supplied with the appliance or those specified in the instruction manual. The use of other accessories may compromise safety.
The sound pressure level (noise) emitted by the device during operation is L=70 dB(A).
Knowledge and awareness of the risks of working in ATEX zones is essential for the use of this equipment.
The device belongs to group II category 3D according to the classification of the ATEX Directive. It is therefore suitable for use in Zone 22.
This means that it can be used in places where an explosive dust atmosphere, in the form of a cloud of combustible dust in the air, is not likely to occur during normal operation, but may persist only for a short time.
CONNECTION

This appliance must be grounded using the clamp provided.
Connect the ground clamp of the product to a part connected to ground of the building.

CAUTION : Always connect the ground of the product to the ground of the building, especially when using the dust extractor, or when emptying the dust bag or replacing it.
MAINTENANCE

- Maintenance should only be carried out by a qualified person.
The instruction manual should give details of the following, if applicable:
- Warning! Always disconnect the compressed air supply before working on the device.
- The bag is considered full and should be emptied when it contains 7 kg of dust. In this situation, this corresponds to a dust height of 8 cm.
- A decrease or loss of aspiration may be observed in some cases:
- The suction module no longer sucks, even with a new bag. The ducts of the suction module are clogged and push air into the hose. These dust accumulations can occur when the suction module is used for a long period of time with a full bag, or when wet materials are sucked in, resulting in a thicker and thicker film in the suction module ducts.

Cleaning with the brush in the ducts removes this dust and the suction module returns to its original performance.
- Regularly remove the cover and blow out the dust. Take the opportunity to check the earth connection (clamp and cable)
- Never use solvents or other aggressive cleaning agents
- Clean the surfaces of the device with a dry cloth.
REGULATION

• The device complies with the European directives.
- The declaration of conformity is available on our website.
• EAC (Eurasian Economic Community) mark of conformity.


- Material conforms to UK requirements.
- The UK Declaration of Conformity is available on our website (see cover page).
WASTE DISPOSAL

- This material is subject to separate collection. Do not dispose of in domestic waste.
EN 60335-2-69
The dust compartment should be emptied when necessary, but also after each use.
For dusts with an ignition energy of less than 1mJ, additional restrictions from labour legislation may apply.
Type 22 units are not suitable for the extraction of dusts or liquids with a high explosion risk, or mixtures of combustible dusts and liquids.
CAUTION - Use only accessories approved by the manufacturer for use with the Type 22. Use of other accessories may cause an explosion hazard.
EN 60335-2-69
CAUTION - Use only accessories approved for use with the ESD protected area type. Use of other accessories may cause electrostatic discharge.
The appliance should only be operated when all filters, including the engine cooling air filters, are in place and undamaged.
Dust extractors of the electrostatically protected area type are suitable for connection to dust-producing appliances in electrostatically protected areas. It must be ensured that no ignition sources are drawn in. Conductive parts of appliances, including extractor hoods and conductive parts of Class II appliances, must be electrostatically grounded. Electrostatic earthing can be achieved through the dust extractor or through an independent electrostatic earthing device.
Type 1 and Type 2 ESD protected dust extractors are not suitable for use in equipment where ignition sources are produced.
PNEUMATICS
The inlet air system pressure must be less than or equal to 10 bar.

A higher pneumatic pressure than recommended can alter the operation of the product, with a significant loss of suction. In this case, it is necessary to check the pressure at the product inlet and on the suction system, located inside the product. (Setting 4 bars max). A malfunction of the suction system can occur when the bag is full or completely blocked. In this case, the full bag must be removed and replaced by a new one. For the bag, the manufacturer's recommendations must be followed. Dry and filtered air supply.
SANDING MACHINE
A pneumatic sander (not included) with a 32 mm suction nozzle connects to the hoover. It can also be connected to the pneumatic network via the automatic nozzle included in the suction hose.
WARNING
The following indications:
- Before use, read the instructions
- Connect the hoover's metal ground clamp to a part of the workplace connected to the installation's ground circuit. (The suction and circulation of dust generates static electricity).
- Disconnect the pneumatic power supply before changing the bag.

The dust bag should avoid contact with flames or sparks.
FEATURES OF THE HOOVER
Mobile pneumatic hoover for explosive dusts deriving from sanding or similar operations, designed for connection to a pneumatic tool.
| Features | |
| Depression 1 150 mm H2O | |
| Air flow 600 l/min | |
| Air consumption 340 l/min | |
| Adjustable suction pressure 5 bar max | |
| Suction cable length 3 m | |
| Suction cable diameter ∅ 29 mm | |
| Dust bag capacity (included) 7 kg | |
| Dimensions 350 x 800 x 400 mm | |
| Weight 21 kg | |
  | ATEX StandardGroup IICategory 3 |
FITTING THE DUST BAG (058880)
WARNING: during this operation, explosive atmospheres and dust deposits may be formed; avoid introducing potential sources of ignition such as: mechanical sparks, electrical parts, hot surfaces, flames, hot gases, electrostatic charges in the vicinity of the device. Follow the internal standards for behaviour in the presence of potentially explosive atmospheres according to the Atex Directive 2014/34/EU.
- Check, at least at the end of the working day, that the dust bag inside the hoover is full.
- The maximum capacity of the dust bag is 7 kg and 20 l volume: do not exceed this limit!
- In the event that the removed bag shows tears, proceed with care and following the internal standards of behaviour in the presence of explosive atmospheres in accordance with the Atex Directive 2014/34/EU.
- Do not use the same dust bag more than once and use ONLY the GYS dust bag with code 058880.
- Spare bags should be stored in a dry place.
- For disposal, act in accordance with the law and internal standards of behaviour for handling explosive dusts.
Steps for fitting the dust bag
1 - Carry out this operation with the metal clamp connected to the earth circuit of the installation.
2 - Close the compressed air supply valve on top of the hoover.
3 - Disconnect the quick disconnect power connector on the back of the hoover before opening the rear cover. Use the flush latches to open the bonnet.
natural_image
Line drawing of a mechanical lifting device with wheels and a handle (no text or symbols)4 - Unhook the flange of the dust bag from the suction port, close the dust bag with the cap provided to prevent dust from escaping from the bag during transport. Carefully lift the dust bag and place it in a designated area within the ATEX installation.
5 - Remove any dust deposits inside the bucket.
6 - Place a new dust bag in the bucket, connecting the flange to the suction port.
7 - Check for breaks or tears in the filter cloth.
8 - Close the cover by slamming it shut, making sure not to tear the bag.
9 - Connect the compressed air supply to the rear of the hoover with the quick coupling provided.
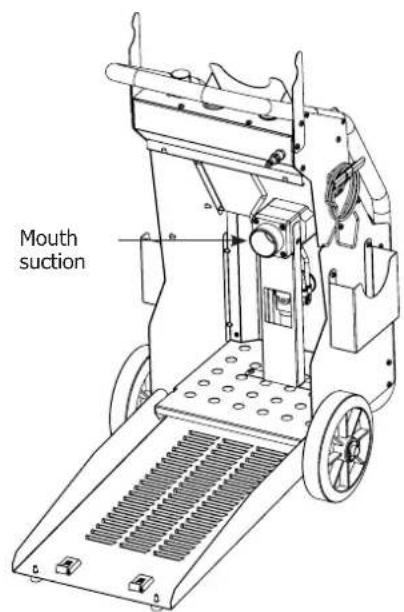
text_image
Mouth suction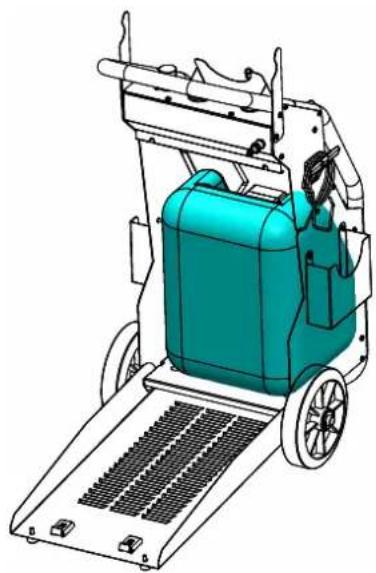
natural_image
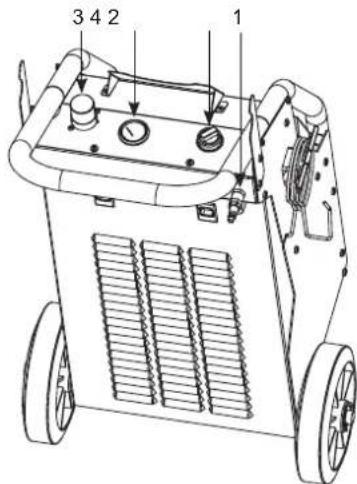
Illustration of a teal-colored industrial machine with wheels and a handle (no text or symbols)CONNECTING THE HOOVER
1 - Connect the unlubricated compressed air supply, not exceeding 10 bar, to connector 1.
2 - Turn knob 2 to activate the suction.
3 - The operating pressure of the sander can be adjusted with the knob 3.
4 - Pressure gauge 4 indicates the operating pressure of the sander.
text_image
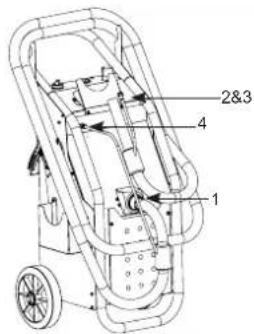
3 4 2 15 - Insert the duct into hole 1.
6 - Connect suction hose 2 and sander supply 3 (G1/4)
7 - Connect hose 4 to the hoover.
text_image
2&3 4 1FAILURES AND ANOMALIES
| Failures Anomalies | ||
| The hoover does not work | Check that the hoover is connected to the unlubricated compressed air network. Press the start button. Check the pressure gauge inside the hoover. It is set at the factory and should be at 3.5 bar. Check that no hoses are pinched or disconnected. Check that the bag or the duct is not blocked. |  |
| The sander does not work | Check that the pneumatic hose is connected. Check that the pressure gauge 1 indicates a pressure of around 4 bar, otherwise adjust using the knob. |  |
| The hoover blows air instead of sucking. | the bag is full or clogged. The suction system is clogged (grease suction, or air connection to lubricated network). A procedure is available for dismantling and cleaning the suction unit. | |
CLEANING OF DUST DEPOSITS
At the end of the working day, check for dust deposits on the flat surfaces of the hoover (front, top, etc.). If there are dust deposits, make sure that the metal clamp of the hoover is connected to the earth circuit of the installation and carefully remove the dust deposits, avoiding creating explosive atmospheres.
WARRANTY
The warranty covers faulty workmanship for 2 years from the date of purchase (parts and labour).
The warranty does not cover:
- Transit damage.
- Normal wear of parts (eg. : cables, clamps, etc..).
- Damages due to misuse (power supply error, dropping of equipment, disassembling, suction of grease or use of lubricated air).
- Environment related failures (pollution, rust, dust).
In case of failure, return the unit to your distributor together with:
- The proof of purchase (receipt etc ...)
- A description of the fault reported
natural_image
Technical line drawing of a mechanical device with wheels and a handle (no text or symbols)natural_image
Illustration of a teal-colored portable electric lift with wheels and control panel (no text or symbols)natural_image
Line drawing of a mechanical device with wheels and a handle (no text or symbols)natural_image
3D technical illustration of a teal-colored industrial machine with wheels and a side-mounted panel (no text or symbols)CONECTANDO LA ASPIRADORA
natural_image
Line drawing of a mechanical device with wheels and a handle (no text or symbols)natural_image
Illustration of a teal-colored industrial machine with wheels and a handle (no text or symbols)WAARSCHUWINGEN - VEILIGHEIDSINSTRUCTIES
ALGEMENE INSTRUCTIES
natural_image
Line drawing of a mechanical lifting device with wheels and a handle (no text or symbols)text_image
Afzuig mond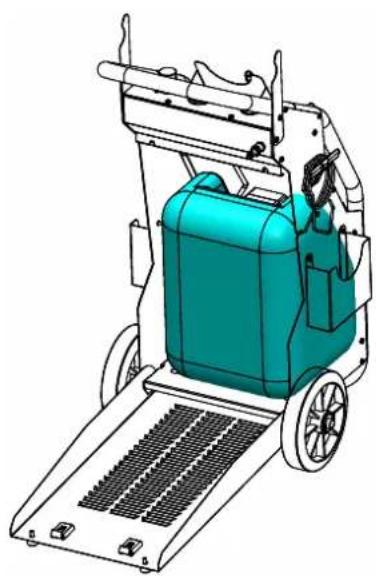
natural_image
Illustration of a teal-colored portable space lift with wheels and a handle (no text or symbols)AANSLUITING STOFZUIGER
natural_image
Line drawing of a mechanical device with wheels and a handle (no text or symbols)natural_image
Illustration of a teal-colored portable space lift with wheels and control panel (no text or symbols)COLLEGAMENTO DELL'ASPIRATORE
text_image
Technical diagram of a mechanical device with numbered components for identification| 1 | Flexible / Flexible / Schlauch / Flexible / Гибкий / Flexibil / Flessibile / Flexibel | F0586 |
| 2 | Coupleur / Coupler / Koppler / Acoplador / Муфта / Cuplaj / Commutatore / Koppelaar | 55341 |
| 3 | Régulateur / Regulator / Regler / Regulador / Стабилизатор / Regulator / Controller / Regulator | 71729 |
| 4 | Manomètre / Pressure gauge / Manometer / Manómetro / Manometr / Manometru / Manometro / Manometer | 71461 |
| 5 | Interrupteur / Switch / Schalter / Interruptor / Выключатель / Întrerupător / Interruttore / Schakelaar | 70986 |
| 6 | Porte / Door / Schutzabdeckung / Puerta / Дверца / Uşă / Porta / Klep K0452GF | |
| 7 | Verrou / Lock / Riegel / Cerrojo / Затвор / Lacăt / Blocco / Vergrendeling | 71003 |
| 8 | Pied butée / Piés con tope / Fuß Anschlag / Опорные ножки / Opritor / Piedino / Stootdopje | 71140 |
| 9 | Roue / Wheel / Rad / Rueda / Koleco / Roată / Ruota / Wieltje 71375 |
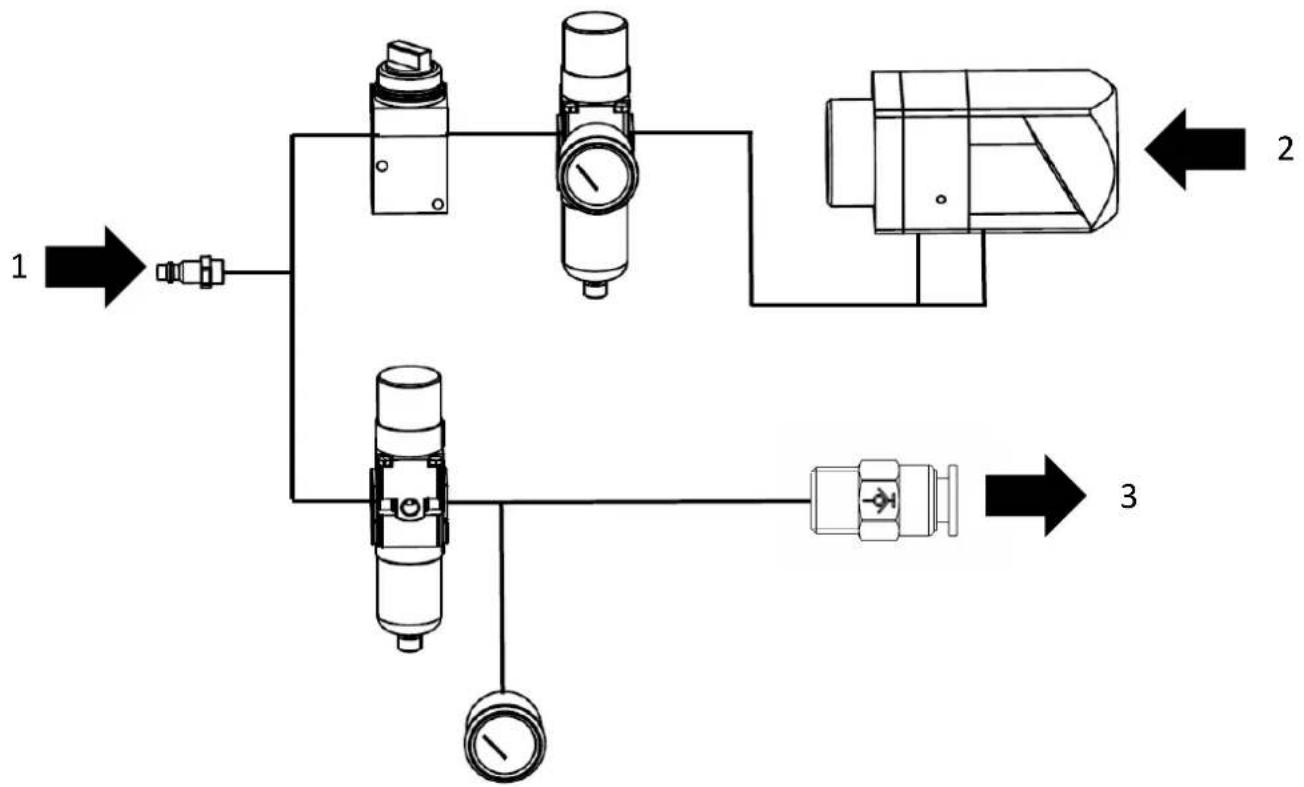
PNEUMATIC DIAGRAM / PNEUMATIKPLAN / DIAGRAMA NEUMÁTICO / ПНЕВМАТИЧЕСКАЯ ДИАГРАММА / PNEUMATISCH SCHEMA / DIAGRAMMA PNEUMATICO
flowchart
graph TD
    A["1"] --> B["Valve"]
    B --> C["Pressure Relief Valve"]
    C --> D["Main Component 2"]
    D --> E["Valve"]
    E --> F["Valve"]
    F --> G["Valve"]
    G --> H["Valve"]
    H --> I["Valve"]
    I --> J["Valve"]
    J --> K["Valve"]
    K --> L["Valve"]
    L --> M["Valve"]
    M --> N["Valve"]
    N --> O["Valve"]
    O --> P["Valve"]
    P --> Q["Valve"]
    Q --> R["Valve"]
    R --> S["Valve"]
    S --> T["Valve"]
    T --> U["Valve"]
    U --> V["Valve"]
    V --> W["Valve"]
    W --> X["Valve"]
    X --> Y["Valve"]
    Y --> Z["Valve"]
| 1 | Air comprimé / Compressed air / Pressluft / Aire comprimido / Сжатый воздух / Samengeperste lucht / Aria compressa |
| 2 | Aspiration / Suction / Absaugung / Aspiración / Всасывание / Zuigen / Aspirazione |
| 3 | Air comprimé (ponceuse) / Compressed air (sander) / Pressluft (Schleifer) / Aire comprimido (lijadora) / Сжатый воздух (шлифовальная машина) / Samengeperste lucht (schuurmachine) / Aria compressa (levi-gatrice) |
SYMBOLS / ZEICHENERKLÄRUNG / ICONOS / СИМВОЛЫ / PICTOGRAMMEN / ICONE / ICONES / IKONY / IKONER / IKONER / IKONER / KUVAKKEET / IKONOK / VYSVĚTLENÍ SYMBOLŮ / アイコン / 図示 / EIKONIΔIA / ICOANE
 | FR Attention ! Lire le manuel d'instruction avant utilisation. EN Warning ! Read the user manual before use. DE ACHTUNG ! Lesen Sie diese Anleitung sorgfällig durch vor Inbetriebnahme des Geräts. ES |Atención! Lea el manual de instrucciones antes de su uso. RU Внимание! Прочтите инструкцию перед использованием. NL Let op! Lees aandachtig de handleiding. IT Attenzione! Leggere li manuale d'istruzioni prima dell'uso. |
 | FR Symbole de la notice EN User manual symbol DE Symbole in der Bedienungsanleitung ES Símbolo del manual RU Символы, использующиеся в инструкции NL Symbol handleiding IT Simbolo del manuale |
 | FR Matériel conforme aux Directives européennes. La déclaration UE de conformité est disponible sur notre site (voir à la page de couverture). EN Device complies with europeans directives, The EU declaration of conformity is available on our website (see cover page). DE Gerät entspricht europäischen Richtlinien. Die Konformitätserklärung finden Sie auf unsere Webseite. ES Aparato conforme a las directivas europeas. La declaración de conformidad UE está disponible en nuestra página web (dirección en la portada). RU Устройство соответствует директивам Евросоюза. Декларация о соответствии доступна для просмотра на нашем сайте (ссылка на обложке). NL Apparaat in overeenstemming met de Europese richtlijnen. De verklaring van overeenstemming is te downloaden op onze website (adres vermeld op de omslag). IT Materiale in conformità alle Direttive europee. La dichiarazione di conformità è disponibile sul nostro sito (vedere sulla copertura). |
 | FR Matériel conforme aux exigences britanniques. La déclaration de conformité britannique est disponible sur notre site (voir à la page de couverture). EN Equipment in compliance with British requirements. The British Declaration of Conformity is available on our website (see home page). DE Das Gerät entspricht den britischen Richtlinien und Normen. Die Konformitätserklärung für Grossbritannien ist auf unserer Internetseite verfügbar (siehe Titelseite). ES Equipo conforme a los requisitos británicos. La Declaración de Conformidad Británica está disponible en nuestra página web (véase la portada). RU Материал соответствует требованиям Великобритании. Заявление о соответствии для Великобритании доступно на нашем веб-сайте (см. главную страницу) NL Materiaal conform aan de Britse eisen. De Britse verklaring van overeenkomt is beschikbaar op onze website (zie omslagpagina). IT Materiale conforme alla esigenze britanniche. La dichiarazione di conformità britannica è disponibile sul nostro sito (vedere pagina di copertura). |
| [X3HH] | FR Matériel conforme aux normes Marocaines. La déclaration C _P (CMIM) de conformité est disponible sur notre site (voir à la page de couverture). EN Equipment in conformity with Moroccan standards. The declaration C _P (CMIM) of conformity is available on our website (see cover page). DE Das Gerät entspricht die marokkanischen Standards. Die Konformitätserklärung C _P (CMIM) ist auf unserer Webseite verfügbar (siehe Titelseite). ES Equipamiento conforme a las normas marroquies. La declaración de conformidad C _P (CMIM) está disponible en nuestra página web (ver página de portada). RU Товар соответствует нормам Мароюко, Декларация C _P (CMIM) доступна для скачивания на нашем сайте (см на титульной странице). NL Dit materiaal voldoet aan de Marokkaanse normen. De verklaring C _P (CMIM) van overeenstemming is beschikbaar op onze internet site (vermeld cp de omslag). IT Materiale conforme alle normative marocchine. La dichiarazione C _P (CMIM) di conformità è disponibile sul nostro sito (vedi scheda del prodotto). |
 | FR Ce matériel faisant l'objet d'une collecte sélective selon la directive européenne 2012/19/UE. Ne pas jeter dans une poubelle domestique ! EN This hardware is subject to waste collection according to the European directives 2012/19/EU. Do not throw out in a domestic bin ! DE Für die Entsorgung ihres Gerätes gellen besondere Bestimmungen (sondermüll) gemäß europäische Bestimmung 2012/19/EU. Es darf nicht mit dem Hausmüll entsorgt werden! ES Este material requiere una recogida de basuras selectiva según la directiva europea 2012/19/UE. No tirar este producto a la basura doméstical RU Это оборудование подлежит переработке согласно директиве Евросоюза 2012/19/UE. Не выбрасывать в общий мусоросборник! NL Afzonderlijke inzameling vereist volgens de Europese richtlijn 2012/19/UE. Gooi het apparaat niet bij het huishoudelijk afval ! IT Questo materiale è soggetto alla raccolta differenziata seguendo la direttiva europea 2012/19/UE. Non smaltire coni rifiuti domestici! |
 | FR Produit recyclable qui relève d'une consigne de tri. ES This product should be recycled appropriately DE Recyclingprodukt, das gesondert entsorgt werden muss. ES Producto reciclable que requiere una separación determinada. RU Этот аппарат подлежит утилизации. NL Product recyclebaar, niet bij het huishoudelijk afval gooien IT Prodotto riciclabile soggetto a raccolta differenziata. |
| Type 22 | FR Adapté pour extraire des poussières combustibles dans la Zone 22. EN Suitable for extracting combustible dust in Zone 22. DE Geeignet zum Absaugen von brennbarem Staub in Zone 22. ES Adecuado para la aspiración de polvo combustible en la zona 22. RU Подходит для удаления горючей пыли в зоне 22. NL Geschikt voor het afzuigen van brandbaar stof in Zone 22. IT Adatto per l'estrazione di polvere combustibile nella zona 22. |
 | FR Ne pas aspirer des poussières incandescentes ou d'autres poussières présentant un risque d'inflammation. Ne pas utiliser avec des machines générátrices d'étincelles. EN Do not suck in glowing dust or other dust that may cause ignition. Do not use with spark-generating machines. DE Saugen Sie keinen glühenden Staub oder andere Staube ein, die eine Entzündung verursachen können. Nicht mit funkenerzeugenden Maschinen verwenden. ES No aspire polvo incandescente u otro polvo que pueda provocar la ignición. No utilizar con máquinas generadoras de chispas. RU He всасывайте раскаленную пыль или другую пыль, которая может вызвать воспламенение. Не используйте с машинами, вырабатывающими искру. NL Zuig geen gloeiend stof of ander stof op dat ontbranding kan veroorzaken. Niet gebruiken mel vonken genererende machines. IT Non aspirare la polvere incandescente o altre polveri che possono causare l'accensione. Non utilizzare con macchine che generano scintille. |
 | II 3D | EX h III c T50°C | Zone 22FR La machine est conforme à la directive ATEX2014/34/UE et aux normes harmonisées reportées dans la déclaration de conformité en tant qu'appareil de catégorie II 3 D. EN The machine complies with the ATEX2014/34/EU directive and the harmonised standards reported in the declaration of conformity as category II 3 D equipment. DE Die Maschine entspricht der Richtlinie ATEX2014/34/EU und den harmonisierten Normen, die in der Konformitätserklärung als Geräte der Kategorie II 3 D angegeben sind. ES La máquina cumpie con la directiva ATEX2014/34/UE y con las normas armonizadas informadas en la declaración de conformidad como equipo de categoría II 3 D. RU Машина соответствует директиве ATEX2014/34/EU y гармонизированным стандартам, указанным в декларации о соответствии, как оборудование категории II 3 D. NL De machine voldoet aan de ATEX2014/34/EU-richtlijn en de geharmoniseerde nomen die in de conformiteitsverklaring worden vermeld als categorie II 3 D-apparatuur. IT La macchina è conforme alla direttiva ATEX2014/34/UE e alle norme armonizzate riportate nella dichiarazione di conformità come apparecchiatura di categoria II 3 D. |
 | Mise à la terre (terre de protection) / Grounding (protective earth) / Erdung (Schutzerde) / Conexión a tierra (tierra de protección) / Заземление (защитное заземление) / Messa a terra (terra di protezione) |
 | Porter des lunettes / Wear goggles / Schutzbrille tragen! / Lieve gafas de protección / Носите защитные очки / Indossare occhiali di protezione |
| [C2WS] | Porter des gants / Wear gloves / Handschuhe tragen! / Lieve guantes / Носите перчатки / Indossare guanti di protezione |
| [OT53] | Entretien / maintenance / Care / maintenance / Instandhaltung / Wartung / Mantenimiento / Уход / Обслуживание / Cura / manutenzione |
GYS France
Siège social / Headquarter