VPT100 - Anemometer VOLTCRAFT - Free user manual and instructions
Find the device manual for free VPT100 VOLTCRAFT in PDF.
User questions about VPT100 VOLTCRAFT
0 question about this device. Answer the ones you know or ask your own.
Ask a new question about this device
Download the instructions for your Anemometer in PDF format for free! Find your manual VPT100 - VOLTCRAFT and take your electronic device back in hand. On this page are published all the documents necessary for the use of your device. VPT100 by VOLTCRAFT.
USER MANUAL VPT100 VOLTCRAFT
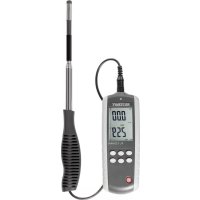
PITOT TUBE ANEMOMETER VPT-100
GB OPERATINGINSTRUCTIONSPAGE20-36
ANÉMOMÈTRE À TUBE DE PITOT VPT-100
F NOTICE D'EMPLOI PAGE 37-53
PITOTBUIS ANEMOMETER VPT-100
9.1 Setup Options 26
9.2 Calling and Terminating the Setup Menu 26
9.3 Changing a Setting in the Setup 26
9.4 Selecting the Measuring Unit for the Flow Channel 26
9.5 Determination of the shape of the Flow Channel 27
9.6 Setting the Flow Channel Parameters 27
Rectangular Flow Channel 27
Round Flow Channel 28
9.7 Auto Power Off (Automatic Deactivation) 28
9.8 Configure Measuring Settings 29
9.9 Delete Memory 29
10.Measure Pressure 30
11.Measure Flow Velocity 31
12.Measure Volume Flow 32
13. Display Temperature 32
14. "HOLD" Function ("Freeze" Data on the Display) 32
15. Call Min, Max and Average Values 32
16. Save Measured Data 32
17. Call Saved Measured Data 33
18. Delete Stored Measured Data 33
19. Maintenance and Cleaning 34
20. Error Messages 34
21. Replacing Batteries 34
22. Installation and Use of the PC Software "Manometer & Flow Meter" 34
23. Disposal 35
24. Technical Data 35
1. INTRODUCTION
Dear customer,
Thank you for making the excellent decision to purchase a Voltcraft® product.
Voltcraft®This name stands for above-average quality products in the areas of measuring, charging and grid technology, characterised by technical competence, extraordinary performance and permanent innovation. Whether you are an ambitious hobby electronics technician or a professional user - a product of the Voltcraft®brand family will provide you with the best solution for even the most sophisticated of tasks. Special features: We offer the sophisticated technology and reliable quality of our Voltcraft®products at a near-unbeatable price/performance ratio. We are positive: With our Voltcraft®series, we are laying the groundwork for long, good and successful cooperation.
Enjoy your new Volcraft® product!
2. INTENDED USE
The pitot tube anemometer is designed for precise differential pressure measurement. Furthermore, the pitot tube anemometer records flow velocities of air and gases and ambience temperatures. In combination with a pitot tube, it is also possible to measure high air velocities.
The flow supply of the pitot tube anemometer is performed via a 9-Volt block battery (E-Block).
Operation of the pitot tube anemometer is possible both indoors and outdoors, but not in potentially explosive environments. The device should not be exposed to extreme temperatures, direct solar irradiation, high moisture or wetness. The pitot tube anemometer is not suitable for aggressive environments.
Read these operating instructions thoroughly and carefully, they contain a lot of important information for commissioning and operation. Always observe the safety information!
Any use other than that described above damages the product. Moreover, this is linked to dangers such as short circuit, fire, electric shock, etc. No part of the product must be modified or converted!
3. SCOPE OF DELIVERY
- Pitot tube anemometer
- Angled pitot tube (diameter: 8 mm, length: 210 mm + 335 mm)
- 2 connection hoses (length: 850mm )
E-block battery 9 V - Mini-USB-/USB-cable to connect to a PC
- PC Software
- Carrying case
- Operating instructions
4. SPECIAL FEATURES
Large LC display with backlighting
- Integrated time measurement clock delivers relative time stamps for the values MAX, MIN and AVG
- Measurement of barometric pressure, air velocity and air flow with zero reconciliation function
- Display of barometric pressure, air velocity, air flow and ambience temperature
- Mini-USB interface for transfer of the measured values to a PC with USB connection. The connection between the measuring device and PC is established with the enclosed mini-USB-/USB-cable.
- CD-ROM with PC software "Manometer & Flowmeter" for further processing and visualisation of the measured values on the computer. System requirements: PC with Pentium 90 MHz or higher, 32 MB RAM, 7 MB hard disc memory, Win2000/XP/Vista
- Warning message at low battery and battery savings mode with automatic deactivation (sleep mode)
5. EXPLANATION OF SYMBOLS

The lightning-bolt symbol in a triangle indicates a health hazard, e.g. danger of an electrical shock.

The exclamation mark in a triangle indicates important notes in these operating instructions that must be observed strictly.
The "arrow" symbol informs you that there are special tips and hints concerning operation.
6. SAFETY INFORMATION

The guarantee/warranty will expire if damage is incurred resulting from non-compliance with the operating instructions! We do not assume any liability for consequential damage!
not assume any liability for property damage and personal injury caused by improper use or noncompliance with the safety instructions! In such cases the guarantee/warranty will expire!
-
The unauthorized conversion and/or modification of the product is inadmissible for safety and approval reasons (CE).
-
The product is not a toy. Children cannot judge the dangers involved when handling electrical devices.
-
If the product is brought from a cold into a warm room (e.g. in transport), it is possible that condensation develops. Therefore, allow the product to reach room temperature before operating it.
- Operate the product only via the included battery or another equal model (9 V E-block). Replace empty batteries by new ones to avoid damage from incorrect measured values.
- Regular batteries must not be recharged. There is a danger of explosion if the battery is used improperly or inserted into the pitot tube anemometer. The included battery must only be replaced by a battery of the same type or an equal product. Never subject the battery to high temperatures.
-
In commercial institutions, the accident prevention regulations of the Employer's Liability Insurance Association for Electrical Systems and Operating Materials are to be observed.
-
Do not leave packaging material unattended. It may become a dangerous toy for children.
- Handle the product with care. It can be damaged by impact, blows or when dropped even from a low height.
- Please observe that the thresholds in the specifications must never be undercut or exceeded for the measured values.
7. CONTROL ELEMENTS
See fold-out page
- ON/OFF:
To switch the pitot tube anemometer on and off.
2.MAX/MIN:
To call the minimum, maximum and average values. To return to the standard mode, keep the button pushed for 2 seconds.
- P/N/F:
Push the button "P/V/F" once to display the flow velocity. If you push the button twice, you will receive information on the scope or the diameter of the flow channel. After pushing the button "P/V/F" three times the volume flow is displayed. Press the button again to return to the pressure display.
- HOLD/ZERO:
Push "HOLD/ZERO" once to "freeze" the value currently displayed. If you want to terminate the "HOLD" mode, push the button "HOLD/ZERO" again. To return the measuring device to zero, keep the button "HOLD/ZERO" pushed for 2 seconds.
- SAVE/CLEAR:
Push "SAVE/CLEAR" to save the currently displayed values in a data record. If you call the data record from the memory again later, you can delete it by pushing "SAVE/CLEAR".
- SETUP:
Push "SETUP" to switch the backlighting of the display on and off. Push "SETUP" for 3 seconds to get to the menu to change the device settings. You can leave the setting menu by keeping the "SETUP" button pushed for 3 seconds again.
- Unit▲:
Push "Unit ▲" to change the measuring unit for the temperature display. In the "SETUP" mode, use the button to scroll through the setting options. When calling saved data, you will get to the desired higher data record number by pushing the button several times.
- Unit
This button changes the measuring unit of the second presented measured value. In the "SETUP" mode, use the button to scroll through the setting options. When calling saved data, you will get to the desired lower data record number by pushing the button several times.
- Avg/Rec:
Push and hold the "Avg/Rec" button for 2 seconds to call saved data records ("recall mode"). In "recall" mode, you can have the averages of the saved data output by pushing the "Avg/Rec" button. Push "Avg/Rec" in "SETUP" mode to confirm a selection.
- Number of the Saved Data Records for the Currently Saved Measuring Parameters
- Indicators for REC, MIN, MAX and AVG
- Main Display
- Second Display (Temperature and Time)
- “+”-Input
- " -" -Input
- Angled Pitot Tube
- Display of the Time Unit
- Active Parameters (Pressure, Temperature, Flow Velocity, Volume Flow)
- Measuring Unit Pressure
- Auto Power Off Symbol (Automatic Deactivation Active)
- Display for the Active "HOLD" Mode
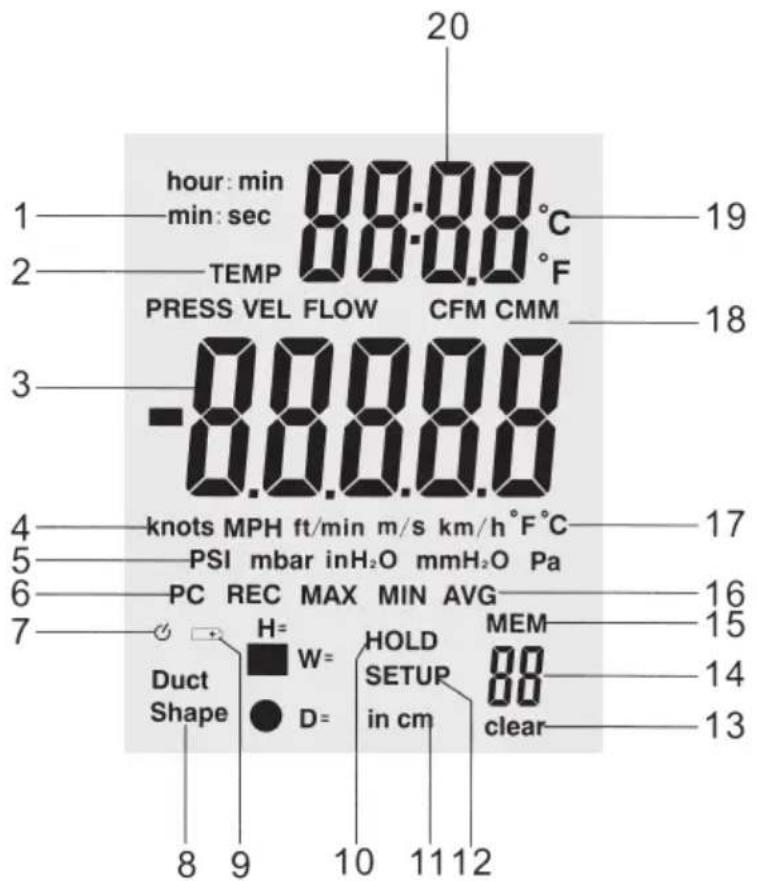
- Display of the Time Unit: ("Hours: Minutes" or "Minutes: Seconds")
- Active parameters ("Temp" = temperature, "Press" = pressure, "Vel" = flow velocity, "Flow" = volume flow)
- Main display
- Measuring units of the flow velocity
- Measuring unites of pressure
- Data interface (PC) - displayed when the measuring device is connected to the computer by USB cable
- Auto power off icon (automatic deactivation)
- Flow channel shape (rectangular or round)
- Battery: battery level display
- "HOLD" notes that the data display is currently "frozen"
- Dimensions of the flow channel: "H" = Height, "W" = Width, "D" = Diameter
- "SETUP" notes that the setup mode with the setting options is currently active
- "DELETE" shows that one or several data records are deleted from memory
- Memory slot number
- "MEM" indicates that memory access is taking place
- Indicators for REC, MIN, MAX and AVG
- Measuring units for large temperature display (main display)
- Measuring units for the volume flow
- Measuring units for small temperature display (second display)
- Second display for temperature and time
9. CHANGE SETUP SETTINGS
In the setup, you can define, e.g., the shape of the flow channel and the associated parameters. Further settings refer to the auto power off function and the settings for MAX, MIN and AVG. You can also delete saved data via the setup.
9.1 Setup Options
| Option Menu Item Settings | ||
| Measuring units for channel dimensions Channel shape and parameters | Unit Duct Shape | inch/cm Specified area for flow measurements |
| Auto-Power-off (Automatic Deactivation) | SLEEP Auto off/on | |
| Menu setting ENU 1, 2, 3 | ||
| Delete Memory Mem clear Yes/No |
9.2 Calling and Terminating the Setup Menu
Push the button "SETUP" for 2 seconds to call or terminate the setup menu. If the setup mode is active, the word "SETUP" appears in the lower area of the display.
9.3 Changing a Setting in the Setup
Push "Unit" or "Unit", to scroll to the setup option that you want to change.
Push "Avg/Rec" to confirm your selection.
Push "Unit ▲" or "Unit ▼" repeatedly until the desired value for your setting is displayed.
Push "Avg/Rec" to confirm your selection and save the new settings.
The setup can be called in mode "MAX MIN/AVG".
9.4 Selecting the Measuring unit for the Flow Channel
In setup mode, push "Unit" or "Unit", until "unit" appears in the display.
Push "Avg/Rec" to confirm your selection.
Select the measuring unit "in" (inch) or "cm" by pushing "Unit ▲" or "Unit ∨ until the desired setting appears in the display.
Push "Avg/Rec" to confirm and save your selection.


9.5 Determination of the Shape of the Flow Channel
In setup mode, push "Unit" or "Unit", until "duct shape" appears in the lower area of the display.
Push "Avg/Rec" to conform your selection.
Use the buttons "Unit" or "Unit" to select the round or square icon for a rectangular or round flow channel.
Push "Avg/Rec" to conform your selection.


9.6 Setting the Flow Channel Parameters
Rectangular Flow Channel

If the flow channel is rectangular, the display first shows "W=" and a number that indicates the width of the channel in the selected measuring units.
" or "Unit to determine the position of the decimal point.

even decimal points - the currently selected number flashes.
Push "Save/Clear" to switch between decimal points - the currently selected number flashes. "Unit▲" or "Unit▼now can be used to set the individual numbers according to your wishes (0...9).
Plesh "ArgRcs" to confirm your selection and save the settings.

The display now switches to "H=" and shows the height of the channel in the desired measuring unit.
" or "Unit to determine the position of the decimal point.
even decimal points - the currently selected number flashes.
"Unit ▲" or "Unit now can be used to set the individual numbers according to your wishes (0 ... 9).
selection and save the settings.
Round Flow Channel
If you have selected a round flow channel, e.g. a pipe, the display shows "D=" for the diameter of the channel.
Push the "Unit " or "Unit to determine the position of the decimal point.
Push "Save/Clear" to switch between decimal points - the currently selected number flashes. "Unit ▲" or "Unit▼now can be used to set the individual numbers according to your wishes (0 ... 9).
Push "Avg/Rec" to confirm your selection and safe the settings.
9.7 Auto Power Off (Automatic Deactivation)
The device has a battery saving function and switches off automatically if you do not operate any button for 20 minutes.
To switch the auto power-off function on or off, switch to setup mode.
Push "Unit ▲" or "Unit ▼ to scroll to the screen with the settings for "SLEEP". Confirm the selection by pressing the "Avg/Rec." button.
Use "Unit" or "Unit" to select between the options "On" and "OFF". "On" switches on the auto power-off function, "off" deactivates it.
Push "Avg/Rec" to confirm your selection and safe the settings.


9.8 Configure Measuring Settings
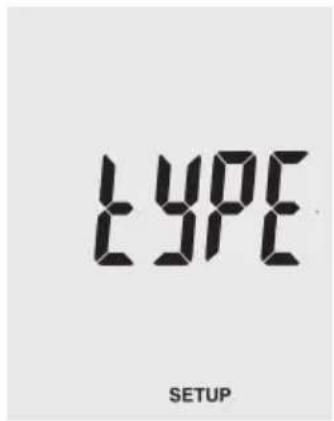
Use the buttons "Unit" or "Unit" in setup mode to scroll to the menu item "type".
Push "Avg/Rec" to conform your selection. The display shows either "1", "2" or "3":
1: The display shows pressure and flow velocity
2: The display shows flow velocity and volume flow
3: The display shows pressure, flow velocity and volume flow
Select the button "Unit ▲" or "Unit▼ to display the desired option "1", "2" or "3" and confirm your selection by pushing "Avg/Rec".

9.9 Delete Memory
Use the buttons "Unit" or "Unit" in setup mode to scroll to the menu item "ALL".
Push "Avg/Rec" to conform your selection.
Push "Save/Clear" to switch between the following four deletion options:
PRESS VEL FLOW: Deletes all saved pressures, flow velocities and volume flows
PRESS: Deletes all saved pressure data
VEL: deletes all saved flow velocity data
FLOW: deletes all saved volume flow data
To delete, use the buttons "Unit▲" or "Unit▼ to switch between the options "YES" (delete) and "no" (do not delete).
Confirm your selection by pressing "Avg/Rec."


10. MEASURE PRESSURE
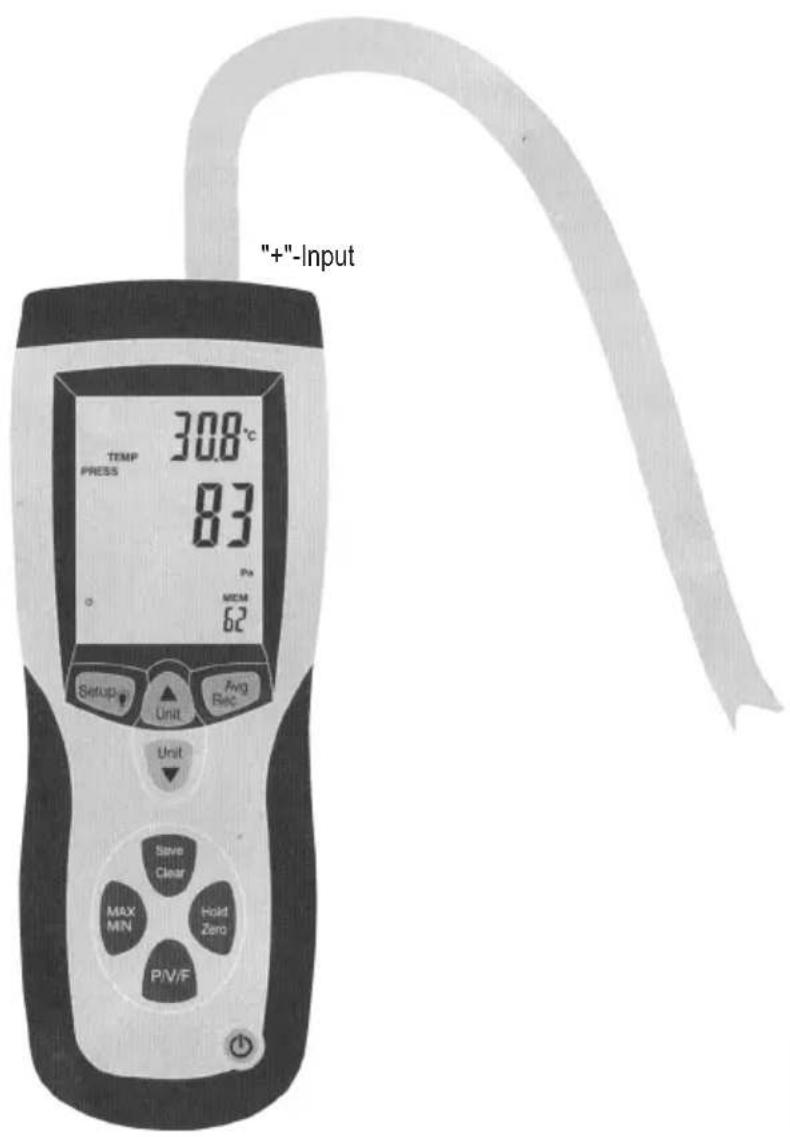
The main display (3) on the display shows the manometer pressure or the differential pressure up to 5,000 Pa. You can choose between the five measuring units psi, mbar, Pa, inH _2 O and mmH _2 O for the display.
Push "P/V/F" once to switch to the pressure mode (PRESS). Push the button "Unit▼" several times if required to select the desired measuring unit.
Connect a hose to the "+" input of the pitot tube anemometer and leave the "-" input open.
The device registers the ambience conditions via the hose opening. Push and hold the button "Hold/Zero" for 2 seconds to perform a zero reconciliation.
Place the open end of the hose in another environment than the anemometer.
The anemometer now shows the pressure difference between the ^+ input (ambience conditions at the hose end) and the - input (reference ambience conditions at the anemometer).
11. MEASURE FLOW SPEED

The anemometer measures flow velocities and volume flows based on the following standard conditions: 21.1^ ambience temperature, 1,013 mbar barometric pressure. The device has no automatic temperature compensation.
The main indication (3) of the display shows the flow velocity. It can be presented in five different measuring units: m/s, ft/min, km/h, mph, knots.
Push "P/V/F" twice to switch to the flow mode (VEL). Push the button "Unit▼" several times if required to select the desired measuring unit.
Connect the two hoses with the anemometer and the pitot tube as shown in the figure. The "+" input of the pitot tube anemometer is connected to the overall total pressure connection of the pitot tube by the white hose. Connect the "-" input of the measuring device to the connection for the static pressure at the pitot tube via the black hose.
Push and hold the button "Hold/Zero" for 2 seconds to perform a zero reconciliation.
For the most precise measurement possible, hold the opening of the pitot tube as precisely against the flow direction as possible - the deviation from the flow direction should not be larger than ± 10^
If the output measured value is negative or if you receive an error message ("Error"), check if the two hoses are correctly connected to the anemometer and to the pitot tube.
12. MEASURE VOLUME FLOW
Push "P/V/F" three times to switch to the volume flow mode (FLOW). Push the button "Unit▼" several times if required and then select the desired measuring unit.
The anemometer display shows the saved form of the flow channel (rectangular or round) with the associated dimensions.
If you use any other flow channel for the current measurements than the one that has been saved, you have to re-define the channel data in the setup.
Push the "setup" button for more than 3 seconds and make the new settings as described in chapter "Setting the flow channel parameters".
The functions "Hold", "Save", "MIN/MAX/AVG", "Zero" and "Setup" cannot be used while measuring pressure, flow speed or volume flow.
13. DISPLAY TEMPERATURE
The current environmental temperature is displayed in the second display (20). The button "Unit " switches between the measuring units ^ C and ^ F .
14. "HOLD" FUNCTION ("FREEZE" DATA ON THE DISPLAY)
Push "HOLD/ZERO" once to "freeze" the value currently displayed. To deactivate the "HOLD" function again, push "HOLD/ZERO" again
15. CALL MIN, MAX AND AVERAGE VALUES
Push the button "MAX/MIN", to browse through the min, max and average values. Additionally, either the elapsed time since calling of the "MAX/MIN/AVG" function or the time at which a maximum or minimum value was measured is displayed.
Push the "P/V/F" to display the maximum, minimum and average values for pressure, flow velocity and volume flows.
Push the button "MAX/MIN" for 2 seconds to leave the "MAX/MIN"AVG" mode again.
16. SAVE MEASURING DATA
Use the anemometer to save the measuring data for pressure, flow velocity and volume flows separately in up to 99 data records each.
To save a data record push the button "SAVE/CLEAR" during the measuring process.
If all 99 memory slots are assigned, you cannot deposit any further data records. Instead, the display shows the message "FU" (FULL: memory full) when you push the "SAVE/CLEAR" button. To clear memory for new measured data, proceed as described below in chapter 18 "Delete saved measuring data".
17. CALL SAVED MEASURED DATA
To call saved data records in the corresponding operating mode (P = pressure, V = flow speed, F = volume flow), push the button "P/V/F".
Push and hold the "Avg/Rec" button for 2 seconds to display saved data records. The last data record saved appears in the display first.
Push the buttons "Unit" or "Unit" to browse the saved data records.
Push "Avg/Rec" to have the average value of all saved measured values displayed in the selected operating mode.
To leave the saving mode again, keep "Avg/Rec" pushed for 2 seconds again.
18. DELETE STORED MEASURED VALUES
To delete individual saved data records in the corresponding operating mode (P = pressure, V = flow speed, F = volume flow), push the button "P/V/F".
Push and hold the "Avg/Rec" button for 2 seconds to display saved data records. The last data record saved appears on the display first.
Push the buttons "Unit ▲" or "Unit ▼ to browse the saved data and select the desired data record.
Push "SAVE/CLEAR" to delete the selected data record. This reduces the displayed number of saved data records at the bottom right of the display.

To leave the saving mode again, keep "Avg/Rec" pushed again for 2 seconds.
To delete all data records, proceed as described in chapter 9 "Change Setup Setting" item 9.9 "Delete Memory".
19. MAINTENANCE AND CLEANING
If the battery status symbol in the display shows a low battery status, you need to replace the battery of the pitot tube anemometer by a new 9 V E-block. Proceed as described in chapter 21 "Replacing batteries". Other than that, the pitot tube anemometer is maintenance-free to you. Never take it apart. To clean the product, a dry, soft and clean cloth is sufficient. Clean the display very carefully to avoid scratches. Do not use aggressive detergents as these will cause discoloration of the casing.
20. ERROR MESSAGES
The measuring device has internal diagnosis functions. In case of malfunctions, the display outputs error messages and "freezes" all buttons.
| Error code Cause | |
| OL The pressure or flow velocity is above the measuring range. | |
| -OL The pressure is below the measuring range | |
| Error The flow velocity or volume flow is below the measuring range | |
| FU The memory is full; no further data records with measuring data can be displayed |
21. REPLACING BATTERIES
Switch off the anemometer.
Push the rear battery compartment lid of the housing down at the mark to open the battery compartment.
Replace the flat battery by a new 9 V E battery block (item no. 65 25 09).
Slide the battery compartment cover back onto the casing until it latches.
22. INSTALLATION AND USE OF THE PC SOFTWARE MANOMETER & FLOW METER
Insert the CD-ROM included with the pitot tube anemometer into the CD-ROM drive of your Windows PC.
Double-click the icon "Computer" on your desktop and then the icon of your CD-ROM drive to open the corresponding folder. You will find an installation file with the extension *.exe" there. Double-click the file name to start the installation process.
Follow the instructions on the screen for installation.
Connect the pitot tube anemometer to your PC by pushing the mini USB plug of the enclosed connection cable into the intended socket at the pitot tube anemometer. Then connect the USB plug of the cable to the USB input of your PC.
For details on operation of the PC software "Manometer & Flow Meter" see the help function that is available to you in the software under the menu item "Help" (H).
23. DISPOSAL
a) Product

Remove
Electronic devices are recyclable waste and must not be disposed of in the household waste! Disposse of the product according to the applicable statutory provisions at the end of its service life.
any inserted battery and dispose of them separately from the product.
b) Batteries and Rechargeable Batteries
You as the end user are required by law (Battery Ordinance) to return all used batteries/rechargeable batteries. Disposing of them in the household waste is prohibited!

Batteries/rechargeable batteries that contain any hazardous substances are labelled with the adjacent icon to indicate that disposal in domestic waste is forbidden. The descriptions for the respective heavy metal are: Cd = cadmium, Hg = mercury, Pb = lead (the names are indicated on the battery/rechargeable battery e.g. under the rubbish bin symbol shown to the left).
You may return used batteries/rechargeable batteries free of charge at the official collection points of your community, in our stores, or wherever batteries/rechargeable batteries are sold!
You thus fulfil your statutory obligations and contribute to the protection of the environment.
24. TECHNICAL DATA
Specifications anemometer
Dimensions 203 x 75 x 50 mm
Weight 280g
- Operating conditions. -10^ +60^
- Rel. humidity in operation 0^ +50^ < 90% , rel. humidity, non-condensing
Air channel .round/rectangular
- Power supply .9 V E-Block-Battery
- Display . LC display
- Interface ............ Mini-USB
Memory capacity .99 measured values/parameters
- Hose length 85 cm
- Pitot tube (angled) Diameter: 8 mm Length: 21 cm/33.5 cm
Specifications air/gas pressure
- Measuring range. 0 50 mbar
Resolution 0.01 mbar
Measuring accuracy. ± 0.3% at +25^ - Reaction time 0.5 seconds
Maximum pressure .689.475 mbar - Selectable measuring units .mbar, psi, inH₂O, mmH₂O, Pa
Conversion of the measuring units:
1 psi * 27.68 = inH₂O
1 psi * 68.947 = mbar
1 psi * 703.072 = 1*mmH₂O
1 psi * 6,894.6 = Pa
Specifications air speed
- Measuring range 2.0 ~ 80.0 m/s,
200~15,733 ft/min
3.6 288~km / h
2.24\~178.66 mph,
2.0 ~ 154.6 knots (nautical miles/hour)
Resolution 0.01 m/s
- Measuring accuracy. ±2.5% to 10 m/s
- Selectable measuring units .m/s, ft/min, km/h, mph, knots
Specifications volume flow
- Measuring range. 0 99.9999 ~m^3 / min
0~99.9999 ft
3/min
Resolution 0.001\~100 m/min
0.0001\~3,048.00cm
3/min
- Measuring accuracy. ± 0.3% of the measuring value
- Selectable measuring units . m^3/min,ft^3/min
Calculation volume flow:
Cubic meters/minute: m^3/min = flow velocity (m/s) * area (m²) * 60
Cubic feet/minute: ft³/min = flow speed (ft/min) * area (ft²)
Specifications temperature
- Measuring range. 0^ +50^
22^ 122^
Resolution 0.1°C,
0,1°F - Measuring accuracy. ±1,0°C
± 2,0^ - Selectable measuring units. ^ C,^ F
TABLE DES MATIÈRES

Spcifications anemometre
Copyright 2014 by Voltcraft

Legal notice
This is a publication by Conrad Electronic SE, Klaus-Conrad-Str. 1, D-92240 Hirschau (www.conrad.com).
All rights including translation reserved. Reproduction by any method, e.g. photocopy, microfilming, or the capture in electronic data processing systems require the prior written approval by the editor. Reprinting, also in part, is prohibited. This publication represent the technical status at the time of printing.
Copyright 2014 by Voltcraft

Information legales
Copyright 2014 by Voltcraft