DT 8820 - Thermometer VOLTCRAFT - Free user manual and instructions
Find the device manual for free DT 8820 VOLTCRAFT in PDF.
Document temporarily unavailable
The manual is currently being transferred to our new server. It will be accessible again in a few hours. Thank you for your patience.
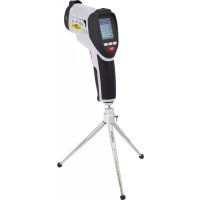
| Product type | 4-in-1 environmental multimeter (thermometer, lux meter, sound level meter, hygrometer) |
| Brand | Voltcraft |
| Model | DT 8820 |
| Dimensions | 251 x 85 x 40 mm (with sensor holder) |
| Weight | Approx. 360 g (without external sensors) |
| Power supply | 9V alkaline battery (type 6LR61, MN1604, 6F22 or 006P) |
| Power consumption | Approx. 6 mA |
| Display | 3½-digit LCD, max value 1999 |
| Main functions | Light intensity (lux), relative humidity (%), sound level (dB), temperature (°C/°F) |
| Temperature range (type K probe) | -20 °C to +750 °C |
| Temperature range (built-in sensor) | 0 °C to +50 °C |
| Humidity range | 25% to 95% RH |
| Sound level range | 35 dB to 130 dB (A and C curves) |
| Light intensity range | Up to 20,000 lux (display with factor 10) |
| Humidity accuracy | ±5% (at 25 °C, 35% to 95% RH) |
| Temperature accuracy (K probe) | ±(3% reading + 2 °C) from -20 °C to 200 °C; ±(3.5% reading + 2 °C) from 200 °C to 750 °C |
| Sound accuracy | ±3.5 dB at 94 dB / 1 kHz |
| Light accuracy | ±(5% reading + 10 digits) for color temperature 2856 K |
| Auto power off | After approx. 10 minutes |
| Operating temperature | 0 °C to +50 °C |
| Storage temperature | -10 °C to +60 °C |
| Package contents | Unit with micro case, light sensor, type K thermocouple, 9V battery, user manual |
| Maintenance | Clean with a clean, dry, lint-free cloth; do not use solvents |
| Safety | Max. input protection 60 VDC / 24 VAC; only measure on de-energized objects |
Frequently Asked Questions - DT 8820 VOLTCRAFT
User questions about DT 8820 VOLTCRAFT
0 question about this device. Answer the ones you know or ask your own.
Ask a new question about this device
Download the instructions for your Thermometer in PDF format for free! Find your manual DT 8820 - VOLTCRAFT and take your electronic device back in hand. On this page are published all the documents necessary for the use of your device. DT 8820 by VOLTCRAFT.