
SelectTech BD1090i - Strength Training Equipment BOWFLEX - Free user manual and instructions
Find the device manual for free SelectTech BD1090i BOWFLEX in PDF.
| Product type | Adjustable dumbbell |
| Brand | Bowflex |
| Model | SelectTech BD1090i |
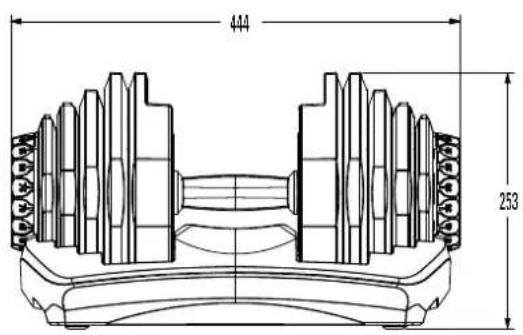
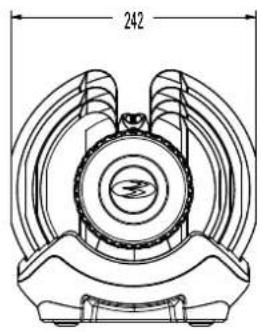
| Dimensions (L x W x H) | 44.4 x 24.2 x 25.3 cm |
| Total weight | 41.9 kg (92.3 lbs) |
| Weight range per dumbbell | 4.5 kg to 41 kg (10 to 90 lbs) |
| Number of increments | 17 |
| Adjustment mechanism | Rotary dials with progressive locking |
| Disc material | Steel |
| Handle covering | Rubber |
| Intended use | Home workout |
| Maintenance | Clean with a damp cloth and mild soap; silicone lubrication if necessary |
| Cleaning | Do not use solvents or abrasive products |
| Safety | Locking mechanism preventing rotation out of the base |
| Precautions | Do not drop; do not use if damaged |
| Warranty | Contact Bowflex customer service |
| Repairability | User non-serviceable parts; contact Bowflex |
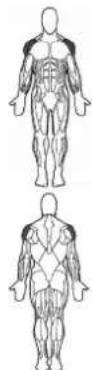
| Exercises included in the manual | Squat, bench press, bicep curl, lateral raise, etc. |
| Power | None (manual device) |
Frequently Asked Questions - SelectTech BD1090i BOWFLEX
User questions about SelectTech BD1090i BOWFLEX
0 question about this device. Answer the ones you know or ask your own.
Ask a new question about this device
Download the instructions for your Strength Training Equipment in PDF format for free! Find your manual SelectTech BD1090i - BOWFLEX and take your electronic device back in hand. On this page are published all the documents necessary for the use of your device. SelectTech BD1090i by BOWFLEX.
USER MANUAL SelectTech BD1090i BOWFLEX
Thanks for choosing BowFlex SelectTech 1090i Dumbbell as your fitness equipment. We are sincerely encourage you to read through this Owner's manual carefully before the assembling of your equipment started, especially of below WARNINGS! WARNINGS WILL REDUCE THE RISK OF BURNS, FIRE, ELECTRICAL SHOCK OR INJURY TO PERSONS.
Before exercising, find your equipment's serial number located on a white barcode sticker on product, and exercise in the space provided below.
ENTER YOUR SERIAL NUMBER AND MODEL NAME IN THE BOXES BELOW:
SERIAL NUMBER:
MODEL NAME: BowFlex SelectTech 1090i Dumbbell
» Refer to the SERIAL NUMBER and MODEL NAME when calling for service.
SERIAL NUMBER LOCATION

WARNING
- READ ALL INSTRUCTIONS BEFORE USING THIS EXERCISE EQUIPMENT.
All warnings and instructions should be read and proper instruction obtained prior to use. Use this equipment for its intended purpose ONLY.
If at any time the Warning stickers become loose, unreadable or dislodged, replace the labels, contact your local distributor for them. -
Keep children under the age of 13 away from this strength training equipment. Teenagers must be supervised at all times while using this equipment.
This equipment is not intended for use by persons with reduced physical, sensory or mental capabilities, or lack of experience and knowledge, unless they have been given supervision or instruction concerning use of the equipment by a person responsible for their safety. -
Inspect the machine before use. DO NOT use machine if it appears damaged or inoperable.
DO NOT exceed weight capacity of this equipment. -
Make sure all adjustment devices are fully inserted and properly adjusted before use to avoid injury.
Injuries to health may result from incorrect or excessive training. Cease exercise if you feel faint or dizzy. Obtain a medical exam before beginning an exercise program. -
Keep body, clothing, hair, and fitness accessories free and clear of all moving parts.
- Make sure machine is stabilized on the floor and uneven surfaces are leveled before use.
-
It is essential that your equipment is used only indoors, in a climate controlled room.
-
Always fully stow all accessories between workouts. This helps keep you and everyone in your household safe, and helps preserve longevity of your equipment.
To assure that the safety level of this product is maintained, examine components for wear and tear on a regular basis. Components that are worn excessively or inoperable should be replaced immediately or the product should be put out of use until it is repaired.
DO NOT over exert yourself during exercise.
The equipment is only for indoor use at home, DO NOT to use in any commercial, rental, school or institutional setting.. - Consult a physician before starting an exercise program. Stop exercising if you feel pain or tightness in your chest, become short of breath, or feel faint. Contact your doctor before using the machine again.
Periodically inspect and test the locking mechanism for correct function. Follow the test procedures included in this manual.
Before you start your workout, make sure that your surroundings are free from possible interference and third parties. Your workout free space should be 60~cm(2 feet) more than the maximum reach of the exercise in all directions.

ADDITIONAL WARNING - ADJUSTABLE EQUIPMENT (FREE WEIGHT)
DO NOT engage the locking mechanism and use the handle to try to lift the main body and base together. To lift the main body and base together, engage the locking mechanism and use the lift handles molded into the base assembly.
DO NOT try to force the Adjustment Knob to turn when the main body has been removed from the base.
DO NOT Drop to the floor. Damage to the product and possible personal injury can occur.
DO NOT let the equipment's forcefully hit together during operation. Damage to the product and possible personal injury can occur.
DO NOT lean on the equipment's handles or use them to support your body weight, such as using them as a base to perform a push up. Damage to the product and possible personal injury can occur.
- DO NOT try to disassemble your equipment's handles, or base assembly.
- The equipment are very heavy. If you are not using the optional Stand, put the equipment assembly directly on the floor for best support.
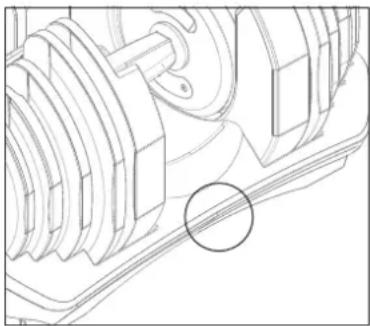
If use with Dumbbell stand, please keep at least 1.3m (50 inch) on each side of the stand clear. This is the recommended safe distance for access and passage around and emergency dismounts from the machine.
FREE AREA
WORKOUT SPACE
Exercise on a level and stable base. There should be 1.3m (50^ ) of free space each side surrounding.
- Do not exercise in any area that will block any vent or air openings. The equipment should not be located in a garage, covered patio,near water or outdoors.
CAUTION!
If you experience chest pains, nausea, dizziness or shortness of breath, stop exercising immediately and consult your physician before continuing.
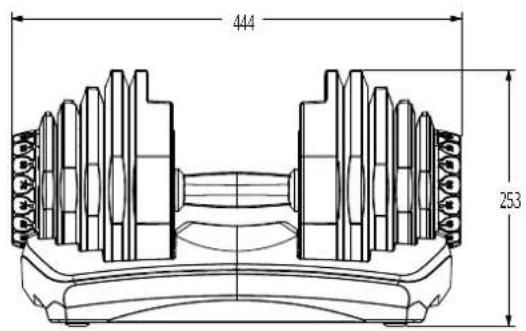
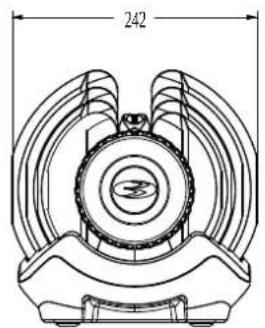
TECH SPECS
| Assembled Dimensions (L x W x H) | 44.4 x 24.2 x 25.3 cm / 17.5" x 9.5" x 10" |
| Product Weight | 41.9 kg / 92.3 lbs. |

From now on, you can assemble your equipment at your convenience. For detailed instructions on assembly, operation, programs, troubleshooting, and maintenance, please scan the QR code on the left side to access the complete manual.
If scanning the QR code fails, you can visit the website provided here: https://global.BowFlex.com/en/manuals.html

For assembly video, please visit:
https://global.BowFlex.com/en/assembly-videos.html
WARRANTY
If your equipment requires warranty service, please contact local Customer Tech Support.

NEED HELP?
If you have any questions, need assistance with missing parts, or require technical support or maintenance for your equipment, please contact Customer Tech Support.
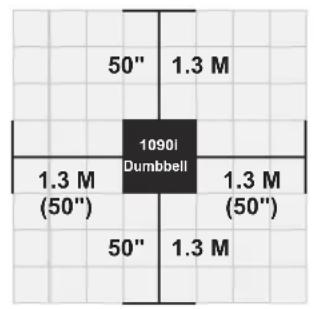
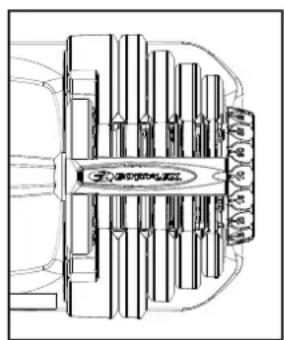
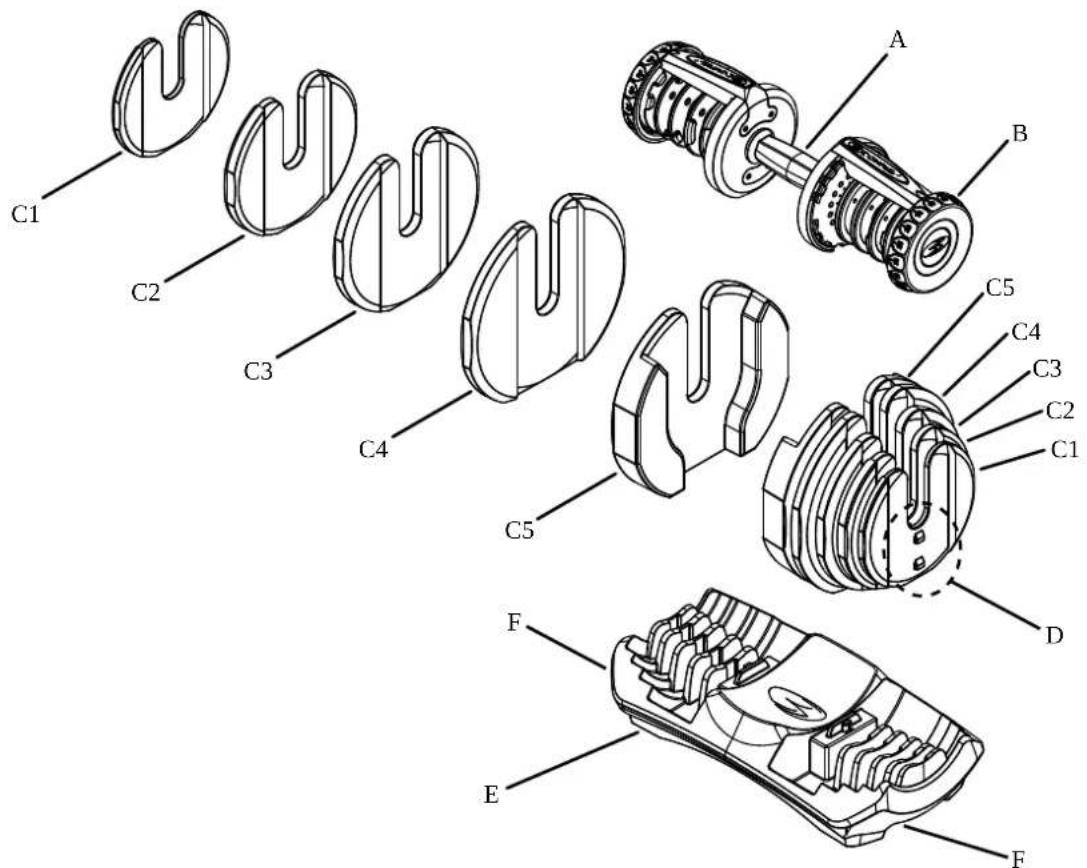
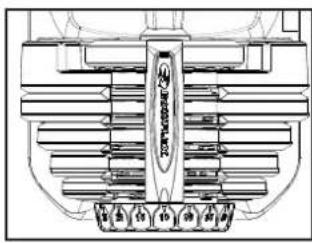
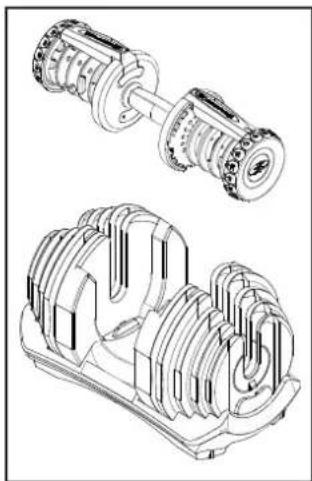
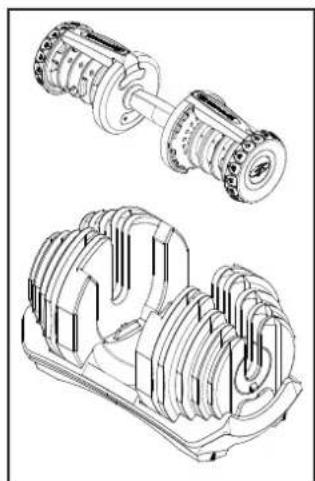
FEATURES
A. HANDLE GRIP
B. ADJUSTMENT KNOB
C. WEIGHT PLATES
1. 2.5 LBS (1.1 KG)
2. 5 LBS (2.3 KG)
3. 7.5 LBS (3.4 KG)
4. 10 LBS (4.5 KG)
5. 15 LBS (6.8 KG)
D. WEIGHT LOCKING TAB
E. BASE
F. LIFTING HANDLE
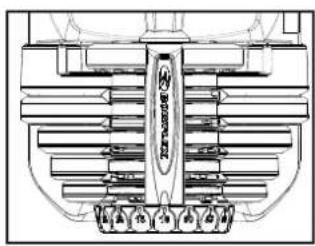
There are 17 weight increments:
| KG 4 | 7 9 11 | 14 16 | 18 20 | 23 25 | 27 30 | 32 34 | 36 39 | 41 | |||||||||
| LBS | 10 15 | 20 25 | 30 35 | 40 45 | 50 55 | 60 65 | 70 75 | 80 85 | 90 |

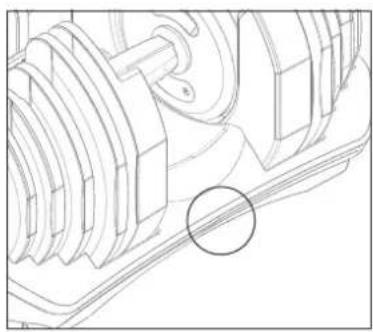
Do not drop the dumbbell. Dropping the dumbbell will damage the weight plates and/or the locking mechanism, and can cause the weight plates to disengage (drop) from the handle without warning. This can cause serious injury, and will void the warranty.
- After removing the dumbbell from its protective packaging, inspect the products and packaging material for any damages.
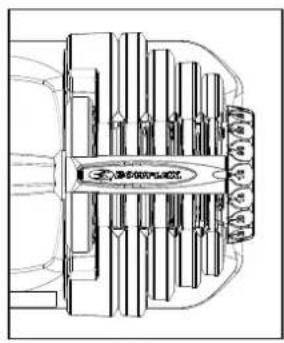
- Push down slightly on the handle assembly to make sure it is fully seated in the base. Rotate each adjustment knob several full rotations to make sure it turns freely in both directions. Make sure there is a click at each weight increment of the adjustment knob. This click will help you locate the proper alignment to select a given weight increment.
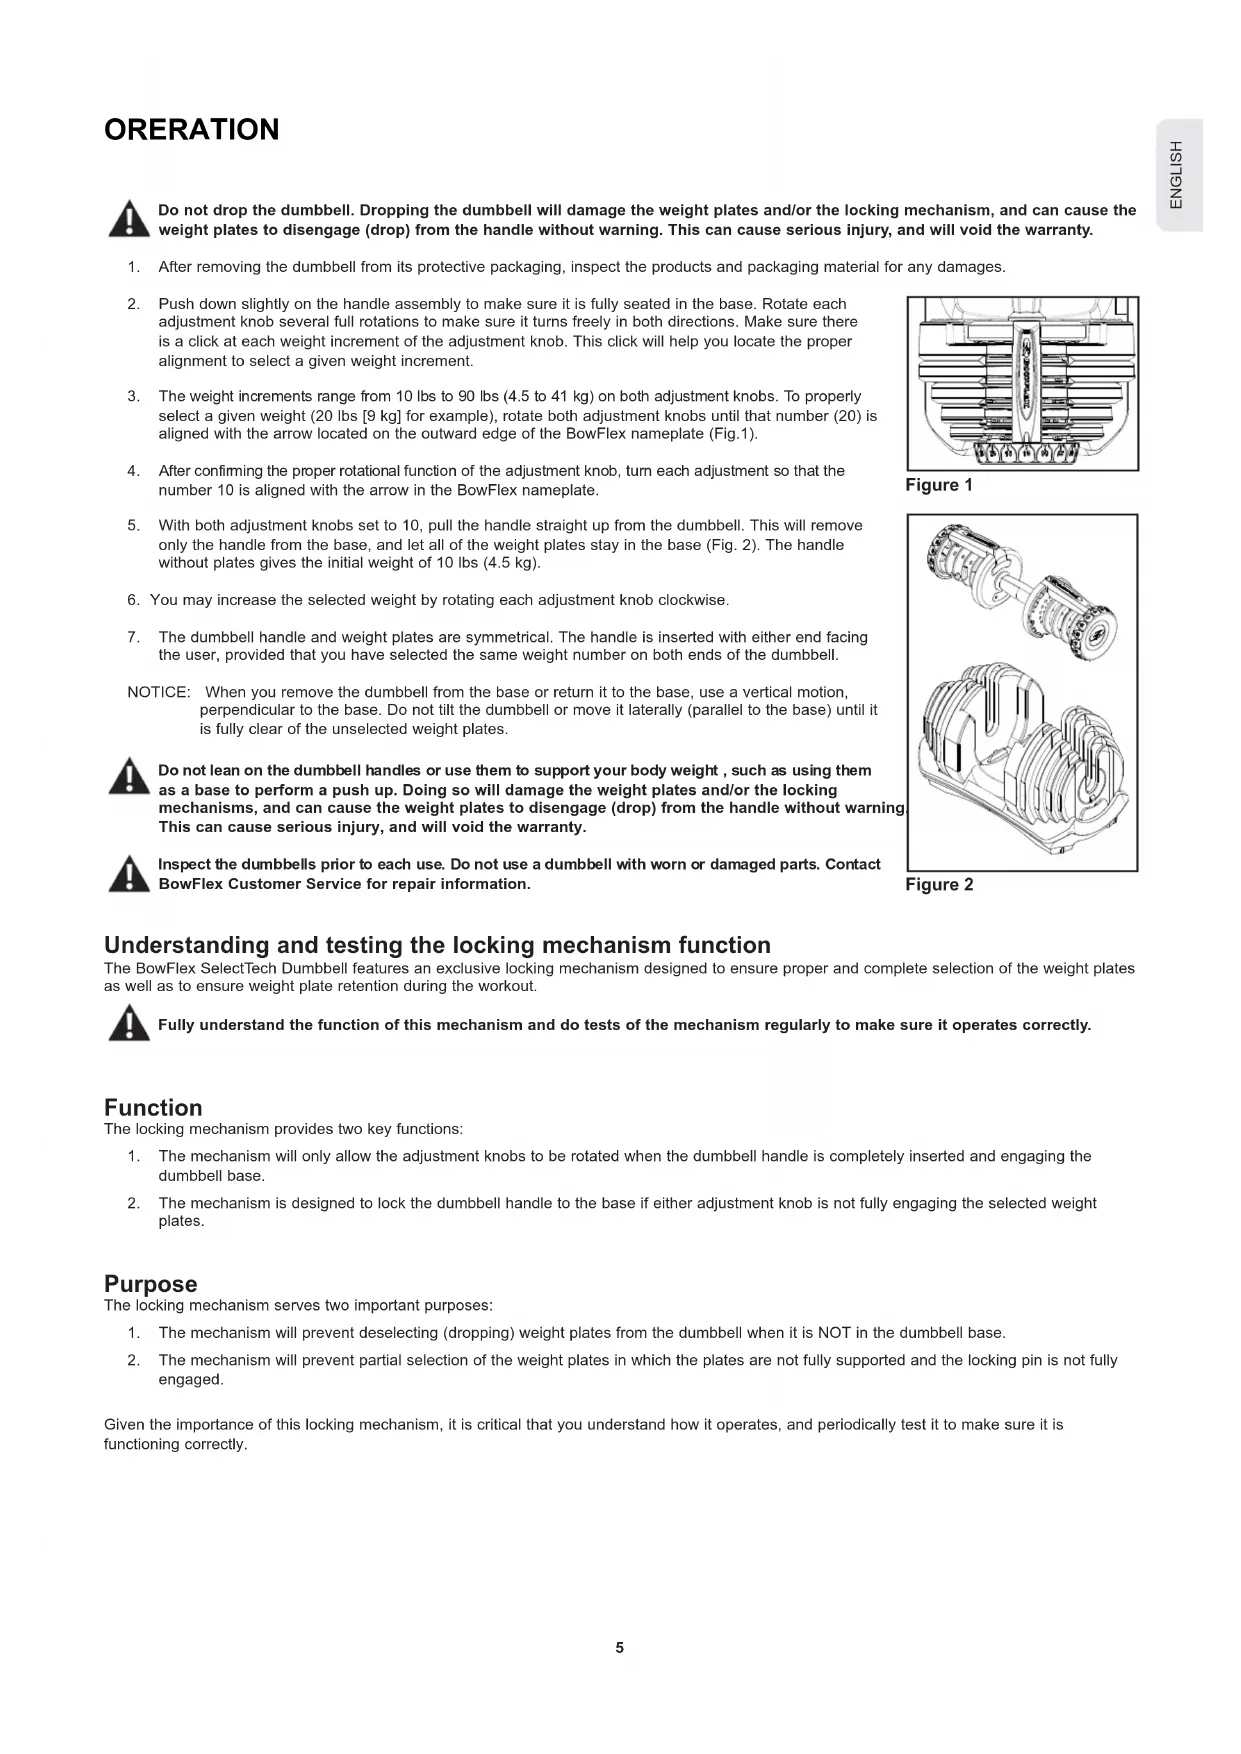
- The weight increments range from 10 lbs to 90 lbs (4.5 to 41 kg) on both adjustment knobs. To properly select a given weight (20 lbs [9 kg] for example), rotate both adjustment knobs until that number (20) is aligned with the arrow located on the outward edge of the BowFlex nameplate (Fig.1).
- After confirming the proper rotational function of the adjustment knob, turn each adjustment so that the number 10 is aligned with the arrow in the BowFlex nameplate.
- With both adjustment knobs set to 10, pull the handle straight up from the dumbbell. This will remove only the handle from the base, and let all of the weight plates stay in the base (Fig. 2). The handle without plates gives the initial weight of 10 lbs (4.5kg)
- You may increase the selected weight by rotating each adjustment knob clockwise.
- The dumbbell handle and weight plates are symmetrical. The handle is inserted with either end facing the user, provided that you have selected the same weight number on both ends of the dumbbell.
NOTICE: When you remove the dumbbell from the base or return it to the base, use a vertical motion, perpendicular to the base. Do not tilt the dumbbell or move it laterally (parallel to the base) until it is fully clear of the unselected weight plates.

Do not lean on the dumbbell handles or use them to support your body weight, such as using them as a base to perform a push up. Doing so will damage the weight plates and/or the locking mechanisms, and can cause the weight plates to disengage (drop) from the handle without warning. This can cause serious injury, and will void the warranty.

Inspect the dumbbells prior to each use. Do not use a dumbbell with worn or damaged parts. Contact BowFlex Customer Service for repair information.
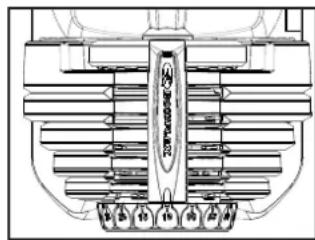
Figure 1
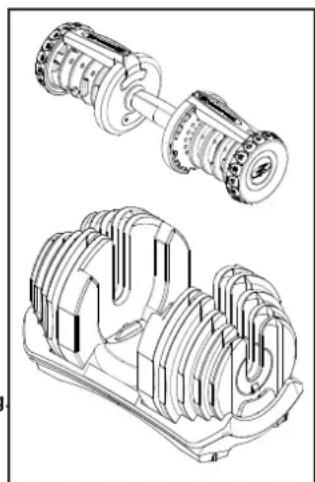
Figure 2
Understanding and testing the locking mechanism function
The BowFlex SelectTech Dumbbell features an exclusive locking mechanism designed to ensure proper and complete selection of the weight plates as well as to ensure weight plate retention during the workout.

Fully understand the function of this mechanism and do tests of the mechanism regularly to make sure it operates correctly.
Function
The locking mechanism provides two key functions:
- The mechanism will only allow the adjustment knobs to be rotated when the dumbbell handle is completely inserted and engaging the dumbbell base.
- The mechanism is designed to lock the dumbbell handle to the base if either adjustment knob is not fully engaging the selected weight plates.
Purpose
The locking mechanism serves two important purposes:
- The mechanism will prevent deselecting (dropping) weight plates from the dumbbell when it is NOT in the dumbbell base.
- The mechanism will prevent partial selection of the weight plates in which the plates are not fully supported and the locking pin is not fully engaged.
Given the importance of this locking mechanism, it is critical that you understand how it operates, and periodically test it to make sure it is functioning correctly.
Testing proper locking mechanism function
- With the dumbbell handle set in the dumbbell base, turn both adjustment knobs to the number 10. You will know you have fully and correctly selected the number when you feel the adjustment knob settle into a notch (known as a detent). You will also hear a slight, but audible, clicking noise that corresponds with the detent locations for each number.
- You should be able to withdraw the handle from the base leaving all the weight plates behind.
- With the handle removed from the base, grab one adjustment knob with your other hand and gently attempt to turn the knob, the knob should not rotate. A locking pin in the mechanism will have engaged the rotational assembly when the unit was withdrawn from the base. Perform this test with all adjustment knobs.

Do not use too much force to try to turn the locked adjustment knob. Too much force can damage the locking mechanism.
- After confirming the proper function of the locking mechanism as described above, return and fully insert the dumbbell handle back into the base assembly.
- With the handle back in the base, turn the adjustment knob on one side to a position that is between the numbers 10 and 15. This represents an incomplete weight selection where the adjustment knob has not fully selected a weight and the knob is in-between the selection detents ( clicks).
- With the selection knob in this improper position, gently attempt to lift up on the handle to remove it from the base. You should find that the handle is locked to the base and cannot be removed with light pressure, as it can normally.
- Return the improperly selected adjustment knob to a full and proper weight selection and assure that the dumbbell handle can once again be removed.
- Repeat this test for all adjustment knobs.
- Assure the entire dumbbell handle assembly is properly tightened. Do this by setting the adjustment knobs to 10 pounds and removing the handle assembly from the base. Grab both adjustment knobs and very slightly push and pull the knobs toward and away from the handle grip. The knobs should not exhibit free play and all of the selection discs should feel tightly connected.
- You have now tested the function of the locking mechanism. We suggest you repeat this test monthly to make sure that the locking mechanism operates correctly.
If the dumbbell locking mechanism operates unsatisfactorily in the test procedure above, do the following:
- Stop use of the product immediately until approved service is available.
- Contact your BowFlex retailer or contact Bowflex directly by phone at 1-800-628-8458 for service.
MAINTENENCE
BowFlex SelectTech Dumbbell maintenance

Equipment must be regularly examined for damage and repairs. The owner is responsible to make sure that regular maintenance is done. Worn or damaged components must be replaced immediately or the equipment removed from service until the repair is made. Only manufacturer supplied components can be used to maintain and repair the equipment.
The BowFlex SelectTech Dumbbell is a very low maintenance product. However, there are steps that you should take to keep the product performing and looking its very best.
- Should your SelectTech Dumbbell handle assembly, plates or base become soiled you may clean them with a cloth lightly dampened with warm water and a small amount of mild soap. Wipe dry with a separate cloth.
- The SelectTech Dumbbell is internally lubricated and will not require further internal lubrication. The contact between weight plates and selection discs is not lubricated but has naturally low friction. This generally will not require any lubrication. Should you feel it necessary to lubricate the weight plates and/or selection discs, use only a silicon lubricant, preferably "food grade".

Do not use any solvents, harsh detergents, chemicals or bleach on this product - doing so may damage the materials, resulting in degradation of the product's performance or strength.
Do not attempt to disassemble the dumbbell handle or base assembly. These items are not designed to be user serviced. Doing so will void the manufacturers warranty. Contact Bowflex directly for service.
TROUBLESHOOTING
| Problem Solution | |
| Dumbbell handle does not fully insert into base when no plates are selected (handle has no plates attached). | Make certain that both adjustment knobs are set directly to the number 5. |
| Dumbbell handle does not fully insert into base when plates are selected (handle has plates attached). | 1. Check to see if you have selected different weights on each side of the dumbbell (for example one adjustment knob is set to 5 and the other is set to 7.5). If this is the case, you must replace the dumbbell in the base with the same orientation from which it was was withdrawn. This is to allow the plates to settle back into the correct and vacant openings in the base.2. Verify that the plates not selected (those plates remaining in the dumbbell base) are in their correct spots and have not been moved to different support slots. This may be blocking the dumbbell from fitting back into the base. |
| Adjustment knob will not turn while handle is in base. | 1. Check to assure that the dumbbell handle is fully depressed into the dumbbell base. If not fully depressed, the locking mechanism will not be released and may prevent the adjustment knobs from rotating.2. Check to see if any weight plates have been put into the base assembly backwards with the "Locking Tab" facing the grip of the dumbbell handle. All weight plates must have the selection tongue facing away from the grip of the dumbbell handle.3. Check to see if there is any dirt, debris or other obstruction in the dumbbell base. You may need to remove the weight plates from the base to accomplish this check. Remember to put each weight plate back in its appropriate location with the selection tongue facing away from the dumbbell grip. |
| Plates are not secured to the handle and drop out. | 1. Confirm that all of the weight plates have the "Locking Tab" facing away from the dumbbell grip. If one or more of the weights are inserted backwards with "Locking Tab" facing inward toward the grip, the handle can get blocked, and the plates may wedge into the handle.2. Verify that the plates not selected (those plates remaining in the dumbbell base) are in their correct spots and have not been moved to different support slots. This may be blocking the dumbbell from fitting back into the base. |
SelectTech Dumbbell locking mechanism test
After replacing any part of your BowFlex SelectTech Dumbbell, be sure to perform the following procedures before using your Dumbbell for any exercises:

This is a functional test of the weight plate locking mechanism.
- With the dumbbell handle set in the dumbbell base, turn both adjustment knobs to the lowest number (Figure 1). You will know you have fully and correctly selected the number when you feel the adjustment knob settle into a notch (known as a detent). You will also hear a slight, but audible, clicking noise that corresponds with the detent locations for each number.
- You should be able to withdraw the handle from the base leaving all the weight plates behind (Figure 2).
- With the handle removed from the base, grab one adjustment knob with your other hand and firmly attempt to turn the knob; the knob should not rotate.
- Place the dumbbell back into the base, and turn the adjustment knob to the next lowest weight setting. Lift the dumbbell from the base approximately 1 inch (2.5 cm).
- With the handle still above the base, grab one adjustment knob with your other hand and firmly attempt to turn the knob; the knob should not rotate. A locking pin in the mechanism will have engaged the rotational assembly when the unit was withdrawn from the base. Perform this test with all adjustment knobs.
- Repeat this test for all weight settings on your dumbbells.

If any of the knobs rotate outside of the cradle, do not use the dumbbell, and contact Bowflex Customer Service.
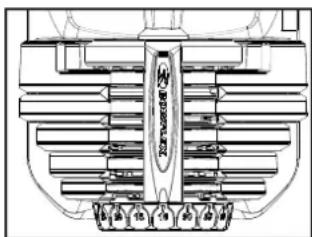
Figure 1
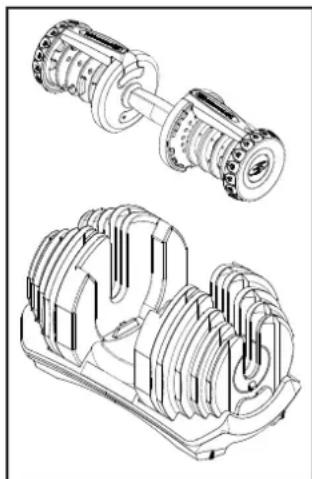
Figure 2
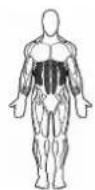
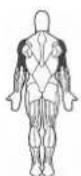
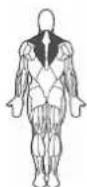
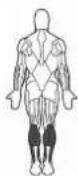
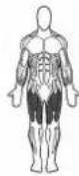
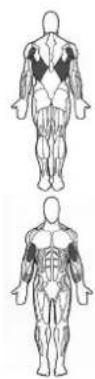
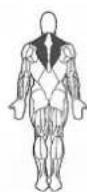
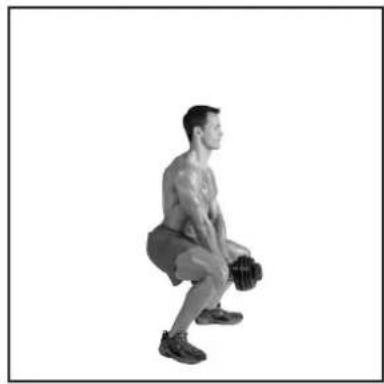
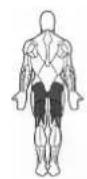
Muscles worked
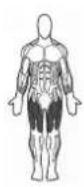
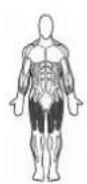
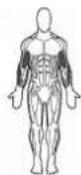
Quadriceps, glutes, hamstrings and adductors
Success tips:
- Keep the knees pointed in the same direction as the toes.
- Keep the head and neck in line with the trunk.
Pay close attention to all alignment and stabilization issues on every part of each and repetition.

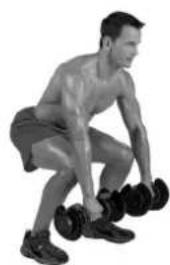
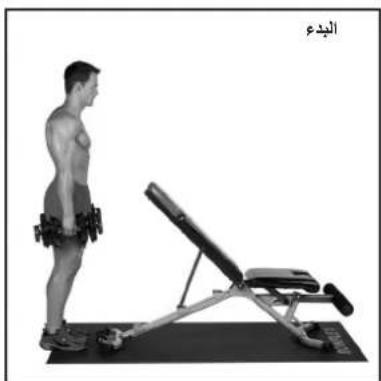
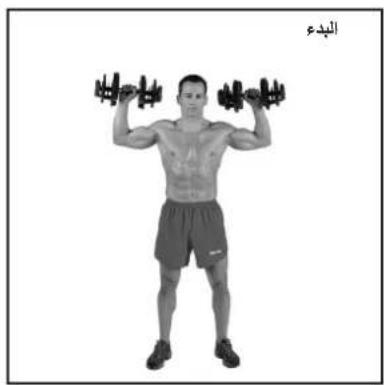
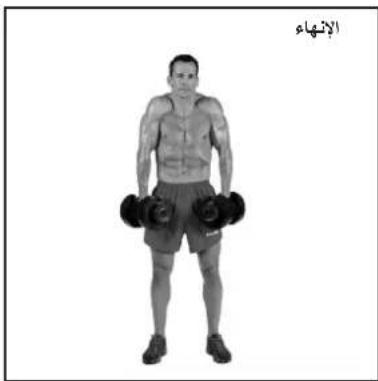
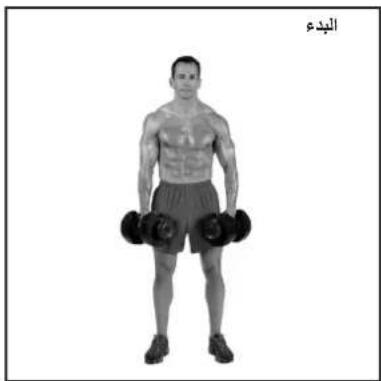
START
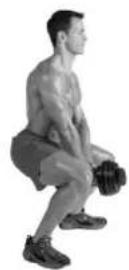
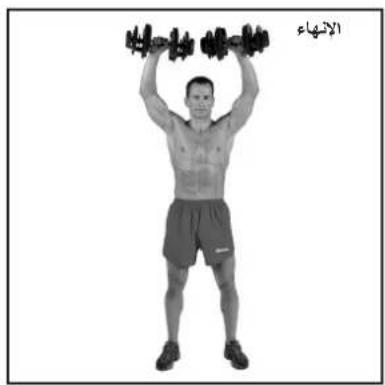
FINISH
START ACTION
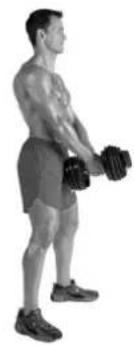
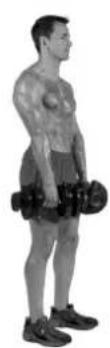
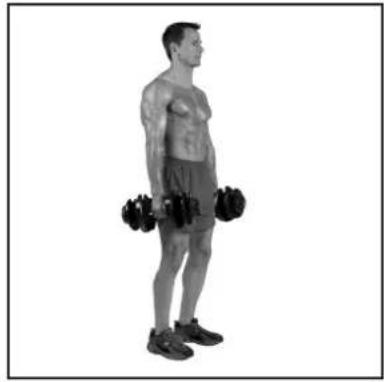
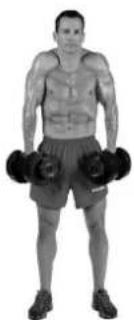
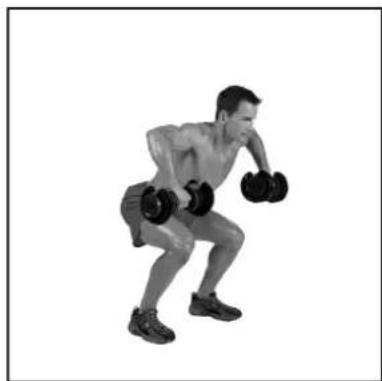
- Grab the dumbbell with both hands and stand with you feet slightly wider than shoulder width apart.
- Slightly rotate your hips outward, feet and knees should be lined up in that outward position as well.
- Stabilize your torso by lifting your chest, tightening your abs and maintaining a slight arch in your lower back.
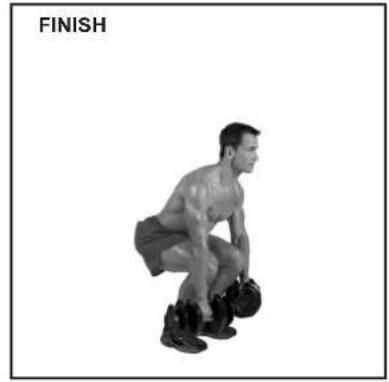
Under control, slowly squat down by sticking the hips back as the knees start to bend.
- Keep the chest up and the back flat as the hips continue to move backward.
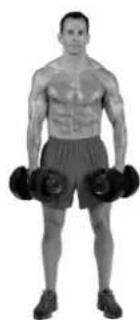
- Lower to approximately 90 degrees at the knees, unless otherwise determined.
- Return to the starting position.
- Do not lockout the knees at the top of the squat.
Calf Raises
Gastrocnemius and soleus
- Do not change your hip or knee position during the exercise.
- Rise up as high as you can, maintaining your balance, on the balls of your feet.
START
ACTION
- Slowly rise up on the balls of your feet, lifting your heels as high as you can off the floor.
- Slowly return to the starting position, keeping tension on the calf muscles.
Note: Optional accessories shown in photos.
- Stand with your feet about shoulder width apart, feet facing straight forward.
- Hold the dumbbells at your sides with your palms facing in.
- Keep your chest lifted, abs tight and a slight curve in your lower back.
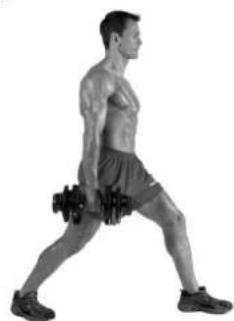
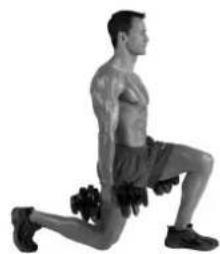
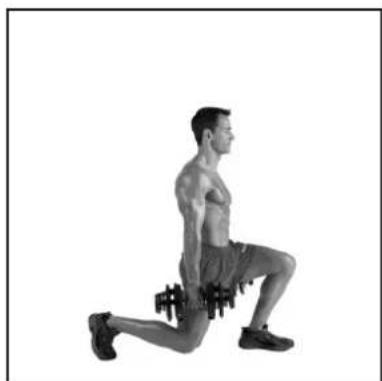
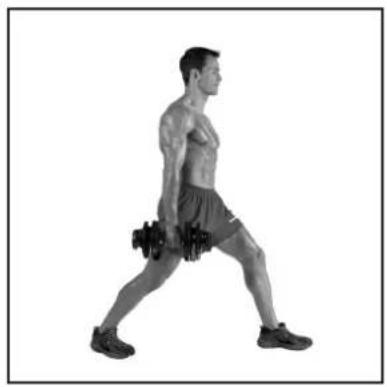
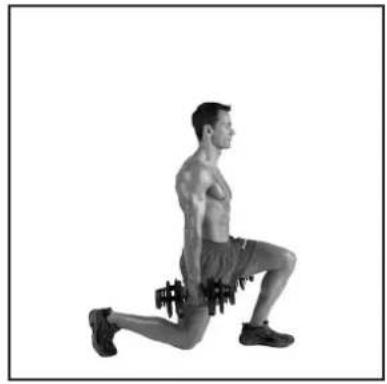
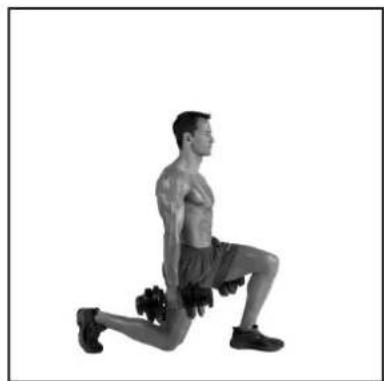
Stationary Lunges
Muscles worked
Quadriceps, glutes, hamstrings and adductors

START
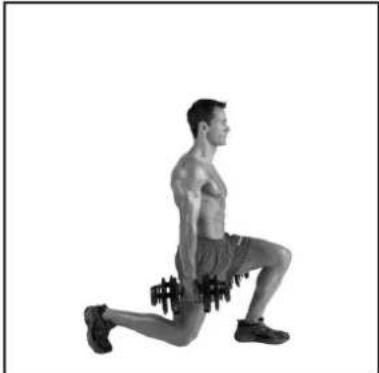
Success tips
- Place feet in a position so that when you lunge down, your front foot is directly under your knee and your back leg lines up under your hip.
- Keep your head and chest lifted, with a slight arch in the lower back during the movement.
- Do only one side to fatigue, then switch to the other side.
START ACTION
- Stand with one foot forward and one foot backward in a position so when you move to the bottom of the lunge, your front foot is under your knee and your back knee is directly under you hip.
- Hold the dumbbells at your sides with your palms facing inward.
-
Keep the chest lifted, abs tight and a slight arch in the lower back.
-
Slowly lower your body bending at both knees, simultaneously keeping the front knee in line with the toes.
- Move down and stop just before the back knee is going to touch the floor.
- Reverse the motion and come back up to the starting position.
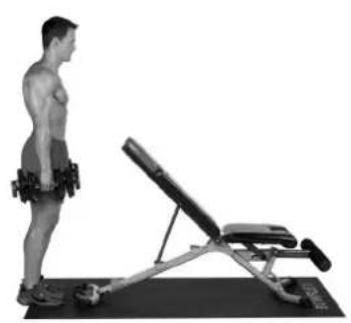
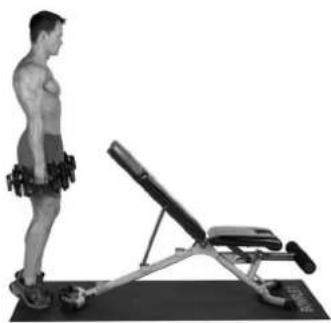
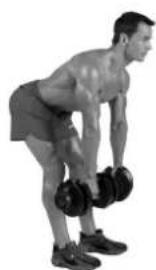
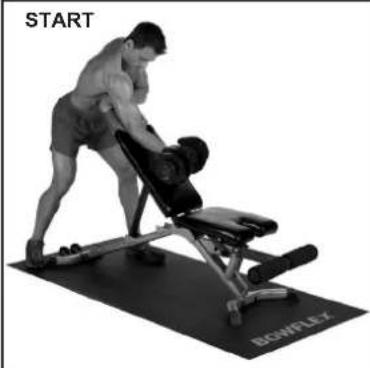
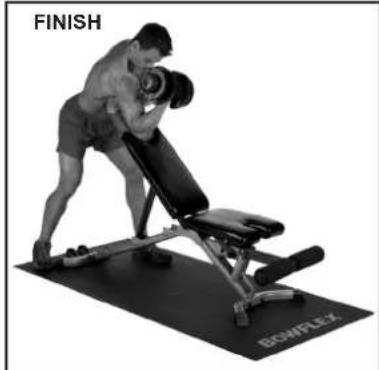
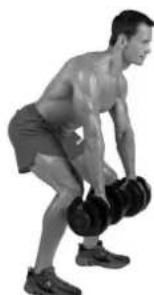
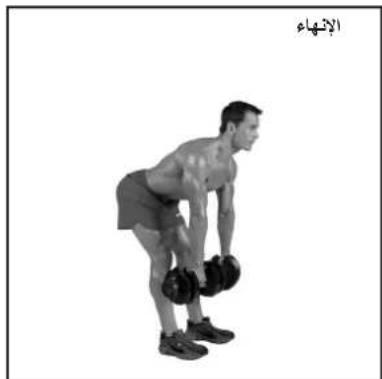
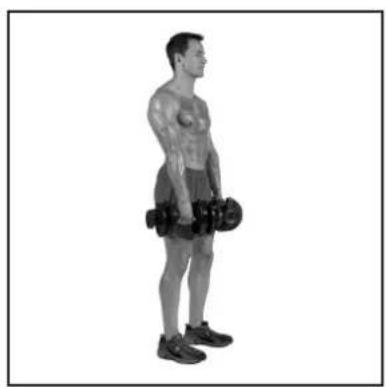
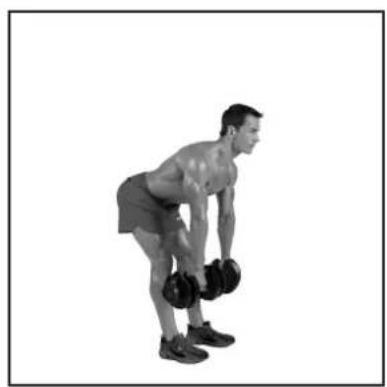
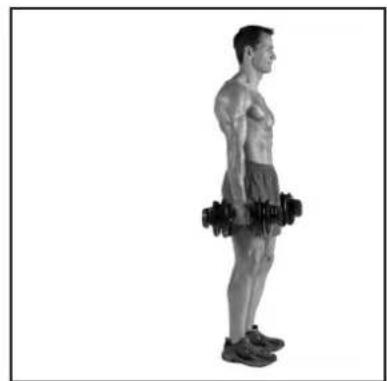
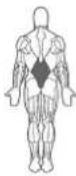
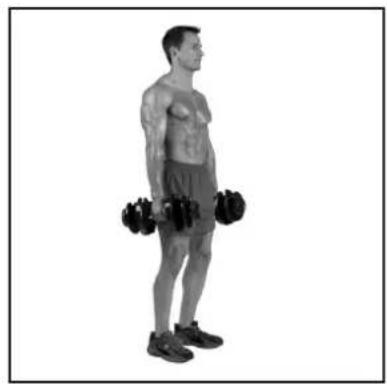
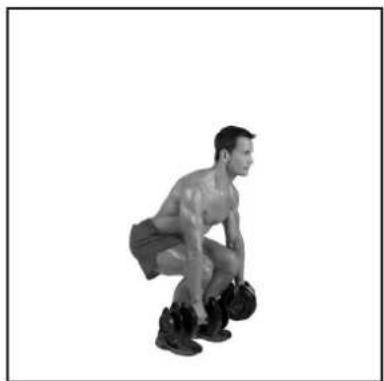
Stiff-leg Dead Lift
Muscles worked
Hamstrings, glutes and spinal erectors
START
FINISH
Success tips
- Your torso should move from standing vertical to leaning forward at the hips without rounding your spine during any part of the movement.
- Keep the knees slightly bent.
Only move as far as you can correctly.
It is critical that you keep the chest lifted and do not allow your spine to round at any time during the movement.
START ACTION
- Stand with your feet approximately shoulder width apart.
- Hold the dumbbells down in front of your thighs with your palms facing back.
- Stand with a very slight bend at the knees.
-
Keep the chest lifted, abs tight and a very slight arch in your lower back.
-
Maintaining your knee position, slowly bend forward at the hips moving your butt backward.
- Stop as your hamstings begin to get taut and before your back begins to round.
Concentrate on tensing your hamstrings to pull you back up to the starting position.
LEG EXERCISES
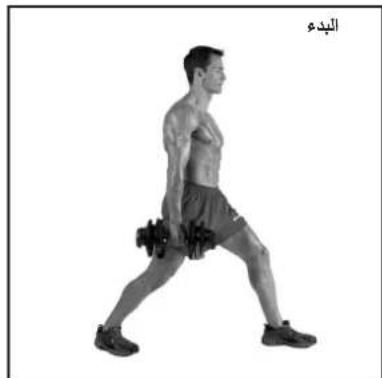
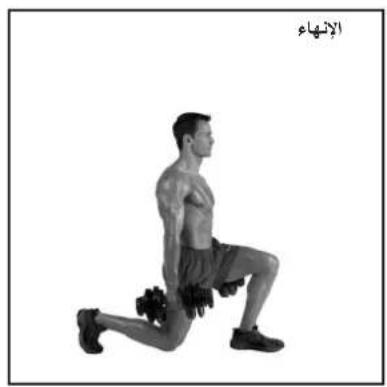
Reverse Lunge
Quadriceps, glutes, hamstrings and adductors
- Place feet in a position so that when you lunge back, your front foot is directly under your knee and your back leg lines up under your hip.
- Keep your head and chest lifted, with a slight arch in the lower back during the movement.
- Do only one side to fatigue and then switch to the other side.
START
FINISH
START ACTION
- Stand with your feet together.
- Hold the dumbbells at your sides with your palms facing inward.
-
Keep the chest lifted, abs tight and a slight arch in the lower back.
-
Initiate the movement by tightening your glutes and slowly pivoting your leg from your hip. Move your entire leg backward, keeping your knee steady at a 90 degree angle.
- Slowly move your leg as far as you can, without allowing any movement at the waist, knee or lower back.
- Slowly return to start position.
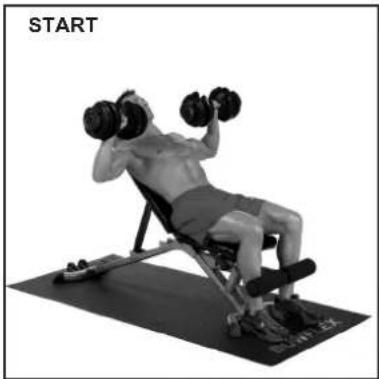
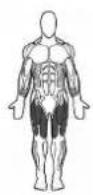
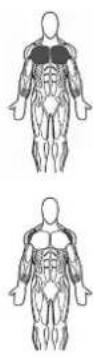
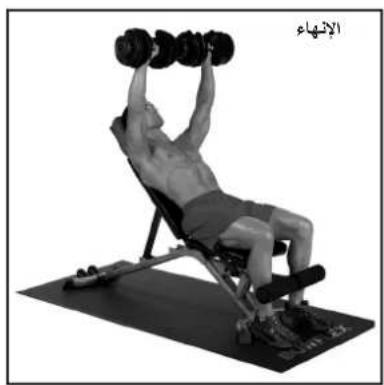
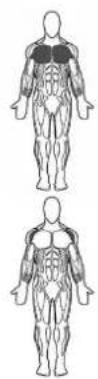
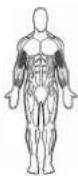
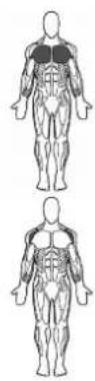
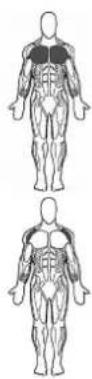
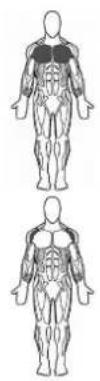
CHEST EXERCISES
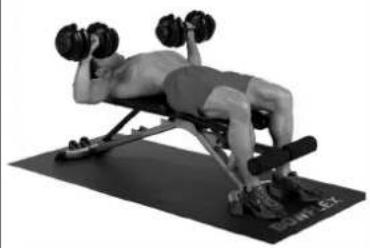
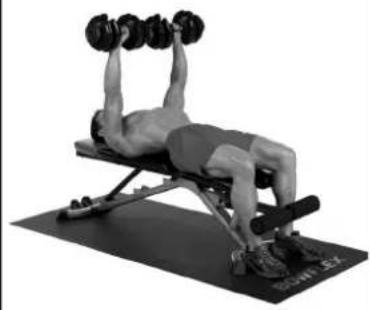
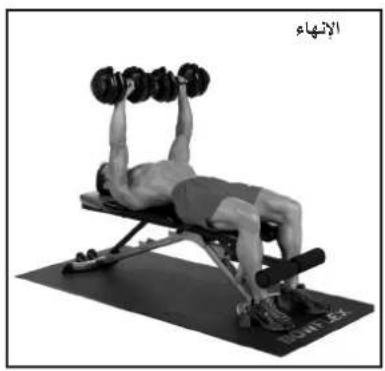
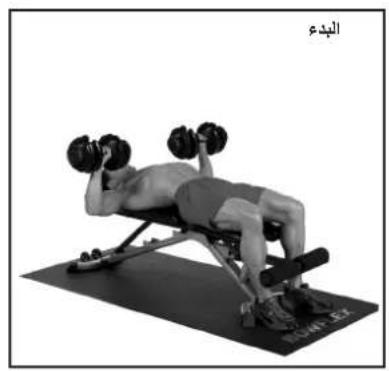
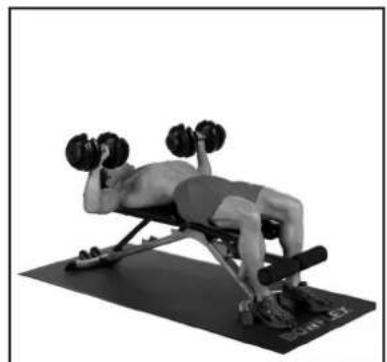
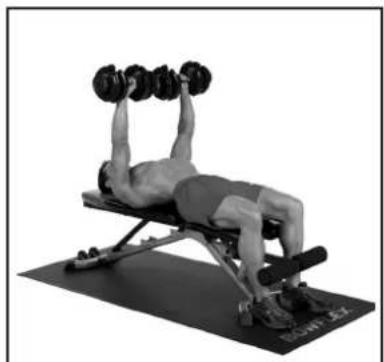
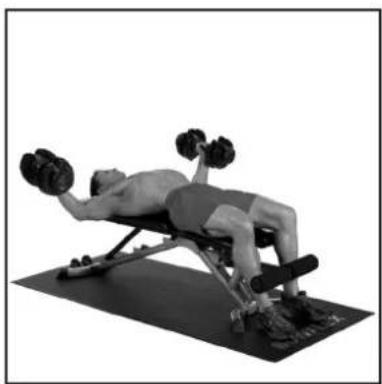
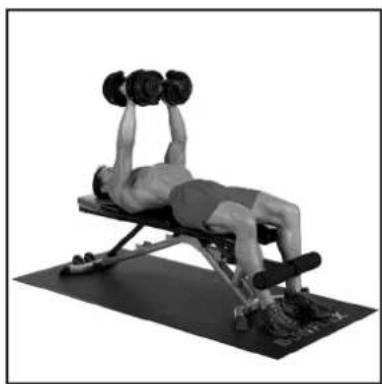
Flat Chest Press
Muscles worked
Pectoralis major, deltoids and triceps
Bench position
Flat
Success tips
- Maintain a 60-90 degree angle between your upper arms and torso at the start of the motion, and a 90 degree angle from your torso at the top.
- Keep knees bent so your feet are positioned flat on the floor directly under your knees.
- Do not let your elbows travel behind your shoulders when you are lowering the dumbbells.
- Keep shoulder blades pinched together and maintain good spinal alignment.

START
FINISH
START ACTION
- Grab the dumbbells and lie back on the bench.
- Bend your elbows back keeping your arms at approximately 60-90 degrees away from your sides, and your elbows equal to your shoulder.
- Keep your arms directly in line with the dumbbell, over your wrists and elbows.
- Raise your chest, pinch your shoulder blades together and maintain a comfortable arch in your lower back.
Slowly press the dumbbells upward, straightening your arms while moving the dumbbells toward each other, directly over the center of your chest.
- Don't lock out your elbows, keep the tension on the chest.
- Slowly return to the starting position, keeping your wrists steady and your movements slow and controlled.
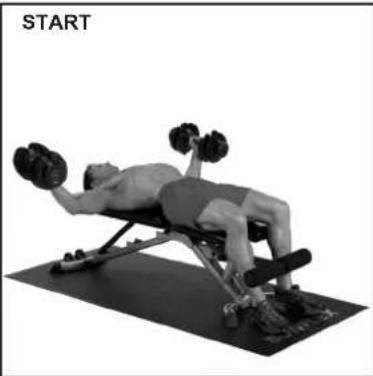
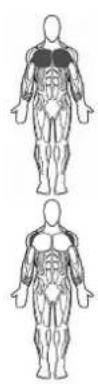
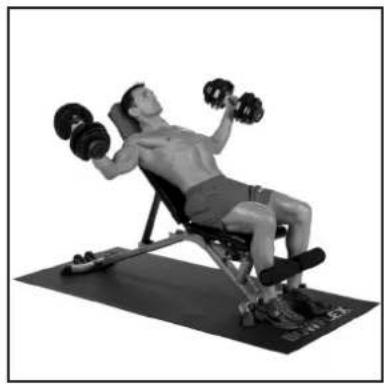
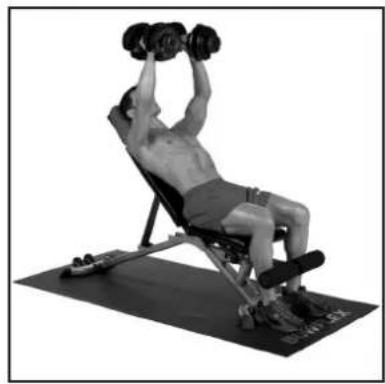
Incline Chest Press
Muscles worked
Pectoralis major, deltoids and triceps
Bench position
Inclined to 45 degrees
Success tips
- Maintain a 60-90 degree angle between your upper arms and torso at the start of the motion and slightly more than 90 degrees from your torso at the top.
- Keep knees bent so your feet are positioned flat on the floor directly under your knees.
- Do not let your elbows travel behind your shoulders when you are lowering the dumbbells.
- Keep shoulder blades pinched together and maintain good spinal alignment.
- Keep your arms directly in line with the dumbbell over your wrists and elbows.
START ACTION
- Grab the dumbbells and lie back on the bench.
- Bend your elbows back, keeping your arms at approximately 60-90 degrees away from your sides, and your elbows equal to your shoulder.
-
Raise your chest, pinch your shoulder blades together and maintain a comfortable arch in your lower back.
-
Slowly press the dumbbells upward, straightening your arms while moving the dumbbells toward each other, directly over the center of your chest.
- Don't lock out your elbows, keep the tension on the chest.
- Slowly return to the starting position, keeping your wrists steady and your movements slow and controlled.
Flat Chest Fly
Pectoralis major and deltoids Flat
- Maintain a 60-90 degree angle between your upper arms and torso at the start of the motion, and slightly more than 90 degrees from your torso at the top.
- Keep knees bent so your feet are positioned flat on the floor directly under your knees.
- Do not let your elbows travel behind your shoulders when you are lowering the dumbbells.
- Keep shoulder blades pinched together and maintain good spinal alignment.
START ACTION
- Grab the dumbbells and lie back on the bench.
- Rotate your upper arms away from your torso so that your elbows and palms are pointing upward.
- Maintain a slight bend at the elbow and stabilize your wrist in a neutral position.
-
Raise your chest, pinch your shoulder blades together and maintain a comfortable arch in your lower back.
-
Slowly move the dumbbells forward, then upward, keeping your arms stable at the elbow, while moving the dumbbells toward each other directly over the center of your chest.
- Keep the tension on the chest throughout the movement.
- Slowly return to the starting position, keeping your wrists steady and your movement slow and controlled.
CHEST EXERCISES
Muscles worked
Pectoralis major and deltoid
Bench position
Inclined 45 degrees

START ACTION
Success tips
- Maintain a 60-90 degree angle between your upper arms and torso at the start of the motion, and slightly more than 90 degrees from your torso at the top.
- Keep knees bent so your feet are positioned flat on the floor directly under your knees.
- Do not let your elbows travel behind your shoulders when you are lowering the dumbbells.
-
Keep shoulder blades pinched together and maintain good spinal alignment.
-
Grab the dumbbells and lie back on the bench.
- Rotate your upper arms away from your torso so that your elbows and palms are pointing upward.
- Maintain a slight bend at the elbow and stabilize your wrist in a neutral position.
- Raise your chest, pinch your shoulder blades together and maintain a comfortable arch in your lower back.
Slowly move the dumbbells forward, then upward, keeping your arms stable at the elbow. Move the dumbbells toward each other directly over the center of your upper chest.
- Keep the tension on the chest throughout the movement.
- Slowly return to the starting position.
Decline Chest Press
Muscles worked
Pectoralis major, deltoids and triceps
Bench position
Declined
START
FINISH
START ACTION
Success tips
- Maintain a 60-90 degree angle between your upper arms and torso at the start of the motion, and 90 degree angle from your torso at the top.
- Keep knees bent so your feet are positioned flat on the floor directly under your knees.
- Do not let your elbows travel behind your shoulders when you are lowering the dumbbells.
- Keep shoulder blades pinched together and maintain good spinal alignment.
-
Keep your arms directly in line with the dumbbell over your wrists and elbows.
-
Grab the dumbbells and lie back on the bench.
- Bend your elbows back, keeping your arms at approximately 60-90 degrees away from your sides, and your elbows equal to your shoulder.
-
Raise your chest, pinch your shoulder blades together and maintain a comfortable arch in your lower back.
-
Slowly press the dumbbells upward, straightening your arms while moving the dumbbells toward each other, directly over the center of your chest.
- Don't lock out your elbows, keep the tension on the chest.
- Slowly return to the starting position, keeping your wrists steady and your movements slow and controlled.
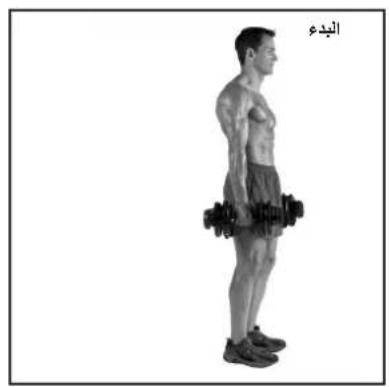
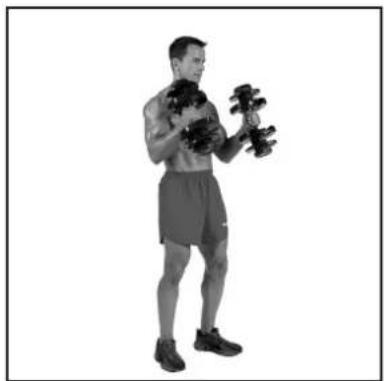
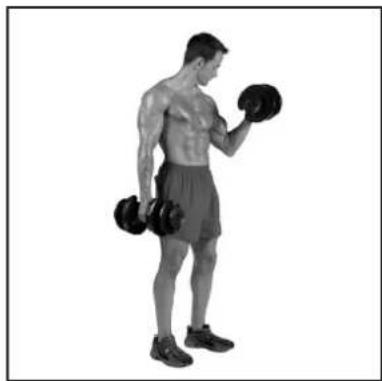
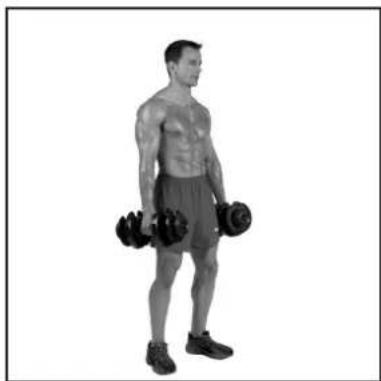
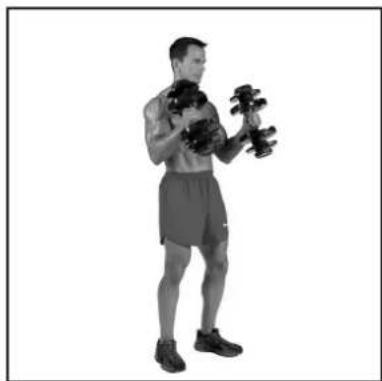
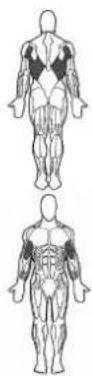
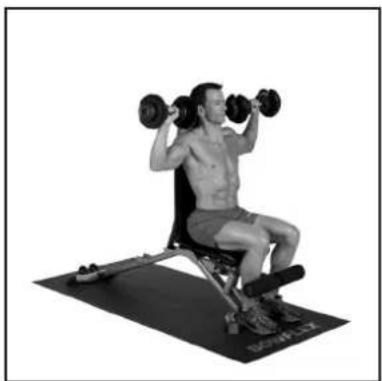
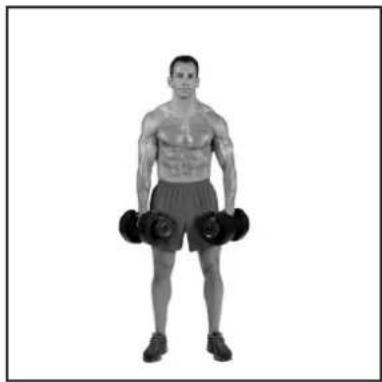
Standing Curls
Muscles worked
Biceps and other elbow flexors
Success tips
- Keep elbows at your sides.
- Keep your wrists straight.
- Keep your trunk muscles tight and maintain a very slight arch in your lower back.


START
- Hold the dumbbells with your hands facing forward.
-
Stand with your upper arms by your sides, lift your chest, tighten your abdominals and maintain a very slight arch in your lower back.
-
Curl the dumbbells forward, then upward, and then toward your shoulders while keeping your elbows at your sides and your upper arms completely still.
- Slowly lower to the starting position by performing the same arcing motion.
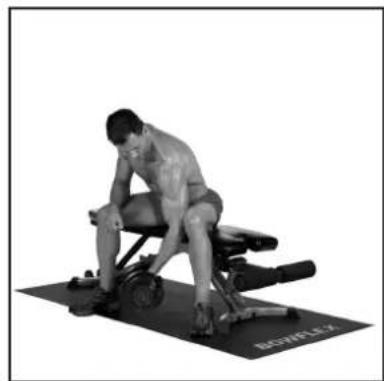
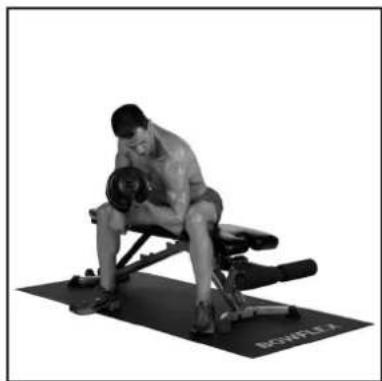
Concentration Curls
Muscles worked
Biceps and other elbow flexors
Bench position
Flat

START
FINISH
Success tips
- Do not rock the upper body while bending the elbow.
- Keep your wrist straight.
- Keep your chest lifted, trunk muscles tight and maintain a very slight arch in your lower back.
START ACTION
- Sit on the bench sideways and place your feet flat on the floor slightly wider than shoulder width.
- Grab the dumbbell and rest the back of your upper arm against the inside of your leg just above the knee.
The arm holding the dumbbell should be slightly bent maintaining tension on the biceps. -
Maintain a good spinal alignment.
-
Curl the forearm toward the upper arm, keeping your upper arm and shoulder blade completely still.
- Slowly return to the starting position without relaxing the biceps.
ARM EXERCISES
Incline Bench Curls
Muscles worked
Biceps and other elbow flexors
Bench position
Inclined to 45 degrees

START
FINISH
Success tips
- Keep tension on the biceps throughout the movement, don't allow the arm to go to full extension.
- Keep your wrist straight.
-
Keep your chest lifted, trunk muscles tight and maintain a very slight arch in your lower back.
-
Grab the dumbbells and sit on the inclined bench and place your feet flat on the floor directly under your knees.
- Hold the dumbbell with a slight bend at the elbow maintaining tension on the biceps.
- Maintain a good spinal alignment with the chest lifted and the abs tight.
ACTION
- Curl the forearms toward the upper arm, keeping your upper arm and shoulder blade completely still.
- Slowly return to the starting position without relaxing the biceps.
Scott Curls - Standing Concentration Curls
Biceps and other elbow flexors Inclined to 60 degrees
- Do not rock the upper body while bending the elbow.
- Keep your wrist straight.
- Keep your chest lifted, trunk muscles tight and maintain a very slight arch in your lower back.
- Stop the arm motion at the top of the movement slightly before your arm is straight up.
- Keep feet slightly wider than shoulder width.
- Grab the dumbbell and rest the back of your upper arm against the upper portion of the bench pad.
- The arm holding the dumbbell should be slightly bent maintaining tension on the biceps.
- Place the other arm between the bench and the upper arm.
- Maintain a good spinal alignment.
ACTION
- Curl the forearm toward the upper arm, keeping your upper arm and shoulder blade completely still.
- Slowly return to the starting position without relaxing the biceps.
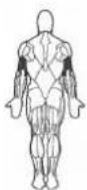
Overhead Triceps Extension
Muscles Worked
Triceps
START
FINISH
Success tips
- Keep your knees slightly bent with your feet approximately shoulder width apart.
- Keep your chest lifted, shoulders pinched together and a very slight arch in your lower back.
- Keep your upper arms and shoulders motionless and your wrists straight.
- Tighten your triceps throughout the exercise, using a controlled motion.
START ACTION
- Stand with your knees slightly bent and feet shoulder width apart.
- Place both hands over the inside edge of one side of the dumbbell weights.
-
Bring the arms up over your head with an approximate 90 bend at the elbow.
-
Keeping your upper arms stable, slowly straighten your elbows moving your arms in a arcing motion upward, over your head.
- Stop the motion before your arms are completely straight, and then reverse the motion, slowing returning to the starting position, keeping tension on the muscle.
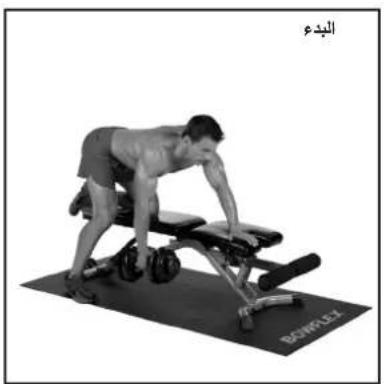
Muscles Worked
Triceps
Bench position
Flat
START
FINISH
Success tips
- Maintain spinal alignment.
- Keep your arm at your side and your wrist straight throughout the entire motion.
- Tighten your triceps throughout the exercise and control the motion.
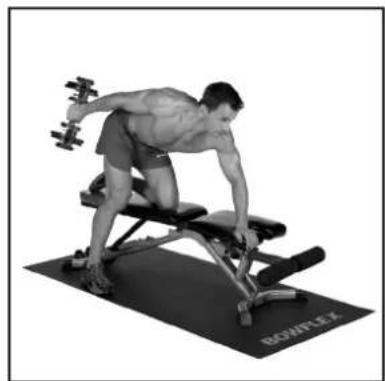
START ACTION
- Kneel with one leg on the bench, bend forward at the hips and place one hand on the bench.
Support yourself with one arm on the bench and hold the dumbbell with the other with your palm facing in. -
Keeping your elbow bent, bring your upper arm to your side, parallel to the ground.
-
Straighten the elbow while keeping your upper arm completely still.
- When the arm is completely straight, slowly return to the starting position.
ARM EXERCISES
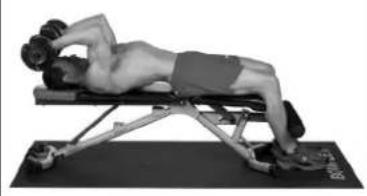
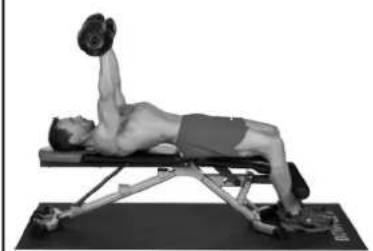
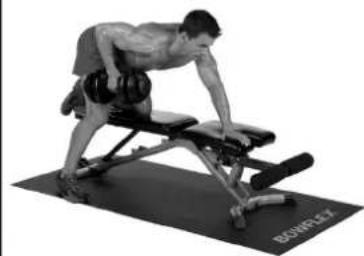
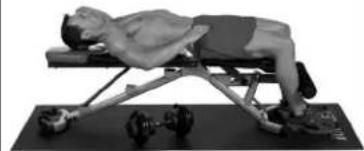
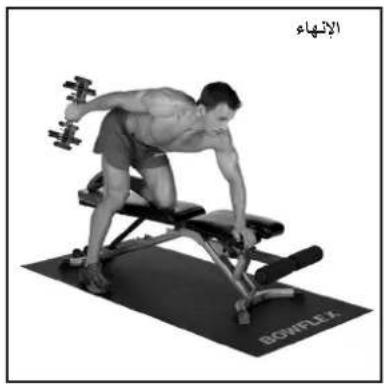
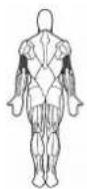
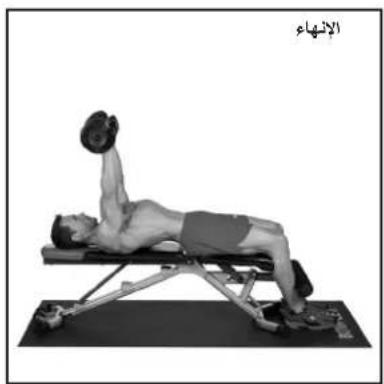
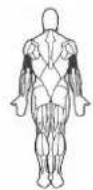
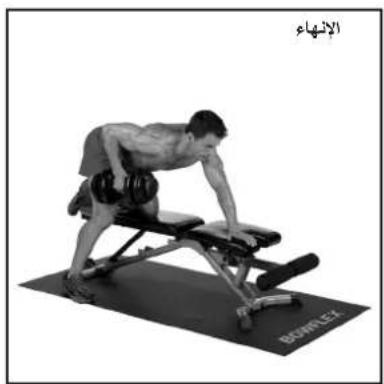
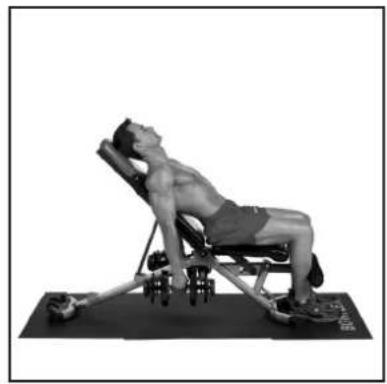
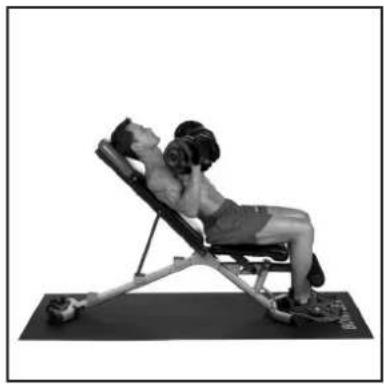
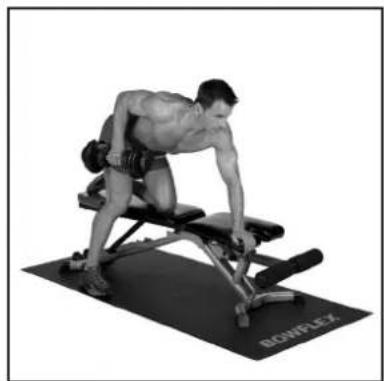
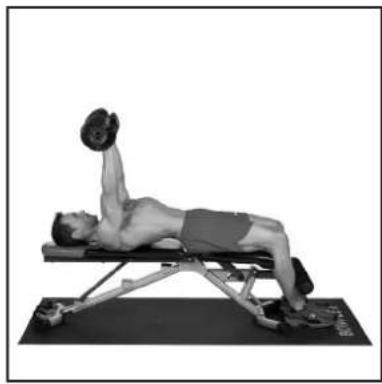
Lying Triceps Extension
Muscles worked
Triceps
Bench position
Flat
START
FINISH
Success tips
- Keep the upper arm motionless.
- Keep the wrists straight.
- Tighten your triceps throughout the exercise and control the motion all the way down.
-
Keep the knees bend and the feet planted on the floor directly under your knees.
-
Lie back on the bench with your head supported on the bench.
- Grab the dumbbells and move your upper arm up to a position that your elbow is facing upward and your hands holding the dumbbells are just over your forehead.
- Raise your chest and pinch your shoulder blades together.
- Maintain a very slight arch in the lower back.
ACTION
- Keep the upper arms stationary while moving the hands in an arcing motion upward.
- Stop the motion slightly before locking out the elbows. Do not lock out the elbow!
- Slowly reverse the arcing motion back to the starting position.
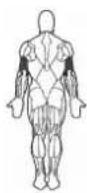
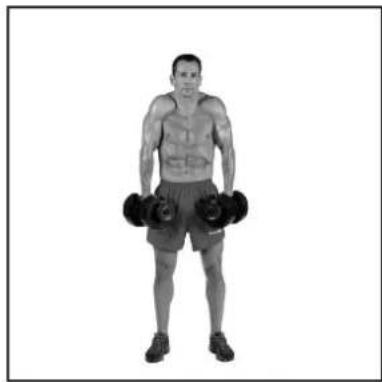
Biceps, brachioradialis and brachialis
- Keep the upper arms motionless and your wrists straight throughout the entire exercise.
- Keep the chest lifted, spine straight and a slight arch in the low back.
START
START ACTION
- Stand with your feet shoulder width apart and knees slightly bent.
- Grab the dumbbells with your palms facing inward toward each other.
-
Stabilize the hips, knees and spine.
-
Curl the dumbbells forward, then upward, then in toward the shoulder, keeping the upper arm completely motionless.
- Keep the palms facing in without rotating the lower arm.
- Slowly move back to the starting position.
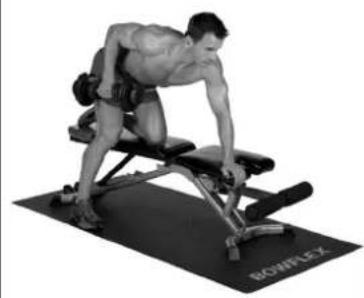
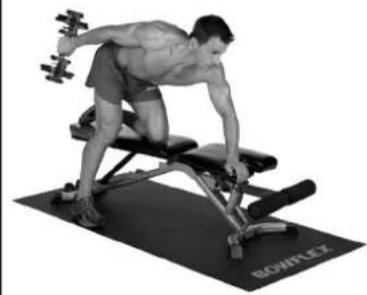
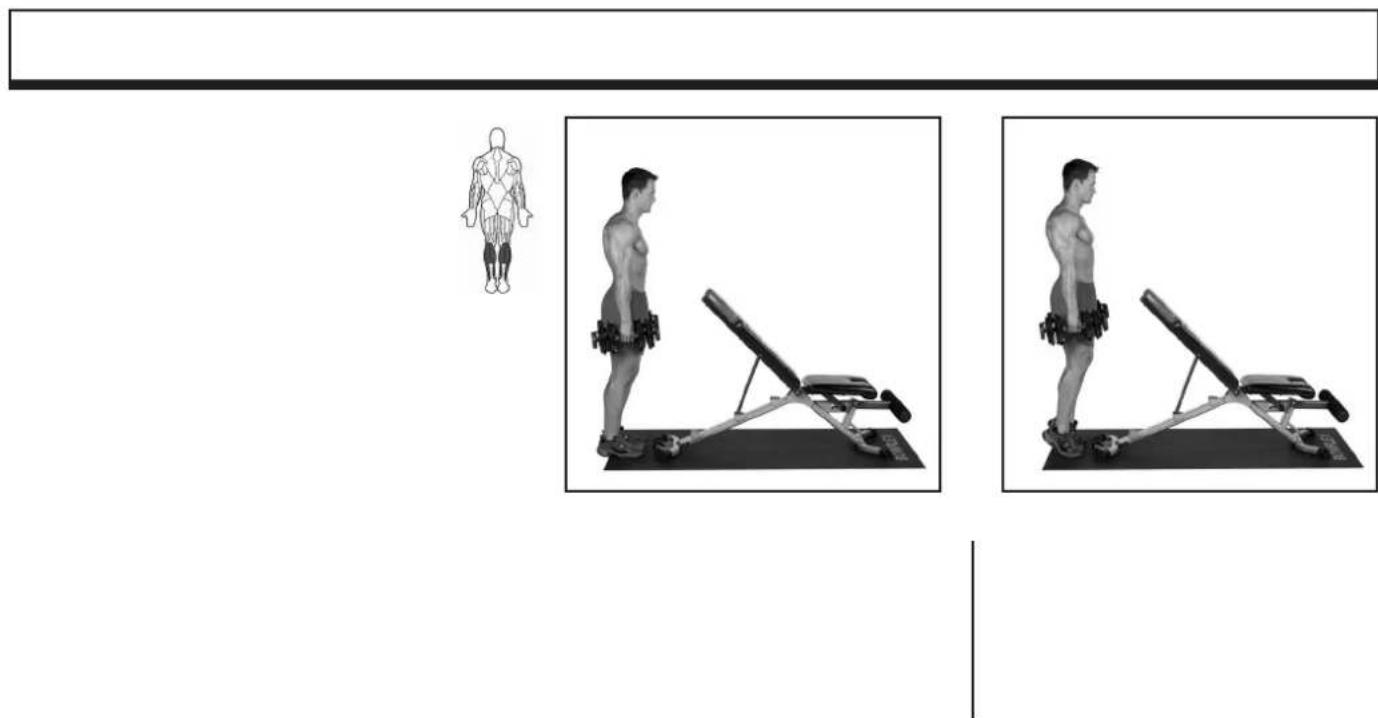
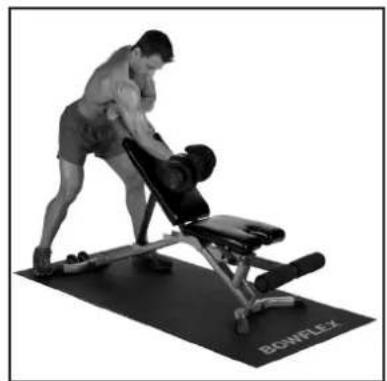
Single Arm Row — Alternating Rows
Muscles Worked
Latissimus Dorsi, teres minor, postier deltoid and biceps
Bench position
Flat
START
FINISH
Success tips
- Stabilize your body in position so the effort is focused on your lat as you lead the movement with extending your elbow upward.
- Keep the dumbbell lined up directly under your wrist and elbow when doing the movement.
- Keep your spine aligned, abs tight and a slight arch in your lower back.
- Do not let your spine rotate side to side, keep the shoulder at equal height during the movement.
START ACTION
- Put one knee on the bench and place the other foot on the floor directly under your hip.
- Place free hand on the bench slightly in front of you in a position that allows you to stabilize your upper body.
- Allow the arm with the dumbbell to hang straight down, while maintaining control of your back and shoulder.
-
Hold dumbbell in a neutral grip with your palm facing the bench.
-
Initiate the movement by pinching your shoulder blades back, while simultaneously moving your elbow backward, then upward.
- Continue moving the elbow up, slightly above the height of your trunk while keeping the forearm lined up under the elbow.
While controlling the resistance, lower the arm back to the starting position letting the shoulder blade slide forward without slouching.
Wide Rows
Muscles worked
Rear deltoid, rear portion of the middle deltoid, postier rotator cuff, upper lats and teres minor
START
FINISH
Success tips
- Place the feet in a comfortable shoulder width position.
- Keep the chest lifted, abs tight and a very slight arch in the lower back.
- Lean forward slightly at the hip while keeping the upper body in alignment
- Your forearms should always point in the direction of the dumbbells.
START ACTION
While standing holding the dumbbells, lean forward at the hip allowing the arms to extend directly in line with the resistance.
- Keep your spine in a stable position.
- Rotate the shoulder so that you palms are facing behind you.
- Allow your arms to bend as you go, move your elbows outward and backward keeping a 70-90 degree angle between your upper arms and your torso.
- Move until your elbows are slightly behind your shoulders, then slowly reverse the action keeping the rear shoulder muscles tightened during the entire motion.
BACK EXERCISESBACK EXERCISES
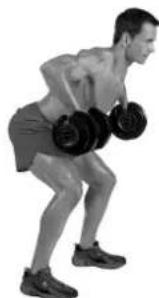
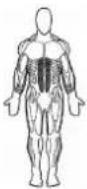
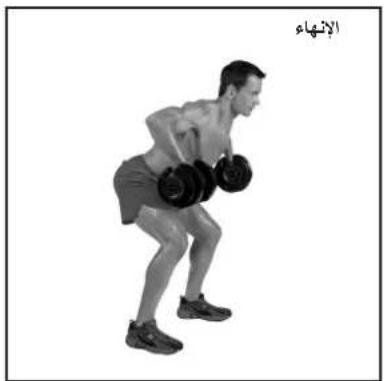
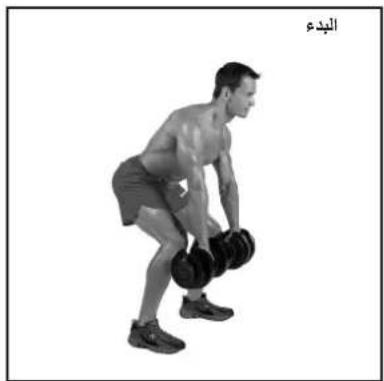
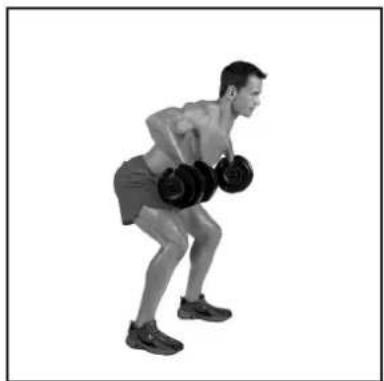
Dead Lifts
Muscles worked
Glutes, adductors, hamstrings, quads, spinal erectors and traps
Success tips
- Keep knees pointed in the same direction as the feet.
- Keep head and neck in line with the trunk.
- Pay close attention to all the alignment and stabilization issues on every part of each repetition.
- Keep pressure through the middle of the arches/feet, not the toes or heels.

START ACTION
- Position your feet in line with the dumbbell about shoulder width apart.
- Point your toes outward slightly and direct the thighs to the same outward angle as the feet.
- Hold the dumbbells with your palms facing backward.
Under control, slowly squat down by sticking the hips out as the knees start to bend.
- Keep the chest lifted and back flat as the hips continue to move backward.
- Lower to approximately a 90^ bend at the knees, unless otherwise determined.
- Move back to the starting position, keeping the chest lifted while moving the hips forward and extending the knee.
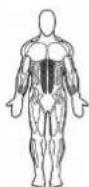
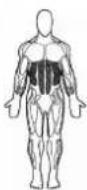
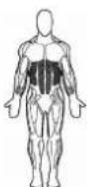
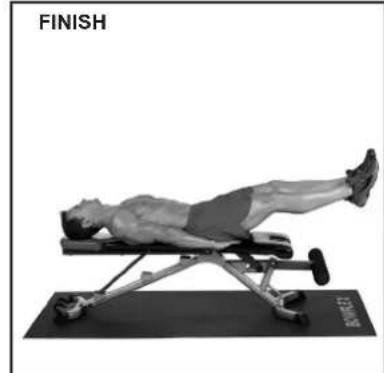
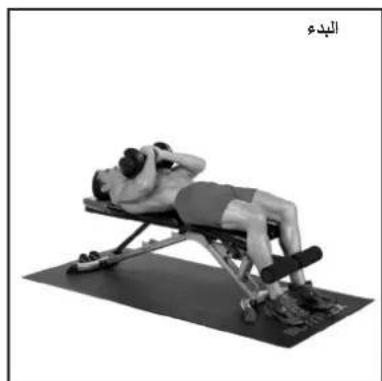
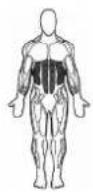
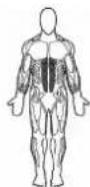
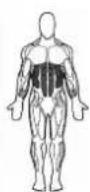
ABDOMINAL EXERCISES
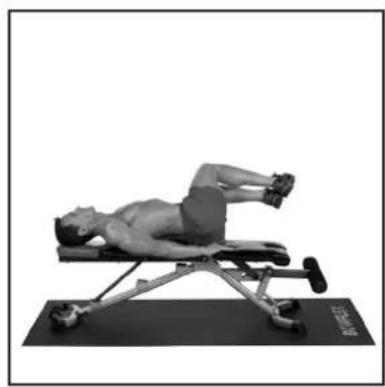
Ab Crunch
Muscles worked
Rectus abdominus and obliques
Bench position
Flat
START
FINISH
START ACTION
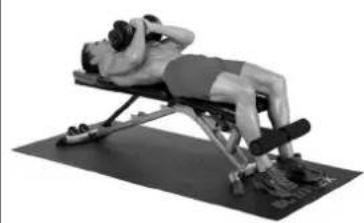
- Grab a dumbbell with both hands, as shown.
- Lie flat on the bench holding the dumbbell over your upper chest.
- Place your legs behind the roller pads, as shown, for added support, with your feet flat on the floor.
-
Your lower back can start out flat or in a normal arch.
-
Tighten your abs and only curl your torso, slowly moving your lower ribs toward your hips.
- Move as far as you can without moving the hips and neck.
The lower back should not lose contact with the bench when fully crunched. - Slowly reverse the action, returning to the start position keeping tension on the abs throughout the movement.
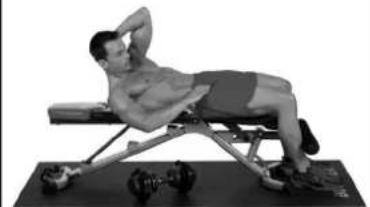
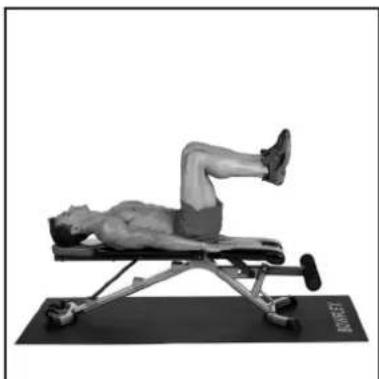
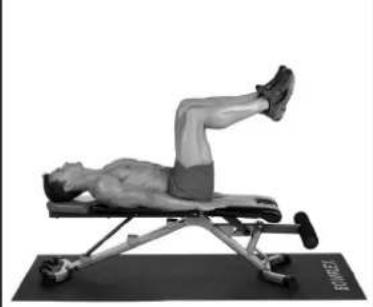
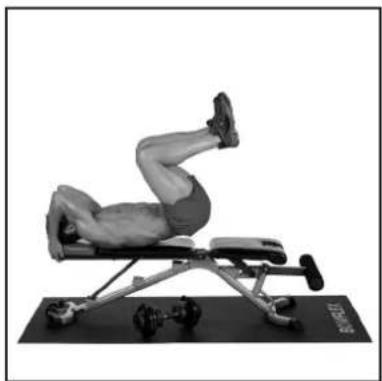
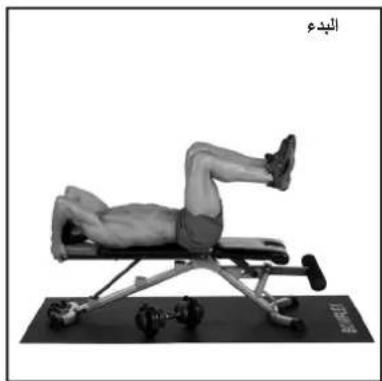
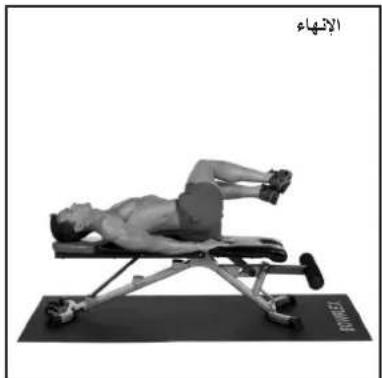
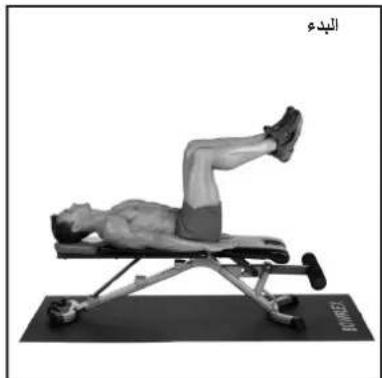
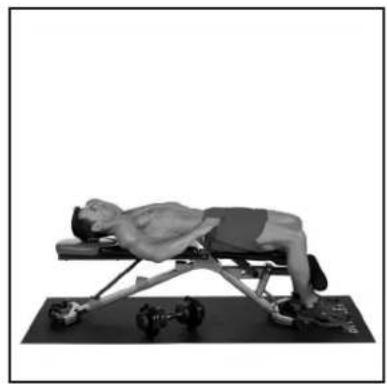
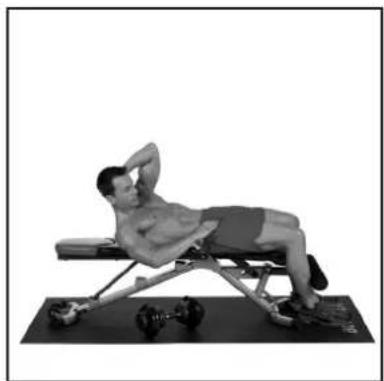
Reverse Crunch
Muscles worked
Abdominal area, including the rectus abdominus and the obliques
Bench position
Flat
START
START ACTION
- Lie on your back with your head resting on the bench.
- Bend your knees fully.
- Determine these positions and maintain throughout the exercise.
-
Reach over the head and grasp the bench with each hand.
Relax the neck. -
Tighten your abs and slowly curl your hips toward your rib cage.
- Move as far as you can without using your legs to get momentum, and do not curl up onto your shoulder blades.
- Slowly reverse the action and return to the starting position without relaxing.
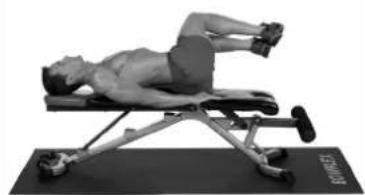
Lying Trunk Rotation
Muscles worked
Deep spinal and trunk muscles
Bench position
Flat
START
FINISH
START ACTION
Success tips
- This is an important exercise but can become high risk if done incorrectly.
- Keep the chest lifted and always maintain a good spinal alignment with a very slight arch in the lower back.
- More range of motion is not necessarily better, especially in this exercise.
-
Move only as far as your muscles can take you. Try to eliminate uncontrolled momentum.
-
Lie flat on the bench.
- Bend your hips and knees to approximately 90 degrees.
- Keep your chest lifted, abs tight and a slight arch in your low back.
-
Hold onto the sides of the bench.
-
Tighten the entire abdominal area and slowly rotate your legs and hips to one side.
- Move slow and controlled, being careful not to let your legs and hips rotate uncontrolled to the side.
- Move back to the starting position.
Work one side to fatigue and then do the opposite side.
ABDOMINAL EXERCISES
Twisting Side Crunch
Obliques and rectus abdominus Flat
- Allow exhalation up and inhalation down.
- Your head should follow the motion of the rib cage. Maintain normal neck posture.
- Move slowly to eliminate momentum.
- Move as far as you can without moving your hips or neck.
START
FINISH
- Lie back flat on the bench and place one hand behind the head of the involved side.
- Place legs behind the roller pads for added support, as shown.
-
Your back can start flat against the bench or in a normal arch.
-
Tighten your abs and move in a diagonal direction, slowly moving your ribs to the opposite hip.
The lower back should not lose contact with the bench when fully crunched. - Slowly reverse the motion to the starting position without relaxing the abdominal muscles.
Muscles worked
Abdominal area, including the rectus abdominus, obliques and quadriceps
Bench position
Flat
Success tips
- Tighten your abs before you move.
- Allow exhalation up and inhalation down, without exaggerating breathing.
- Contract as far into the movements as possible.
- Keep your back flat against the bench.
START ACTION
- Lie on your back with your head resting on the bench.
- Tighten your abs and flatten your back against the bench.
- Bend your knees and hips to 90 degrees.
-
Reach to the side and grasp the bench with each hand.
Relax the neck. -
Tighten your abs and slowly extend your hips and knees.
- Move your legs away from you keeping them parallel to the floor.
- Keep your back flat against the bench for the entire movement.
- Slowly reverse the action and return to the starting position without relaxing.
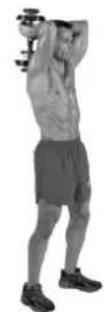
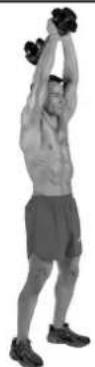
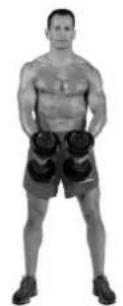
Standing Shoulder Press
Muscles worked
Front deltoid, upper traps and triceps
Success tips
- Keep knees slightly bent.
- Keep abs tight and a good spinal alignment.
- Do not increase the arch in the lower back as you raise your arms. Keep your spine steady.
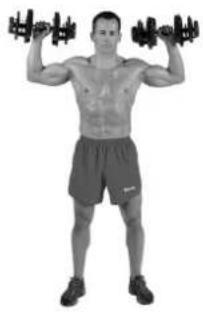
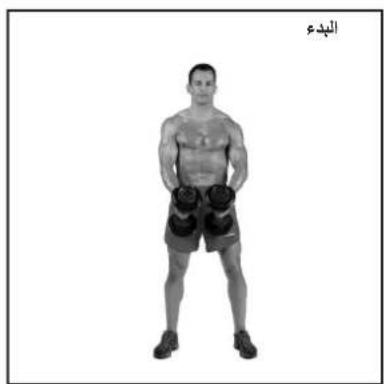
START
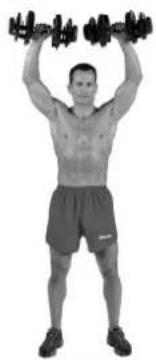
FINISH
START ACTION
- Grab the dumbbells and stand up straight.
- Keep your chest lifted, abs tight and a slight arch in the lower back.
- Raise the dumbbells to shoulder height, keeping your palms facing forward.
-
Upper arms should be 90 degrees away from your torso and your elbows should be bent to 90 degrees, as shown.
-
Straighten your arms slowly over your head, focusing on moving your elbows up and inward toward your ears.
- Straighten your arms slowly over your head, focusing on moving your elbows up and inward toward your ears.
- Slowly return to the starting position, keeping tension on your front shoulder muscles through the entire motion.
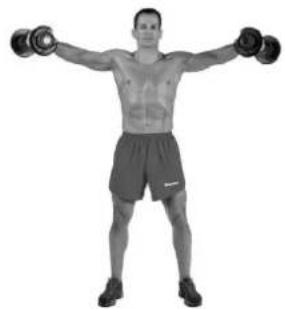
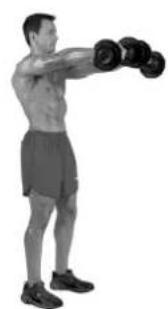
Lateral Raise
Front and middle deltoids
- Do not swing the arms upward or move the trunk during the motion.
- Maintain good spinal alignment.
START
FINISH
START
- Grab the dumbbells with the palms facing each other.
- Stand with your feet slightly wider than shoulder width apart.
-
Maintain an erect spinal alignment with the chest lifted, abs tight and a slight curve in the lower back.
-
Raise arms directly outward, then upward, to approximately shoulder height.
- Lift your hand and elbow at the same speed.
- Do turn or rotate your arms while raising them.
- Keep the side of your arm/elbow facing out/up throughout the movement.
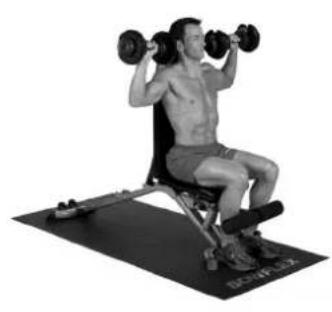
Seated Overhead Press
Muscles worked
Front deltoid, upper traps and triceps
Success tips
- Keep feet flat on the floor and directly under your knees.
- Keep abs tight and a good spinal alignment.
- Do not increase the arch in the lower back as you raise your arms. Keep you spine steady.

START
FINISH
START ACTION
- Grab the dumbbells and sit up straight.
- Keep your chest lifted, abs tight and a slight arch in the lower back.
- Raise the dumbbells to shoulder height, keeping your palms facing forward.
-
Upper arms should be 90 degrees away from your torso and your elbows should be bent to 90 degrees as shown.
-
Straighten your arms slowly over your head, focusing on moving your elbows up and inward toward your ears.
- Slowly return to the starting position, keeping tension on your front shoulder muscles through the entire motion.
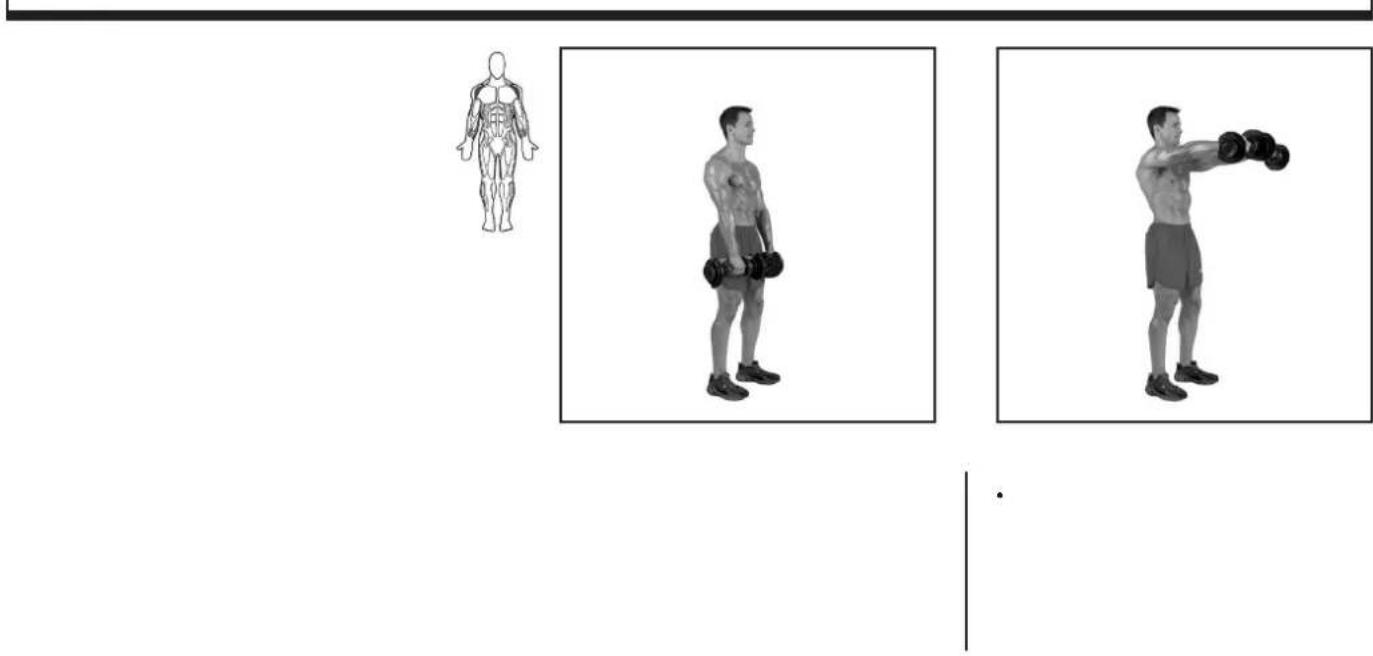
Front Raise
Muscles worked
Front deltoid
Success tips
- Keep knees slightly bent.
- Keep abs tight and a good spinal alignment.
- Do not increase the arch in the lower back as you raise your arms. Keep you spine steady.
START
FINISH
START ACTION
- Grab the dumbbells and stand up straight.
- Feet should be approximately shoulder width a part.
- Keep your chest lifted, abs tight and a slight arch in the lower back.
-
Hold the dumbbells in front of you with your palms facing back.
-
Keep the arms straight and the palms facing down, move your arms forward and then upward to shoulder height.
- Slowly return to the starting position, keeping tension on your front shoulder muscles through the entire motion.
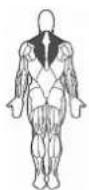
Rear Delt Row
Muscles worked
Back of the middle deltoid, the rear deltoid, posterior rotator cuff, trapezius and rhomboids.
START

FINISH
Success tips
- Keep your spine and hips stable and do not allow your body to sway during the motion.
- For normal pulling exercises you may choose to let the shoulder blades float forward and backward naturally. However, for more emphasis to the rear deltoid, keep the shoulder blades pinched together throughout the movement.
- Keep your abs tight, chest lifted and maintain a slight arch in your lower back.
START ACTION
- Stand with your feet approximately shoulder width apart.
- Grab the dumbbells with your palms facing back.
- Bend forward at the knees and hips so that your arms will hang slightly in front of your knees holding the dumbbells.
-
Keep your head/neck in line with your spine, as shown.
-
Allow your arms to bend as you move your elbows upward, keeping a 60-80 degree angle between your arms and your torso.
- Your forearms should always point in the direction of the dumbbells.
- Move till your elbows are slightly behind your shoulders, then slowly reverse the motion, keeping tension on the rear shoulder muscles during the entire motion.
Shrugs
Muscles worked
Upper trapezius
START
FINISH
Success tips
- Do not bend the neck backward or forward while raising the shoulders.
- Keep abs tight and a good spinal alignment.
Make sure both shoulders are raised evenly.
START ACTION
- Grab the dumbbells and stand up straight.
- Feet should be approximately shoulder width a part.
- Keep your chest lifted, abs tight and a slight arch in the lower back.
-
Hold the dumbbells naturally to your sides.
-
Raise your shoulders toward the back of your head, making sure your neck/head position does not move.
- Slowly return the shoulders to the starting position, keeping tension on your upper shoulder and neck muscles through the entire motion without slouching or rounding your upper spine.
Lying Trunk Rotation
Getrainde spieren
Diepe wervel-en rompspiren
Bankpositie
Plat
START
EINDE
Tips voor succes
Inclined at 60^
DEPART
FIN
Astuces de réussite
Peitoral major, deltoides e triceps
Posicao do banco Reto
Dicas de succès
Peitoral major, deltoides et triceps
Posicao do banco
Inclinado a 45 graus
Dicas de succès
Peitoral major, deltoides et triceps
Posicao do banco
Declinado
Dicas de succès
a a a a a a a a a a a a a a a a a a a a a a a a a
J 1
(1) = ( x1,y1) , = ( x2,y2)
J 1
a
()
sall aegaaagaaagaaagaaagaaagaaagaaagaaagaaagaaagaaagaaagaaagaaagaaagaaagaaagaaagaaagaaagaaagaaagaaagaaagaaagaaagaaagaaagaaagaaagaaagaaagaaagaaagaaagaaagaaagaaagaaagaaagaaagaaagaaagaaagaaagaaagaa
aaii 1
Aa aal
A
Ae aee eae ee eae eae eae eae eae eae eae eae eae eae eae eae eae eae eae eae eae eae eae eae eae eae eae eae eae eae eae eae eae eae eae eae eae eae eae eae eae eae eae eae eae eae eae eae eae eae eae eae eae eae eee
aaiiie aegaa j chnall jaiy J
aie jie jie jie jie jie jie jie jie jie jie jie jie jie jie jie jie jie jie jie jie jie jie jie jie jie jie jie jie jie jie jie jie jie jie jie jie jie jie jie jie jie jie jie
yagai aiai iaii aie 100
- gJg 10
·
.
。
.
.
.
.
。
.
.
.
(2)
.
.
m = 311
(一)
.
sall aegaaagaaagaaagaaagaaagaaagaaagaaagaaagaaagaaagaaagaaagaaagaaagaaagaaagaaagaaagaaagaaagaaagaaagaaagaaagaaagaaagaaagaaagaaagaaagaaagaaagaaagaaagaaagaaagaaagaaagaaagaaagaaagaaagaaagaaagaaagaa
aaii 1
Aa aal
y 1
e 1
aaiiie aegaa j chnall jaiy J
aie jie jie jie jie jie jie jie jie jie jie jie jie jie jie jie jie jie jie jie jie jie jie jie jie jie jie jie jie jie jie jie jie jie jie jie jie jie jie jie jie jie jie jie
yagai aiai iaii aie 100
- gJg 10
j
a 10000000000000000000000000000000000000000000000000000
!
y 1
示
ailllal
a a a a a a a a a a a a a a a a a a a a a a a a a a a
a 1000000000000000000000000000000000000000000000000000000
8]SbJy)jssu Jn jy jyall baaal 5s (pss1) 0) SbJg. gjjj1. nnnn nn nnnn nnnn nnnn nnnn nnnn nnnn nnnn nnnn nnnn nnnn nnnn nnnn nnnn nnnn nnnn nnnn nnnn nnnn nnnn nnnn nnnn nnnn nnnn nnnn nnnn nnnn nnnn nnnn nnnn nnnn nnnn nnnn nnnn nnnn nnne
gill aaglll ggl gall g 1. gll lalaaa aiaa Jy y jayn Jy jayn Jy jayn Jy jayn Jy jayn Jy jayn
y 1
aolulw jae alal gai jao jao jao jao jao jao jao jao jao
y
Jaaal jaiia aai jaii jai jai
a 1 1 1 1 1 1 1 1 1 1 1 1 1 1 1 1 1 1 1 1 1 1 1 1
J 1
y
aannn aannnnn nnnn nn nnnn nnnnnn nnnnnn nnnnnn nnnnnn nnnnnn nnnnnn nnnnnn nnnnnn nnnnnn nnnnnn nnnnnn nnnnnn nnnnnn nnnnnn nnnnnn nnnnnn nnnnnn nnnnnn nnnnnn nnnnnn nnnnnn nnnnnn nnnnnn nnnnnn nnnnnn nannn nannn nannn nannn nannn nannn nannn nannn nannn nannn nannn nannn nannn nannn nannn nannn
Aaal 1 Aaaal 1 A aal BOWFExae aee aee aee aee aee aee aee aee aee aee
E
aill
BowFlex SelectTech
aaii aai iiaaa aaii aai iai iai iai iai iai iai iai iai iai iai iai iai iai iai iai iai iai iai iai iai iai iai iai iai iai iai iai iai iai iai iai iai

a a a a a a a a a a a a a a a a a a a a a a a a a a
()
J 1
y
Bowflex 2a Jua Jua Jua Jua Jua Jua Jua Jua Jua Jua Jua Jua


A
L 1234567890123456789012345678901234567890123456789012345678901234567890123456789012345678901234567890123456789
:ciui
eolololololololololololololololololololololololololololololololololololololololololololololololololololololololololololololol
e 1
Jjssy jsls 11
( x + 1) ( x - 1) = 0
y 1
laa a bbl lai jy wll 1e bla
aill ayal g jz yll yai lai
ie ay9. jay la yai jai
A
a 100000000000000000000000000000000000000000000000000000000000000000000000
.
i
aill alilal gai jil alilal
yll 1s yll g dylg aag y 1e blln e klll jai j
a 2000
1
a 150
240
240
240
240
.
a 1000000000000000000000000000000000000000000000000000000000000000000000
.
auii ciie
j 1
( x,y) = ( ab,52xy)
pall palaal s2a1 pao gao 8
laie yaa aaiy gaiaiy 5
uaiy eaiy ai jaiy
ayaiy al ayi yjaiy jaiy
ayaiy ayaiy jaiy
ayaiy ayaiy jaiy
ayaiy ayaiy jaiy
ayaiy ayaiy jaiy
a
L 1234567890123456789012345678901234567890123456789012345678901234567890123456789012345678901234567890123456789
ciill ciadi
Jaii loia gao ydi a
jgai d jaiyai lao jsi
s jai paaa la gai ai
elai que gao ayuayu yle bai
as yall jai jai gai
jai gao 2y jai yai jai
y
1 1 1 1 1 1 1 1 1 1 1 1 1 1 1 1 1 1 1 1 1 1 1 1 1 1 1 1 1 1 1 1 1 1 1 1 1 1 1 1 1 1 1 1 1 1 1 1


a
C 11111111111111111111111
12 · 1 + u1 - 12 × u
Ljai Jaii aay yao sao 10
. jaiy
aeg ay dia pao jaiy jaiy
. aiil ay
. gbiy biy gbiy
. iay ciie, ie yie yie
. gaiy iay gaiy gaiy
ciill ci
gaggl gaoe eie 1y j y
juy kyy d ie plxu olaiy all ydoal
yjy aia ygi y gai y gai
ydi ydi yde la
asall ic di jy dy jy
yduy du
dyd ldl yda yda y dy
()
J 1 J 1 1 1 1 1 1 1 1 1 1 1 1 1 1 1 1 1 1 1 1 1 1 1 1 1 1 1 1 1 1 1 1 1 1 1 1 1 1 1 1 1
12 + 13 + ·s + 1n + 1 + 1n + 2 + ·s + 1n + 1
jia gao dai jao 4gao gao dai jao 1jao jao 1jao jao 1jao jao
i 11111111111111111111111111111
1 1 1 1 1 1 1 1 1 1 1 1 1 1 1 1 1 1 1 1 1 1 1 1 1 1 1 1 1 1 1 1 1 1 1 1 1 1 1 1 1 1 1 1
J
gannnnaa
g j 1000000000000000000000000000000000000000000000000000000000000000000000000000
12 · 4^2 + 35 · 5^2
g 1000000000000000000000000000000000000000000000000000000000000000000000000
aegnll
aaii 1
i 1
ciill ciui
gall jll jy 91.4 yj g l b
g jy 25 jll ay y e i a y j j
35 jll g ie cie jn 9
g d s y y y y y y y
g jy jy jy jy y y
g jy jy jy jy y y
y jy
pai Lioe slkcs ll Jy y y y
jy
jy
jy
J
Jilalall b
g 1000000000000000000000000000000000000000000000000000000000000000000000000000

1
1 1 1 1 1 1 1 1 1 1 1 1 1 1 1 1 1 1 1 1 1 1 1 1 1 1 1 1 1 1 1 1 1 1 1 1 1 1 1 1 1 1
.
.
.
y
aiee eae
aaii aaiii aaiiaai
()
a
i0
ciill ci
m = 311
m = 311 ;
Clllil
Jilal

1
jgl 0 jll slydy Lg p
jgl 0 jall g dall g e 1
Lal 1 1 1
laal 1 1
(1)
Jlll 1e Jdall dal .
JyJyIe y Jdy Bg
.
JyJyIe y Jdy Bg
.
JyJyIe y Jdy Bg
.
JyJyIe y Jdy Bg
.
JyJyIe y Jdy Bg
.
clll cai
aigial
()
i
a. = ( x1,y1) b. = ( x2,y2)
()j 1000000000000000000000000000000000000000000000000000000000000000000000
i 1

1
jg jz jz jz jz jz jz jz jz jz jz jz jz jz jz jz jz jz jz jz jz jz jz jz jz jz jz jz jz jz jz jz jz jz jz jz jz jz jz jz jz jz jz jz jz jz jz jz jz jz jz j
1 1 1 1 1 1 1 1 1 1 1 1 1 1 1 1 1 1 1 1 1 1 1 1 1 1 1 1 1 1 1 1 1 1 1 1 1 1 1

aiee eae
()
a
5
ciill ci
12x - 1 > 0
e jll 15 bll 1000000000000000000000000000000000000000000000000000000
a
1
j 1 j 1 1 1 1 1 1 1 1 1 1 1
1 1
a a 1000

e 1
gall gall al jay
1
y 1
- 1 + u
1
Jie 12 aia bocil 10 1
aagaaal y
()
jai
1
Jusudus idae
111 1
Jaaas
1 1
1 1
12 1234567890

Aa aal alal, (sall) 11111111
jll j j g jll j lal al jyall j j yai i aaii 1 1 1 1 1 1 1 1 1 1 1 1 1 1 1 1 1 1
( xt^2 + x) ( 1 - x) = 4t
1 1
aal jao jao all gao slao
g
aiee
(5jall 8jll all alal, aaiy al ay jll alilal (sall) jll ai alal, aaiy alal alal
jai
clll ciui
J 111 J 111
J 111
J 111
J 111
J 111
.
.
.
.
#
a
aill jglll e jgl, aalil alalll alll llll glll lall llll
ciill ciui
Lgaii aaln Jaoa 1
i 1
J 1
#
1 1 1 1 1 1 1 1 1 1 1 1 1 1 1 1 1 1 1 1 1 1 1 1 1 1 1 1 1 1 1 1 1 1 1 1 1 1 1 1 1 1 1 1 1 1 1 1 1
.
a Jaiill jin: Suaa gall caii
Gauu lao joll iie plxl elnly
alil aipaa kkiy dniy yol
y 1
1

aiee eae
yjai Cui, (ayj) Cui, xue
ii Cui, (ayj) Aai, iai, Cui,
y jai yai Cui, (ayj) yai
ciill ci
aai jai jia jia jia jia jia jia jia jia jia jia jia jia jia jia jia jia jia jia jia jia jia jia jia jia jia jia jia jia jia jia jia jia jia jia jia jia jia jia
iioial
1 1
yj 1234567890
Ji jiu liu yiu liu liu liu liu liu liu liu liu liu liu liu liu liu liu liu liu liu liu liu liu liu liu liu liu liu liu liu liu liu liu liu liu liu liu liu liu liu liu liu liu liu liu liu liu liu liu liu liu liu liu liuuai yiu yiu yiu yiu yiu yiu yiu yiu yiu yiu yiu yiu yiu yiu yiu yiu yiu yiu yiu yiu yiu yiu yiu yiu yiu yiu yiu yiu yiu yiu yiu yiu yiu yiu yiu yiu yiu yiu yiu yiu yiu yiu yiu yiu yiu yiu yiu yiu yiu yiu y
#
Jzj Jzll 111 111 111 111 111 111 111 111 111 111 111 111 111 111 111 111 1
-
#
#
aiee eae
ailll, aillll aillll alll
J
S
1
1 1 1 1 1 1 1 1 1 1 1 1 1 1 1 1 1 1 1 1 1 1 1 1 1 1 1 1 1 1 1 1 1 1 1 1 1 1 1 1 1 1 1 1 1 1 1 1 1 1 1
1 1 1 1 1 1 1 1 1 1 1 1 1 1 1 1 1 1 1 1 1 1 1 1 1 1 1 1 1 1 1 1 1 1 1 1 1 1 1 1 1 1 1
.
ciill ci
1 1
J 1
Gssell
a
aill aalll alll lll 1ay jall aibio
Ailal Ailal
jai
5
plill
J 1
AEC = = 3 .
J 1
Jaa 2a aal
aaii i 1
xy 共线 4. B( x,y,0)
Jlssy jn nn nnnn nn nn nn nn nn nn nn nn nn nn nn nn nn nn nn nn nn nn nn nn nn nn nn nn nn nn nn nn nn nn nn nn nn nn nn nn nn nn nn nn nn nn nn nn nn nn nn nn nn nn nn nn nn nn nn nn nn nn nn nn nn nn nn nn nn nn nn nn nn nn nn nn nn nn nn nn nn nn nn nn nn nn nn nn nn nn nn nn nn nn nn
Jlll 1
1
.
Jss
jglbale bala 1
aalalalalalalalalalalalal
S = S1 + S2 + S_3
a
eaiie 1
aiee
aell jll, g jll gll d
a
5
ciill ci
1
y
aajjail aagaaal alzall, alzai alzai
5
J 1
a a a a a a
1 1
a 1
aiial aaiiial aiie 1ay jaiil aiia (aay) ayaiy iaiy iaiy aiia,
jai
5
12
1 1
-
1
-
i.e. 2.
LagleblasJe 1y jy
1 1
aagaae aegaae eae
a
.
.
产
川
E
.
78
laol
aiee eae
aallll lllllllllllll
()
ciill ci
y
aaii iiaia aiee
KuJgJzJgJ
e jie jie jie jie jie jie jie jie jie jie jie jie jie jie jie jie jie jie jie jie jie jie jie jie jie jie jie jie jie
L
#
a 1 1 1 1 1 1 1 1 1 1 1 1 1 1 1 1 1 1 1 1 1 1 1
1 1
blal 10000000000000000000000000000000000000000000000
a 12
a 1
1 1 1 1 1 1 1 1 1 1 1 1 1 1 1 1 1 1 1 1 1 1 1 1 1 1 1 1 1 1 1 1 1
.
.
.
i

a a a a a a a
y
Ae
yall yall sbil 1
c++
1 11
Ae yll aaiy daiy gao ay 1
Lagai jaiy caiy jaiy yuyi pi
Iaiaiaiaiaiaiaiaiaiaiaiaiaiaiaiaiaiaiaiaiaiaiaiaiaiaiaiaiaiaiaiaiaiaiaiaiaiaiaiaiaiaiaiaiaiaiaiaiaiaiaiaiaiaiaiaiaiaiaiaiaiaiaiaiaiaiaiaiaiaiaiaiaiaiaiaiaia
1
1
Sjy gddgall 1e jb.
#
aiguiell ciuie
a glalll jill cuiue g aolai
()
ciill ci
b1 = 23,b2 = - 43,b_3 = - 53
aal, 02g 1
J 2
a 1
1.
12
a
15 15
blal 1000
11 2023/4/28 15:49:46
S = S_1
-
diay duiacg jao yjua jie bila
aJd Jai jai aai 0iui j 0
00 1
Lulj
1
.
#

aegnll
a
ciill ci
y
aaii, 82
( 5x - 2x) = 85
yj 1
1
#
e 1 j j j j j j j j j j j j j j
paoa oui jia jia jia jia jia jia
=
blal 1000
113 1
S ADB = S COD + S_ BDO
J 1
a 1
aal y aal alal jaaal
S OBC = S COD + S_ BOC
aaii iiaaa

aiguiill ciLizell
aillll alinaall, g blll aillll alinaall jgailll c jnll 1yll aline, adilll s yll aline gailll
clill ciu
J 15
J 15
J 15
J 15
J 15
J 15
( x + 1) ( x - 1) = 0
a 111111111111111111111111111111111111111111
L 1000000000000000000000000000000000000000000000000000000000000000000000
.
e jy yuuyuuyuuyuuyuuyuuyuuyuuyuuyuuyuuyuuyuuyuuyuuyuuyuuyuuyuuyuuyuuyuuyuuyuuyuuyuuyuuyuuyu
i
a
aalal
ciill ci
#
511 511 511 511 511 511 511 511 511 511 511 511 511 511 511 511 511 511 511 511 511 511 511 511 511 511
.
J 1
J 1
J 1
J 1
J 1
.
.
.


44.4 × 24.2 × 25.3

https://global.bowflex.com/en/manuals.html

https://global.bowflex.com/en/assembly-videos.html

1
( )
2 999
- 2.5 LBS (1.1 KG)
- 5 LBS (2.3 KG)
- 7.5 LBS (3.4 KG)
- 10 LBS (4.5 KG)
- 15 LBS (6.8 KG)
| KG 4 | 7 9 11 | 14 16 | 18 20 | 23 25 | 27 30 | 32 34 | 36 39 | 41 | ||||||||
| LBS | 10 15 | 20 25 | 30 35 | 40 45 | 50 55 | 60 65 | 70 75 | 80 85 | 90 |

3.


.


BowFlex

- WARNING
- ADDITIONAL WARNING - ADJUSTABLE EQUIPMENT (FREE WEIGHT)
- WORKOUT SPACE
- CAUTION!
- WARRANTY
- FEATURES
- Understanding and testing the locking mechanism function
- Function
- Purpose
- Testing proper locking mechanism function
- MAINTENENCE
- BowFlex SelectTech Dumbbell maintenance
- TROUBLESHOOTING
- SelectTech Dumbbell locking mechanism test
- Muscles worked
- Success tips:
- START ACTION
- Calf Raises
- ACTION
- Stationary Lunges
- Success tips
- Stiff-leg Dead Lift
- LEG EXERCISES
- Reverse Lunge
- CHEST EXERCISES
- Flat Chest Press
- Bench position
- Incline Chest Press
- Flat Chest Fly
- Decline Chest Press
- Standing Curls
- START
- Concentration Curls
- ARM EXERCISES
- Incline Bench Curls
- Scott Curls - Standing Concentration Curls
- Overhead Triceps Extension
- Lying Triceps Extension
- Single Arm Row — Alternating Rows
- Wide Rows
- BACK EXERCISESBACK EXERCISES
- Dead Lifts
- ABDOMINAL EXERCISES
- Ab Crunch
- Reverse Crunch
- Lying Trunk Rotation
- Twisting Side Crunch
- Standing Shoulder Press
- Lateral Raise
- Seated Overhead Press
- Front Raise
- Rear Delt Row
- Shrugs
- Getrainde spieren
- Bankpositie
- Tips voor succes
- Astuces de réussite
- Dicas de succès
- Posicao do banco
- ()
- aill
- BowFlex SelectTech
- A
- :ciui
- ( x + 1) ( x - 1) = 0
- i
- 1
- auii ciie
- ( x,y) = ( ab,52xy)
- ciill ciadi
- y
- · 1 + u1 - 12 × u
- ciill ci
- + 13 + ·s + 1n + 1 + 1n + 2 + ·s + 1n + 1
- J
- gannnnaa
- · 42 + 35 · 52
- aegnll
- ciill ciui
- Jilalall b
- aiee eae
- Jilal
- i 1
- 12x - 1 > 0
- ( xt2 + x) ( 1 - x) = 4t
- g
- aiee
- clll ciui
- #
- Gssell
- plill
- eaiie 1
- 12
- laol
- c++
- aiguiell ciuie
- aaii iiaaa
- aiguiill ciLizell
- clill ciu
- BowFlex
Brand : BOWFLEX
Model : SelectTech BD1090i
Category : Strength Training Equipment