DIR261 - Radio LENCO - Free user manual and instructions
Find the device manual for free DIR261 LENCO in PDF.
User questions about DIR261 LENCO
0 question about this device. Answer the ones you know or ask your own.
Ask a new question about this device
Download the instructions for your Radio in PDF format for free! Find your manual DIR261 - LENCO and take your electronic device back in hand. On this page are published all the documents necessary for the use of your device. DIR261 by LENCO.
USER MANUAL DIR261 LENCO
text_image
Lenco Internet radio 97.34 BBC Radio 3 Radio 1 where the UK's playfully into new music begins. from your home? Internet Radio Lenco 2/20/08 5/20/08 6/20/08 7/20/08 8/20/08 9/20/08 10/20/08 11/20/08 12/20/08 13/20/08 14/20/08 15/20/08 16/20/08 17/20/08 18/20/08 19/20/08 20/20/08 21/20/08 22/20/08 23/20/08 24/20/08 25/20/08 26/20/08 27/20/08 28/20/08 29/20/08 30/20/08 31/20/08 32/20/08 33/20/08 34/20/08 35/20/08 36/20/08 37/20/08 38/20/08 39/20/08 40/20/08 41/20/08 42/20/08 43/20/08 44/20/08 45/20/08 46/20/08 47/20/08 48/20/08 49/20/08 50/20/08 51/20/08 52/20/08 53/20/08 54/20/08 55/20/08 56/20/08 57/20/08 58/20/08 59/20/08 60/20/08 61/20/08 62/20/08 63/20/08 64/20/08 65/20/08 66/20/08 67/20/08 68/20/08 69/20/08 70/20/08 71/20/08 72/20/08 73/20/08 74/20/08 75/20/08 76/20/08 77/20/08 78/20/08 79/20/08 80/20/08 81/20/08 82/20/08 83/20/08 84/20/08 85/20/08 86/20/08 87/20/08 88/20/08 89/20/08 90/20/08 91/20/08 92/20/08 93/20/08 94/20/08 95/20/08 96/20/08 97/20/08 98/20/08 99/20/08USER MANUAL
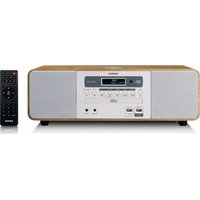
Internet, DAB+/FM radio with CD player and Bluetooth
HANDLEIDING
Usage of controls or adjustments or performance of procedures other than those specified herein may result in hazardous radiation exposure.
KEEP THESE INSTRUCTIONS IN MIND:
- Do not cover or block any ventilation openings. When placing the device on a shelf, leave 5 cm (2") free space around the whole device.
- Install in accordance with the supplied user manual.
- Keep the device away from heat sources such as radiators, heaters, stoves, candles and other heat-generating products or naked flame. The device can only be used in moderate climates. Extremely cold or warm environments should be avoided. Working temperature between 0^ and 35^ C.
- Avoid using the device near strong magnetic fields.
- Electrostatic discharge can disturb normal usage of this device. If so, simply reset and restart the device following the instruction manual. During file transmission, please handle with care and operate in a static-free environment.
- Warning! Never insert an object into the product through the vents or openings. High voltage flows through the product and inserting an object can cause electric shock and/or short circuit internal parts. For the same reason, do not spill water or liquid on the product.
- Do not use in wet or moist areas such as bathrooms, steamy kitchens or near swimming pools.
- The device shall not be exposed to dripping or splashing and make sure that no objects filled with liquids, such as vases, are placed on or near the apparatus.
- Do not use this device when condensation may occur. When the unit is used in a warm wet room with damp, water droplets or condensation may occur inside the unit and the unit may not function properly; let the unit stand in power OFF for 1 or 2 hours before turning on the power: the unit should be dry before getting any power.
- Although this device is manufactured with the utmost care and checked several times before leaving the factory, it is still possible that problems may occur, as with all electrical appliances. If you notice smoke, an excessive build-up of heat or any other unexpected phenomena, you should disconnect the plug from the main power socket immediately.
- This device must operate on a power source as specified on the specification label. If you are not sure of the type of power supply used in your home, consult your dealer or local power company.
- Keep away from animals. Some animals enjoy biting on power cords.
- To clean the device, use a soft dry cloth. Do not use solvents or petrol based fluids. To remove severe stains, you may use a damp cloth with dilute detergent.
- The supplier is not responsible for damage or lost data caused by malfunction, misuse, modification of the device or battery replacement.
- Do not interrupt the connection when the device is formatting or transferring files. Otherwise, data may be corrupted or lost.
- If the unit has USB playback function, the USB memory stick should be plugged into the unit directly. Don't use an USB extension cable because it can cause interference resulting in failing of data.
- The rating label has been marked on the bottom or back panel of the device.
- This device is not intended for use by people (including children) with physical, sensory or mental disabilities, or a lack of experience and knowledge, unless they're under supervision or have received instructions about the correct use of the device by the person who is responsible for their safety.
- This product is intended for non professional use only and not for commercial or industrial use.
-
Make sure the unit is adjusted to a stable position. Damage caused by using this product in an unstable position vibrations or shocks or by failure to follow any other warning or precaution contained within this user manual will not be covered by warranty.
-
Never remove the casing of this device.
-
Never place this device on other electrical equipment.
-
Do not allow children access to plastic bags.
-
Only use attachments/accessories specified by the manufacturer.
-
Refer all servicing to qualified service personnel. Servicing is required when the device has been damaged in any way, such as the power supply cord or the plug, when liquid has been spilled or objects have fallen into the device, when the device has been exposed to rain or moisture, does not operate normally, or has been dropped.
-
Long exposure to loud sounds from personal music players may lead to temporary or permanent hearing loss.
-
If the product is delivered with power cable or AC power adaptor:
- If any trouble occur, disconnect the AC power cord and refer servicing to qualified personnel.
- Don't step on or pinch the power adaptor. Be very careful, particularly near the plugs and the cable's exit point. Do not place heavy items on the power adaptor, which may damage it. Keep the entire device out of children's reach! When playing with the power cable, they can seriously injure themselves.
● Unplug this device during lightning storms or when unused for a long period.
● The socket outlet must be installed near the equipment and must be easily accessible.
- Do not overload ac outlets or extension cords. Overloading can cause fire or electric shock.
● Devices with class 1 construction should be connected to a main socket outlet with a protective earthed connection.
● Devices with class 2 construction do not require a earthed connection.
● Always hold the plug when pulling it out of the main supply socket. Do not pull the power cord. This can cause a short circuit.
- Do not use a damaged power cord or plug or a loose outlet. Doing so may result in fire or electric shock.
- If the product contains or is delivered with a remote control containing coin/cell batteries: Warning:
- “Do not ingest battery, Chemical Burn Hazard” or equivalent working.
● [The remote control supplied with] This product contains a coin/button cell battery. If the battery is swallowed, it can cause severe internal burns in just 2 hours and can lead to death.
- Keep new and used batteries away from children.
- If the battery compartment does not close securely, stop using the product and keep it away from children.
- If you think batteries might have been swallowed or placed inside any part of the body, seek immediate medical attention.
- Caution about the use of Batteries:
● Danger of explosion if battery is incorrectly replaced. Replace only with the same or equivalent type.
● Battery cannot be subjected to high or low extreme temperatures, low air pressure at high altitude during use, storage or transportation.
● Replacement of a battery with an incorrect type that can result in an explosion or the leakage of flammable liquid or gas.
● Disposal of a battery into fire or a hot oven, or mechanically crushing or cutting of a battery, that can result in an explosion.
● Leaving a battery in an extremely high temperature surrounding environment that can result in an explosion or that leakage of flammable liquid or gas.
● A battery subjected to extremely low air pressure that may result in an explosion or the leakage of flammable liquid or gas.
● Attention should be drawn to the environmental aspects of battery disposal.
INSTALLATION
- Unpack all parts and remove protective material.
- Do not connect the unit to the mains before checking the mains voltage and before all other connections have been made.
* Those instruction are related only to products using power cable or AC power adaptor.
Accessories:
User manual

natural_image
Simple line drawing of an open book with no text or symbols visiblePower adaptor

natural_image
Technical line drawing of a mechanical clamp or connector assembly (no text or symbols)Remote control

text_image
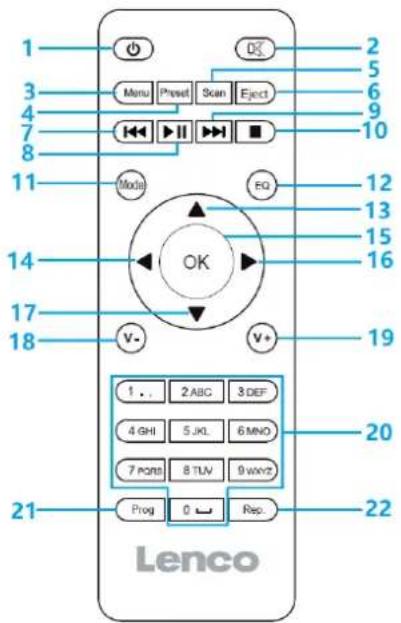
OK Menu: Print Clean Sleep Mode EQ OK V+ V+ 1. 2 ABC 3 OFF 4 GHz 5 JX 6 MHz 7 PSB 8 TUV 9 MHz Prog 0 Reset Rep. Lenco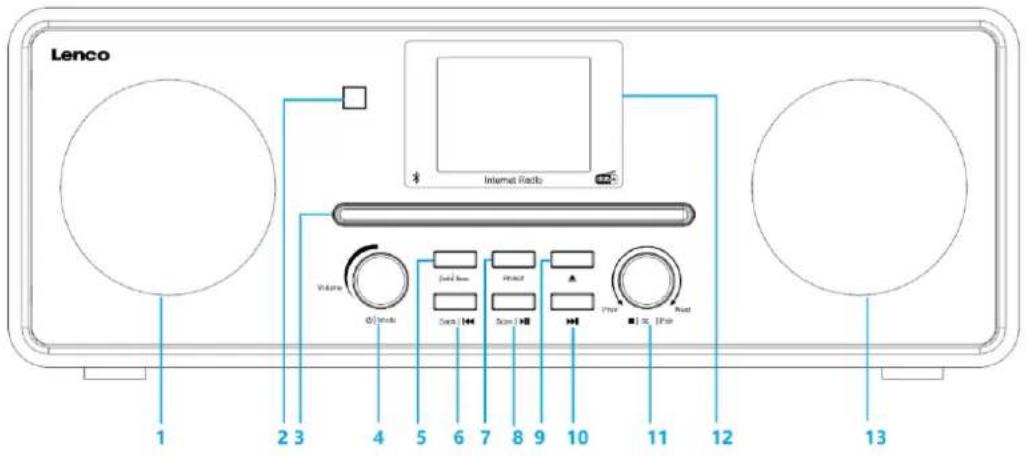
text_image
Lenco Internet Radio Volume Φ/Mode I/O mode DCs Input Scan I/O I/O I/O I/O I/O 1 2 3 4 5 6 7 8 9 10 11 12 13- Driver
- Remote Control Receiver
- CD Passages
- Volume/Standby/Mode knob
- Menu Button
- Back/Prev Button
-
Preset Button
-
Scan/Play/pause Button
- CD Eject Button
- Next Button
- Stop/OK/pair/navigate knob
- LCD Display (TFT 2.8")
- Driver
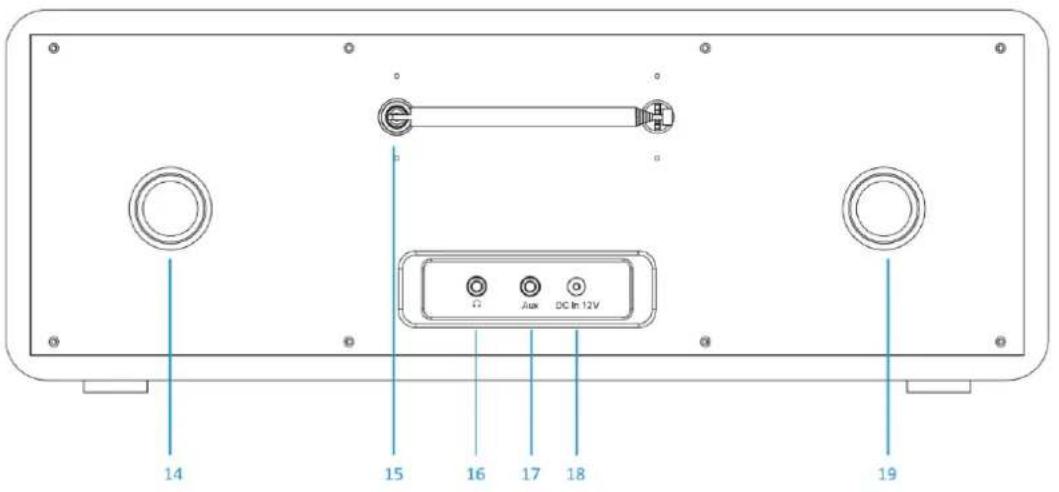
text_image
14 15 16 17 18 Aux DC In 12V 19- Inverter tube
- Earphone jack
-
DC in jack (12V/2.5A)
-
Telescopic antenna
- Aux jack
- Inverter tube
text_image
1 2 3 4 5 6 7 8 9 10 11 12 13 14 15 16 17 18 19 20 21 Prog 0 Rep. Lenco- Standby button
- ✗ switch speaker ON/OFF
- Menu-Main menu and Info
- Preset-saved stations, Favorites, etc
- Scan-DAB/FM scan
- Eject button
- Go back one track
- ▶Play/Pause
- Go forward one track
- Stop play button
-
Mode button
-
Equalizer settings
- Up cursor button
- Left cursor button
- OK Confirm selection
- Right Cursor button
- Down cursor button
- V- Decrease volume
- V+ Increase volume
- 0.....9 Call up favorites/Memory; input letters and numbers
- Prog for CD
- Rep. for CD
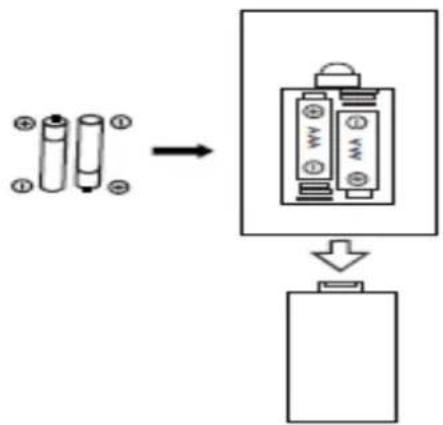
Battery installation for remote control:
- Push on the 'open' marking of the battery cover and slide it downwards
- Install two (2) x AAA size batteries into the battery compartment (check the correct polarity)
- slide the battery cover back
text_image
Diagram illustrating battery charging process with battery arrangement and charging device assemblyBattery Precautions:
Follow these precautions:
- Use only the type of battery specified in this manual.
- Be sure to follow the correct polarity when installing the battery as indicated in the battery compartment. A battery which is inserted in the wrong way may cause damage to the device.
- Do not try to recharge single use batteries. (Follow the battery manufacturer's directions.)
- Do not throw batteries into fire because they may explode.
- Clean the battery contacts of the device prior to replacing empty batteries.
First use
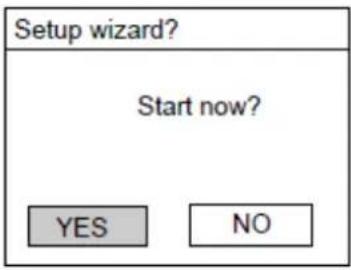
- Plug the Adapter into the wall outlet, the display will appear as below.

text_image
Lenco- Wait for about 20 seconds, the display will appear as below. Turn the NAVIGATE knob on the unit counterclockwise or press the navigate button on remote control to highlight "YES", and press the OK knob on the unit or press the OK button on remote control to continue.
text_image
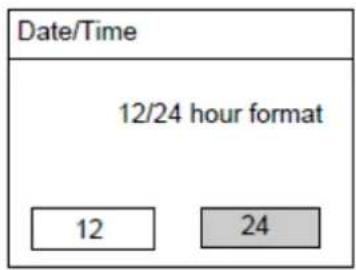
Setup wizard? Start now? YES NO- The display will appear as below. Turn the NAVIGATE knob on the unit or press the navigation buttons on the remote control to highlight the desired hour format, then press the OK knob on the unit or press the OK button on remote control to continue.
text_image
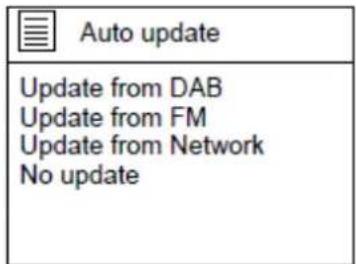
Date/Time 12/24 hour format 12 24- The date and time update page will appear as below.
text_image
Auto update Update from DAB Update from FM Update from Network No updateExplanation of the options:
Update from DAB: The time and date will be synchronized from a DAB signal
Update from FM: The time and date will be synchronized from a FM signal
Update from Network: The time will be synchronized from the Internet/network signal
No update: Time and date have to be set manually
Turn the NAVIGATE knob on the unit or use the navigate buttons on the remote control to highlight your selection and press OK to confirm your selection
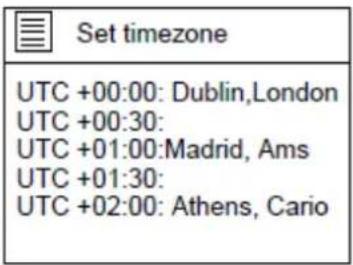
text_image
Set timezone UTC +00:00: Dublin,London UTC +00:30: UTC +01:00:Madrid, Ams UTC +01:30: UTC +02:00: Athens, Cario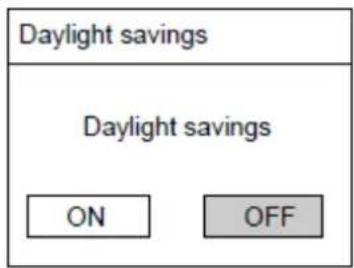
text_image
Daylight savings Daylight savings ON OFFIf 'No update' is selected:
Set the date and time manually.
| Set Time/Date |
| 0 1 -0 1 -2 0 1 7 0 0:0 0 |
The day number will flash, Turn the NAVIGATE knob on the unit or use the navigate buttons on the remote control to set the desired day, then press the 'OK' button on the unit or the remote control to confirm. Now the month number will flash. Use the same procedure as setting the day, then do the same to set the year and time. Go ahead to next setup page.
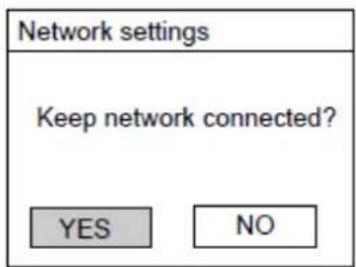
- The Network settings page will appear as below. Turn the NAVIGATE knob on the unit or use the navigation buttons on the remote control to select 'YES' or 'NO'.
Press the "OK" knob on the unit or remote control to continue.
text_image
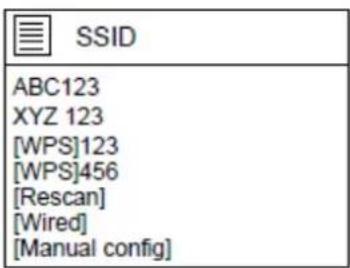
Network settings Keep network connected? YES NO- The screen will be as below. On the SSID page, choose one of the wireless networks from the list or choose one of the network with the prefix [WPS]...
| Network settings |
| Nework wizard Scanning.- |
text_image
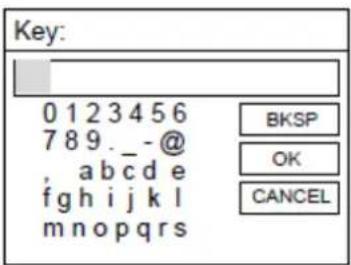
SSID ABC123 XYZ 123 [WPS]123 [WPS]456 [Rescan] [Wired] [Manual config]If for example. the wireless network ABC123 is selected, the Key page will pop up.
Turn the NAVIGATE knob on the unit or using the navigate button on remote control to highlight the character needed, press the 'OK' button on the unit or remote control to continue to the next character and repeat the above to complete your WIFI password.
BKSP = delete the last entered character
OK = confirm the password
CANCEL = cancel entering the password
text_image
Key: 0 1 2 3 4 5 6 7 8 9. _ -@ , abc d e f g h i j k l m n o p q r s BKSP OK CANCELAfter completing the correct password, select the OK on the display and press the 'OK' button on the remote control to continue. The next pages will appear as below.
NOTE: You can also use the number buttons on the remote control to enter the WIFI password.
text_image
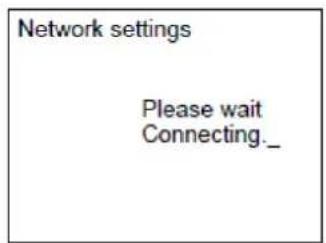
Network settings Please wait Connecting_
text_image
Connected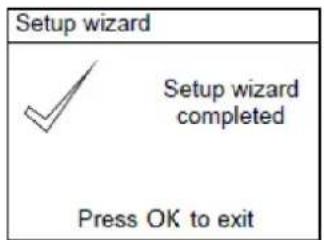
text_image
Setup wizard Setup wizard completed Press OK to exitWhen setup wizard completed, press the NAVIGATE knob or press the OK button on remote control to exit
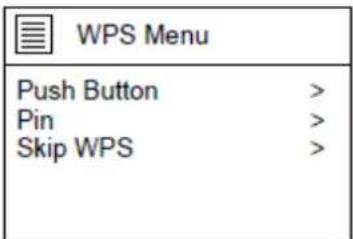
In the SSID page, if for example the network [WPS] 123 is selected, the WPS Menu page will appear.
NOTE: to use the WPS function you will need a WPS compatible WIFI router!
text_image
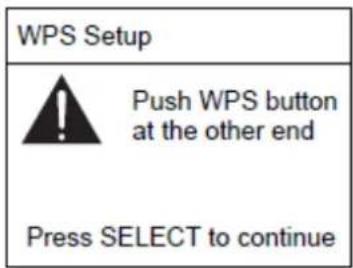
WPS Menu Push Button > Pin > Skip WPS >If "Push Button" is selected, the below page will appear. Press the WPS connect button on your router and then press the OK knob on the unit or the remote control.
text_image
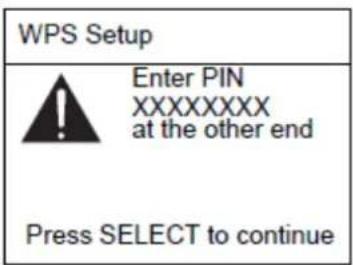
WPS Setup Push WPS button at the other end Press SELECT to continueIf "Pin" is selected, the unit generates an 8-digit code number which you have to enter in your wireless router/accesspoint configuration menu. (check the manual of your router if you need help)
text_image
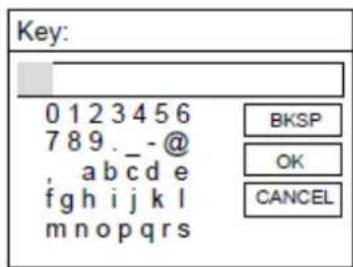
WPS Setup Enter PIN XXXXXXXXX at the other end Press SELECT to continueWhen "Skip WPS" is selected, the below page will appear. Enter your WIFI network passkey
text_image
Key: 0 1 2 3 4 5 6 7 8 9. _ -@ , abc d e f g h i j k l m n o p q r s BKSP OK CANCELTurn the NAVIGATE knob on the unit or using the navigate button on remote control to highlight the character needed, press the 'OK' button on the unit or remote control to continue to the next character and repeat the above to complete your WIFI password.
BKSP = delete the last entered character
OK = confirm the password
CANCEL = cancel entering the password
After completing the correct password, select the OK on the display and press the 'OK' button on the remote control to continue.
NOTE: You can also use the number buttons on the remote control to enter the WIFI password.
Main Menu
After setup is completed, the unit will enter the main menu. The following page will appear. Turn the NAVIGATE knob on the unit or press the navigate button on remote control to navigate through the items in main menu list.
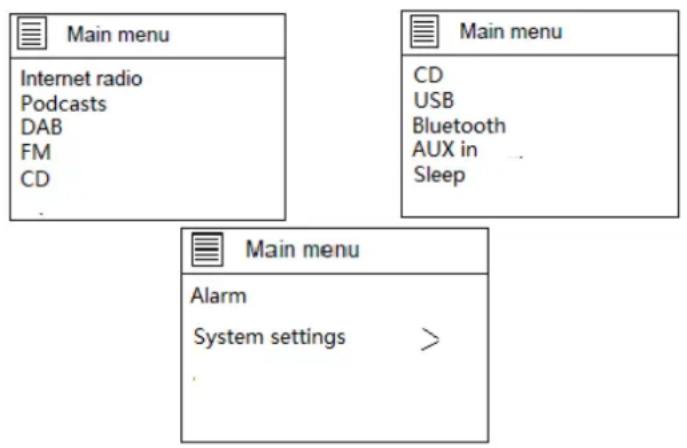
flowchart
graph TD
    A["Main menu"] --> B["Internet radio"]
    A --> C["Podcasts"]
    A --> D["DAB"]
    A --> E["FM"]
    A --> F["CD"]
    G["Main menu"] --> H["CD"]
    G --> I["USB"]
    G --> J["Bluetooth"]
    G --> K["AUX in ..."]
    G --> L["Sleep"]
INTERNET RADIO
Select internet radio from the main menu or press 'mode' on the remote control until internet radio is selected.
The Lenco DIR-260/DIR-261 internet radio can play thousands of radio stations and podcasts from around the world through a broadband internet connection. When you select Internet radio mode, it contacts the solution provider Internet radio portal to get a list of stations, organized into different categories like Country and Popular. Once you select a station, radio connects directly to that station.
The common local controls for sound volume, mute, play/stop and Presets are available.
Note: The station list menu is provided from the Internet radio portal, so it is only accessible when radio is connected to the Internet. Station lists and submenus will change from time to time.
The station list is organized into various categories and search facilities:
| Internet radio | |
| UK | > |
| History | > |
| Search | > |
| Location | > |
| Popular | > |
UK (this can be another country. Depends on the country you are using this device)
Presents a sub-menu to search for stations using a variety of categories, for example, local stations, BBC stations, Genres or stations from a specific city. Choose the required category and either a further list of sub categories is shown, or (if there is no further sub-categories) the available stations for the chosen category are listed.
History
When Internet radio mode restarts, the last-listened station is selected. To select another recently used station, select Menu > Station list > History then one of the stations listed. Most recent stations appear at the top of the list.
Search
You can also search through Internet broadcasts for stations with particular keywords in their title. To search, select Menu > Station list > Search. Enter a keyword by selecting characters in turn, then OK. The search entry screens are similar in operation to the Wi-Fi passphrase entry screen.
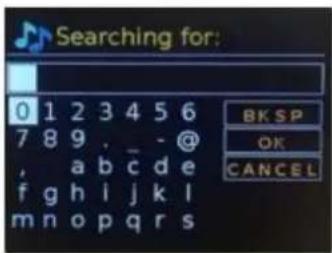
text_image
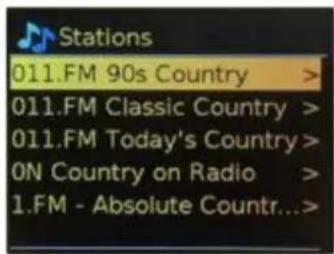
Searching for: 0 1 2 3 4 5 6 7 8 9 . _ - @ , a b c d e f g h i j k l m n o p q r s BK SP OK CANCELSelect a broadcast from the list.
text_image
Stations 011.FM 90s Country > 011.FM Classic Country > 011.FM Today's Country > ON Country on Radio > 1.FM - Absolute Countr...>Location
To select an Internet broadcast from a particular location, select Menu > Station list > Location. Select a continent from the menu and a list of countries available is presented, select a country and the available internet radio stations are presented. Choose a radio station from the list to tune to that station.
Popular
Presents a list of the most popular internet stations from around the world.
Discover
Allows you to select from a list of stations defined by either their origin (Country), Genre (style of music) or language. Navigate through the category options; once you have made your selection a screen confirms your selected category and the number stations within that category. To see the list, select the option showing the number of available stations.
Now playing information
While the stream is playing, the screen shows its name and description. If artist and track information is available, this is also shown. To view further information, press Info. Each time you press Info, another set of information is displayed, cycling through the following details:
- Slogan (default; where available)
- Language/Location
- Codec and sampling rate
- Playback buffer
- Today's Date
Podcasts
This Radio can play podcasts from around the world through a broadband internet connection. When you select Podcast mode, radio contacts the solution provider portal to get a list of available podcasts. Once you select a podcast, radio connects directly to that podcast source. To enter Podcast mode, either press Mode to cycle through the listening modes until Podcasts is displayed or select Menu > Main menu > Podcasts. The common local controls for sound volume, mute, play/pause and Presets are available.
Note: The podcast menu is provided from the Podcast portal, so it is only accessible when radio is connected to the Internet. Podcast lists and submenus will change from time to time.
UK
- Search
- Popular
- Location
- Discover
UK (this can be another country. Depends on the country you are using this device)
Presents a sub-menu to search for podcasts using a variety of categories, for example, comedy of the week, books and authors, popular, etc. Choose your favorite category and either a further list of sub categories is shown, or
(if there is no further sub-categories) the available podcasts for the chosen category are listed.
Search
You can also search through podcasts with particular keywords in their title.
To search, select Menu > Podcast list > Search. Enter a keyword by selecting characters in turn, then OK. The search entry screens are similar in operation to the Wi-Fi passphrase entry screen.
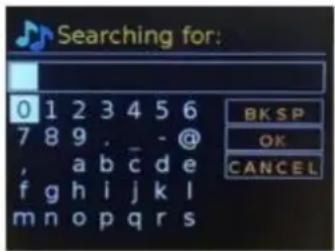
text_image
Searching for: 0 1 2 3 4 5 6 7 8 9 , _ - @ , a b c d e f g h i j k l m n o p q r s BK SP OK CANCELSelect a broadcast from the list.
Location
To select a Podcast from a particular location, select Menu > Podcast list > Location >. Select a continent from the menu and a list of countries available is presented, select a country and the available podcasts are presented. Choose a podcast from the list to tune to that podcast.
Popular
Presents a list of the most popular podcasts from around the world.
Discover
Allows you to select from a list of podcasts defined by either their origin (Country), Genre (style of music) or language. Navigate through the category options; once you have made your selection a screen confirms your selected category and the number podcasts within that category. To see the list, select the option showing the number of available podcasts.
Storing a station as a favorite
Internet Radio Station storing a preset:
During play, press and hold the 'Preset' button on the unit or remote control to store the current station as a favorite.
The following page will appear:

text_image
Save to Preset 1. [Not set] 2. [Not set] 3. [Not set] 4. [Not set] 5. [Not set]Press the ▲or buttons on remote control and select your desired location, press the 'OK' button on the unit/remote control to confirm storing the station on the selected preset.
Repeat the above steps to store up to 10 preset stations.
You will find them in My Added Stations list.
Recall a stored preset
Press the 'PRESET' button on the unit or remote control to recall a stored station, turn the NAVIGATE knob on the unit or use the navigate buttons on the remote control to recall a stored station, press 'OK' and listen to the selected station.
Station information:
Press the 'INFO' button on the remote control repeatedly to check the available station information.
Press the button to pause and press it again to resume play.
Press the MENU button on the unit or press the Menu button on remote control to return back to internet radio menu.
Explanation of symbol on playing page:
text_image
★1 This symbol indicates one station stored. This symbol indicates wired connection. This symbol indicates wireless connection.DAB radio mode
The DAB radio mode receives DAB/DAB+ digital radio and displays information about the station, stream and track playing. To enter DAB mode, either press Mode to cycle through the listening modes until DAB Radio is displayed, or select Menu > Main menu > DAB. The DAB radio mode menu offers the following options:
- Station list
- Scan
-
Manual tune
-
Prune invalid
DRC - Station order
- System settings
- Main Menu
Station List
The first time you select DAB radio mode, or if the station list is empty, radio automatically performs a full scan to see what stations are available. You may also need to start a scan manually to update the list of stations for one of the following reasons:
● Available stations change from time to time
- If reception was not good for the original scan (for example the antenna was not up), this may result in an empty or incomplete list of available stations.
- If you have poor reception of some stations (burbling), you may wish to list only stations with good signal strength.
A question mark before a station in a list indicates that station is currently unavailable. Depending on the cause of the loss of signal this may be only temporary. Stations that unlikely to be available again (for example you have moved out of the broadcast range of a station), can be removed from the station list.
Scan for stations
To start a scan manually, select Menu > Scan. Once the scan is complete, the radio shows a list of available stations. The manual tune menu option allows the user to select a particular channel and display the signal strength for that channel.
Remove stations from list
To remove stations that a listed but unavailable, select Menu > Prune invalid.
Selecting stations
To listen to or change a station, select Menu > Station List and press OK knob. Scroll knob control to select station you want to listen to. Stations listed with a '?' question mark in front of them are not available. Once selected, the station plays and the screen shows 'playing' information about the station, track or show broadcast by the station. Alternatively, pressing either the left and right keys, jumps to the next station up or down in the station list. Preset stations can be stored and recalled as described in Section 4.5 presets.
Now playing information
While the stream is playing, the screen shows its name and DLS (Dynamic Label segment) information broadcast by the station giving real-time information such as programme name, track title and contact details. Stereo broadcasts are indicated with an icon at the top of the screen. To view further information, press Info. Each time you press Info, another set of information is displayed, cycling through DLS text, programe type, ensemble name/frequency, signal strength/error rate, bit rate/codec/channels, today's date and DL Plus (if available).
Slideshow
When slideshow is available (dependent on the broadcasted signal), the images are displayed on the left side of the screen. To cycle through the different display options (thumbnail, slide with DLS text and full screen slide) press the knob control.
Settings
Dynamic range compression (DRC)
Some DAB broadcasts offer dynamic range compression (DRC). This feature allows radios to compress the dynamic range of the output audio stream, so that the volume of quite sounds is increased, and the volume of loud sounds is reduced. This can be useful if you are listening to music with a high dynamic range in a noisy environment (for example, classical music while cooking). To change the DRC setting for radio, select Menu > DRC, and then DRC high, DRC low or DRC off.
Note: Radio DRC setting does not have any effect if DRC data is not included in the broadcast.
Station order
You can choose the order of DAB station list to be either Alphanumeric, Ensemble or Valid, Ensemble lists groups of stations that are broadcast together on the same ensemble, for example BBC or South Wales local. Valid lists valid stations first, alphanumerically, then off-air stations. To change station order, select Menu > Station order > then Alphanumeric, Ensemble or Valid.
Station storing or preset:
While a station is playing, press and hold the 'PRESET' button on the unit or press and hold the preset button on the remote control.
The following screen will appear.
text_image
Save to Preset 1. [Not set] 2. [Not set] 3. [Not set] 4. [Not set] 5. [Not set]Turn the NAVIGATE knob on the unit or use the navigate buttons on the remote control to select the preset/storing position, press the OK knob on the unit or press the OK button on the remote control to confirm preset/storing.
Repeat the above steps to store/preset up to 10 stations.
IMPORTANT INFORMATION REGARDING DAB+ RECEPTION
DAB+ radio reception is different from FM radio reception.
- In FM, you can often still receive a weak station, but probably with a rustling or crackling sound.
- DAB + reception works digitally and if there is not enough signal you hear nothing. No hiss or crackle as with FM. This is not due to the radio, but to the fact that there is not enough DAB+ signal at that location.
• DAB + rule is: no or weak reception = no sound.
What can you do if you do not have direct DAB+ reception.
• Always point the antenna straight up vertically first.
- Do not place the radio too close to potential sources of interference such as, battery chargers, rotating machinery, computers, large metal surfaces, etc.
- Move the radio a few meters.
• Turn on the radio and activate a full scan in the DAB+ menu
- In the display of the radio you will see the progress of the scan and the number of stations found in the current position of the radio.
Important
- With DAB+ reception, there can be a very big difference in reception level between one location and "a few meters away". In case of a local weak DAB+ signal, move the radio to find a stronger signal.
- If you take the radio to another location, perform a full scan again. This will show you which DAB+ stations can be received there.
FM radio mode
FM radio mode receives analogue radio from the FM band and displays RDS (Radio Data System) information about the station and show (where broadcast). To enter FM Radio mode, either press Mode to cycle through the listening modes until FM Radio is displayed, or select Menu > Main menu > FM. The FM radio mode menu offers the following options:
- Scan Settings
- Audio Settings
- System Settings
- Main Menu
Selecting stations
To find a station, press OK. The frequency display starts to run up as radio scans the FM band. Alternatively, you can scan up or down by pressing and holding left or right buttons or tune manually with quick presses.
Note: Scanning can be set to search for strong signals only. Preset stations can be stored and recalled as described in Presets.
Now playing information
While a FM station is playing, the screen shows one of the two following sets data:
- If RDS information is available, by default the service name (i.e. station name) is displayed. You can cycle through further RDS information by pressing Info. Each time you press Info, another set of information is displayed, cycling through RDS radio text, RDS programme type, frequency and today's date.
- If no RDS information is available, the currently tuned frequency is shown.
Settings
Scan settings
By default, FM scans stop at any available station. This may result in a poor signal-to-noise ratio (hiss) from weak stations. To change the scan setting to stop only at stations with good signal strength, select Menu > Scan setting > Strong stations only? > Yes
Audio Settings
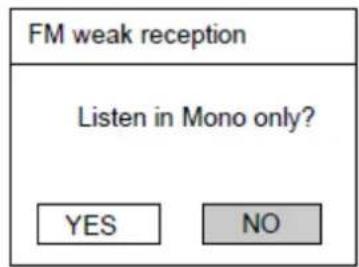
By default, all stereo stations are reproduced in stereo. For weak stations, this may result in a poor signal-to-noise ratio (hiss). To play weak stations in mono, select Menu > Audio setting > FM weak reception: Listen in mono only > Yes.
Station Recall:
After preset completed, press the MEMORY button or the Preset button to recall the stored station, press the OK knob or the OK button to listen to the selected station.
When Scan is selected, the unit will scan and stop at the next available station.
When Manual tune is selected, there will be a list of certain frequency, select one and play.
When Prune invalid is selected, there will remove all invalid stations from list.
text_image
Prune Invalid This removes all invalid stations, continue? YES NOSelect "YES" to remove all invalid stations, select "NO" to cancel.
When DRC is selected, set it to DRC high, DRC low or DRC off.
There are 3 levels of compression:
DRC Off - no compression. This is the default setting.
DRC Low - medium compression.
DRC High - maximum compression.
When Station order is selected, set it to Alphanumeric, Ensemble or Valid.
NOTE: If the reception is weak, please unwind or extend the telescopic antenna, or relocate the unit to get better reception
FM Mode:
In Main menu, if FM is selected, the following page will appear.
text_image
FM 00:00 87.50MHz [No Radio Text] FM RadioSymbol explanation:
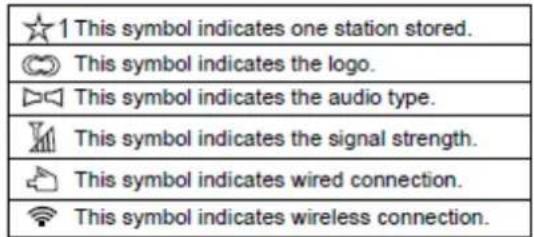
text_image
★1 This symbol indicates one station stored. © This symbol indicates the logo. ▷This symbol indicates the audio type. M This symbol indicates the signal strength.This symbol indicates wired connection.
¶ This symbol indicates wireless connection.Automatic searching:
Method 1: Press the scan button on the unit to search automatically;
Method 2: Press the Scan button on the remote control to search automatically;
Method 3: Press and hold the ☑ button on the unit and remote control to search up and down; when a station searched, it will stop and play.
Station storing or preset:
When a station searched (eg. 92.00MHz), press and hold the Preset button on the unit or press and hold the Preset button on the remote control, the following page will appear.
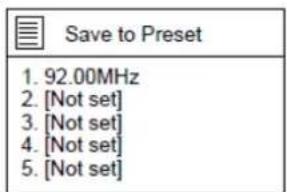
text_image
Save to Preset 1. 92.00MHz 2. [Not set] 3. [Not set] 4. [Not set] 5. [Not set]Turn the NAVIGATE knob on the unit or press the ▲ or button on the remote control to select the preset/storing position, press the NAVIGATE knob or press the OK button to confirm storing/preset.
Repeat the above steps to store/preset up to 10 stations.
Station recall:
After preset completed, press the Preset button to recall the stored station, press the OK knob or the OK button to listen to the selected station.
FM menu.:
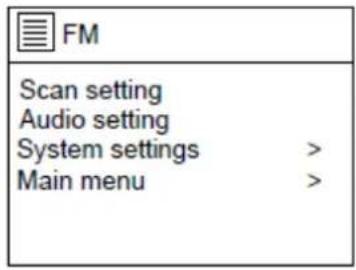
text_image
FM Scan setting Audio setting System settings > Main menu >If scan setting is selected, the following page will appear, turn the NAVIGATE knob on the unit or press the navigate button on remote control to set to YES or NO.
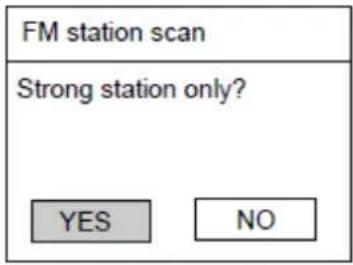
text_image
FM station scan Strong station only? YES NOIf Audio setting is selected, the following page will appear, turn the NAVIGATE knob on the unit or press the navigate button on remote control to set to YES or NO.
text_image
FM weak reception Listen in Mono only? YES NONOTE: If the reception is weak, please extend the telescopic antenna, or relocate the unit to get better reception.
Aux in mode:
Aux in mode plays audio from an external source such as an MP3 player.
To play audio with Aux in mode
- To avoid sudden loud volume, turn the volume low on both radio and, if adjustable, the audio source device.
- Connect the external audio source to the Aux in 3.5mm stereo socket.

flowchart
graph TD
    A["MP3 Player"] --> B["Mobile Phone"]
    B --> C["AUX Out"]
    C --> D["Line Out Jack of the external devices (Such like MP3 Player; cell phones; iPod/iPad ... etc)"]
    D --> E["AUX in"]
- To enter Aux in mode, either press Mode to cycle through the listening modes until Aux in is displayed, or select Menu > Main menu > Aux in.
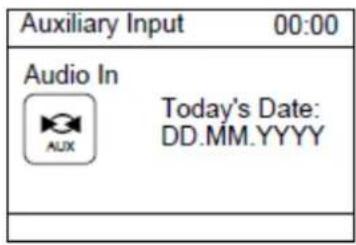
text_image
Auxiliary Input 00:00 Audio In Today's Date: DD.MM.YYYY- Adjust the volume of the DIR-260/DIR-261 radio (and, if necessary, the audio source device) as required.
During playing, use the control on your external device.
CD mode:
In Main menu, if CD is selected, the following page will appear.
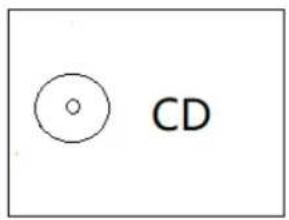
text_image
CDPress the Eject button on the unit or on the remote control to open the CD door.
Insert a CD disc into the CD compartment.
PLAY/PAUSE operation
Press OK button on the device or ▶ button on the remote control to start play.
Press Enter button on the device or ▶button on the remote control to Pause.
Press ■ button on the device or on the remote control to stop play.
Press for on the device to skip backward or forward to the desired track.
Press 📄 button on the remote control to skip backward or forward to the desired
track
TRACK PROGRAMMING
In CD/MP3 mode, press the prog button on remote control to start the memory function.
In CD disc: "P01" will display while "T00" flash, press ▲ or ▼ to select the track you want to memory.
Press Prog button on remote control to confirm. Repeat this operation can memorize 20 tracks.
REPEAT 1 To repeat the current track (song). "REPEAT" will display.
REPEAT ALL To repeat all tracks (full CD). "REPEAT ALL" will be displayed.
REPEAT FOLDER (in MP3 disc) To repeat the whole Folder. "REPEAT FOLDER" will be displayed.
RANDOM To shuffle all track and play them in random order. "RANDOM" will be displayed. INTRO To play the first 10 seconds of every track.
Bluetooth mode:

Bluetooth
The Bluetooth mode allows Bluetooth devices to pair with the radio, stream music and displays information about the track playing. To enter Bluetooth Audio mode, either press Mode to cycle through the listening modes until Bluetooth Audio is displayed, or select Menu > Main menu > Bluetooth. The Bluetooth Audio menu offers the following options:
- Setup Bluetooth
- View Details
- System Settings
- Main Menu
To pair a Bluetooth device with the radio
In Bluetooth mode, on your radio press Menu > Setup Bluetooth, this puts the radio into discoverable mode. The screen shows the Bluetooth name of the radio (Lenco DIR-260/DIR-261). On your Bluetooth smart device, make sure you Bluetooth is on and scan for device select the radio from the list of available Bluetooth devices.
To switch to another paired Bluetooth device
In Bluetooth mode, on the radio select Menu > View details > Paired Device List then select the required device from the list.
Control from the radio
While in Bluetooth mode you can pause, play, jump to next track and jump to previous track (in the playlist on the controlling Bluetooth device) using the buttons available on the radio.
Bluetooth connection details
For information on the current state of the Bluetooth connection and paired Bluetooth devices, in Bluetooth mode select Menu > View details, the menu offers the following options:
Bluetooth Info – information on the current state and version of the Bluetooth connection on the radio
Connected Device – details of the currently connected Bluetooth device
Paired Device List – list of up to ten devices that have been paired with the radio
NOTE "This product has a bluetooth reception function, you can't transmit any bluetooth sound with it: this means that you can receive wirelessly a bluetooth sound signal from an external source like a smartphone."
Press the ▶ button to Play/Pause
Press the 14 button on the device or press the or button on the remote control to skip track back/forward
Press and hold the or button to fast forward or fast backward
To disconnect a connected Bluetooth device: Press and hold down the [OK] button for 3 seconds. The message "Bluetooth Discoverable" will appear on the display.
Sleep Function:
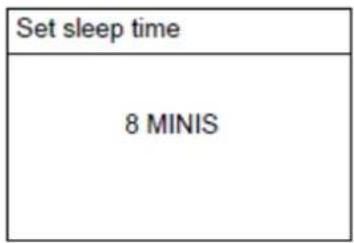
In Main menu, if Sleep is selected, the following page will appear.
| Set sleep time |
| Sleep OFF |
\~ Turn the NAVIGATE knob on the unit or press the ▲ or button on remote control to set to 15, 30, 45, 60 MINS. When finished setting, the left time will appear on display.
\~ The left sleep time icon will appear on the bottom column of the screen as illustrated below.
text_image
Set sleep time 8 MINIS
text_image
Auxiliary Input 00:00 Audio In Today's Date: DD.MM.YYYY 8Alarm Funtion:
In Main menu, if Alarms is selected, the following page will appear.
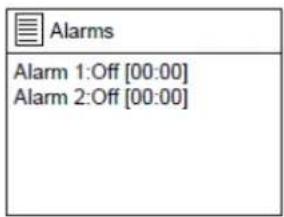
text_image
Alarms Alarm 1:Off [00:00] Alarm 2:Off [00:00]If Alarm 1 is selected, the following page will appear
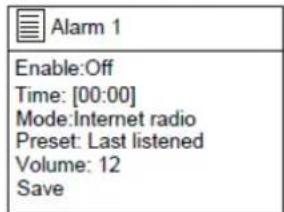
text_image
Alarm 1 Enable:Off Time: [00:00] Mode:Internet radio Preset: Last listened Volume: 12 SaveSelect "Enable" to set it to off, Daily, Once, Weekends or Weekdays.
Select "Time", the hour digit will blink, turn the NAVIGATE knob on unit or press the ▶or ▶ button on remote control to set the desired hour, press the NAVIGATE knob or the OK button to confirm; the minute digit will blink, set the desired minute in the same way.
Select "Mode" to set the alarm mode to Buzz, Internet radio, DAB or FM.
Select "Preset" to set the alarm sounding by the last listened or the stored station in Internet radio, DAB or FM page.
Select "Volume", turn the NAVIGATE knob on unit or press the <or button on remote control to set the desired volume.
Select "Save" after all settings, the alarm icon will appear at the bottom column of the screen, use the same way to set the Alarm 2.
When the alarm sounds, press the ⏻MODE button on unit or press the 📁 button on remote control to stop sounding.
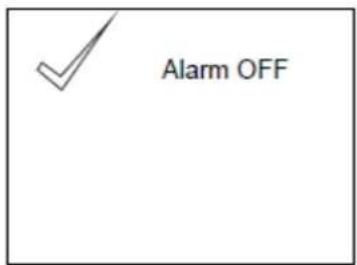
text_image
Alarm OFF
To cancel alarm completely, enter the alarm settings and set it OFF. The alarm icon will disappear.
SYSTEM SETTINGS:
After Main menu setup is completed, enter system settings, the following page will appear.
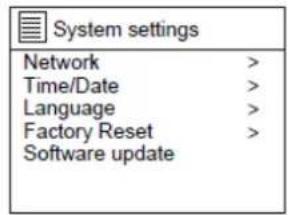
text_image
System settings Network > Time/Date > Language > Factory Reset > Software update >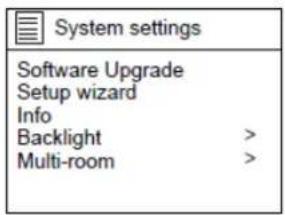
text_image
System settings Software Upgrade Setup wizard Info Backlight > Multi-room >- In System settings menu, if Network is selected, the screen will appear as below.
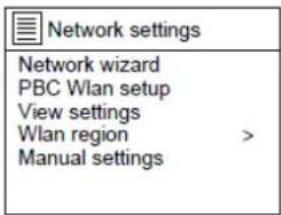
text_image
Network settings Network wizard PBC Wlan setup View settings Wlan region > Manual settings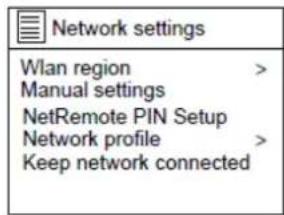
text_image
Network settings Wlan region > Manual settings NetRemote PIN Setup Network profile > Keep network connectedWhen Network wizard is selected, the unit will scan the available wireless network.
After scanning, the wireless network name list will appear, select one and try to connect.
Refer to page 6.
| Network settings |
| Nework wizard Scanning / |
When PBC Wlan setup is selected, the unit will scan the available wireless network.
Refer to page 6.
When View settings is selected, you can check the "Active connection",
"MAC address", "Wlan region", "DHCP", "SSID", "IP address", "Subnet mask", "Gateway address", "Primary DNS" and "Secondary DNS".
When Wlan region is selected, refer to page 6.
- In System settings menu, if Time/Date is selected, the screen will appear as below
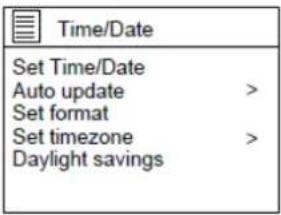
text_image
Time/Date Set Time/Date Auto update > Set format Set timezone > Daylight savings- In System settings menu, if Language is selected, select one to set the interface language.
- In System settings menu, if Factory Reset is selected, set it to "YES" to proceed, set it to "NO" to cancel factory reset.
- In System settings menu, if Setup wizard is selected, you can confirm if start setup now.
- In System settings menu, if Info is selected, you can check the "SW version", "Radio ID" and "Friendly Name".
- In System settings menu, if Backlight is selected, the screen will appear as attached images.
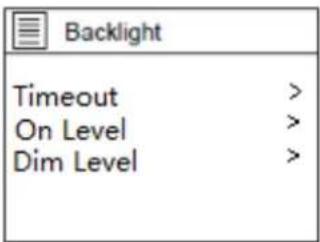
text_image
Backlight Timeout > On Level > Dim Level >If Timeout is selected, you can set the backlight of the screen of Timeout to On, 10 sec, 20 sec, 30 sec, 45 sec, 60 sec. 90 sec, 120 sec or 180 sec.
If On level is selected, you can set the backlight of the screen of Power On level to High, Medium or Low.
If Dim level is selected, you can also set the backlight of the screen of Standby Level to High, Medium or Low.
Error messages
| Message | Description | Example |
| Failed to connect | Correct key entered, but router rejects request | MAC filtering enabled on router |
| Format error | Cannot recognize file format – independent of network | Received MP3, but found that the stream wasn't MP3 when trying to decode |
| Network error | Problem past router - incorrect data being received from network | Data obtained from server is unreadable. |
| Network not ready | Problem with connection to router | Router switched off |
| Network timeout | Problem past router - no response being received from network | Streaming IR station and suddenly station becomes unavailable |
| Service not available (DAB) | No DAB reception |
| Update failed | Software upgrade failed |
Troubleshooting
| Problem | Cause | Solutions |
| Cannot connect to network | Network down | Check that network is working between a computer and the router |
| Router restricts access to listed MAC addresses | Obtain the DIR-260/DIR-261 MAC address from Menu > System settings > Network > View settings and add to router list. Note: DIR-260/DIR-261 has separate MAC addresses for wired and wireless networks; only the current network adaptor method address is displayed, but the other address can be obtained by changing the first pair of digits between '00' (wireless) and '02' (wired) | |
| Insufficient Wi-Fi signal strength | Check distance to router; see if a computer can connect to the network in this location | |
| Unknown encryption method | Change encryption method on router. DIR-260/DIR-261 supports WEP. WPA and WPA2 | |
| Unusual network configuration | Setup network manually through Menu > System settings > Network > Manual settings | |
| Firewall preventing access | Check the following ports are open on the router: UDP and TCP ports 80 and 123; DNS port 53. Windows shares: ports 135-139 and 445. Windows Media Player: varies – non-Microsoft firewalls may require configuration for UPnP. | |
| Cannot connect to Internet | Internet connection down | Check that Internet is working for a computer connected to the same network |
| Firewall preventing access | Check the following ports are open: UDP and TCP ports 80 and 123; DNS port 53. Some Internet radio stations may require additional ports to be opened. | |
| Cannot play particular Internet radio station | Station not broadcasting, overloaded or insufficient bandwidth. Station broadcasting using unknown codec. Link out of date. | Try other stations; try listening on computer via Internet radio portal website; try later. |
DAB+ Stuttering Sound Adjust the antenna angle or place the radio in a different location with better reception.
DAB+ No sound Move the radio to a location to find reception.

UNDOK ^™ is the companion app for your Lenco DIR-260/DIR-261 audio system.
With UNDOK you can control your Lenco DIR-260/DIR-261 audio device via a WiFi network connection.
There is a version for ANDROID and APPLE los smartphones/tablets and can be downloaded from the Google Play app store and Apple appstore. The UNDOK App runs on any iOS Smartphone or tablet running iOS 7 or later. An Android version is also available.
Scan the QR code below for direct download/install from Google Play/Apple Appstore


text_image
QR code image containing encoded data, no visible human-readable text

text_image
QR code image containing encoded data, no visible human-readable textNetwork connection setup.
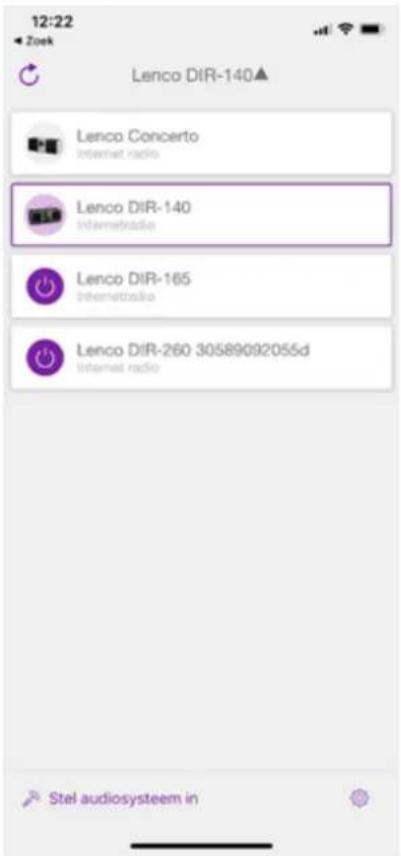
Before UNDOK can be used to control your Lenco DIR-260/DIR-261, you first must be sure that your smart device (smartphone, tablet) and the Lenco DIR-260/DIR-261 are connected to the same WIFI network.
To connect your audio devices to the appropriate network either consult this documentation for your audio device or consult the documentation of your smartphone/tablet.
When connected to the same WIFI network, the Lenco DIR-260/DIR-261 device will be found in the list of audio devices found. Select the Lenco DIR-260/DIR-261. Now you can start controlling the device with your UNDOK app.
UNDOK Example screen of the devices screen
text_image
12:22 Zoek Lenco DIR-140▲ Lenco Concerto Internet radio Lenco DIR-140 Internetradio Lenco DIR-165 Internetradio Lenco DIR-260 30589092055d Internet radio Stel audiosysteem inTechnical Specifications
| Connections | DC, 3.5mm AUX-IN, 3.5mm Headphone-Out |
| Input | AC 100-240V ~ 50/60Hz |
| Output | 12V/2.5A |
| Output power | 2 x 10W RMS |
| Batteries in remote control(not included) | AAA |
| DAB Frequency | 174.928 - 239.200 MHz |
| FM Frequency | 87.5 - 108 MHz |
| Bluetooth Frequency: | 2402 - 2480MHz |
| Power consumption | Max 30W |
| Power consumption (standby) | < 1W |
| Power consumption (network standby) | < 2W |
| Operating Temperature | 0°C-35°C |
| Operating position | Horizontal |
| Dim. unit | 380 x 218 x 145mm |
| Weight | 3.2KG |
Power supply adaptor: (For EU only)
Manufacturer: SHENZHEN SHI GUANGKAIYUAN TECHNOLOGY., LTD
Model Number: GKYPS0250120EU1
Use only original AC adaptor
Use only the power supply listed in the user instructions.
| Information | Value and precision |
| Manufacturers name or trade mark, commercial registrationAddress | SHENZHEN SHI GUANGKAIYUAN TECHNOLOGY LTD.91440300053998927W2 floor, 41 TianSheng Road, TianLiao village, GongMing Street, Guangming, Shenzhen, Guangdong, P.R. China |
| Model Identifier | GKYPS0250120EU1 |
| Input voltage | 100-240V |
| Input AC frequency | 50/60Hz |
| Output voltage | 12V |
| Output current | 2.5A |
| Output Power | 30W |
| Average active efficiency | 86.95% |
| Efficiency at low load (10%) | 80% |
| No load Power consumption | 0.095W |
Disclaimer
Updates to Firmware and/or hardware components are made regularly. Therefore some of the instruction, specifications and pictures in this documentation may differ slightly from your particular situation. All items described in this guide for illustration purposes only and may not apply to particular situation. No legal right or entitlements may be obtained from the description made in this manual.
Guarantee
Lenco offers service and warranty in accordance to European law, which means that in case of repairs (both during and after the warranty period) you should contact your local dealer.
Important note: It is not possible to send products that need repairs to Lenco directly.
Important note: If this unit is opened or accessed by a non-official service center in any way, the warranty expires.
This device is not suitable for professional use. In case of professional use, all warranty obligations of the manufacturer will be voided.
Disposal of the Old Device

natural_image
Simple line drawing of a trash bin with crossed lines indicating no waste or prohibition (no text or symbols)
This symbol indicates that the relevant electrical product or battery should not be disposed of as general household waste in Europe. To ensure the correct waste treatment of the product and battery, please dispose them in accordance to any applicable local laws of requirement for disposal of electrical equipment or batteries. In so doing, you will help to conserve natural resources and improve standards of environmental protection in treatment and disposal of electrical waste (Waste Electrical and Electronic Equipment Directive).
DECLARATION OF CONFORMITY
Hereby, Commaxx declares that the radio equipment type [Lenco DIR-260/261] is in compliance with directive 2014/53/EU. The full text of the EU declaration of conformity is available at the following internet address:
https://commaxx-certificates.com/doc/dir-260_doc.pdf
| Type RF | Frequency range (MHz) | Power (dBm) |
| Bluetooth | 2402-2480 | <6 |
| WiFi 2.4 | 2412-2472 | <20 |
| WiFi 5 | 5180-5240 | <23 |
| DAB | 174-240 | - |
| FM | 87.5-108 | - |
Service
For more information and helpdesk support, please visit www.lenco.com
Commaxx B.V. Wiebachstraat 37, 6466 NG Kerkrade, The Netherlands.
LET OP:
natural_image
Simple line drawing of an open book with no text or symbols visibleVoedingsadapter

natural_image
Technical line drawing of a mechanical clamp or connector assembly (no text or symbols)Afstandsbediening

text_image
OK Menu Power Scan Sleep Mode EQ OK V+ V+ 1 .. 2 ABC 3 DEF 4 GB 5 JX 6 MWD 7 FORD 8 SUV 9 WAVE Prog 0 ... Risp. Lenco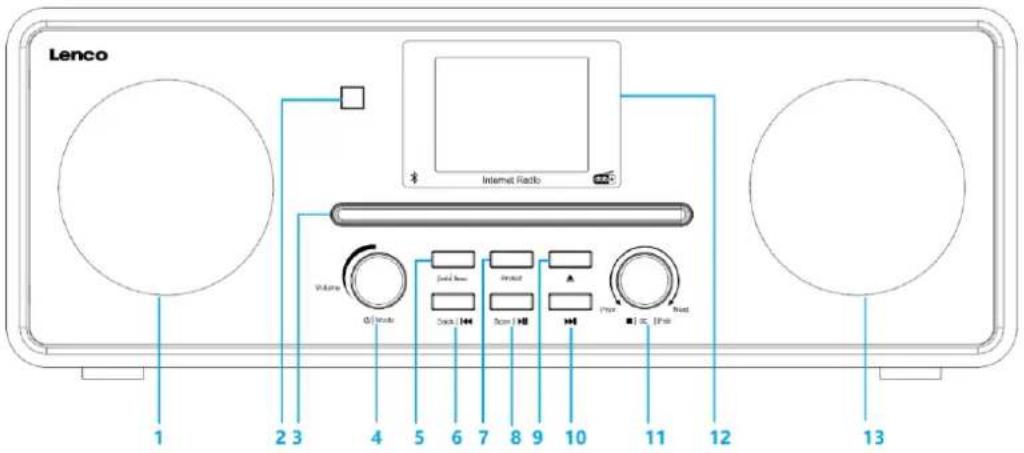
text_image
Lenco Internet Radio Volume Q/Video Sound Box Project Track Score 100% 110% 12 13text_image
Diagram illustrating the process of battery charging and discharging, showing stages from battery arrangement to final discharge.text_image
Setup wizard? Start now? YES NO| EN | NL |
| Setup wizard? | Installatiewizard? |
| Start now? | Nu starten? |
| YES | JA |
| NO | NEE |
text_image
Auto update Update from DAB Update from FM Update from Network No update| EN | NL |
| Auto update | Automatisch bijwerken |
| Update from DAB | Update via DAB |
| Update from FM | Update via FM |
| Update from Network | Update via netwerk |
| No update | Geen update |
text_image
Set timezone UTC +00:00: Dublin,London UTC +00:30: UTC +01:00:Madrid, Ams UTC +01:30: UTC +02:00: Athens, Cario
text_image
Daylight savings Daylight savings ON OFF| EN | NL |
| Set timezone | Tijdzone instellen |
| UTC + 00:00: Dublin, Landon | UTC + 00:00: Dublin, Londen |
| UTC + 00:30: | UTC + 00:30: |
| UTC+ 01:00: Madrid, Ams | UTC+ 01:00: Madrid, Amsterdam |
| UTC+ 01:30: | UTC+ 01:30: |
| UTC + 02:00: Athens, Cario | UTC + 02:00: Athene, Cairo |
| Daylight savings | Zomertijd |
| Daylight savings | Zomertijd |
| ON | AAN |
| OFF | UIT |
| Network settings | |
| Keep network connected? | |
| YES | NO |
| EN | NL |
| Network settings | Netwerkinstellingen |
| Keep network connected? | Netwerk verbonden houden? |
| YES | JA |
| NO | NEE |
text_image
Network settings Please wait Connecting_
text_image
Connected
text_image
Setup wizard Setup wizard completed Press OK to exit| EN | NL |
| Network settings | Netwerkinstellingen |
| Please wait Connecting._ | Even geduld a.u.b. Verbinden._ |
| Connected | Verbonden |
| Setup wizard | Installatiewizard |
| Setup wizard completed | Installatiewizard voltooid |
| Press OK to exit | Druk op OK om te verlaten |
| WPS Menu | |
| Push Button | > |
| Pin | > |
| Skip WPS | > |
| EN | NL |
| WPS Menu | WPS-menu |
| Push Button | Drukknop |
| Pin | Pin |
| Skip WPS | WPS overslaan |
| WPS Setup |
| Push WPS buttonat the other endPress SELECT to continue |
| WPS Setup | |
| Enter PINXXXXXXXXXat the other end | |
| Press SELECT to continue | |
| ☆1 This symbol indicates one station stored. |
text_image
Prune Invalid This removes all invalid stations, continue? YES NO| EN | NL |
| Prune Invalid | Opruimen |
| This removes all invalid stations, continue? | Dit verwijdert alle ongeldig stations,verdergaan? |
| YES | JA |
| NO | NEE |
Selecteer "YES" (Ja) om alle ongeldige stations te verwijderen of selecteer "NO" (Nee) om te annuleren.
text_image
FM 00:00 87.50MHz [No Radio Text] FM Radio| EN | NL |
| FM | FM |
| 87.50MHz | 87,50 MHz |
| FM Radio | FM-radio |
| [No Radio Text] | Geen radiotekst |
| ★1 This symbol indicates one station stored. |
| FM | |
| Scan setting | |
| Audio setting | |
| System settings | > |
| Main menu | > |
| EN | NL |
| FM | FM |
| Scan setting | Scan instelling |
| Audio setting | Audio-instelling |
| System settings | Systeeminstellingen |
| Main menu | Hoofdmenu |
| FM station scan | |
| Strong station only? | |
| YES | NO |
| EN | NL |
| FM station scan | FM-staionsscan |
| Strong station only? | Alleen sterke stations? |
| YES | JA |
| NO | NEE |
text_image
FM weak reception Listen in Mono only? YES NO| EN | NL |
| FM weak reception | Zwakke FM-ontvangst |
| Listen in Mono only? | Alleen in mono luisteren? |
| YES | JA |
| NO | NEE |
flowchart
graph TD
    A["MP3 Player"] --> B["Connect to the Phones; AUX Out; Line Out Jack of the external devices (Such like MP3 Player; cell phones; iPod/iPad ... etc)"]
    C["Mobile Phone"] --> D["AUX in"]
    E["Laptop"] --> D
    D --> F["Switch"]
| Set sleep time |
| 8 MINIS |
| Auxiliary Input 00:00 | |
| Audio InAUX Today's Date:DD.MM.YYYY | |
| 8 |
| EN | NL |
| Set sleep time | Slaaptimer instellen |
| 8 MINIS | 8 minuten |
| Auxiliary Input | AUX-ingang |
| Audio In | Audio-ingang |
| AUX | AUX |
| Today's Date: | Datum van vandaag: |
| DD.MM.YYYY | DD.MM.JJJJ |
Alarmfunctie:
text_image
Alarm 1 Enable:Off Time: [00:00] Mode:Internet radio Preset: Last listened Volume: 12 Savetext_image
✓ Alarm OFFtext_image
System settings Software Upgrade Setup wizard Info Backlight > Multi-room >| EN | NL |
| System settings | Systeeminstellingen |
| Network | Netwerk |
| Time/Date | Tijd/datum |
| Language | Taal |
| Factory Reset | Fabrieksinstellingen terugstellen |
| Software update | Software-update |
| System settings | Systeeminstellingen |
| Software Update | Software-update |
| Setup wizard | Installatiewizard |
| Info | Info |
| Backlight | Achtergrondverlichting |
| Multi-room | Multikamer |
text_image
Network settings Wlan region > Manual settings NetRemote PIN Setup Network profile > Keep network connected| EN | NL |
| Network settings | Netwerkinstellingen |
| Network wizard | Netwerk-wizard |
| PBC Wlan setup | PBC WLAN-instelling |
| View settings | Weergave-instellingen |
| Wlan region | WLAN-gebied |
| Manual settings | Handmatige instellingen |
| Network settings | Netwerkinstellingen |
| Wlan region | WLAN-gebied |
| Manual settings | Handmatige instellingen |
| NetRemote PIN Setup | NetRemote-pininstelling |
| Network profile | Netwerkprofiel |
| Keep network connected | Netwerk verbonden houden |
| Network settings |
| Nework wizard Scanning / |
| EN | NL |
| Network settings | Netwerkinstellingen |
| Network wizard | Netwerk-wizard |
| Scanning/ | Scannen/ |
text_image
QR code image containing encoded data, no visible human-readable text
| EN | NL |
| Download on the App Store | Download in de App Store |

text_image
QR code image containing encoded data, no visible human-readable textNetwerkverbinding instellen.
natural_image
Symbol of a trash bin crossed out by two diagonal lines, with a blank rectangular base below (no text or labels)https://commaxx-certificates.com/doc/dir-260_doc.pdf
| Type RF | Frequentiebereik (MHz) | Vermogen (dBm) |
| Bluetooth | 2402-2480 | <6 |
| WiFi 2.4 | 2412-2472 | <20 |
| WiFi 5 | 5180-5240 | <23 |
| DAB | 174-240 | - |
| FM | 87.5-108 | - |
Service
natural_image
Simple line drawing of an open book with no text or symbols visibleNetzadapter

natural_image
Technical line drawing of a mechanical device with a coiled cable and two ports (no text or symbols)Fernbedienung

text_image
OK Menu Power Scan Sleep Mode EQ OK V+ V+ 1 . . 2 ABC 3 DEF 4 CBS 5 JX 6 MWD 7 PDRS 8 TUV 9 WACC Prog 0 ... Rep. Lenco
text_image
Lenco Internet Radio Volume 0/ Mode Cock 1 Screw 1 I/O I/O I/O 1 2 3 4 5 6 7 8 9 10 11 12 13text_image
Diagram showing battery assembly process with cylindrical cells and a battery cell diagram before and after disassemblytext_image
Setup wizard? Start now? YES NOtext_image
Auto update Update from DAB Update from FM Update from Network No updateUTC +00:00: Dublin,London
UTC +00:30:
UTC +01:00:Madrid, Ams
UTC +01:30:
UTC +02:00: Athens, Cario
Daylight savings
Daylight savings
ON
OFF
| EN | DE |
| Set timezone | Zeitzone einstellen |
| UTC + 00:00: Dublin, Landon | UTC + 00:00: Dublin, London |
| UTC + 00:30: | UTC + 00:30: |
| UTC+ 01:00: Madrid, Ams | UTC + 01:00: Madrid, Amsterdam |
| UTC+ 01:30: | UTC + 01:30: |
| UTC + 02:00: Athens, Cario | UTC + 02:00: Athen, Kairo |
| Daylight savings | Sommerzeit |
| Daylight savings | Sommerzeit |
| ON | EIN |
| OFF | AUS |
| Network settings | |
| Keep network connected? | |
| YES | NO |
text_image
Network settings Please wait Connecting_
text_image
Connected
text_image
Setup wizard Setup wizard completed Press OK to exit| WPS Menu | |
| Push Button | > |
| Pin | > |
| Skip WPS | > |
| WPS Setup |
| Push WPS buttonat the other endPress SELECT to continue |
| WPS Setup | |
| Enter PINXXXXXXXXXat the other end | |
| Press SELECT to continue | |
| ☆1 This symbol indicates one station stored. |
text_image
Prune Invalid This removes all invalid stations, continue? YES NOtext_image
FM 00:00 87.50MHz [No Radio Text] FM Radio| EN | DE |
| FM | FM |
| 87.50MHz | 87,50 MHz |
| FM Radio | FM-Radio |
| [No Radio Text] | [Kein Radiotext] |
Symbolerklärung:
| ★1 This symbol indicates one station stored. |
| This symbol indicates the logo. |
| This symbol indicates the audio type. |
| This symbol indicates the signal strength. |
| This symbol indicates wired connection. |
| This symbol indicates wireless connection. |
| FM |
| Scan setting Audio setting System settings > |
| Main menu > |
| EN | DE |
| FM | FM |
| Scan setting | Suchlaufeinstellung |
| Audio setting | Audioeinstellung |
| System settings | Systemeinstellungen |
| Main menu | Hauptmenü |
text_image
FM station scan Strong station only? YES NO| EN | DE |
| FM station scan | FM-Senderscan |
| Strong station only? | Nur starke Radiosender? |
| YES | JA |
| NO | NEIN |
text_image
FM weak reception Listen in Mono only? YES NO| EN | DE |
| FM weak reception | Schwache FM-Sender |
| Listen in Mono only? | Nur in Mono wiedergeben? |
| YES | JA |
| NO | NEIN |
flowchart
graph TD
    A["MP3 Player"] -->|Connect to the Phones; AUX Out; Line Out Jack of the external devices (Such like MP3 Player; cell phones; iPod/iPad ... etc)| B["AUX in"]
    C["Mobile Phone"] -->|Connect to the Phones; AUX Out; Line Out Jack of the external devices (Such like MP3 Player; cell phones; iPod/iPad ... etc)| B
    D["MP3 Player"] -->|Connect to the Phones; AUX Out; Line Out Jack of the external devices (Such like MP3 Player; cell phones; iPod/iPad ... etc)| B
    E["Mobile Phone"] -->|Connect to the Phones; AUX Out; Line Out Jack of the external devices (Such like MP3 Player; cell phones; iPod/iPad ... etc)| B
    F["MP3 Player"] -->|Connect to the Phones; AUX Out; Line Out Jack of the external devices (Such like MP3 Player; cell phones; iPod/iPad ... etc)| B
    G["Mobile Phone"] -->|Connect to the Phones; AUX Out; Line Out Jack of the external devices (Such like MP3 Player; cell phones; iPod/iPad ... etc)| B
    H["MP3 Player"] -->|Connect to the Phones; AUX Out; Line Out Jack of the external devices (Such like MP3 Player; cell phones; iPod/iPad ... etc)| B
    I["Mobile Phone"] -->|Connect to the Phones; AUX Out; Line Out Jack of the external devices (Such like MP3 Player; cell phones; iPod/iPad ... etc)| B
    J["MP3 Player"] -->|Connect to the Phones; AUX Out; Line Out Jack of the external devices (Such like MP3 Player; cell phones; iPod/iPad ... etc)| B
    K["Mobile Phone"] -->|Connect to the Phones; AUX Out; Line Out Jack of the external devices (Such like MP3 Player; cell phones; iPod/iPad ... etc)| B
    L["MP3 Player"] -->|Connect to the Phones; AUX Out; Line Out Jack of the external devices (Such like MP3 Player; cell phones; iPod/iPad ... etc)| B
    M["Mobile Phone"] -->|Connect to the Phones; AUX Out; Line Out Jack of the external devices (Such like MP3 Player; cell phones; iPod/iPad ... etc)| B
    N["MP3 Player"] -->|Connect to the Phones; AUX Out; Line Out Jack of the external devices (Such like MP3 Player; cell phones; iPod/iPad ... etc)| B
    O["Mobile Phone"] -->|Connect to the Phones; AUX Out; Line Out Jack of the external devices (Such like MP3 Player; cell phones; iPod/iPad ... etc)| B
    P["MP3 Player"] -->|Connect to the Phones; AUX Out; Line Out Jack of the external devices (Such like MP3 Player; cell phones; iPod/iPad ... etc)| B
    Q["Mobile Phone"] -->|Connect to the Phones; AUX Out; Line Out Jack of the external devices (Such like MP3 Player; cell phones; iPod/iPad ... etc)| B
    R["MP3 Player"] -->|Connect to the Phones; AUX Out; Line Out Jack of the external devices (Such like MP3 Player; cell phones; iPod/iPad ... etc)| B
    S["Mobile Phone"] -->|Connect to the Phones; AUX Out; Line Out Jack of the external devices (Such like MP3 Player; cell phones; iPod/iPad ... etc)| B
    T["MP3 Player"] -->|Connect to the Phones; AUX Out; Line Out Jack of the external devices (Such like MP3 Player; cell phones; iPod/iPad ... etc)| B
    U["Mobile Phone"] -->|Connect to the Phones; AUX Out; Line Out Jack of the external devices (Such like MP3 Player; cell phones; iPod/iPad ... etc)| B
    V["MP3 Player"] -->|Connect to the Phones; AUX Out; Line Out Jack of the external devices (Such like MP3 Player; cell phones; iPod/iPad ... etc)| B
    W["Mobile Phone"] -->|Connect to the Phones; AUX Out; Line Out Jack of the external devices (Such like MP3 Player; cell phones; iPod/iPad ... etc)| B
    X["MP3 Player"] -->|Connect to the Phones; AUX Out; Line Out Jack of the external devices (Such like MP3 Player; cell phones; iPod/iPad ... etc)| B
    Y["Mobile Phone"] -->|Connect to the Phones; AUX Out; Line Out Jack of the external devices (Such like MP3 Player; cell phones; iPod/iPad ... etc)| B
    Z["MP3 Player"] -->|Connect to the Phones; AUX Out; Line Out Jack of the external devices (Such like MP3 Player; cell phones; iPod/iPad ... etc)| B
    AA["Mobile Phone"] -->|Connect to the Phones; AUX Out; Line Out Jack of the external devices (Such like MP3 Player; cell phones; iPod/iPad ... etc)| B
    AB["MP3 Player"] -->|Connect to the Phones; AUX Out; Line Out Jack of the external devices (Such like MP3 Player; cell phones; iPod/iPad ... etc)| B
    AC["Mobile Phone"] -->|Connect to the Phones; AUX Out; Line Out Jack of the external devices (Such like MP3 Player; cell phones; iPod/iPad ... etc)| B
    AD["MP3 Player"] -->|Connect to the Phones; AUX Out; Line Out Jack of the external devices (Such like MP3 Player; cell phones; iPod/iPad ... etc)| B
    AE["Mobile Phone"] -->|Connect to the Phones; AUX Out; Line Out Jack of the external devices (Such like MP3 Player; cell phones; iPod/iPad ... etc)| B
    AF["MP3 Player"] -->|Connect to the Phones; AUX Out; Line Out Jack of the external devices (Such like MP3 Player; cell phones: iPod/iPad ... etc)| B
    AG["Mobile Phone"] -->|Connect to the Phones; AUX Out: Cell phones: iPod/iPad... & other devices: iPod/iPad... | B
    AH["MP3 Player"] -->|Connect to the Phones: iPod/iPad... & other devices: iPod/iPad... | B
    AI["Mobile Phone"] -->|Connect to the Phones: iPod/iPad... & other devices: iPod/iPad... | B
    AJ["MP3 Player"] -->|Connect to the Phones: iPod/iPad... & other devices: iPod/iPad... | B
    AK["Mobile Phone"] -->|Connect to the Phones: iPod/iPad... & other devices: iPod/iPad... | B
    AL["MP3 Player"] -->|Connect to the Phones: iPod/iPad... & other devices: iPod/iPad... | B
    AM["Mobile Phone"] -->|Connect to the Phones: iPod/iPad... & other devices: iPod/iPad... | B
    AN["MP3 Player"] -->|Connect to the Phones: iPod/iPad... & other devices: iPod/iPad... | B
    AO["Mobile Phone"] -->|Connect to the Phones: iPod/iPad... & other devices: iPod/iPad... | B
    AP["MP3 Player"] -->|Connect to the Phones: iPod/iPad... & other devices: iPod/iPad... | B
    AQ["Mobile Phone"] -->|Connect to the Phones: iPod/iPad... & other devices: iPod/iPad... | B
    AR["MP3 Player"] -->|Connect to the Phones: iPod/iPad... & other devices: iPod/iPad... | B
    AS["Mobile Phone"] -->|Connect to the Phones: iPod/iPad... & other devices: iPod/iPad... | B
    AT["MP3 Player"] -->|Connect to the Phones: iPod/iPad... & other devices: iPod/iPad... | B
    AU["Mobile Phone"] -->|Connect to the Phones: iPod/iPad... & other devices: iPod/iPad... | B
    AV["MP3 Player"] -->|Connect to the Phones: iPod/iPad... & other devices: iPod/iPad... | B
    AW["Mobile Phone"] -->|Connect to the Phones: iPod/iPad... & other devices: iPod/iPad... | B
    AX["MP3 Player"] -->|Connect to the Phones: iPod/iPad... & other devices: iPod/iPad... | B
    AY["Mobile Phone"] -->|Connect to the Phones: iPod/iPad... & other devices: iPod/iPad... | B
    AZ["MP3 Player"] -->|Connect to the Phones: iPod/iPad... & other devices: iPod/iPad... | B
    BA["Mobile Phone"] -->|Connect to the Phones: iPod/iPad... & other devices: iPod/iPad... | B
    BB["MP3 Player"] -->|Connect to the Phones: iPod/iPad... & other devices: iPod/iPad... | B
    BC["Mobile Phone"] -->|Connect to the Phones: iPod/iPad... & other devices: iPod/iPad... | B
    BD["MP3 Player"] -->|Connect to the Phones: iPod/iPad... & other devices: iPod/iPad... | B
    BE["Mobile Phone"] -->|Connect to the Phones: iPod/iPad... & other devices: iPod/iPad... | B
    BF["MP3 Player"] -->|Connect to the Phones: iPod/iPad... & other devices: iPod/iPad... | B
    BG["Mobile Phone"] -->|Connect to the Phones: iPod/iPad... & other devices: iPod/iPad... | B
    BH["MP3 Player"] -->|Connect to the Phones: iPod/iPad... & other devices: iPod/iPad... | B
    BI["Mobile Phone"] -->|Connect to the Phones: iPod/iPad... & other devices: iPod/iPad... | B
    BJ["MP3 Player"] -->|Connect to the Phones: iPod/iPad... & other devices: iPod/iPad... | B
    BK["Mobile Phone"] -->|Connect to the Phones: iPod/iPad... & other devices: iPod/iPad... | B
    BL["MP3 Player"] -->|Connect to the Phones: iPod/iPad... & other devices: iPod/iPad... | B
    BM["Mobile Phone"] -->|Connect to the Phones: iPod/iPad... & other devices: iPod/iPad... | B
    BN["MP3 Player"] -->|Connect to the Phones: iPod/iPad... & other devices: iPod/iPad... | B
    BO["Mobile Phone"] -->|Connect to the Phones: iPod/iPad... & other devices: iPod/iPad... | B
    BP["MP3 Player"] -->|Connect to the Phones: iPod/iPad... & other devices: iPod/iPad... | B
    BQ["AUX in"]
text_image
Set sleep time 8 MINIS
text_image
Auxiliary Input 00:00 Audio In Today's Date: DD.MM.YYYY AUX 8| EN | DE |
| Set sleep time | Einschlaftimer einstellen |
| 8 MINIS | 8 Minuten |
| Auxiliary Input | AUX-Eingang |
| Audio In | Audioeingang |
| AUX | AUX |
| Today's Date: | Das heutige Datum: |
| DD.MM.YYYY | TT.MM.JJJJ |
Weckruffunktion:
| Alarm 1 |
| Enable:OffTime: [00:00]Mode:Internet radioPreset: Last listenedVolume: 12Save |
text_image
System settings Software Upgrade Setup wizard Info Backlight > Multi-room >text_image
Network settings Wlan region > Manual settings NetRemote PIN Setup Network profile > Keep network connected| Network settings |
| Nework wizard Scanning / |
text_image
QR code image containing encoded data, no visible human-readable text
| EN | DE |
| Download on the App Store | Vom App Store herunterladen |

text_image
QR code image containing encoded data, no visible human-readable textnatural_image
Symbol of a trash bin crossed out by two crossed lines, with a solid black rectangle below (no text or labels)https://commaxx-certificates.com/doc/dir-260_doc.pdf
| Typ HF | Frequenzbereich (MHz) | Sendeleistung (dBm) |
| Bluetooth | 2402-2480 | <6 |
| WiFi 2.4 | 2412-2472 | <20 |
| WiFi 5 | 5180-5240 | <23 |
| DAB | 174-240 | - |
| FM | 87.5-108 | - |
Service
natural_image
Simple line drawing of an open book with no text or symbols visibleAdaptateur secteur
natural_image
Technical line drawing of a mechanical clamp or connector with a coiled cable and terminal ports (no text or symbols)Télécommande

text_image
OK Menu Print Scan Sleep Mode EQ OK V+ V+ 1.. 2ABC 3DIF 4 CBS 5.9L 6MWD 7 PDBS 8 TUV 9 MANS Prog 0 nan Rap. Lenco
text_image
Lenco Internet Radio Volume Q/Node Sound Box Project Track Track Track Track Track Track 1 2 3 4 5 6 7 8 9 10 11 12 13text_image
Diagram illustrating the process of battery charging and discharging, showing stages from battery arrangement to final discharge.Précautions relatives aux piles :
text_image
Setup wizard? Start now? YES NO| EN | FR |
| Setup wizard? | Assistant de configuration ? |
| Start now? | Commencer maintenant ? |
| YES | OUI |
| NO | NON |
text_image
Auto update Update from DAB Update from FM Update from Network No updateUTC +00:00: Dublin,London
UTC +00:30:
UTC +01:00:Madrid, Ams
UTC +01:30:
UTC +02:00: Athens, Cario
Daylight savings
Daylight savings
ON
OFF
| Network settings |
| Keep network connected? |
| YES NO |
text_image
Network settings Please wait Connecting_
text_image
Connected
text_image
Setup wizard Setup wizard completed Press OK to exit| WPS Menu | |
| Push Button | > |
| Pin | > |
| Skip WPS | > |
| EN | FR |
| WPS Menu | Menu WPS |
| Push Button | Bouton-poussoir |
| Pin | Code PIN |
| Skip WPS | Ignorer la fonction WPS |
| WPS Setup |
| Push WPS buttonat the other endPress SELECT to continue |
| WPS Setup | |
| Enter PINXXXXXXXXXat the other end | |
| Press SELECT to continue | |
| ☆1 This symbol indicates one station stored. |
text_image
Prune Invalid This removes all invalid stations, continue? YES NO| EN | FR |
| Prune Invalid | Éliminer non valide |
| This removes all invalid stations, continue? | Cela supprime toutes les stations non valides, continuer ? |
| YES | OUI |
| NO | NON |
text_image
FM 00:00 87.50MHz [No Radio Text] FM Radio| EN | FR |
| FM | FM |
| 87.50MHz | 87,50 MHz |
| FM Radio | Radio FM |
| [No Radio Text] | [Aucun texte radio] |
text_image
☆1 This symbol indicates one station stored. ∞ This symbol indicates the logo. ▷This symbol indicates the audio type. ¶ This symbol indicates the signal strength. ◇This symbol indicates wired connection. ¶ This symbol indicates wireless connection.text_image
FM Scan setting Audio setting System settings > Main menu >| EN | FR |
| FM | FM |
| Scan setting | Réglage de la recherche |
| Audio setting | Réglage audio |
| System settings | Réglages système |
| Main menu | Menu principal |
text_image
FM station scan Strong station only? YES NO| EN | FR |
| FM station scan | Recherche des stations FM |
| Strong station only? | Stations fortes uniquement ? |
| YES | OUI |
| NO | NON |
text_image
FM weak reception Listen in Mono only? YES NOflowchart
graph TD
    A["MP3 Player"] --> B["Mobile Phone"]
    B --> C["Connect to the Phones; AUX Out; Line Out Jack of the external devices (Such like MP3 Player; cell phones; iPod/iPad ... etc)"]
    C --> D["AUX in"]
text_image
Set sleep time 8 MINIS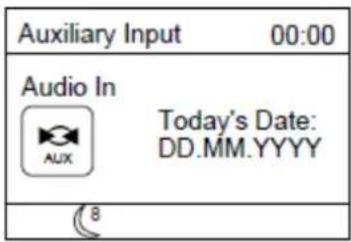
text_image
Auxiliary Input 00:00 Audio In Today's Date: DD.MM.YYYY AUX 8text_image
Alarm 1 Enable:Off Time: [00:00] Mode:Internet radio Preset: Last listened Volume: 12 Savetext_image
System settings Software Upgrade Setup wizard Info Backlight > Multi-room >| Network settings | |
| Wlan region | > |
| Manual settings | |
| NetRemote PIN Setup | |
| Network profile | > |
| Keep network connected | |
| Network settings |
| Nework wizardScanning / |
text_image
QR code image containing encoded data, no visible human-readable text
| EN | FR |
| Download on the App Store | Télécharger sur App Store |

text_image
QR code image containing encoded data, no visible human-readable textnatural_image
Symbol of a trash bin crossed out by two diagonal lines, with a blank rectangular base below (no text or labels)https://commaxx-certificates.com/doc/dir-260_doc.pdf
| Type RF | Bande de fréquences (MHz) | Puissance (dBm) |
| Bluetooth | 2402-2480 | <6 |
| WiFi 2.4 | 2412-2472 | <20 |
| WiFi 5 | 5180-5240 | <23 |
| DAB | 174-240 | - |
| FM | 87.5-108 | - |
Service après-vente
natural_image
Simple line drawing of an open book with no text or symbols visiblenatural_image
Technical line drawing of a mechanical clamp or connector assembly (no text or symbols)Mando a distancia

text_image
OK Menu Power Scan Sleep Mode EQ OK V+ V- 1.. 2ABC 3DEF 4 GHz 5.9L 6MWD 7 PDB 8 TUV 9 MHz Plug 0 1 2 Lenco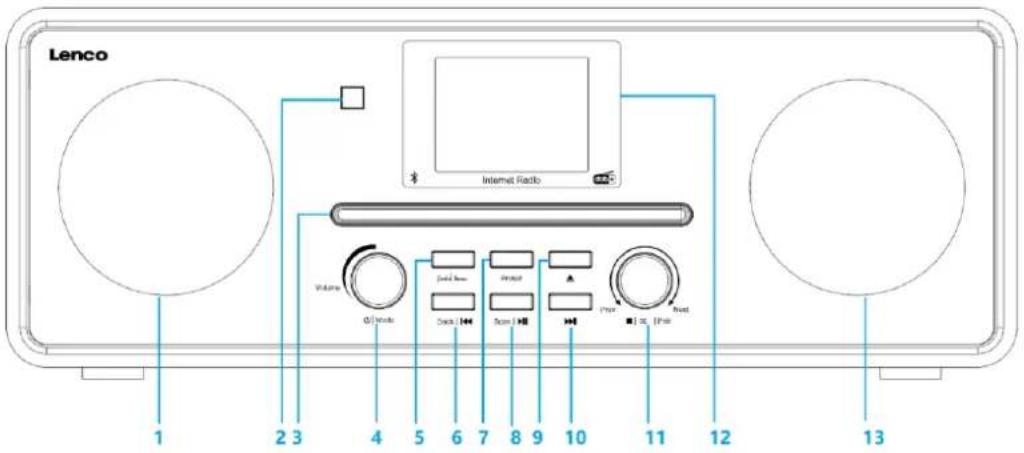
text_image
Lenco Internet Radio Volume Q/Node Sound Box Project Track Track Track Track Track Track 1 2 3 4 5 6 7 8 9 10 11 12 13text_image
Diagram illustrating the process of battery charging and discharging, showing stages from battery arrangement to final discharge.text_image
Setup wizard? Start now? YES NOtext_image
Auto update Update from DAB Update from FM Update from Network No updatetext_image
Set timezone UTC +00:00: Dublin,London UTC +00:30: UTC +01:00:Madrid, Ams UTC +01:30: UTC +02:00: Athens, Cario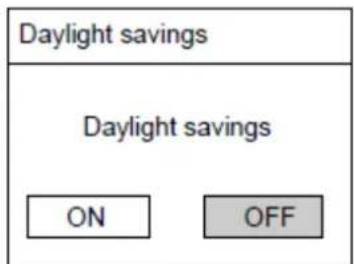
text_image
Daylight savings Daylight savings ON OFF| EN | ES |
| Set timezone | Configurar zona horaria |
| UTC + 00:00: Dublin, Landon | UTC + 00:00: Dublín, Londres |
| UTC + 00:30: | UTC + 00:30: |
| UTC+ 01:00: Madrid, Ams | UTC + 01:00: Madrid, Ámsterdam |
| UTC+ 01:30: | UTC + 01:30: |
| UTC + 02:00: Athens, Cario | UTC + 02:00: Atenas, El Cario |
| Daylight savings | Ahorro de luz diurna |
| Daylight savings | Ahorro de luz diurna |
| ON | ACTIVADO |
| OFF | DESACTIVADO |
| Network settings | |
| Keep network connected? | |
| YES | NO |
| Network settings |
| Nework wizard Scanning.- |
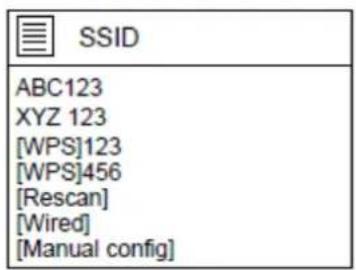
text_image
SSID ABC123 XYZ 123 [WPS]123 [WPS]456 [Rescan] [Wired] [Manual config]| EN | ES |
| Network settings | Configuración de red |
| Network wizard Scanning.- | Búsqueda del asistente de red.- |
| SSID | SSID |
| ABC123 | ABC123 |
| XYZ 123 | XYZ 123 |
| [WPS] 123 | [WPS] 123 |
| [WPS] 456 | [WPS] 456 |
| [Rescan] | [Volver a buscar] |
| [Wired] | [Con cable] |
| [Manual config] | [Configuración manual] |
text_image
Network settings Please wait Connecting_
text_image
Connected
text_image
Setup wizard Setup wizard completed Press OK to exit| WPS Menu | |
| Push Button | > |
| Pin | > |
| Skip WPS | > |
| WPS Setup |
| Push WPS buttonat the other endPress SELECT to continue |
| WPS Setup | |
| Enter PINXXXXXXXXXat the other end | |
| Press SELECT to continue | |
| EN | ES |
| WPS Setup | Ajustes WPS |
| Enter PIN XXXXXXXX at the other end | Introduzca el PIN XXXXXXXX en el otro extremo |
| Press SELECT to continue | Pulse SELECT para continuar |
| ☆1 This symbol indicates one station stored. |
| EN | ES |
| This symbol indicates one station stored. | Este símbolo indica una emisora guardada. |
| This symbol indicates wired connection. | Este símbolo indica una conexión con cable. |
| This symbol indicates wireless connection. | Este símbolo indica una conexión inalámbrica. |
Modo radio DAB
text_image
Prune Invalid This removes all invalid stations, continue? YES NOtext_image
FM 00:00 87.50MHz [No Radio Text] FM Radio| EN | ES |
| FM | FM |
| 87.50MHz | 87,50 MHz |
| FM Radio | Radio FM |
| [No Radio Text] | [Sin texto de radio] |
| ★1 This symbol indicates one station stored. |
| This symbol indicates the logo. |
| This symbol indicates the audio type. |
| This symbol indicates the signal strength. |
| This symbol indicates wired connection. |
| This symbol indicates wireless connection. |
text_image
FM Scan setting Audio setting System settings > Main menu >text_image
FM station scan Strong station only? YES NOtext_image
FM weak reception Listen in Mono only? YES NOtext_image
MP3 Player Mobile Phone Connect to the Phones; AUX Out; Line Out Jack of the external devices (Such like MP3 Player; cell phones; iPod/iPad ... etc) AUX in| Set sleep time |
| 8 MINIS |
| Auxiliary Input 00:00 | |
| Audio InAUX Today's Date:DD.MM.YYYY | |
| 8 |
| EN | ES |
| Set sleep time | Ajuste del temporizador de suspensión |
| 8 MINIS | 8 MINUTOS |
| Auxiliary Input | Entrada auxiliar |
| Audio In | Entrada de audio |
| AUX | AUX |
| Today's Date: | Fecha de hoy: |
| DD.MM.YYYY | DD.MM.AAAA |
Función de alarma:
text_image
Alarm 1 Enable:Off Time: [00:00] Mode:Internet radio Preset: Last listened Volume: 12 Save| EN | ES |
| Alarm 1 | Alarma 1 |
| Enable: Off | Activar: Desactivado |
| Time: [00:00] | Hora: [00:00] |
| Mode: Internet radio | Modo: Radio por internet |
| Preset: Last listened | Presintonizada: Última emisora escuchada |
| Volume: 12 | Volumen: 12 |
| Save | Guardar |
text_image
✓ Alarm OFF| EN | ES |
| Alarm OFF | Alarma apagada |
| System settings | |
| Software Upgrade Setup wizard Info Backlight >Multi-room > |
| Network settings | |
| Wlan region | > |
| Manual settings | |
| NetRemote PIN Setup | |
| Network profile | > |
| Keep network connected | |
text_image
QR code image containing encoded data, no visible human-readable text
| EN | ES |
| Download on the App Store | Descárguelo en la App Store |

text_image
QR code image containing encoded data, no visible human-readable textnatural_image
Symbol of a trash bin crossed out by two diagonal lines (no text or labels)
https://commaxx-certificates.com/doc/dir-260_doc.pdf
natural_image
Simple line drawing of an open book with no text or symbols visibleAlimentatore
natural_image
Technical line drawing of a mechanical clamp or connector with two pins and a coiled cable (no text or symbols)Telecomando

text_image
Menu Panel Scan Sleep Mode EQ OK V+ V+ 1.. 2ABC 3D5F 4 GB 5.9L 6MWD 7 RGB 8 TUV 9 MHz Prog 0 —— Rep. Lenco
text_image
Lenco Volume Φ Work Contact Contact Contact Contact Contact Contact Contact Contact Contact Contact Contact Contact Contact Contact Contact Contact Contact Contact Contact Contact Contact Contact Contact Contact Contact Contact Contact Contact Contact Contact Contact Contact Contact Contact Contact Contact Contact Contact Contact Contact Contact Contact Contact Contact Contact Contact Contact Contact Contact Contact 1 2 3 4 5 6 7 8 9 10 11 12 13text_image
Diagram illustrating the process of battery charging and discharging, showing stages from two batteries to a battery.text_image
Setup wizard? Start now? YES NO| Auto update |
| Update from DABUpdate from FMUpdate from NetworkNo update |
| Set timezone |
| UTC +00:00: Dublin,LondonUTC +00:30:UTC +01:00:Madrid, AmsUTC +01:30:UTC +02:00: Athens, Cario |
| Daylight savings | |
| Daylight savings | |
| ON | OFF |
| EN | IT |
| Set timezone | Impostazione fuso orario |
| UTC + 00:00: Dublin, Landon | UTC + 00:00: Dublino, Londra |
| UTC + 00:30: | UTC + 00:30: |
| UTC+ 01:00: Madrid, Ams | UTC + 01:00: Madrid, Ams |
| UTC+ 01:30: | UTC + 01:30: |
| UTC + 02:00: Athens, Cario | UTC + 02:00: Atene, Cario |
| Daylight savings | Risparmio di luce diurna |
| Daylight savings | Risparmio di luce diurna |
| ON | ON (Attivo) |
| OFF | OFF (Disattivo) |
| Network settings | |
| Keep network connected? | |
| YES | NO |
text_image
Network settings Please wait Connecting_
text_image
Connected
text_image
Setup wizard Setup wizard completed Press OK to exit| WPS Menu | |
| Push Button | > |
| Pin | > |
| Skip WPS | > |
| EN | IT |
| WPS Menu | Menu WPS |
| Push Button | Push Button |
| Pin | Pin |
| Skip WPS | Skip WPS |
text_image
WPS Setup Push WPS button at the other end Press SELECT to continuetext_image
WPS Setup Enter PIN XXXXXXXXX at the other end Press SELECT to continue| ☆1 This symbol indicates one station stored. |
text_image
Prune Invalid This removes all invalid stations, continue? YES NOtext_image
FM 00:00 87.50MHz [No Radio Text] FM Radio| EN | IT |
| FM | FM |
| 87.50MHz | 87,50MHz |
| FM Radio | Radio FM |
| [No Radio Text] | [Nessun testo radio] |
| ★1 This symbol indicates one station stored. |
| FM | |
| Scan setting | |
| Audio setting | |
| System settings | > |
| Main menu | > |
| FM station scan | |
| Strong station only? | |
| YES | NO |
text_image
FM weak reception Listen in Mono only? YES NOtext_image
MP3 Player Mobile Phone Connect to the Phones; AUX Out; Line Out Jack of the external devices (Such like MP3 Player; cell phones; iPod/iPad ... etc) AUX in| EN | IT |
| MP3 Player | Lettore MP3 |
| Mobile Phone | Telefono cellulare |
| Connect to the Phones; AUX Out; Line Out Jack of the external devices (Such like MP3 Player; cell phones; iPod/iPad ... etc) | Collegarsi ai telefoni; Uscita AUX; Line Out Jack dei dispositivi esterni (come lettore MP3; telefoni cellulari; iPod / iPad ... ecc.) |
| AUX in | Ingresso ausiliario |
| Set sleep time |
| 8 MINIS |
| Auxiliary Input 00:00 | |
| Audio InAUX Today's Date:DD.MM.YYYY | |
| 8 |
| Alarm 1 |
| Enable:OffTime: [00:00]Mode:Internet radioPreset: Last listenedVolume: 12Save |
| EN | IT |
| Alarm 1 | Alarm 1 (Sveglia 1) |
| Enable: Off | Enable: Off (Abilita: Disattivo) |
| Time: [00:00] | Ora: [00:00] |
| Mode: Internet radio | Modalità: Radio Internet |
| Preset: Last listened | Preimpostazione: Ultimo ascoltato |
| Volume: 12 | Volume: 12 |
| Save | Salva |
text_image
✓ Alarm OFF| EN | IT |
| Alarm OFF | Sveglia OFF |
| System settings | |
| Software Upgrade Setup wizard Info Backlight >Multi-room > |
| Network settings | |
| Wlan region | > |
| Manual settings | |
| NetRemote PIN Setup | |
| Network profile | > |
| Keep network connected | |
| Network settings |
| Nework wizardScanning / |
text_image
QR code image containing encoded data, no visible human-readable text
| EN | IT |
| Download on the App Store | Scarica dall'App Store |

text_image
QR code image containing encoded data, no visible human-readable textnatural_image
Symbol of a trash bin crossed out by two diagonal lines, with a solid black rectangle below (no text or labels)https://commaxx-certificates.com/doc/dir-260_doc.pdf
| Tipo RF | Intervallo di frequenze (MHz) | Potenza (dBm) |
| Bluetooth | 2402-2480 | <6 |
| WiFi 2.4 | 2412-2472 | <20 |
| WiFi 5 | 5180-5240 | <23 |
| DAB | 174-240 | - |
| FM | 87.5-108 | - |